FIGURE 12-1
You can do excellent work with the Sony FDR-AX100/B digital camera. (Photo courtesy of Sony Corp.)
This chapter outlines what will be most helpful—theoretically and practically—to make your first shooting experiences truly productive. Normally a director works with one or more other people as crew, but for a fast learning curve when you begin, it is fine to shoot and edit solo. You can certainly acquire high quality imagery with a small camera and little else (Figure 12-1). To see the latest consumer camera features and capabilities, see “best HD camcorder reviews” at http://camcorders.toptenreviews.com/hdv. Otherwise go to the B&H Photo and Video website, www.bhphotovideo.com, for a full spectrum of amateur and professional equipment.
To work with the least tech complications, make sure your editing program input can handle your camera’s file output, or codec. This (short for code/decode) is a way of electronically compressing and decompressing the digital files that a camera and sound recorder generate. MPEG-4 and H.264 are two common codecs, and their function is to produce manageably smaller files. “Lossy” codecs however show signs of the codec’s economies, especially during image movement. The codec in use may restrict the amount of color correction and image manipulation you can do. At the other end of the scale are RAW files generated by top-of-the line digital equipment, which are uncompressed imaging or audio information. RAW files are enormous, and only very advanced editing and color correction equipment can handle them.
FIGURE 12-1
You can do excellent work with the Sony FDR-AX100/B digital camera. (Photo courtesy of Sony Corp.)
Cameras at consumer and prosumer (between professional and consumer) levels use standard codecs that an up-to-date editing program should handle without problem, but prove compatibility by running a test. To incorporate materials from archival sources, you must ensure compatibility between all devices, programs, and files in your intended production workflow. Book I covers the basics to get you shooting, and you will see from it why directors place camera, sound, and editing in the hands of specialized colleagues. A director must eventually concentrate on directing, but for now, you can learn a lot from shooting a short observational documentary alone.
Whoever collects equipment should arrive early, and assemble and test every piece there and then, before leaving checkout.
Make “test and test again” your true religion. Never assume that everything will be all right because the supplier is reputable. If you do, Murphy of Murphy’s Law is waiting to get you. (“Everything that can go wrong will go wrong.”) Expect him to sabotage everything that should fit together, slide, turn, lock, roll, light up, make a noise, or work in silence. The whole Murphy clan lurks in every wire, plug, box, lens, battery, and alarm clock. Make no mistake; they mean to ruin you. Make lists, then lists of lists. Pray.
Hopefulness and film production do not belong together. One blithe optimist left the sound tapes of a just-completed feature film overnight in his car trunk. The car happened to be stolen, and a vast amount of fiction work turned into so much silent footage overnight.
Your imagination expended in darkly imagining the worst will impel you to carry spares, special tools, manuals, emergency information, First Aid kits, and three kinds of diarrhea medicine. As a pessimist constantly foreseeing the worst, you will be tranquilly productive compared with the optimist, because you don’t dice with fate.
For information on any specific camera see the website of B&H Photo-Video, New York at www.bhphotovideo.com/c/shop/1881/Cameras. B&H must have the best selection of digital filmmaking equipment anywhere, and their website is a mine of helpful and impartial production information.
Be aware that a DSLR (digital single-lens reflex camera designed for stills), though it may shoot beautiful video, probably does not write timecode. TC is the time signature (in hours, minutes, seconds, and frames) assigned by dedicated video cameras that postproduction software depends on to manage your footage. You will find software discussed on the Internet that adds TC to DSLR files, but it takes time, planning, and management. Some editing programs automatically add TC when you import video files that lack it. However, should you need to reimport anything (at higher resolution, say), the new TC will not match the old, with dire consequences to your editing. Further aspects of TC are discussed under “Settings and Options” in Chapter 27: Advanced Cameras and Equipment.
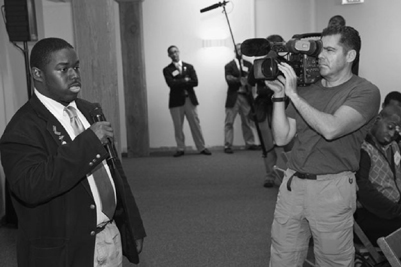
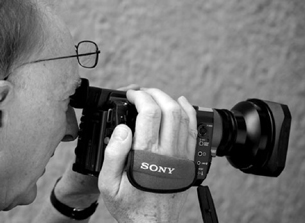
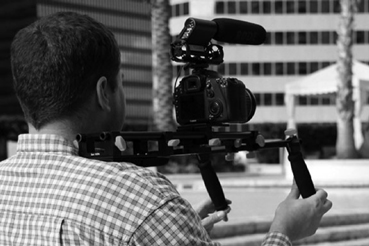
In documentary you often shoot material handheld, so the professional electronic newsgathering (ENG) camera has a side-mounted eyepiece and a body balanced to sit on the user’s shoulder. This allows the camera to become part of the operator’s head and shoulders (Figure 12-2). DSLR and small digital video cameras often record amazing sound and picture, but having their eyepiece or liquid crystal display (LCD) at the rear makes the camera a free-floating appendage that you must hold ahead of your face (Figure 12-3). The absence of bodily contact soon produces distress in your arms, wrists, and hands when you hold shots steady for minutes at a time. A shoulder brace may help, but will sometimes obstruct adapting to the action.
Usually a pivoted liquid crystal display (LCD) unfolds from the side of a small camera so you can look into it from any angle. For low angle shots you can look down into it. You can even point it forward so you frame yourself up as you talk to your own camera. LCD screens work fine until you try shooting in strong daylight, and the image becomes washed out. That’s when a viewfinder eyepiece becomes a necessity.
On small cameras controls are miniaturized, fiddly, and not always placed where you want them. You set the variables in video and audio menus through tiny switches or thumbwheels. Familiarize yourself with what they offer, and run through all the options until you’ve set and reset every one. Your most frequent adjustments will be to focus, exposure, and sound level. Ideally these should be manually controlled, but this may not be feasible while operating handheld. The options you choose show up in the viewfinder as icons, so you must recognize these too—or discover later that all your participants have yellow jaundice because the winking saucer was trying to tell you, “Set white balance.”
The key to these riches lies in cramped manuals, so download a PDF version from the manufacturer’s website and print it large so you can make annotations. To absorb the manual painlessly, turn it into flash cards so that you and your colleagues can test each other. Tossing on the high seas in a trawler is no place to start looking for the sound level control.
Practice all your camera’s functions until it’s second nature. This is your concert instrument: practice till you play like a pro. Never doubt that your camera is capable of serious work, once you’ve learned to work within its limitations (Figure 12-4).
Professional equipment, being rugged and physically large, provides visible, easy to set controls. Expect professional and prosumer cameras to have multiple sound channels, a black level control, a gamma (color linearity) control, and manual settings for exposure, focusing, sound level, and a lot else. Professional equipment has one unwelcome aspect: it may draw attention to you in the street and trigger exaggerated expectations in some participants. A camera that captures well but looks like a holiday accessory may be a necessity in situations where you want to look like a tourist, not a broadcast journalist.
To make flesh tones look natural in color work, the camera must have a correct “white balance.” This adjustment allows the camera to shoot white objects under a particular light source, and to reproduce them as white, not pale pink, green, or orange. The reason is this: though white light contains the whole spectrum, real-life light sources—even different kinds of skylight such as overcast, blue sky, mountain sky—are in reality mixes of light in which particular colors predominate. The human eye compensates effortlessly for this state of affairs, but electronic image-recording is nowhere so efficient. Sadly, it records what is scientifically present. Thus, each illumination source is said to have its own color temperature, and to compensate for this, you must set your camera’s “white balance” control for shooting under that particular light source. If you don’t, everyone under those supermarket fluorescents will become a bilious green. On your camera, expect these white balance options:
Automatic— not good for all situations but a necessity for some. When you first shoot, you’ll probably set everything in your camera to automatic (white balance, exposure, focus, and sound level) so you can concentrate on filming. This is fine while you grapple with the human content of your filmmaking, which will take quite a while. Automatic white balance is almost a necessity if you must follow someone through several lighting zones. The auto white balance and exposure will probably make all the necessary adjustments with wonderful efficiency.
Manual— preferable under stable lighting situations. A custom white setting means that color remains stable as you pan across differently lighted areas. Set the camera to “manual white balance,” frame a white surface under the given source light, and press the button that initiates white balancing. After a few seconds the camera lets you know it has locked on to the new setting.
Preset white balance. These are factory settings offering typical sunlight (which has a blue bias), typical tungsten-filament bulb light (orange bias), and typical fluorescent light (green bias). Since no light is typical, presets are approximations that you should only use in emergency.
Manually set white balance. Using this to adjust for an actual, rather than nominal, light source is always best.
White balance memory retains your settings while the camera is turned off or while you change its battery. Keeping settings in memory allows you to shoot matching material days or months later under similar lighting conditions.
Setting a white balance allows the camera to respond accurately under a given light source, but it cannot handle the mixed color temperature sources that may prevail in, say, a restaurant partially illuminated by interior lighting and daylight. This is because outdoor and indoor color temperatures vary. If you use indoor lighting of between 2800 K to 3200 K (Kelvin), and you white-balance for this source, then outdoor light seen through a window will look cold (blue-biased) because skylight may be 5600 K. Conversely, if you white-balance for the outdoor light, the folks indoors turn orange. So that’s no solution. Watch documentaries for their lighting and you’ll see all sorts of variations.
For an interior with mixed color temperature, three common approaches are:
Solution A: Tape gel filter #85 (orange) over windows. Color filter lets pass its own color, and holds back other colors of light. #85 filter is reddish and holds back the excess blue in the daylight, the remainder of which now matches your interior lighting. By white-balancing to the interior color temperature, colors inside and outside the window will all look normal.
Solution B: Place #80A filters (blue) over your 3200 K halogen movie lights. This holds back excess orange content so their light output now matches daylight color temperature. This, however, halves the output from your lights—so they may not remain adequate. Unless you use LED lights, lighting fixtures get very hot, gels melt, and only heatproof glass filters will stand up to the punishment.
Solution C: Do nothing. If the view through the window is incidental and unimportant, just let it go blue. Conversely, when an evening exterior includes a building with a lighted room, let it go orange. Audiences accept both as a convention of movies.
Can’t I fix color in postproduction? Yes and no. Digital color correction in postproduction is remarkable. It lets you warm an overall cold color cast, or change contrast and brightness, but changing only a single shade (a human face, for instance) without altering everything else takes advanced software and the skills of a trained colorist. Moral: cure everything you can during the shoot.
Many cameras set auto exposure by averaging light in the whole frame. This works well in a desert-scape, where everything is similarly exposed. But shoot a chef in a glaring, white-tiled kitchen, and his face will be severely underexposed. Even when the camera samples chosen areas of the frame, you can get undesirable effects, so don’t get used to relying on auto exposure. Use it, however, in circumstances of rapidly changing light, since this may be the only way to get acceptable results. Imagine following someone out of a car at night and into a roadside café. You pass through a maze of lighting and color temperature situations that only auto exposure and auto white balance can handle.
Most cameras permit manual exposure control, so that exposure does not float up and down whenever the picture composition changes. By locking exposure you can now underexpose to simulate a sunset (Figure 12-5), or overexpose to see the features of someone who is backlit (Figure 12-6). The type and accessibility of control (lever, knob, thumb-wheel) is as important as its responsiveness. Positive and immediate control is good; floating and sluggish is not. The link may be electronic or, in more expensive cameras, a physical lens aperture (or f-stop) control.
This is a one-size-fits-all compensation for situations when light is coming toward the camera, and your subject’s face is backlit and in relative darkness. To adequately expose for facial detail, you must over-expose the background, but to get the exact effect, you will need to set exposure manually.
This, calibrated in decibels, amplifies the camera’s response so you can shoot in really low-light situations. Useful, but expect to pay with increased picture noise (electronic picture “grain”). When you increase picture gain, wear a rubber band on your wrist to remind you to return gain to normal.
Many cameras have an inbuilt neutral density (ND) filter. This acts like sunglasses, lowering the amount of light reaching the imaging chip while remaining color-neutral. A one-stop reduction is .3 rating, two stops is .6, and so on. Avoid overexposure by using ND filtering, or use it to force your lens into using a larger aperture, which then lets you work at a shorter depth of field (DOF—see below). This is useful when you want to throw planes other than the subject-plane out of focus.
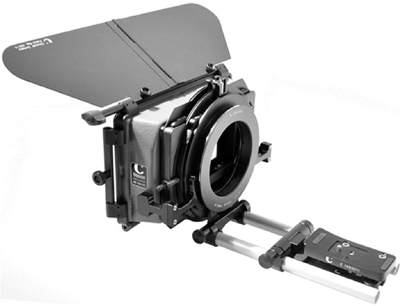
With the addition of a matte box (Figure 12-7) to hold filters in place, you can:
● Use a color correction filter.
● Cool a hot (overbright) sky with a graduated ND filter.
● Use a fog filter to simulate fog or mist.
● Use a diffusion filter to throw light into shadow areas and reduce picture contrast.
● Create sparkles on highlights or a star effect.
● Use a polarizing filter to reduce the glare from water and certain metal surfaces.
Unless designed for DSLR (digital single lens reflex) cameras, video camera lenses often lack external calibration, but you can get basic tech specifications in order to make comparisons through the B&H website (www.bhphotovideo.com), whose camcorder section has a wealth of information on products and production methods.
The prime lens is one of fixed focal length and excellent optical characteristics since primes have few lens elements. Expect a wide maximum aperture (large light-transmitting ability) with little distortion and minimal interior halation (light reflecting between lens elements). The prime lens’s superiority won’t show up unless your camera has a superior imaging system.
The normal lens is one whose focal length makes perspective look normal onscreen. “Normal” means that familiar objects at different distances from the camera appear onscreen in the same relative proportions as they do to the human eye. Digital cameras incorporate differing imaging receptors, and each size demands its own particular focal length lens to render perspective normally.
The telephoto lens is one of high magnification like a telescope, and requires the camera to be tripod-mounted to produce a steady image. A telephoto brings distant objects close; has a shallow DOF (good for isolating a single plane and throwing other planes out of focus); makes objects at different distances look closer than reality; has a limited maximum aperture (that is, a restricted usefulness in low light).
The wide-angle lens is one of low magnification that makes close objects look more distant, exaggerates the distances between planes, and distorts perspective markedly. It has a large DOF, and a large maximum aperture (that is, a good ability to function in low light). It makes moving shots look steadier, and lets you cover the action in a confined space such as a courtyard, car interior, or cramped apartment.
The zoom lens is a multi-element lens of continuously variable focal length between two extremes. A lens whose longest (telephoto) setting is 180 mm and widest (widest-angle) setting is 18 mm has a ratio of 10:1, which represents a ten times (10×) magnification power.
To manually focus a zoom lens (a) zoom in close so focusing becomes critical, (b) find focus, then (c) zoom back to preferred frame size. Unless you are filming wildlife, a zoom with a long telephoto won’t be as generally useful as one with a truly wide wide-angle.
A camera body that accepts interchangeable 35 mm stills-camera lenses is a wonderful idea, but make sure the imaging chip is commensurately large—that is, approaching 35 mm film dimensions—or much of the image gets wasted and the advantages of lens choice are largely illusory.
Note that zooming in or out does not alter image perspective. Try it for yourself. Sure, magnification changes, but the proportion of foreground objects in relation to those in the background remains the same. No matter what lenses you use, you can only alter perspective by changing the camera-to-subject distance.
Here is a typical table of lens information, with the information explained:
Information |
Explanation |
Zoom Range: 20× Optical/400× Digital 35 mm Equivalent: 26.8 to 576 mm |
26.8 mm (35 mm camera equivalent) focal length is the wide end of the zoom range, 576 mm is telephoto. This is an impressive 20:1 zoom (dividing larger focal length by the smaller). Digital magnification has limited usefulness: it magnifies the pixels and gives a grainy image. |
Focal Length: 3.67 to 73.4 mm Max Aperture: f1.8–2.8 |
Focal length describes the distances from the lens optical center to the imaging plane, depending on zoom setting in use. Aperture size describes the lens’s maximum light-gathering ability. At the wide-angle end of the zoom it opens to f/1.8, but only to f/2.8 in telephoto mode—about 1½ stops less. Each stop-change halves or doubles light, so f/2.8 admits rather less than half the light of f/1.8—quite a difference. |
Minimum Focus Wide: 0.8" (20 mm) |
By using the macro adjustment, this is how close you can focus on an object. |
Minimum Focus Throughout Zoom Range: 23.6" (60 cm) |
If you want to zoom in or out, you must be no closer than about 2 feet. |
Zoom Speed Settings: Variable, Constant (16 levels), Fast, Normal, Slow |
The zoom has a wide variety of speeds. |
Filter Ring Size: 58 mm |
58 mm is the size of any filter you screw directly on the front element of the lens. |
For everyday use, keep an ultraviolet (UV) filter on the front element of your lenses. It protects the lens from damage and inhibits the UV light, invisible to the naked eye, which collects in large landscape shots and registers onscreen as mist. Always use a lens hood to shield the front lens element from stray shafts of strong light. Light coming from outside the lens’s field of view will strike the lens’s front element at an angle and cause lens halation (light bouncing internally between lens elements). This will degrade the overall picture with an admixture of white light.
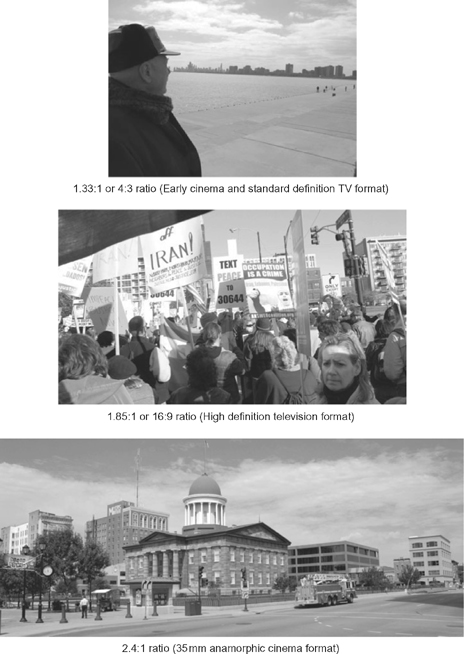
Aspect ratio refers to the width of a screen image in relation to its height. In the early days the cinema screen standard was the relatively square 4:3 or 1.33:1, a ratio copied when the first black-and-white television sets appeared. Attempting to distance itself from TV, the 1950 s cinema offered color and wide-screen images of various aspect ratios. Today the high definition (HD) TV standard aspect ratio is 16:9 internationally, or 1.77:1, close to the cinema’s standard 1.85:1 (Figure 12-8). In this era of rapidly evolving standards, integrating 4:3 archive footage in a 16:9 HD documentary is just one of the workflow problems you face, but History Channel programs, or any professional film using archive footage, will demonstrate how various formats are commonly integrated together.
The camera operator must often adjust focus, especially during handheld coverage. In well-lit surroundings, focus is deep and non-critical with cameras that use small imaging chips. However, if you are using 35 mm type DSLR optics or similar, DOF can be very shallow and focusing during a handheld take can become maddeningly critical. Automatic focus, properly set up, will pull focus for you, provided the critical part of your subject is identifiable to the camera. A professional camera’s large viewfinder, and its mechanically positive lens control, makes adjusting focus by eye much easier. Expect most cameras to offer the following focus options:
Automatic focusing (AF) is fast and accurate but depends entirely on which part of the image the optics are set to scan. Usually it’s a small area in the center of frame but if there are options, see if you can maximize your chance of maintaining proper focus. Some DSLR (digital single-lens reflex) cameras incorporate face recognition in their focusing, but have a disconcerting habit of locking focus to a face in a street advertisement instead of your subject. Check how to disengage auto focus so the camera doesn’t go hunting for focus every time picture composition changes. Autofocus won’t usually work through glass. It either hunts, or focuses on the glass rather than the subject.
Manual focusing is preferable, but without a large, light-proof eyepiece, focusing can be hit or miss. High definition (HD) video raises the stakes—which is why you often see mis-focused footage on the nightly news. To find manual focus, zoom in quickly, run back and forth through focus to find what’s visibly best, then quickly zoom back to the preferred image size. Try to confine this procedure to unimportant action, such as a question during an interview.
Macro focusing allows you a short focus range that often permits focusing within inches of the lens—useful when shooting small objects or images.
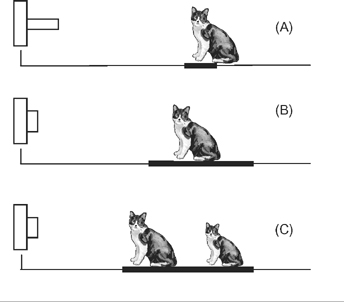
Focus is a relative term since you aim for focus acceptable to the eye, rather than an absolute. Every optimal point of focus has some additional depth, both nearer and farther, in which objects are acceptably in focus (Figure 12-9A). The amount of DOF available changes according to the lens in use, and the aperture (f-stop) you choose to work at.
To restrict DOF use a telephoto lens, or shoot with a wide lens aperture. This, for instance, can allow you by focal plane alone to isolate a notice in a crowded street. A shallow DOF does however make focus very hard to maintain when subject or camera are on the move.
To enlarge depth of field, use wider-angle lenses, more light, and smaller lens apertures (Figure 12-9B). Wide-angle lenses have an inherently larger DOF than normal or telephoto lenses, and so are always easier to keep in focus. By creating deep DOF you can expect to adjust the point of focus to bracket within acceptable focus two subjects widely separated in distance from the camera (Figure 12-9C).
Hyperfocal distance is a lens focus setting that yields the deepest DOF to include infinity, which for practical purposes is any plane more than a hundred feet distant. Hyperfocal distance varies according to the focal length of the lens and the f-stop (iris setting) in use. In bright daylight everything may be in good focus from, say, 4 feet to infinity (Figure 12-10). This is the principle behind the deep focus photography that Greg Toland made famous in Orson Welles’ Citizen Kane (USA, 1941). In the wrong circumstances, however, deep focus deluges the eye with detail, and sends you hurrying to create the selectiveness of shallow focus.
For mobility, camera and recording equipment runs off rechargeable batteries, but if you have a handy AC supply available, chargers can double as power converters, and you can run stationary equipment indefinitely. Seldom do rechargeable batteries run equipment as long as you want, especially if incorrectly charged. Estimate generously how many batteries you should take on location, and try to work each battery to its useable limit before completely recharging it, which may take between 6 and 10 hours. Read manuals carefully in relation to conserving battery life, since wrong handling can shorten a battery’s “memory.”
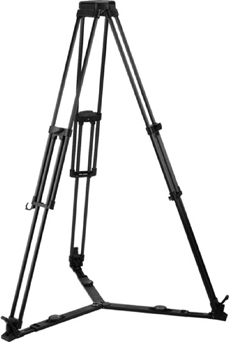
FIGURE 12-11
Tripod and spreader. (Photo courtesy of Vinten, a Vitec Group brand.)
There’s cold comfort here for the under-funded since the budget tripod and tilt head are a dismal substitute for the real deal. They work fine for static shots, but try to pan or tilt, and wobbly movements reveal why professionals use heavy tripods and hydraulically damped tilt heads. Turning on the camera’s image stabilization may smooth your movements, and all camera movements look better when you use a wide-angle lens. A baby legs is a very short tripod for low-angle shots, and a high hat is a hat-shaped support for placing the camera on the ground or other solid surface. A serviceable alternative here is a sandbag, which you pat into shape to allow the degree of angling you want. A spreader or spider is a folding three-arm bracket that goes under the spike legs of a professional tripod (Figure 12-11). Remember to lock the tripod legs to the spreader so they don’t splay and collapse. A spreader guards against scratching or denting a floor, and lets you pick up the camera, tripod, and spreader as a single unit so you can rapidly plunk it down elsewhere.
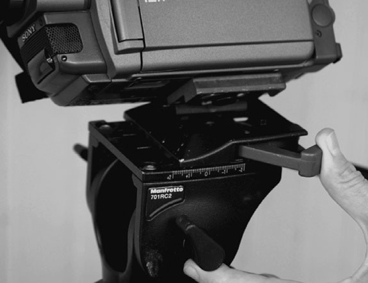
At each new setup check that the pan/tilt head is level by using the inbuilt spirit-level bubble and altering tripod leg lengths. If you forget, you’ll make a pan only to end up with a shot whose horizontals are skewed. Better tripods allow rapid leveling through a ball and cup system (Figure 12-12).
When you prepare to pan or tilt, adjust the head to give some drag. This helps smooth out your movements. If your pan/tilt head permits, position the camera’s center of gravity to balance its weight equally over the pivoting point. If you don’t, it will try to roll forward or back when you momentarily let go of the pan handle. In documentary it is wise to never lock the tilt head while the camera is running in any situation where you might need to reframe.
This bolts to the base of the camera, allowing the camera to mate instantly with the pan/tilt head (Figure 12-13). Later, when you decide to go handheld, pulling a single lever instantly frees the camera. Take care: some quick-releases are dangerously sensitive if your sleeve catches the lever. I once caught my camera in mid-air.
A practiced and well-coordinated human being makes an excellent mobile camera support. During long-take shooting you may need a shoulder brace (Figure 12-14). For more ambitious work involving movement, consider one of the Glidecam (Figure 12-15, www.glidecam.com), Varizoom (www.varizoom.com), or Steadicam (www.steadicam.com) systems. Heidi Ewing and Rachel Grady make good use of one in Jesus Camp (USA, 2006), their frightening film about the religious conditioning of young children. Fundamentalist preachers groom them with a mixture of inspiration and fear, and whip them up into a fervor in a session of “taking back America for Christ.” The gliding, swooping camera complements the kids’ agitation as they reach a weeping, speaking-in-tongues torment (Figure 12-16).
For a dolly (wheeled camera support) use a wheelchair with its tires a little underinflated. Professional dollies run on tracks like a miniature railroad, but your production must fully justify the outlay since they are heavy to transport, expensive to rent, and labor-intensive to use. If your film is a historical reconstruction, for example, you may need all the equipment and expertise of a feature film crew. Before you reach this point, you can shoot perfectly good tracking shots,
● Backwards out of a car trunk or station wagon.
● Forward or sideways off a tripod tied down inside a car with bungee cords and shooting through any window aperture.
● Forward from a camera securely roped to the car hood with a towel under it to protect the car surface.
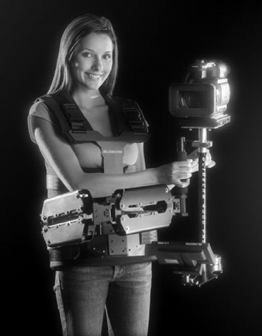
FIGURE 12-15
For ambitious work involving movement consider the Glidecam X10. Such systems need much practice. (Photo courtesy of Glidecam.)
As always, shoot using a wide-angle lens to minimize undue movement and road vibration. You can also smooth a tracking shot during postproduction by applying a degree of slow-motion.
Reliable color and framing come only with a properly adjusted field monitor, which can double as a jumbo viewfinder when you are shooting off a tripod. This is your guarantee of color fidelity while shooting, and a double-check on viewfinder framing, which is occasionally misaligned. If you must make do with a domestic TV set, use the highest quality video input. Monitors and TVs have abysmal sound quality, so during viewings run sound through a stereo system.
When you set up a shot, and particularly when action is taking place, make a habit of scanning the entire frame, moving your eye around the edges and consciously noting the arrangement of visual elements. If you don’t do this, you will lapse into the mental state of an assassin staring fixedly at his target. Unpracticed camera operators set up the shot, then stare contentedly at the subject, immune to changes that might be taking place to the composition as people and vehicles move about in the background.
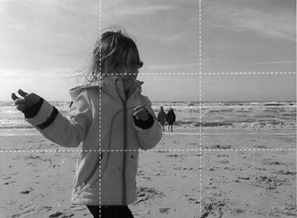
The least satisfactory way to frame a human subject is to plunk them bang in the middle of frame. If you divide the screen up into three bands horizontally and three bands vertically, the commonest points for the focus of interest in the frame are the four places where the lines intersect (Figure 12-17).

FIGURE 12-18
Three sizes of image. If you want any two compositions to cut together well, the compositional center—here the subject’s eyes—must occupy the same part of the frame.
If you shoot an interview conventionally off a tripod in a wide shot, medium shot, and close shot, the three angles will not cut well together unless you place the focus of interest (usually the eyes of the interviewee) proportionally in the same place in the frame in all three angles (Figure 12-18). That means that the close shot may crop the top of a head and bottom of a chin.
When a human subject faces across the screen, either sitting in conversation, or walking, we leave lead space in front of them (Figure 12-19). If you shoot a conversation off a tripod between two people on a couch, the person on the left will have lead space to their right, and the person on the right will have lead space to their left. The two shots will cut very nicely together if you make these two complementary shots (shots designed to cut together) of similar size, with the figures at a similar height.
The same guidelines apply when you are mobile, except that you must continuously monitor the design of your frame, and make adjustments to accommodate movements by you, your subjects, and the changing background elements.
Do not be surprised if, at the end of a 10 minute shot, you can barely remember what you shot. When the mind works overtime designing the frame in real-time, this is normal.
When you shoot two people walking or standing in conversation in the street, it is often a good idea to be close to the scene axis (the invisible line between them—see Chapter 5: Story Elements and Film Grammar, “Scene Geography and Axes”). That way, you can hold both Person A and Person B in the same frame, and the action takes place more dynamically in the frame’s depth rather than flattened and across the frame. Showing both in two-shots lets us see their relationship in space, and the body language of each. The diagram in Figure 12-20 shows how, using a mobile camera and your lens set wide-angle, you can keep the frame continuously occupied, produce five basic shots, and even use the handheld transitions from one to the next. In editing you can often eliminate some of the camera movements if the shots are composed to cut together. Here is the full sequence:
1. Start with an establishing two-shot containing Person A and Person B.
2. Move in to take an overshoulder shot on A (that includes B’s head and shoulder in the foreground) and hold.
3. Move forward to isolate A in close-up, and hold.
4. Then, by pivoting around A, transition to a complementary over-shoulder shot onto B (meaning it will cut well with its complementary over-shoulder shot on A).
5. Move forward to take a close shot on B.
6. By pivoting around B, you arrive back at the over-shoulder on A, or pull out to the establishing two-shot.
Notice that you must stay to one side of the scene axis (the imaginary line between the two characters), or your succession of shots will not cut together logically.
For further ideas on camerawork and composition, see Chapter 26: Optics, in particular “Composition.”
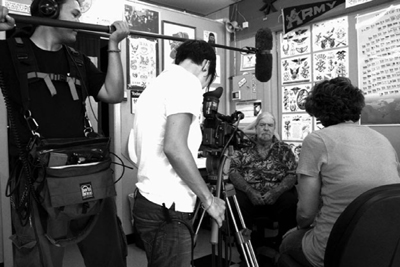
Tripod or handheld? Decide what sort of experience you want the audience to have. At a young children’s party, you’d get the handheld camera down to kid level. That height and handheld camera movement would complement the children’s experience of each other. The point of view of an amused uncle standing apart, being more stable and grounded, might be shot high-down from a tripod. The camera is tripod-mounted in the kind of interview you see in Figure 12-21 where Nancy Schiesari is directing Tattooed under Fire (USA, 2008).
Broadly speaking, there is secure and insecure camerawork, objective and subjective, and a place for either—depending on the experience you are documenting, and what you want us to feel about it. If your subject—a kid on roller skates, say—calls for complete camera mobility, sacrifice stability for nimbleness and go handheld. Otherwise you might use a telephoto lens from a tripod-mounted camera, paying close attention to focusing since with long lenses it is always critical.
While you are operating camera, make a habit of constantly scanning the whole image, looking for improvements, or changes demanded by the changing content of your screen. As we have said, the inexperienced operator gazes mesmerized at the subject (speaking, walking, cleaning his shoes, etc.) instead of looking critically at the composition as a pictorial construct. Remember the Rule of Thirds. Any of its points of intersection are generally preferred over placing the composition’s center of interest at the dead center of the screen.
While you shoot, it helps to maintain an interior monologue that articulates how you are composing and what composition you should transition to next. Then concentrate on executing it as smoothly and naturally as possible. A focused stream of consciousness helps you stay hyper-aware of what you are doing, and locked into executing each precious moment perfectly.
Try always to,
● Position yourself during pans so you turn from an uncomfortable to a comfortable holding position.
● Halt during a tracking shot in a bodily position that lets you smoothly resume movement onward to the next composition.
● If you must kneel, sink on one knee only, or you’ll be unable to rise without jerking the camera.
● If you sit down, place one or both feet under you, so you can rise without rolling forward.
Having to find or reset focus while the camera is running is an accepted part of actuality filming. To do this:
● Zoom in close.
● Run the focus ring quickly back and forth to find where focus is sharpest.
● Zoom back to the size of shot you want.
The editor may take the opportunity to edit out this procedure and instead cut from, say, your wide shot to your close shot. If you think this likely, choose a dead spot in the action to carry out the focus check, and zoom back and reframe as quickly as possible.
Very important: treat handheld shooting as a series of static compositions linked by efficient and tasteful movements. Each should take its movement cue, where possible, from subject movement within the frame. When you want to pan from looking one direction along a road to another, wait for a passing vehicle to “carry” or motivate the pan movement. If you want to track through guests at a party, find someone to follow, who will serve as apparent motivation for the movement.
The worst misuse of a handheld camera is to make wobbly shots of buildings or landscapes. Our perception of such things, unless we are inebriated or staggering during an earthquake, is invariably that they are solid and secure. Commonsense dictates that the camera sees similarly, and that you place the camera on a stable support.
Long lenses always prove too unsteady for mobile handheld material, so use only your widest zoom setting, and create all necessary image size-changes by physically moving the camera toward or away from your subjects. Shooting handheld with a small camera often means holding it in front of your face, so your steadiness deteriorates as your arms get tired. For long-take work, consider a shoulder brace as in Figure 12-16.
To make any handheld tracking shot, put all thoughts of dignity aside, and learn to walk like Groucho Marx. That is,
● Bend your knees a little so you glide, and don’t bob up and down.
● Turn your feet a little outwards, duck fashion, then walk placing your feet in a straight line so you don’t sway from side to side.
● Draw (don’t lift) each foot over the floor surface, in order to,
● Make an imperceptible weight transfer from foot to foot, and avoid any stomping or rocking
● Feel any bump or stair ahead with your foot before having to deal with it
Use the camerawork exercises to develop your skills (see Shooting Projects SP-1–SP-3).
With the camera angled toward a brick wall at around 3 feet distance, execute a 1 minute walking track, parallel with the wall. On playback, ask,
● Does the camera keep a fixed distance from the wall?
● Does the brickwork slide by level or is the camera swaying and bouncing?
● Is the movement speed-consistent?
● Did you remember to hold on a static shot of the wall before starting the movement, then hold on another static after you stopped?
Practice until you are using your body properly to execute steady tracking shots. Few camera operators do this really well.
Always check horizontality of the tripod head using its spirit level. Set a degree of drag on both pan and tilt axes, and hold the pan-handle lightly with two fingers when you perform camera moves. Give the editor options by holding the shot for, say, 5 seconds before and after each movement. Novices move the camera too readily and overuse the zoom (yes, it’s called “firehosing”). Poorly judged camera movements must often be edited out, while long, slow, uncertain camera movements make editing difficult or even impossible.
Occasionally when making a camera movement, you will alight on an incorrect framing. If so, hold the erroneous composition for a few seconds and then imperceptibly “creep” the frame to its optimal proportions. If you recover too quickly and obviously, the audience will notice the error and henceforth feel insecure.
Whether you shoot off a tripod or handheld, make bold differences in image size. That is, make a clearly differentiated wide shot (WS), medium shot (MS), and close shot (CS). For a special moment there’s also big closeup (BCU), also known as an ECU or extra close up.
Why do bold image size differences matter? Because only large size differences cut well together. When the size-change is insufficient, two shots of a statue (for instance) will cut together poorly, looking tentative or even like an ugly jump-cut.
Before allowing the crew to wrap (finish the day’s shoot), cast your mind back over events just filmed and itemize what special shots you might need to enable ellipsis- or cross-cutting.
Your editing can nearly always benefit from cutaway shots or inserts (sometimes called cut-ins). How are cutaways and insert shots different? An insert shot is an enlargement of something already visible in the main frame, such as a page of the book that someone is reading. A cutaway is a shot of something outside the frame, such as the wall clock that somebody looks out of frame at. Shoot it from her eyeline as safety coverage.
During a scene I once directed of a carpenter in his workshop talking to camera, he was folding and unfolding something below frame that made a clicking noise while he spoke (A Remnant of a Feudal Society, GB, 1970, Figure 12-22). The cutaway we took of his hands folding and unfolding his carpenter’s ruler enabled me to visually explain the offscreen noises, and also conceal that we cut to another section of interview.
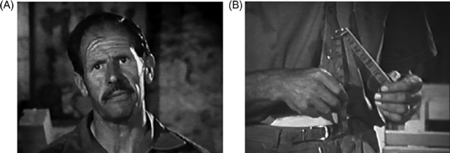
FIGURE 12-22
(A) A carpenter talking to camera, and (B) the cutaway of his hands audibly clicking his ruler outside the close-up frame.
Among the Checklists at this book’s website (www.directingthedocumentary.com) is a lengthy one for anyone operating a camera.
For composition study, try AP-4 Picture Composition Analysis, and perhaps try a piece like Inside Llewyn Davis (Coen Brothers, USA, 2013) for its celebrated cinematography, or Alexander Payne’s Nebraska (USA, 2013). Both films have many scenes of vernacular realism and represent a very high level of film craft. As handheld camera practice, try SP-1 Skills: Handheld Camera Track on Static Subject, SP-2 Skills: Handheld Tracking Moving Subject, and SP-3 Skills: Handheld Back-Tracking with Moving Subject. They will start getting you acclimatized to integrating your camerawork with a world that moves in its own way.