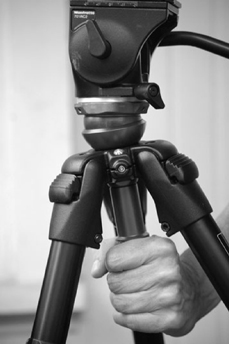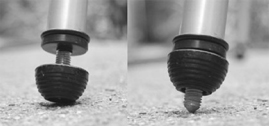
Figure 27-1
Spike feet on a Bogen® tripod ensure a positive engagement with the ground. Rubber feet are kind to floors but allow a sponginess that compromises telephoto shots.
How your film looks depends on how you shoot it, and at what cost. This means choosing equipment carefully. Multiple standards of digital technology, and a bewildering array of excellent equipment make this a challenge, to say the least.
Generally speaking, the higher your recording quality, the costlier will be production—but the more marketable over time your work may become—if the subject and your treatment warrant it. Anything spectacular and durable such as Winged Migration merits the best imaginable quality because of its unlimited future life. You can however make significant work inexpensively—so long as you make a match between the medium, material, and market. You could for instance shoot the inside story on military college hazing rituals with a consumer handicam, because the audience understands the need to shoot undercover.
The only moving-image medium to have physically endured for 100 years is 35 mm film. That doesn’t mean film negatives have endured well: over time, the early acetate-based films turn to dust (when they didn’t explode), and modern film stocks, though no longer inflammable, shrink and their color dyes fade. Paradoxically the only medium in which the original color is recoverable is the long-defunct, three-strip dye-transfer Technicolor. Media stored on high quality magnetic tape or hard disk have a relatively long life, perhaps 30–50 years, while optical media like DVD and Blu-ray are unproven and even unpromising. Pressed disks have a longer life than those you burn, which are deteriorating even before you use them, and may only remain readable for 2–5 years. The chemical surfaces of discount disks are often so unstable that they can become unreadable within weeks or months.
So use the best-rated media, and recopy anything that you mean to store over time every few years. Given the speed of technological change, you will probably also be updating to a new recording standard. Follow the discussions online for up-to-date opinions.
When a software or camera manufacturer recommends particular associated equipment, follow instructions assiduously. Some suggestions:
● Stay with a single manufacturer’s gear wherever possible, so equipment will interface as desired.
● Understand the process and technical workflow of each production stage and know what formats and codecs your equipment can handle. Don’t assume compatibility.
● Before you commit to using particular equipment and methods, crosscheck for definitive answers.
● Do not reinvent the wheel: seek those who have done what you propose doing, and follow their advice closely.
To hire anything you will need to pre-arrange credit, which unless you are an established company is not simple. So visit the rental house in an off-peak time to get a guided tour and set up financial arrangements. They are usually happy to show you their holdings, and to share the relative merits of what they carry. Start building relationships by learning people’s names, titles, and specialties. Knowing who does what will be most important should anything break down.
Part of the hire business is to avoid being scammed, so extended business conversations help them find out who you are, whom you have in common, and what you are planning to do. They also know plenty about common mistakes, and can give you tips to help your shoot go well.
Using native equipment abroad can spring some surprises. An American-standard camera shooting at 30 frames per second (fps) under European 50 hertz (Hz) fluorescent lighting will lead to a slow, pulsing illumination-effect onscreen. A European 25 fps camera shooting under 60 Hz American fluorescents will do the same. The pulsing results when the camera frame rate and the lighting power supply frequency are slightly out of step. You should see this in the video viewfinder, unlike those who shoot film, who find out only when it is too late. Altering the camera shutter-speed settings can sometimes cure the problem.
If you plan to shoot in non-native format (say PAL in America, or NTSC in Europe) run tests. You want to prove that everything, including battery chargers and your editing software, can function in all likely situations.
Most cameras record their files in a range of formats on removable solid-state memory cards, using one of many competing formats and compression codecs. To make wise choices, look ahead to your editing and distribution phases, asking what markets your final product is aimed at, and whether you mean to include Internet and Blu-Ray distribution versions. Make sure that,
● All of your preferred production formats (picture and sound) are supported by your editing system.
● Your editing system can output whatever files are necessary for sound mix, mastering, and distribution formats, as necessary.
Make a roundup of all the equipment, materials, and processes you can possibly need in your production and postproduction workflow. Rely on no link, such as a transcoding program, that you have not first thoroughly tested, because integrating the different frame rates, aspect ratios, and video compression codecs can spring massive problems upon the unwary.
If your technical grasp is shaky (and whose isn’t?), Google key words to bring up explanations on the Internet and keep reading until you understand the guiding principles. In general, Wikipedia is a good source for clear technical explanations, and a good jumping off point for other reference works and information sites.
Particularly if you move between working with American standards and those elsewhere in the world, watch out that you don’t end up with, say, 25 fps sound that is supposed to sync to 30 fps camera material.
Arri, Sachtler, and O’Connor make excellent tripods but there are others less expensive. If you plan to use a long lens, be sure the tripod has spikes, not rubber feet alone, since you cannot afford a spongy engagement with the ground (Figure 27-1). For a superior tripod, look for one that,
● Is made of carbon fiber—lighter than metal if you are trekking in the wilds.
● Can handle a camera 30 percent heavier than the one you plan to use.
● Has a tilt head with ball leveling, which allows you to instantly adjust the head according to a bubble level (Figure 27-2).
● Is equipped with a fluid drag for its pan and tilt head functions, not a friction substitute.
● Has a quick-release plate attachable to the underside of your camera (Figure 27-3). This will let you instantly dismount the camera and go handheld.
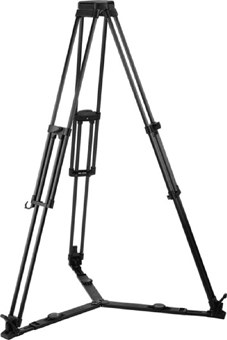
● Has a carry case and a spreader to go under your “legs,” or tripod (Figure 27-4).
● Comes with a baby legs (low tripod, Figure 27-5), and hi hat or sandbag for low-angle camera support.
Figure 27-1
Spike feet on a Bogen® tripod ensure a positive engagement with the ground. Rubber feet are kind to floors but allow a sponginess that compromises telephoto shots.
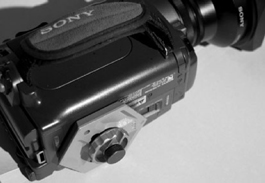
FIGURE 27-3
Quick-release plate mounted on underside of camera.
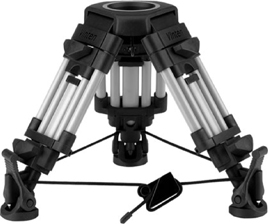
FIGURE 27-5
Baby legs for low-angle shots. (Photo courtesy of Vinten, a Vitec Group brand.)
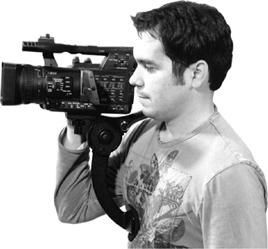
FIGURE 27-7
Small camera stabilizer. (Photo courtesy of the Ikan Corporation.)
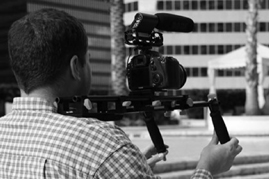
These prosthetics come in a profusion of designs, each promising relief and control like none other. The operator may need one to survive long handheld takes if the camera is heavy and of awkward design, or if you are using a diminutive DSLR camera in video mode (Figure 27-6). Other types support the camera by bracing downward to the chest or stomach (Figure 27-7), but you may have to breathe carefully so the camera doesn’t undulate. Rigs of any kind make it difficult to transition between low and high camera angles, and can either facilitate or impede following focus, adjusting the aperture, or performing any of the other agility tests expected of observational cinema. Really, there is no substitute for a camera designed for the human hands, eye, body, and shoulder that will be using it (Figure 27-8).
To see what a rich field exists for exotic camera supports you have only to look under “stabilizers” in B&H’s listing (www.bhphotovideo.com). This cottage industry developed in the wake of the first Steadicam rigs, made for the heavy 35 mm cameras used in feature film production. Their results can be truly lyrical, as you can see in Wim Wenders’ beautiful fiction feature, Wings of Desire (Germany, 1987). In documentary, Rachel Grady and Heidi Ewing apparently used a stabilizer to great effect in the “talking in tongues” sequence of their Jesus Camp (USA, 2006, Figure 27-9). If your film requires a great deal of controlled movement (ballroom dancing, drum majorettes, hunting, contact sports, etc.) certainly consider a stabilizer. With some practice they can produce wonderfully smooth camera movement, but they can make transitions to special angles quite difficult. Until you know what best fits your purpose, rent and don’t own.
Only a prestige documentary is likely to use a dolly, but with only a little rehearsal you can improvise the effect by shooting seated in a wheelchair or out of a car window. Improve smoothness by letting some air out of the wheelchair’s tires.
Any camera you use will come with many options and settings. They affect picture aspect ratio, shutter speed, exposure control, language, date/time/zone (for date stamping), frame rates for PAL/NTSC video system, black pedestal (useful for creating a common standard for black and colors when multiple cameras are used), manual/automatic focusing, which area auto-focus chooses to focus, and whether it should use face recognition. You must select ISO (sensitivity to light), pixel count, codec, and other things. Choices for sound will include sampling rate (normally 48 kHz) and adjustments depending on whether you are shooting at 25 fps (PAL) or 30 fps (NTSC). Within NTSC there is drop frame (DF) or non-drop frame (NDF), explained in the “Timecode” section below. For sound you will also have to choose between mono or stereo, and manual or automatic level control.
As explained in Chapter 24: Advanced Technology and Budgeting, aspect ratio refers to the width of the frame in relation to its height, which has changed during screen history (Figure 27-10). Cinema and TV ratios were formerly 4:3, that is, a screen of four units wide by three units high. In the 1950s cinema adopted various widescreen formats (1.85:1, 2.35:1, 2.39:1, 2.55:1). For a short illustrated history see www.dvdaust.com/aspect.htm. HD video at 16:9, which approximates the cinema format of 1.85:1, is now the internationally preferred aspect ratio for HD television. Inherently wide pictorial matter, such as landscape shots and anything in horizontal movement, fills the screen more satisfactorily (Figure 27-10). Vertical subjects such as head-shots and tall buildings are harder to accommodate, but most people feel that the wider screen allows for more interesting filming. The world’s archives are mostly 4:3 (also expressed as 1.33:1), so postproduction must either show older material with black bands at the sides, or if the content permits, magnify the original and pare slices from top and bottom.
Shutter speed and motion: Shutter speed is a term left over from photography: it signifies the variable time a camera may take to record a single frame. If you see helicopter blades on the screen that are sharp and whirling in an odd, jerky movement, it’s because the camera is using a fast shutter speed that “freezes” the blades. Interlaced video cannot normally shoot video with a shutter speed slower than 1/60th of a second, but you are free to use faster shutter speeds—up to 1/1000th of a second or faster. If you plan to slow down a racehorse or a pole-vaulter in postproduction, then you should use a fast shutter speed to get a crisp image.
In the American TV standard of NTSC you must make a choice concerning timecode, which is the unique time identity assigned to each video frame (Figure 27-11). In NTSC you must choose either drop frame (DF) or non-drop frame (NDF) timecode. Drop frame removes a digit every so often to keep timecode in step with clock time— useful when you are assembling footage to strict time requirements. Whether you choose DF or NDF doesn’t usually matter so long as you stay consistent throughout production.
Try to use a camera with addressable timecode (meaning, you can set your own starting numbers and letters) so that every batch of material sails under its own unique timecode. Some cameras blindly reset to zero when you change recording media, so that every media item ends up with the same range of TC numbers, creating confusion during postproduction. With addressable TC you can avoid any such confusion.
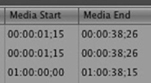
FIGURE 27-11
Timecode is the unique identity by which editing software handles each video frame. It is calibrated in hours: minutes: seconds: frames.
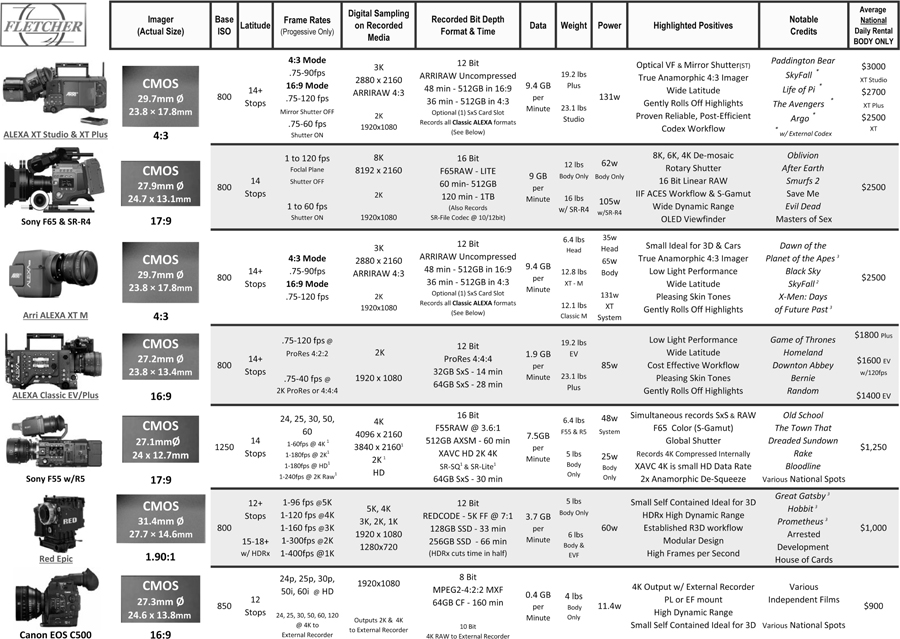
To see what state-of-the-art cameras offer, Table 27-1 shows a current list with their vital statistics, by kind permission of Fletcher Camera and Lenses. The cameras listed show what professionals currently prefer, the range of technological standards in use, and rental averages. Like nothing else, the fine print here should dramatize how vital it is to decide your workflow in advance. The Fletcher website (www.fletch.com) also shows the range of available lenses and accessories.
The shape and design of the camera body are decisive factors for documentary users. Only the Alexa, the Sony F5 and F55, and two of the Phantom cameras have their viewfinders placed forward of the camera so that they can sit—albeit ponderously—on the operator’s shoulder for handheld shooting. Other cameras need a camera support such as a stabilizer, tripod, or dolly. For documentary this would compel you to work in the manner of a bygone era.
The lighter Canon EOS models and high-speed Phantom Miro, all using highly developed stills camera technology, can be held ahead of one’s face—for a while. The Canons allow manual control of aperture and focus, and today’s auto focusing and image stabilization are nothing short of miraculous. Included for comparison is the Arricam ST, the gold standard for 35 mm fiction features. From its design, weight, and top-mounted film magazine, you can see it requires a beefy tripod or dolly.
Each column in the chart carries information whose significance you should at least know about. Note that it is based on 24p performance (24 frames per second, progressive scan):
Imager: High-end image sensors, occasionally CCD (charge-coupled device) chips, but mostly now CMOS (complementary metal–oxide semiconductor). The imager aspect ratio, such as 16:9, tells you the shape of the chip’s imaging surface. In the chart this is indicated as a rectangle with the imager shape given in millimeters. Each has a special distance from the lens flange to the focal plane (symbol Φ). Any imager above 2 K pixels will produce cinema-quality images.
Base ISO, like the older ASA film speed ratings, is an index of light sensitivity. See Wikipedia for a comparison.
Latitude is the difference in photographic stops between the least and the most light within which the imaging system can still register detail. The Arri film camera, whose film stock has 15–16 stops of latitude, now has a clutch of uppity digital brethren snapping at its heels.
Frame rates: Many HD digital cameras offer variable speed filming, so you can speed up clouds passing, or slow down colliding vehicles. See Chapter 24: Advanced Technology and Budgeting for frame rate, aspect ratio, scanning rates, and other technical information.
Digital sampling on recorded media is the amount of digital information recorded per frame. The more there is, the greater the detail. A number of the cameras produce RAW files, which are free of any compression codec. They take enormous storage capacity and need very fast computing. Check the compatibility of your editing system if you decide to work with RAW files.
Recorded bit depth format and time: Bit depth refers to an image’s color information. The higher this is, the more colors it can store, which affects color subtlety and fidelity. Format refers to whether information is RAW or subjected to a specific (often proprietary) compression codec. Time refers to maximum storage using the recommended media.
Data refers to the amount of data output per minute. Shooting a subject with a lot of movement and at higher frame rates greatly increases the data amount.
Weight: This is a minimum figure. Camera weight increases as you load it up with matte box, monitor, radio mike receivers, and other peripherals.
Power: From wattage consumption you can calculate how many batteries you will need for a day’s work. Err on the side of caution.
Highlighted positives are useful for deciding the camera’s strengths and special uses.
Notable credits lists movies made with this camera, so you can see its performance in extreme lighting conditions, always the litmus test of camera technology.
Average national daily rental: This figure is for the camera body only—lenses and camera support, etc. are extra. Usually you can hire a basic shooting package. Read the hire house’s terms very carefully and well in advance of hiring, since you’ll need to satisfy their credit conditions and set up equipment insurance cover—both of which take time to arrange. The good news is that a week’s hire is normally computed at three times the daily rate.
For a full range of cameras and accessories, go to B&H Photo, a New York supplier with highly competitive pricing (www.bhphotovideo.com). Their website also contains much information and instructional help. Another great resource for equipment and pricing is Abel Cine, especially if you want to research rental prices for budgeting (http://www.abelcine.com/store/Rental-Equipment). Whatever you plan to buy, check its reputation extensively with users familiar with its strengths and drawbacks.
Chrosziel and other manufacturers make matte box kits for popular cameras. Mounted in front of the lens, a matte box lets you slot in a range of standard-size filters (Figure 27-12). You might find yourself needing any of the following:
● Common color conversion filters such as #85 and #80A. These allow you to quickly adapt to shooting under a different color temperature.
● and 2 stop ND filters (.3 and .6). Good for reducing overall light transmission so that you can restrict DOF by working at a larger aperture.
● graduated ND filter for cooling a “hot” sky. Be careful that camera movements don’t reveal the filtering.
● Graduated color filters. Use these to color the sky or (say) the sea.
● Fog filter—creates a misty or downright foggy look. These come in various strengths and are tricky to use believably.
● Diffusion filter—also comes in various degrees. Its effect is to mix a modicum of white light with the picture’s shadow areas. The effect is to lower contrast at the cost of some sharpness.
● Polarizing filter. Rotate it to tune out surface glare when shooting through windows, over water, or certain other reflective surfaces.
● Close-up diopters—additional lenses that alter the characteristics of your main lens so you can (say) focus in closer.
● Split diopter. Lets you photograph a close object in focus through one half of the diopter, and a distant background, also in focus, in the other half.

FIGURE 27-12
A matte box is an accessory that lets you slot in a range of filters in front of your camera’s lens. (Photo courtesy of Chrosziel GmbH.)
These prevent strong, off-axis light (such as sunlight) from obliquely striking the front lens element and causing halation (light reflecting between the lens’s interior elements). A lens hood may mount on the front of the lens, or come as part of the matte box assembly. Check wide-angle images for vignetting (dark in the corners) that can result from an incorrect size or shape of lens hood.
Directors often uncritically use the camera at eye-level. This not only becomes predictable and dull, but there is a psychological reason to avoid it. At eye-level, the audience feels itself intruding in the action, rather like standing in the path of a duel. Being a little above or below eye-level positions gets us out of the firing line. If you can motivate high or low angles, or Dutch angles (camera tilted), consider using them to reduce the banality of naturalism.
Of course, the old adage says that a high-down camera position suggests domination, and a low angle, subjugation, but there are plenty of other, less colonial reasons to vary camera height.
There are no reliable rules for camera positioning and movement because every situation brings its own conditions. Limitations are usually physical: there may be windows or pillars in an interior that restrict shooting in one direction, or an exterior has an incongruity you must avoid. A Victorian house turns out to have a background of aerial power lines, forcing you to film from a high angle. Often you must shelve your expectations and redirect energy into solving the unforeseen. For the rigid, linear personality, this constant adaptation is frustrating, but for others it poses interesting, never-ending challenges. Nonetheless, you must plan, and sometimes plans even work out.
Deciding what part background plays in relation to foreground means being conscious of lens choices and camera positioning. For a depressed and hungry character there is a nice irony in showing a lurid Ronald McDonald watching her from behind a bus stop. The composition highlights her dilemma and suggests she might blow her bus money on a large fries.
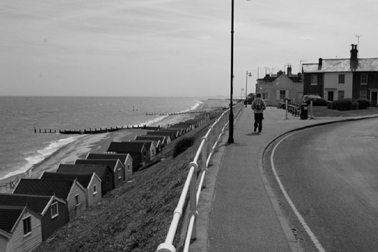
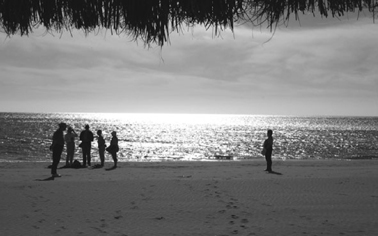
The composition subject is often in the middle ground, as with the figures on the beach in Figure 27-13. The fringe of foreground palm roofing, the receding footsteps in the sand, and the glittering horizon help create the different planes. Depth, the third dimension, is often missing from two-dimensional imagery unless you take advantage of composition, lighting, and perspective to enhance the illusion of it (Figure 27-14).
Each shot has a subject, and its composition helps suggest a subtext. Looking down on the subject, looking up at it, or peering between tree trunks all suggest different contexts, contrasts, and different ways of seeing. This means experiencing the action differently according to the juxtapositions you have arranged. You could use dialectical editing to make us see the irony of riot police lined up in front of a nice bed of tulips, but how much more effective to make the point in a single well-composed frame, especially as red flowers might even foreshadow the bloodshed to come.
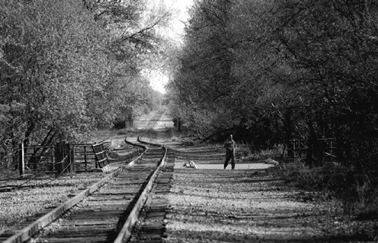
FIGURE 27-14
Unless you use composition, lighting, and perspective to create depth, it is often absent from two-dimensional imagery.
Aim to make every framing contain significant juxtapositions, and try to build irony and dramatic tension into every aspect of your camerawork. Make each location a meaningful environment, and respond with your camera to the actions and sightlines of participants to help the scene’s unfolding dynamics. Thus you endow us, your audience, with the consciousness of someone intelligent and intuitive who picks up all the contextual tensions and ironies.
Because movement within a frame can look 20–30 percent faster than in life, you may need to ask participants to slow their movements when shooting action sequences, especially in close-shot. No camera operator can keep a profile in tight framing if the person moves too fast. How much should you compromise participants’ spontaneity to achieve a visually and choreographically polished result? This of course depends on the comfort of those you are filming. Sometimes you can ask for changes, other times you may have to loosen the shot (that is, go wider).
Occasionally, when panning across a repetitive pattern such as a picket fence, you must vary the speed of the camera movement to stop the subject strobing. This happens when the frequency of the pattern interacts with the camera’s frame rate (ever wonder how they won the West with wagon wheels turning backwards?) Film camera operators could not see the strobing, but anyone using today’s video cameras can. Occasionally stripes or checks in clothing cause similar stroboscopic effects during camera movement. They are distracting and an aware camera operator will take steps to avoid the situation—by going wider, or slowing a panning movement.
Well before going abroad, make a safety check with US Department of State www.usembassy.gov or your own country’s embassy website. Take particular note of hazard warnings, and if in doubt, call your embassy in that country for on-the-spot advice and contacts. Also,
● Check specialized guidebooks for medical information.
● Try to set up a friendly contact in case you need an interpreter, go-between, or other assistance requiring local knowledge.
● Get injections to guard against local parasites, diseases, etc.
● Research water safety and availability of electricity, cell phone, and Internet services.
● Research how to handle bribery demands.
● Leave detailed travel plans and contact numbers with those at home.
● Do the same with your embassy on arrival, and keep them apprised of all changes so they can take action should it become necessary.
● Carry toilet paper.
Someone or something is bound to need mending on location, especially if you are abroad, so bring,
● Phrasebook.
● Information on nearest medical facilities in case of accidents.
● First aid manual
● Bandages, tourniquet to inhibit severe bleeding, band-aids, disinfectant, tweezers, scissors, etc. for dressing small wounds.
● Sun-block cream for working outdoors
● Mosquito repellent
● Water-purification tablets
● Diarrhea and pain medicines
● Equipment manuals.
● Information on nearest equipment hire or repair center.
● Basic repair kit including,
● Flashlight
● Different types and sizes of screwdrivers, adjustable wrench, and pliers
● Hex key and socket sets
● Electrical wire, electrical tape, solder, and soldering iron
● An electrical test meter for resistance, continuity, voltage, and other testing
● Compass to check the sun’s orientation during location spotting.
● Radio or phone to check weather reports and news.
● Spare batteries for everything that uses them.
● Spare sound and power cables.