FIGURE 24-1
Two frames, one with even lines and one with odd, interlace to make an “i” (interlace) frame. A “p” or progressive frame writes the complete frame from top to bottom.
Budgeting and fundraising are a chicken and egg situation: you can’t work without funds and you can’t raise funds without a budgeted plan for your work. Deciding on the equipment and shooting schedule is the prelude since different levels of technology involve very different levels of cost. For a truly fascinating PBS survey of the most-used equipment by their documentarians, see www.pbs.org/pov/filmmakers/2013-documentary-equipment-survey.php#.UoT9B5Tk9bs. Their relative years of experience is also interesting.
For the workflow and technology information that follows, I am indebted to Mick Hurbis-Cherrier, my esteemed co-author of Directing: Film Techniques and Aesthetics, fifth edition, whose knowledge of digital technology (and most else) far exceeds mine. For more about the technologies surveyed below, consult his Voice & Vision: A Creative Approach to Narrative Film and DV Production (Focal Press, 2012).
Because digital electronics are in such rapid evolution, expect at the outset of each new project to research every aspect of workflow, which, as described in “Codecs and Workflow”, Chapter 12: Cameras, is the format path, codecs, and technological processes that your project must follow. Those who lose their way, having begun in happy oblivion, usually fetch up against very expensive consequences. The only safeguard is rigorous research and crosschecking from the beginning. Workflow includes the technology for,
● Image shooting.
● Sound gathering.
● Editorial processes.
● Incorporating archive materials.
● Finishing processes, including sound.
● Mastering and distribution formats.
Preproduction meetings with your cinematographer, recordist/production sound mixer, editor, and postproduction lab (if you require lab services like color grading) are the forum for discussing what formats to adopt when you record both sound and image. Everyone in the crew must be on the same technical page before a single frame has been shot.
Whether you aim for release on television, Webcast, DVD, or a theatrical Digital Cinema venue, you must know your workflow from beginning to end, checking its viability by consulting with others who followed a similar path. There are four basic workflow questions:
1. What is the shooting format? Film, HD video (720p, 1080i), uncompressed or RAW video?
2. How are we editing? Format, codecs, frame rate, resolution?
3. How do we want to finish and master the movie? Film, HD video (720p, 1080i), uncompressed media files (2 K, 4 K)?
4. How do we want to exhibit and distribute the project? Broadcast HD format (720p, 1080i), Blu-ray, DVD, web, or a combination? Or high-end theatrical projection like 35 mm film, or Digital Cinema?
Within these general questions are many arcane details to reconcile if you are not to waste inordinate time, money, and energy later. Most directors need considerable education in these ever-evolving areas, so a cinematographer, sound mixer, and editor are more than creative collaborators—they must be technologically up to date or your project won’t make it through to completion successfully. For up to date best practices in tapeless workflow, go to the Keycode Media site: www.keycodemedia.com/Tapeless-Workflow.
Directors generally choose their cinematographers by the quality of their previous work, their creative judgment, and their ideas about the project at hand—but at some point you will need to have “the discussion” about shooting technology. What are you going to shoot on? Whether to shoot film or digitally has two major aspects: the first is creative—what look can I get from each production format? The second is budgetary—what will each format cost me? Both then involve additional choices: film shooting can be 35 mm or Super 16 mm format, and digital shooting can be done in HD broadcast standards (720p, 1080i) or at the uncompressed video file resolutions of 2 K or 4 K.
To shoot a scripted, acted history documentary digitally is not inherently cheaper than shooting film. However, the far higher shooting ratio of an observational documentary will almost certainly compel the use of video on cost grounds, and it can in any case produce aesthetically beautiful, professionally polished documentaries for far less than using film. Recent developments in RAW and uncompressed video shooting, enlarged image sensors, and a full range of superior, interchangeable lenses now give you a very sophisticated medium. Digital cameras like the RED Epic and Arri Alexa make digital video quite as expressive as any 35 mm film production.
The major expense with film shooting, apart from cost of the film stock, is the unavoidable involvement with a film lab and the expense of its services for processing, transferring, intermediate prints, effects, optical track masters, and possibly distribution copies too. A digital camera, on the other hand, uses reusable recording media like SD or S × S cards or hard drives, and computers handle all of its output.
Using film for documentaries is virtually obsolete because of cost and the inconvenience of frequent reloading. Consequentially 16 mm film labs are practically obsolete, though film will continue in use for the occasional specialized project. What film camera equipment you use depends on your chosen format, such as 35 mm or Super 16 mm (16 mm widescreen). Superior image quality is associated with 35 mm film because it: has finer grain (greater sharpness, or acuity); uses lenses with a usefully limited DOF; and can be shown in any cinema in the world. Furthermore, you can transfer it to any video format—at a hefty price.
Shooting on film takes heavy funding up front to buy stock, and is vastly expensive to process and print. Anybody experienced enough to light and shoot it will know where to get the equipment and how much it will cost. A film acquisition feature with a $2 million budget is considered cheap. Comparing the two film formats,
Super 16 mm shoot: This widescreen format is a less expensive and more mobile way to shoot on film, but get advice from someone who has successfully (and recently) completed your preferred chain of production.
35 mm shoot: You will need the appropriate camera support systems and a dolly on rails, especially if you shoot Panavision. Any handheld shots will need either a shoulder-mounted, short-run 35 mm camera or, if you intend a more gliding motion, a SteadicamTM operated by someone very strong and very experienced at using it.
The workflow from 16 mm or 35 mm film acquisition to a HD or D-Cinema master is complex, expensive, and requires careful research and consultation with a film lab.
In the United States, high definition (HD) broadcast resolution conforms to the frame rate, aspect ratio, and resolution standards established by the consortium of engineers, communication companies, and policy makers of the ATSC (Advanced Television Systems Committee).1 Of principle interest to filmmakers are the HD formats:
● 1080i HD records 1,920 pixels × 1,080 lines at a frame rate of 30 interlaced frames per second.
● 720p HD records 1,280 pixels × 720 lines at 30 or 60 progressively scanned frames per second.
● 1080/24p HD records 1,920 pixels × 1,080 lines at a frame rate of 24p (resembling film).
Aspect ratio expresses the width of the frame in relation to its height, and is 16:9 for all the above standards (see Chapter 12). HD thus approximates the cinema format of 1.85:1, and is now the preferred aspect ratio internationally for HD television. Older archive material will probably be in 4:3, the original cinema screen format inherited by television in its early days.
Because of differing electrical supplies, American frame rate standards are based on 30 fps (frames per second), while the European PAL system shoots at 25 fps. Which you use depends on where you live or where your film will be shown.
ATSC standards create the frames in each of its 30 fps formats using one of two strategies. One uses progressive scanning, meaning that the entire 720 horizontal lines of video information making up the image are scanned (drawn on your image sensor or monitor screen), from top to bottom, 30 times per second. Progressive scan formats are indicated with the designation “p” while the alternative “i” designation stands for interlaced scanning. A complete video frame results from two partial scans called fields. In one the odd lines of information are scanned from top to bottom (lines 1, 3, 5, 7, etc.) and in the other the even lines of information are scanned (lines 2, 4, 6, 8, 10, etc.). These two fields (the odd field and even field) are interlaced to create a full frame. The interlace system takes a 60th of a second to scan each field but achieves the full frame of two interlaced fields every 30th of a second (Figure 24-1).
FIGURE 24-1
Two frames, one with even lines and one with odd, interlace to make an “i” (interlace) frame. A “p” or progressive frame writes the complete frame from top to bottom.
Resolution determines image quality and is of paramount importance to director and cinematographer alike. It refers to the format’s ability to reproduce visual detail, sharpness of line, subtlety and degrees of luminance, and accuracy of color. Several factors determine this: scanning type, lens quality, the number of sensor pixels, sampling bit rates, chroma subsampling, and data compression. Of principal interest is the pixel count. A “pixel” (short for picture element) refers to one of the hundreds of thousands or even millions of tiny capacitors that line the face of a video sensor, commonly a CCD or CMOS chip. Pixels are like the photoreceptor rods and cones in the retina of the human eye. They receive focused light from the camera lens, and translate the image’s light values into digital information. In your video monitor this process happens in reverse: digital information becomes little points of light at each monitor pixel. Here again, the more pixels, the better they render image detail, light, and color.
The number of pixels in each of the ATSC standards (such as 720 and 1080) determine picture resolution. You calculate this by multiplying the vertical lines by the horizontal pixels. Thus the 720 format contains 921,600 pixels per frame, and 1080 contains 2,073,600 pixels per frame—more than twice the information, which means resolution that is twice as fine.
With so many pixels capturing so much detail and generating so much data, the camera, postproduction equipment, and television transmitters must all process a torrent of digital information. However, since each frame repeats much information from that preceding it, engineers have invented compression codecs (short for compression/decompression), which are like shorthand and reduce what must be “written” to the recording medium. A good codec is invisible, but a high-compression “lossy” codec will visibly intrude its economies onto the screen, particularly during image movement.
There are many different codecs, most proprietary by manufacturer. Sony HD cameras for example use MPEG-2 long GoP and Panasonic uses AVC-Intra. In many digital single-lens reflex (DSLR) cameras that shoot video, the H.264 codec is popular. All you need know at this juncture—not to disappear down the rabbit hole of formats and codecs—is that your shooting format and codec must be supported (a) by your editing system and (b) by your postproduction lab—should you need their services. Thus, in preproduction your DP, editor, and lab must all talk with each other.
Your camera’s imaging sensor greatly affects the aesthetics of the final image, so size matters when you choose a camera (Figure 24-2). There are two issues in play: (a) larger sensors contain a greater pixel density (more or larger pixels) and can render finer detail, (b) lens depth of field (DOF) is involved because small video sensors render images with great depth of field, making it difficult to control this important compositional element.
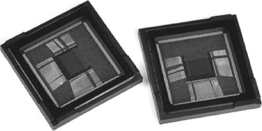
FIGURE 24-2
CMOS video sensors, the heart of camera performance. (Courtesy Samsung.)
Professional camcorders have long utilized large sensors (usually measuring 1/2″, or 2/3″—about the size of a 16 mm film frame), and HD cameras often contain sensors approaching a 35 mm film frame in size. Allowing interchangeable lenses, these cameras achieve the same quality, perspective, and DOF control as 35 mm film. See Chapter 26 Optics for detailed information about depth of field and the creative impact of lenses.
Broadcast-quality HD is always recorded and transmitted compressed, then decompressed for display. For cinema projection, however, ultra-high-end digital cameras like the Arri Alexa, Aaton Penelope Δ, and RED Epic now record full resolution, 12-bit uncompressed video (or RAW files). They have light sensitivity and image quality easily matching 35 mm negative film. Known as 2 K (2048 × 1080) and 4 K (4096 × 2304) after their approximate number of horizontal pixels, these ultra-high resolutions far exceed the ATSC HD standards because they’re intended for the Digital Cinema (D-Cinema) standard, a high-resolution digital theatrical projection format established by the Digital Cinema Initiative (DCI). Camera sensors for these formats are of exceptional quality and size, and most have a single CCD or CMOS sensor the size of a 35 mm negative frame, and shoot at 24 frames per second, the standard cinema projection frame-rate for motion picture film and the D-Cinema formats.2
By comparison, low-end consumer camcorders have poor quality factory lenses, notoriously small imaging chips (which produce an unmanageably large DOF), lack of manual controls for focus, exposure, and so on. They are not considered viable for professional filmmaking, which demands manual control over all visual aspects of the image, but picture aesthetics can always take a back seat to the exigencies of documenting anything potentially fascinating. What equipment people in fact use is fascinating. David Tames’ documentary website Kino-Eye.com recommends items for a budget documentary shooting outfit, and lists seven American documentaries made with an iPhone, most of which can be seen on Vimeo or YouTube. They are listed here from short to long: Kevin Sweet: Intervals (1:19, David Tamés, 2012), Flying iPhone 4 (HD Aerial Video) (1:29, Brandon J Laatsch, 2010), Coffee Branch iPhone Documentary (3:00, Stephen de Villiers, 2012), 156 Turns (3:24, Seth Schaeffer and Greg Tracy, 2010), iSolation (5:07, Daniel Hume, 2012), and Syria: Songs of Defiance (24:52, Al Jazeera).
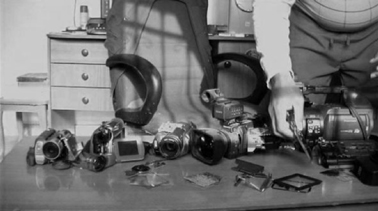
Emad Burnat used a succession of consumer cameras while shooting his Five Broken Cameras (Palestine/Israel/France/Netherlands, 2013, Figure 24-3). During his valiant fight to document a Palestinian village trying to hold on to its land, Burnat lost camera after camera. That each was of limited technical scope seems unimportant when they were in the hands of a powerful filmmaker, and especially so when documentary often incorporates archival sources of varying quality. Some filmmakers, however, have specifically used consumer cameras for their small size and low-tech aesthetic to creative advantage in fiction filmmaking, notably Thomas Vinterberg with The Celebration (Denmark, 1998), Spike Lee with Bamboozled (USA, 2000), and Rebecca Miller in Personal Velocity: Three Portraits (USA, 2002).
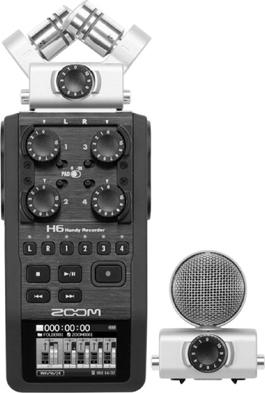
FIGURE 24-4
Sound recorder for double system filming. (Courtesy Zoom.)
Address all questions about sound to the sound recordist (on larger productions often called the production sound mixer). He or she heads the field sound team, which usually includes a boom operator. Choose equipment by deciding first whether sound will (a) be recorded single system through the camera and on the same recording media as the picture, or (b) double system using a separate, dedicated recorder that records on its own digital media (Figure 24-4).
Professional projects often shoot double system for two good reasons: (a) the audio aspects of digital cameras are generally inferior to those in a professional digital sound recorder, and (b) since field sound recordists must constantly monitor and adjust audio levels, they cannot keep intruding on the camera operator to do so.
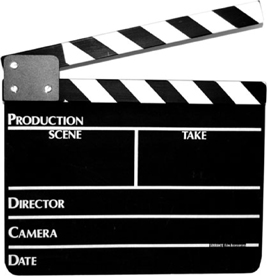
FIGURE 24-5
Clapperboard—necessary whenever you use double system recording and must synchronize sound to picture.
Since picture and sound in professional production are on separate media, they must be synchronized (synced up) during postproduction. Vital to this is the slate or clapperboard (Figure 24-5) which,
● Visually identifies the head of every take (including scene, shot, take, and sound number), but sometimes at the tail as a “tail slate.”
● Verbally identifies the shot and take for whoever syncs sound to picture in the cutting room. In documentary, files can be very long so all identification is important.
● Creates a one-frame, easily identifiable “reference moment” by which to align picture with its accompanying sound.
That reference moment is either the sharp snap of the clapsticks recorded by both camera and audio recorder at the beginning of every take, or it can be a timecode reference on picture and sound when using a “smart slate.” This generates visible timecode numbers (see “Smart Slates” under Chapter 28: Advanced Location Sound). With material correctly identified and logged, either system should make syncing sound to picture a straightforward procedure during postproduction.
Planning to shoot location sound poses these budgetary questions:
● Single system or double system?
● How many channels will you need to record?
● Will you need a portable mixer?
● How will you mike each different situation? (Boom? Planted mics? Radio lavaliers?)
● If you are using radio mikes, will you carry wired mikes as backup? (You should.)
● If shooting double system, what kind of slate will you use (regular or timecode)?
● What effects or ambient sounds should be recorded during location shooting?
Your sound recordist should be able answer your questions, and provide all the information you need to make an accurate estimate for the budget.
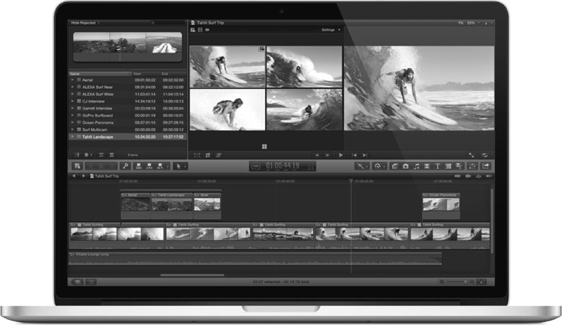
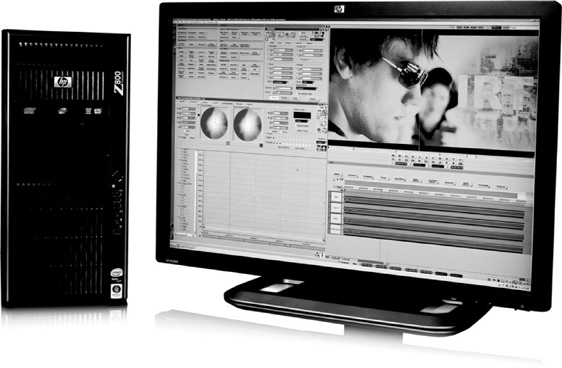
Whatever acquisition medium you use, you will need an appropriate postproduction setup, from a $2,000 Mac computer equipped with $900 Final Cut Pro at the low end (Figure 24-6), to an Avid|DS HD postproduction rig costing ten times as much at the high end (Figure 24-7). Some salient issues, all affecting the postproduction schedule, equipment choice, and budget, are,
● The length of the intended documentary.
● Likely shooting ratio, and magnitude of hard drive storage required.
● Whether special effects require extensive rendering (computer processing).
● Whether you will need film or digital lab services.
In a broad sense, the budget of a film is essentially how much money (and other resources) one expects to have available. Budgeting is primarily the domain of the producer, but has profound consequences for the director’s ability to function. A detailed budget includes a price line for every item or service, and lays out how much your film will cost and where the money will go. Allow for plentiful hard drive storage, including for the audio phase when you mix the final track using a Pro ToolsTM software suite, and be realistic about the time you’ll waste if you decide you can get by with a limited computer. Take advice so you budget for the sound mix, project mastering, music rights, color grading, pressing DVDs, and for otherwise making distributable copies.
Use pessimistic figures because the real total for a film can be a mortal shock, and you don’t want to get a reputation for naivety or (worse) outright deception when you have to find more money to finish. Approaching production, you and your production crew must consider:
● How much does the production have in the bank?
● What is still to come?
● What “in kind” resources are available?
● What will the film cost using the projected shooting schedule?
● Are there enough funds to cover projected costs?
● Are more funds needed?
● Where can savings be made?
● What shooting could be delayed until funds have been assembled?
Broadly speaking, budget expenses divide into above-the-line and below-the-line costs. The line itself is the division between preproduction and beginning production. Thus:
Research costs
Any story rights involved ‘if you work with the author of a book on the subject, for instance’
Producer’s fee
Director’s fee
Costs for any tests necessary
_____________________ “The Line”
Below-the-line costs:
Production unit salaries
Location rentals
Film stock or media
Camera, electric, sound, and other equipment ‘purchase and rental’
Laboratory fees ‘processing and transfers’
Catering, hotel, and living expenses
Travel and transportation
Legal costs and production insurance
Miscellaneous expenses
Music rights and composition
Postproduction expenses ‘sound mix, color grading, mastering, and other services’
Distribution copies and publicity materials
Festival entry fees and travel to festivals
All movie budgets should also include a contingency percentage, usually 4 percent or more of the total budget. This is your Murphy’s Law surcharge; it allows for equipment failure, bad weather, reshooting, and other hidden costs.
A large line item that novices tend to avoid is production insurance, which should be a necessity for all film shoots, regardless of size, scale, and budget. Accidents happen: a participant falls and breaks an arm, a car is in an accident on the way to the set, a $10,000 lens lands on the sidewalk … Without production insurance, any of these scenarios could easily shut you down. Most equipment rental houses require proof of insurance, and if your crew are union members, their union will stipulate what coverage is necessary when they are hired.
Insurance is complicated territory, so be sure to research exactly what kind of policies your project requires. If you’re an independent filmmaker, The Independent Feature Project ‘IFP’ website ‘www.ifp.org’ is a good place to find advice on affordable insurance. Depending on the expense and sophistication of your production, you may need to carry any of the following:
● Preproduction indemnity
● Workers’ compensation
● Film producer’s indemnity
● Consequential loss
● Negative insurance
● Employer’s liability
● Public, or third-party, liability
● Third-party property damage
● Equipment insurance
● Sets, wardrobe, props insurance ‘for reenacted scenes’
● Vehicles
● Fidelity guarantee
● Union and other insurances
Special insurances are also generally necessary when working abroad under unusual health or other conditions.
Figure 24-8
Gorilla™ budgeting software from Jungle Software.
For short film projects download the budget form from this book’s companion website ‘www.directingthedocumentary.com’. If you mean to approach anyone in the professional filmmaking world, all paperwork must use recognized budget and scheduling software, two facets of filmmaking inseparably linked. The industry favorite is Movie Magic™, an expensive but all-encompassing software package. Less pricey, and fine for the lean, mean independent, is Gorilla™ from Jungle Software ‘Figure 24-8’, who like many software manufacturers offer a cut-rate “academic edition” for bona fide students. Either will help you break down the script ‘if one exists’, turn it into a schedule, and arrive at a detailed, properly laid out budget based on all the variables you anticipate.
The beauty of dedicated relational databases is that whatever budget, coverage, or scheduling changes you enter will immediately ripple through the entire set of documents, showing up like magic everywhere it matters. In the case of re-enactment scenes, the software will also help you generate scene breakdowns, call sheets, contact lists, and organize locations and storyboards.
Most new users will need training to make full use of their purchase, but properly used, the software even monitors daily cash flow, so there need be no ghastly surprises lurking in the accounts department.
Early in your directing career, you and your crew will be hard put to stay on top of basic conceptual and control issues, so it’s wise to foreswear advanced equipment and the time it takes to master it. Safety is involved too: a film production is no place for on-the-job training in potentially harmful equipment, especially any that involves high voltages. I once saw a wrongly tied-in electrical ballast transform a metal gate into a lightning generator. Thankfully nobody got hurt.
Brainstorm with your team in a production meeting and figure what equipment you will need for each situation. Expect an experienced sound department to want a rather large inventory. Often they must adapt to unforeseen lighting or other circumstances, and cannot comply without reserve equipment.
It is tempting for the technician trying to forestall problems to insist on the “proper” equipment—always, of course, the most complicated and expensive. In experienced hands, sophisticated equipment saves time and money, but not in those of novices. Beware, too, of strong-minded cinematographers trying to pad their sample reel using exotic lenses, cranes, and dollies at your expense. Keep it simple wherever possible, but listen to experience.
Software, as discussed above, will help you schedule and re-schedule participants, locations, crew, and other necessities. Aim to set the shortest practicable schedule because the number of working days translates directly into costs ‘see below, “Under- or Over-scheduling”’. Take into account,
● Availability of crew and participants.
● Availability of locations.
● Travel and accommodation.
● Any special equipment, or facilities.
● Complexity of each lighting setup and power requirements.
● Time of day, so available light comes from the expected direction. ‘Take a compass when location scouting!’
Remember to factor in the expenses and delays imposed by travel between locations, time to set up and strike lighting setups, and some contingency time to allow for bad weather, illness, or equipment breakdowns.
Normally you shoot in convenience order according to the logistics of locations and the availability of participants and crew. Since lighting setups and changes take the most time during a shoot, a compact schedule avoids relighting the same set. Scenes at a common location are shot on the same day‘s’ regardless of their order in the eventual film.
If you are shooting to a script, schedule wide shots first because they establish the spatial relationships and layout, and often take all your lighting resources. Subsequent lighting for closer shots must match the master shot. Then if time runs out, you might get away with not shooting a close up or a detail. Master shots are usually indispensable because they cover so much of a scene’s action. Shoot cutaways and inserts last because they can be shot separately and later, if need be.
If your film documents a process, such as surgery after an accident followed by lengthy physical therapy, you would need to shoot in event order. In other films you may be able to shoot for convenience, and imply the order and time progression in editing.
Occasionally a scene you plan is a mainstay, and should it fail, the film itself collapses. This might be a confrontation in the workplace, or a performance at a party political conference. If so, shoot the obligatory scene early, in case no scene means no film.
Another problem arises when you are shooting competitive processes, and don’t know who will win. Perhaps you want to follow a young actor in a demanding Shakespeare part, but don’t know until casting who will become your central character. Scheduling should allow you to follow three hopefuls, then the audition. Once the part is cast, you can plan the rest of the coverage.
If you have freedom in the order you shoot, it is wise to cover those that are factual and least emotionally demanding early in the schedule. Documentary participants take a while to grow into their new role because at first they have to struggle with feelings of strangeness while acting the part of themselves. If you can, hold back on any emotionally demanding scenes until later, when they have begun to relax and enjoy their role.
Make alternative shooting plans whenever you face disabling uncertainties. Schedule exteriors early in case unsuitable weather causes a delay, and arrange for cover sets, that is, interior scenes on standby as alternatives. This way you will not fall behind schedule.
Depending on length and intensity of the scene, the amount of coverage, and the reliability of participants and crew, you might expect to shoot anywhere between one and three scenes per day. Traveling between locations, elaborate setups, or relighting the same location may greatly slow the pace.
You can sabotage a promising film with misplaced optimism. Consider the following:
● Work may be alarmingly slow at first because the crew is figuring out efficient working relationships. Schedule the first two or three days of any shoot lightly.
● You can always shorten a long schedule, but it may be impossible to lengthen one too brief because key people have scheduled other jobs.
● Most nonprofessional ‘and some professional’ units often expect to shoot too much screen time in too short a schedule. Be realistic.
● The standard turnaround for a crew ‘the time between the end of one shooting day and the start of another’ is 12 hours, and 10 hours is the minimum.
● An average working day should be around 8–10 hours. Occasionally, you may need to schedule longer days. Beyond that, the law of diminishing returns kicks in—an exhausted crew working 14-hour days begins making serious errors.
● Dog-tired crew and participants tend to work progressively slower. Tempers and morale deteriorate, artistic commitment evaporates, and fatigue compromises safety.
● A normally cared-for crew will go all-out to help when there’s an emergency.
The production manager is responsible for translating the shooting schedule into day-by-day call sheets. These, distributed to the crew ‘and posted on the project’s Facebook page’, detail:
● What portion of the documentary is being shot on a specific day.
● Who needs to be on the set.
● Any special equipment, props, or costuming.
● What time each person needs to be there.
● How to get to the set.
● Emergency contact phone numbers.
You can generate your own call sheets using one of the popular film scheduling software packages that integrate all scheduling functions.
At the advanced level you should do your budgeting and production organizing by making use of industry-approved software, such as Movie Magic™ or Gorilla™. Not only will it make professionally presented budget information, it will make all necessary changes should a single item or schedule change, saving hours of computational labor. To assemble the information you need to enter in the software, use BP-2 Advanced Budget.
1. Unfortunately, there are currently three other digital TV standards around the globe. DVB-T Digital Video Broadcasting-Terrestrial’ is used throughout western and eastern Europe, Russia, Australia, and many nations throughout Asia and Africa; ISDB-T ‘Integrated Services Digital Broadcasting-Terrestrial’ is used in Japan, Brazil, and most of South America; and DTMB ‘Digital Terrestrial Multimedia Broadcast’ is used by China and Hong Kong.
2. During the writing of this edition there was much chatter in the industry about achieving resolutions of 5 K and 6 K … so stay tuned.