
FIGURE 28-1
Using double system shooting, the sound operator is self-contained with her own recorder, and can operate near or far from the camera. (Camille Zurcher/Colectivo Nomada.)
This chapter summarizes some of the sound equipment, skills, and approaches required for advanced sound production, but you may first want to review the basics in Chapter 10: Capturing Sound. Fortunately, a great deal of advice is now available on the Internet. For cost-conscious reviews and practical articles on all aspects of sound, go to Fred Ginsburg’s articles at FilmTVSound (http://filmtvsound.co. For an outstanding 72-page article on sound theory and practice, see “Location Sound: The Basics and Beyond” by Dan Brockett, published under the Ken Stone Index at www.kenstone.net/fcp_homepage/location_sound.html (an offshoot of Final Cut Pro). For a wide range of up-to-date sound equipment, go to (www.locationsound.com/proaudio/ls/index.html). The Broadcast Shop at www.thebroadcastshop.com is good for professional equipment, and the Digital Information Network at www.dvinfo.net has up-to-date information on various aspects of digital filmmaking. You can Google many instructional videos online via Vimeo and others.
Sound equipment evolves less rapidly than cameras, so I have mentioned some industry favorites in the discussions below. Planning sound coverage poses a number of questions:
● Will you record sound using the camera alone, or use a separate digital recorder?
● What sound rate should you use (normally it is 48 kHz)?
● Are you shooting to sync 24 fps, 25 fps PAL, or 30 fps NTSC? If the latter, will you use drop frame (DF) timecode or non-drop frame (NDF)?
● If you mean to shoot double system (using a separate camera and sound recorder), which kind of sync marker system will you use?
● How many types of sound setup can you expect and what will you need to mike each?
● What is the maximum number of sound channels you will need to record?
● How many channels does your camera afford, and will you need to incorporate a multichannel mixer?
● Do you plan to take advantage of the mobility of radio mikes?
● For economy, should you rent sound equipment, or purchase your own?
Single system shooting (camera recording both picture and sound) is common in low budget documentary work, but hazardous for run-and-gun shooting since the camera and fishpole (microphone boom) operator are linked together by cables, which take careful management.
Double system shooting means using a separate audio recorder, so sound and camera can operate freely and unattached (Figure 28-1). This lets you,
● Move together or separately at will.
● Record better quality sound.
● Get easier and more representative headphone monitoring by the recordist.
● Shoot wild tracks as you need them.
However,
● Someone, probably the director, will need to operate a clapperboard (as a sync marker).
● You may need extra personnel to operate more elaborate equipment, and keep records. Without logs, syncing sound and picture in postproduction can turn into a nightmare.
● Using a clapperboard will make your operation more visible and intrusive, but you can use mike-taps and low voice announcements instead.
Over time, recorder and camera may drift out of sync. You may detect creeping sync in the computer after 5 minutes running time, or it may only be discernible after an hour or two. Creeping sync is apparent to the eye once sound and action are more than two frames apart, which means only 1/15th of a second out of sync. Only by advance testing can you know whether you are susceptible. Find out by shooting a 30-minute take; place a clapper front and end, then sync sound and picture and see whether the second clapper is still in sync 30 minutes later.
FIGURE 28-1
Using double system shooting, the sound operator is self-contained with her own recorder, and can operate near or far from the camera. (Camille Zurcher/Colectivo Nomada.)
Unless you use a professional-level camcorder with sturdy XLR connector inputs and businesslike VU meters, be ready for the following from lesser cameras:
● Flimsy input sockets.
● Inaccessible controls for changing input level while shooting.
● Input metering that is indefinite or misleading.
● Poor signal-to-noise ratio.
● “Hunting” for level when set to automatic level and mike input is low.
● Headphone output auto level, underpowered, or poor quality.
Documentary often operates in marginal situations, and substandard sound can tip the balance into unintelligibility, so where possible, use double system recording.
Using a separate recorder puts the whole job in the hands of someone who is concentrating on sound, where it belongs. Digital audio, like video, can either record raw (uncompressed information, which takes up a lot of hard drive or memory card space) or use a codec to condense the files into less recording space. Your recorder must let you monitor through ear-enclosing headphones, and offer a choice of codecs so you can output files compatible with your editing system. Here’s a link to an article comparing the different audio codecs and the operating systems that handle them: http://en.wikipedia.org/wiki/Comparison_of_audio_codecs.
For reliability and high quality recording, the Nagra VI is from the long established, top of the line Nagra range (Figure 28-2, www.nagraaudio.com ). Lower-budget productions might use the 4-track Sound Devices 744T which records on to a hard disk or flash card (Figure 28-3 www.sounddevices.com/products/744t.htm). There is also the highly capable stereo Tascam range www.tascam.com which records to flash cards, and locks to external timecode for inter-machine syncing. Those on stringent budgets can use the Zoom H6 which offers six channels of recording and four XLR microphone inputs (Figure 28-4). Sound recorders feature extensively in radio and music recording, so there is a good range on offer. If you buy your own, comparison-shop for features, and put ruggedness, XLR connectors, and a choice of output codecs high on your list. Film equipment takes a beating, so a light plastic housing won’t last long.
Three backup measures that may save you:
a) Any material shot on flash cards or hard drives should be quickly backed up on to a computer hard drive array in case the recording medium fails, gets lost, or recorded over.
b) When shooting with a mono mike feeding into a 2-channel recording system, use a “Y” connector to split its input across both channels. Then adjust one channel to peak at, say, –6 dB, and the other to under-record somewhat. Should your main channel overload, the second track stands ready as an undistorted alternative.
c) When shooting double system, let the camera’s deck mike record scratch (catch-as-catch-can) sound too. You then have (a) a fallback track in case your main audio recorder fails, and (b) a guide-track as reference when syncing up poorly identified track material from the main recorder.
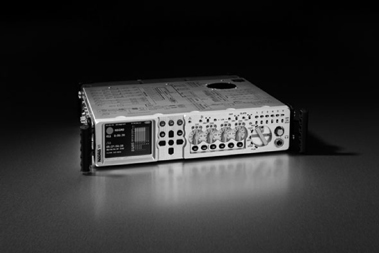
FIGURE 28-2
Nagra VI, an outstanding sound recorder. (Photo courtesy of Nagra, a Kudelski Group Company.)
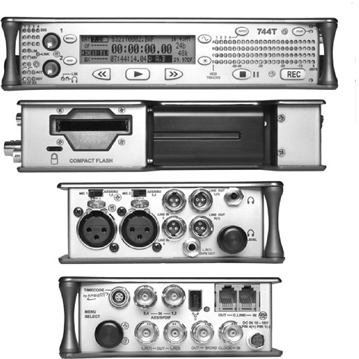
FIGURE 28-3
The 4-track Sound Devices 744T records to a hard disk or flash card. (Copyright Sound Devices, LLC—used with permission.)
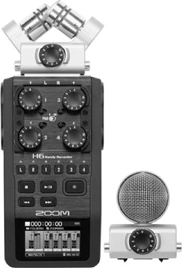
FIGURE 28-4
The Zoom H6 offers four XLR microphone inputs and six channels of recording total. An H6 is being used in Figure 28-1.
Digital sound recording uses a variety of codecs and sampling rates. Sampling refers to the refresh rate the system uses as it draws sound waveforms. For sound fidelity, set your sound sampling rate to 48K or above (48,000 waveform re-draws per second). Stay consistent throughout your shoot because some editing software will gag if you feed it mixed sample rates.
If you are shooting a conference or concert, and need to combine and balance several mike inputs, you’ll need a location mixer. This is because most cameras are limited to two sound channels. Choose a battery-powered mixer that you can sling over your shoulder, but remember that you become far less mobile as you cobble more sound equipment together. Professional Sound Corporation (PSC) makes excellent 4- and 8-channel portable mixers, as do Wendt (www.wendtinc.net/index.htm) and Shure www.shure.com/ProAudio/index.htm). In value for money, look at Mackie www.mackie.com or Sound Excellence http://soundexcellence.com whose ENG-44A is a modestly priced, serviceable battery-powered portable mixer with four inputs and two outputs (Figure 28-5).
It is not a good practice to adjust equalization (EQ) as you record. You may however roll-off (reduce in advance) the excessive bass of traffic, since this can mis-register in the level meter and lead to distortion. Many microphones and sound mixers have a bass roll-off or low-cut switch for this very purpose. If in doubt, record “flat” (all frequencies equally) and defer EQ to the postproduction stage.

FIGURE 28-5
Sound Excellence’s ENG-44A is a modestly priced portable mixer with four inputs and two outputs. (Photo courtesy of Sound Excellence, LLC.)
As we said in Chapter 10: Capturing Sound, most VU meters are averaging meters, that is, they display average sound levels with a slight time lag, which approximates the way the human ear registers sound. They do not reflect peaks accurately, where the killer distortion sets in, so look for a supplementary red LED light that gives an immediate readout of peaking. Alternatively you may have a whole bar of LEDs in a display, with sound levels beginning in green, transitioning through the caution area of orange, and peaking dangerously in red. Play back anything dubious on the spot.
Calibrating a supplementary mixer can be tricky, so read the manual. Generally you use the mixer’s inbuilt tone-generator to set a saturation recording level of 0 dB on its VU meter. Next feed the mixer output signal into the camera’s line level input. Manually adjust the camera’s manual input levels to also register a 0 dB reading. Record a minute of tone, then check the recording with your editing program’s playback to verify that saturation recording is indeed 0 dB. If it’s off, lower the camera input until 0 db at the mixer VU meter will handle a peak of any frequency without distorting.
In mike recording tests, adjust mixer input levels so normal speech registers at –6 dB on the VU meter, and peaks don’t stray into the red area. Using editing software, listen back to your tracks to check speech quality, footsteps, door slams, etc. Experiment with deliberate overloads (peaking beyond 0 dB) to discover where audible distortion sets in and which frequencies seem most vulnerable. If absolutely necessary, ride gain (that is, adjust recording level during recording) to keep from peaking into the red. This is usually difficult or impossible with camera-only recording.
If you cover several speakers with several mikes and leave all mixer channels equally open, all the mikes’ ambiences sum together to create a dull roar. To minimize this, hold every channel low if nobody is using it, and raise and lower each mike as the person assigned to it speaks. If, however, you can record each mike into its own channel of a multichannel recorder, you can set all channels to record at full level, mixing them selectively later as needed.
Multiple mikes whose inputs combine into a common recording channel can create phasing. This shows as recorded sound pulsing rather than holding steady as it should. This is caused by further and nearer mikes picking up the same source but in different phase relationships, so that one periodically cancels out the other. Try reducing the number of mikes involved in pickup.
Unless you have studied the engineering parameters for stereo or 5.1 recording, don’t even attempt setting up multiple mikes. There’s even one deadly setup in which one channel cancels out the other, and stereo is reduced to mono!
If a mike mysteriously refuses to work, suspect there is no phantom power present to activate the mike (see Chapter 10: Capturing Sound).
FIGURE 28-6
The Denecke smart slate electronic clapper system. The timecode numbers are in hours, minutes, seconds, and frames. (Photo courtesy of Denecke, Inc.)
A smart slate is a clapperboard containing a crystal-controlled timecode display (Figure 28-6). The numbers move when you raise the slate bar, and freeze when you close it. For double system shooting this makes syncing sound to its timecoded picture easy, but (a) the camera and the recorder must be compatible with the smart slate, and (b) their operators must remember to jam sync (synchronize) their timecode generators every morning, since they drift apart over time. Carry a traditional clapperboard in case the electronic wizardry goes on strike.
Professional quality, ear-enclosing headphones that isolate the user from the surrounding world are a necessity for monitoring your work. Headphones made by Sony and Sennheiser are popular with professionals (Figure 28-7). Be aware that,
● Camera outputs to headphones can be inadequate in level.
● You are probably only able to monitor sound as it enters the recorder, and cannot hear overload distortion, which happens during the recording process.
● Some professional equipment lets you verify recording quality by letting you monitor the actual recording, but with a slight playback delay.
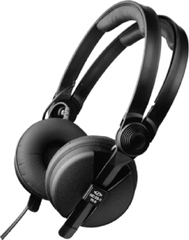
FIGURE 28-7
Sennheiser® HD-25 ear-enclosing headphones. (Photo courtesy of Sennheiser Electronic Corp.)
● Headphone circuitry may include a compressor circuit that gives a false impression of the recording dynamics.
● Use headphones only to monitor audio content. Use the level meters (VU or Peak) to monitor the strength of the incoming sound levels.
Most documentary sound shooting uses cardioid and hyper-cardioid directional mikes, as well as lavalier omni-directional body mikes. They are made by a range of manufacturers such as Neumann, Sennheiser, AKG, Audio Technica, Beyer Dynamic, ElectroVoice, Schoeps, and Shure. Each mike type has a different pickup pattern, which determines how much off-axis sound it accepts.
This kind of mike, as we saw in Figure 10-13 in Chapter 10: Capturing Sound, gets its name from its heart-shaped response pattern. Cardioid mikes are thus directional and have quite a broad angle of acceptance. Dynamic cardioids are an older design that—unlike sensitive, battery-powered electret condenser mikes—are completely sound-powered. Though less sensitive, they are rugged and will endure very loud transients, rough handling, and temperature or moisture extremes that would disable their more delicate cousins.
The hyper-cardioid or shotgun mike is ultra-directional and achieves this by discriminating strongly against off-axis sound. Named for their rifle appearance, shotguns like the Neumann KMR-82i or the Sennheiser MKH-70 (an industry favorite) use interference tube serrations to suppress off-axis sound. The polar pattern for a Sennheiser MKH-70 (Figure 28-8) reveals that its off-axis discrimination varies sightly according to frequency, a feature common to most mikes.
Shotguns, like telephoto lenses, tend to squeeze background and foreground together, so you must watch for sound originating from behind the subject. However, by angling the mike downward, you might be able to lower that idling truck motor, once it is out of the mike’s “line of sight.”
Use a hyper-cardioid to favor a sound source over others competing from other axes, such as a group of speakers in a noisy street. Since the fall-off between on-axis and off-axis sound is considerable for hyper-cardioids, you must pan the mike quickly to any new speaker in a group. Ultra-directional miking can become a handicap if people in a group are speaking unpredictably and from multiple directions. It that case, try a regular cardioid or even an omni-directional mike. Expect shorter hyper-cardioids to have a wider angle of acceptance than their longer brethren.
The omni-directional lavalier is normally a miniature electret condenser mike that clips to a lapel or dress front (Figure 28-9). They are highly sensitive, full spectrum, and sometimes physically tiny, occasionally no more than a match-head. With each lavalier comes a small globular foam windscreen that fits over the mike to inhibit popping on speech plosives. If air currents become troublesome, wrap the “lav” in cheesecloth or bury it in the wearer’s clothing. You can plug a “lav” into a microphone input, but for full mobility, it will have its own wireless transmitter (Figure 28-10). For easy disconnection between bouts of filming, tape the lav’s XLR connector to the wearer’s ankle.
FIGURE 28-8
The polar pattern for the Sennheiser MKH-70 reveals off-axis discrimination that varies slightly according to frequency, a feature common to all mikes. (Images courtesy of Sennheiser Electronic Corp.)
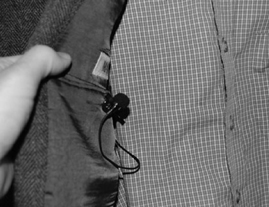
FIGURE 28-9
The omni-directional lavalier clips to clothing and can remain out of view.
If several participants each have a wireless lavalier being picked up by a receiver plugged into a mixing desk, you should be able to confidently record several people on the move. Well, yes and no. Wireless mikes, like mobile phones, are occasionally vulnerable to radio frequency interference, emergency service transmitters, dead spots, and so on. They also take setup time, gobble batteries, and need channel changes, all taking time and expertise. So think of them as useful but occasionally treacherous. Check experienced users’ comments on the Internet concerning pros and cons of particular models—for instance, how many radio channel alternatives a system should have, and how automatically and seamlessly it changes channels when encountering transmission difficulties.
Fix a lavalier out of sight in a speaker’s clothing, if you can. Don’t mount it too close to the speaker’s mouth, because head-turns will register as drastic shifts in loudness. Sometimes when you must cover a group of individuals speaking unpredictably, hang a lavalier above them and make use of its omni-directional properties.
Your choice of microphone boom or fishpole is between aluminum and carbon fiber. The latter is less resonant and lighter, which will mean a lot to its handler (Figure 28-11). Expect to pay more for the convenience of having the cable pass through the pole’s interior. Wherever the cable goes, guard against it tapping the pole during movement, since the mike will pick this up.
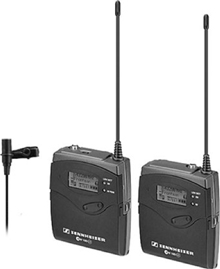
FIGURE 28-10
A lavalier mike, its transmitter and receiver
When lighting and composition allow, mike from above, as discussed in Chapter 10: Capturing Sound. It gives a nice sense of changing sound perspectives, and speech levels will be high in relation to footsteps, and movements by body and hands. You can also mike from either side of the frame, or from below. In the latter case, body movements may be disturbingly loud in relation to speech.
If you are filming intensively and over a long period, it may pay you to purchase sound equipment rather than rent it. Owning your own editing setup is mandatory, and if you must shoot at short notice, owning your own camera may be unavoidable too. Something better in the sound world isn’t going to suddenly appear—as happens with heartbreaking frequency with cameras. Thus, having your own set of basic mikes, mixer, and tripod may all make economic sense too. Anything else that you will use infrequently, such as wireless mikes, exotic lighting, or expensive camera supports, is better rented.
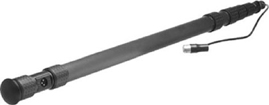
FIGURE 28-11
A K-Tek boom pole. Its five carbon fiber sections extend to 16 feet. (Photo courtesy of K-Tek.)