Cautious filmmakers do not call the last editing stage “the final cut,” but the fine cut since it usually still needs minor changes and accommodations. Most of these arise from laying music, after which comes picture lock, when the film is deemed ready for tracklaying in preparation for the sound mix. If you are commissioning original music, the picture lock stage is when you should work with your composer (see the description of that process in Chapter 34: Using Music and Working with a Composer).
As you near fine cut, review all your dailies to make sure you’ve overlooked nothing useful. Time consuming though this is, you will surely have one or two “Eureka!” discoveries that make the long viewing worthwhile.
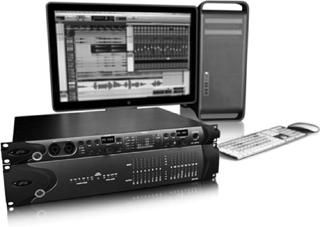
For your first films, you can use the audio suite supplied with your editing program to do a decent job of mixing sound. For more advanced work you will need a specialist equipped with a sound suite program like Pro Tools (Figure 16-1). A sound mix uses a first-rate amplifier and speakers to replicate the best cinema sound. Few cinemas approach the state of the art, yet good sound, as Dolby cinemas know, is good business. Sound may yet get its day.
Sound is an incomparable stimulant to the audience’s imagination, but only rarely does it get designed into the film from the early stages. Usually sound is really dialogue tracks that languish on the back burner until the “audio sweetening” session, an expression I dislike for its rescue connotations. Better terms are sound design, sound editing, and sound mix.
If you had a sound design from the inception of the film, this part of the process is now one of finalizing. More often, film sound just evolves, so an overview discussion now, near the end of editing, is a good way to ensure you are stepping back to take in the big picture.
The components of film sound are dialogue, atmospheres, effects, and music, but since they combine like a composition in the listener, one should try to consider sound design holistically. How and why you intend using music, and what music rights may complicate your choice, also needs careful discussion.
Decide an overall sound strategy for the entire film before the editor goes to work reorganizing dialogue tracks and laying in missing sound effects. Try to assign a particular sound identity to each sequence. This might be loud and noisy, mysterious, lyrical, building from quiet to a crescendo—all sorts of patterns and moods might apply. You should also agree on how to tackle known sound problems. This is a priority since dialogue reconstruction—if it’s needed—is an expensive, specialized, and time consuming business, and no film can survive having it done poorly (see Post-synchronizing dialogue below).
Though documentary leads the way in narrative inventiveness, feature films use far more resources to develop their sound tracks, and documentarians can learn much from them. Walter Murch, the doyen of editors and sound designers, makes a practice of watching any film he is editing with the sound turned off, to allow himself space in which to imagine what the sound composition might be. Other functions of sound, listed in Randy Thom’s important article “Designing a Movie for Sound” (www.filmsound.org/articles/designing.for.sound.html), are to,
● Indicate a historical period.
● Indicate changes in time or geographical locale.
● Connect otherwise unconnected ideas, characters, places, images, or moments.
● Heighten ambiguity or diminish it.
● Startle or soothe.
It’s not the quantity or complexity of sound that makes a memorable sound experience, but the psychological journey it leads you on. This is the art of psychoacoustics. A strong, simple sound track does this more effectively than one that’s dense and naturalistic. Often this requires you to simplify the numbing panoply of sounds in a contemporary location, and replace them with those few that have a strongly subjective meaning to the point of view (POV) character.
If you load up your film with naturalistic sounds instead of responding creatively to the narrative needs of the movie, your film will sound clichéd. A shot of a cat walking across a kitchen does not need a cat meow, unless said cat is visibly demanding its breakfast. This is a sound cliché. For a hilarious list of them, look up www.filmsound.org/cliche. Here all bicycles have bells; car tires always squeal when a car pulls away, turns, or stops; storms start instantaneously; wind always whistles; doors always squeak; and so on.
Post-synchronizing dialogue (aka “automatic dialogue replacement” or ADR): Rarely used in documentary, post-sync is used to remedy poor dialogue tracks and requires making participants lip-sync what they said in an existing shot. Variously called dubbing, looping, or ADR, you have seen its full horrors in low budget films where actors have watched a screen and spoken a couple of lines to picture. Long dialogue exchanges are broken into multiple small increments, and recorded voices invariably sound flat and dead in contrast with live location recordings. This is not because they lack background presence (which can always be added) or even because sound perspective and location acoustics are missing. What kills ADR is the artificiality of the situation itself. The poor actor, laboring to reconstitute 10 seconds of dialogue, is flying blind and completely in the hands of whoever signs off on each few sentences.
Dialogue replacement invariably degrades actors’ performances, so they hate it with a passion. If actors feel that way, imagine what you are asking of a chef, auctioneer, or hospice nurse. In documentary, there is really no need, since audiences understand that this is the trade-off for capturing reality and will tolerate patches of poor sound recording. The moral? Never consider ADR unless the original is utterly incomprehensible. Even then, first try adding subtitles, which is the usual solution in documentary.
You can however shoot and fit sound effects to your film, and greatly improve it. These may come from a sound library, be shot on location, or generated in a Foley studio. The Foley process got its name from its intrepid inventor, one Jack Foley, who realized back in the 1940s that with the right resources you could mime all the right sounds to picture. He used a sound studio equipped with a range of resources, materials, and props. Often what a film needs is an authentic-sounding mass of footsteps, so a Foley studio has a variety of surfaces—concrete, heavy wood, light wood, carpet, linoleum, gravel, and so on. To this, Foley artists may add sand, paper, or cloth to modify footsteps so they suit what’s on the screen. My job in an appalling Jayne Mansfield comedy (The Sheriff of Fractured Jaw, Raoul Walsh, GB, 1959) was to post-sync horse footsteps with coconuts, and simulate steam engine noises with a modified motorcycle engine. It was great fun. We also shot all the footsteps, body movements, horse harnesses jangling, and I don’t know what else.
It takes some ingenuity to create the right sound for a particular shot. Baking powder under compression in a sturdy plastic bag, for instance, makes the right scrunching noise for footsteps in snow, and you might have to experiment with punching a cabbage or thumping a sandbag to get a decent range of body blows for a film about boxing. The art of sound lies in making sound authentic to the ear. Paradoxically, one must contrive many effects because the genuine article sounds phoney. A door-close that sounds like someone kicking a cardboard box destroys the illusion of authenticity on which film depends.
You can create sounds to fit a repetitive action such as knocking on a door, shoveling snow, or feet going up stairs by recording their action a little slower, and then, on the computer, removing some frames before each impact’s attack. More complex sync effects (two people walking through a quadrangle) will have to be post-synced to picture, paying attention to the different surfaces that their feet pass over (grass, gravel, concrete, etc.)
A grueling post-sync session makes you understand two things: that location recordists who procure good original recordings are worth their weight in gold, and that feature sound and editing crews are often phenomenal craftspeople.
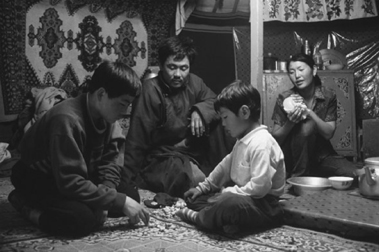
There is much Foley work in Luigi Falorni and Byambasuren Davva’s documentary, The Story of the Weeping Camel (Germany, 2003, Figure 16-2). They shot important action with the camels using long lenses, so usable sound was not possible with the unit so distant. Recreating sound was unavoidable, as in so many nature subjects.
Appropriate sound effects can often be found in a good sound library, but never assume anything will work until proved against picture. Googling “sound effects library” turns up many, some of which let you listen and download. Try Sound Ideas at www.sound-ideas.com/bbc.html. Sometimes libraries hold material shot long ago and their SFX may come with a heavy ambience or system hiss. This is no problem with loud or exotic sounds such as helicopters, Bofors guns, or elephants rampaging through an Indian jungle. It’s nitty-gritty noises like footsteps on grass, doorbells, or “small dog growling” that may be tough to get right. At one time only six different gunshots were in use throughout the film industry. I heard attempts at recording new ones, and they sounded like a ruptured air hose.
The culmination of the editing process is the mix, in which you combine sound components together in their final proportions. Balancing sound tracks is more than adjusting levels, it also requires adjustments in equalization (EQ).
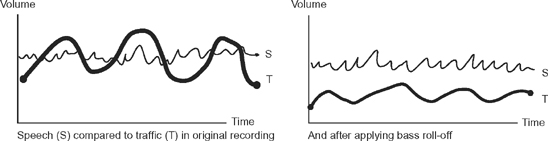
Each sound track contains a variety of frequencies, and each group of frequencies is adjustable by level relative to other groups (Figure 16-3). For instance, in a busy street we see two people talking, but their conversation is on the margin of intelligibility owing to a heavy traffic background. Their voices are in the frequency range of 500–3,000 Hz (Herz, or cycles per second), but most of the traffic is below 200 Hz. By rolling off or attenuating frequencies in the low frequency band, you effectively lower the volume of that band of frequencies. Since traffic rumble is below the range of human speech, you can filter some of it out and leave voices unaffected. With less low frequency competition they now seem louder and clearer (Figure 16-4).
EQ has other uses. A voice recorded from two mike positions often doesn’t match when you cut the tracks together, but by “tweaking” the different bands of component frequencies, they can often be made indistinguishable. This work in skilled hands lets your film achieve the seamlessness that moviegoers take for granted.
You can also use EQ to make sound effects either easier on the ear, or more striking, and EQ adjustments can prevent sounds meant to be background on one track from competing with those intended as foreground on another, which might be speech or music. Sound and sound mixing deserves a very large book all to itself, so what follows is a list of essentials along with some tips.
You are ready to mix down tracks into one master track when you have,
● Locked the picture content of your film.
● Fitted music, making any necessary picture or cutting point adjustments.
● Split dialogue into multiple tracks, grouping them to require the fewest EQ changes:
● a separate track for each mike position used in dialogue recording.
● sometimes a different track for each speaker, depending on how much EQ is necessary for each mike position on each character.
● Filled in backgrounds (missing sections of background ambience, so there are no dead spaces or abrupt background changes).
● Recorded and laid narration or voice-over (if there is any).
● Recorded and laid sound effects and mood setting atmospheres.
● Finalized sound timeline contents and layout.
The mix procedure determines the following, described in detail later:
● Balance of sound levels (say, between a dialogue foreground voice against a background of noisy factory sounds if, and only if, they are on separate tracks).
● EQ adjusted for sound quality consistency.
● Level changes (fade up, fade down, sound dissolves, and level adjustments to accommodate sound perspective and to facilitate entry of new track elements such as narration, music, or interior monologue).
● Sound processing (adding echo, reverberation, telephone effect, etc.).
● Dynamic range (a compressor squeezes the broad dynamic range of a movie into the narrow range favored in TV transmission; a limiter leaves the main range alone but limits peaks to a preset maximum).
● Perspective (to some degree, EQ and level manipulation can mimic perspective changes, thus helping create a sense of space and dimensionality through sound).
● Multichannel sound distribution (if you are developing a stereo track or 5.1 surround sound treatment, a sound specialist will send different elements to each sound channel to create a sense of horizontal spread and sound space).
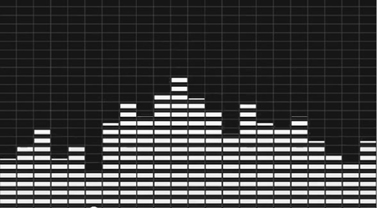
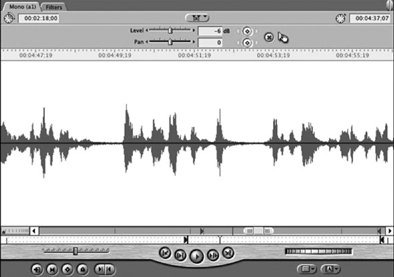
Place sound track elements in different groups according to their hierarchy, which conventionally favors holding back control of dialogue over SFX and music. That order may vary: you might want music to occupy the foreground and make dialogue scarcely audible. To cut and lay sound tracks, consider using the program’s audio waveforms option (Figure 16-5). It displays sound modulations (waveform) and saves you from clipping a sound’s attack (its inception) or from cutting off its barely audible decay (tail). Laying tracks using Pro Tools, or any waveform display, means you can edit with surgical precision, even within a syllable. You can see the “mods” you are cutting, and hear your work immediately. Sound editing should be done at moderately high volume, so you can hear what is (or isn’t) present.
When laying narration or interior monologue, fill gaps between dialogue or narration sections with room tone, so the intervening track remains “live.” This is vital during a quiet sequence, but less necessary in a street scene having lots of ambient noise. If you need to write narration, see Chapter 33: Creating Narration.
Digital editing systems can handle many tracks, but it is usually prudent to premix tracks in groups, holding back control over the most essential until last, so dialogue remains intelligible over music or effects.
Begin by dividing up the dialogue tracks. This is necessary because different camera positions occasion different mike positions. Played “as is,” they will vary disturbingly in level and room acoustics from shot to shot. This strains the audience’s patience and prevents them concentrating. Intelligent EQ adjustment during the mix, plus work on background tracks, can greatly improve the feeling of consistency. First rate sound editing produces the seamless sound continuity familiar from feature films, but it requires painstaking, labor-intensive sound work:
● Split the dialogue tracks, that is,
● Lay them on separate tracks according to speaker, mike positioning, or other sound determinant. (In a scene shot from two angles and having two mike positions, all close shot sound goes on one track, and all the medium shot sound goes on the other. You can now minimize EQ setup labor by using a blanket EQ setting for each track.)
● With four or five mike positions, expect to lay at least four or five tracks.
● Tracks may need subdividing according to character, who may also need different EQ and level settings, especially if one is louder than the other.
● Determine EQ settings roughly during tracklaying, but leave final settings until the mix. Aim to make all voices consistent and to bring all tracks into acceptable compatibility. The viewer usually expects sound perspective to match the different camera distances.
● Clean up background tracks.
● Remove extraneous noises, creaks, and mike handling sounds—anything that doesn’t overlap dialogue and can be removed.
● Fill any resulting gaps with authentic room tone or you will have audible drop-out.
● Inconsistent backgrounds: Frequently when you cut between two speakers in the same location, the background to each is different in level or quality. The microphone may have been angled differently, or background traffic or other activities perhaps changed over time. The cure is to,
● Use the location presence track to augment the lighter track so it matches its heavier counterpart.
● Consider using a graphic equalizer to filter out an intrusive background sound. Any intruding sound, such as a high-pitched whine, or the rumble of traffic, can be made less intrusive. Graphic EQ lets you tune out the offending frequency, but in so doing you may lose that band of frequencies in your characters’ voices.
● The worst place to make an ugly atmosphere or ambience change is in the clear. Try to do it as a quick dissolve behind a commanding foreground sound, which distracts the audience’s attention from noticing the change.
● Inconsistent voice qualities: When speakers’ voice qualities vary, your audience experiences strain and irritation from having to adjust to irrational changes. The causes can be,
● Varying acoustical environments in the location.
● Different mikes.
● Different mike working distances.
Laying music is not difficult, but acquiring it legally may be excruciating (see Chapter 34: Using Music and Working with a Composer). To make library music conclude at a certain point, back-lay it from the known ending point, then see if you can fade it up at the start point. If the music is only a little too long, you can commonly find repeated sections and cut one or two out. Conversely, if it’s a little short, consider copying a section and repeating it.
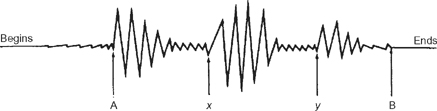
Cut in music or any pre-recorded sound just before the first sound attack so we don’t first hear studio atmosphere. Arrow A in Figure 16-6 represents the ideal cut-in point; to its left is unwanted presence. To the right of A are three attacks in succession that lead to a decay down to silence at arrow B.
The sound profile in Figure 16-6 reappears in many repetitive sounds such as footsteps, hammering on a building site, or a clock ticking. By removing sound between x and y we could reduce three footfalls to two. One can also remove some of the quiet before the attack to make footsteps faster. These editing strategies have many applications.
These are the effects that sync to something onscreen—like a car door closing, a coin placed on a table, or someone picking up a house-phone. Sound effects (SFX) are often necessary because the location recording is unavoidably poor. The click of a door in a peaceful chapel interior may, for instance, be marred by the drone of trucks passing from outside. So you have to use a new atmosphere and record the few footsteps, then add the dramatic clicking, which must be synchronized and have an acceptable perspective.
You lay atmospheres to create a mood, which might be morning birdsong over a valley, or singing and tire irons jangling from within a garage. Notes:
● Obey screen logic by laying atmospheres to cover the entire sequence, not just a part of it.
● When a door opens during an interior scene, the atmosphere outside (playground, for instance) will rise while the door is open.
● When you intend a sound dissolve, check there is enough extra to allow for the sound overlap.
● Check sound overlaps for inequities, such as the recordist quietly calling “Cut.”
When you face an ugly background change, mask it by placing a commanding foreground effect over the transition, such as a doorbell ringing, or even dialogue. Bring any new background sound in or out by fading up or down, because the ear registers a gradual sound transition far less acutely than one that is a cut, and sudden.
A battle sequence in a feature-length documentary might need 40 or more sound tracks, so you must group tracks ready for premixing. Too often, documentary location sound is only marginally intelligible, so plan therefore to mix down your elements in an order that leaves control over the most important until last. Usually this means determining dialogue-to-background levels in the last stage.
Many tracks, played as laid, enter and exit abruptly, leaving an unpleasantly jagged impression. So, unless you are deliberately disrupting attention, aim for a seamless effect. Use short sound dissolves rather than cuts, and cut from quiet to noisy, or vice versa, by tailoring: that is, by building in a fade-up or fade-down of a few frames so the louder track meets the quieter on its own terms. The effect onscreen is still that of a cut, but not one that assaults the ear (Figure 16-7).
Mix studios use first-rate speakers but with misleading results, since many will hear your documentary through the dismal little speaker in their domestic TV. These make the foreground and background, so nicely separate in the sound mix, merge into a confusing mush. Be conservative, therefore, and ask the sound mixer to keep foregrounds and backgrounds well separated. A mix suite can usually replay through a TV set if you ask, so you can check what the home viewer will hear.
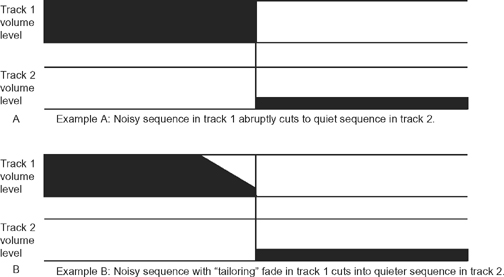
FIGURE 16-7
An abrupt sound cut tailored by making a quick fade of the outgoing track so it matches the level of the incoming track.
You and your editor must approve each stage of the mix and feel sure that each sequence meets your expectations. The mix engineer will offer alternatives according to latitude and alternatives provided by the sound editor in the tracks. Mixing is best accomplished one section at a time, building sequence by sequence from convenient stopping points.
At the end, listen to the whole mix without stopping, just as the audience will. There is nearly always an anomaly or two needing correction.
A sound mix being a long and painstaking process, professionals immediately make backup copies on a durable medium to be stored in multiple buildings in case of loss or theft. Follow the same backup principle for picture: that is, keep media masters and safety copies in different places so all trace of your work doesn’t vanish. An unlucky Chicago group suffered irreparable losses in a fire, and a friend in New Orleans had the agony of finding ten years of work wiped out by the waters of Hurricane Katrina. More often it’s thieves walking off with a computer.
Some foreign purchasers require a separate M & E track. A foreign-language crew makes their own voice dub and uses your atmosphere, effects, and music tracks in their sound mix. They will also need you to supply a dialogue transcript (see below under “Transcript and Subtitling”).
Every film has a working title, but its makers must often choose the final in an agony of indecision. TV listings and festival programs rarely have space to describe their offerings, so the title you choose may be your sole means of drawing an audience. Your title should be short, snappy, and descriptive of the film’s main allure.
Form follows function, so documentary titles are usually plain and unfussy. Check examples in other documentaries and note that some of the most artistically ambitious films use brief and classically simple white lettering on a black background. You could do a lot worse.
Professional quality titles are easy to generate in digital postproduction, but you may need a plugin program for refinements. All lettering, and especially that for subtitles, is more legible when you choose a black outline to the lettering, which makes the characters stand out no matter whether the background is light or dark.
Choose font for clarity and size. Probably you have a large array of typefaces with drop shadow, movement, crawl, and other exotic behaviors. Unless your film’s topic and treatment call for something special, resist temptation and keep titling classically simple. Anything too small or fancy disappears on home screen where most people see documentaries. Keep titling well within a safe area of the screen, especially subtitles.
A sure sign of amateurism is a film loaded with a long and egocentric welter of credits. Keep acknowledgments brief, and the director’s name should not crop up in multiple capacities.
Check titles and subtitles scrupulously for spelling and use at least two highly literate, eagle-eyed checkers. The proper spelling for people’s names should receive special care since a mistake indicates for all time that you cared too little to get someone’s name right.
See box for title length calculations. Long crawl titles (titles that slide up or across the screen) must run fast, or TV stations chop them. Check the speed of other people’s.
At the very end of the titles, remember to include your name and the © symbol, with the year you claimed copyright protection of your material. To file for copyright in the United States, look up the US Copyright Office at www.loc.gov/copyright. For other countries, check out copyright procedure with professionals.
If your film makes an international sale, or is exhibited in a film festival, you will probably be asked for a dialogue transcript of the whole film for simultaneous translation during projection. If your film is in a minority language, they will also expect a subtitled version, usually in English. You can plan subtitling using the typed transcript, but,
● Compress dialogue exchanges down to minimal essentials and eliminate anything not strictly necessary—your audience can’t be too busy reading to see your film.
● Have the text translated by a literate, native speaker and typed up with all the appropriate accents.
● Make sure that two or more other literate native speakers approve every detail of the text.
● Make a copy of your film on which to superimpose subtitles.
● Pick a plain typeface in yellow with black edging, so your subtitles are clearly legible no matter how light or dark the background. Use a size of font that is easy to read on a small TV screen and keep subtitles well in the TV safe area (that is, not near image edges).
● Place every sentence within a continuous shot (when titles persist over two shots, we read the whole title a second time, which is annoying).
● To accomplish this, break long sentences into short sections as you are placing each subtitle, indicating anything that is run-on with triple periods (…) as in this example, spread over four shots:
| How are you? | Shot 1 |
| I feel OK just now … | Shot 2 |
| … but I’m hoping you can … | Shot 3 |
| … give me some advice. | Shot 4 |
Participants or location owners often grant favors in return for an acknowledgment in the titles, so be sure to honor your debts to the letter. Double-check every such agreement before you lock down titles. Funding sources or other contracts may require you to use particular wording for credits and acknowledgments, and ask you to supply text for closed captioning.
No television channel will transmit your film unless you have documentary proof that all contents are legal for them to transmit. Be sure you have secured legal rights to use everything your film contains, especially contributions by participants, and all music that is not legitimately part of a location’s diagetic (inherent to the location) sound. Legal omissions can be costly or even paralyzing when you come to sell your film.
Now your film is complete, you can enter it in festivals. People who like your work will look for your website, expecting to reach you and buy copies. Plan to build a website or blog (try Wordpress.com) and through it begin compiling a list of supporters whom you can alert to screenings, keep abreast of developments, make funding appeals, etc.
To help market your work at festivals, carry copies of a press kit to give out. This might be a folder containing
● A leaflet promoting the film’s subject and main characters.
● Quotations from any reviews it has received.
● Brief details on the careers of the makers.
● Good quality press photographs.
● Social media contacts for the film.
Everything printed should include all desirable contact details such as email and website, and your street address and email.
Find festivals via the websites cited in Chapter 36: Developing a Career. At last you experience the ultimate rite of passage—seeing your film with a paying audience. This can be thrilling—or chastening. Whichever comes your way, it’s the final reckoning, and closes the loop of learning all you can about the artform from your present project. Go to all the festivals you can afford, and go armed with press kits and business cards. You will be surprised what develops from serendipitous encounters at screenings and conferences.
Now what film will you make next?