Manipulating Objects
Tables can keep even the most disorganized user in check, what with their strict row-and-column structure. But you’re not aided by any grid when you work on a sheet as you add multiple tables, some charts, a few text boxes and perhaps some divider lines. And maybe images, movies, sounds….
Fortunately, Numbers provides tools that can keep sheet elements in line (literally), so you can present yourself to your colleagues or boss, or to the world, in a better light.
After you attend to the basics—set your ruler and guide preferences, and review basic techniques to Select and Move Objects, you’ll learn how to rearrange, align, group, and resize selected objects manually when you Work on the Sheet, or take a more by-the-numbers approach when you Work in the Arrange Pane.
Ruler and Guide Preferences
Before trying to organize things on a sheet, set your preferences for rulers and guides, since you’ll be depending on them for precisely sizing and placing objects. In the Rulers pane of Numbers’ Preferences:
- Choose points, inches, or centimeters as the unit of measure for the rulers.
- Check Show Size and Position When Moving Objects to see a readout with those statistics near the pointer whenever you move or resize something.
- Set a color for guides. This affects both ruler and alignment guides.
- Activate all four “Show guides” options, as they are not as intrusive as you might assume, and they’re invaluable for neat sheets.
Select and Move Objects
Methods for selecting and moving objects on a sheet are common to most apps (and the Finder), so I’ll just give you a quick review list:
Select an object:
- Click to select something.
- Shift-click to extend the selection.
- Command-click to add or remove non-contiguous items from a selection.
- Drag around multiple objects to select them (they don’t have to be completely inside the dragged rectangle).
Move an object:
- Drag it.
- Use the arrow keys to move a selected object.
- Add Shift to an arrow key to move the object by larger increments.
- Add the Option key while you move an object to pull out a copy.
To Option-drag an active table, you must grab it by its name or the table handle; anywhere else selects the cells you’ve touched in the dragging process. A selected (inactive) table can be Option-dragged by its name; if it has no name, you’ll have to activate it before Option-dragging.
Work on the Sheet
Numbers provides two types of guides to help you position objects on a sheet; use them in tandem for best results:
- Ruler guides can be pulled out of the rulers to make horizontal and vertical background lines on the sheet to help you position items exactly where you want them.
- Alignment guides help you place and resize an object in relation to others on the sheet.
Rulers and Ruler Guides
You’ve probably used rulers and guides in other programs on your Mac, but even if you haven’t, you’ll find their use straightforward:
-
Show/hide rulers: Choose View > Show Rulers or the View
 button in the toolbar. The command changes to Hide Rulers if the rulers are showing.
 - Place guides: Drag vertical or horizontal guides onto the sheet from a ruler.
- Remove guides: Remove a single guide by dragging it back into the ruler whence it came; it disappears in a puff of smoke. Remove all guides by choosing View > Guides > Clear All Guides on Sheet.
- Show/hide guides: Choose View > Guides > Hide Guides; the command changes to Show Guides so you can reverse the process.
Watch the moving hairlines in your rulers when you move or resize an object so you can place or resize it exactly (Figure 172).

Alignment Guides
With alignment guides turned on in the Numbers Preferences, temporary guides appear when you move or resize an object.
-
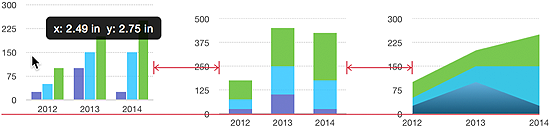
Moving an object: In Figure 173, the leftmost chart is being dragged:
- The readout gives the chart’s position in the units the ruler uses.
- The alignment guides for relative spacing (with the arrows at either end) appear when each object is the same distance from its neighbor; you won’t see them if you’re moving an item close to only one other object.
- The guide at the bottom shows that the base of the object being dragging is aligned with the base of the chart areas on the other objects. (Depending on the size of the dragged object relative to nearby objects, you may see alignment guides at the top, bottom, and/or center of the objects or their major elements.)
- Resizing an object: In Figure 174, the chart on the left is being resized; the readout shows the size. There’s a guide at the bottom because the objects are aligned there. Size guides indicate that the objects are the same width; if they were the same height, vertical size guides would appear.

Work in the Arrange Pane
You can get finer control over positioning and resizing objects on a sheet using the Format Inspector’s  Arrange pane. Select one or more objects and then:
- Resize or reposition by the numbers: The Size and Position sections of the Arrange pane report the stats for a selected item, but it’s not just a static readout; you can enter numbers in the pane, and the object changes size and position. Check Constrain Proportions so you can change just the height or width and have the other dimension resized accordingly.
- Group and ungroup objects: You can group items so they can be manipulated together. A group gets its own handles, which replace the handles of its constituents (Figure 175). Unfortunately, you can’t group tables or charts, the most-used elements on a sheet, somewhat crippling the usefulness of this command. To group and ungroup items, select them and click Group or Ungroup in the Arrange pane, or choose Arrange > Group/Ungroup.
-
Lock and unlock objects: A locked item is not only locked in position, but also from any changes. The exception is a locked chart: if you change a value in a locked chart’s table, it is reflected in the chart. The sort-of reverse isn’t true: clicking Edit Data References in an unlocked chart won’t let you change the references in a locked table.
To lock or unlock selected items, click the Lock or Unlock button in the Arrange pane or choose Arrange > Lock/Unlock.
- Adjust relative layer positions: Each item on a sheet lives in its own “layer,” with the first item created in the bottom layer. When objects overlap, some can be obscured or difficult to select. To change the order of the layers, select an item and then click the buttons at the top of the Arrange pane or use the Arrange menu’s commands. Backward and Forward move an item one layer at a time; Back and Front send it to the bottom or top of the heap.
-
Align and distribute objects: The Align and Distribute pop-up menus in the Arrange pane (or the commands in the Arrange > Distribute Objects submenu) let you organize objects in relation to one another. Select the objects and then choose:
- Align Left, Right, Top, or Bottom: These align to the object whose edge is the furthest in the chosen direction.
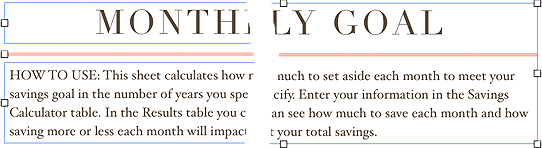
- Align Center or Middle: The Center command in the Align menu aligns the vertical midlines of objects, while Middle aligns the horizontal midlines (Figure 176).

Figure 176: Left to right: The initial object positions; middle alignment applied; center alignment applied to the initial three objects. - Distribute Horizontally, Vertically, or Evenly: Use Horizontally or Vertically to space selected objects evenly along those axes, using the outermost items as the endpoints. The Evenly option spaces items along both axes.
- Return a media item to its original size: Click Original Size (available only for images and video).
-
Redistribute items: If you’ve used the alignment commands with more abandon than planning, you might end with a pile of objects (as at the right in the previous figure). If Undo doesn’t help, it may seem that the only way you can get at your objects is to drag them out of the pile one at a time. But there’s an easier way:
- Drag out one item, putting it a far(ish) distance from the rest.
- Select all the items (including the one you just dragged).
- Choose a command from the Arrange > Distribute submenu, or from the Distribute pop-up menu in the Arrange pane. The position of the pile and that of the item you dragged out will be used as the end points for the distribution, with items spread out between them.