Color Controls
What a long way we’ve come from the black-and-white world of the early Mac and the first spreadsheet program it had from Microsoft—Multiplan! (Didn’t see that coming, did you?)
In fact, we’ve come so far that dealing with the various color-picking options in Numbers gets its own short chapter, since they are myriad, almost everywhere in Numbers (for tables, cells, charts, lines, shapes, and even text), and not always intuitive.
After a tour of the Numbers “color well” approach to choosing colors, I’ll show you how to work in the Colors Window, a standard Mac interface element that you’ve probably not explored to its fullest. With that under your belt, we’ll look at Gradient Fills and at Custom Fills so you don’t have to recreate non-standard colors and gradients when you want to use them again.
Color Well
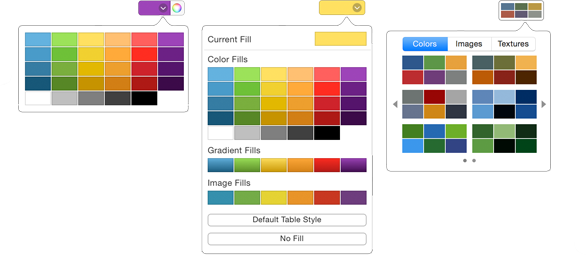
A color well provides color choices; in a stretched-to-the-limit metaphor, you dip into the well for a color (Figure 177). The well displays the color of the currently selected item and/or any special characteristics, such as a gradient or an opacity level—or if no color is applied at all. The “duplex” version of the color well includes a Colors button that opens the Colors window for roll-your-own hues.

A click on a color well opens a popover that shows the colors in the document’s palette, which is inherited from the template on which the document was based. The popover changes based on what’s selected on the sheet (Figure 178).
Colors Window
Clicking the Colors button on a duplex color well opens the Colors window (Figure 179), a standard interface element for choosing a color in any Mac program. It provides five approaches to choosing a color (sometimes after “mixing” it yourself) through the buttons along the top. I’ll cover the default approach—the color wheel—and let you explore the others on your own.
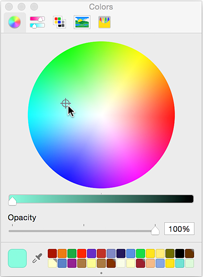
To choose or create a color:
- Drag the crosshairs around inside the color wheel, or click a spot within the wheel.
- Change the brightness with the slider beneath the wheel.
- Set a transparency level with the Opacity slider.
- Click a sample block at the bottom of the window.
The Colors window is shared across every Mac app, so the samples you save anywhere are available everywhere. If you’ve never saved one, all the samples will be blank, or the window might be too short to show sample slots. We’ll get to both of those things just below.
- Pick up a color from the screen: click the eye dropper (next to the current-color sample) and then click anywhere on the screen. Anywhere: you can click outside the current window without deactivating it.
You can save a color for quick reuse by dragging it from the current-color sample to a block at the bottom of the window. You can drop a new color on an existing one to replace it, and you can adjust the length of the window to see more or fewer saved colors by dragging the little dot at its bottom edge.
Once the Colors window is open, it stays open until you specifically close it. This gets confusing when you select another element on your sheet and try to use the still-open color wheel to change its color: nothing happens because Numbers doesn’t know you want to alter the new element’s color. You don’t have to close and reopen the Colors window (although that works); instead, you can simply click the Colors button on a duplex color well to alert Numbers that you’re altering a newly selected element.
Gradient Fills
I wrote about the Color Well and the Colors Window earlier in this chapter, because you need to know how those interface elements work before you set up gradients.
Gradients—fills that morph from one color to another—are available in place of solid color almost everywhere. That doesn’t mean you should use them almost everywhere, but they can be effective when applied sparingly and appropriately. (Was that too schoolmarm-ish?)
Numbers lets you design both standard gradients (next) and Advanced Gradients.
Standard Gradients
For an interface element that provides a minimum of options, you can get a lot out of a standard gradient fill.
Start by selecting the object you want to fill. If the object is a cell, then open the Format Inspector’s Cell pane; otherwise, open the Style pane. In either case, choose Gradient Fill from the Fill pop-up menu and set your options:
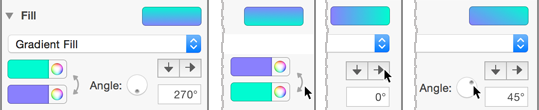
- Colors: Choose your color extremes—without being too extreme—from the two color wells. Use different shades of the same color, or colors that blend well in a middle range (dark yellow into light orange, or green into blue, rather than, say, purple into orange).
- Swap the colors: Click the swap arrows next to the color wells.
-
Direction: Click the black arrows to snap to a horizontal or vertical gradient, just right for bar and column charts, or for when you need fancy shading for a text box background, or, if you’re very careful, a subtle shading for a table’s headers.
Define a different angle for the gradient by dragging the Angle wheel’s dot or clicking on the wheel’s edge. If you’re numerically inclined, type the angle in the degree field—zero degrees is 3 o’clock on the wheel (Figure 180).
Advanced Gradients
With advanced gradient options, you can tweak your gradients till the cows come home, with options such as defining the blend area and mixing more than two colors (Figure 181).
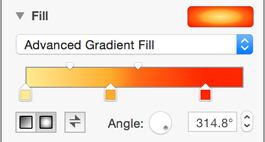
Begin by selecting the object you want to fill. If the object is a cell, open the Format Inspector’s Cell pane; otherwise, open the Style pane. From the Fill pop-up menu, choose Advanced Gradient Fill and:
- Choose or change colors: Click a color stop beneath the fill bar to open the Colors window, and choose your colors. While the window’s open, you can click other color stops to change them.
- Add or a remove color: Click just beneath the fill bar to add a new color stop. Remove one by dragging it downward and releasing it. (You have to drag it quite far for it to appear glued to your pointer before you can release it, so don’t give up too soon.)
- Set the blend area: Drag the color stops left and right to define the relative areas that will accommodate the colors.
- Set the blend point: Drag a white marker on the top of the slider.
- Define a solid-color swath at an end point: Keep more of an “end” color showing by dragging a color stop away from the edge of the sample.
- Choose a linear or radial blend: Click the linear or radial button in the lower left of the Fill section.
-
Set the angle and direction of the blend: Use the Angle wheel or the degree field to define the blend direction; reverse it by clicking the Reverse
 button.
As if all those format options weren’t enough, selecting an item with a gradient blend reveals a special control that lets you set the endpoints of a blend inside the object. Drag an endpoint of the blend line to reposition or resize it; move the line itself to define the range of the blend area (Figure 182).

Custom Fills
Once you’ve carefully blended custom colors, painstakingly crafted perfect gradients, or created special image fills, you can use them at any time throughout a document by adding them to the Color Fill popover.
Here’s how to add something to the Color Fill popover:
- Select an item that’s filled with your color, gradient, or image.
- Click the color well in the Fill section of the Format Inspector (it’s in the Cell or Style pane, depending on the element you’ve selected).
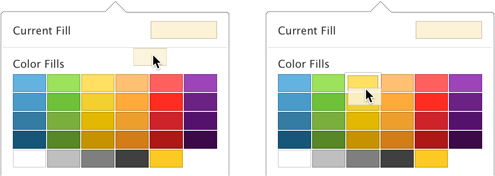
- In the popover that opens, drag the current fill sample from the top down into the appropriate section: Color Fills, Gradient Fills, or Image Fills. A replaceable color is framed in white as you drag over it.
You can’t replace one type of fill with another. So, if you’ve created a gradient fill, it can replace only another gradient fill. If you drag your new color over an incompatible palette, the palette will dim in refusal.
- Release the current fill sample to replace the highlighted color (Figure 183).
Numbers adds the fill to the palette, making it available throughout the document.
The palette of colors that shows up from a standard color well—which is used for everything from cells to chart elements to text—comes from the template you used to create the spreadsheet document. Built-in and Custom Templates explains how to make a template, but here’s how you make its palette: following the directions above, replace every color swatch in the well’s popover with those you want. Of course, to do that, you’ll have to first make color samples from the Colors window, and to do that, you’ll have to create about two dozen shapes and colorize them. Yep, that’s all—tedious, but with luck and talent, ultimately rewarding if you use the template frequently.