Importing, Exporting, and Sharing Files
There’s lots of talk, much of it snide, regarding the Apple “ecosystem” and its “walled garden” of hardware and software that work together—and alone, not playing well with others. If there’s any place Apple and Mac users can’t ignore the outside world, it’s the spreadsheet arena, where Excel has worn the laurels for decades. This chapter explains how you exchange files with Excel, Import and Export Text Files, and Share with iCloud.
Exchange Files with Excel
The good news is that you can open Excel documents in Numbers, and even charts can survive the procedure. The not-as-good news is that not everything survives, since Excel offers functions and options that Numbers does not. And now back to the good news: many things import flawlessly or with only minor problems, including cell and chart formatting and table-status items such as hidden columns—and even graphic elements. This Apple page offers a very extensive list of supported, partially supported, and unsupported Excel features.
Some machinations are needed when you go in the other direction. Although Excel documents can have multiple worksheets, each one is a single “table” in Numbers-speak. So, each table in Numbers turns into a worksheet on the Excel side.
To export a Numbers document for Excel:
- Choose File > Export To > Excel.
- Click the Excel button in the export dialog.
- If the document has more than one table, check Include a Summary Worksheet. This compiles a worksheet that describes where elements from the Numbers document went in the Excel document, with helpful links for jumping to the worksheets. Figure 184 shows the summary report for the Grade Book template.
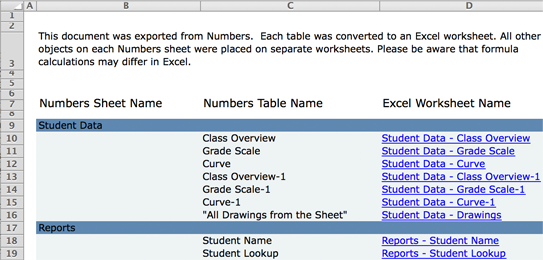
Figure 184: The summary sheet, displayed in Excel, compiled for Numbers’ Grade Book template. - Click Advanced Options to reveal the Format pop-up menu, from which you can choose the .xlsx format for compatibility with current Excel versions or .xls for the 1997–2004 versions.
- Click Next to get to the Save dialog.
- Name the export document, choose where it should be saved, and click Export.
Numbers exports a copy of the file as an Excel spreadsheet.
Import and Export Text Files
Numbers can import two types of text files: CSV and tab delimited. For text-based exporting, it can save only CSV files.
In a CSV (comma separated values) file, which has a .csv filename extension, commas separate items that are going into or coming from individual cells, while a paragraph return marks the end of a row. This format is common enough that there’s even a specific export command for it in Numbers.
A tab-delimited file uses tabs to separate the values in a row; it, too, uses returns to mark the end of the row. It usually has the filename extension .txt, but a .txt extension is no guarantee that a file is tab delimited, since a text file can hold any kind of text.
Import a CSV or Tab-delimited File
You have several options for opening CSV and tab-delimited files into Numbers. In each case, the data is automatically slapped into a table for you:
- Choose File > Open: Text files show in the Open dialog.
- Use Open alternatives: The standard Mac options for opening a file apply, so you can drag the file into the Numbers’ icon in the Dock, for instance.
- Drag a CSV file onto a sheet: This is a nifty shortcut for when you already have a Numbers document open and want to add the data from a CSV file to it. Position your windows so you can see both the CSV file in the Finder and the target sheet, and drag the file onto the sheet.
Export in CSV Format
To export a Numbers spreadsheet in CSV format, choose File > Export To > CSV and then click Next to get the standard Save dialog. (Unless you have a specific reason to do otherwise, keep the Text Encoding pop-up menu in the export dialog set to Unicode (UTF-8).)
Here’s what happens when you export to CSV format:
- Each table is exported to a separate file.
- Rows of empty cells come through as strings of commas. (So, it’s a good idea to delete extra rows and columns before you export.)
- If a cell contains text with commas (perhaps a city-and-state cell), its entire contents are put inside quotes to preserve the comma as a text character.
Share with iCloud
If your goal in exporting isn’t so much to put the file into a different format as it is to share it with another person, or with yourself on a different device, sharing via iCloud could work nicely for you.
To do so, your Yosemite Mac must be signed in to iCloud with iCloud Drive enabled. If you haven’t done this yet, first read the TidBITS article Moving to iCloud Drive and then:
- Go to System Preferences > iCloud.
- If you aren’t already signed in to iCloud, enter your Apple ID and password, and click the Sign In button.
- Select iCloud Drive in the panel, and click its Options button.
- In the list of apps, select Numbers and click Done.
With iCloud Drive set up, you can share a Numbers 3.5 file:
-
Among your various Apple devices: When you save your Numbers file, save it in iCloud Drive. When your Mac is signed in to iCloud with iCloud Drive enabled, iCloud Drive is listed in the Favorites section of the sidebar in Finder windows and Save dialogs.
The simplest place to save in iCloud Drive is the Numbers subfolder, which is automatically created for you. Once you’ve saved it there, you can access it from any Apple device that is signed in to the same iCloud account, and has iCloud Drive enabled for Numbers—and, of course, has Numbers installed. Sharing a file this way means that you don’t have to manually copy or sync the Numbers file between devices. (It also means that you need a reliable Internet connection.)
-
With other people via iCloud: You can share a Numbers file saved in iCloud Drive with others by sending them a link to it, using the Share
 button on the Numbers toolbar; all the details are on this Apple support page. Your invitees will be able to work with the file in any supported Web browser; they don’t need an iCloud account.
- With yourself via iCloud: When the file is shared in iCloud, you can still work with it on your Mac, but you can also work with it from within a Web browser on a Mac or in Windows by signing in at iCloud.com and clicking the Numbers icon. The features in Numbers for iCloud aren’t identical to those on the Mac, but they are close enough that you’ll be able to find your way around and even do useful work.
Multiple people should be able to work on the file in real time in Numbers for iCloud, even while you also work on it on your Mac; all edits should sync up nicely. However, in practice it’s often best for only one person at a time to make significant changes. It’s also good practice to give a shared file a few minutes to catch up to its current state after waking your Mac or relaunching Numbers.