
One of the most fun aspects of being a quilter is buying and collecting fabric. If you have not yet been bitten by the fabric bug, get ready. Quilters buy fabric just because they have to own a piece of it! It is like collecting artwork. Each fabric has a beauty of its own, and when you combine it with several others, the WOW! factor kicks in. Many of us lose sleep planning the quilts that our fabrics inspire us to make.
Falling in love with and buying fabric is only the beginning. Choosing the right fabrics and preparing them properly is essential in order to keep fabrics and quilts durable and vibrant for years.
In this class, you’ll learn the basics about fabric selection and preparation. In Class 160, we’ll get to the aesthetics—color, prints, and so forth.
When choosing fabrics for quiltmaking, fiber content, thread count, shrinkage, and colorfastness all need to be taken into consideration. We strongly recommend using only high-quality 100% cotton fabrics. It’s also essential that your fabric be straight and on-grain in order for your finished quilt top to be successful. You’ll learn all about these factors in this class.
note
As this series of lessons progresses, we will delve deeper into the subject of textiles. Harriet’s book on textiles for quiltmakers, entitled From Fiber to Fabric, explores the science of making fabric, batting, and thread. If you are interested in the nitty-gritty of quiltmaking products, this book is a necessary read (see Resources, page 112).
Selvage – the lengthwise edges of the fabric, usually from ¼ to ½ inch wide. The selvage ensures that the edges of the fabric will not tear when the cloth undergoes the stresses and strains of the printing and finishing processes.
Lengthwise grain – runs parallel to the selvage and has very little stretch. Also known as the warp yarns.
Crosswise grain – runs perpendicular to the selvage and has more stretch than the lengthwise grain. Also called filling or weft yarns.
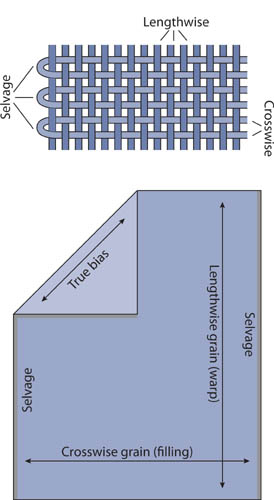
Position of fabric grains
Bias – the 45° angle to both sets of yarns. It has the most stretch.
Thread count – the number of threads in a square inch of cloth, both lengthwise and crosswise. Quilting fabric is an even-weave fabric, meaning there are an equal number of yarns in both directions. Quality fabrics for quiltmaking run from 60 × 60 to 76 × 76 yarns per square inch. The fewer yarns in the count, the heavier and beefier the fabric will feel. The higher the thread count, the finer and tighter the fabric feels.
It is very important that you work with fabrics that are on-grain. Not all fabrics that you buy will be perfectly on-grain, but most can be straightened and put back on-grain once you get them home. We’ll explain how in Exercise: Realigning fabric grain (page 15). This brings us to the subject of tearing versus cutting fabric from the bolt.
When you buy fabric, it will either be cut or torn off the bolt, depending on your quilt shop owner’s preference. Some quilters favor one approach and some the other. The most common reason for the alignment problem is that the fabric is wrapped onto the bolt unevenly. Whether it is cut or torn can affect whether you get enough fabric for your project.
Cutting. If a fabric is cut off the bolt at a perfect 90° angle to the selvage, you might think you have the exact amount you need. However, consider whether the fabric is coming off the bolt on-grain crosswise. You will need to look very closely to see how the filling yarns (crosswise, selvage to selvage) align with the warp yarns (parallel to the selvage). Are they perfectly straight and even with the cut, or do they run off the cut edge at an angle? Once cut, do the yarns of the crosswise grain unravel evenly from edge to edge? Or do they stop somewhere along the cut?
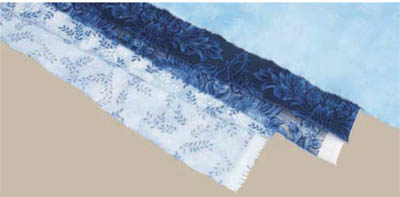
Different degrees of off-grain shown by tearing
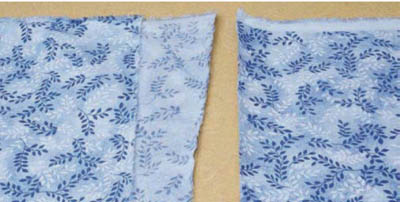
Left: Fabric torn from bolt showing edges out of alignment Right: Same fabric cut from bolt—uneven edges aren’t visible
Cutting an off-grain fabric off the bolt can often add up to a large loss. Once you’ve straightened it at home, you may find yourself short of the yardage you need for the project. If you detect this at the store, you’ll need to purchase up to ¼ yard extra just for straightening.
Tearing. If a fabric is torn from the bolt, you automatically know if the fabric is on-grain or not. You will have exactly the same usable length on each selvage edge, even though the ends do not line up.
When the fabric is torn, some of the threads can turn over, exposing the backside that has not been saturated or printed with dye. This is more prevalent in fabrics with low (60 × 60) thread count. If the fabric is torn, this damaged area is generally added to the yardage you’re buying at each end. Therefore, when you cut away the damaged areas after straightening, you’ll be left with the exact yardage you purchased.
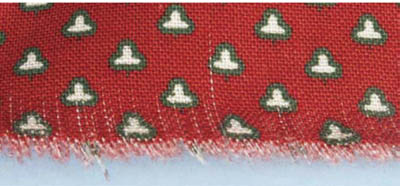
Turned threads caused by low thread count and tearing
If you find that the torn edges of the fabric on the bolt are up to 3 inches off-grain, feel the “hand” of the fabric. If it is soft and pliable, you’ll most likely get the grain realigned with little effort. If the fabric feels stiff, reconsider buying it—stiff fabric can be next to impossible to straighten. Also, if the bolt is labeled “perma-press,” the fabric might be a bit harder to straighten.
If fabric is printed off-grain, you need to consider how you are using the fabric and whether this will affect the finished quilt. Too often, you won’t notice this problem until the quilt is finished and you see that the off-grain fabric wavers.
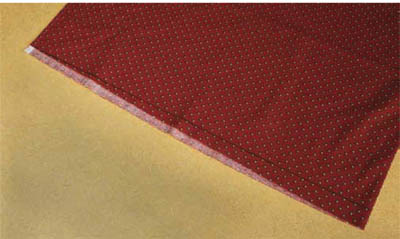
Line shows print is off-grain crosswise.
General guidelines for this issue are as follows:
 If the pieces are cut small enough that the off-grain print isn’t noticeable, you can cut on-grain, off-print.
 If you are planning to use the fabric for larger blocks and pieces, cutting on-print, off-grain will give the most appealing look.
 Cutting borders on the lengthwise grain can help minimize the problem.
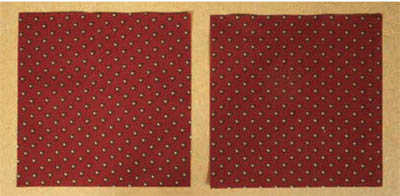
Left: Block cut on-grain, off-print. Right: Block cut on-print, off-grain
If you’re thinking of using an off-grain print for sashing or borders and the problem would be obvious, you would need to cut on-print. However, because borders should be on the straight grain for stability (and, in the case of wallhangings, to make the piece hang straight), you might need to choose a different fabric.
The “big debate” is whether to prewash all your fabrics as soon as you get them home, or to store them new and make the choice whether to wash them or not depending on the project. Like everything else, this can be a multifaceted issue. It has to do with how you work, as well as the style of quilting you develop. It also involves colorfastness and other fabric issues. Because it can be a complex question, we don’t want to simply say, “Do (or don’t) prewash, and everything will be okay.” That might set you up for potential problems in the future. Therefore, we are introducing some concepts that you might want to keep in mind as you begin to buy fabric. We will expand on this topic with each of the books in this series.
Many quilters prewash everything as it comes in the door, believing that this will take care of color bleeding and shrinkage. However, you can’t tell if a fabric has a colorfastness problem just by washing it. In fact, incorrect prewashing can actually cause stress, fading, or bleeding in fabrics. As for shrinkage of the finished quilt, you will find that it is actually dictated by the batting and the spacing of the quilting stitches, not by the fabric.
The decision to prewash or not will be based on your personal preferences as you learn to quilt. Many quilters work with prewashed fabric because they deal with many colors and scraps, often shared among several quilters. You may want to prewash if you prefer the soft “hand” of washed fabric, or if you prefer a less textured look to the quilt when it is finished and laundered.
You will find that piecing with prewashed fabric presents a few problems. Prewashed fabric is soft and has less body than new fabric, so it can be a bit harder to cut accurately. When you are sewing, the pressure of the presser foot can distort the pieces slightly. Also, pressed seams tend not to be as flat and crisp as with unwashed fabric. Starching prewashed fabric can help. However, do not starch fabric before storing it. Starch can invite bugs such as silverfish and moths to take up residence in your stash, so starch only the yardage you need for a particular project. Starch it when you straighten the grain to give it stability for cutting and sewing, and when pressing, for sharper edges on the pressed seams.
note
If you find that you are allergic to the finish on a fabric, or you develop a skin rash from working with nonwashed fabrics, then by all means, prewash!
Some quilters prefer to store all their fabric just as it comes off the bolt, and then to prewash or not for a given quilt project depending on the look they want for the finished quilt. For example, if all your fabric is prewashed, but you decide to make a reproduction 1930s quilt, the finished quilt will not have the right texture and look. That vintage look comes from the shrinkage of the fabric and batting together. The shrinkage is what makes the older quilts soft, warm, and cuddly. However, if you want to make a contemporary wall quilt with no texture, prewashing might be the best solution. If you do not prewash everything as you buy it, your options are always open and your fabric stash is very versatile.
Neither way of handling fabric is right or wrong. It’s as simple as deciding on your preferences and work styles. Try working with both washed and nonwashed fabrics. Start out by storing your new fabric unwashed. If you find that over time, you’re constantly washing every piece, you will probably want to switch to prewashing. If, however, you find that you need the choice of nonwashed fabric for some of your projects, or you just prefer the feel of working with it, you may want to store all your fabric unwashed, and wash it when you’re ready to use it. The bottom line is that you need to take responsibility for your decisions and make them based on fact, not on guesswork or because “someone told me I had to.”
tip
For beginners, Carrie recommends sticking with safe colors to lessen your headaches. Mediums, lights, pastels, and multicolor prints are generally free from most color transference problems. Avoid using two highly contrasting colors, such as red and white, as well as batiks and very dark, rich colors.
note
Again, if you want the complete story on fabrics right now, consult Harriet’s book From Fiber to Fabric.
We feel that at this point, all that detailed information would be overwhelming. However, if we simply tell you, “Prewash (or not), and everything will be okay,” that would not be honest, and it would set you up for potential problems with your quilts in the future. So, we have introduced some concepts for you to keep in mind as you begin buying fabric.
Right now we know you just want to jump in and get started. But as you expand your skills and your interest continues, you will be ready to take the time to deal with the care of textiles in a knowledgeable way. So we will expand on this topic with each book in this series.
Your fabric must be prepared properly before you cut it, so that the units sew and press accurately. When working with strips, as we are in this book—whether they are for strip piecing, sashings, or borders—the trueness of the fabric’s grain is a major factor in how well your quilt top behaves. If the grainline along the edge of the strips varies by more than a few threads, there is potential for stretching and distortion. In this class, we explain the right way to realign fabric that is off-grain.
 EXERCISE:
Supplies:
Pins
Iron
Faultless Heavy spray starch
Materials:
½ yard 100% cotton fabric
Many people believe that by pulling the fabric on the bias opposite to the direction it is off, they can straighten the fabric. However, if you examine a piece of fabric that has been pulled in this way, you’ll see that the yarns have been misaligned and pulled out of square. A better way to realign the fabric grain is to press a new center fold into the fabric.
1. If your fabric is not already torn, begin by tearing each end of the yardage to find the crosswise grain. (Work in short yardages of ½ yard or less.) Make a ½″ clip in the fold at least 2½″ from each end of the fabric and grasp both sides of the cut at the fold. Tear quickly to prevent stretching.
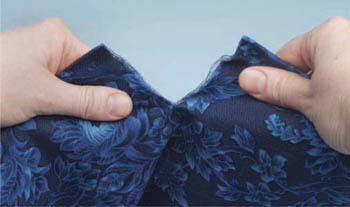
Start with a ½″ cut to tear fabric.
tip
Tearing a strip at least 2½ inches wide off your fabric will enable you to cut pieces for your quilts from that strip later, if needed. Tearing narrower strips may result in having to tear a second or third strip in order to get the fabric to tear cleanly from selvage to selvage. It is better to tear a big strip to start with and have it wide enough to use later than to waste a smaller piece of fabric.
2. Open the fabric so it lies flat on your ironing board and spray it with water to dampen it lightly. If you have prewashed the fabric, you can do this step while the fabric is still damp. The sizing must be damp in order to allow the yarns to move back to their original position.
3. Press to remove the original center fold. Iron the fabric dry. If you have prewashed the fabric, now is a good time to start applying starch to build body and stability back into the fabric.
4. Fold the fabric in half from selvage to selvage and pin the 2 selvage edges together. A can of heavy spray starch is helpful here. Lightly spray with starch and use your fingers to coax the fabric to lie flat.
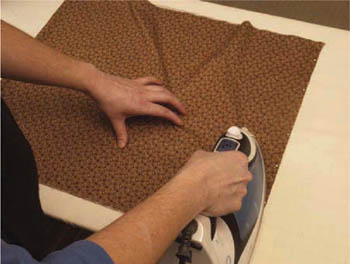
Fold in half and pin selvages together to start straightening process.
tip
Starch works like a muscle relaxant for fabric, helping it “relax” into the new shape. Our favorite is Faultless Heavy spray starch. It seems to add the most crispness without flaking or scorching. Make sure your iron is not set beyond the cotton setting. If the iron is too hot, the starch will scorch and stick to the bottom of the iron.
5. To create a new center fold, press toward the center, working from the torn edge and selvage down. Use one hand on the iron, and the other to smooth the fabric as you press. You are coaxing the fabric back into alignment, so be patient and light-handed. Steam can also be helpful in this process, but don’t use steam after you have applied starch.
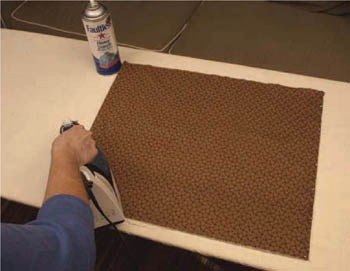
Using iron to press fold
6. If you have someone around who can work with you, this job can be very efficient. As one person holds the fabric at the selvage corners and the other pulls at each end of the center fold, the fabric will automatically realign into a new center fold.
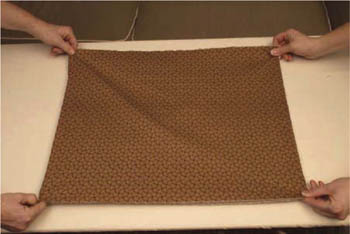
An extra pair of hands makes fast work of realigning grain.
7. Once you have established a new center fold, turn the fabric over and press the other side, checking for folds and distortions. Fold the fabric in half crosswise again.
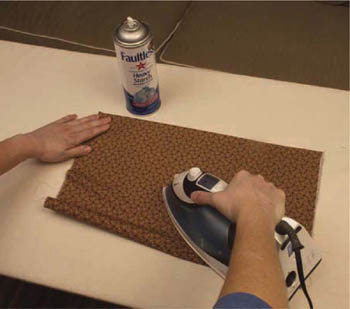
Fold in half again, line up torn edges, and fold to selvage.
8. Check to see that the torn edges again align. If not, repeat the process. A few threads’ variance is acceptable here. Once this final alignment is achieved, the fabric is ready for cutting.
Before cutting strips, you must establish a straight edge on the fabric. In addition, check the following three things before you actually cut the fabric.
 First, make sure your fabric is well pressed. Take a minute and iron the fabric to eliminate sharp creases where the fabric has been folded in storage (not the creases you pressed in when straightening). Pressing your fabric carefully at this point will make it easier to cut now and to sew later.
 Second, make sure your cutting mat is on a firm, flat surface that allows plenty of room for your fabric and tools. A solid wood table has no give and works best to support the mat and the pressure of cutting. (Most newer lightweight plastic folding tables are too spongy.)
 Third, check how your fabric is folded. Fold it wrong sides together so that the selvage edges match up. Fold it a second time so that the fold matches up with the selvages. The fabric is now 11″ wide (this is the folded size that you get once you straighten the grain as described on page 17.
note
Many quilters prefer not to make the second fold, but work with the fabric folded once, selvage to selvage, making the fabric 22 inches wide. This may eliminate some of the problems with bends in the fabric strips, but the ruler is apt to slip when cutting such a long length. We suggest that you try both ways to see which feels most comfortable and gives you the most accurate results. Remember that a narrow ruler could eliminate much of the problem.
A small, narrow ruler is more manageable when cutting strips. Choose a ruler that is several inches longer than the folded fabric. The narrower the ruler, the less likely it is to slip while you are cutting. If you are cutting narrow strips, a 2½″- or 3½″-wide ruler is adequate.
We recommend that you work with the lines of the ruler and avoid using the grid lines printed on the cutting mat. If possible, turn the mat over to the plain side.
Position the ruler on the fabric, and place the ring finger of the hand holding the ruler against the ruler’s outside edge. This helps brace the ruler so it doesn’t slip while you are cutting.
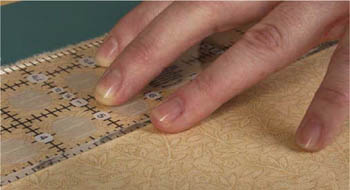
Placement of ring finger against edge to help prevent slippage
When cutting, you can walk your hand up the length of the ruler to keep it straight and accurate, keeping your finger against the edge of the ruler.
 EXERCISE:
Supplies:
Rotary cutter, mat, and ruler
Materials:
Straightened fabric, folded to be 11″ wide, from Exercise: Realigning fabric grain (page 15)
1. To clean up the torn fabric edge and establish a straight edge, position a cross line of the ruler on the folded edge of the fabric. This fold should be closest to you, with the selvage edge at the top. If you are right-handed, the fabric will be positioned so that it extends to the left. If you are left-handed, the fabric will extend to the right.
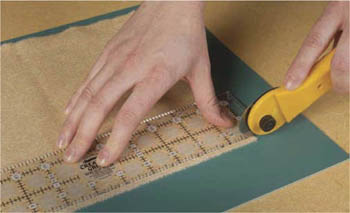
Position of fabric if left-handed
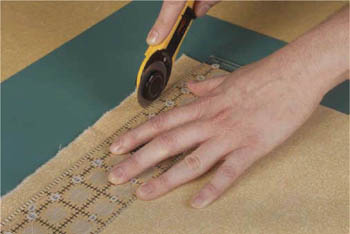
Position of fabric if right-handed
2. Your arm should be extended comfortably at about a 45° angle to your body. Hold the cutter with the blade next to the ruler. You should be able to make one clean cutting action across the fabric, applying enough pressure to cut through all the layers, but not so much that you cut into the mat. Do not saw back and forth on the fabric; this will result in a rough, choppy edge.
3. Keep the long edge of the ruler close to the torn edge of the fabric and a cross line of the ruler on the double fold. This aligns the ruler at both the fold and the edge to be cut. Cut off the torn edge.
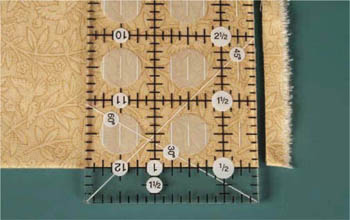
Align cross lines on ruler.
Now that you have a properly aligned piece of fabric with a straight edge, you’re ready to cut strips.
 EXERCISE: CUTTING STRIPS
Supplies:
Rotary cutter, mat, and ruler
Materials:
Straightened and trimmed fabric from previous exercise
1. Once you have cut off the torn edge, the fabric will now need to be turned 180°, so that the bulk of the fabric is on the same side as the hand you cut with.
2. To cut strips, position the ruler on top of the fabric, measuring in from the cut edge. Align the line of the measurement you desire with the cut edge, extending the ruler that amount into the body of the fabric. Make sure that the horizontal lines of the ruler align with the fold of the fabric perfectly, and that the vertical measurement line is running exactly along the cut edge.
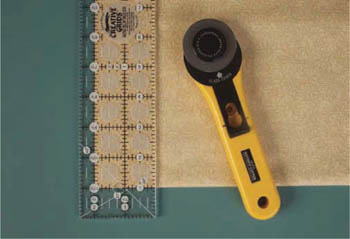
Position ruler to prepare to cut strips.
3. Unfold the first fabric strip you cut and check the center fold. If the strip is straight, you know the fabric is folded properly. If it has a V at the fold, your strips will continue to be bent unless you re-press the piece of fabric and make sure everything is even. If the ruler is not aligned perfectly with both the fold and the cut edge, you’ll also get V’s in every strip.
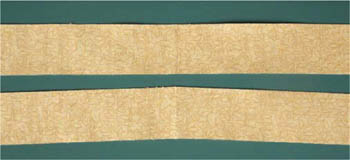
Straight strip and strip with V
4. As you continue to cut strips, be sure that the ruler remains exactly aligned with the fabric—checking both the cut edge and the fold. You can readily see when anything is out of alignment, as the fabric will no longer be perpendicular to the ruler. Check that you are using the same side of the printed line every time you align the ruler.
5. After cutting 3 or 4 strips, check again for straightness. If there is any V to the strips, realign the fabric piece and square it up again. The importance of this step cannot be overstressed. Too often we assume that everything is okay, only to find after cutting that all the strips are bent and therefore difficult to work with.
note
If you have several strips with V’s, you can cut across them at the fold, and they will be usable as two shorter strips.
Double-check that your strips are all EXACTLY the same width. Take time to double-check which side of the ruler line you are aligning with. The simple act of changing sides of a line can cause a cut that is threads wider or narrower, making a difference in the width of the strip. Cutting is the first step toward accurate piecing. If the strip width varies by only a few threads, it will continually add up to misfit pieces.