THE BOX WAS MARKED “LINENS FROM ITALY.” It must have weighed twenty pounds—obviously too heavy for linens. This was back in 2003 on the cusp of the Spanish chefs movement. A few months before my box of “linens” arrived, I happened to be up in New York for a weekend and decided to go to Babbo for dinner. Mario Batali was there, and after a few courses he came over to my table and we started talking. He told me about Casa Mono, the Spanish tapas place he was planning to open later that year. He was really excited about the ingredients: the Spanish olive oils, the bacalao, the Iberico ham, the perfectly aged Manchego, the chorizo. “I’m taking a bunch of chefs to Barcelona in a couple of weeks,” he said, “to do research.” It sounded good, and I happened to mention how unimpressed I’d been with most of the chorizo I’d tasted so far in my life. “Dude, you should come with us,” he said. “You can see what it’s supposed to taste like.”
It took me all of a micro-second to say, “Sounds awesome!” A week and half later, I was on a plane to Barcelona. I toured around with Mario and his chefs for a few days, tasting everything in sight. When we hit La Boqueria, the big public market, I found it: that perfect chorizo with just the right spice. Mario looked at me, but he didn’t say anything. He just watched me eat and smiled. I savored that chorizo bite by bite so my mouth would remember what it tasted like when I got back home. I was going to make a chorizo just like it.
Mario opened Casa Mono later in the fall of that year. To mark the occasion, I decided to smuggle a whole Iberico ham into the United States for the opening. This was before it was legal to buy jamón ibérico de bellota in the States. I told my friend Marco Rossi in Italy about the plan and he said, “I have just the right guy. He raises some of the best Iberico pigs free-range on a small farm in Spain. They eat acorns by the bushel and get nice and plump.” I was sold. “You have to FedEx it to me,” I told him. “But how?” he shot back. “Isn’t it illegal?” I thought for a moment. “I don’t know,” I said, “You’ll figure something out. Just FedEx it to me and send me the bill.”
My twenty-pound box of “linens” from Italy arrived a few days later. The contents cost $800. The FedEx charge was another $800. But I didn’t care. I took my linens up to New York for the Casa Mono opening. I handed the box to the chef, Andy Nusser, and said, “Here.” He nearly dropped it because it was so heavy. “What is this?” he asked. I looked at him and said, “Open it.”
Andy and Mario were blown away. Especially on opening night of Casa Mono. I mean, a whole pata negra? The real deal, shipped from Spain? Illegally? Who does that?
Some things are worth taking a risk for, and great food is one of them. I had finally tasted a great chorizo, and the ham was simply a way of saying thanks.
TYPES OF SALUMI
Iberico ham is a dry-cured ham similar to prosciutto. Preserved and cured meats like these fall under the umbrella term salumi, which is the Italian equivalent of charcuterie. I like to make four basic types of salumi: terrines, cooked sausage, dry-cured salami, and whole-muscle salumi. Prosciutto and Iberico are whole-muscle salumi. A few quick definitions: A terrine is like a coarse-textured pâté. It’s made with seasoned ground meat that’s packed into a loaf-shaped mold or baking dish and then baked in a water bath. After cooking, a terrine is usually chilled, unmolded, then cut crosswise into slices like bread. It’s an old-school salumi that makes a big impression on a modern menu. The type of salumi that’s probably most familiar to home cooks is cooked sausage. Think bologna, mortadella, or anything else called a “cold cut” in the States. Cooked sausage is ground meat stuffed into a casing—usually a large casing—poached until the meat is cooked, then chilled and sliced as needed. A cold cut. Cooked sausage is similar to a terrine, except that it’s tubular in shape and poached on the stove top instead of baked in a water bath. So what’s the difference between cooked sausage (salami cotto) like bologna and dry-cured salami like Spanish chorizo? Both are made with ground meat stuffed into tubular casings. But dry-cured salami like Spanish chorizo and Italian soppressatta are not cooked. Instead, they are fermented for several hours to create good bacteria and then hung in a cool, moist environment to air-dry and cure over a period of several weeks. Curing salt and gradual dehydration help prevent the meat from spoiling, or “cure” it, so that the dry-cured salami will keep for a month or more under normal refrigeration. That dry-curing environment is the same for whole-muscle salumi, the last type of salumi I like to make. Whole-muscle salumi refers not to ground meat but to whole pieces of meat like pork shoulder, pork belly, or pork leg (ham) rubbed with seasonings and hung in a cool, moist environment to air-dry and cure over a period of several months. Whole pieces of meat take longer to dry-cure than ground meat sausage because the muscle fibers remain intact and hold on to their moisture longer. Whole-muscle salumi includes things like Italian pancetta and American bacon (cured whole pork belly), ham and prosciutto (cured whole pork leg), coppa (cured whole pork shoulder), guanciale (cured whole pork jowl), and lardo (cured whole pork fatback).
Why do I make all these different forms of salumi when it’s easy enough to buy them in a store? Because they taste better when you make them yourself. The satisfaction of dry-curing a piece of meat over several weeks in your home, then serving it to friends and family, is enormous. It’s like growing your own tomatoes. Once they’re ready, you’re so proud, you just can’t wait to eat them, cook with them, and share them with everyone you know. Guests never fail to be impressed by home-cured salami. Get ready for eager friends to rub their hands together and ask, “Are they ready yet?” Imagine shaving off a thin slice of your own homemade Soppressata Calabrese or Fennel Salami to begin a meal. It’s unlike any other form of cooking because it isn’t cooking. It’s curing. There’s something magical about taking a piece of raw meat, salting it, then serving it with full confidence three months later. It’s something you have to experience for yourself.
SANITATION
Sausage making isn’t hard, but you have to be diligent in how you handle the meat. You want to minimize any bacterial contamination. Use clean and sanitized equipment and utensils. To make sanitizer, mix a capful of full-strength chlorine bleach with a gallon of water, then scrub or soak anything that will come into contact with the meat. Simply put, keep your work area sanitized, wear gloves, and handle the meat as little as possible. Any time you take another step with the meat, you are introducing new bacteria. Work quickly in a small area, and try not to touch the meat too much.
FREEZING
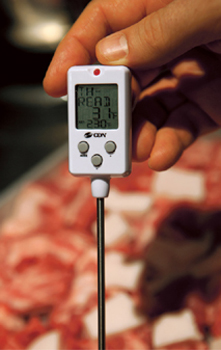
It takes longer for bacteria to grow in cold temperatures, so try to keep everything as cold as possible—from the meat to whatever’s holding the meat to whatever’s grinding the meat. A good rule of thumb is to keep everything below 41°F (refrigerator temperature) the entire time you’re working with it. Working in a cold room helps, too.
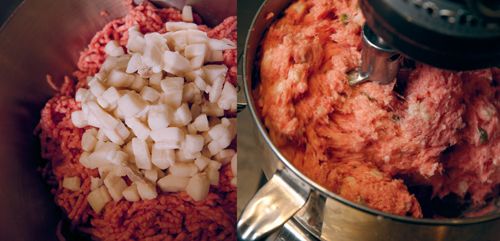
Most of my ground sausage has a ratio of about 80 percent meat to 20 percent fat. I usually cut both the meat and the fat into 1-inch cubes, then freeze them in a single layer on metal baking sheets until partially frozen. After about an hour in the freezer, they should be the right texture—firm but not frozen solid. Put all your meat grinding and mixing parts in the freezer, too, from the grinder auger and cutting die to the mixing bowls, paddles, and trays. Keeping everything cold serves two purposes. First, it reduces bacterial activity, and second, it makes it easier to grind the fat into those nice, juicy white pieces you see in a cross-section of salami. If the fat warms up too much as you work, it will soften and smear in the grinder instead of getting cut into nice little pieces. Again, don’t handle the meat and fat too much, because the heat from your 98.6°F body will transfer to the meat, which you want to keep below 41°F throughout the process. Before you start making salumi, wash your hands in hot soapy water, put on gloves, and stick your hands in a bowl of ice until they are very cold, almost painful. Remember, everything should stay cold.
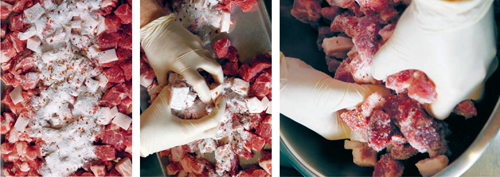
SEASONING
I like to season the meat and fat right when I take it out of the freezer—before grinding. This is an old method I learned in Italy, and when you are making smaller artisan-style batches, the sausage gets more consistently seasoned this way. Just scatter all of the dry seasonings over the partially frozen chunks of meat/fat and mix it thoroughly, wearing rubber gloves (on your cold hands). When adding spices and herbs, I tend to season my sausage lightly to let the taste of the meat shine through. If you want to test the seasoning of the raw sausage, fry some and taste it before stuffing it into casings. Just pinch up a large piece of the seasoned ground meat, form it into a little patty between your gloved palms, and cook it over medium heat in a skillet until browned on both sides. Then taste it. If you want to taste more of any single seasoning like black pepper or ground coriander, mix a little more into the raw meat. Jot down your changes so you know how you like it next time. But don’t go overboard with seasoning. Dry-cured sausage tends to lose about 30 percent of its weight when fully dry-cured, a dehydration process that concentrates all the flavors. I under-season to make sure the fully cured meat isn’t overwhelmed by spice flavors.
SALT AND SUGAR
When adding salt and sugar to ground sausage, I usually calculate the amount as a percentage of the total weight of the meat and fat. I add 2 to 4 percent salt and 0.5 to 1 percent sugar by weight. For instance, in my Soppressata Calabrese and Fennel Salami, the total weight of the meat and fat in each recipe is 5 pounds (2.5 kg). In each recipe, I add 2.8 percent salt and 0.5 percent sugar by weight, which works out to 70 grams (½ cup plus 1½ teaspoons) Diamond Crystal kosher salt and 12.5 grams (5¼ teaspoons) dextrose powder or 10.5 g (4 teaspoons) superfine sugar.

It might sound like a lot of salt, but salt does the hard work of curing sausage by dehydrating the meat and making it less hospitable to bad bacteria. I use kosher salt for curing salumi and measure it by weight because this is more accurate than volume measurements. Here’s the reason: salt is the main ingredient that cures the meat, and different salts vary dramatically in their weight-to-volume ratios. See for yourself. Weigh out the same weight of three different salts—fine sea salt, Morton’s kosher salt, and Diamond Crystal kosher salt. Say, 10 grams each. Then use level tablespoons to measure the volume of each little pile of salt. You’ll see that Morton’s measures about one and a half times more than fine sea salt, and Diamond Crystal about twice as much as fine sea salt. That’s a big difference, especially when you’re scaling up salumi recipes from 1 pound of meat to 10 pounds or more. But I know that most American cooks measure by volume, so I tested all the salumi recipes with both volume and weight measurements to make sure they work. For accuracy’s sake, you should know that the volume measurements in my salumi recipes are based on Diamond Crystal kosher. That’s the salt I use for curing meat. If you use a different brand, go by the gram amounts in the recipes, and weigh your salt for an accurate measurement.
The other salt in cured sausage is, you guessed it, curing salt. There are two types: curing salt No. 1 and curing salt No. 2. Simple, right? Both are formulated so that 1 level teaspoon cures 5 pounds of meat. Cure No. 1, also known as pink salt, Tinted Cure Mix (TCM), Insta Cure No. 1, and DQ Curing Salt No. 1, is tinted pink so it’s easy to recognize. It contains 6.25 percent sodium nitrite and 93.75 percent salt. Use Cure No. 1 for fresh and cooked sausages like mortadella, terrines, and fresh link sausage. Cure No. 2 (aka Insta Cure No. 2 and DQ Curing Salt No. 2) is white, like regular kosher salt, and it’s used for uncooked dry-cured salumi like soppressata, chorizo, pancetta, and coppa that will be dried for weeks. Cure No. 2 also contains 6.25 percent sodium nitrite, but with 4 percent sodium nitrate and 89.75 percent salt. That small amount of nitrate is what helps control the growth of harmful bacteria over weeks and months of curing in the open air.
Sugar has the opposite effect of salt. Instead of slowing down the growth of bacteria, it speeds it up. Sugar gives the bacteria something to feed on. By adding sugar to the cure, you’re trying to feed the good bacteria early on in the process, so it will develop during the initial fermentation of the salumi. This good bacteria helps fight off the bad bacteria as the salumi dries and cures.
It’s important to add something sweet to the mix, and I use powdered dextrose. It has a fine texture that distributes very evenly throughout the sausage, much more evenly than granulated sugar. I typically use 0.5 percent dextrose for soppressatta and other dry-cured sausages that will be fermented. You can find dextrose powder in most natural foods stores and nutrition stores like GNC. Fitness buffs use it in smoothies and such, and most of them probably have no clue that it’s perfect for making salumi, too. If you can’t find dextrose, you can substitute superfine granulated sugar, but the measurements aren’t one to one. Dextrose is made from corn, and superfine sugar (aka castor sugar or bar sugar) is usually made from cane. Dextrose is about 25 percent less sweet than cane sugar. That means you need to use about 25 percent less superfine sugar than dextrose. Essentially, substitute 1 cup dextrose with ¾ cup plus 2½ teaspoons superfine sugar. Or, replace 100 grams of dextrose with 80 grams of superfine sugar. I wrote the salumi recipes to list both dextrose and superfine sugar. And what if you can’t find superfine sugar? Just make it at home. Take regular granulated sugar, put it in a clean spice grinder or coffee mill, and process until very finely ground.
GRINDING
There’s a nice segue! Once your meat and fat are seasoned with sugar, salt, curing salt, and whatever other seasonings you like, you’ll need a meat grinder to get the texture right. If you have a KitchenAid stand mixer, you’re all set. Every sausage recipe in the book was tested on a 6-quart KitchenAid with the sausage grinder attachment. The key is grinding the meat quickly so it doesn’t have time to warm up and smear. Attach your cold grinder parts to the machine, then set it to high speed. I grind most sausage with a large cutting die for a coarse texture, and I usually grind twice. But for smoother sausages, like mortadella, I grind the meat and fat together five times using a small die. Big die for coarse sausage. Small die for smooth sausage. Give yourself a couple of hours for grinding, especially if you’re making smooth sausages like mortadella that must be put through the grinder at least five times to get the texture right. That gives you enough time to grind the meat and put it back in the freezer between grindings to get it cold and firm again so it won’t smear. When grinding more than once, it also helps to grind the meat into a bowl set in a larger bowl of ice.
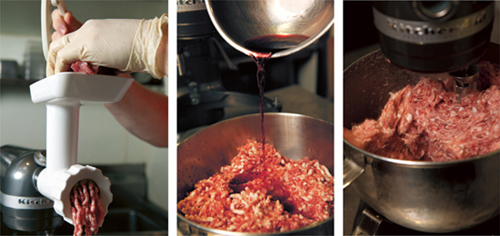
MIXING
After you grind, it’s important to mix everything into a sort of paste. If you grind into the bowl of the stand mixer, you just put the bowl in the machine and mix with the paddle attachment on low speed. Most sausages include some kind of cold liquid like ice water or wine, and this is the time to add it. Sausage makers often use garlic powder or onion powder, but I can’t stand that stuff. I like to soak the smashed whole cloves of fresh garlic in wine for 30 minutes or so, then toss the garlic and use the wine. You get a nice, light garlic scent that way. Either way, mix everything on low speed until it looks dense and sticky, kind of like wet bread dough. It takes only a minute or two.
STUFFING
For cooked sausage and dry-cured salami, the next step is stuffing the meat mixture into casings. I use three types of casing, all of them natural: hog casings, beef middles, and beef bungs. These come from the intestines of pigs and cows and have been the perfect casings for handmade artisanal sausage for centuries. Hog casings are the smallest (think link sausage), beef middles are the next biggest (think soppressatta), and beef bungs are the largest (think mortadella and bologna). The larger the casing, the longer the sausage will take to dry-cure. Sausages in hog casings dry in a matter of weeks, while those in beef bungs can take months. I like the beef middles because the sausages seem to age best in them.
The casings will come packed in salt and should be soaked and rinsed to remove the salt. After soaking them in cold water in the refrigerator for about an hour, I usually tie one end closed with butcher’s string (tie it extra tight!), then fill it with water like a water balloon. That helps me see the shape the final sausage will take once it’s stuffed. As for sausage length, it’s up to you. You can fill an entire casing at once and twist it into links, or cut the casing into lengths a little longer than the final sausage length you want. If you want links, just feed the meat into the casing until you reach a link length, then twirl the sausage a couple of times to form the link. Keep stuffing until you reach another link length, then twist the sausage in the opposite direction from the first time. That keeps the links from unraveling as you go. The first time you make sausage, you might find it easier to just cut the casings into 1½-foot lengths and tie them off. That will give you sausages that are about a foot long—a very manageable size. Or make them longer, if you like. Sausage is one of those great arts that is totally open to your personal preference!
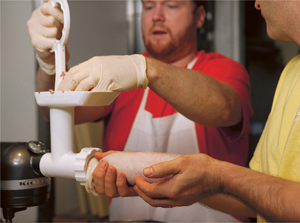
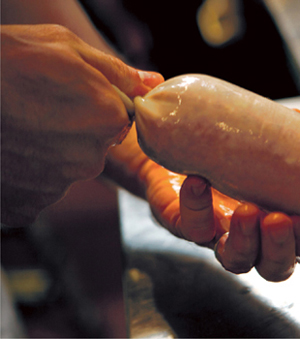
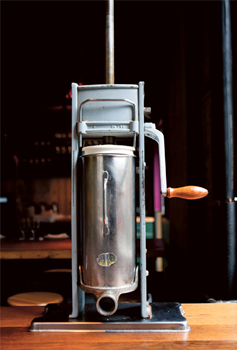
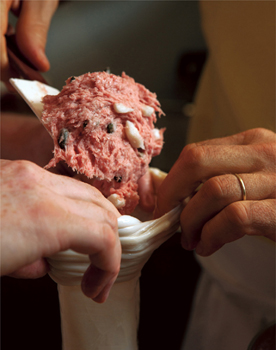
I will say that stuffing is the only time it’s hard to use gloves. With gloves on, you just can’t hold the casing tightly enough against the sausage stuffer without it slipping away. Stuffing is the time to invite a friend over. Believe me, the process is much, much easier with two people: one person feeds the meat into the stuffer (wearing gloves) and the other handles and shapes the sausage (without gloves).
Start by feeding some of the meat mixture into the feed tube until it just starts to poke out of the end of the sausage stuffer. That way, there is no air in the system. Then you grease the stuffer tube with a little meat mixture and slip the casing onto the stuffer. Slip it all the way to the end of the stuffer tube, like putting a sock on your foot. Once it’s on there, it helps to put pressure on the tied end of the casing so it’s gently pressed against the stuffer. When the meat comes through the machine, a little pressure helps the meat pack tight into the middle of the casing with fewer chances of air getting in. You want a nice tight sausage with no air in it. If you have any air bubbles, mold will grow inside of them during dry-curing and ruin the sausage. The worst thing is getting halfway through the weeks and weeks of dry-curing and anticipation to find out that you’ve got air bubbles in your sausage. As the meat gets stuffed into the casing, constantly check for air bubbles, working them out the open end of the casing as needed. You can also prick the casing wherever there is a bubble to let out the air.
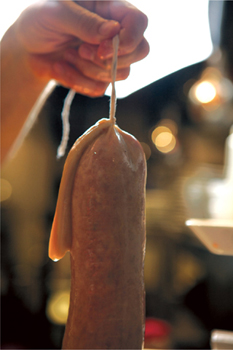
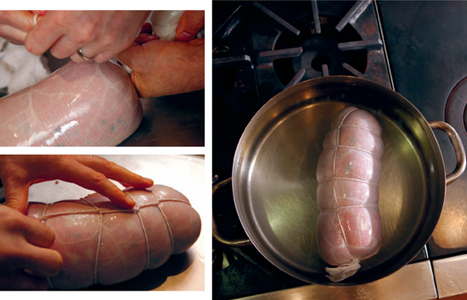
Remove the stuffed casing from the stuffer, grab the open end, and squeeze it down tightly against the meat to pack it down. Twist the open end several times against the meat until the sausage is sealed. Then tie off that twisted end with butcher’s string. Be sure to leave enough extra string for hanging the sausage in your curing room, which can be as simple as an empty basement closet with a humidifier and air conditioner or heater in it.


COOKING
The hardest thing about cooked sausage is poaching it at the right temperature. If the poaching liquid is too hot, the fat in the sausage will melt. If it’s too cold, the meat won’t cook properly. The temperature also can’t fluctuate too much. I like to use a big pot of water on the stove so the temperature doesn’t change too drastically when the cold sausage goes in. Use a thermometer and adjust the burner to maintain the poaching water at a constant temperature. That temperature could be anywhere from 145°F to 165°F, depending on what kind of meat is in the sausage. Fish and rabbit should poach on the lower end of that range to keep them tender, while lamb and pork should poach at the upper end.
Cooked sausages often include internal “garnishes” like cubed pork fat and pistachios. To keep fat garnishes from melting when the sausage is cooked, I like to blanch the fat first to render it a little. It’s a simple step that makes a big difference.
I also like to sear my cooked sausages. Once poached, you could slice and eat Rabbit Salami or Swordfish Sausage as is. But they taste even better if you slice them lengthwise or into rounds, then sear them in a hot skillet until brown. It puts a nice crispy crust on the outside of the tender sausage.
As I mentioned earlier, terrines are another type of cooked sausage. Sausage just means “ground meat,” which certainly applies to a terrine. The difference is that the meat for a terrine is packed into a terrine mold instead of being stuffed into a soft casing. Then it’s cooked, usually in a water bath (bain marie). The cooking is very similar to poaching a stuffed sausage except that the terrine isn’t completely submerged in the water. Either way, the water helps cook the ground meat slowly and gently so it stays moist and rich when it’s done. Terrines are a great place to start in this chapter because they are easy and impressive. The cooked sausages like Lamb Mortadella and Swordfish Sausage are good starting places, too, because you don’t have to deal with the issues of fermentation and controlling humidity and air temperature as you do with dry-cured sausages.
FERMENTATION
Ground-meat dry-cured sausage is by far the most complicated type to make. It takes dedication, precision, and a lot of patience. Don’t be surprised if it doesn’t work out the first time you try it. There are so many variables to control! You could do everything right and it still won’t work. I still get failed batches now and then. Don’t worry; it’s not you. It’s just a very complex process! The most important variables are sanitation, temperature, and humidity. Learn as much as you can about these factors, be diligent about them, and you’ll have the best shot at success.
The bottom line for all dry-cured salami is the drying itself. You basically need to dry the salami so it has a very low “water activity” level, which is expressed numerically by scientists as “aw.” When the salami has an aw of 0.85 or lower, it is considered microbiologically stable. But how do you get there without creating a petri dish of bacteria inside the salami? That is the dilemma. The solution is to slow down the growth of bad bacteria with an initial fermentation step. This step creates good lactic bacteria that holds off the unwanted bad bacteria. It’s that simple. Create good bacteria and it will deter bad bacteria. Commercial sausage makers in America create the good lactic bacteria by adding a starter culture like Bactoferm. But that chemical fermenter can bring the pH up so high that it gives the finished salami a metallic taste. The pH should range between 4.6 and 5.3. But if it’s too high, it can make the salami texture too rubbery, which is how you end up with horrible rubbery pepperoni.
The artisan sausage makers in Italy create good bacteria the old-school way—by letting it grow naturally. They put the sausage in a warm, humid environment to ferment, encouraging good bacteria like Staphylococcus carnosus and Kocuria to grow right away. Increasing the number of these bacteria helps develop good color and flavor in the finished salami. Fermentation also increases the number of good lactic acid–producing bacteria like Lactobacillus and Pediococcus. These beneficial bacteria keep the harmful bacteria at bay, and they continue to multiply during the weeks or months of dry-curing.
That’s the trick: keeping the beneficial bacteria multiplying and keeping the harmful bacteria at bay. I have found that the best way to initiate this fermentation process is with an exact temperature, humidity, and length of time. I ferment my salami at 90°F and 100 percent humidity for 36 hours. I do it in an oven that has a steaming function. If you have an oven with steam, set it for 100 percent humidity and 90°F, put the salami inside (preferably hung so each one is separate) and close the door for 36 hours.

If you don’t have a steam oven, create one using a regular oven and a small humidifier. This method will work for most home cooks and it’s how we tested all the fermented sausage recipes in this book. You can use a gas oven with the pilot light on, or if your oven has a bread-proofing or warming mode, set the oven to 90°F. Take out all the oven racks and put a small humidifier right inside the oven on the oven floor. Run the cord out the oven door, plug it in, and set the humidifier to high. To monitor the temperature and humidity, put a thermometer and hygrometer inside the oven, and close the oven door. A remote thermometer/hygrometer is really convenient because the sensor stays inside the oven and sends a wireless signal to a receiver that automatically displays the temperature and humidity. It allows you to easily monitor the salami without opening the oven. Then, you simply adjust the oven temperature or the humidifier to maintain 90°F and 100 percent humidity inside the oven for 36 hours. You may have to replenish the water in the humidifier once or twice, and I highly recommend using distilled water to keep the humidifier from getting gummed up by any minerals in hard water. Plus, it will get pretty wet in there, just like a steam room, so put a large drip pan or rimmed sheet pan on the oven floor to catch some of the water. If you have enough room at the top of the oven, keep one oven rack in place so you can hang the salami from it.
Either way, you can see that the most important factors to regulate are the heat and the humidity. To make it easy, pick up an inexpensive remote thermometer/hygrometer. As for timing, I’ve found that 36 hours is the sweet spot, but if your temperature and/or humidity is over or under 90°F and 100 percent, you may have to adjust the total time. You can tell that the salami is done fermenting when it starts to turn reddish and the casing begins to get tight, as if the meat has plumped up a bit. At that point, it is ready to be put into the curing room.
CURING
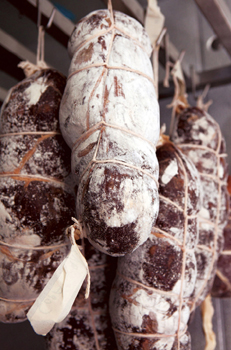
To slow down the bacterial activity, you need to move the salami to a cooler and less humid environment. I hang my dry-cured salumi at 50°F to 55°F and 75 percent humidity for anywhere from 4 weeks to 6 months, depending on the size of the casing and whether they are ground-meat sausages or whole-muscle salumi. Here is where the salumi gets gradually drier, firmer, and more flavorful.
Pick a small area so it’s easier to regulate the key environmental factors of temperature and humidity. It should also be dark to prevent light from discoloring the salumi. A wine cellar or root cellar is traditional, but an uninsulated basement closet works great, too. The area should be clean, with at least a little air circulation. Here are a few options I’ve tried successfully:
Basement closet: For most home sausage makers, an uninsulated basement closet will be the way to go. As long as your basement is underground, the temperature should stay at or close to 55°F. Temperatures do fluctuate at different times of the day and different times of the year, so it’s safest to set a small window-style air conditioner in the closet to adjust the temperature if it gets too hot. You can also put a small space heater in there if it gets too cold. To regulate the humidity, put a small cool-mist humidifer in the closet (use a standard cool-air humidifier, the kind used to relieve congestion in kids). To monitor everything, hang a remote thermometer/hygrometer in the closet. They only cost around fifty bucks. Get the room set up a few hours ahead of time, so you’ve got the environmental factors stabilized before you put the salumi in the room. Then, if the temperature gets too high, turn up the air conditioner. If the humidity falls too low, turn up the humidifier. To make it even easier, you can buy an in-line thermostat and hydrostat for each appliance and set the thermostat to 55°F and the hydrostat to 75 percent humidity. They cost a hundred dollars or so each, but they do the real work of sensing the temperature and humidity and automatically turn the air conditioner or humidifier on or off whenever necessary. When testing this method, I simply cranked the humidifier and air conditioner to high and plugged them into the thermostat and hydrostat. The in-line thermostat and hydrostat did the rest of the work. It was by far the easiest method for home use.
Wine refrigerator: Here’s another nifty option. It is a little more expensive than a basement closet, but wine refrigerators are designed to replicate a cave or cellar environment, and they are generally adjustable to 55°F and 75 percent humidity. Just be sure to buy a wine refrigerator with adjustable temperature and humidity controls and adjustable racks so you can fit the salumi inside. Bonus: When you’re not curing salumi, you can age wine in the fridge!
Converted freezer: I haven’t tried this method myself, but dedicated home sausage makers swear by it. Buy a small freezer and plug it into an in-line thermostat to bypass the freezer control. A freezer has its own internal thermostat that powers the cooling mechanism to drive the temperature down to around 0°F. With an in-line thermostat, you can bypass the internal thermostat, set the temperature to 55°F, and the freezer’s cooling mechanism won’t power on until that temperature is exceeded. Humidity is the other factor to control and placing a cool-mist humidifier in the freezer is the best way do it, just as described above for a basement closet. If you plug the humidifier into an in-line hydrostat, then both the thermostat and the hydrostat will automatically regulate the temperature and humidity. Simple! The only other thing to keep in mind is the defroster, which is designed to cycle on periodically to eliminate moisture in the freezer—basically, all the humidity you’ve worked so hard to get in there! If you have a frost-free unit, find and disconnect the wire to the defroster, which usually runs beneath the main cooling coils of the freezer. The advantage to this converted freezer method is that when you’re not curing salumi, you have an extra freezer on hand.
EQUIPMENT AND DONENESS
So where do you buy all this sausage making equipment? And the ingredients? Most of the ingredients like curing salt and sausage casings you can order from the Sausage Maker (see Sources). As for equipment, if you don’t have a KitchenAid sausage grinder and stuffer attachment, you can order those through KitchenAid. Or go to the Sausage Maker for a separate meat grinder, plus other equipment like a gram scale, thermometers, etc. You can get cool-mist humidifiers, small window air conditioners, and space heaters at most home stores. For the humidifier, Crane makes a one-gallon model that fits nicely into small spaces. Just be sure to use distilled water and be prepared to replenish it every couple of days, which isn’t a big deal because that’s how often you should check on your dry-cured salumi anyway.
Curing salumi is like growing a garden. It requires some advance planning and careful tending, but the rewards are well worth it when you reap the harvest. It’s easy to tell when vegetables are ready to pick because they are so heavy they weigh down the entire plant. With salumi, it’s the opposite. They should actually lose weight. A good rule of thumb is that dry-cured salami like soppressata and chorizo should lose 25 to 30 percent of their initial weight. Whole-muscle salumi like coppa and speck should lose 20 to 25 percent of their weight. To keep track, weigh each string of salami before dry-curing. Jot down the name of the salami, the weight, the starting hang date, and the expected doneness date in a notebook or on masking tape taped to the hanging string of the salami. When you think the salami are done, weigh them. They should weigh 20 to 30 percent less than what you initially jotted down, depending on the type of salami. For instance, 5 pounds of coppa should weigh about 4 pounds when cured. Five pounds of soppressata should weigh about 3½ pounds when cured.
The size of the casing determines the aging time. I usually make soppressata, chorizo, and other salamis in beef middles and age them for 6 to 8 weeks. But if you use smaller hog casings, figure on 4 to 6 weeks. At that point, the salami should be firm yet pliable, not quite as dry as the pepperoni you’re probably familiar with. I like my sausage young.
The other thing to keep track of is the look and feel of the salami. When you touch the casing after a week or so, it should start to feel a little tacky, almost sticky, just like your own skin would feel if you were in 75 percent humidity for a week. When the casing feels a little tacky, the moisture is right on. If the casing feels smooth and tight, as if it’s wrapped in plastic wrap, the humidity is too low and the salami is drying too fast. If it goes the other way and the casing feels really sticky, the humidity is too high. Don’t worry about a little white mold on the surface. That is normal. But a thick covering of mold or off-colored mold usually means the humidity is too high. If you find a salami that looks bad and isn’t getting any better, remove it so it doesn’t contaminate the whole batch.
Touch and feel the salami with gloves every couple of days. When fully cured, the salami should feel firm but slightly pliable when you try to bend one. As for looks, the meat should get a deeper and deeper red as it ages. So deep that you just want to cut it open right there and bite into it. After you do bite into it, or slice it, or devour it in a single sitting, store any leftover salami in the refrigerator. It should keep for a month or more and continue to slowly age and dry.
Both whole-muscle salumi and ground-meat sausage can be dry-cured as described here. Whole-muscle salumi is a great way to learn the process. There is minimal chance to mess things up, so I highly recommend it. Instead of dealing with grinding and stuffing, you simply soak the meat in a tub of dry cure in the refrigerator for a week or two, turn it over every day or so, then hang the meat at 50°F to 55°F and 75 percent humidity for several weeks or a few months. This is how Pancetta, Coppa, and Beef Speck are made. Starting with this whole-muscle salumi will give you confidence and time to get your curing environment dialed. Then when you move on to ground-meat sausages like Soppressata Calabrese, Fennel Salami, and Chorizo, you’ll be ready to fully enjoy the craft of making artisanal salumi in your own home with little more than meat, fat, salt, and your own two hands.
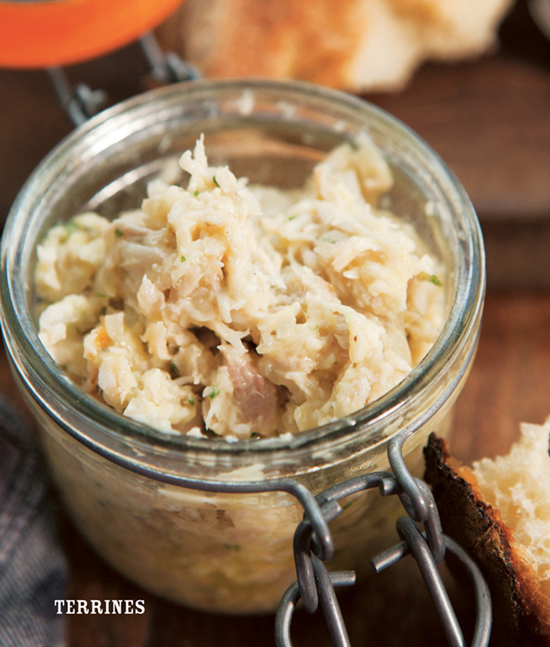
Fish may not be the first thing that comes to mind for a terrine, but it’s delicious. I like to use trout because it has a lot of natural gelatin that enriches the terrine. I usually grill the fillets for a little smoke flavor, but if you like it more plain Jane, just sear the fillets in a pan. This terrine is so easy because there is no exact cooking process, no precise poaching temperature, and no terrine mold! I spoon the mixture into tiny glass mason jars, which makes an awesome presentation at the table. With a few crackers on the side, some sliced Pickled Eggs and a dollop of Horseradish Crème Fraîche, it makes a really impressive appetizer. Or you can just serve the trout with Rustic Loaf. Or tie a ribbon around the jars and give them away as gifts!
MAKES ABOUT 1½ PINTS TOTAL, OR 6 HALF-PINT JARS FILLED HALFWAY
1¾ pounds boneless trout fillets (9 or 10 fillets)
2 tablespoons grapeseed oil
Salt and freshly ground black pepper
3 tablespoons plus 1 teaspoon unsalted butter
3 tablespoons plus 1 teaspoon olive oil
¼ cup minced shallot
2 to 4 teaspoons fresh lemon juice
2 tablespoons chopped fresh flat-leaf parsley
Light a grill for medium-high heat. Scrape the grill clean and oil it with a wad of paper towels dipped in oil. Place the trout on a foil-lined baking sheet, skin side up. Oil the skin with grapeseed oil, then flip and oil the flesh. Season the flesh with salt and pepper.
Grill the trout directly on the grill grate, flesh side down, for 2 to 3 minutes. Flip and cook just until the trout is cooked through, 1 to 2 minutes more. Transfer the grilled trout to a baking sheet to cool.
Meanwhile, melt the butter with the olive oil in a small sauté pan over medium heat. Add the shallot and cook until soft and barely browned, 2 to 3 minutes. Remove from the heat and let cool.
Working over a large bowl, use your hands to peel off and discard the trout skin, dropping the flesh into the bowl. Mix in the lemon juice, shallot mixture, and parsley. Season with salt and pepper. Mix with your hands, breaking up the flesh, but not too much. Taste and season with lemon juice, salt, and pepper as needed.
Spoon the terrine into half-pint mason jars until half full, then seal and refrigerate.
Make the terrine up to 5 days ahead and keep it sealed in the refrigerator.
BEVERAGE—Cantina Ferentana, Pecorino 2009 (Abruzzo): Recently rediscovered, the Pecorino grape is being brought back into production, and its round, balanced flavors of stone fruit, honey, and citrus are propelling it into the mainstream.
Here’s a terrine with a little flair. When you slice it, you see three layers: ground meat on top and bottom with a strip of whole duck breast pieces in the center. I make this with whole ducks and remove all the fat, skin, and bones. It’s always better (and less expensive!) to start with the whole food and break it down yourself. But you could also start with 4 pounds of skinless, boneless duck meat instead. You’ll need about 1¼ pounds breasts and 2¾ pounds thigh and leg meat. Sprinkle the finished sliced terrine with some Maldon sea salt and serve with bread and savory preserves like Artichoke Mostarda or Pickled Mustard Seeds.
MAKES 10 TO 12 SERVINGS
2 whole ducks (about 3¾ pounds each), fat, skin, and bones removed (about 4 pounds meat)
½ cup sugar
½ cup plus 2½ teaspoons kosher salt
2 to 3 tablespoons fresh thyme leaves
1½ tablespoons tipo 00 or all-purpose flour
½ teaspoon curing salt No. 1 (pink salt)
½ teaspoon ground pepper
⅓ cup heavy cream
1 egg
1 egg yolk
½ teaspoon Madeira wine
Maldon sea salt, for garnish
Separate the breasts from the rest of the duck meat and cut the breasts into cubes. Combine the sugar, the ½ cup salt, and the thyme in a medium bowl. Add the cubed breasts, tossing to coat. Cover and refrigerate for 1 hour.
Cut the remaining meat into cubes and freeze in a single layer on a baking sheet that will fit in your freezer until firm but not solid, about 1 hour. At the same time, freeze all the parts to a meat grinder.
Fit the meat grinder with the small die, then put on plastic gloves and stick your hands in a bowl of ice until very cold, almost painful. Set the grinder to high speed and grind the partially frozen meat through the small die into the bowl of a stand mixer. Add the flour, the remaining 2½ teaspoons salt, the curing salt, black pepper, cream, egg, egg yolk, and Madeira. Using the paddle attachment, mix on low speed for 1 to 2 minutes.
Rinse the salt mixture off the duck breasts and preheat the oven to 300°F.
Line an 8-cup terrine mold with heavy-duty heatproof plastic wrap, leaving enough extra plastic hanging over the sides to cover the mold when it is filled. To get 3-inch rectangular slices, use a 15½ by 3¼ by 3-inch terrine or pullman loaf pan (pain de mie; 8-cup capacity). Or use 4 mini-loaf pans (each 5½ by 3 by 2 inches) for a similar shape. Gently pack half of the meat mixture into an even layer in the plastic-lined mold. Lay the duck breasts over the meat. Gently pack the remaining meat mixture around and over the breasts to create three layers. Securely pack in the meat to eliminate all air pockets. It’s important to press out all the air to help keep the terrine from spoiling. Smooth the top and fold the plastic over the meat, covering it completely and gently pressing it onto the meat.
Set the mold in a larger, deep roasting pan and put on the center oven rack. Pour enough hot water into the larger pan to come at least ½ inch up the sides of the mold. Bake in the water bath to an internal temperature of 145°F, 1 to 1½ hours for a single large mold or 45 to 55 minutes for several small molds.
Remove the terrine from the oven and compact it: cut a piece of cardboard to fit inside the terrine mold; put a heavy weight over the cardboard, and let cool to room temperature. When cool, remove the weight, cover with plastic wrap, and refrigerate until cold.
Unmold the terrine and slice about ½ inch to 1 inch thick. Sprinkle each slice with Maldon sea salt. Refrigerate any remaining terrine for up to 1 week.
You can bone the ducks, removing all fat and skin, up to a day ahead of time and refrigerate the meat in an airtight container.
BEVERAGE—Scarbolo, Merlot 2006 “Campo del Viotto” (Friuli): Made in the Amarone style, this Merlot exhibits rich, dried fruit flavors and spice but also feels fresh. It displays much of that weighty mouthfeel that Amarone has while retaining a velvety texture that complements the smoothness of the terrine.
This is by far my favorite terrine. Brad Spence, my chef at Amis, came up with it, and I love its sage and coriander flavors. It’s also firm enough to slice yet soft enough to spread on bread. I like to serve it with toasted Brioche and Shallot Marmalade. If you can’t find pork liver, you can use the same amount of chicken liver instead. But the pork liver is much, much better.
MAKES 6 TO 8 SERVINGS
1¼ pounds pork liver, cut into 1-inch cubes
1¼ pounds boneless pork butt (shoulder), cut into 1-inch cubes
1½ teaspoons grapeseed oil or olive oil
1 cup finely chopped onion
1 tablespoon chopped fresh sage
5½ teaspoons kosher salt
1 teaspoon sugar
1 teaspoon ground pepper
1 teaspoon ground coriander
½ teaspoon curing salt No. 1 (pink salt)
6½ tablespoons heavy cream
1 egg
Maldon sea salt, for garnish
Freeze the pork liver and pork butt in a single layer on a baking sheet until firm but not solid, about 1 hour. At the same time, freeze all the parts to a meat grinder.
Meanwhile, heat the oil in a small sauté pan over medium heat. Add the onion and sage and cook until soft but not browned, about 5 minutes. Let cool.
Fit the meat grinder with the small die, then put on plastic gloves and stick your hands in a bowl of ice until cold, almost painful. Set the grinder to high speed and grind the cold liver, shoulder, and onion mixture into the bowl of a stand mixer. Add the salt, sugar, pepper, coriander, curing salt, cream, and egg. Mix on low speed with the flat beater until sticky like wet bread dough, about 1½ minutes.
Preheat the oven to 300°F. Line a 6-cup terrine mold with heavy-duty heatproof plastic wrap, leaving enough extra plastic hanging over the sides to cover the mold when it is filled. To get 2½-inch rectangular slices, use an 8-cup terrine or pullman loaf pan (pain de mie). Or use 3 mini-loaf pans (each 5½ by 3 by 2 inches) for a similar shape. Gently pack the meat mixture into the mold, pressing to eliminate all air pockets. Smooth the top and fold the plastic over the meat, covering it completely and gently pressing it onto the meat.
Set the mold in a larger, deep roasting pan or baking sheet and place on the center oven rack. Pour enough hot water into the large pan to come at least ½ inch up the sides of the mold. Bake in the water bath to an internal temperature of 145°F, 40 to 50 minutes for a single large mold or 30 to 40 minutes for small molds.
Remove the terrine from the oven and compact it by cutting a piece of cardboard to fit inside the terrine mold; put a heavy weight on top of the cardboard and let cool to room temperature. Remove the weight, cover with plastic wrap, and refrigerate until cold.
Unmold the terrine and slice ½ inch to 1 inch thick. Sprinkle each slice with Maldon sea salt. Refrigerate any terrine for up to 1 week.
BEVERAGE—Birrificio Italiano, Scires NV (Lombardia): This beautiful sour ale brewed with cherries has a sweet/tart flavor that exemplifies Italy’s thriving craft beer culture: exciting, original, often with a nod to Belgium, and sometimes incorporating herbs, fruit, nuts, spices, and tea.


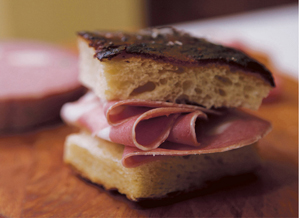
Whenever I can, I go to Vinitaly, the wine show held every year in Verona. It is the largest wine show in the world, taking up ten airplane hangars. If you go, you’ll find little mortadella panini everywhere at the show. Mortadella is the classic Italian pork salami made with cubes of pork fat. At Vinitaly, you can’t miss the mortadella. It’s usually sitting on a table, and it’s almost as big as one of the mini cars you’ll see on the city streets. You’ll find a big knife like a machete on the table. Just slice off hunks of the mortadella, put them on one of the small rolls on the table, and slather on some mayonnaise. I once spent a whole day at the wine show eating those little sandwiches. But when it came time to make it myself, I thought, “You always see pork mortadella. Let’s try something different!” In the summer of 2010, my chef Brad Spence tried it with lamb and it was fantastic. The key here, as with all mortadella, is the grinding. I like to grind it five times, but if you do more, it won’t hurt. The more you grind the meat, the creamier the mortadella will become. Once it’s cured, try it in sandwiches, in Mortadella Tortelli with Pistachio Pesto, or on Mortadella Pizza.
MAKES ONE 5-POUND SAUSAGE
4 pounds (1.8 kg) lean lamb leg meat, cubed
1 pound (450 g) pork fatback, cubed, plus 8 ounces fatback (225 g), cut into ½-inch dice
1 clove garlic (4 g), smashed
1 tablespoon (15 g) dry white wine
1 cup (224 g) crushed ice with water
⅔ cup (89 g) dry milk
¼ cup plus 1 tablespoon (44 g) kosher salt
3 tablespoons (22 g) dextrose powder, or 2 tablespoons (16 g) superfine sugar
1¾ teaspoons (8 g) unflavored powdered gelatin
1 teaspoon (6 g) curing salt No. 1 (pink salt)
1 teaspoon (3.5 g) whole black peppercorns, ground
1 teaspoon (3 g) whole coriander seeds, ground
⅛ teaspoon (0.5 g) ground nutmeg
⅔ cup pistachios (70 g)
1 beef bung, soaked in cold water for 1 hour, then rinsed inside and out
Freeze the lamb and 1 pound cubed fatback in a single layer on a baking sheet until firm but not solid, about 1 hour. At the same time, freeze all the parts to a meat grinder.
Meanwhile, blanch the 8 ounces ½-inch-diced fatback by immersing it in boiling water for 30 seconds, then immersing it in ice water until cold. Refrigerate until needed. Soak the garlic in the wine for 30 minutes, then discard the garlic and keep the wine.
Fit the meat grinder with the large die. Put on plastic gloves and stick your hands in a large bowl of ice until very cold, almost painful. Place the bowl of a stand mixer in the large bowl of ice, then set the grinder to high speed. Grind the cold lamb and fat into the mixer bowl. Cover the bowl and freeze for 10 minutes. Switch to the small die in the grinder, then uncover the meat and grind with the small die 4 more times, covering and freezing the bowl for 10 minutes between each grinding. You can also work in batches, dividing the ground mixture between two small baking sheets and keeping one batch in the freezer while grinding the other batch. Just be sure to grind at least 5 times so the mixture is very smooth.
Add the ice water, dry milk, kosher salt, dextrose, gelatin, curing salt, ground pepper, ground coriander, and nutmeg to the lamb mixture. Mix with the paddle attachment (or the dough hook if your mixer seems to be working too hard) on medium speed for a minute or so. Add the wine, blanched fatback, and pistachios and mix until the meat is sticky, like wet bread dough, another minute or so.
Attach a large sausage stuffer tube to the grinder. You may need to leave off the retainer bar so the pistachios will fit through the tube. Grease the stuffer tube with some of the meat mixture. The next step of stuffing the sausage is much easier with two people: if you can, have one person feed in the meat and the other person handle the casing as it fills up. Feed some of the meat into the feed tube on high speed until it just starts to poke out the end of the sausage stuffer. Turn off the machine. Slip the open end of the beef bung (casing) onto the stuffer all the way to the end, like putting a sock on your foot. Put pressure on the end of the casing so it’s gently pressed against the stuffer. Turn the machine to high speed and feed in the meat. Keep gentle pressure on the casing so the meat packs into the middle of the casing as tightly as possible. You want no air in there. As the meat gets stuffed into the casing, it should surround at least 1 inch of the end of the stuffer tube to prevent air from getting into the sausage. While stuffing, constantly check the sausage for air bubbles, working them out the open end of the casing as necessary. Continue stuffing the meat into the casing until you have a tight sausage about 1 foot long.
Remove the stuffed casing from the stuffer, grab the open end, and squeeze it down tightly against the meat to pack it down. Twist the open end several times against the meat until the sausage is firm and sealed. Tie off the twisted end with butcher’s string. If necessary, tie the mortadella in several places to make it tight.
Put the mortadella in a large, deep roasting pan and cover with cold water. Put the pan over medium-high heat and bring the water to 160°F. Adjust the heat to maintain that temperature until the mortadella reaches an internal temperature of 150°F, 2 to 3 hours. Remove from the water and immerse in a large bowl of ice water (or the emptied roasting pan) until the mortadella is cool.
Store in the refrigerator for up to 2 weeks.
BEVERAGE—Monzio Compagnoni, Saten 2002 (Lombardy): This beautiful, richly flavored sparkler is my go-to alternative to Champagne. The quality will surprise you. Bottled at a lower atmospheric pressure near the lake district in Lombardy, Saten exhibits a soft, sparkling character with flavors of apple, pear, and spice. The mortadella, with its silky texture and pistachios, benefits from this wine’s supple mouthfeel.
Salami requires a careful balance of lean meat and fat, and rabbit has very little fat, so you need to add a little more fat than usual here or the sausage won’t be tender. I like to serve this sliced and seared with some crusty bread (try the Rustic Loaf) and dried fruit. My favorite is prunes soaked in Armagnac.
MAKES ABOUT 5 POUNDS
4 pounds (1.8 kg) boneless lean rabbit meat, cubed
1 pound (450 g) pork fatback, cubed, plus 4 ounces (125 g) pork fatback, cut into ½-inch dice
1 small clove garlic (2.5 g), smashed
4 tablespoons plus 1¼ teaspoons (62.5 g) dry white wine
⅓ cup plus ¾ teaspoon (50 g) kosher salt
5¼ teaspoons (12.5 g) dextrose powder, or 4 teaspoons (10 g) superfine sugar
1 tablespoon (6 g) mustard powder
1 teaspoon (6 g) curing salt No. 1 (pink salt)
1 teaspoon (3.5 g) cracked pepper
1 teaspoon (2 g) chopped fresh sage
¼ teaspoon (1 g) ground juniper berries
1 cup (125 g) pistachios
Beef middles, soaked in cold water for 1 hour, then rinsed inside and out
Freeze the rabbit and 1 pound cubed fatback in a single layer on a baking sheet until firm but not solid, about 1 hour. At the same time, freeze all the parts to a meat grinder.
Meanwhile, blanch the 4 ounces ½-inch-cubed fatback pieces in boiling water for 30 seconds, then immerse in ice water until cold. Refrigerate until needed. Soak the garlic in the wine for 30 minutes, then discard the garlic and keep the wine.
Fit the meat grinder with the large die, then scatter the kosher salt, dextrose, mustard powder, curing salt, black pepper, sage, and ground juniper berries over the cold meat and fat. Put on plastic gloves, then stick your hands in a large bowl of ice until very cold, almost painful. Place the bowl of a stand mixer in the large bowl of ice. Mix together the meat and seasonings with your hands, then set the grinder on high speed. Grind the meat, the 1 pound fatback, and the seasonings into the mixer bowl. Dump the mixture back onto the baking sheet and grind it a second time. Add the wine, the blanched diced fatback, and the pistachios to the bowl.
Mix with the paddle attachment (or the dough hook if your mixer seems to be working too hard) on medium speed until the mixture is sticky, like wet bread dough, about 2 minutes.
Cut the beef middles into 1½-foot lengths and tie one end tight with butcher’s string. Attach a large sausage stuffer tube to the food grinder. You may need to leave off the retainer bar so the pistachios will fit through the tube. Grease the stuffer tube with some of the meat mixture. The next step of stuffing the sausage is much easier with two people. If you can, have one person feed in the meat and the other person handle the casing as it fills up. Feed some of the meat mixture into the feed tube on high speed until it just starts to poke out the end of the sausage stuffer. Turn off the machine. Slip the open end of a beef middle (casing) onto the stuffer all the way to the end, like putting a sock on your foot. Put pressure on the end of the casing so it’s gently pressed against the stuffer. Turn the machine on high speed and feed in the meat. Keep gentle pressure on the casing so the meat packs into the middle of the casing as tightly as possible. You want no air in there. As the meat gets stuffed into the casing, the meat should surround at least 1 inch of the end of the stuffer tube to prevent air from getting into the sausage. Constantly check the sausage for air bubbles,
working them out the open end of the casing as necessary. Continue stuffing the meat into the casing until you have a tight sausage about 1 foot long.
Remove the stuffed casing from the stuffer, grab the open end, and squeeze it down tightly against the meat to pack it down firmly. Twist the open end several times against the meat until the sausage is tight and sealed. Tie off the twisted end with butcher’s string. Repeat with more tied beef middles until the meat mixture is used up.
Put the salami in a large roasting pan and cover with cold water. Put the pan over medium-high heat and bring the water to 145°F. Adjust the heat to maintain that temperature until the salami reaches an internal temperature of 145°F on a meat thermometer, 1 to 1½ hours. Remove from the water and immerse in a large bowl of ice water (or the emptied roasting pan) until the salami is cool.
Store in the refrigerator for up to 2 weeks. You can slice and serve this salami cold. But I like to sear pieces in a hot pan and serve them warm.
BEVERAGE—Paitin di Pasquera Elia-Langhe 2006 (Piedmont): This fresh Nebbiolo-Barbera blend has just the right acidity and earthy spiciness to keep pace with the rabbit.
I got bored with making meat sausages, but all the seafood sausages I ever tried were weak and rubbery. Not these. Swordfish has enough fat and a firm enough texture to make a satisfying sausage. Of course, it is fish, so it’s still somewhat delicate. Keep an eye on the temperature of your poaching water. If it’s too hot, the sausage will lose all its juices. When poached carefully, it’s amazing. As with the Rabbit Salami, I like to cut this sausage into medallions and quickly sear them in a hot pan in a little grapeseed oil. It gives the sausage a nice crispy crust.
MAKES ABOUT 3 POUNDS
2½ pounds (1125 g) swordfish, cubed
12 ounces (375 g) pork fatback, cubed
3 tablespoons (25 g) kosher salt
1½ teaspoons plus ⅛ teaspoon (6.25 g) sugar
½ teaspoon (1.5 g) ground pepper
½ teaspoon (1.5 g) ground coriander
1 small clove garlic (2.5 g), minced
¼ cup (55 g) water
Hog casings, soaked in cold water for 1 hour, then rinsed inside and out
Freeze the fish and fatback in a single layer on a baking sheet until firm but not solid, about 1 hour. At the same time, freeze all the parts to a meat grinder.
Fit the meat grinder with the large die, then put on plastic gloves and stick your hands in a large bowl of ice until very cold, almost painful. Place the bowl of a stand mixer in the large bowl of ice, then set the grinder on high speed. Grind the fish and fat into the mixer bowl.
Add the kosher salt, sugar, pepper, coriander, garlic, and water. Mix with the paddle attachment on medium speed until the mixture is sticky, like wet bread dough, 3 to 4 minutes.
Attach a large sausage stuffer tube to the food grinder and grease the tube with some of the fish mixture. The next step of stuffing the sausage is much easier with two people: if you can, have one person feed in the fish mixture and the other person handle the casing as it fills up. Feed some of the fish mixture into the feed tube on high speed until it just starts to poke out the end of the sausage stuffer. Turn off the machine. Slip the open end of a hog casing onto the stuffer all the way to the end, like putting a sock on your foot. Put pressure on the end of the casing so it’s gently pressed against the stuffer. Turn the machine to high speed and feed in the fish mixture. Keep gentle pressure on the casing so the mixture packs into the middle of the casing as tightly as possible. You want no air in there. As the fish gets stuffed into the casing, it should surround at least 1 inch of the end of the stuffer tube to prevent air from getting into the sausage. Constantly check the sausage for air bubbles, working them out the open end of the casing as necessary. Continue stuffing the mixture into the casing, and when you reach the length of a link (I like 6-inch lengths for these sausages), twist the link a few times to seal one end. Continue stuffing until you reach another link length, then twist that link in the opposite direction. This will keep the links from unraveling. Continue stuffing until the casing is full and all the mixture is used, using additional hog casings as necessary.
Remove the stuffed casing from the stuffer, grab the open end, and squeeze it down tightly against the fish to pack it firmly. Twist the open end several times against the fish until the sausage is firm and sealed. Tie off the twisted end with butcher’s string. Repeat with more tied beef middles until the fish mixture is used up.
Put the sausage in a large roasting pan and cover with cold water. Put the pan over medium-high heat and bring the water to 160°F. Adjust the heat to maintain that temperature until the sausage reaches an internal temperature of 150°F on a meat thermometer, 10 to 15 minutes. Remove from the water and immerse in a large bowl of ice water until the sausage is cool.
Cut between the links and store in the refrigerator for up to 2 weeks or freeze for up to 1 month. You can grill or pan-sear this sausage whole, but I like to slice it into coins and sear the coins in a little oil in a hot pan.
BEVERAGE—Anselmi, San Vincenzo 2008 (Veneto): From the Soave region of the Veneto, this Garganega/Chardonnay blend exhibits some weight on the palate, and the intensity of its citrus, pear, and hazelnut aromas picks up on the coriander and garlic in the sausage.

This is one of my favorites. Years ago, when I started making dry-cured salami, Calabrese was the first. For me, it is the perfect combination of salt and spice. It’s kind of like pepperoni, but sooo much better. If you like it really spicy, up the amount of red pepper flakes and black pepper.
MAKES ABOUT 3½ POUNDS (ABOUT TWO 12-INCH-LONG SALAMI)
4 pounds (2 kg) boneless pork butt (shoulder), cubed
1 pound (500 g) pork fatback, cubed
1 small clove garlic (2.5 g), smashed
¼ cup plus 4 teaspoons (75 g) dry red wine
½ cup plus 1½ teaspoons (70 g) kosher salt
5¼ teaspoons (12.5 g) dextrose powder, or 4 teaspoons (10.5 g) superfine sugar
2 teaspoons (4 g) red pepper flakes
1 teaspoon (6 g) curing salt No. 2
1 teaspoon (3.5 g) cracked black pepper
½ teaspoon (1.5 g) ground white pepper
Beef middles, soaked in cold water for 1 hour, then rinsed inside and out
Freeze the pork and fatback in a single layer on a baking sheet until firm but not solid, about 1 hour. At the same time, freeze all the parts to a meat grinder.
Soak the garlic in the wine for 30 minutes, then discard the garlic and keep the wine.
Fit the meat grinder with the large die, then scatter the kosher salt, dextrose, red pepper flakes, curing salt, black pepper, and white pepper over the cold meat and fat. Put on plastic gloves, then stick your hands in a large bowl of ice until very cold, almost painful. Place the bowl of a stand mixer in the large bowl of ice. Mix together the meat and seasonings with your hands, then set the grinder on high speed. Grind the meat, fat, and seasonings into the mixer bowl. Dump the mixture back onto the baking sheet and grind it a second time.
Pour the wine over the meat, then set the bowl in the stand mixer fitted with the paddle attachment. Mix on medium speed until the mixture is sticky, like wet bread dough, about 2 minutes.
Cut the beef middles to 1½-foot lengths and tie one end tightly with butcher’s string. Attach a large sausage stuffer tube to the food grinder. Grease the stuffer tube with some of the meat mixture. The next step of stuffing the sausage is much easier with two people: if you can, have one person feed in the meat and the other person handle the casing as it fills up. Feed some of the meat mixture into the feed tube on high speed until it just starts to poke out the end of the sausage stuffer. Turn off the machine. Slip the open end of a beef middle (casing) onto the stuffer all the way to the end, like putting a sock on your foot. Put pressure on the end of the casing so it’s gently pressed against the stuffer. Turn the machine to high speed and feed in the meat. Keep gentle pressure on the casing so the meat packs into the middle of the casing as tightly as possible. You want no air in there. As the meat gets stuffed into the casing, the meat should surround at least 1 inch of the end of the stuffer tube to prevent air from getting into the sausage. Constantly check the sausage for air bubbles, working them out the open end of the casing as necessary. Continue stuffing the meat into the casing until you have a firm sausage about 1 foot long.
Remove the stuffed casing from the stuffer, grab the open end, and squeeze it down tightly against the meat to pack it firmly. Twist the open end several times
against the meat until the sausage is firm and sealed. Tie off the twisted end with butcher’s string, leaving enough extra string for hanging. Repeat with more tied beef middles until the meat mixture is used up.
Ferment the sausage in a warm (80°F to 90°F), dark place with 100 percent humidity for 36 hours. See
Fermentation for options on setting up the fermentation environment.
After fermentation, hang the sausage in a cool (50°F to 55°F), dark place with some air circulation and 75 percent humidity until the salami feels firm yet slightly pliable, usually 6 to 8 weeks (see
Equipment and Doneness). Check the salami every couple of days. It should feel a little tacky on the surface and lose 25 to 30 percent of its weight. Some white mold is okay. A thick covering of mold usually means the humidity is too high. If the casing becomes hard and brittle, the humidity is too low.
Remove and store in the refrigerator for several months.
BEVERAGE—Librandi, Ciro Rosato 2008 (Calabria): Soppressata is rich, salty, and supremely satisfying. The wild berry, date, and spice aromas of this fresh rosato—as well as its solid acidity—act as the perfect foil.
If you want to be inspired by salumi, go to Italy. You can get mortadella the size of tree trunks in one city and tender, young sausages no more than three days old in another. When I went back to visit friends in Bergamo in 2008, we ate at La Brughiera in Villa d’Almè. They served a soppressata made in the traditional way, but instead of aging it until it was firm, they served it after only three days. It was so soft, you could spread it with a butter knife. The bread on the side of the plate was there for just that purpose. It was the most flavorful sausage I have ever tasted. This soft, young dry-cured sausage opened my eyes to so many new things about sausage making. When I got home, I immediately cut into my dry-cured sausages to see how they would taste. They were a little more aged than three days, but one bite told me that I would be serving sausages in new ways from there on out.

Fennel Salami
I like my salami very young. I only age them for about six weeks. But you could age them even less. Do an experiment: when you make dry-cured salami, cut into one of them after a week and taste it. Wait another week, then cut into another one. The next week, another one. It can be very satisfying to watch and taste how the salami changes as it ages. Maybe you’ll find out that you prefer your salami after eight weeks of curing, and that’s fine.
MAKES ABOUT 3½ POUNDS (ABOUT EIGHT 12-INCH-LONG SALAMI)
4 pounds (1.8 kg) boneless pork butt (shoulder), cubed
1 pound (500 g) pork fatback, cubed
2 cloves garlic (7.5 g), smashed
¼ cup plus 4 teaspoons (75 g) red wine
½ cup plus 1½ teaspoons (70 g) kosher salt
5¼ teaspoons (12.5 g) dextrose powder, or 4 teaspoons (10.5 g) superfine sugar
½ teaspoon (1.5 g) cracked pepper
2 teaspoons (5.5 g) fennel seeds
1 teaspoon (6 g) curing salt No. 2
Beef middles, soaked in cold water for 1 hour, then rinsed inside and out
Freeze the pork and fatback in a single layer on a baking sheet until firm but not solid, about 1 hour. At the same time, freeze all the parts to a meat grinder. Soak the garlic in the wine for 30 minutes, then discard the garlic and keep the wine.
Fit the meat grinder with the large die, then scatter the kosher salt, dextrose, black pepper, fennel seeds, and curing salt over the cold meat and fat. Put on plastic gloves, then stick your hands in a large bowl of ice until very cold, almost painful. Place the bowl of a stand mixer in the large bowl of ice. Mix together the meat and seasonings with your hands, then set the grinder on high speed. Grind the meat, fat, and seasonings into the mixer bowl. Dump the mixture back onto the baking sheet and grind it a second time.
Pour the wine over the meat, then set the bowl in the stand mixer fitted with the paddle attachment. Mix on medium speed until the mixture is sticky, like wet bread dough, about 2 minutes.
Cut the beef middles toto 1½-foot lengths and tie one end tightly with butcher’s string. Attach a large sausage stuffer tube to the food grinder. Grease the stuffer tube with some of the meat mixture. The next step of stuffing the sausage is much easier with two people: if you can, have one person feed in the meat and the other person handle the casing as it fills up. Feed some of the meat mixture into the feed tube on high speed until it just starts to poke out the end of the sausage stuffer. Turn off the machine. Slip the open end of a casing onto the stuffer all the way to the end, like putting a sock on your foot. Put pressure on the end of the casing so it’s gently pressed against the stuffer. Turn the machine to high speed and feed in the meat. Keep gentle pressure on the casing so the meat packs into the middle of the casing as tightly as possible. You want no air in there. As the meat gets stuffed into the casing, the meat should surround at least 1 inch of the end of the stuffer tube to prevent air from getting into the sausage. Constantly check the sausage for air bubbles, working them out the open end of the casing as necessary. Continue stuffing the meat into the casing until you have a firm sausage about 1 foot long.
Remove the stuffed casing from the stuffer, grab the open end, and squeeze it down tightly against the meat to pack it firmly. Twist the open end several times against the meat until the sausage is firm and sealed. Tie off the twisted end with butcher’s string, leaving enough extra string for hanging. Repeat with more tied casings until the meat mixture is used up.
Ferment the sausage in a warm (80°F to 90°F), dark place with 100 percent humidity for 36 hours. See
Fermentation for options on setting up the fermentation environment.
After fermentation, hang the sausage in a cool (50°F to 55°F), dark place with some air circulation and 75 percent humidity until the salami feels firm yet slightly pliable, usually 6 to 8 weeks (see
Equipment and Doneness for options on setting up the curing environment). Check the salami every couple of days. It should feel a little tacky on the surface and lose 25 to 30 percent of its weight. Some white mold is okay, but a thick covering of mold usually means the humidity is too high. If the casing becomes hard and brittle, the humidity is too low.
Remove and store in the refrigerator for several months.
BEVERAGE—Casa Girelli, Primitivo 2007 “Virtuoso” (Puglia): Herbal spice and rich, dried fruit and earth flavors characterize this Primitivo, which is the genetic equivalent of Zinfandel.
I have tasted chorizos for years, but I never really had one I liked until I went to Barcelona. There, in La Boqueria, the big main market, I found the perfect texture and flavor: firm yet pliable, not quite spicy, but redolent with the smoky aroma of pimentón, and perfectly salted. Everything was dead on. When I got home, I started experimenting to re-create that exact flavor and texture. I think this is pretty damn close. It’s milder than the heavily spiced Spanish chorizo you might be used to. And don’t confuse it with Mexican chorizo, which is an uncooked fresh sausage.
MAKES ABOUT 3½ POUNDS (ABOUT EIGHT 12-INCH-LONG SALAMI)
4 pounds (1.8 kg) boneless pork butt (shoulder), cubed
1 pound (500 g) pork fatback, cubed
2 cloves garlic (7.5 g), smashed
¼ cup plus 4 teaspoons (75 g) red wine
½ cup plus 1½ teaspoons (70 g) kosher salt
10½ teaspoons (25 g) dextrose powder, or 8 teaspoons (21 g) superfine sugar
3 tablespoons (24 g) pimentón (smoked paprika)
1 tablespoon (10 g) cracked pepper
1 teaspoon (6 g) curing salt No. 2
Beef middles, soaked in cold water for 1 hour, then rinsed inside and out
Freeze the pork and fatback in a single layer on a baking sheet until firm but not solid, about 1 hour. At the same time, freeze all the parts to a meat grinder. Soak the garlic in the wine for 30 minutes, then discard the garlic and keep the wine.
Fit the meat grinder with the large die, then scatter the kosher salt, dextrose, pimentón, black pepper, and curing salt over the cold meat and fat. Put on plastic gloves, then stick your hands in a large bowl of ice until very cold, almost painful. Place the bowl of a stand mixer in the large bowl of ice. Mix together the meat and seasonings with your hands, then set the grinder on high speed. Grind the meat, fat, and seasonings into the mixer bowl. Dump the mixture back onto the baking sheet and grind it a second time.
Pour the wine over the meat, then set the bowl in the stand mixer fitted with the paddle attachment. Mix on medium speed until the mixture is sticky, like wet bread dough, about 2 minutes.
Cut the beef middles into 1½-foot lengths and tie one end tightly with butcher’s string. Attach a large sausage stuffer tube to the food grinder. Grease the stuffer tube with some of the meat mixture. The next step of stuffing the sausage is much easier with two people: if you can, have one person feed in the meat and the other person handle the casing as it fills up. Feed some of the meat mixture into the feed tube on high speed until it just starts to poke out the end of the sausage stuffer. Turn off the machine. Slip the open end of a casing onto the stuffer all the way to the end, like putting a sock on your foot. Put pressure on the end of the casing so it’s gently pressed against the stuffer. Turn the machine to high speed and feed in the meat. Keep gentle pressure on the casing so the meat packs into the middle of the casing as tightly as possible. You want no air in there. As the meat gets stuffed into the casing, the meat should surround at least 1 inch of the end of the stuffer tube to prevent air from getting into the sausage. Constantly check the sausage for air bubbles, working them out the open end of the casing as necessary. Continue stuffing the meat into the casing until you have a firm sausage about 1 foot long.
Remove the stuffed casing from the stuffer, grab the open end, and squeeze it down tightly against the meat to pack it firmly. Twist the open end several times against the meat until the sausage is firm and sealed. Tie off the twisted end with butcher’s string, leaving enough extra string for hanging. Repeat with more tied casings until the meat mixture is used up.
Ferment the sausage in a warm (80°F to 90°F), dark place with 100 percent humidity for 36 hours. See
Fermentation for options on setting up the fermentation environment.
After fermentation, hang the sausage in a cool (50°F to 55°F), dark place with some air circulation and 75 percent humidity until the salami feels firm yet slightly pliable, usually 6 to 8 weeks (see
Equipment and Doneness for options on setting up the curing environment). Check the salami every couple of days. It should feel a little tacky on the surface and lose 25 to 30 percent of its weight. Some white mold is okay, but a thick covering of mold usually means the humidity is too high. If the casing becomes hard and brittle, the humidity is too low.
Remove and store in the refrigerator for several months.
BEVERAGE—Bastianich, Rosato 2008 (Friuli)/Beba, Toro Doppio Malto NV (Piedmont): The Rosato is made from the Refosco grape, which produces a deep rosy color, a hefty mouthfeel, and pronounced spice and red fruit flavors that stand up well to the smoky, spicy chorizo. Or try a beer with this sausage. Toro Doppio Malto from Piedmont complements the chorizo by imparting a nutty caramel component that softens its spice.

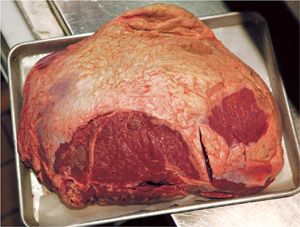
The region of Tyrol is part Italian, part Austrian, and famous for the lightly smoked, juniper-scented dry-cured ham called speck. Even though pork leg is traditional, I wanted to show you that beef makes great speck, too. I love it sliced paper-thin and draped on a plate like carpaccio, with some lumps of Gorgonzola cheese and pickled vegetables.
MAKES ABOUT 4 POUNDS
5 pounds (2.25 kg) beef top round
⅔ cup plus 1¼ teaspoons (100 g) kosher salt
5¼ teaspoons (12.5 g) dextrose or 4 teaspoons (10.5 g) superfine sugar
½ teaspoon (2 g) crushed garlic
1 teaspoon (1.5 g) ground black pepper
1 teaspoon (6 g) curing salt No. 2
½ teaspoon (2 g) ground juniper berries
¼ teaspoon (0.5 g) red pepper flakes
Rinse the beef and pat it dry. Combine all the remaining ingredients in a shallow plastic tub with an airtight lid.
Wearing plastic gloves, add the beef to the cure and rub the cure all over the meat. Cover and refrigerate for 10 days. Wearing gloves, turn over the beef every day or so and rub with the liquid from the bottom of the tub.
Rinse the beef, pat it dry, and set it on a wire rack. Cover and refrigerate for 1 day to dry the surface and form a sort of “skin” known as a pellicle. The surface should feel somewhat tacky, a texture that helps absorb smoke aromas.
Lightly smoke the beef using very low heat (100 to 125°F) and oak or hickory wood for 30 minutes. On a stove top, you can put wood chips or shavings on one side of a large roasting pan, then put a small wire rack on the other side of the pan. Set the chips side of the pan over a burner on medium-high heat until you see smoke (turn on your hood vent or open a window). Lower the heat to medium and set the beef on the rack on the opposite side of the pan, away from the heat. Cover tightly with aluminum foil and smoke for 30 minutes. Peek under the cover once or twice to make sure the chips are still smoking. If they burn up, replenish them.
After smoking, if there is any moisture on the surface of the beef, pat it dry. Tie butcher’s string securely around the beef in several places or lengthwise through the top of it using a trussing needle. You could also put the beef in a mesh meat bag.
Hang the speck in a cool (50°F to 55°F), dark environment with some air circulation and 75 percent humidity until it feels firm yet slightly pliable, usually 4 to 5 months. It should feel a little tacky on the surface and lose 20 to 25 percent of its original weight. A little white mold is okay. See
Curing for options on setting up the curing environment.
BEVERAGE—Piccolo Birrificio “Chiostro”: The herbal spice from the juniper in this salumi is what sets it apart on a charcuterie board. I can think of nothing better to drink with it than Chiostro, a witbier from Liguria that’s scented with wormwood from a dash of absinthe in the beer.
When I started making salumi, I messed around with coppa a lot. I made it with whole pork butt and with cut-up pieces. I tried hanging the coppa with nothing around it, and I tried stuffing it in cheesecloth. What I liked best was stuffing the whole muscle into beef bungs. Pork butt, or shoulder, is an uneven cut because of all the bone that is removed, and stuffing it into a big casing helps it hold its shape so it’s easier to slice when fully cured. By the way, this is the “cold cut” that you often find on submarine sandwiches called “capicola” or, even worse, “gabagool.” Let’s just call this salumi what it is: coppa. Be sure to slice it paper-thin or it will be too chewy.
MAKES ABOUT 4 POUNDS
5 pounds (2.25 kg) boneless pork butt (shoulder) in one piece
⅔ cup plus 1¼ teaspoons (100 g) kosher salt
5¼ teaspoons (12.5 g) dextrose powder, or 4 teaspoons (10.5 g) superfine sugar
1 teaspoon (3.5 g) cracked pepper
2 cloves garlic (7.5 g), minced
1 teaspoon (6 g) curing salt No. 2
Leaves from 3 to 4 sprigs rosemary (6 g), chopped (about 1 tablespoon)
1 beef bung, about 1½ feet long, soaked in cold water for 1 hour, then rinsed inside and out
Rinse the pork and pat it dry. Combine all the remaining ingredients except the bung in a shallow plastic tub with an airtight lid.
Wearing plastic gloves, add the pork to the cure and rub the cure all over the meat. Cover and refrigerate for 15 days. Wearing gloves, turn over the pork every day or so and rub with the liquid from the bottom of the tub.
Rinse the pork and pat dry, then stuff it into the beef bung, packing it in tight and massaging the bung so the meat takes the oblong shape of the bung. Twist the open end of the bung tightly against the pork. Tie butcher’s string tightly around the twisted end to seal it, leaving extra string for hanging.
Hang the coppa in a dark environment with some air circulation at 50°F to 55°F and 75 percent humidity until it feels firm yet slightly pliable, 2 to 3 months. It should feel a little tacky on the surface and lose 20 to 25 percent of its original weight. See
Curing for options on setting up the curing environment.
BEVERAGE—Monteflor, Friulano 2009 “Satis” (Friuli): Friulano is the classic wine to pair with salumi. The wine has bright acidity and light flavors of lemon oil with salty minerality. This is a great example of how a modest wine can be elevated by its food pairing.
Americans tend to like pork bellies smoked and cured with lots of sugar. That’s American bacon. Italians usually skip the smoke and let the pork belly speak for itself. Pure and simple. You often see pancetta rolled, but this flat method is much easier. When you roll pancetta, you need to make it airtight. If you don’t, there will be air pockets that let bacteria grow, which can ruin the pancetta. Making flat pancetta gives you the same flavor and texture but without the added risk. You can use this pancetta anywhere you would normally use bacon.
MAKES ABOUT 4 POUNDS
5 pounds (2.25 kg) pork belly
⅔ cup plus 1¼ teaspoons (100 g) kosher salt
5¾ teaspoons (25 g) granulated sugar
1 teaspoon (6 g) curing salt No. 2
1 teaspoon (3 g) ground pepper
½ teaspoon (1.5 g) ground cinnamon
Rinse the pork belly and pat it dry. Combine all the remaining ingredients in a shallow plastic tub with an airtight lid.
Wearing plastic gloves, add the pork belly to the cure and rub the cure all over the belly. Cover and refrigerate for 10 to 12 days. Wearing gloves, turn over the belly every day or so and rub with the liquid from the bottom of the tub.
Rinse the belly and pat it dry. Tie butcher’s string securely around the belly in several places or lengthwise through the top of it using a trussing needle, leaving extra string for hanging. You could also put the belly in a mesh meat bag.
Hang the pancetta in a dark environment with some air circulation at 50°F to 55°F and 75 percent humidity until it feels firm yet slightly pliable, 2 to 3 months. It should feel a little tacky on the surface and lose 20 to 25 percent of its original weight. See
Curing for options on setting up the curing environment.
BEVERAGE—Cantina di Montecchia, Lessini Durello NV Brut (Veneto): Here’s a compelling Venetian sparkling wine: floral with stone fruit aromas and lots of minerality on the palate to complement the saltiness of the pancetta but cut through the fat.
If you’ve never tasted cured pork fatback—lardo—pull up a chair. It’s one of the most luxuriously rich things you will ever put in your mouth. Three important points here: first, you need extra-thick fatback. It will be hard to find, but look for it at your local butcher shop or farmers’ market. Better yet, if you know a pig farmer in the area, ask the farmer for extra-thick fatback. Whatever you do, don’t bother trying this recipe with fatback that’s less than 1 inch thick. It just won’t work. Two inches thick is even better. Second, I like a lot of spice in my lardo. It gives the fat such great flavor. I cure the lardo with spices, then rub the same spices on it again before storing it. Third, it’s important to add water to the lardo after a few months and let it soak. It really enhances the soft, melting texture. Italians usually soak the lardo in a marble tub. But any container will do. After it’s done, just thinly slice the lardo and enjoy it naked. Maybe put a thin slice or two on toasted Rustic Loaf or on Pesca Pizza.
MAKES ABOUT 5 POUNDS
5 pounds (2.25 kg) pork fatback at least 1 inch thick
1 teaspoon (3.5 g) cracked pepper
1 teaspoon (6 g) curing salt No. 2
1 teaspoon (2.5 g) ground coriander
½ teaspoon (1.5 g) ground cinnamon
½ teaspoon (1.5 g) ground cloves
½ teaspoon (1.5 g) grated nutmeg
2 cloves garlic (12.5 g), minced
Leaves from 2 sprigs rosemary (3 g), chopped (about 1½ teaspoons)
5 fresh sage leaves (2 g), chopped (about 1¼ teaspoons)
3 cups plus 3 tablespoons (450 g) kosher salt
1 teaspoon (3.5 g) cracked pepper
1 teaspoon (2.5 g) ground coriander
½ teaspoon (1.5 g) ground cinnamon
½ teaspoon (1.5 g) ground cloves
½ teaspoon (1.5 g) grated nutmeg
Leaves from 2 sprigs rosemary (3 g), chopped (about 1½ teaspoons)
5 fresh sage leaves (2 g), chopped (about 1¼ teaspoons)
Rinse the fatback and pat it dry. Combine all the remaining ingredients except for the separate herb mixture in the bottom of a large, dark plastic trash bag.
Wearing plastic gloves, add the fatback to the cure and rub the cure all over the fatback. Press the air out of the bag, seal with a twist tie, and put the sealed bag in a shallow plastic tub with an airtight lid.
Put the tub in a cool (50°F to 55°F), dark place with some air circulation for 4 months. After 4 months, add enough water to the plastic bag to completely cover the fatback. Reseal the bag, put the lid on the container, and return to the same cool, dark place for at least 2 months or up to 6 months.
Remove the fatback from the water and pat dry. In a small bowl, combine all the ingredients for the herb mixture. Rub the herbs over the fatback and wrap tightly in plastic. Store in the refrigerator for up to 6 months. You can also vacuum seal the seasoned fatback and refrigerate it for up to 1 year.
BEVERAGE—Elisabet, Prosecco di Valdobbiadene NV (Veneto): Prosecco’s soft effervescence, green-apple aroma, and tart citrus flavor makes it an enchanting counterpoint to the creamy luxury of lardo.
It is scientifically proven that certain flavors will affect other flavors in very well-documented ways. Salt suppresses bitterness, as does sugar. But I firmly believe that those flavor alterations don’t mean the same thing to everyone. If that were true, we would all add cream to our coffee or squeeze citrus into our Diet Coke. The real truth is that tasting is very personal. A platter of salumi is a great opportunity to discover your own preferences. An assortment of spicy Chorizo, creamy Lardo, tender cooked salami, and all the other foods on the plate, like pungent Mostarda and acidic pickles, gives you plenty of beverage options. You could play off the salt with a tannic wine, or choose a beer to tame the spicy chorizo, maybe try a Franciacorta or other frizzante with the lardo. But how will it taste with the Fennel Salami? Try different flavor combinations to find out what you enjoy most!
Italians cure both pork bellies and pork jowls. But the jowls are where it’s at. With more fat and more collagen, cured jowl (guanciale) has a phenomenally rich mouthfeel. It’s so good that I can’t always wait for a full cure as in Pancetta. So I came up with a quick-curing method that takes less time and still gives you an awesome flavor. After curing the seasoned jowls for a few days in the refrigerator, you slow-roast them with very low heat for a few hours to dry them out a bit. Cubed and browned in a pan with some tomatoes, red pepper flakes, and pecorino, guanciale is perfect in Bucatini alla Matriciana. Or use it anywhere you would use bacon. Just keep in mind that the quick-cure method means that it won’t keep as long. Try to use it up within a week, which shouldn’t be a problem once you have your first taste.
MAKES ABOUT 14 OUNCES
1 pound (500 g) pork jowl
2 tablespoons plus 1 teaspoon (20 g) kosher salt
2 teaspoons (5 g) dextrose powder, or 1½ teaspoons (4 g) superfine sugar
½ teaspoon (1.5 g) ground coriander
1 teaspoon (3.5 g) ground pepper
1 teaspoon (6 g) curing salt No. 1 (pink salt)
1 teaspoon (4 g) crushed garlic
Leaves from 4 sprigs rosemary (6 g), coarsely chopped (about 1 tablespoon)
Rinse the pork jowl and pat it dry. Combine all the remaining ingredients in a shallow plastic tub with an airtight lid.
Wearing plastic gloves, add the jowl to the cure and rub the cure all over the jowl. Cover and refrigerate for 3 days.
Preheat the oven to 275°F. Rinse the jowl, pat it dry, and place on a roasting rack in a roasting pan. Roast until tender, 2½ to 3 hours.
Store in the refrigerator for up to 1 week.
BEVERAGE— Brouwerij Bosteels, Deus Brut de Flanders (Belgium): You will likely be using your guanciale as an addition to another dish that will dictate what you drink. However, if you want to nibble on the guanciale by itself, I would go for something effervescent and light in body to lift the salty, fatty meat. Sour ale could work, but so would sparkling wine. That leads me to this great Belgian ale, which is technically a “Biere de Champagne.” A beer that acts like champagne—perfect!
I like pig. It’s just a fact. I like it cold, sliced, roasted, seared—any way you serve it, I like it. In 2008, we were getting ready for the Great Chefs Event that I host in Philadelphia to benefit Alex’s Lemonade Stand. That year, Bobby Flay, Michael Symon, Paul Kahan, John Besh, Suzanne Goin, and several other chefs were coming out to support the cause. We had about forty chefs from around the globe, including my friend Marco Rossi from Italy, all helping to raise money for pediatric cancer research. The night before the event, I always host all the chefs at a big dinner at Osteria. Jeff Michaud and I usually come up with a fun menu. That year, we decided to switch up our usual charcuterie platter of house-cured soppressatta, coppa, and lardo. This pig ended up being the best thing on the platter.
MAKES 4 SERVINGS
¼ cup (35 g) kosher salt
1 tablespoon (15 g) sugar
½ teaspoon (3 g) curing salt No. 1 (pink salt)
2 teaspoons (6 g) freshly ground pepper
½ teaspoon (1.5 g) ground coriander seeds
1 clove garlic (3 g), minced
2½ pounds (1.25 kg) pork belly
Mix together the kosher salt, sugar, curing salt, pepper, coriander, and garlic, then rub all over the pork belly. Wrap the belly in plastic wrap and refrigerate for 4 days.
Preheat the oven to 350°F. Unwrap the pork and put it on a rimmed baking sheet or in a shallow roasting pan. Cover the pan with aluminum foil and cook in the oven until tender, about 1½ hours.
Remove the pork from the oven and let cool in the pan. Slice it like you would a thick slab of bacon—into strips about 6 inches long and ¼ inch thick. Cook the slices in a skillet over medium-high heat or on a grill over medium heat until the pieces are crisp and browned, about 2 minutes per side. Serve warm.
The curing takes 4 days, but you can cool the roasted pork belly and refrigerate it in an airtight container for up to 4 days. Slice off strips and crisp them as you need them.
BEVERAGE—Abbazia di Novacella, Lagrein 2008 (Alto Adige): From one of the most interesting wineries in the region, which belongs to a twelfth-century monastery, comes this earthy, full-flavored red. With hints of violet, Lagrein always pairs well with fattier meats.