9 Previewing a Prototype
Lesson overview
In this lesson, you’ll learn how to do the following:
Record prototype interactions.
Preview on a device via USB.
Preview a cloud document on a device.

This lesson will take about 30 minutes to complete. To get the lesson files used in this chapter, download them from the web page for this book at www.adobepress.com/XDCIB2020. For more information, see “Accessing the lesson files and Web Edition” in the Getting Started section at the beginning of this book.
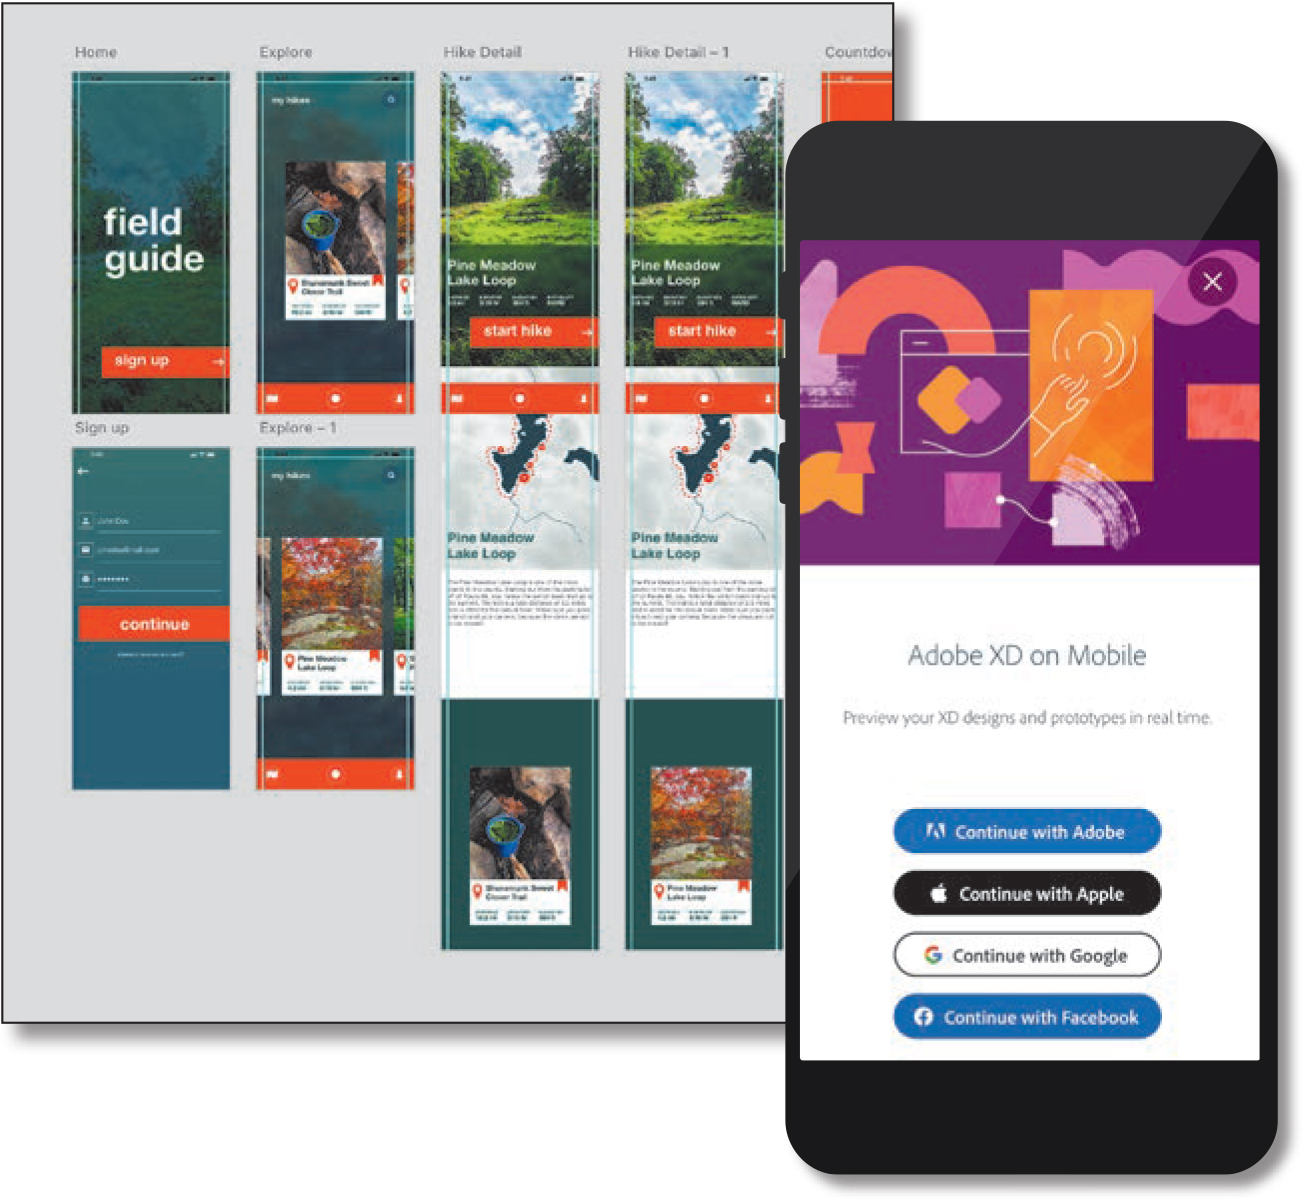
In this lesson, you’ll preview a working prototype in Adobe XD, record prototype interactions that you can share with others as a video file, and use the Adobe XD mobile app on a device to preview your prototypes via USB and as a cloud document.
Starting the lesson
In this lesson, you’ll test a working prototype from your app design locally as well as on a handheld device. To start, you’ll open a final lesson file to get an idea for what you will create in this lesson.
Start Adobe XD, if it’s not already open.
On macOS, choose File > Open From Your Computer. On Windows, click the menu icon (
 ) in the upper-left corner of the application window and choose Open From Your Computer. Open the file named L9_end.xd, which is in the Lessons > Lesson09 folder that you copied onto your hard disk.
 Note
NoteIf you have not already downloaded the project files for this lesson to your computer from your Account page, make sure to do so now. See the “Getting Started” section at the beginning of the book.
 Note
NoteFor either macOS or Windows, if the Home screen is showing with no files open, click Your Computer in the Home screen. Open the file named L9_end.xd, which is in the Lessons > Lesson09 folder that you copied onto your hard disk.
If the Assets panel opens on the left and you see a Missing Fonts message, close the panel by clicking Assets panel icon (
 ) in the lower left.
 Note
NoteThe screen shots for this lesson were taken on macOS. On Windows, the menus can be accessed by clicking the hamburger menu.
Press Command+0 (macOS) or Ctrl+0 (Windows) to see all of the design content. This file shows you what you will create by the end of the lesson.
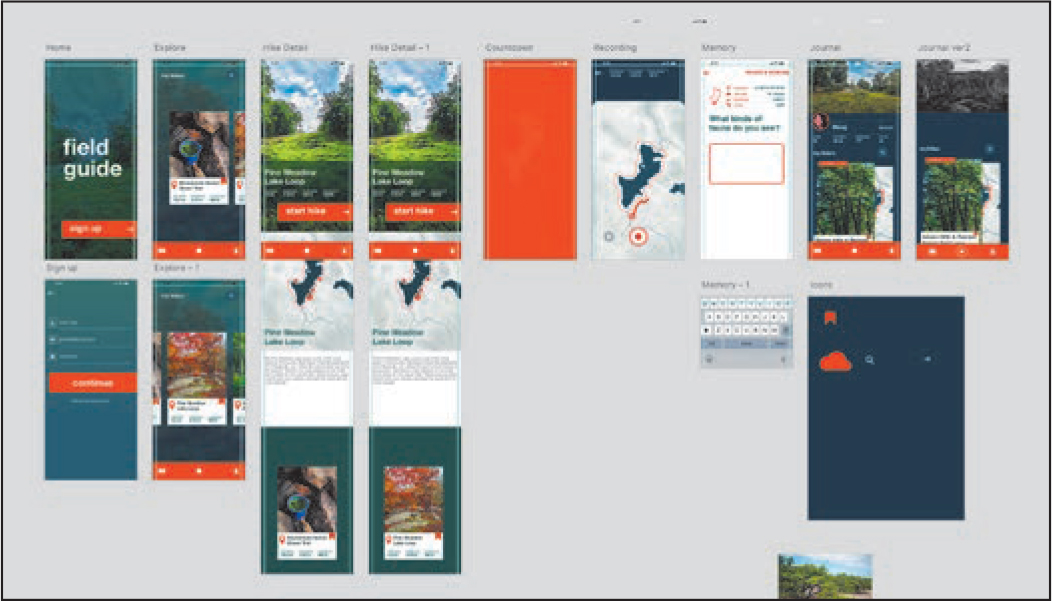
Leave the file open for reference, or choose File > Close (macOS) or click the X in the upper-right corner of the open window (Windows) to close the file.
Recording a prototype
In Lesson 8, “Creating a Prototype,” you were introduced to previewing a prototype within Adobe XD using the Preview window. At some point in the design process, you may also want to share your prototype with others. One way to share a prototype is to record prototype interactions and create a video in the MP4 format. In this section, you’ll record a video of the prototype interactions in your Travel_Design file.
There are separate instructions for recording on macOS and Windows, so you only need to pay attention to the instructions that pertain to the operating system you are using.
Choose File > Open From Your Computer (macOS) or click the menu icon (
 ) in the upper-left corner of the application window and choose Open From Your Computer (Windows). Open the Travel_Design.xd document in the Lessons folder (or where you saved it).
 Note
NoteIf you are starting from scratch using the jumpstart method described in the section “Getting Started,” open L9_start.xd from the Lessons > Lesson09 folder.
Click in the gray pasteboard to make sure everything is deselected.
When you open the Preview window in the next section, with nothing selected, the Home artboard will show in the window.
Recording on macOS
To start, macOS users will explore how to create a prototype recording. Windows users can jump to the next section, “Recording on Windows.”
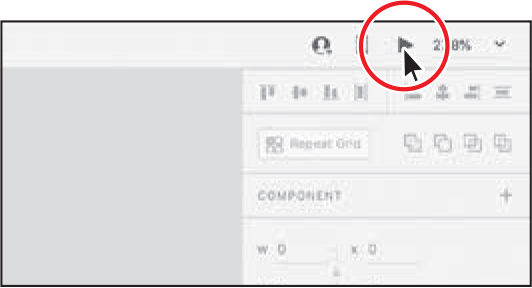
Click Desktop Preview (
 ) in the upper-right corner of the application window to open the Preview window.
 Tip
TipYou can also press Command+Return (macOS) or Ctrl+Enter (Windows) to open the Preview window.
Move the pointer into the Preview window and click the arrow to the right of the time-code (00:00) in the upper-right corner.
By default, only video—not audio—is recorded. You can select Enable Microphone if you also want to record audio. Leave the microphone option deselected.

Press Esc to hide the options, then click the time-code (00:00) to start recording.
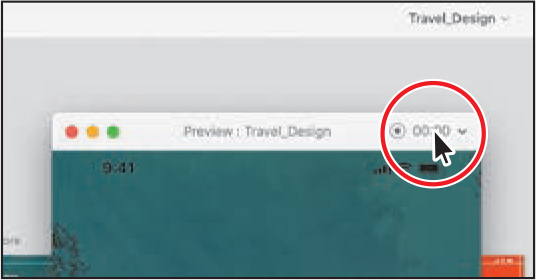
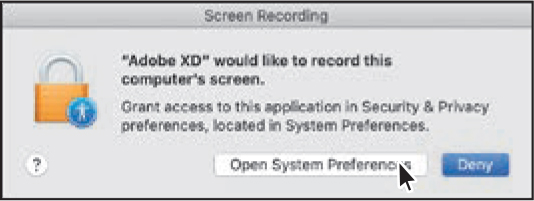
A message may appear, asking for permission to record. If you see this message, you will need to follow the instructions in the message window and grant access in the OS system preferences to allow XD to record. This process usually requires that you quit and restart XD.
While recording, click the “sign up” button to transition to the Sign up screen.
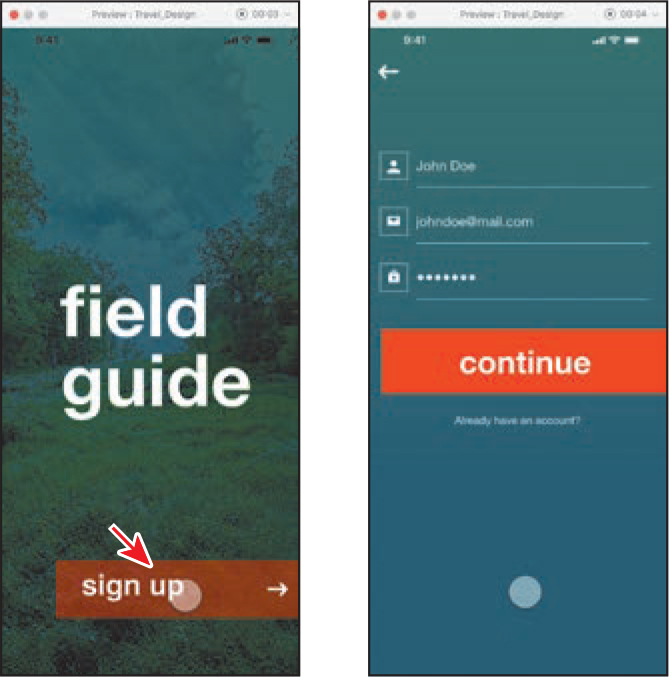
When in the Preview window, while recording, the pointer shows as a circle, which makes it easier to see and follow along with in the video. Notice that the timer in the upper-right corner of the Preview window is changing, indicating that it’s recording.
Press Esc to stop recording. In the dialog box that appears, make sure the filename is Travel_Design, navigate to the Lessons > Lesson09 folder (if you aren’t there already), and click Save.

 Note
NoteOn macOS, recording also stops when you switch away from the application.
Recording prototype interactivity is easy using this method, which can make this a great way to share that interactivity with someone else. Once the video file is saved, you can share it via email and many other available options.
Close the Preview window.
macOS users can skip to the section “Previewing on a mobile device.”
Recording on Windows
Recording prototypes is not directly supported in Adobe XD on Windows. However, there’s a workaround using the native recorder to record what you do in the Preview window.
![]() Note
Note
To complete this section on Windows, you’ll need to have the Game Bar app installed, which is available via the Microsoft Store.
Click Desktop Preview (
 ) in the upper-right corner of the application window to open the Preview window.
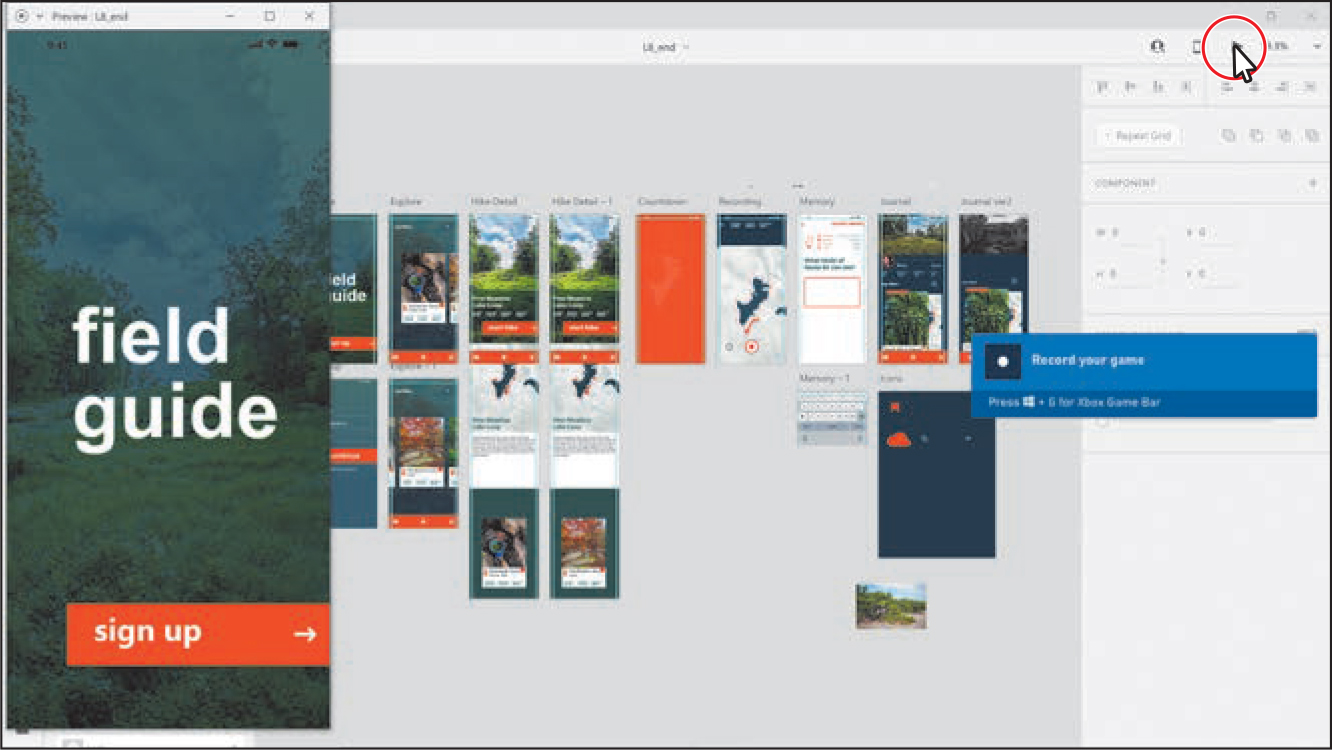
A message may appear, telling you to press Win+G to begin recording. The Windows Game Bar app, installed by default, will be used.
Move the pointer over the button in the upper-left corner of the Preview window and a tooltip appears. Press Win+G (Windows) to begin recording.
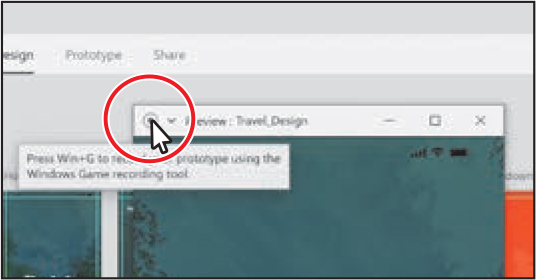
 Tip
TipYou can also enable the microphone in the Game Bar if you want to record the audio.
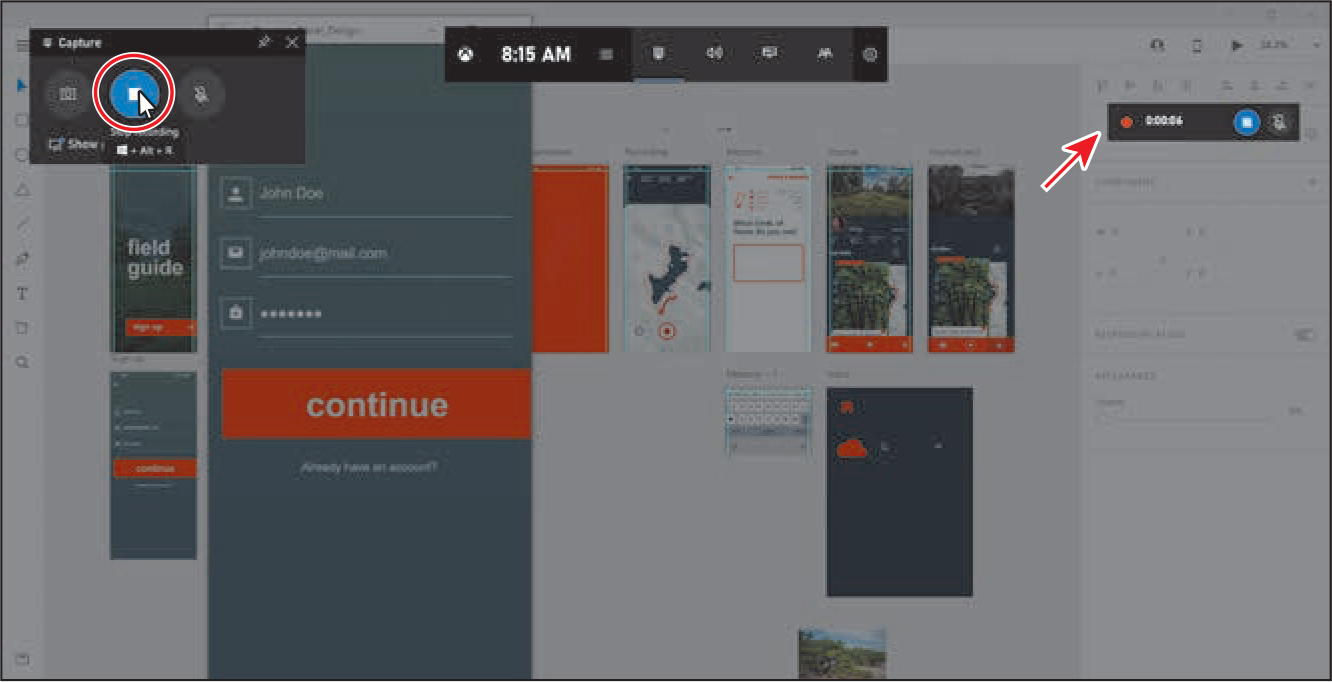
In the Game Bar that opens, click the Record From Now button (the black circle) to begin recording. The display should disappear, and a small toolbar with a timer and Stop button appear in the operating system. You can control the recording from there.

Move the pointer into the XD Preview window and click the “sign up” button to transition to the Sign up screen.
Click Stop in the small floating toolbar to stop recording (an arrow is pointing to the toolbar in the following figure). You can also press Win+G and click the Stop button in the Game Bar that opens.
 Note
NoteOn Windows, recording doesn’t automatically stop when you switch away from the application or when the Preview window does not have focus anymore.
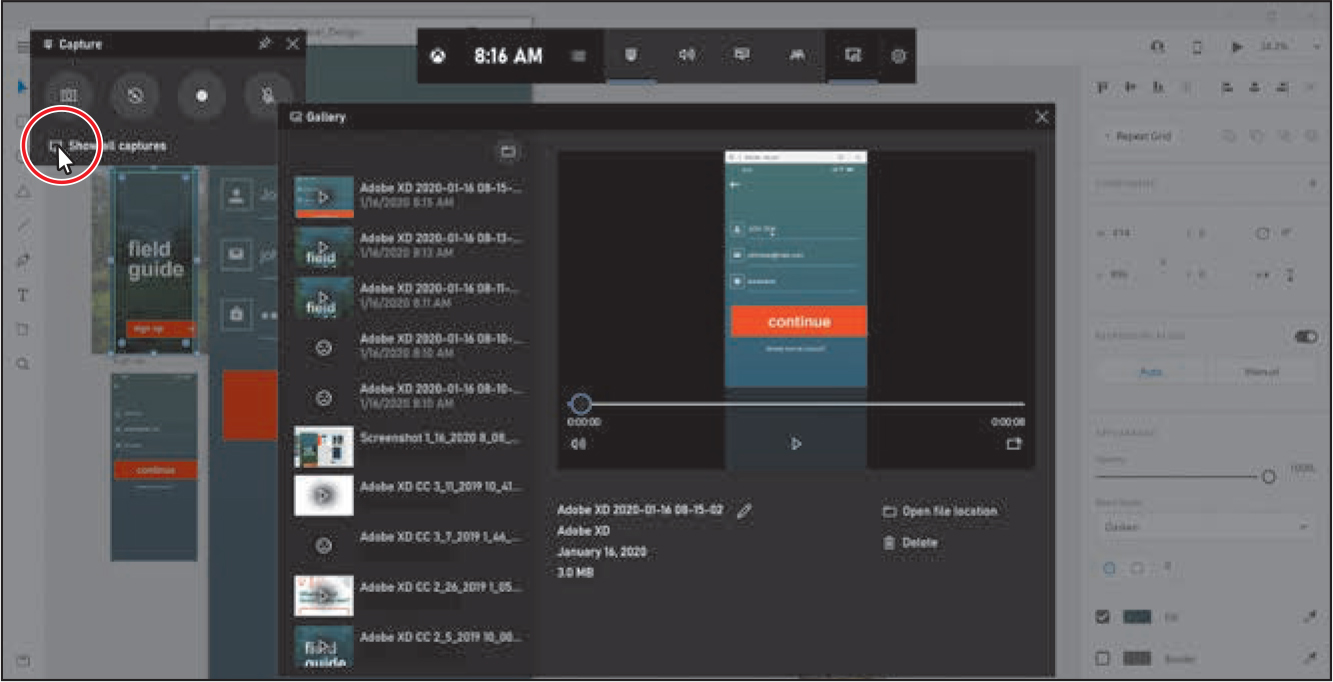
If you want to access the video that was created, you can press Win+G to show the Game Bar, if it isn’t showing. You can then click Show All Captures to show your video captures in the Gallery.
Previewing on a mobile device
Previewing locally in Adobe XD using the Preview window can be an effective way to test links and get an idea of what your design will look like. To truly experience your prototype, you should test on a device such as an iPhone. The free Adobe XD mobile app lets you preview designs you create in Adobe XD on iOS and Android devices (see the note to the right).
![]() Note
Note
To learn more about system requirements for Adobe XD on mobile devices, check out this page: helpx.adobe.com/xd/system-requirements.html.
There are two methods for testing on devices using the mobile app:
Real-time preview via USB: You can connect multiple devices via USB to a computer that is running Adobe XD, make changes to your designs and prototypes on the desktop, and preview them in real time on all connected mobile devices.
Loading cloud documents from Creative Cloud (available for documents created in Adobe XD on macOS or Windows 10+): If you save your XD documents as cloud documents, you can load them onto your devices using Adobe XD on mobile.
![]() Note
Note
Real-time preview is supported between macOS and iOS or Android or between Windows 10+ and iOS (currently not Android).
Setting up the XD mobile app
In this section, you’ll set up the Adobe XD mobile app on your device. There are a few things you will need in order to proceed:
Internet access to download and sign in to the Adobe XD mobile app
A free (trial) or paid Creative Cloud account (preferably the same Creative Cloud account you are using in Adobe XD)
The free Adobe XD app from the iOS App Store for iOS (iPhones and iPads) or Google Play store (Android phones and tablets)
With the Adobe XD mobile app installed on your device, launch the app.
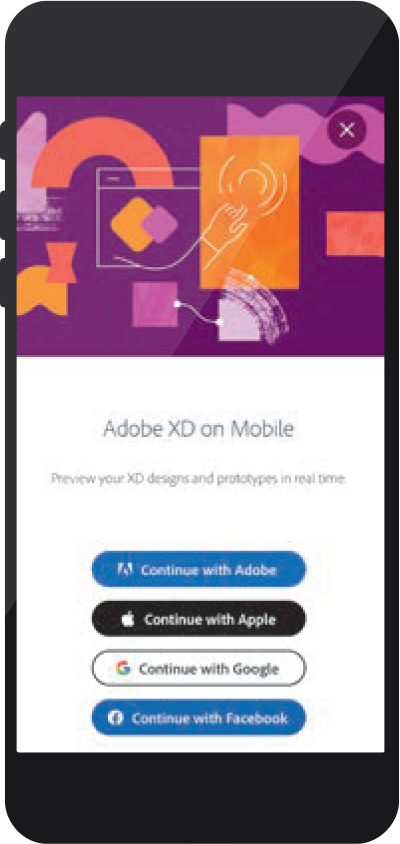
Use one of these methods to sign in to the Adobe XD app:
If you have a free (trial) or paid Creative Cloud account, or if you want to create a free Adobe ID, click Continue with Adobe and log in with your usual Adobe ID.
If you don’t have a Creative Cloud account, click Continue with Apple, Continue with Google, or Continue with Facebook (to use an account you already have with one of those services).
After signing in, you will see the app home screen. By default, on the home screen, you’ll see all of your cloud documents saved to Creative Cloud. If you haven’t saved any cloud documents, the screen will resemble the figure to the right. You’ll learn more about saving a document as a cloud document in Lesson 10, “Sharing Your Designs.”

 Note
NoteIf you create a new Adobe ID or choose to sign in with Facebook or Google, the sign in process will involve more steps.
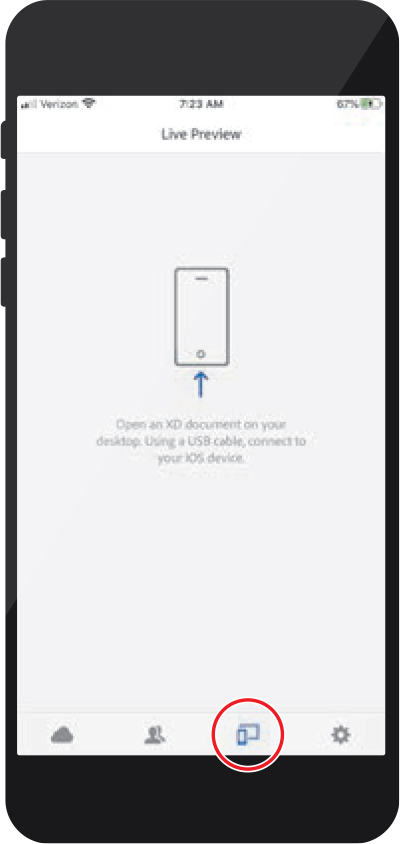
At the bottom of the screen (circled in the figure) you’ll see options for Cloud Documents (which is selected by default), Shared with You, Live Preview, and Settings. The Live Preview option is for previewing a file on your device that’s open in the Adobe XD desktop (when connected via USB), and the Settings option is where you can log out, check storage usage, and more.
Setting up preview via USB
Previewing via USB, or Live Preview, is available on macOS and Windows (currently, if your device is running Adobe XD on Windows 10, real-time preview through USB is not supported on Android). In this section, you’ll test the Travel_Design.xd prototype that is open in Adobe XD on your device.
![]() Note
Note
The device needs to be unlocked. On macOS, depending on the device and operating system of the device connected via USB to your computer, iTunes may open.
Connect your mobile device to the USB port of the computer running Adobe XD on the desktop.
Make sure the copy of Adobe XD on your desktop machine is up to date by checking the Creative Cloud desktop app.
 Note
NoteEnsure that you use USB cables that transfer data. Some USB cables can be used only to charge your devices and cannot transfer data.
 Note
NoteOn Windows, if you are previewing on an iOS device, such as an iPhone, you will need to have the latest version of iTunes installed.
Tap the Live Preview option at the bottom of the screen.
The Live Preview screen opens, and instructions may appear in the center of the screen telling you to connect the device to your desktop and/or open an XD document in XD on desktop.
Ensure that Adobe XD is showing on your desktop computer and that the Travel_Design.xd file is also showing. The home screen (or currently selected screen) should appear in the mobile app on your device.
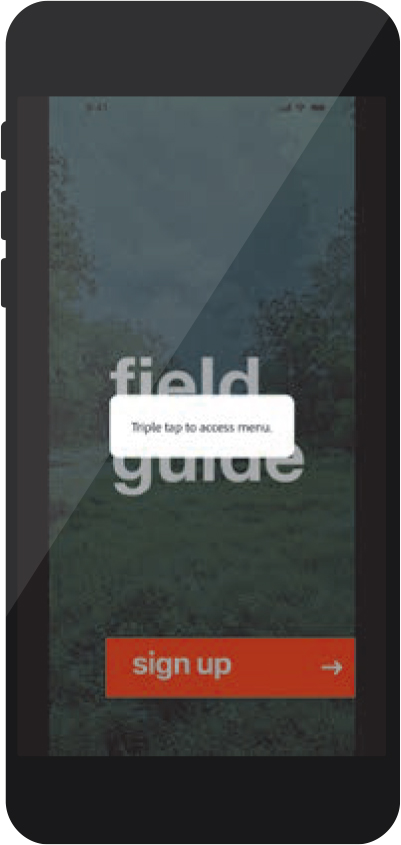
A message may appear on screen telling you to triple tap to access a menu. Tap the device screen to close the message.
 Note
NoteIn the figures in this section, the design prototype has black borders when previewing in the mobile app on a device. That’s because the artboard size in the design file is set to iPhone X/XS and I’m previewing the prototype on an iPhone 8 Plus.
If the open document in XD on the desktop doesn’t appear on your device, you can disconnect and reconnect to the USB port on your machine. You can also close and then launch the Adobe XD app on your mobile device.
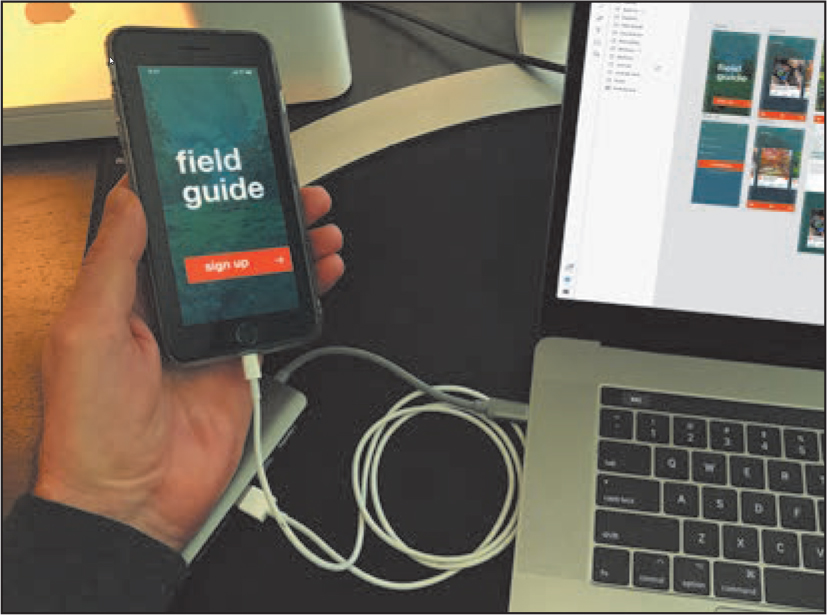
An iPhone connected to my laptop via a USB cable
 Note
NoteIn Adobe XD on the desktop, you may see a notification explaining that fonts will be sent to your device(s) when you preview on mobile. If you see this message, click OK. Please be aware that certain font vendors do not allow for the transfer, display, and distribution of their fonts. You are responsible for ensuring that you respect the font license agreement you have with the font vendor.
 Note
NoteIf you are testing on an Android device with macOS, make sure it is set to transfer data through the USB port, not just to transfer power (charging mode). Visit this page to learn more: helpx.adobe.com/xd/help/adobe-xd-on-mobile-faq.html#Android.
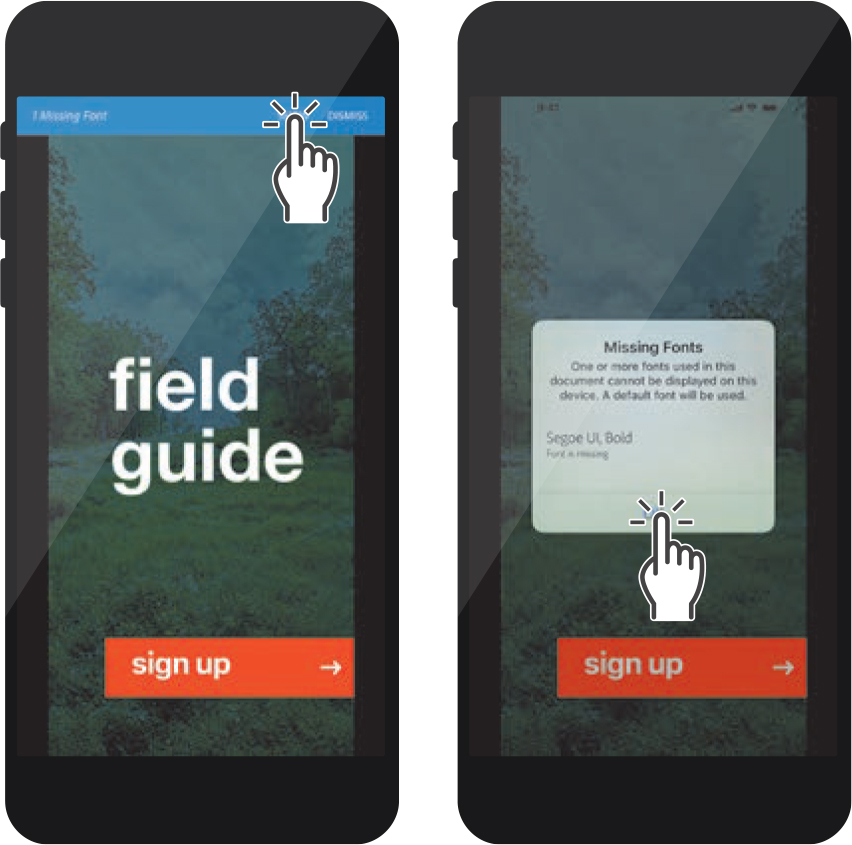
You may also see a message about missing fonts. To see the fonts that are missing, tap SHOW. The missing font or fonts will appear in a list. Since I am previewing an XD file that was originally created on Windows, on my Mac, Segoe UI is missing. Any missing fonts are substituted with available fonts.
In Adobe XD on the desktop, you can close the Preview window if it’s still open. Click Device Preview (
 ) in the upper-right corner of the application window to see a list of connected devices.
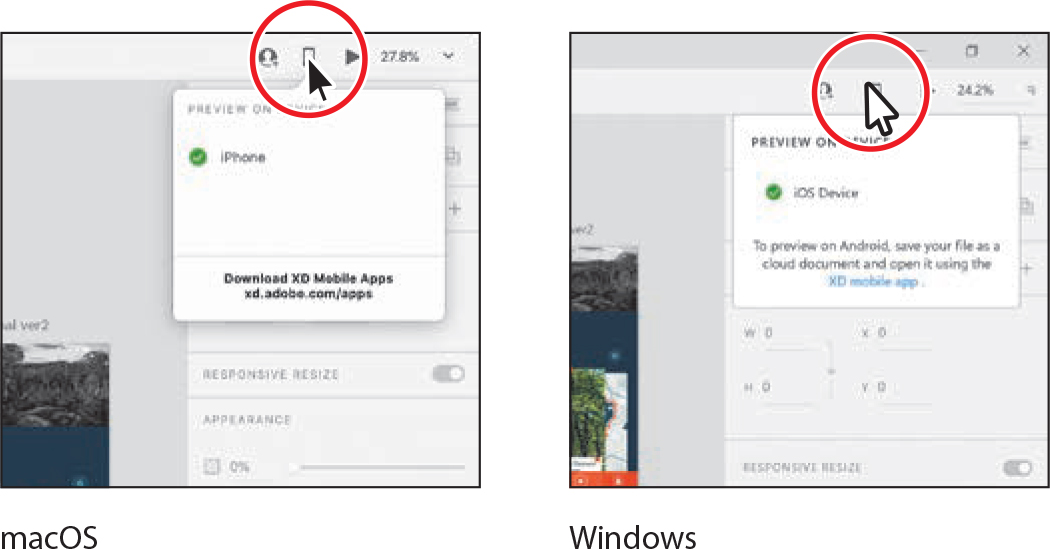
If there are multiple devices connected via USB to your desktop machine and they’re set up to transfer data, they will all appear in the Preview On Device window.
Navigating the XD mobile app
With the XD mobile app set up and your Travel_Design.xd project file showing in the app, next you’ll navigate the app and explore some of the features available.
With the Home screen of your prototype showing on your device, tap an area of the screen where there are no links to see blue hotspot hints appear. You may need to tap a few times at first to clear a message about tapping with three fingers to show the menu. An arrow is pointing to the hotspot hint in the following figure.
 Tip
TipYou can easily turn off the blue hotspot hints you saw in the previous section by triple tapping (to show options), and then tapping the Hotspot Hints toggle.
Tap the “sign up” button on the Home screen to go to the sign up form.

 Note
NoteIf you rotate your device, the screens will scale to fit, with letterboxing (black bars) around them, if necessary.
By default, blue hotspot hints appear where you created connections in your prototype in Adobe XD. You can turn off hotspot hints in the mobile app settings.
Back in your Travel_Design file in Adobe XD on the desktop, zoom in to the Home artboard a bit. With the Select tool (
 ) selected, drag the “sign up” button on the Home artboard down a little, to see the mobile app preview change in real time.
Save the document in XD by pressing Command+S (macOS) or Ctrl+S (Windows).
Back on your device in the Adobe XD mobile app, tap three times (triple tap) on the device screen to open the menu.
The Adobe XD mobile app has a series of settings available in a menu that appears. These settings can make navigating a larger prototype easier, allow you to take screen shots, toggle options, and more.
Tap Browse artboards to see all of the artboards. This is a way to jump around in the document when previewing it.
Tap the Explore artboard to open it in the app.
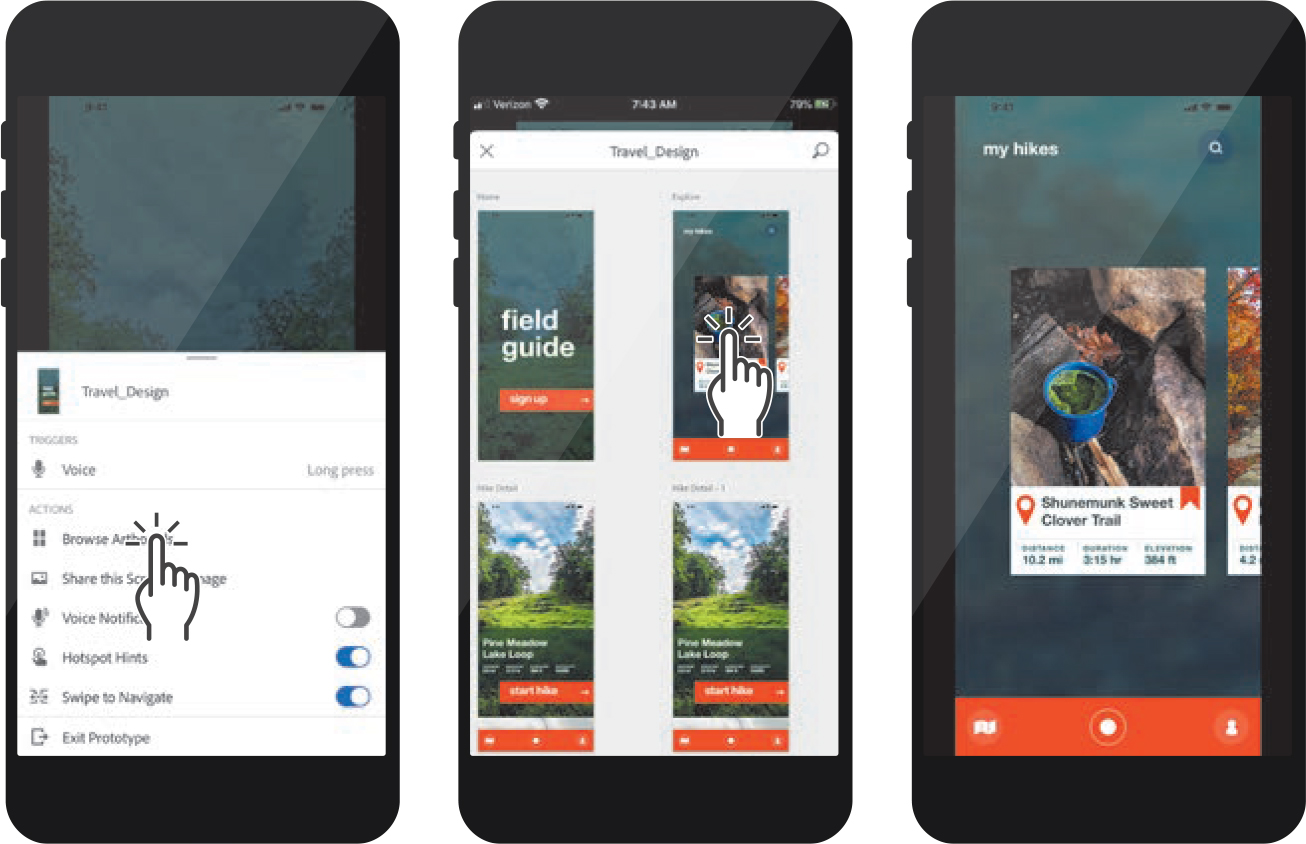
Triple tap on the device screen again to open the menu. Tap Exit Prototype to return to the app home screen.
At this point, you can resume the preview by tapping Resume Preview or navigate elsewhere.

Disconnect the USB cable from the device.
Since you will load a cloud file in the next section, you won’t need to have the cable connected. If you want to return to a live preview of an open XD document, you will need to reconnect the USB cable.
You can unplug the USB cable and continue viewing and testing a cached version of the prototype. Without a connection, however, there will no longer be real-time updating if changes are made in Adobe XD on the desktop. If you reconnect the cable while in the same session and with the design file still open in Adobe XD, the app screen will refresh on your device.
Previewing cloud documents
In the Adobe XD mobile app, you can also view a cloud document stored on Creative Cloud. To open a cloud document in the mobile app, that cloud document needs to be shared with you or you need to save a document as a cloud document in Adobe XD on the desktop, which is what you’ll do next.
In Adobe XD on the desktop, with the Travel_Design file open, choose File > Save As (macOS) or click the menu icon (
 ) in the upper-left corner of the application window and choose Save As (Windows). In the menu of options that appears, change the name to Travel_Design_cloud.
 Note
NoteTo perform this step, you will need access to the storage that comes with your Creative Cloud membership.
Select Cloud Documents in the Save To section, and then click Save.

In the title bar above the document, a cloud icon (
 ) appears to the left of the name above the document, indicating that it’s a cloud document. You may see “Saving...” to the right of the filename in the title bar above the document. When a document has finished saving to Creative Cloud (which may take some time), “Saving” will disappear. The file won’t show in the XD mobile app until it has finished saving in Adobe XD on the desktop.
By saving an XD document as a cloud document, you are saving it to a destination called Cloud Documents, which is hosted on Creative Cloud. To view a cloud design file saved in Creative Cloud, you do not need to have your mobile device connected to the USB port of the computer running Adobe XD on the desktop. All you need is an active Internet connection on the device.
 Note
NoteSaving the document as a cloud document may take some time, depending on your Internet speed.
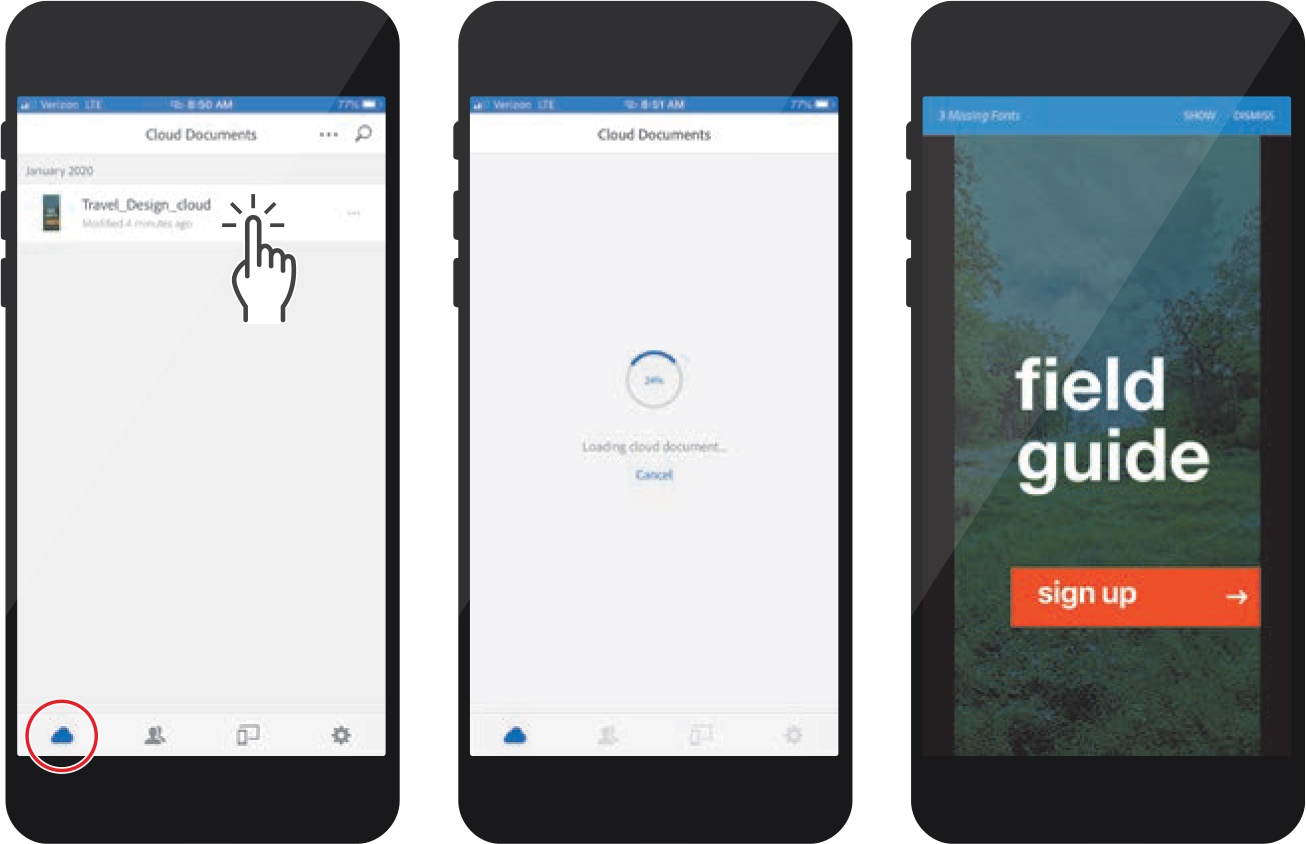
In the Adobe XD mobile app on your device, with the main app screen showing, tap Cloud Documents (
 ) at the bottom of the screen (circled in the first part of the following figure).
Files saved as cloud documents cannot be viewed if there is no Internet connection on the device.
In the file list that appears, tap Travel_Design_cloud to load the document.
 Note
NoteThe list of files you see may be different from those in the figure.
 Tip
TipTo refresh the list of XD cloud documents synced with Creative Cloud or to update documents already in the list that you’ve edited and saved in Adobe XD, pull the XD Documents screen down and release.
Triple tap your device screen to open the Adobe XD menu. Tap Exit Prototype to return to the mobile app home screen, where you will see the list of cloud documents again.
 Note
NoteYou may see a message telling you that you can tap three times to see a menu. You can tap the screen with one finger to dismiss it, if necessary.
Now you’ll explore what happens when you update the XD file in Adobe XD.
In your Travel_Design_cloud file in Adobe XD on the desktop, with the Select tool (
 ) selected, make a simple change to the Home artboard. Maybe move the “sign up” button on the Home artboard, as you did previously.
After making the change, you’ll see an asterisk (*) to the right of the name in the title bar above the document, indicating that you made a change. If you make a change to the design file in Adobe XD on the desktop, cloud documents are auto-saved. After a short time, you should see “Saving” to the right of the document name in the title bar. The file will update in the app, assuming you have an Internet connection and aren’t currently viewing it. You can also make a cloud document available offline. That means it will download in its current state and you can view it whether or not you have an active Internet connection.
Back on your device, in the XD app, with the cloud document list showing, drag the screen down to refresh the list. This is a faster way to get the list to update with the latest version of the file.

 Note
NoteThe list of cloud documents will update automatically without you having to pull to refresh the screen, but that may take some time, depending on your Internet connection.
As stated earlier in this section, you will need to be connected to the Internet to view the cloud documents and update them. What happens if you need to view a cloud document and you know you won’t have an active Internet connection when you need to view it? You can set cloud documents in the app to download to the device for offline viewing later.
Tap the ellipsis (...) to the right of the Travel_Design_cloud name in the app (circled in the following figure).
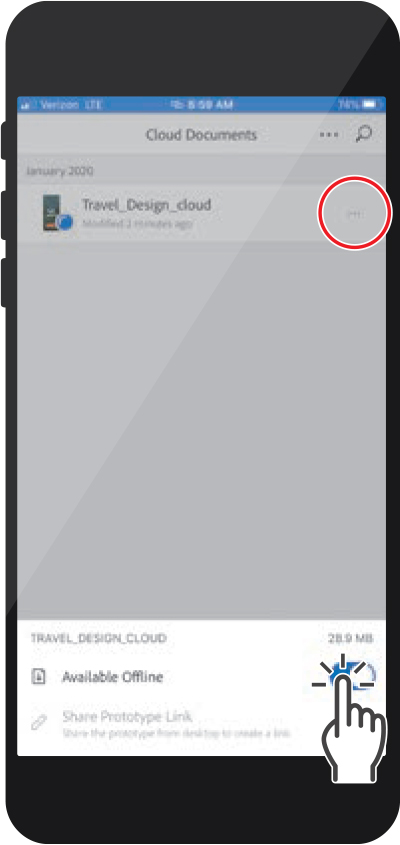
Tap Available Offline to turn the option on. The document is downloaded in the current state and will be available for offline viewing. Tap in a blank area of the screen to hide the menu at the bottom of the screen.
 Note
NoteIf you are viewing the cloud document in the XD mobile app and the document has been updated in Adobe XD on the desktop, a message may appear, when you have an Internet connection, asking if you would like to update the file on your device.
The Travel_Design_cloud document is downloaded to the device, and a blue circle with a white arrow now appears on the filename in the app. When Available Offline is set for a cloud document, any further changes made to the document in Adobe XD will be applied as long as there is an Internet connection. When the Internet connection is unavailable, the document remains in its last saved state before losing Internet. As soon as an Internet connection is available again, the cloud document can be updated, even though it’s still set to Available Offline.
 Note
NoteUsing the Adobe XD mobile app, you can also view files shared with you.
Close the app on your device and return to Adobe XD on your desktop.
Document history
As you work with cloud documents (not locally saved documents) you can see a history of the changes made to the document. Document history lets you open previous versions of that document so you can copy elements to the current document or save out a previous version and pick up your work from there. Your document’s history is available for up to 30 days and you can “mark” specific versions to save those history states indefinitely. You can also name versions to keep track of important milestones throughout a design project.
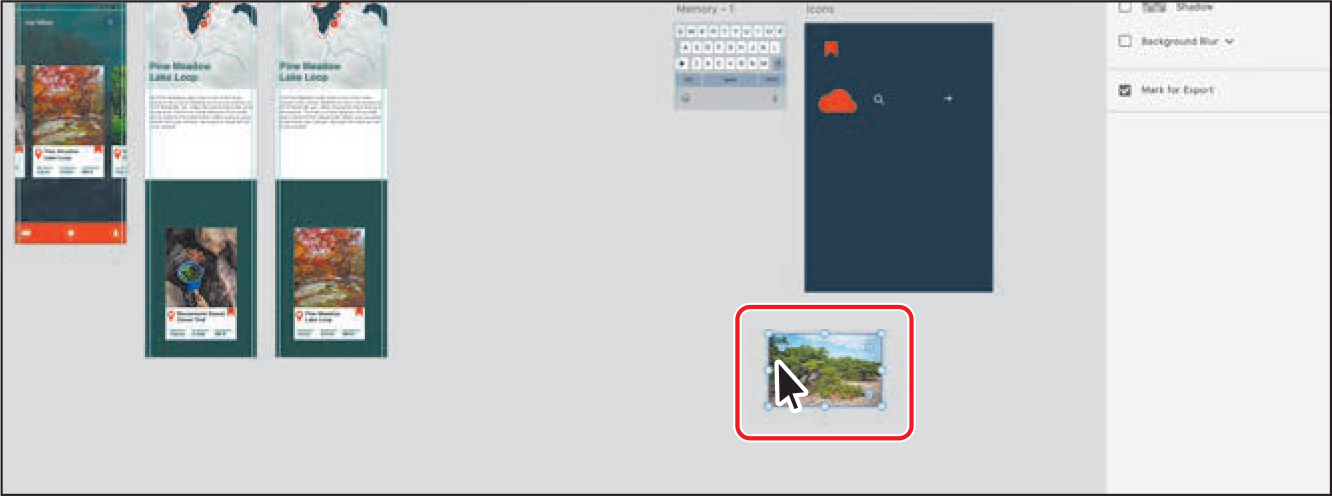
With the Travel_Design_cloud document still open, click the image below the Icons artboard and press Delete or Backspace to remove it.
 Note
NoteThe figures show working in Design mode. You can also perform the steps in this section in Prototype mode.
Click the artboard name “Journal ver2” in the document window and press Delete or Backspace to remove it. The cloud document will automatically save the changes for you.

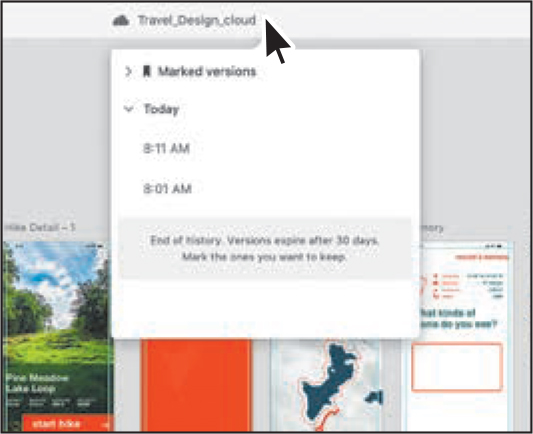
To see the history for the document, above the document click the arrow to the right of the document name “Travel_Design_cloud.”
 Note
NoteYou may see different history states and that’s okay.
A menu appears showing versions of history states that you have marked or saved for longer than 30 days, the history states that are saved automatically, and a message. In order to go back in time and see what a previous version of the document looks like, you can choose to open one of the history states in a new window.
To see a previous version of the document, move the pointer over the earliest time stamp in the list. I see “8:01 am” because that was the time when XD first auto-saved the document. Click the ellipses (...) and choose Open In A New Window.
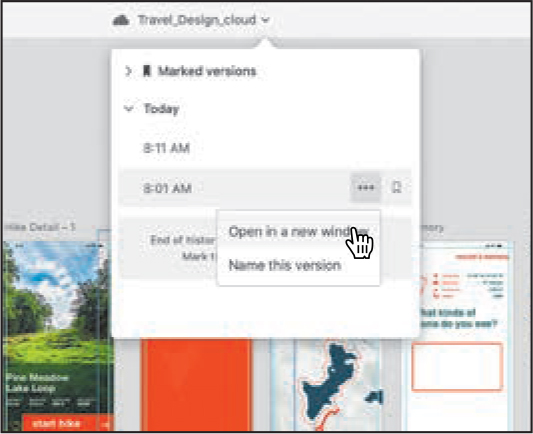
The saved version of the document opens in a new window and is a separate cloud document that will have its own history if you begin editing it.
Close the version that opened to return to the Travel_Design_cloud document.
Click the arrow to the right of the document name “Travel_Design_cloud” again. This time, to save one of the history states so you can access it for more than 30 days, you can mark it. Move the pointer over the earliest time stamp and click the Mark Version icon (
 ). Change the name to “Image and Journal Ver 2 artboard” and press Return or Enter to accept the name.
Click the arrow to the left of the Marked Versions in the drop down to show the marked history state.

To open the marked history state in a separate document, you could click the ellipses (...) and you’ll see the same options as before.
Choose File > Close (macOS) or click the X in the upper-right corner (Windows) for each open document.
Review questions
1. How do you record interactivity in your prototype in Adobe XD on the desktop?
2. What file format does Adobe XD create when recording interactivity in your prototype?
3. What are the two ways you can preview an XD document in the Adobe XD mobile app?
4. Which method of previewing in the mobile app, via USB or viewing a Creative Cloud file, allows for real-time updates?
5. What is a cloud document?
6. With what type of document can you view document history (cloud or local)?
Review answers
1. To record interactivity in Adobe XD on desktop, click Desktop Preview in the upper-right corner of the application. On macOS, click the time code (00:00) to begin recording. After having tested the prototype, press Esc to stop recording. In the dialog that appears, name the video file and click Save. On Windows, after the Preview window is open, press Win+G to begin recording. You can start recording in the Game Bar that appears. After you have finished recording, press Win+G again and click Stop.
2. When recording prototypes, the video file format is MP4.
3. When previewing an XD document in the XD mobile app, either you can view documents saved as cloud documents or you can view an open document in Adobe XD on the desktop using Live Preview.
4. Only previewing via USB in the mobile app allows for real-time updates.
5. A cloud document is an XD document that is saved in Creative Cloud from the Adobe XD desktop app.
6. In order to see the history of a document, the document must be a cloud document.
