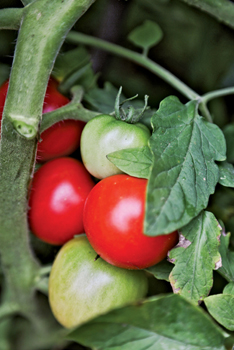
SOME OF MY MOST treasured photos are of me toddling behind my grandparents in their garden. As an adult, I still love vegetable gardening. Ours seems to get larger every year. There’s something indescribably satisfying about planting seeds, then harvesting and cooking from a plot of land you’ve tended.
This is not a case of me having a green thumb. I am not very good with houseplants. I can barely keep the hearty houseplant pothos alive, which could likely survive nuclear winter and Sahara-like drought, but vegetables? Oh, I love to dig in the dirt. The taste of a tomato fresh off the vine is like no other. The tenderness of freshly picked summer squash and the fiery, floral heat of a chile seared by the summer sun are worth every shovel of dirt.
But you don’t have to
grow your own vegetables to be interested in what you eat and how it’s produced. Studies show that more and more consumers are seeking out foods that are better for their families as well as the environment.
Organic farming promotes healthy soil, biodiversity, and the conservation of water. It helps keep chemicals out of the air, earth, and water. Organic farmers focus on utilizing renewable resources. Makes a whole lot of sense to me that if you are taking care of your body, you will want to take care of the earth, too.
Organic produce is grown without synthetic fertilizers, herbicides, and pesticides. The USDA strictly enforces organic production and handling. (Organic meat and dairy livestock receive no antibiotics, added hormones, and are raised on organic feed.) No organic products are ever irradiated or tagged with the letters “GMO” (genetically modified organism). GMO fruits and vegetables are altered in a laboratory using molecular genetic engineering techniques such as gene cloning or protein engineering. This is in the news a lot and there are vehement opinions on both sides.
Whether you go “green” or conventional, you need to make sure you get two to three cups of vegetables a day, as
recommended by the USDA on
ChooseMyPlate.gov—or more if you’re trying to lighten up. I find it’s best to eat with the
seasons.
The food is fresher and just tastes better. Summer produce is the embodiment of an easy, breezy sunny day. Ripe tomatoes are sliced. Okra only needs a short simmer or perhaps a bit of grilling. Fresh corn takes a quick dip in salted, boiling water and is eager and ready for a soft, melting—and judicious—dab of butter. Fall brings wet mornings and long cool nights. Fall produce can be more challenging, but has its own glorious colors, flavors, and textures. As the days grow shorter, dark greens replace the tender lettuces and easy vegetables of spring and summer. The dark leafy greens, gnarled root vegetables, and hard winter squash of fall are more complex than sunny summer produce and need more components to balance their flavors.
This chapter is bursting with vibrant vegetable recipes to enjoy throughout the year, and many are made with seven or so ingredients, making them easy on the wallet. And, if you need some time-saving shortcuts, you can “hack” your way with prechopped vegetables, including onions, carrots, celery, tomatoes, greens, and even butternut squash. Don’t limit yourself to vegetables only for supper. Say “yes!” to vegetables for breakfast, lunch, and dinner. One of my favorite breakfast dishes is Collard Greens with Chipotle Potlikker topped with an over-easy farm egg. Give Oven-Fried Okra a try for a party snack and Roast Sweet Potato and Pears with Blue Cheese for a filling and satisfying lunch. Want an enlightened Sunday supper? Try the “new Southern” vegetable plate of Creamed Corn–Stuffed Tomatoes, Green Beans with Candied Garlic, and Spicy Eggplant Stir-Fry, a mouth-watering combination without a squeal of pig in sight.
PAN-ROASTED ASPARAGUS and MUSHROOMS
SERVES 4
I have a confession. Until very recently, I never really liked fresh asparagus. Bigger confession. I actually like canned asparagus. My grandmother always had a couple of the familiar silver cans in her cupboard for “salad” or to be heated with a can of sliced mushrooms and a knob of butter for a side dish for company.
We’ve lost sight of the seasonality of asparagus and mushrooms because they are always in the grocery store, but both are spring crops—so make this recipe when they really are most plentiful. Asparagus and mushrooms also have a natural affinity. This dish works well with plain old white button mushrooms as well as cremini or oyster, and is exceptionally splendid if you want to gild the lily with chanterelles or porcini.
1 tablespoon pure olive oil
1 pound mushrooms, sliced
Coarse kosher salt and freshly ground black pepper
1 shallot, sliced
1 garlic clove, sliced
1 pound asparagus, ends trimmed and stalks cut into 1½-inch pieces
Finely grated zest of 1 lemon
Heat the oil in a large skillet over medium-high heat. Add the mushrooms and season with salt and pepper; cook, stirring often, until tender and no longer squeaky, about 3 minutes. Add the shallot and garlic and cook until fragrant, 45 to 60 seconds. Add the asparagus and stir to combine. Add the chicken stock and cover with a tight-fitting lid. Cook until just tender, 3 to 5 minutes, depending on the thickness of the asparagus. Remove the lid and increase the heat to high to reduce the stock. Cook, stirring constantly, until the liquid has glazed the vegetables and the asparagus is tender, 1 to 2 minutes. Add the lemon zest and stir to combine. Taste and adjust for seasoning with salt and pepper. Serve immediately.
Calories 74
Fat 4 g
Carbs 8 g
Fiber 2 g
Protein 5 g
Taste experts refer to five basic flavors: sweet, salty, sour, bitter, and umami, often translated as “savory.” Think of the meaty flavor of sautéed mushrooms, a juicy steak, or a rich stock. Umami is actually used in various forms all over the world. Umami is found in beans and grain, fermented products, mushrooms, and cured meats. When you can wield umami in your kitchen to enhance and bolster flavor, it allows you to lessen the emphasis on fat, sugar, and salt. Umami-rich foods satiate more readily, and enable you to eat less. In the wise words of my fellow Georgian, Julia Roberts, in Steel Magnolias, “I would rather have thirty minutes of wonderful than a lifetime of nothing special.” Think of umami as what makes food wonderful, and use it to make flavors pop—and help you lighten things up.
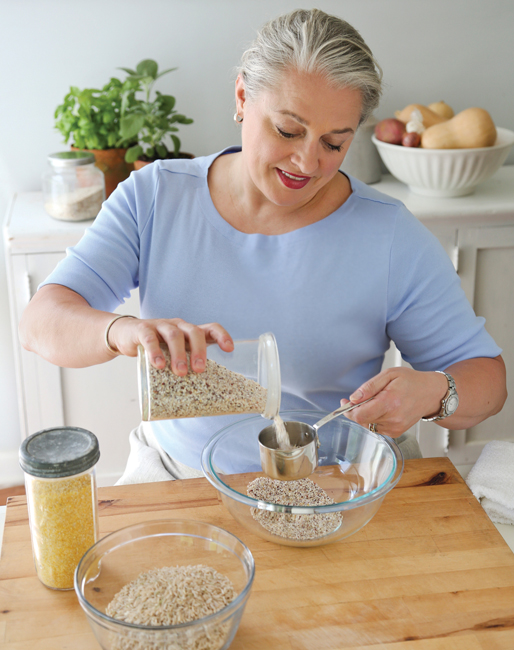
SPRING PEA, LEEK, and CAULIFLOWER “COUSCOUS”
MAKES 7 CUPS TO SERVE 6
My dear friend and mentor Nathalie Dupree has an ancient, battered couscoussière from her far-flung travels. It’s a curved, two-pot steamer; while the stew simmers in the lower pan, the steam rises into the upper pot to cook the couscous. When I first started working for her as a novice apprentice, it seemed as exotic as the moon!
Couscous is not a grain, but a fine pasta. It is deceptively light and it feels like it should be exceptionally healthy, but regular pasta is actually slightly more nutritious. This “couscous” isn’t really couscous at all but grated cauliflower! It makes a light and lemony dish, a perfect accompaniment to grilled chicken or seafood.
1 head (32 ounces) cauliflower, outer leaves removed, halved, and cored
1 tablespoon pure olive oil
2 small tender leeks, cut into rings, well washed
1 stalk celery, diced
1 cup shelled English peas
½ cup dry white wine
¼ cup water
Pinch freshly grated nutmeg
Finely grated zest of 1 lemon
1 tablespoon unsalted butter, at room temperature
¼ cup freshly grated Parmigiano-Reggiano cheese (1 ounce)
2 tablespoons chopped fresh mint
Coarse kosher salt and freshly ground white pepper
Using the large-hole side of box grater, grate the cauliflower into rice-size pieces. The yield should be about 8 cups. Set aside.
Heat the oil in a large nonstick skillet over medium-low heat. Add the leeks and celery; cook until the white of the leeks is soft and translucent and the green is bright, about 5 minutes. Add the peas and grated cauliflower and cook for 2 minutes, stirring occasionally.
Add the white wine and water and cook, stirring occasionally, until the vegetables are tender and the liquid has evaporated, about 8 minutes. Remove from the heat and add the nutmeg, lemon zest, butter, cheese, and mint. Stir to combine. Taste and adjust for seasoning with salt and pepper. Serve immediately.
Calories 134
Fat 6 g
Carbs 14 g
Fiber 5 g
Protein 6 g
SAUTÉED GREEN BEANS with SUMMER CORN
SERVES 6
When my grandfather grew corn down by the river, it seemed to all come in at once. We would sit on the front porch in the still, stifling heat of the evening and shuck corn. Good Lord, it was hot! Everything seemed to move in slow motion, especially for a fidgety kid who had lost interest in helping after the fifth ear. Well, that was until a large black snake slithered out of the burlap sack that held the harvested corn and headed toward my grandmother. I’m not certain I had ever seen her move so fast. I think it was very shortly after that incident that she made my grandfather dump the corn out of the sack under the carport and bring it to her on the porch, one well-searched bucket at a time.
3 ears fresh sweet corn, shucked and silks removed
1 pound green beans, stemmed
1 teaspoon pure olive oil
½ sweet onion, very finely chopped
Coarse kosher salt and freshly ground black pepper
1 tablespoon chopped fresh basil
Prepare an ice-water bath by filling a large bowl with ice and water. Bring a large pot of salted water to a rolling boil over high heat. Add the corn and beans and cook until the beans are crisp-tender, about 3 minutes. Drain well in a colander, then set the colander with beans and corn in the ice-water bath (to set the color and stop the cooking), making sure the beans and corn are submerged.
Remove the corn from the ice bath and pat dry with a paper towel. Cut the corn kernels from the cob and set aside.
Heat the oil in a large skillet over medium-high heat. Add the onion and cook until soft and translucent, 3 to 5 minutes. Drain the green beans and add to the onions. Add the reserved corn and season with salt and pepper. Cook, stirring to combine, until heated through and the flavors have combined. Add the basil and stir to combine and coat. Taste and adjust for seasoning with salt and pepper. Serve immediately.
Calories 98
Fat 2 g
Carbs 20 g
Fiber 3 g
Protein 4 g
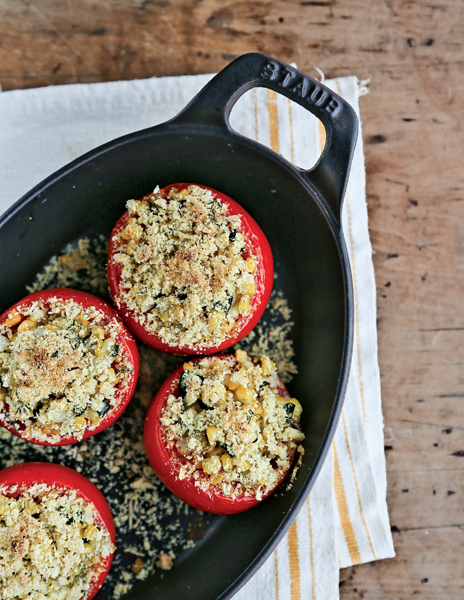
CREAMED CORN–STUFFED TOMATOES
SERVES 6
Creamed corn is one of summer’s most precious gifts. I spend a lot of time in New England where I was told all about the sweet summer corn. “Our corn is the best in the world.” In my mind, I silently dismissed it. “Oh, okay,” I responded, the half acknowledgment that conveys the unspoken sentiment, “You really don’t know what the hell you are talking about.” Best in the world? Yankee corn? Seriously? Well, let me tell you. It is the best corn I have ever tasted.
You’ll notice I’m calling for gluten-free bread crumbs here; they are available in gourmet grocery stores and larger stores like Whole Foods Market, but you can also use wheat bread crumbs, if you like. While I don’t have any issues with wheat, a member of my family does, as well a handful of other dietary issues. I try very hard to be inclusive with my cooking and if she’s eating with us, then I make those changes for all of the dishes. It’s not that hard to make adjustments if you have the information, and it’s far more hospitable for everyone to enjoy the same meal.
6 medium tomatoes
2 teaspoons pure olive oil
Scraped kernels from 4 ears fresh sweet corn (about 2 cups kernels)
1 poblano chile, cored, seeded, and finely chopped
Coarse kosher salt and freshly ground black pepper
3 tablespoons freshly grated Pecorino-Romano cheese
1 teaspoon chopped fresh thyme, plus optional sprigs for garnish
¼ cup gluten-free bread crumbs
Preheat the oven to 350°F. To form tomato shells, with a serrated knife, slice off the tops of the tomatoes and remove their cores. Using a melon baller or a spoon, scoop out the seeds and pulp of the tomatoes to create a shell, transferring the juices and pulp to a small bowl. Using your hands, squish the pulp and seeds until smooth but slightly chunky. Set aside.
Meanwhile, to make the filling, heat the oil in a large skillet over medium heat. Add the corn and poblano and season with salt and pepper. Cook, stirring occasionally, until the corn is tender, 8 to 10 minutes. Add the reserved tomato mixture and cook until it’s absorbed into the corn and the skillet is dry, stirring occasionally, about 3 minutes. Add the grated cheese and chopped thyme. Taste and adjust for seasoning with salt and pepper.
Arrange the tomato shells, cut-side up, in a small casserole dish. For each tomato shell, spoon in some filling (about ⅓ cup each, depending on the size of the tomato). Sprinkle over the gluten-free bread crumbs.
Bake the tomatoes until the filling is heated through, the tomato shells are tender, and the topping is golden brown, 20 to 25 minutes. Serve immediately.
Calories 124
Fat 4 g
Carbs 20 g
Fiber 4 g
Protein 5 g
SERVES 6
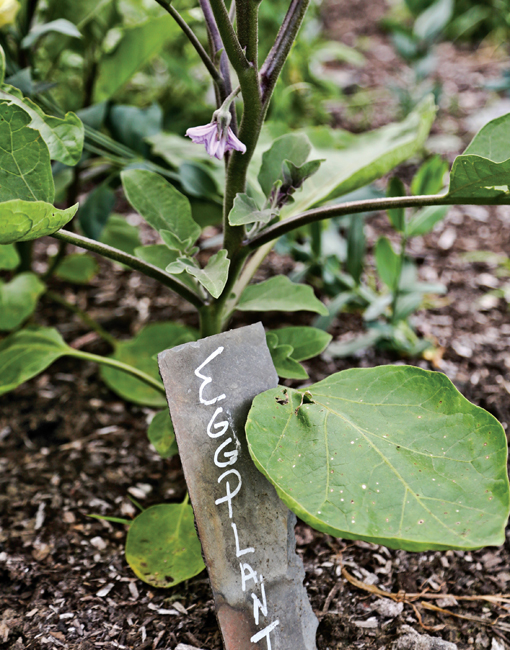
Eggplant is one of summer’s most luscious and sensuous vegetables and has always been one of my favorites both to eat and to grow. And, while eggplant readily belongs in both Italian and Far Eastern cuisine, it suits our hot Southern climate, as well. My grandparents always had the brilliant, jewel-like, nearly black-purple vegetable in their garden.
Eggplant is very meaty in texture, which adds bulk to a meal. Feeling hungry is a surefire way to stray from a healthy eating; I like to eat vegetables with substance, such as eggplant, so I don’t feel deprived. The trouble is that eggplant will soak up oil like a sponge if given the chance. It’s necessary to first salt the eggplant to help remove the moisture, making the flesh less sponge-like and denser. Plus, it needs quick cooking over high heat, as in this Asian-inspired stir-fry.
2 medium globe or 4 small Asian eggplants, skin on, cut into 1-inch pieces
2 tablespoons coarse kosher salt
2 teaspoons canola oil
1 sweet onion, chopped
1 red bell pepper, cored, seeded, and chopped
2 garlic cloves, finely chopped
½ teaspoon red pepper flakes
2 tablespoons reduced-sodium soy sauce
Freshly ground black pepper
Sprinkle the eggplant generously with salt and let them sit in a colander for about 30 minutes to drain. Rinse the eggplant under cold running water to remove the salt, then firmly squeeze a few pieces at a time in the palm of your hand to draw out almost all the moisture. Pat the eggplant dry with a clean kitchen towel and set aside on a plate.
Heat 1 teaspoon of the oil in a large nonstick skillet over medium heat. Add the onion and red bell pepper. Cook, stirring occasionally, until the onion is soft and translucent, 3 to 5 minutes. Add the garlic and red pepper flakes; cook until fragrant, 45 to 60 seconds. Transfer to a bowl and keep warm.
Add the remaining teaspoon of oil to the skillet and place over high heat. Add the eggplant and cook, tossing occasionally, until tender and golden, about 10 minutes. Return the sautéed-onion mixture and stir to combine. Add the soy sauce and basil and toss to coat and combine. Taste and adjust for seasoning with salt and pepper. Serve immediately.
Calories 87
Fat 2 g
Carbs 15 g
Fiber 4 g
Protein 3 g
To chiffonade means to thinly slice an herb or leafy green into ribbons. To do this, stack the leaves on top of each other, tightly roll them into a cylinder, then slice crosswise into thin strips.
GREEN BEANS with NEW POTATOES
AND CANDIED GARLIC
SERVES 6
Old-school beans and potatoes are most often nearly cooked to pablum and served swimming in bacon grease. There’s a time and place for that, but not when we are lightening things up! If it’s more likely to help you get in the kitchen, go ahead and purchase the peeled cloves in the produce department. This caramelized garlic is good on these beans, on meats, and yes, even just on a spoon.
8 ounces small new potatoes, about the size of a walnut
1 pound green beans, stemmed
½ cup garlic cloves
2 tablespoons pure olive oil
1 tablespoon balsamic vinegar
1 cup water
1 tablespoon firmly packed dark brown sugar
Coarse kosher salt and freshly ground black pepper
Make an ice-water bath by filling a large bowl with ice and water. Line a plate with paper towels.
To cook the potatoes, place them in a large pot of salted water and bring to a boil over high heat. Cook until just tender to the point of a knife, about 15 minutes, depending on the size of the potatoes. Add the beans and cook until crisp-tender, about 3 minutes. Drain the potatoes and green beans well in a colander, then set the colander in the ice-water bath (to set the color and stop the cooking), making sure the beans and potatoes are submerged. Once chilled, remove the beans to the prepared plate.
Meanwhile, place the garlic cloves in a small saucepan and cover with water. Bring to a boil over medium-high heat. Decrease the heat to simmer. Cook for 3 minutes to remove the initial bitterness of the garlic, then drain well and pat dry.
Dry the saucepan with a kitchen towel—make sure you do this very well to prevent the oil from popping—and drizzle 1 tablespoon of the olive oil in the saucepan. Add the balsamic vinegar and the water (be careful, it will spit and spew at you as the water hits the hot oil), and bring to a boil. Add the garlic and simmer, stirring occasionally, for 10 minutes. Then add the sugar and simmer on medium heat until most of the liquid has evaporated and the garlic is caramelized, about 15 minutes.
Heat the pot used to cook the beans and potatoes over high heat. Add the reserved beans and potatoes. Cook, stirring constantly, to reheat the vegetables. When they are hot, pour the caramelized garlic and any of the cooking liquid over the bean-potato mixture. Stir to combine and coat. Taste and adjust for seasoning with salt and pepper. Serve immediately.
Calories 117
Fat 5 g
Carbs 17 g
Fiber 3 g
Protein 3 g
SERVES 6
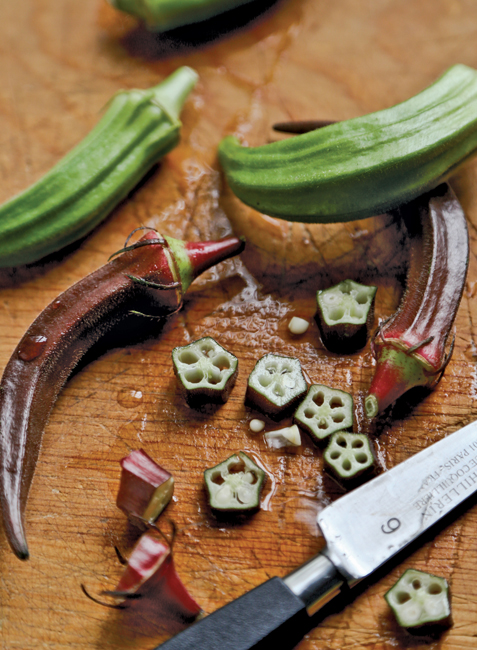
I love okra. It is one of those vegetables that people either love or hate. The only symbol of okra armistice is crispy, crusty fried okra. Even rabid okra haters will admit to tolerating fried okra. (After all, people will get on board with deep-fried anything.) Let’s face it, there’s really nothing like fried okra, but this oven-fried version does a darn good job of coming close. And, technically, I suppose this okra dish should really be called oven-baked, but that’s not nearly as seductive, now is it?
1 cup stone-ground yellow cornmeal
¼ teaspoon cayenne pepper
Coarse kosher salt and freshly ground black pepper
½ cup low-fat buttermilk
1 large egg, lightly beaten
1 pound fresh okra pods, stemmed and cut into ¾-inch slices
Organic nonstick cooking spray
Place a rimmed baking sheet oven in the oven. Preheat the oven to 450°F. Combine the cornmeal and cayenne pepper in a shallow dish. Season heartily with salt and pepper; set aside.
Whisk together the buttermilk and egg in a large bowl. Add the okra and season with salt and pepper. Stir to combine and set aside to coat, about 3 minutes.
Using a slotted spoon, remove the okra from the buttermilk mixture and add to the cornmeal. Dredge okra in the cornmeal mixture. Remove the hot baking sheet from the oven and spray with cooking spray. Place the coated okra on the heated pan and lightly coat the okra with additional cooking spray. Bake for 25 minutes, stirring once. Stir and spray again. Cook until crispy and dark golden brown, 10 to 12 additional minutes. Remove from the oven and season with salt and pepper. Serve immediately.
Calories 110
Fat 2 g
Carbs 21 g
Fiber 4 g
Protein 4 g
The folks who despise okra are put off by the slime, sometimes more politely called mucilage. Personally, I think mucilage sounds pretty scary, but no matter what you call it, here are five cooking tips to bust the slime.
• Choose small pods; wash and thoroughly dry them.
• If cutting into pieces, wipe your knife on a kitchen towel between slicing so as not to spread the slime.
• Give it some room! Don’t crowd the pan when cooking, as the steam will produce more slime.
• Cook okra at high heat and cook it fast.
• Don’t cover okra while cooking.
MAKES 8 CUPS TO SERVE 8
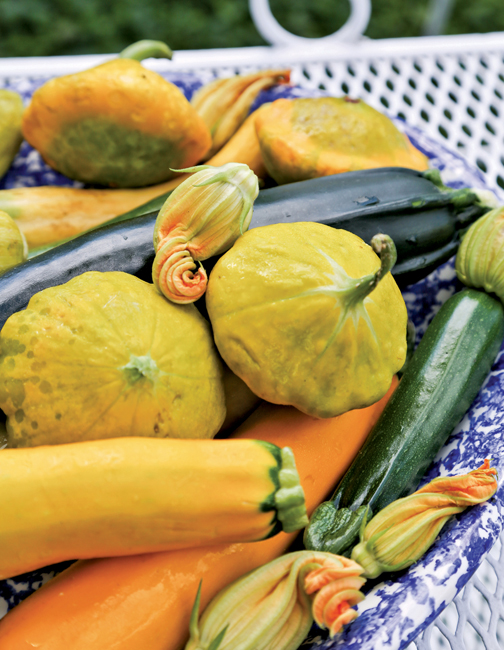
There are many variations of this Southern staple: church lady recipes that use cans of “cream of” soup, Junior League egg-mayo combinations, and chef-y versions with heavy cream and bread crumbs. I’ve lightened up this old-school Southern favorite and suggest preparing a béchamel sauce with low-fat milk, to which I add a combination of reduced-fat and regular Cheddar cheese. It is far less fatty and rich than the traditional version—and still tastes delicious. When preparing summer squash dishes, I like to mix the squash varieties for an interesting contrast of color.
4 zucchini squash, sliced ¼ inch thick (about 1 pound)
3 yellow squash, sliced ¼ inch thick (about 1 pound)
½ sweet onion, chopped
½ cup freshly grated 50 percent reduced-fat Cheddar cheese (2 ounces)
½ cup freshly grated sharp Cheddar cheese (2 ounces)
1 tablespoon canola oil
1 tablespoon unbleached all-purpose flour
¾ cup 2 percent milk, warmed
Coarse kosher salt and freshly ground black pepper
2 large eggs, lightly beaten
1 cup fresh whole wheat bread crumbs (from about 1½ slices of bread)
¼ cup chopped mixed fresh herbs (such as flat-leaf parsley, chives, and basil)
Preheat the oven to 350°F. Lightly coat a medium ovenproof casserole dish with nonstick cooking spray. Bring a pot of salted water to a rolling boil over high heat. Place the zucchini, yellow squash, and onion in a steamer basket and set over the boiling water; steam until the squash is just tender, about 5 minutes. (You can also place all of the squash in a microwave-safe bowl and zap it on high power until tender, about 4 minutes, depending on the strength of your microwave.) Drain away any excess water and pat the squash dry with a kitchen towel. Set aside.
Combine the grated cheeses. Measure out ¾ cup of the mixed cheeses for the sauce; set aside the remaining ¼ cup of cheese for the topping.
Heat the oil in a saucepan over medium heat. Add the flour and, stirring constantly, cook until very pale blonde, about 1 minute. Add the milk and whisk until smooth. Bring to a boil, whisking constantly, over high heat. Remove from the heat. Add the reserved ¾ cup of cheese to the sauce and stir to combine. Taste and adjust for seasoning with salt and pepper.
Pour over the squash and onion; stir to combine. Add the eggs, half of the bread crumbs, and the herbs. Transfer to the prepared casserole. Combine the remaining ½ cup bread crumbs and the remaining ¼ cup of cheese. Sprinkle on top of the squash mixture. Bake until firm and brown on top, about 30 minutes.
Remove to a rack to cool slightly, then serve.
Calories 125
Fat 6 g
Carbs 11 g
Fiber 2 g
Protein 9 g
When you are making choices, it’s important to set S.M.A.R.T goals, ones that are specific, manageable, attainable, realistic, and time-bound (set to a specific period of time). It’s no good to say, “I wish I looked like I did in college.” There’s not much about you that’s the same as it was when you were twenty, and a whole lot you are probably glad is not! One way or the other, wishing won’t make it so. It is realistic to understand that safe, attainable weight loss happens at one to two pounds a week. So, if you want to lose twenty pounds, it’s very likely going to take at least ten to twenty weeks—and that’s staying on track, on target, on point. Knowing that going in will help you stick to the plan!
Shred a block of cheese rather than using the purchased preshredded cheese in a bag. Freshly shredded cheese has more moisture, so it melts more smoothly and retains a bolder, more pronounced flavor. Also, instead of using all reduced-fat cheeses, use a combination of reduced fat and regular. Reduced fat cheeses don’t melt as easily and are sometimes lacking in flavor. Mixing it up allows for great meltability and trims some of the fat at the same time. I prefer the Cabot brand of cheese over many of the other reduced-fat brands; they offer both 75 percent and 50 percent reduced-fat Cheddar.
SERVES 8
I posted a photo of this dish on Facebook while testing recipes for this book and it lit up my page like fireworks on the Fourth of July—everyone wanted the recipe. I had to make them wait, but here it is! There’s absolutely nothing like gooey, cheesy goodness. It’s also the siren call that can crash your best-laid plans to lose weight on the rocks. In this recipe, I use tender summer squash instead of lasagna noodles to lighten things up in a most flavorful way. The squash is paired with a simple marinara sauce layered with a judicious, yet still luxurious, amount of cheese for ultimate flavor. It’s not saying “no” to pasta, it’s saying “yes” to vegetables!
Keep that in mind in the summer when so many vegetables are in season and you have the grill fired up. Try grilling the vegetables for this lasagna for a bit of extra smoky flavor. And, while you are at it, grill extra vegetables to enjoy the entire week and store them in an airtight container. You can chop them up and put in a salad or a wrap.
8 medium zucchini or yellow squash (about 3 pounds), stemmed and cut lengthwise into ¼-inch-thick strips
Coarse kosher salt and freshly ground black pepper
1 cup part-skim ricotta cheese
¼ cup plus 1 tablespoon freshly grated Parmigiano-Reggiano cheese (1.25 ounces)
2 garlic cloves, very finely chopped
¼ teaspoon red pepper flakes
2 tablespoons chopped fresh herbs (such as basil, oregano, and flat-leaf parsley)
1 cup best-quality prepared marinara sauce
10 ounces part-skim mozzarella cheese, grated
Preheat the oven to 425°F. Line 2 rimmed baking sheets with silicone mats or parchment paper. Place the squash on the prepared baking sheets in a single layer. Season with salt and pepper. Roast, rotating the baking sheets once, until the squash is tender, about 25 minutes. (Leave the oven on after vegetables are cooked.) Remove the vegetables to a rack to cool slightly.
Meanwhile, spray an 8 by 11½-inch baking dish with nonstick cooking spray. In a bowl, combine the ricotta, ¼ cup of the Parmesan, garlic, red pepper flakes, and herbs. Season with salt and pepper and stir to combine.
Place ½ cup of marinara sauce in the bottom of the prepared baking dish. Layer with half of the vegetables. Top with the ricotta mixture, spreading with a spoon to cover the vegetables completely. Top with ¼ cup of the marinara and spread to cover. Layer with the remaining vegetables and top with the remaining ¼ cup of marinara. Top with grated mozzarella and sprinkle over the remaining tablespoon of Parmesan. Transfer to the oven and cook until bubbly and golden brown, 25 to 30 minutes. Remove to a rack to cool slightly, then serve.
Calories 197
Fat 10 g
Carbs 11 g
Fiber 2 g
Protein 16 g
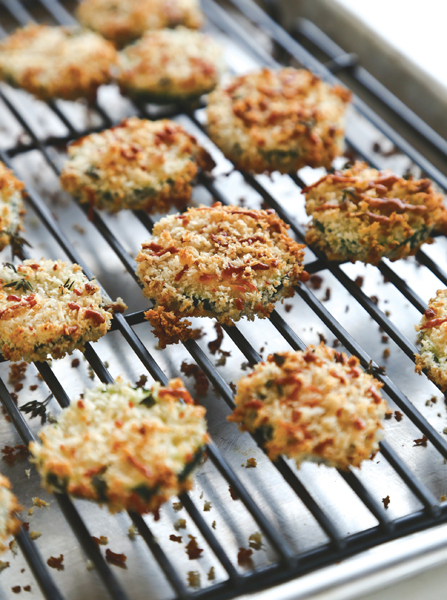
MAKES 60 PIECES TO SERVE 6
My grandmother used to stand at the stove and fry slices of squash and zucchini in her cast-iron skillet. She’d dip thick rounds of squash in egg then coat them in a combination of seasoned cornmeal and flour. They’d bubble furiously in the fat, transforming from pale yellow disks to golden brown coins. Using her well-worn two-pronged fork, she would transfer them, one at a time, to layers of split-open brown paper bags to drain. It seems they never made it to the table. My sister, cousins, and I would hover round the kitchen table like little birds with mouths wide open, our greasy little fingers scarfing down the crispy rounds as soon as they would cool enough to touch.
I’ve found that oven-baking squash yields the same delightful, crunchy texture—with a fraction of the fat. Serve with mustard or warm marinara for a crispy side dish.
2 large egg whites, lightly beaten
2 medium zucchini, stemmed and sliced ¼ inch thick
Pinch of cayenne pepper
Coarse kosher salt and freshly ground black pepper
2 cups panko (Japanese) bread crumbs
½ cup freshly grated Parmigiano-Reggiano cheese (2 ounces)
2 teaspoons fresh thyme leaves
Organic nonstick cooking spray
Preheat the oven to 425°F. Line two rimmed baking sheets with silicone mats. Place the egg whites in a large bowl and beat with a whisk until frothy. Add the zucchini slices and cayenne pepper. Season with salt and pepper and stir to combine and coat.
In a shallow dish, combine the panko, Parmesan, and thyme. Season with salt and pepper. Dip each squash round into the panko mixture, coating it evenly on both sides, pressing the coating to stick. Place them in a single layer without touching on the prepared baking sheets. Spray lightly with nonstick cooking spray. Transfer to the oven and bake until golden brown and crispy, rotating top to bottom, about 25 minutes. Using a metal spatula, immediately remove the crisps to a rack to cool slightly (and to prevent them from becoming soggy) before serving.
Calories 112
Fat .2 g
Carbs 22 g
Fiber 1 g
Protein 5 g
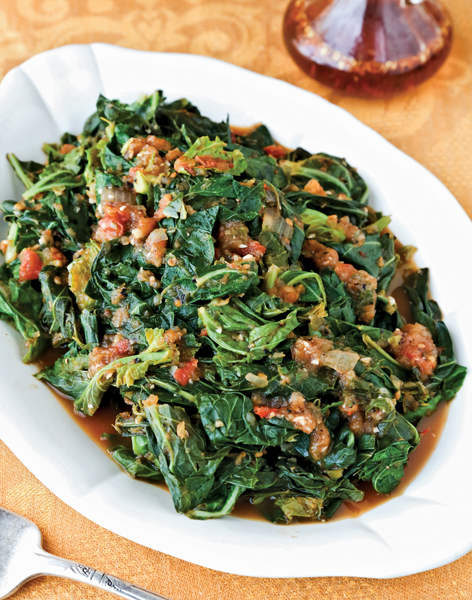
BRAISED COLLARDS
IN TOMATO-ONION GRAVY
SERVES 6
A few years ago, I was visiting my cousin Gene and his wife, Kathy, in Fort Valley, Georgia, and teaching a class at a local cooking school. We needed collard greens, so I told the owner I needed two bunches. She drove down the street to a pickup truck parked nearby and came back with two “bunches.” Well, these bunches easily contained two or three monster-size bundles, so big that I had to hug them with both hands. We laughed for hours about the size of Fort Valley collards.
Traditional Southern collards are cooked with fatback, ham hock, or bacon grease. There’s a lot of flavor in that fat, so when you eliminate it, you need to bump up the flavor elsewhere. Charring the tomatoes before adding them to the gravy is a great way to add a smoky, umami-rich note without adding fat or calories.
4 ripe, medium Roma tomatoes, cored
2 teaspoons canola oil
1 sweet onion, chopped
3 garlic cloves
Coarse kosher salt and freshly ground black pepper
16 cups chopped collard greens (1 pound)
Heat a medium skillet over high heat. Add the cored tomatoes and cook until they are charred on all sides, about 5 minutes. Remove to the bowl of a food processor fitted with the metal blade.
Let the skillet cool slightly by taking it off the heat or decreasing the heat, depending on how smoking-hot your skillet is. Have the heat at low and add the oil (the skillet will still hold a great deal of heat). Add the onion and garlic, and sauté, stirring occasionally, until both are a deep golden-brown, 8 to 10 minutes. Remove from the heat and let them cool slightly. Transfer to the food processor bowl containing the reserved charred tomato, and process until smooth. Transfer the mixture to a large saucepan. Cook over medium-low heat until thickened, 5 to 7 minutes. Season with salt and pepper.
Add the chopped collards and cook until just tender, 15 to 20 minutes. Taste and adjust for seasoning with salt and pepper. Serve warm.
Calories 72
Fat 2 g
Carbs 11 g
Fiber 5 g
Protein 4 g
COLLARD GREENS with CHIPOTLE POTLIKKER
SERVES 6
Instead of smoky bacon or fatback and hot sauce, how about we skip the meat and keep the heat? This recipe has become a family favorite for a weeknight side dish. Chipotles are smoked jalapeño chiles and can be found dried whole or canned swimming in a spicy adobo sauce that is made from a combination of chipotles, tomatoes, and other spices for a rich, often smoky, flavor. Adobo is Spanish for marinade. You can find canned chipotles in adobo in the international or Hispanic section of most major supermarkets.
Transfer any unused chiles and the sauce to a sealable glass container. (The brick-red sauce will stain plastic and permeate the container with the spicy aroma.) Refrigerate for up to 4 weeks or try freezing individual chiles with some of their sauce in an ice cube tray and then transfer the cubes to a sealable freezer container. Frozen, they’ll keep for about 3 months.
1 sweet onion, sliced
4 garlic cloves, halved
1 chipotle in adobo
1 tablespoon adobo sauce
Coarse kosher salt and freshly ground black pepper
12 cups chopped collard greens (about 12 ounces)
In a medium saucepan, bring the stock, onion, garlic, chipotle, and adobo sauce to a boil over high heat. Season with salt and pepper. Decrease the heat to simmer and cook until the onion is soft and translucent, about 5 minutes. Add the greens and cover. Cook, stirring occasionally, until the greens are tender, 15 to 20 minutes. Taste and adjust for seasoning with salt and pepper. Serve immediately.
Calories 57
Fat 1 g
Carbs 10 g
Fiber 4 g
Protein 4 g
Chicken stock couldn’t be easier to make at home. If you save vegetable scraps (carrot and celery tops, for example) and chicken carcasses (from whole roasted chickens) in a bag in your freezer, you can combine them to make an easy stock. Or you can start fresh: combine 2 pounds of chicken wings or bones, 3 chopped celery stalks, 3 chopped carrots, 3 chopped onions, 2 bay leaves (I prefer fresh), 2 sprigs of flat-leaf parsley, 2 sprigs of thyme, 4 to 6 black peppercorns, and 14 cups of water in a large stock pot. Bring the mixture to a boil over high heat, then decrease to low and simmer for 1½ hours, skimming the foam off the top as it rises. Strain through a colander, then store in an airtight container in the refrigerator for up to 1 week, or freeze for up to 3 months. Before using, skim off and discard any fat that has risen to the surface.
BRUSSELS SPROUTS with RAISINS AND PECANS
SERVES 6
Sour, salty, bitter, sweet, and savory all come together to make these brussels sprouts an astonishingly good side dish. When left whole, it’s often best to parboil the sprouts. They can also be peeled layer by layer, for a quick-cooking stir-fry, but that can be quite time-consuming. The method used here of slicing these miniature cabbages is the best of both worlds—and is even quicker if you have a mandoline.
1 teaspoon pure olive oil
16 ounces brussels sprouts, trimmed and sliced ⅛ inch thick
Coarse kosher salt and freshly ground black pepper
3 garlic cloves, halved
2 tablespoons golden raisins
1 tablespoon balsamic vinegar
2 tablespoons chopped pecans
Heat the oil in a large skillet over medium-high heat until shimmering. Add the sprouts and season with salt and pepper. Cook, stirring occasionally, until the sprouts are beginning to char and still bright green, about 3 minutes. Add the garlic and cook until fragrant, 45 to 60 seconds. Add the stock and raisins; cook, stirring occasionally, until the pan is nearly dry and the sprouts are just tender, 8 to 10 minutes. Add the balsamic vinegar and pecans. Stir to combine. Taste and adjust for seasoning with salt and pepper. Serve warm.
Calories 77
Fat 3 g
Carbs 9 g
Fiber 3 g
Protein 3 g
ROASTED SWEET POTATO and PEARS
SERVES 4
Our family home had an ancient, gnarled, and knotty pear tree on the property. I believe it was some form of an heirloom Bartlett, but the true name of the fruit was long lost. Every fall my grandfather would harvest the pears and my grandparents would preserve the golden, tapered orbs in sugar syrup or combine them with savory ingredients such as onion and spices for pear chow-chow, a traditional Southern fruit relish made with end-of-season fruits and vegetables. Pears are one of fall’s sweetest gifts. The season is more fleeting than apples and they don’t have as long of a shelf life. Pears must be enjoyed during that short time or preserved, as my grandparents did, for future enjoyment.
The honey-rich flavor of pear marries wonderfully with the earthy sweetness of the sweet potato in this side dish, bringing to mind the expression “what grows together, goes together.” I’m finishing the combination of their mutual sweetness with a smattering of blue cheese crumbles for a hint of salt and spice.
2 large sweet potatoes, sliced, or 1 pound small sweet potatoes, cut into ¼-inch-thick slices
1 pear (such as Bosc), cored and into ¼-inch-thick slices
1 tablespoon unsalted butter, melted
3 sprigs fresh thyme, leaves only
Coarse kosher salt and freshly ground black pepper
½ teaspoon sherry vinegar
2 ounces blue cheese, crumbled
Preheat the oven to 350°F. Combine the potato and pear in a medium gratin dish or ovenproof skillet. Pour over the butter, scatter over the thyme leaves, and season with salt and pepper. Toss to combine. Transfer to the oven and bake until the potatoes are tender, about 45 minutes. Remove from the oven and drizzle over the vinegar and blue cheese crumbles. Stir to combine. Taste and adjust for seasoning with salt and pepper. Serve immediately.
Calories 199
Fat 7 g
Carbs 30 g
Fiber 5 g
Protein 5 g
SERVES 4
I’m most accustomed to roasting squash in the oven. Mama slow-roasts acorn squash halves filled with butter, maple syrup, and pecans to absolute candy sweetness. This recipe mirrors the flavors of that classic dish, but with far less butter and sugar. The bonus is that the natural sugar in the slices becomes mottled with a series of deep golden brown circles when pan-seared; it’s gorgeous. It’s then finished in the oven with a few whole sprigs of thyme and bay leaves scattered between the pieces to enhance the savory flavor. Lastly, just a drizzle of maple syrup and a smattering of pecans finish the dish. This will become your guaranteed go-to dish for fall.
1 tablespoon canola oil, plus more if needed
1 acorn squash (left unpeeled), seeded and cut into eighths
4 to 6 (unpeeled) butternut squash slices, cut ¼ inch thick (6 ounces)
1 small red onion, stem end trimmed and root attached, cut lengthwise into eighths
Coarse kosher salt and freshly ground black pepper
2 bay leaves, preferably fresh
2 fresh thyme sprigs, leaves only
2 tablespoons maple syrup
2 tablespoons chopped pecans
Preheat the oven to 350°F. Brush a large skillet with oil and heat over medium heat. Add the squash pieces without crowding and cook on both sides until mottled and browned, 2 to 3 minutes per side. Transfer to a bowl. (You will need to sear the vegetables in 2 to 3 batches, depending on the size of your skillet.) Repeat with remaining oil and squash.
Return all of the squash to the skillet and season with salt and pepper. Drizzle over any remaining oil. Tuck the onions and herbs around the vegetables in the skillet and transfer to the oven. Bake until tender to the point of a knife, about 35 minutes. Remove from the oven and drizzle over the maple syrup and sprinkle over the pecans. Return to the oven to warm the syrup and lightly toast the pecans, additional 5 minutes. Remove the herbs and serve immediately.
Calories 147
Fat 6 g
Carbs 24 g
Fiber 3 g
Protein 2 g