CHAPTER 5
OFF-THE-WALL TECHNIQUES
TRADITIONALLY, ALMOST EVERYTHING that went into beer went into the kettle. Even the more unconventional ingredients were subjected to a boil before the beer started to ferment. But as brewers began to think about and experiment with more untraditional flavors, they also came up with different, often more effective, ways to introduce those ingredients. Now it’s common to add flavorings in the primary or secondary fermenter, or even at the time of packaging.
We’ll show you a variety of ways to do that in this chapter, and we’ll also cover other experiments that push the limits of your brewery. Whether you want to fake an authentic cask, make your first Eisbeer, concoct your own invert sugar, or dabble in soda-making, we bet there’s something here you haven’t done yet. Heck, we even have some projects for your spent grain.
FLAVOR SHOTS
Ignore the nonsense that says anything added to the cold side of brewing is cheating. Two of the most important techniques in this chapter are all about adding flavors outside the kettle. Keep in mind that while both of the techniques have the same goal—to create an intensely flavored liquid you can add to your beer—they extract different qualities from the same ingredients. For example, think of the warm, earthy cinnamon you taste in a freshly mulled hot cider. That cinnamon character is one you will only get through making a tea. If you make a cinnamon tincture, the extraction will remind you of the bright red-hot heat you experience when eating a cinnamon candy. Of course, you can create both a tea and an extract and play with flavoring the beer in different ratios to achieve a desired profile.
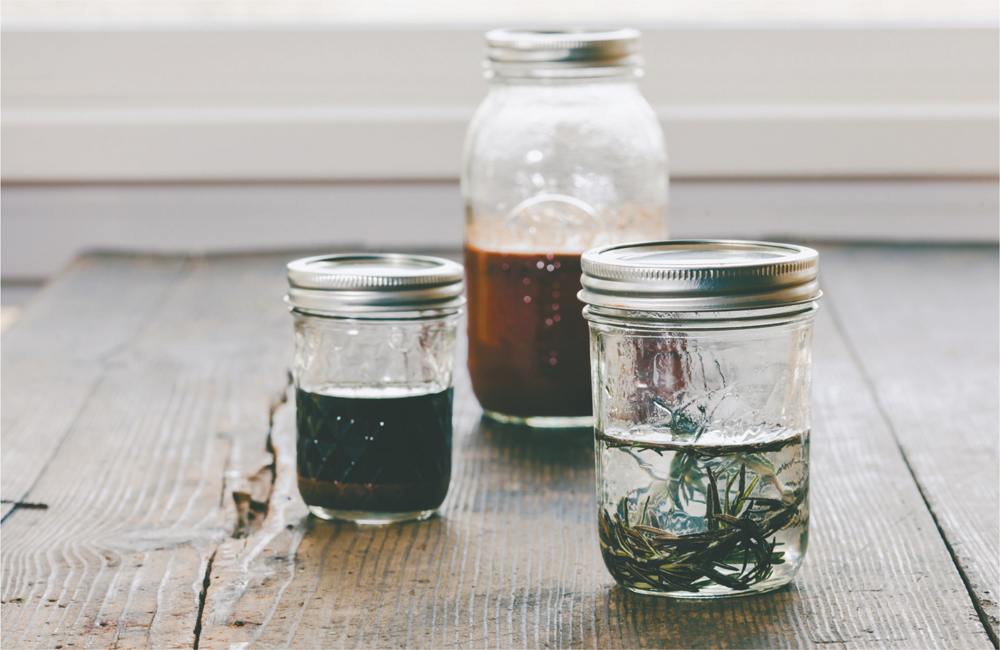
TEA
A flavoring tea, in this case, is a lot like making a really strong pot of tea. Go figure. You’ll get the best results when the water used is hot but not boiling. The advantage of an herb or spice tea is the speed at which it’s ready to use. It beats tinctures by days. However, unlike a tincture, the tea won’t remain shelf stable for very long. Don’t worry; it’s fine once it’s in the beer.
You Will Need
• 1 pint water
• 2–4 tablespoons of herb or spice (for vanilla, use 2–4 beans)
• Fine mesh strainer
• Coffee filter
• 1-pint Mason jar with lid
Instructions
1. Bring the pint of water to a boil and let it cool to approximately 180°F. Stir in the herbs and allow the mixture to steep for 15 minutes.
2. Strain the mixture through a fine mesh strainer lined with a coffee filter into the Mason jar and seal tightly. Store in the fridge and use within 2–3 weeks.
Want to sound fancy? Don’t call it an herbal tea. Call it a tisane instead. This is a word derived from the ancient Greek for “barley water.” Don’t ask why; just be happy it’s beer related!
TINCTURE
You’ll sometimes hear people refer to this as an extract, but we prefer tincture since that’s the precise term for an ethanol-based extract. Turns out that ethanol is a heck of a solvent and can strip most essential oils out of spice, herbs, fruits, and so on. Make no mistake: it’s the essential oils that we’re concerned with. Sometimes it’s the cinnamaldehyde and ethyl cinnamate found in whole cinnamon bark we’re after, other times it’s the limonene and citral found in lemon zest. Tinctures require a little bit of time to make but produce stable and intense flavors. The goal is to make a strongly flavored shot so that you don’t need to pour a ton of it into the beer.
Denny: I’ve gotta chime in here. In general, I don’t care for alcohol-based tinctures. The added alcohol often adds a heat to the beer that I don’t care for. I avoid this technique unless I have no other choice for using an additive. But that’s my opinion. Many people use tinctures with no objections. The best way to find out what you like is to try it yourself!
You Will Need
• 6 oz decent vodka (not the cheapest rotgut, but nothing too expensive)
• 1–4 oz herb or spice
• 1-pint Mason jar with a plastic lid (Plastic lids don’t rust like regular canning lids.)
Instructions
1. Mix the vodka and herb or spice in the Mason jar. Secure the plastic lid tightly.
2. Shake the jar at least twice daily for 4–6 days. Taste the tincture. When it’s as potent as you’d like, strain the mixture through a fine mesh strainer lined with a coffee filter.
3. Return the tincture to the Mason jar and seal the lid. Store for up to 2 years and use as needed.
Variants
If you want to play with some other flavors, try rum or bourbon instead of vodka for complementary extractions, such as vanilla beans.
If you have an old-fashioned whipping siphon, you can make a tincture in under ten seconds. Load the siphon with your booze and your spice or herb. Seal the container and crack one cartridge of CO2 or nitrous oxide into the siphon. Shake for a few seconds and then, holding the siphon with the spout facing up, press the dispense lever and rapidly vent the pressure. Open up the siphon and strain the infused vodka through a fine mesh sieve. This makes a great party trick to doctor one beer in many different ways (or if you’re spiritually minded, it allows you to create an impressively varied vodka cocktail list).
STEAM DISTILLATION
So let’s say you hate the effect of alcohol tinctures. It’s entirely possible to make a steam distillation extract, and sometimes this method is preferable. A quick note on legality: in pretty much all parts of the world (except New Zealand) home distillation comes with restrictions; namely, no home distillation of drinking ethanol is allowed. Depending on your local laws, you can likely still distill water, essential oils, perfumes, and fuel alcohol. Just no moonshining!
We’ll start with a classic: rosemary. Trying to make an alcoholic tincture with most heavily pitchy and piney things is an exercise in woe. The essential oils are protected by nasty, sticky pitch the alcohol will dissolve. Instead you need to use steam in order to bust free the aromatic power without the terpenic pitchy flavors of other extraction methods.
The process is fairly straightforward. You create a closed environment that you cram a bunch of your desired plant matter into. You run steam through the plant matter and direct the steam to an area where it can cool and condense.
You Will Need
• Large stock pot with draining basket and lid
• 2 feet of copper wire
• Glass bowl
• Tongs
• Gloves
• Ice
• Water
• A few handfuls of rosemary (or other material for distillation)
Instructions
1. Add a quart of clean, filtered water to the bottom of the stock pot (this is the “retort” in distillation terms). Steam distallion is inefficient, so fill the basket with as much plant matter as you can.
2. Take copper wire and run it through a pair of the topmost holes of the straining basket. You want to have two wires running the across the center of the basket. Your glass catch bowl will sit on these wires above the plant material. Perch the bowl on the wires. Take the pot lid and flip it upside down so the peak of the lid is over the glass bowl. The whole basket, plant matter, bowl, and lid are placed over the water in the stock pot. The water will be heated to steam. This will flow through the plant matter and condense back to water/essential oil on the cold metal lid and run to the center of the lid, dropping into the glass bowl.
3. Turn on the heat and wait until you see steam escaping the pot. Add a bunch of ice to the upside-down lid. Wait until the steam is almost gone and with tongs and gloves, carefully remove the bowl. It should now be filled with a very fragrant water called a hydrosol. When you let the hydrosol cool, you’ll notice a faint shimmer on the surface—that’s your essential oil!
4. If you allow the hydrosol to settle and lightly freeze, you should be able to extract the oil with few problems. But doing so is not necessary for our purposes. Pure essential oils are extremely potent and not all of them are safe for human consumption in sizeable quantities. Using the hydrosol mixture as-is is safer and gives you a larger margin for error.
USING A TEA, TINCTURE, OR DISTILLATION
Whether you’re planning to add a tea, tincture, or distillation, you need to wait until the beer has fermented completely and is ready for packaging. You can also use this process to add other flavorings, like liquor or coffee.
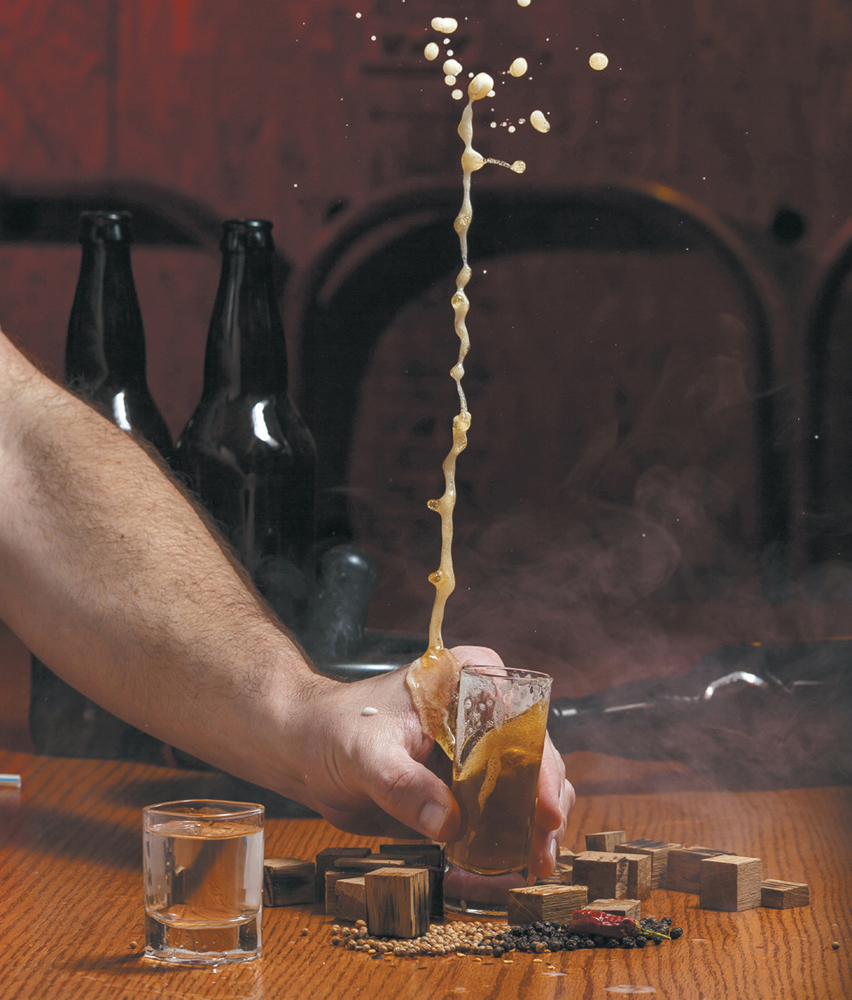
On packaging day, grab a pint of the beer in question and pour half into a measuring cup so you know you have exactly eight ounces. Add a small measured amount of the tea or tincture (~1.0 ml or smaller). Stir and taste. Repeat this process until you’ve achieved the appropriate taste level. Remember to top up the half pint with fresh beer if you draw down too far. You can also pour multiple beer samples and dose them each with a different amout. Then you can compare them to see which you like best.
Multiply the amount of extract added to the cup by the number of half pints remaining in the batch—or the part of the batch that you want to doctor. To save some time, you can assume you have 78 half pints remaining for a 5-gallon batch since you started with 80 half pints and used 2 for sampling. Add the amount indicated to the keg or bottling bucket and proceed with your beer transfer as usual.
Example: You have 5 gallons of wheat beer that you want to doctor with coriander and lemon peel tinctures. But you only want half of it doctored. After tasting and blending, you determine that 1 milliliter is sufficient for the coriander, but 2 milliliters are needed for the lemon tincture in a half pint. Since there are 40 half pints in 2.5 gallons, you have 38 half pints remaining in the portion to be doctored. That means 38 milliliters of coriander tincture and 76 milliliters of lemon tincture are added to the bottling bucket or keg. In English units that’s roughly 1.25 ounces of coriander tincture and 2.5 ounces of lemon tincture.
FORCE INJECTION OF FLAVORS
Back on page 66 we talked about constructing your very own draft hop infuser. Its normal mode of operation is stuck at the end of a keg, just before a draft faucet. Fill it with hops, coffee, mushrooms, or whatever else you want.
It’s a great gizmo, but for the average homebrewer it’s not terribly practical. Outside a party situation, you have to figure out how to store the infuser (do you let the beer continue to sit in contact or do you disconnect it and drink that last pint, toss out the hops and so on, and get ready to go again?
Why not just use the infuser to infuse the beer from keg to keg? Remember, we’re normally building these things out of cartridge filter housings. When filtering, you’re using a fiber mesh filter to trap all the undesirable particles. You slowly push uncarbonated beer from the source keg through the filter housing and filter media and out into a receiving keg.
So what we propose is filter through your flavoring material instead of a filter straight into another keg. Boom! You now have flavor-infused beer that you never have to worry about (or waste a ton of hops) to make happen. For anyone who just heard the word torpedo in their head: this was inspired by Sierra Nevada’s invention of their fermentation dry hopping torpedo.
You Will Need
• 1 draft infuser (See page 66.)
• 1 beverage line with a black liquid-out fitting
• 1 keg, filled with fermented beer (Uncarbonated makes the cleanest transfer, but some swear that carbonation helps strips volatiles.)
• 1 empty keg to receive the filtered beer
• Flavoring—hops, coffee, chocolate, fruit, herbs, spices—enough to flavor 5 gallons
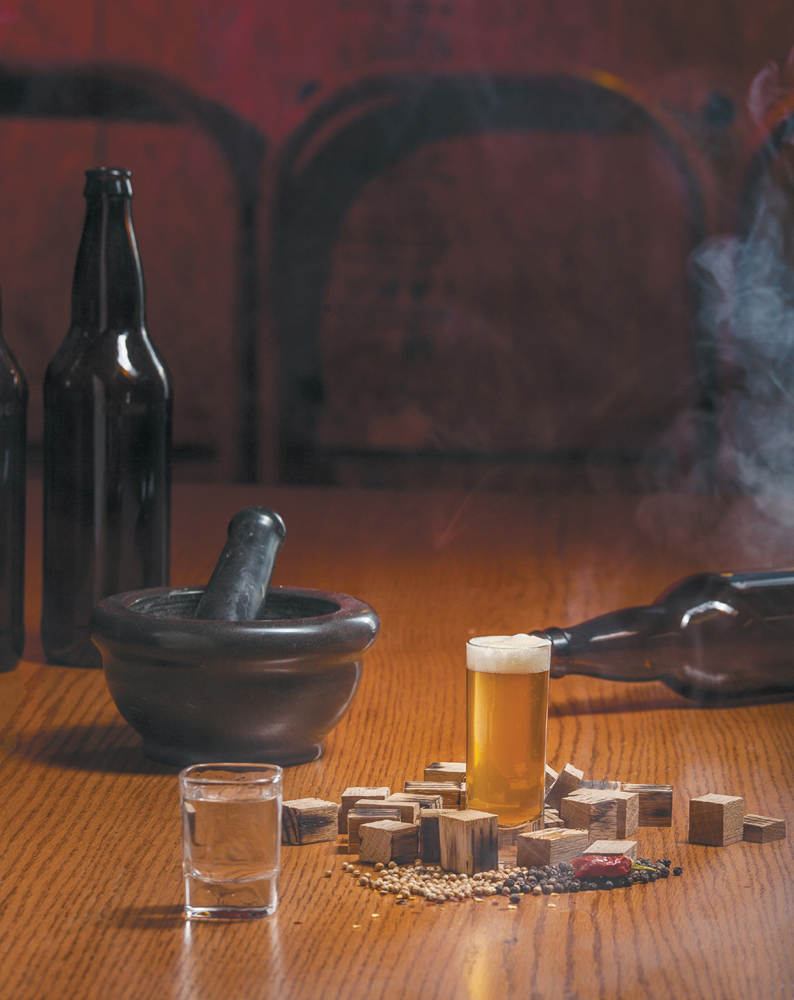
ONE NIGHT IN TIJUANA
By Drew
I used tinctures to great effect to rescue a beer that had been accidentally scorched in the mash, turning it from something that was trashed to something insanely popular! The beer had started life as a Golden Oat Barleywine, but a scorched character from the mash carried through and wouldn’t age out. So, I hit the keg with Tequila-soaked oak cubes. After aging with the beer for a week, the smokiness of the tequila and oak successfully masked the scorch character, but it left a little too much flavor from the tequila. To correct for that, I used a few small additions of coriander, red chile pepper, black pepper, and lime zest tinctures. This not only cut the oily character, it also invoked Mexico. Thus the beer became One Night in Tijuana.
For 5.5 Gallons at 1.082, 63 IBUs, 6.6 SRM, 9.3% ABV
GRAIN BILL
12 lbs |
Maris Otter Malt |
1.25 lbs |
Flaked Oats (toast at 325°F for 20 minutes and stir often) |
1.25 lbs |
Thomas Fawcett Oat Malt |
1.0 lbs |
Brown sugar |
MASH SCHEDULE
Rest |
138°F |
15 minutes |
Rest |
153°F |
60 minutes |
Mash Out |
168°F |
10 minutes |
HOPS
1 oz |
Warrior |
Pellet |
17% AA |
90 minutes |
0.75 oz |
Amarillo |
Pellet |
8.2% AA |
5 minutes |
0.75 oz |
Citra |
Pellet |
13.4% AA |
5 minutes |
YEAST
WLP001 California Ale or WY1056 American Ale
OTHER INGREDIENTS
2 oz |
French oak beans soaked in tequila (mine were soaked for many months) |
2 oz |
Mexican coriander extract (2 ounces of coriander by weight, roughly cracked and soaked in 4 ounces of vodka for two weeks) |
1 oz |
Lime zest extract (1 zested lime soaked in 4 ounces of vodka for two weeks) |
20 drops |
Red Pepper extract (2 tablespoons red pepper flakes soaked in 4 ounces of vodka for two weeks) |
20 drops |
Black Pepper extract (30 whole peppercorns soaked in 4 ounces of vodka for two weeks) |
Note: For the extracts above, shake often over the 2-week infusion period to ensure you get the full flavor.
Instructions
1. Remove the draft line from the output of the filter housing. Replace it with another line with a black QD fitting from your receiving keg. Sanitize the infuser.
2. Make sure the receiving keg is flushed with CO2.
3. Fill the infuser with the flavorings of your choice. Stuff it full of hops, coffee, frozen fruit, or whatever floats your boat. With some items, like spices, you’ll only need a few teaspoons. In general, look at how much of an item you’d use for a 5-gallon batch and load a little more than that in the infuser. Some ingredients, like fruit, are even better when you go bananas!
4. Hook the receiving keg up to the infuser and open the relief valve (or other quick disconnect) and let the infuser flood with CO2. Pull the receiving keg off the infuser.
5. Hook the source keg of carbonated beer to the input of the infuser. Hook the output to your receiving keg’s liquid out. This will create less turbulent flow in the receiving keg.
6. Gently release some of the pressure in the receiving keg and allow the infuser to fill with beer. Let the beer pour slowly into the new keg. Allow the pressure to equalize until the flow stops.
7. Let the beer infuse for 5 minutes before releasing the receiving keg’s pressure again. Repeat until all the beer has flowed through the infuser. If you think the flavoring needs a double charge, disconnect everything, sanitize the infuser again, replace the flavorings, reconnect everything, and repeat.
CANNED STARTERS
In the case of starters, it’s clear that the traditional process has its downside. You have to measure extract, boil water and mix in the extract, wait for it to cool, sanitize a growler, pitch the yeast, and so on. Well, what if we told you there was a way to make your starters superfast by concentrating most of your time well in advance?
You Will Need
• A pressure canner (23-quart size or larger)
• Mason jars: A case of half-gallon jars (6 jars) and a case of quart jars (12 jars) or a case of pint jars (12 jars)
Note: Why two different jar sizes? Not only does it allow you to maximize the amount of wort processed at any time, but it gives you flexibility by allowing you to use a pint jar to start an old yeast culture or a slurry of yeast from the bottom of a beer without stressing the yeast out.
• 8.25 pounds of pale malt or about 6 pounds pale dry malt extract (DME)
Instructions
1. Wash all the jars. Don’t worry about sanitizing them.
2. Mash 8.25 pounds of pale malt at 150°F for 60 minutes. Sparge and collect 6 gallons of wort. The gravity should be around 1.036. Note: If you don’t want to spend time mashing, you can instead directly weigh in 6.4 ounces of pale DME per quart into each half-gallon jar (3.2 ounces for a quart jar, 1.6 ounces for a pint jar), add water, seal, and shake.
3. Fill each jar to just below where the shoulder turns to the neck. Wipe the lip and add a lid. Screw down a band until it’s finger-tight.
4. Stack as many jars as will fit at a time in one layer in the canner. Make sure the included jar rack is on the bottom of the pot. Jars should not sit on the pot bottom. Add water to fill the canner to halfway up the jars.
5. Read your instruction manual for your canner. Once you have it set up, bring the canner to 15 pounds per square inch (psi) and hold there for 15 minutes. Don’t walk away! Turn off the heat, let the canner return to normal pressure, and carefully remove your jars.
6. Set the jars aside and let them cool. You should hear them ping as they stop boiling. Once cool, slip off the bands and check the lids. If one isn’t sucked in or is popped, that jar is no good. Don’t fret if you see a bunch of flaky material; that’s just hot break.
7. Repeat the process with the next batch of cans as everything else is cooling off. The process takes a few hours, but you end up with absolutely sterile jars of starter wort that can hang out on the shelf for years.
That’s it! When it’s time to make a starter, just grab a can and a growler. Sanitize both, pop the lid, pour the wort in, and pitch the yeast! It’s that easy.
BREWER’S INVERT SUGAR
Unlike the fussy Germans, the British have never exactly been afraid of adding this, that, or the other to the brew kettles if they thought it would give an appropriate kick and help keep costs low. One such fundamental ingredient is brewer’s invert sugar.
Invert sugar is a syrup produced from sucrose, also known as table sugar. In the inversion process, sucrose is split into its two constituent molecules (fructose and glucose). The resulting syrup is many times sweeter than table sugar, and thanks to the structure of the molecule, it won’t crystallize.
There’s a debate amongst brewers whether or not it’s necessary to invert sugar. Yeast produce an series of enzymes, invertases, that naturally cleave the sucrose, since fructose and glucose are more accessible to yeast than sucrose. But traditionalists argue that the flavors of specially made brewer’s invert sugars can’t be reproduced with simple sugar additions. Since you can’t buy these syrups at homebrewer quantities, they’ve remained relatively unexplored at our level … until now.
MAKING BREWER’S INVERT SUGAR
Brewing boffins Nic Henke and Kristen England, big believers in this tradition, set about making their own syrups that would replicate the increasingly dark and complex flavors found in Brewers #1–4. Now typical instructions for making invert syrup require mixing sugar, an acid, yeast nutrient, and water and bringing it to a boil. Once the water’s gone, you carefully raise the temperature to a fixed level for 20–200 minutes based on how dark you want it. It’s a pain to get it right. For Henke and England, the key was taking advantage of a common hyperboiled sugar syrup: blackstrap molasses. By mixing small portions (1–25 percent by weight) to simple invert sugar (either homemade or with Lyle’s Golden Syrup from the UK), they’ve reliably replicated the profiles of commercial syrups. Their approach was developed and validated by their talks with commercial producers. Not only is it easy to pull off, it’s also highly consistent.
In the instructions that follow, you can either make your own invert sugar syrup by following steps 1-6, or you can buy the admittedly pricey Lyle’s Golden Syrup, an invert sugar imported from the UK equivalent to Brewer’s Invert Sugar #1. If you go that route, you can skip directly to step 7 and skip over the ingredients for the homemade invert sugar syrup as well.
You Will Need
• 1 small nonstick saucepan
• Silicone spatula
• Small digital scale (reads up to 500 grams)
• Invert white sugar (ingredients and instructions follow) or Lyle’s Golden Syrup
• Blackstrap molasses: The key is to find a high-quality, licorice-oriented blackstrap molasses. Henke and England recommend the following, all sourced in the United States: Plantation Blackstrap Molasses, Golden Barrel Blackstrap, or other food grade blackstrap. Regardless of the variety you choose, you’ll want to play around to adjust for your particular brand of molasses.
Invert Sugar Recipe
For 2.5 pints of homemade invert sugar syrup, you will also need:
• 2.5 lbs raw sugar
• 2.5 pints filtered water
• 1 teaspoon lactic acid at 88%
• 1/2 cup (4 fluid ounces) light corn syrup
Instructions
1. Heat the water to boiling.
2. Turn off the heat, slowly add the sugar, and stir until it’s completely dissolved.
3. Add the lactic acid.
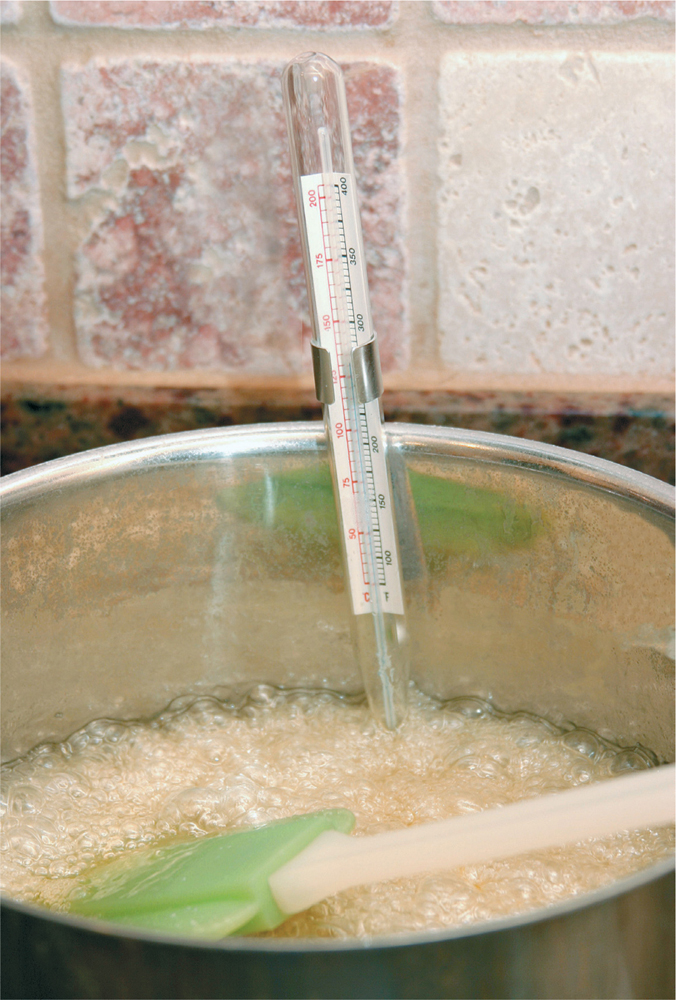
4. Immediately reduce the heat to medium-high, and set a candy thermometer alarm for 230°F (reduce your stove if you are heating more than 3°F/minute). Stir occasionally until simmering starts.
5. Once the mixture hits 230°F, set the alarm for 240°F. Slowly reduce the heat to keep the mixture’s temperature stable. You want to slowly ramp up to 240°F, as once you go over it is very tough to get the temperature down.
6. Once the alarm goes off at 240°F, immediately reduce the heat to keep the mixture at 240°F. It is okay to hit 245°F, but keep under 250°F. Keep at 240°F for approximately 10 minutes.
7. Blend your invert sugar solution (left columns) or Golden Syrup (right columns) with the appropriate amount of molasses. Once you blend your white syrup with the molasses, store it in a jar in the fridge. It will last an eternity. However, you’ll have to gently warm it in order to pour it.
Syrup |
SRM/EBC |
Invert Sugar (g) |
Blackstrap (g) |
Lyle’s Golden Syrup (g) |
Blackstrap (g) |
Invert #1 |
15/30 |
495 |
5 |
500 |
0 |
Invert #2 |
33/65 |
489.17 |
10.83 |
494.17 |
5.83 |
Invert #3 |
66/130 |
478.33 |
21.67 |
483.33 |
16.67 |
Black Invert |
178/350 |
441.67 |
58.33 |
446.67 |
53.33 |
Invert #4 |
305/600 |
400.00 |
100.00 |
405.00 |
95.00 |
FAKING A CASK
If you’ve never heard the term real ale, where have you been? Real ale is naturally carbonated by yeast in a barrel-like container and served via gravity or pump. It’s lighter in carbonation, and generally served warmer at 50°F–55°F (as opposed to American standard 38°F). Cask service, at least as it’s done in Britain, yields a softer, more open beer that expresses more of the yeast’s esters and the earthy, floral nature of traditional British hops. Even American hops become perfumelike, with less of that harsher, piney cattiness they can express.
But here’s an important thing that a good number of people get confused about, both at home and in the professional realm: sticking force-carbonated beer into a cask and serving it via a hand pump doesn’t make your beer a real ale. For it to be fully real, it must be 100 percent naturally carbonated. If you skip that step, you’ve made faux ale.
If you look online, you’ll find a single pin (a 5.4-gallon cask) with parts for gravity service costs hundreds. That’s enough to stick in anyone’s craw. However, if you have a keg, then you can easily fake it for a few bucks.
You Will Need
• 5-gallon corny keg
• CO2 tank
• Priming sugar
• Dry hops (optional)
• Ice
• 2-foot serving line with liquid-side fitting but no faucet
• Soft wooden spile or cotton ball
• 2-foot serving line with gas-side fitting and cobra faucet
Instructions
1. Purge your keg with CO2. Add enough corn sugar to the keg to prime the keg for 1.3–2.0 volumes and fill it with beer. Add any whole hops that you’d like for dry hopping.
2. Attach the lid and seal it with a jolt of CO2 at 10 psi. Lay the keg on its side, positioning the gas side connector on the bottom. Let the beer naturally carbonate for about 2 weeks by keeping it at room temperature.
3. Move the keg to the serving location and let settle for a few days.
4. The day you want to tap the keg, start by chilling the keg down with ice: Fill freezer bags with ice and drape them over the keg. Cover with towels to slow the melting. Secure a serving line to the liquid side fitting and shove a soft wooden spile or cotton ball into the end of the tube where you would normally attach a faucet. This will let the keg breathe. Attach the liquid fitting to the liquid post, which should be on top. Secure the hose to the top side of the keg. Let the cask breathe for a few hours.
5. Attach a gas fitting to the post, but instead of connecting to your CO2 tank, connect it to a short line with a cobra faucet.
Congrats! You now have a cask of real ale and approximately three days to drink it. As the keg empties, prop the far (keg bottom) end up to ensure the flow of beer.
Alternatively, you can use a technique designed to replicate some of the impact of the real ale experience but have it last longer. Repeat all of the above. After drawing a pint or two, replace the air inlet tube with a liquid fitting hooked up to a CO2 tank set to 1 psi. The idea is that the limited exposure to oxygen from the first two pints will slowly age the beer in the same gentle fashion as regular cask service but won’t let it go too far.
ICE ICE BABY (EISBIER)
Here’s a favorite technique of ours that more than likely was discovered completely by accident: eisbier. All it takes is a forgetful brewer, a few freezing-cold days, and you’ve got a discovery: when beer freezes, there’s a liquid core of deliciousness surrounded by frozen ice walls. The technique is most associated with the Bavarian town of Kulmbach and its famous beer, the deadly smooth and sweet eisbock. Supposedly, a lazy brewer left a barrel of strong doppelbock out in the winter night. In the morning the brewer discovered the concentrated core of supermalty, superpotent superbock. The freezing had caused the beer to clear and smooth out while concentrating the alcohol.
Let’s be very clear about this: eisbier is a completely different creature than the nasty “ice beer” that every major brewery came out with in the 1990s. Two Canadian brewers, Molson and Labatt, looked to other industries to speed up their production of lager beer. Remember, time is money! The faster you get beer to the shelves, the faster the money can flow in. Taking a look at what frozen juice manufacturers were doing, Labatt’s patented a method of barely freezing part of their beer to create heavy ice crystals that sink to the bottom of the fermenter. In the process of forming and falling, the crystals trap and drag various haze-inducing proteins, particles, and yeast. Once safely trapped at the bottom, the still liquid beer is drawn away from the ice and reconstituted with an addition of water to bring it back closer to original strength and gravity. In other words it’s partially frozen, watered-down beer that’s designed to be sold fast. The thing that’s kept this beer on the market is its reputation for being stronger. It provides a quick drunk that’s more socially acceptable than malt liquor.
Despite the dubious quality of the mass-produced beer, the method used was sound. Besides the watering-down process, it works on a similar principle as making eisbeer. Unlike water, which freezes at 32°F, ethanol doesn’t freeze until -173°F. This allows brewers to perform what is known as fractional freezing, colloquially (although incorrectly) known as freeze distilling.
When beer freezes slowly, small ice crystals form that are filled mostly with water. The ice entrains proteins, yeasts, and a very wee bit of alcohol. As you remove more water from solution, the more concentrated the alcohol becomes in the remaining beer. The trick to making an eisbier lies in the timing. Despite its low freezing point, if you leave a beer freezing long enough, ice will eventually trap all the alcohol, leaving you with nothing but a beer ice cube.
Globally there’s an on-again-off-again pissing contest to produce the world’s strongest beer, and it’s all about this technique. For a while the record passed back and forth between Boston Beer (Sam Adams) and Dogfish Head with their Utopias and World Wide Stout pushing the boundaries of what was possible with fermentation. Utopias won out, landing around 27 percent ABV. The battle restarted when Scottish brewers Brew Dog started chasing the record, but instead of focusing on pushing fermentation, they and other brewers used fractional freezing to push to the current record of 67 percent ABV (134 proof) from another Scottish brewer, Brewmeister.
Frankly, all this is sound and fury that doesn’t mean a whole lot. However, it is interesting in that it blows the bottom end of this chart of expected maximal extraction at a given freezing temperature. (But we suspect that’s because Brew Dog and the others involved in the race for strongest beer are performing multiple fractional freezing steps and the chart assumes a single pass.)
Freezing Temperature (°F) |
Expected Maximum ABV (%) |
0 |
14 |
-10 |
20 |
-20 |
27 |
-30 |
30 |
MAKE AN EISBEER
Ready to take your own crack at an eisbeer? All it takes is a steady source of cold and patience. Okay, and a beer like the World Wide Doppelbock (page 86). Kegs make this task really easy because you can transfer the concentrated beer off the ice. No kegs? You can freeze your beer in a bucket and pour the beer through a screened funnel, but that’s a pain.
What You Need
• An 8% ABV or higher beer that has finished fermentation
• Freezer
• 2 kegs and transfer equipment
• Serving line with cobra faucet
• CO2 tank
Instructions
1. Make sure your fermentation is complete and rack the beer into a cleaned and sanitized keg. Seal the lid with 10 psi of CO2, but don’t continue to carbonate it! Turn off the CO2.
2. Set the keg in a freezer or a cold place that will stay below 32°F (ideally around 25°F) for 24 hours.
3. Check the beer by shaking the keg. If it feels and sounds slushy, you’re ready for the next step. If the beer isn’t slushy, check it every 2 hours until it’s ready. If the beer is frozen beyond slush, allow it to thaw at room temperature and check it every hour.
4. Push the beer that’s still liquid out of the keg into a waiting keg.
5. Carbonate as usual and enjoy.
WORLD WIDE DOPPELBOCK
By Drew
For 5.5 gallons at 1.099, 47.5 IBUs, 19.9 SRM, 9.9% ABV
GRAIN BILL
20 lbs |
Munich 10°L Malt |
2.0 lbs |
Munich 30°L Malt |
12 oz |
Crystal 120°L Malt |
6 oz |
Melanoidin Malt |
3 oz |
Carafa II |
MASH SCHEDULE
Rest |
122°F |
30 minutes |
Rest |
150°F |
60 minutes |
HOPS
0.75 oz |
Magnum |
Pellet |
14.8% AA |
90 minutes |
0.5 oz |
Tettnager Tettnang |
Pellet |
4.9% AA |
15 minutes |
YEAST
WY2206 Bavarian Lager or WLP833 German Bock
DRY HOPS IN THE BOTTLE (OR KEG)
You can put hops everywhere else—why not in the bottle as well? It seems straightforward; just pop a few pellets into place and let ’em sit and add their magic to the beer within. Yet it’s surprisingly tricky. Here’s how you do it and keep your sanity. Hat tip to Scott Bert of www.BertusBrewery.com, who offered the original version of this technique as a way to test dry hops using Bud Light.
What You Need
• 12-ounce bottles of beer
• 6 hop pellets per bottle
• Extra caps
• Capper
Instructions
1. Prime and bottle your beer as usual. Make absolutely sure the beer is done fermenting before it hits the bottle. Seal and wait until the beer is fully carbonated, which is usually about 3 weeks.
2. Chill the beer to near freezing temperature. Prepare a 6-pellet dose of your favorite hop or hop blend for each bottle.
3. One bottle at a time, working quickly, follow this procedure: Pop the cap, drop 6 pellets into the bottle, recap the bottle, and invert to mix the pellets.
4. Store your newly dry-hopped beer upright for 2 weeks at refrigerator temperatures. (This reduces oxidation damage during infusion.)
5. Carefully open and decant through a sieve. Even with the beer ice-cold, you should expect some wild foaming.
Variants
Mix up the hops! Nothing says you’ve got to add the exact same hops to each bottle. Make one bottle all Cascade, make another all Citra, and so on. Mark the bottles well, and you’ll have a tasting party in a six-pack!
Dry hopping in a keg or growler is much easier. For every gallon, add 1 ounce of hop pellets. Just make sure you have the hops well secured in a tied mesh bag. It also helps to have a screen on your keg dip tube. If not, you too can enjoy the experience of a DIPA geyser smacking you in the face after a poppet had to be removed to clear it of hop debris.
BRETTANOMYCES AT BOTTLING
Whether in the bottle or the keg, Brettanomyces strains can add interesting complexity—leathery, spicy, vinous, haylike aromas and flavors—with very little work from you. The secret: Brett can consume longer chain trisaccharides that are not accessible to regular brewer’s yeast.
COSMOPOLITAN TROUT
By Drew
This beer is inspired by the monks of Orval and the crazy global nature of our hobby. It contains an ingredient from all the major brewing powers!
For 5.5 gallons at 1.058, 25 IBUs, 9 SRM, 5.9% ABV, 90 minute boil
GRAIN BILL
7.0 lbs |
German Pilsner Malt |
2.0 lbs |
English Mild (or Pale Ale) Malt |
0.5 lbs |
Aromatic Malt |
1.5 lbs |
Belgian candi syrup (Clear or Simplicity) |
MASH SCHEDULE
Mash In |
148°F–150°F |
60 minutes |
HOPS
0.5 oz |
Magnum |
Pellet |
12.9% AA |
60 minutes |
0.5 oz |
Czech Saaz |
Pellet |
5.0% AA |
10 minutes |
0.5 oz |
Spalt |
Pellet |
4.8% AA |
0 minutes |
0.5 oz |
Fuggle |
Pellet |
4.8% AA |
Dry hop |
0.5 oz |
Styrian Goldings |
Pellet |
6.0% AA |
Dry hop |
YEAST
WY3522 Belgian Ardennes for primary fermentation, then WY3112 Brettanomyces bruxellenis and WY3526 Brettanomyces lambicus in secondary
VARIANT
For a tropical version of the trout, replace the dry hop with 1.0 ounces of Citra or Amarillo and substitute WLP645 Brettanomyces claussenii for the Bretts above in secondary.
The technique can barely even be called a technique. You just add Brett and two ounces of sugar dissolved in four ounces or less of water to the keg or bottling bucket. (If you’re bottling, just add the couple ounces of sugar, into your normal priming sugar solution.)
Note: Make sure your beer has finished fermenting! If there are still fermentable sugars, you will end up with massively overcarbed beer—and even bottle bombs—due to the Brett.
Then all you need to do is hold the beer warm (about 70°F to 75°F) for 1–2 months, or even longer for additional complexity. Serve the beer and be amazed! Oh and if you’re looking at this thinking these guys are nuts, consider this: The technique comes directly from Brasserie Orval in Belgium where their classic twist on a pale ale is put through these steps before sale to the public.
BLENDING MULTIPLE BEER STYLES
When you study beer styles, you quickly learn beer styles are almost inevitably built out of other styles: the pale ale gave rise to the IPA and the Imperial IPA and the Triple IPA (and inevitably someday the Decuple IPA). Or consider the porter, which supposedly came about from a blend of common beers in the 1700s.
Whether or not that porter story is true, blending beers is an ancient and mysterious art. Sure, most of us know lambic producers blend, but did you realize that the largest breweries blend as well? Those big macro lagers all have spec sheets designed for them with aromas, gravities, and flavor compounds marked with very narrow acceptable ranges. Even as great as their process controls are, the big guys still need to blend individual batches to pull their numbers in line.
But blending’s not just about numbers and old stories that aren’t true. It is about exploiting those heritage lines and making new flavors sing. And sometimes it’s about saving your beer, too!
We would guess that one of the least-used rescue tactics is also arguably the best. Look at your beer that needs help. What is it missing? Hops? Malt? Roast? The classic advice to fix it is brew another beer that has that needed characteristic in spades and then blend it in. Most folks don’t do it, because who wants to brew another batch of beer to have something fixed? But stop thinking the usual way. Instead of thinking, Hey, my brown ale needs hops, so I’ll brew a hoppy brown and blend the two together, think, Hey, I need hops, I’ll brew a Double IPA! You’ll end up with two drinkable beers instead of one out-of-whack beer with one fixed beer.
Let’s skip away from the rescue ranger scenario and look at the creation of new flavors. This is the beer equivalent of the convenience store suicide soda. When faced with a few taps that you’ve already been through, you could have another straight pint, but why not mix it up? Blend a shot of something hoppy into your glass to goose the hops.
A personal favorite of ours is the dessert blend. Take three parts Imperial Stout and blend in one part fruit beer, like a Raspberry Lambic, for a dessert that beats a chocolate cake.
Do you have to do these blends right at serving? No, but you can use serving time to explore what you like. Just as with our tea and tincture instructions on page 74, keep track of the ratio that works. Then you can port the blend over to a keg, replicating what you have in the glass.
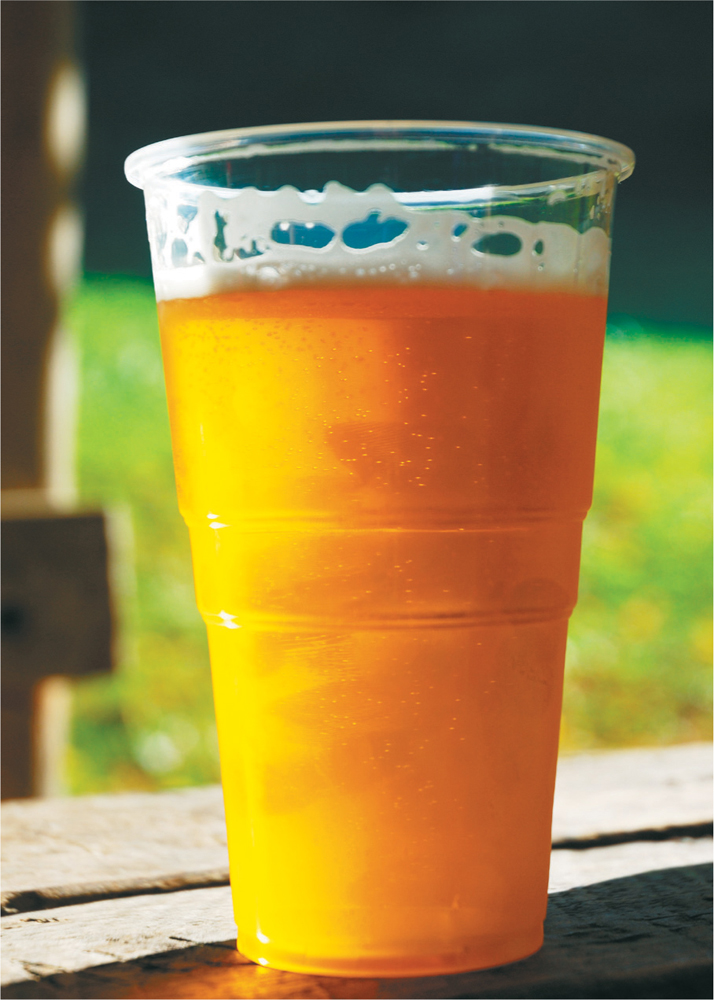
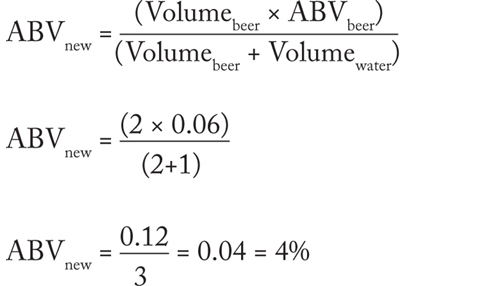
USING CARBONATED WATER TO MAKE LIGHT BEER
This technique comes from Mike “Tasty” McDole of the Brewing Network. Mike is a big fan of making bold, beautiful beers and also a fan of the golf course, but not of the two together. He prefers a lighter-weight beer on the course. Instead of sacrificing his taste buds to his needs, he simply prepares a light version of his beers using carbonated water.
By the way, this is a really great use for those 3-gallon kegs you bought on a whim that one time they were on sale.
You Will Need
• 2 gallons of 6 percent ABV or higher beer
• 1 gallon water, filtered and decholrinated
• 1 3- or 5-gallon keg
Instructions
1. Boil the water. Let it cool and transfer it to the keg.
2. Carbonate the water to match the stronger beer. (For example, if the beer is at 2.5 volumes, carbonate your water at 35°F by setting the CO2 pressure to 10 psi and shaking for 10 minutes.)
3. Bleed the pressure from the water keg and then using a jumper transfer hose, add the 2 gallons of beer to the water keg. After transferring, close the keg up and gently rock to blend.
4. Note: We’ve tried the technique by just adding the boiled and cooled water to already prepared beer and then adding more carbonation. It works fine; we just don’t recommend that treatment for long-term storage. After transferring, make sure the keg is tightly sealed.
5. Gently rock to blend and add a few psi of CO2 to the keg for serving.
6. This will produce 3 gallons of beer at 4 percent. Use our dilution calculations to figure out how much water to add to reduce your beer to a target alcohol level.
MEASURING DISSOLVED OXYGEN
The role of oxygen to yeast health and cell growth has been well documented in the world of brewing. Oxygen is used to synthesize the sterols that make yeast cells elastic so that a bud can form. Homebrewers often discuss the merits of various aeration techniques and equipment but beyond published generalities have little idea of exactly how much oxygen they have gotten into their wort.
If you’re feeling particularly chemically minded, you can find a twenty-two-step process that involves cooking, titration, and enough chemical gear and chemicals to worry your neighbors online at http://serc.carleton.edu/microbelife/research_methods/environ_sampling/oxygen.html and www.ne-wea.org/LabManual/dissolved_oxygen.htm. We suspect after you’ve bought all the equipment, you’ll have spent almost as much as you would buying a meter, though, and you’ll end up with more work.
Don’t feel like jumping through all of those hoops? Well, we don’t blame you, but we had to at least mention real science and titration and semi-meth lab setups! Now for the easy way. You can find dissolved oxygen kits online that contain all the parts you need. (LaMotte is one trustworthy brand.) These kits look a bit like a pool water testing kit and will allow you to test your wort fifty times for about $50. That should be more than enough for you to get your process in line.
Remember, the whole point of this process for us isn’t to have a number that we write down on a spreadsheet. What we want to do is have the knowledge that our particular aeration practices are working. You want to have confidence that by mixing for a set period of time or setting your O2 regulator to a particular flow for 30 seconds that you’re achieving sufficient levels of dissolved oxygen (typically 10-15 ppm). If you’re not, add more. If you’re overshooting, you need to cut back because the extra oxygen isn’t going to do you any good; it may actually harm your beer, causing it to stale and fade faster than you want.
YEAST CELL COUNTING
Like most things in brewing, there is debate about the proper amount of yeast to pitch in order to make the beer you desire. Of course there is a difference of opinion about the consequences of overpitching or underpitching your beer. There is even debate about what the proper pitch rate is! But let’s assume that the oft-quoted figure of 100 million cells/milliliter/degree Plato is correct. How do you know how much you’re pitching? You need to count the cells. And since you don’t have enough fingers and toes to count that high, you need to employ special equipment to count with. The following information for this quick overview comes from Kai Troester, who has spent much of his homebrewing experience looking at the methods homebrewers use and analyzing their effectiveness. This information is based on his website (http://braukaiser.com), where you can find even more in-depth instructions.
To start, you’ll need some specialized equipment. First and foremost, if you don’t already have a microscope capable of both 400x and 100x magnification, you will have to buy or borrow one. You’ll also need a hemocytometer, which is a grid that defines a given amount of sample and allows you to count the cells within that portion of the grid. You’ll also need: pipettes, a pipette pump to fill them accurately, methylene blue stain, a small dropper bottle, and some sort of tally counter to keep track of your count.
In a nutshell, you start by diluting a sample from your yeast propagation vessel 1:20. That means you’ll add 19 milliliters of water to a test tube or other container and 1 milliliter of your stirred yeast solution. Mix well, but don’t shake. Some yeast strains will clump together when shaken, leading to an inaccurate count. Repeatedly pull a sample into the pipette and release it to flush the pipette.
For yeasts that are heavy flocculators, you’ll need to unfloc them to get an accurate count. Since maltose inhibits flocculation, the easiest thing to do is simply add fresh wort to the yeast sediment and place it on a stirplate for a few minutes. You can also use sulfuric acid, disodium EDTA, or even PBW to do the same thing.
Transfer your sample via pipette to the hemocytometer following the manufacturer’s directions on how to fill the hemocytometyer. Then place the hemocytometer under the microscope and focus on the hemocytometer grid. Count the cells in the 4x4 grids in the corners and center. Use the following formula to find the cell density with the sample dilution taken into account:
In order to get the most accurate results, be sure to count at least 100 cells. To discover the number of viable cells in your sample you must stain them with methylene blue and count the living cells. Prepare methylene blue for staining by mixing 0.1 gram of methylene blue with 100 milliliters of distilled water. Mix equal parts methylene blue preparation and diluted yeast sample. Let sit for a minute and then plate and count your cells again. Dark blue cells are dead; lighter blue or plain-looking cells are viable. Examination on a hemocytometer grid under a microscope will allow you to find the amount of healthy yeast cells in your total sample.
SODA MMM POP
One of the biggest problems facing Americans is the increasing and fractured demands for our time. Pick up the kids from soccer practice, make a nutritious and tasty dinner, answer your boss’s emails at 2:30 in the morning, and so on. For homebrewers the challenge is: How do you fit the three to seven hours needed for brewing into that pell-mell?
One tactic that also allows you to involve the family is to make some soda (tonic, pop, or whatever you call it). While your local shop may sell a plethora of flavored concentrates, there’s something to be said for whipping up your own batch of soda in an hour. It’s inexpensive, you can tailor the drink to your own needs, and you can make it healthier than store-bought. (The average 20-ounce bottle of commercial cola contains 44 grams of sugar. That’s 176 calories just from the sugar. It adds up quickly!)
Soda making also allows you to more easily incorporate some family creative time into your busy day. Kids, thankfully, don’t have much interest in beer, but they do love to play around with flavors. You can turn your soda making into a guided playtime. Even better, after everything is said and done, they can enjoy a beverage they created. If you think your kids were proud the first time they made a grilled cheese sandwich, just wait until the try their very own soda! One last sneaky reason: Soda making serves as a stealthy way to test flavor combinations that you can deploy in your beer. Not all research involves beakers and chemistry; sometimes it’s just exploration.
Here are few notes before you try your first recipe:
• The recipes that follow are all written for forced carbonation and kegs.
• Most soda recipes are based around a flavorful syrup mixed into soda water. So if you have a SodaStream™ or other carbonator on hand, you can add your chilled syrup into a plain glass of soda water. Just keep your syrup mix chilled in the fridge. Just pour a few glasses to dial in on a desired strength.
• You may want to keep an extra set of keg gaskets on hand to swap out after you’re done with the soda. These natural sodas shouldn’t taint the rubber like the more spicy commercial sodas, but it’s better to be safe with it!
• Even though you’re not dealing with yeast and fermentation, an infection can creep in to your soda. There’s plenty of food for bugs to eat, and you’re not providing any yeast and booze to crowd them out, so pay extra-close attention to your sanitation, or you may end with a glass full of nasty!
• Look at a can of soda, and you’ll see one of the chief ingredients is phosphoric acid. Yet none of the sodas that follow rely on it. Why use acid of any kind? In beer we use hops and carbonation to provide a break from the sweetness of the malt. Since few sodas will use bittering hops, most depend on acid to provide the break. All soda will carry carbonic acid just from the dissolved carbon dioxide, but our sodas also rely on the acid in fruit juice. If you want to play with the big boys, you can buy food-grade phosphoric acid. However, we don’t recommend it. It’s nasty stuff, so stick with the easier and safer options like powdered citric acid if you want to balance a soda without any fruit juice.
TWO CENTS PLAIN
By Drew
This recipe is the basis of all soda! If you listen to enough Depression-era music, you’ll hear about two cents plain. It was the cheapest thing in a soda shop, since it was just carbonated water.
For 3.0 gallons
SODA BILL
3.0 gallons |
Filtered water |
INSTRUCTIONS
• Add the water to a keg. Chill the water to 35°F overnight.
• Shake the keg for about 10 minutes at 30 psi for full carbonation.
VARIANT
For club soda, boil 1.0 gram of chalk and 0.5 grams each of sodium citrate (sour salt) and kosher salt in 1 cup of water. Add the mixture to the rest of the water and proceed as above.
BLUEBIER
By Drew
It’s only natural that a soda as tasty as the blueberry-ginger creation below has a beery counterpart. Think of it as a witbier with new flavors!
For 5.5 gallons at 1.036, 12 IBUs, 3.2% ABV
GRAIN BILL
7.0 lbs |
Pilsner Malt |
4.0 lbs |
Wheat Malt |
1.0 lb |
Flaked Oats |
MASH SCHEDULE
HOPS
0.5 oz |
Magnum |
Pellet |
11.0% AA |
60 minutes |
OTHER BOIL INGREDIENTS
4 oz |
Ginger, grated |
10 minutes |
1.0 Tbsp |
Powdered ginger |
10 minutes |
1/2 |
Lemon, zested |
10 minutes |
YEAST
WLP400 Belgian Wit Ale Yeast
OTHER INGREDIENTS
64 oz |
100% Blueberry juice (add to secondary fermenter) |
DR. DREW’S BLUEBERRY GINGER REJUVENATING TONIC
By Drew
Ever since I stumbled on the idea of blueberry salsa, blueberry and ginger have been inextricably linked in my mind. This soda takes that combination in a different direction—and it’s quick to make, too.
For 3.0 gallons
SODA BILL
2 cups |
Filtered water |
2 cups |
Sugar |
4 oz |
Ginger, grated |
1 Tbsp |
Powdered ginger |
32 oz |
Pure blueberry juice (such as Trader Joe’s Just Blueberry Juice) |
2.5 gallons |
Filtered water |
INSTRUCTIONS
• Bring the sugar and 2 cups of water to a boil. Add the ginger and boil for 10 minutes.
• Allow the mixture to cool to room temperature and strain through a fine mesh sieve.
• Mix the syrup, juice, and water together inside a keg. Stir or shake (with the lid on) until thoroughly combined. Chill the mixture to 35°F overnight set at 10 psi.
• Shake the keg for about 10 minutes at 30 psi for full carbonation.
WATERMELON MINT SPARKLING FRESCA
By Drew
This recipe is inspired by the agua frescas that I find around town during the months when fruit is ripe and the weather too warm for words. It’s a refreshing combination of cool, delicious watermelon with a hint of acidity and a bright pop of mint. The salt in this recipe is very important, as watermelon needs it to stand out.
For 3.5 gallons
SODA BILL
1.5 gallons |
Watermelon juice (about two 15-lb watermelons) |
1.5 gallons |
Filtered water |
2 cups |
Filtered water |
2 cups |
Sugar |
1 tsp |
Salt |
1 bunch |
Mint, lightly crushed |
1/2 cup |
Lime juice |
1/4 cup |
Lemon juice |
INSTRUCTIONS
• Juice the watermelon flesh—not the rind—with a juicer and allow it to settle. If you only have a blender, blend it and then give it a day to settle before moving on.
• Remove the foam and decant off the fiber.
• Mix the juice with the 1.5 gallons of filtered water inside the keg.
• Boil the sugar and 2 cups of filtered water together to make a simple syrup.
• After 10 minutes at a full boil, turn off the heat and add the mint and salt. Stir to combine. Cool the mixture to room temperature.
• Strain the syrup and add it to the keg along with the lime and lemon juices.
• Chill the mixture to 35°F overnight set at 10 psi.
• Shake the keg for about 10 minutes at 30 psi for full carbonation.
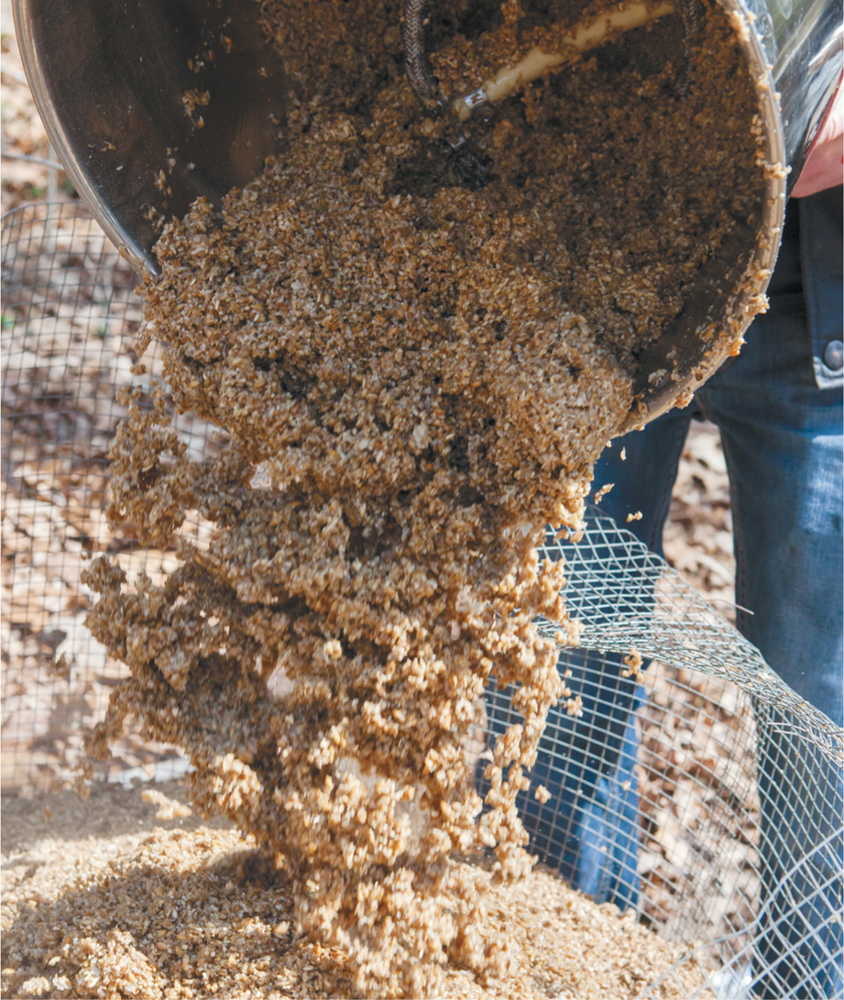
SPENT GRAIN BREAD
If you’ve never attempted making bread due to the amount of kneading and working or you haven’t been very successful in prior attempts, then give this recipe a try. It’s based on a technique—no-knead baking—that was first described by Jim Lahey, owner and head baker of New York’s Sullivan bakery. It hit the Internet like a storm when Mark Bittman of the New York Times presented Lahey’s technique.
The purpose of kneading is to activate and mix two separate proteins found in wheat flour: gliadin and glutenin. Together these two proteins form gluten, a meshy, sticky protein matrix that traps CO2 and gives bread its chewiness. The mechanical action of folding and pressing quickly causes creation and reinforcement of the gluten mesh.
Drew: Incidentally, gluten is used by vegetarians as a source of protein (in the form of seitan). However, a number of folks are exploring gluten-free diets due to physical reactions to the gluten and precursor proteins.
What Lahey discovered is that a wetter-than-normal dough will naturally form gluten if chilled and given enough time, thanks to the action of hydration and perturbation induced by the fermenting yeast.
Lahey’s other fun technique is the use of a Dutch oven to recreate a professional bread oven. Spiffy commercial ovens have special features such as steam injectors, which allow a dense, chewy crust to form. By trapping a wet dough inside a Dutch oven’s cast-iron enclosure, the steam naturally forming from the dough creates a similar effect.
The combination of Lahey’s two techniques allow novice home bakers to easily create round boule-shaped loaves with the same intense flavors and crackling crusts that you pay good money for in a bakery. To keep this project beer-related, we’ll start with every baking-oriented brewer’s quest: spent-grain bread.
This recipe is based on Laheys basic no-knead recipe featured in My Bread. We’ve adapted the recipe for use with leftover grains from a batch of beer.
Ingredients
• 3 cups Bread flour
• 1.5 Tbsp Salt
• 0.25 tsp Instant bread yeast
• 1 cup Water
• 1 cup Spent mash grains (still slightly damp)
You Will Need
• Large stainless-steel mixing bowl
• Tea towel
• Parchment paper
• 6-quart cast-iron Dutch oven
Instructions
1. Mix together flour, salt, and yeast.
2. Add the water and grains and stir to make a sticky dough. Cover the bowl and allow to rest for at least 12 hours.
3. Scrape the dough from the bowl. It will be looser than any dough you’ve used; that’s okay.
4. Fold the dough briefly and shape into a round.
5. Move the round onto a floured piece of parchment paper and cover with a floured towel (anything but terry cloth) for 2 hours.
6. Meanwhile, preheat your oven to 475°F and add a clean, ungreased 4- to 6-quart ovenproof Dutch oven and lid at least 30 minutes before the dough is done resting.
7. Once the dough is ready, it will have doubled in size. Remove the Dutch oven, take the lid off, and quickly and gently invert the dough into the oven. Close the pot and slide it back into the oven for 30 minutes.
8. Remove the lid and bake for an additional 20 minutes to finish the bread. Remove the bread from the oven and rest it for at least 1 hour before eating.
Eat the bread within 3 days or use for additional purposes, such as … well, beer, of course.
SPENT GRAIN BLOND
By Drew
One of my mentors was Doug King, who tragically passed away in an accident while homebrew festival–bound. Doug had a habit of adding whatever he had to a beer—leftover tortillas, chocolate cake, and even loaves of bread. Let’s keep Doug’s spirit going!
For 5.5 gallons at 1.087, 68 IBUs, 6 SRM, 9.0% ABV
GRAIN BILL
17 lbs |
Domestic 2 Row Ale Malt |
3.0 lbs |
Bread |
MASH SCHEDULE
HOPS
1.25 oz |
Magnum |
Pellet |
14.0% AA |
60 minutes |
OTHER INGREDIENTS
1/2 tablet |
Whirlfloc |
10 minutes |
YEAST
WLP001 California Ale or WY1056 American Ale
ADDITIONAL INSTRUCTIONS / NOTES
Bread is assumed to provide about 15 ppg. Strike the mash as normal. Crumble or cube the bread and stir in thoroughly to wet and dissolve. Once the bread is dissolved into the mash, brew like any other all-grain beer.