Anyone—whether a dedicated hobbyist or the occasional home baker—can make cupcakes. Most people have all the necessary equipment already in their kitchen cabinets: measuring cups and spoons, a sturdy mixing bowl or two—and, of course, muffin tins. If you’re considering buying new items, invest in the best ones you can afford; good-quality pans and tools will withstand years or even generations of baking. In addition to laying out the supplies you’ll need, these pages will familiarize you with the basic ingredients and take you step by step through techniques for mixing and decorating. You’ll also find ample recipes for frostings, fillings, and other embellishments. Use them where suggested throughout this book—or adapt them as you wish to create something new and unexpected.
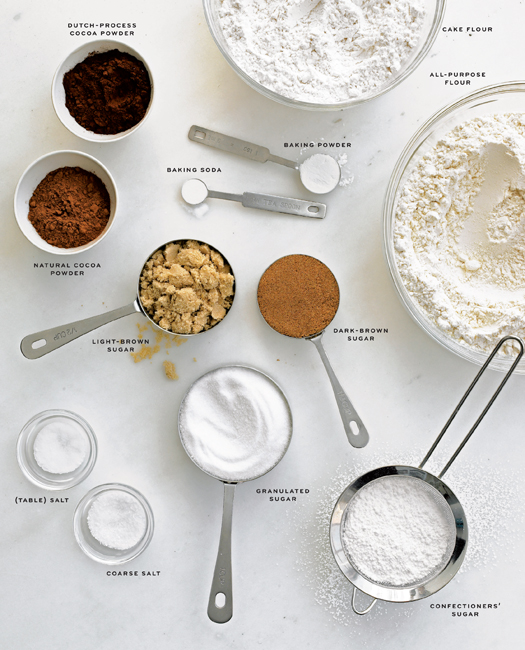

COCOA POWDER Cocoa powder is made by removing anywhere from 65 to 90 percent of the cocoa butter from chocolate, then finely grinding what remains. The result is an intensely flavored powder that gives baked goods a deeper, rounder flavor than when made with solid chocolate alone. You’ll find two types of cocoa powder: natural cocoa (sometimes called “nonalkalized cocoa”), and Dutch-process cocoa, which is treated with an alkaline solution that reduces cocoa’s natural acidity and gives the powder a milder flavor and redder color. Unless a recipe specifically calls for a particular type of cocoa, you can use either. Before using any cocoa powder, you may want to sift it with a fine sieve to remove any lumps.
BAKING SODA AND BAKING POWDER Baking soda and baking powder are chemical leavening agents that add volume and lightness to the texture of cakes and other baked goods. Baking soda is usually combined with an acid, such as sour cream, buttermilk, honey, or even brown sugar (due to the presence of molasses), to hasten the leavening action and to produce better flavor. Baking powder essentially takes care of this by combining baking soda with the precise amount of acid (usually cream of tartar) needed to achieve the same result. For this reason, baking soda and baking powder are not interchangeable (although they are often combined in recipes to produce the proper texture). Store both in a cool, dry place, and note the use-by date on the label. To test for potency, stir ¼ teaspoon baking powder into ½ cup hot water; the water should instantly form bubbles. For baking soda, add ¼ teaspoon white vinegar to the hot water before testing.
FLOUR Most home cooks reach for all-purpose flour when it’s time to bake, but other types—especially cake flour—are also common. With its higher protein content, all-purpose flour produces a coarser crumb (or texture) in cupcakes and other baked goods, while cake flour, which contains much less protein, will result in a finer texture. A combination can be used to achieve the right results. For the recipes in this book that call for cake flour, do not buy the self-rising kind; it contains baking powder and salt. Always sift cake flour, which is prone to clumping, as indicated in each recipe; all-purpose flour does not need to be sifted (unless specifically instructed). Use only dry measuring cups for flour, and never shake the cup or tap it on the counter to make level; both actions will lead to inaccurate measurements. Instead, fill the cup to overflowing, then level with a straightedge.
SUGAR
White granulated sugar is the most widely used sugar, especially for baking. Made from refined sugarcane or sugar beet, it serves as a base for most other types of sugars.
Brown sugar is a combination of granulated sugar and molasses. Because dark-brown sugar has a higher molasses content than light-brown sugar, it is deeper in color and flavor. Use light-brown sugar when you want a milder molasses taste. Brown sugar labeled “granulated” is processed so the grains flow freely; do not substitute it in recipes. Pack brown sugar tightly in the measuring cup to eliminate air pockets. After opening, seal the package securely, so the sugar does not harden. To soften, place a wedge of apple in bag, and reseal; leave a day or two, until sugar is sufficiently soft again, then remove apple.
Confectioners’ sugar (also called powdered sugar) is made by grinding granulated sugar to a fine powder, then sifting and adding a small amount of cornstarch to prevent caking. It is primarily used to make frosting, or for dusting over baked desserts. Confectioners’ sugar often forms clumps, so you may want to sift it with a fine sieve before using.
SALT A small amount of salt is usually added to cake batters (and some frostings) to enhance their flavors. Our recipes call for “salt” (table salt) or “coarse salt” (kosher salt). If substituting one for the other in a recipe, use a bit less table salt than the amount of coarse salt called for (and vice versa).
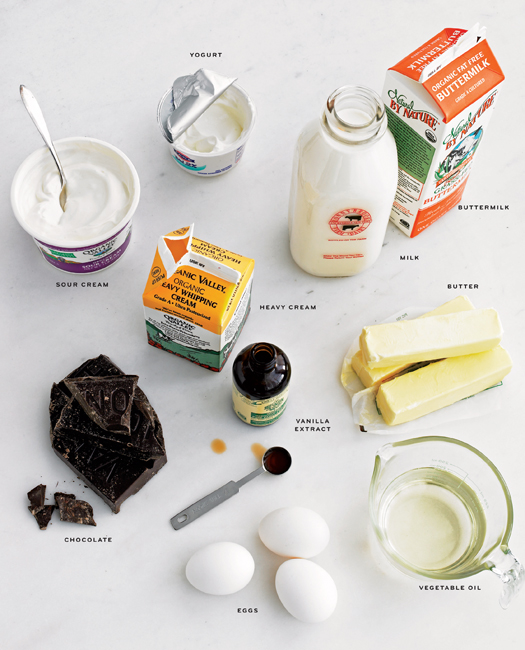
DAIRY Dairy products give cupcakes richness, and different kinds provide different flavors and textures. Cream, for example, produces a much more velvety texture than whole milk; buttermilk creates a more tender crumb and, like sour cream and yogurt (which also keep baked goods moist), adds subtle flavor. Although some dairy products can be substituted for others, it is best to use what the recipe calls for to ensure proper results, especially for buttermilk (as the amount of baking soda would have to be adjusted). In a pinch, you can make your own buttermilk by adding 1 tablespoon white vinegar or lemon juice to 1 cup regular milk (adjust the amounts of each depending on how much buttermilk is called for); let milk mixture sit for 10 minutes, or until sufficiently thickened, before using in a recipe.
CHOCOLATE Chocolate, used alone or in combination with cocoa powder, produces baked goods that are moist and wonderfully dense (think brownies). It also creates frostings that are rich and satiny (such as ganache). When buying chocolate for baking, look for the best quality bar, block, or chips you can find; the higher the percentage of cacao (or chocolate liquor), the richer and deeper the taste. Milk chocolate must only contain 10 percent chocolate cacao, while dark chocolate (unsweetened, bittersweet, and semisweet), as its name suggests, has a higher cacao content—anywhere from 35 to 70 percent, depending on the quality. (White chocolate is not technically considered to be chocolate, since it contains no cacao.) Some premium brands to look for are Valhrona, Callebaut, El Ray, and Scharffen Berger. Chocolate chips are simply morsels of chocolate that are designed to hold their shape during baking, so they contain less cocoa butter than block or bar chocolate.
EXTRACTS Extracts are concentrated flavorings made by steeping and aging an ingredient in liquid (usually alcohol). Always choose extracts labeled “pure,” which have a sharper, cleaner flavor. Vanilla extract is the one most commonly used in baking, as it adds subtle but distinctive flavor; extracts made with vanilla beans from Madagascar, Tahiti, and Mexico are worth the extra cost. Some of the recipes in this book call for vanilla beans instead of extract, as the seeds import a deeper, more complex flavor and fragrance (but you can generally substitute 1 tablespoon extract for each whole bean called for). To release the seeds, lay the bean flat on a cutting board; holding one end, slice it open lengthwise with a paring knife, then run knife along each cut side. You can save the pod for making vanilla sugar to use in baking or sweetening drinks: Place split pod in a jar of sugar, seal lid, and leave for at least a week (shake daily to distribute flavor); use sugar within several months.
BUTTER AND OIL Butter and oil keep baked goods moist and also contribute or enhance flavor. Unsalted butter has the purest flavor and is usually fresher than salted (because salt is added as a preservative). Whipped and light butters—mixed with air and water, respectively—won’t produce the same results. When butter is used in making cake batter, it should be at a cool room temperature before you begin; this ensures that it will develop as many fine bubbles as possible during the creaming stage, a crucial step in producing a light cake with a velvety crumb. Some recipes in this book call for vegetable oil instead of butter, as it produces a soft (or fine) crumb. Make sure to use only neutral-tasting oils, such as safflower or sunflower.
EGGS Eggs play a critical role in baking: The whites act as leaveners, especially when beaten to stiff peaks separately before being folded into batter, while yolks are emulsifiers, which enable fats and liquids to hold together and produce a smooth texture and rich flavor. Use large eggs (the color indicates the type of hen they came from, not the quality). Eggs are easiest to separate when they are cold, but they should generally be brought to room temperature before using to allow them to blend more easily with other ingredients. For the most volume, whites are best beaten when at room temperature (or warm, as when making meringue and some buttercreams).

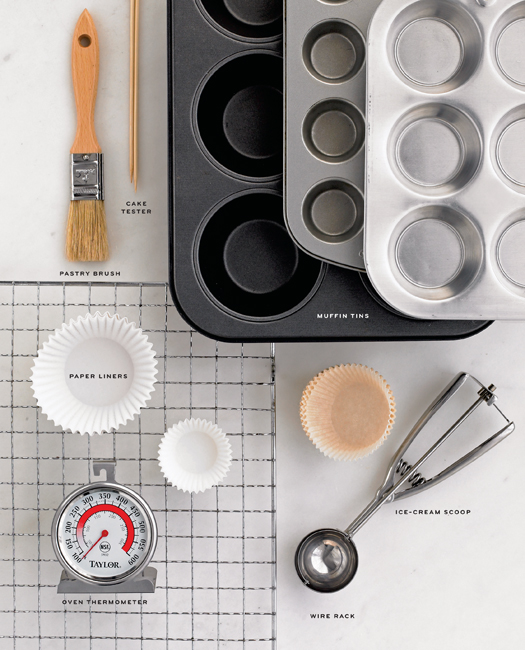
PASTRY BRUSH For recipes that call for muffin tins to be buttered and floured (instead of using paper liners), use a small pastry brush to coat the cups with softened (or melted) butter, as the bristles can readily reach into crevices. Use a clean brush with firmly attached bristles; wash after every use in warm, soapy water, and let dry completely before storing.
CAKE TESTER Most often, the best way to determine doneness is by inserting a wooden skewer or thin metal cake tester into the center of a cake or cupcake. If it comes out clean, or with only a few moist crumbs clinging (as some recipes instruct), the cupcakes are finished baking. Some cupcakes, such as those that are intentionally moist and dense, should not be tested this way, so follow the recipe to see which method to use.
MUFFIN TINS Muffin tins come in mini, standard, and jumbo sizes. Each cup of a mini tin holds 2 ounces of batter, a standard cup holds 4 ounces, and a jumbo cup holds 8 ounces. If you choose dark or nonstick cake pans, reduce your oven temperature by 25 degrees to avoid burning (and begin checking for doneness a little earlier than the recommended baking time). You can, of course, substitute tin sizes, but you will need to adjust the cooking times (see below).
PAPER LINERS Liners, which keep cupcakes from sticking to baking tins, are made of glassine paper, greaseproof paper, or foil laminated with waxed paper. Also called baking cups, these liners eliminate the need to butter and flour the tins, and ensure easy cleanup. Paper liners come in solid colors and a variety of prints (see Sources). If you can’t find mini or jumbo liners, butter and flour the cups instead.
OVEN THERMOMETER Oven temperatures are rarely accurate. Use an oven thermometer—they are widely available and often inexpensive—to monitor the temperature of your oven, and adjust accordingly.
WIRE RACK A wire rack is the perfect tool for cooling baked goods, as it allows air to circulate freely so they cool quickly and evenly. Look for a rack with heavy-duty stainless steel wires. If you bake frequently, or plan to make large batches, you may want to invest in two or three racks, or a larger one that folds up neatly for storing.
ICE-CREAM SCOOP An ice-cream scoop with a quick-release mechanism is a convenient tool for filling muffin tins with batter; it will make uniform scoops to encourage even baking. Look for different sizes that can be used for standard and jumbo muffin tins (a soup spoon or tablespoon is best for mini cups). A small cup with a spout (such as a dry-measure cup) is a suitable alternative.
ADAPTING RECIPES TO MAKE MINI, STANDARD, OR JUMBO CUPCAKES
It’s easy to adapt almost any cupcake recipe to make treats of different sizes. Generally, a recipe that results in 12 standard cupcakes will yield enough batter for anywhere from 32 to 46 mini cupcakes; minis should take 10 to 15 minutes to bake in a 350°F oven. The same amount of batter will produce 5 to 8 jumbo cupcakes, which should bake for about 25 minutes. Unless otherwise instructed in a recipe, the muffin cups should be filled three-quarters full, regardless of size. And remember to check the cupcakes a little early, and watch for visual cues.

GEL-PASTE FOOD COLORS More concentrated than the liquid variety, these gels are a good choice for tinting frostings (and royal icing) without diluting them. They are also easier to use with fondant and marzipan, which require kneading to incorporate the food color (and only a few drops or dabs of gel paste is generally needed for even the deepest of shades). Gel-paste food colors are available in a wide range of colors and are sold in either drop bottles or lidded containers (in which case you will need to use a toothpick or wooden skewer to add color to frostings or fondant). Look for them at baking-supply stores and online retailers. They are inexpensive and will keep, tightly sealed, indefinitely (this is important, since a little goes a long way).
CANDIES AND SPRINKLES Practically any type of candy will do; this page shows those commonly used to decorate the cupcakes in this book. Long sprinkles and nonpareils (round candy sprinkles) are all-purpose, while licorice, taffy tape, and marshmallows, among other candies, can be used to make any manner of embellishment.
PASTRY BAGS Pastry bags come in disposable and reusable varieties. Disposable bags are inexpensive and can be purchased in quantity; having multiples on hand makes it possible to use one for each shade of frosting (and they are clear, so you can easily tell which one is which). Reusable bags—made from pliable nylon or plastic-lined cloth—can be more economical and are more environmentally friendly if you decorate cakes and cupcakes often. For easy handling, choose a pastry bag that is between 10 and 14 inches long; any larger and the bag may be unwieldy. Once the bag is filled with frosting, use a rubber band to seal its open end.
PAPER CORNET Piping cones made of parchment paper are usually used for making fine details, such as when writing or piping little dots with royal icingor melted chocolate, or when you are piping only a very small amount. They are also disposable, for easy cleanup. See how to make a cornet.
FLOWER NAIL This tool is convenient when piping buttercream roses for adorning cakes and cupcakes. Rather than having to pipe each rose on a cupcake, you pipe the flower on the nail (lined with a square of parchment), which can be slowly turned with one hand while you pipe with the other. Any mistakes can easily be swept back into the pastry bag, and you can also pipe the roses in advance.
OFFSET SPATULA The thin metal blade and angled design of a small offset spatula is just right for spreading and smoothing frosting onto cupcakes. It is also efficient for lifting and placing piped designs, such as dried royal icing letters and piped roses, and other small decorations (including those made from marzipan or fondant) onto frosted cupcakes, and for loosening and lifting cupcakes from tins.
KITCHEN TWEEZERS Inexpensive and just the right size, kitchen tweezers are very helpful when attaching little candies or other fine details onto frosted cupcakes. Look for the kind with curved pincers for greater precision.
TIPS Piping tips are sold individually or in sets; choose based on how often you plan to use them and the types of designs you want to create. If you are just getting started, you may want to buy a set of 10 basic tips (most sets include a coupler and come in a handy storage box), and then pick up any additional ones as needed. See the glossary of basic tips used in this book.
PLASTIC COUPLER A coupler allows you to easily remove and replace a pastry tip, helpful when you will be piping different patterns with the same frosting. Couplers come in two parts: the tube that rests on the inside tip of the bag, and a ring that screws onto the tube to fasten the tip to the bag. Sometimes, as when piping frosting in a swirled peak to cover a cupcake, the coupler is used alone, without any tip; make sure the coupler does not have a slit at the tip.


1. If using a new pastry bag, cut the end of the bag so that the narrow end of the plastic coupler aligns with the hole. Place the coupler inside the bag; the coupler’s grooves should be visible and the bag should fit snugly on the base of the grooves (if not, snip off a bit more). Attach the tip and screw on the outer ring. Unscrew the ring to change tips as needed.
2. To fill the pastry bag, cuff the open end over one hand and use a flexible spatula to transfer icing to the bag. For best results, fill the bag only halfway.
3. Squeeze out air from the open end of the bag, and twist the bag closed to prevent the icing from leaking out; use a rubber band to securely seal after twisting. When not in use, store the filled bag, tip down, in a glass lined with a damp paper towel. This is especially important when using royal icing, which hardens quickly. If a tip becomes clogged, use a toothpick or straight pin to clear it.

HOW TO MAKE A PAPER CORNET
Cut parchment into a 12-by-16-by-20-inch triangle, as shown (or an 8-by-12-by-14½-inch triangle for piping melted chocolate). With the mid-length side closest to you, curl the upper right-hand point down toward the middle of the shortest side to form a cone shape; form the cone’s point at the middle of the longest side. Wrap the slack around the cone shape, while pulling the inside flap of parchment taut to keep the point tight and completely closed. Tuck the top flap inside the cone, and use tape to secure it, or make a small tear in the folded side you have just created. Snip the tip of the cone after filling it.

In most cases, fondant (firm sugar icing) and marzipan (a paste of ground almonds, sugar, and sometimes egg whites) can be used interchangeably. The only exception is when you desire a pure white color (as with the springerle Easter bunny cupcakes, in which case you will need to use fondant). Both can be easily tinted and used to cover a cupcake for a smooth topping or to shape into animals, fruit, or any other objects imaginable. Work with fondant and marzipan as you would modeling clay; each is sticky enough that you can press the parts together and they’ll adhere.
While they are largely treated in the same manner, fondant calls for a few extra steps. Fondant must be at room temperature before you can use it. And because it picks up the tiniest speck of lint, keep your workspace as clean as possible. Also, fondant must be kneaded until it feels soft and pliable (at which point you may add coloring). Follow these steps to tint and roll out fondant and marzipan.
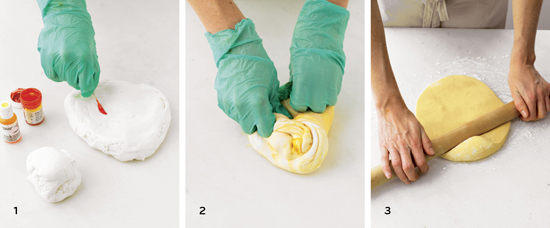
1. Divide fondant or marzipan into parts, one for each color you need; leave some untinted to lighten colors if necessary. Use gel-paste food color and a toothpick or wooden skewer to dab with color. (You may want to wear latex gloves when tinting.)
2. Begin kneading to distribute color, adding more gel paste a little at a time as you go. Avoid adding too much color too soon; the intensity will increase as you knead. Continue kneading until the color is uniform and the desired shade is reached. If necessary, knead in a bit of untinted fondant or marzipan to tone down the color.
3. If rolling out to cut into shapes, dust the work surface lightly with cornstarch to keep fondant or marzipan from sticking. Roll out to ⅛ inch thick (or as instructed in a recipe) with a rolling pin. If you notice any air bubbles in the fondant or marzipan as you roll, prick them with a clean straight pin.

With a bowl of buttercream and a basic collection of pastry tips, you can create countless designs. Piping tips are sold individually or in small sets with pastry bags and couplers, and are categorized by family according to the decorative effects they produce (as listed below). Tips are also designated by number; the recipes in this book include suggestions for Ateco and Wilton tips by number (unless a brand name is specifically mentioned, the numbers are the same for both); other companies may use different numbers. Nearly every category of tip comes in a range of sizes to create even greater variety; oversize (large) tips are perfect for making dramatic decorations or to quickly cover a cupcake in a swirly peak. If your set doesn’t have the number shown here, a tip from the same category and of an approximate size will produce similar results.
PLAIN TIPS
(SUCH AS #1, #4, #11, AND ATECO #806)
Plain, or round, tips are the most versatile and are used for making thin or thick lines, letters, dots, beads, delicate vines, and simple flowers.
STAR TIPS
(SUCH AS #14, #17, #20, #199, AND ATECO #828, #863, AND #867)
There are three basic styles of star tips: open, closed, and French (or fine-ribbed) stars. The tips of open stars are used to create the traditional star shape, while French stars are most often used to create shells. The tips of closed stars are crimped inward slightly, and are the ones to use for creating rosettes.
LEAF TIPS
(SUCH AS #66, #67, #68, #349, AND #352)
A leaf tip can be used to make foliage-like designs or ribbons with a vein down the middle. Standard leaf tips will make a flat shape, while a V-leaf tip will create a more textured, raised design. Both tips are also good for making soft ruffles and borders.
PETAL TIPS
(SUCH AS #102, #103, AND #104)
A petal tip is essential for forming flowers and also works well for making ruffles and ribbons.
MULTI-OPENING TIPS
(SUCH AS #233)
Also known as grass tips, these multi-holed tips make fast work of piping lots of little strands at once.
BASKETWEAVE TIPS
(SUCH AS #44 AND #47)
As its name suggests, a basketweave tip makes lattices and fancy edges, as well as ribbon-like lines. Straight tips make smooth designs, such as ruffles, while the others can be piped with the ridged side facing up for textured lines, or with the straight (back) side up for smooth ones; you can even switch back and forth for variety. These tips are also good for forming pleats and ribbon borders.

Memories of childhood birthday cakes will be evoked by this sweet frosting, made quickly with just three ingredients and a handheld mixer (a standing mixer will take even less time). This frosting can also be tinted with food color; add a drop at a time and stir with a flexible spatula until well combined before adding more.
MAKES ABOUT 4 CUPS
1½ cups (3 sticks) unsalted butter, room temperature
1 pound (4 cups) confectioners’ sugar, sifted
½ teaspoon pure vanilla extract
1. With an electric mixer, beat butter on medium-high speed until pale and creamy, about 2 minutes.
2. Reduce speed to medium. Add the confectioners’ sugar, ½ cup at a time, beating well after each addition and scraping down sides of bowl as needed; after every two additions, raise speed to high and beat 10 seconds to aerate frosting, then return to medium. This process should take about 5 minutes. Frosting will be very pale and fluffy.
3. Add vanilla, and beat until frosting is smooth. If not using immediately, frosting can be refrigerated up to 10 days in an airtight container. Before using, bring to room temperature, and beat on low speed until smooth again, about 5 minutes.
This deep, dark, satiny frosting (thanks to the addition of melted semisweet chocolate) is a favorite of Martha Stewart Living food editors, since it has just the right consistency for spreading or piping into beautiful swirls. It also has a wonderful sheen.
MAKES ABOUT 5 CUPS
½ cup plus 1 tablespoon unsweetened Dutch-process cocoa powder
½ cup plus 1 tablespoon boiling water
2¼ cups (4½ sticks) unsalted butter, room temperature
¾ cup confectioners’ sugar, sifted
¼ teaspoon salt
1½ pounds best-quality semisweet chocolate, melted and cooled
Combine cocoa and the boiling water, stirring until cocoa has dissolved. With an electric mixer on medium-high speed, beat butter, confectioners’ sugar, and salt until pale and fluffy. Reduce speed to low. Add melted and cooled chocolate, beating until combined and scraping down sides of bowl as needed. Beat in the cocoa mixture. If not using immediately, frosting can be refrigerated up to 5 days, or frozen up to 1 month, in an airtight container. Before using, bring to room temperature, and beat on low speed until smooth again.
Made with beaten egg whites, this frosting is similar to meringue, but is more stable and sturdy enough for piping. And, like meringue, it also takes well to browning with a small kitchen torch. Use immediately, as the frosting will harden quickly (have your piping bag ready).
MAKES ABOUT 8 CUPS
1½ cups plus 2 tablespoons sugar
⅔ cup water
2 tablespoons light corn syrup
6 large egg whites, room temperature
1. Combine 1½ cups sugar with the water and corn syrup in a small saucepan; clip a candy thermometer to side of pan. Bring to a boil over medium heat, stirring occasionally, until sugar dissolves. Continue boiling, without stirring, until syrup reaches 230°F.
2. Meanwhile, in the bowl of a standing electric mixer fitted with the whisk attachment, whisk egg whites on medium-high speed until soft peaks form. With mixer running, add remaining 2 tablespoons sugar, beating to combine.
3. As soon as sugar syrup reaches 230°F, remove from heat. With mixer on medium-low speed, pour syrup down side of bowl in a slow, steady stream. Raise speed to medium-high; whisk until mixture is completely cool (test by touching the bottom of the bowl) and stiff (but not dry) peaks form, about 7 minutes. Use immediately.
COCONUT VARIATION: Add ½ teaspoon pure coconut extract at the end of step 3, whisking to combine.
COFFEE VARIATION: Add 2 tablespoons pure coffee extract (see Sources) at the end of step 3, whisking to combine.
Versatile, tangy, and quick to prepare, cream-cheese frosting has a perfectly soft consistency for swirling or swooping. It’s the classic choice for topping many cupcakes, including carrot and red velvet, and is also especially good with others, such as zucchini-spice and applesauce-spice.
MAKES 4 CUPS
1 cup (2 sticks) unsalted butter, room temperature
12 ounces cream cheese, room temperature
1 pound (4 cups) confectioners’ sugar, sifted
¾ teaspoon pure vanilla extract
With an electric mixer on medium-high speed, beat butter and cream cheese until fluffy, 2 to 3 minutes. Reduce speed to low. Add sugar, ½ cup at a time, and then vanilla, and mix until smooth and combined, scraping down sides of bowl as needed. If not using immediately, frosting can be refrigerated up to 3 days in an airtight container; before using, bring to room temperature, and beat on low speed until smooth again.
If there is one frosting recipe a home baker should always have on hand, this is it. This all-purpose buttercream has an ultra-silky, stable texture that spreads beautifully over cakes and cupcakes, and can be piped into perfect peaks and patterns. Swiss meringue buttercream is also less sweet than other types of frosting, with a wonderful buttery taste. It can be varied with different extracts, juices, zests, and other flavoring agents, and tinted any shade. Don’t worry if the mixture appears to separate, or “curdle,” after you’ve added the butter; simply continue beating on medium-high speed, and it will become smooth again.
MAKES ABOUT 5 CUPS
5 large egg whites
1 cup plus 2 tablespoons sugar
Pinch of salt
1 pound (4 sticks) unsalted butter, cut into tablespoons, room temperature
1½ teaspoons pure vanilla extract
1. Combine egg whites, sugar, and salt in the heatproof bowl of a standing mixer set over a pan of simmering water. Whisk constantly by hand until mixture is warm to the touch and sugar has dissolved (the mixture should feel completely smooth when rubbed between your fingertips).
2. Attach the bowl to the mixer fitted with the whisk attachment. Starting on low and gradually increasing to medium-high speed, whisk until stiff (but not dry) peaks form. Continue mixing until the mixture is fluffy and glossy, and completely cool (test by touching the bottom of the bowl), about 10 minutes.
3. With mixer on medium-low speed, add the butter a few tablespoons at a time, mixing well after each addition. Once all butter has been added, whisk in vanilla. Switch to the paddle attachment, and continue beating on low speed until all air bubbles are eliminated, about 2 minutes. Scrape down sides of bowl with a flexible spatula, and continue beating until the frosting is completely smooth. Keep buttercream at room temperature if using the same day, or transfer to an airtight container and refrigerate up to 3 days or freeze up to 1 month. Before using, bring to room temperature and beat with paddle attachment on low speed until smooth again, about 5 minutes.
4. (Optional) To tint buttercream (or royal icing), reserve some for toning down the color, if necessary. Add gel-paste food color, a drop at a time (or use the toothpick or skewer to add food color a dab at a time) to the remaining buttercream. You can use a single shade of food color or experiment by mixing two or more. Blend after each addition with the mixer (use the paddle attachment) or a flexible spatula, until desired shade is achieved. Avoid adding too much food color too soon, as the hue will intensify with continued stirring; if necessary, you can tone down the shade by mixing in some reserved untinted buttercream.
MAKING SWISS MERINGUE BUTTERCREAM
CHOCOLATE VARIATION: Using a flexible spatula, fold 4½ ounces semisweet chocolate, melted and cooled, into buttercream mixture in step 3, along with the vanilla extract.
COFFEE VARIATION: Mix 2 tablespoons good-quality instant espresso powder (do not use instant coffee) with the vanilla extract, and add in step 3.
VANILLA-BEAN VARIATION: Split 1 vanilla bean lengthwise and scrape seeds into a food processor (reserve pod for another use); pulse with the sugar in the recipe until combined, then pass through a fine sieve to separate the larger pieces (discard these). Heat vanilla-bean sugar with the egg whites in step 1.
RASPBERRY VARIATION: Beat in 1 container (6 ounces) fresh raspberries (or other berries) after all butter has been added, until buttercream is streaky (do not overbeat).
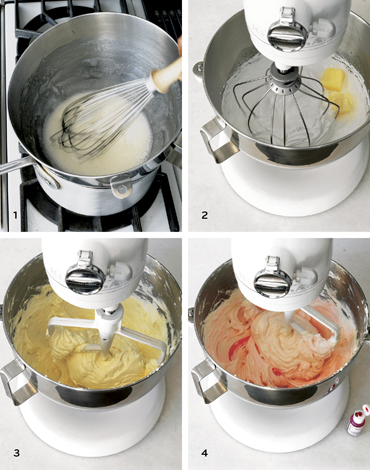
This fruit-flavored buttercream is made using the same technique as Swiss meringue buttercream, so you can refer to the step-by-step photos as you proceed.
MAKES ABOUT 5 CUPS
1½ cups fresh strawberries (8 ounces), rinsed, hulled, and coarsely chopped
4 large egg whites
1¼ cups sugar
1½ cups (3 sticks) unsalted butter, cut into tablespoons, room temperature
1. Puree strawberries in a food processor. Combine egg whites and sugar in the heatproof bowl of a standing electric mixer set over a pan of simmering water. Whisk constantly by hand until mixture is warm to the touch and sugar has dissolved (the mixture should feel completely smooth when rubbed between your fingertips).
2. Attach the bowl to the mixer fitted with the whisk attachment. Starting on low and gradually increasing to medium-high speed, mix until stiff (but not dry) peaks form. Continue mixing until the mixture is fluffy and glossy, and completely cool (test by touching the bottom of the bowl), about 10 minutes.
3. With mixer on medium-low speed, add the butter a few tablespoons at a time, mixing well after each addition. Once all butter has been added, scrape down sides of bowl with a flexible spatula and switch to the paddle attachment; continue beating on low speed until all air bubbles are eliminated, about 2 minutes. Add strawberries and beat until combined. Stir with a flexible spatula until the frosting is smooth. Keep buttercream at room temperature if using the same day, or transfer to an airtight container and refrigerate up to 3 days or freeze up to 1 month. Before using, bring to room temperature and beat with paddle attachment on low speed until smooth again, about 5 minutes.
This is another variation of Swiss meringue buttercream, only you cream the butter before incorporating it into the beaten egg-white mixture; caramel is added at the end, resulting in a buttercream that is at once rich and ethereal.
MAKES ABOUT 4 CUPS
1 cup plus 2 tablespoons sugar
¼ cup water
¼ cup heavy cream
1½ cups (3 sticks) unsalted butter, room temperature
4 large egg whites
1 teaspoon pure vanilla extract
1. Combine ½ cup plus 2 tablespoons sugar and the water in a heavy saucepan. Heat over medium, stirring occasionally, until sugar is dissolved and syrup is clear. Stop stirring, and cook until syrup comes to a boil, washing down sides of pan with a wet pastry brush to prevent crystals from forming. Continue to boil, gently swirling pan occasionally to color evenly, until mixture is very dark amber. Remove from heat; add cream in a steady stream (the mixture will spatter), stirring with a wooden spoon until smooth and combined. Let cool.
2. With an electric mixer on medium-high speed, cream butter until pale and fluffy. In the heatproof bowl of a standing electric mixer, combine remaining ½ cup sugar and the egg whites. Set bowl over a pan of simmering water; whisk constantly by hand until mixture is warm to the touch and sugar has dissolved (the mixture should feel completely smooth when rubbed between your fingertips).
3. Attach bowl to the mixer fitted with the whisk attachment. Starting on low and gradually increasing to medium-high speed, mix until stiff (but not dry) peaks form. Continue whisking until egg mixture is fluffy and glossy, and completely cool (test by touching the bottom of the bowl), about 10 minutes. Reduce speed to medium-low. Add beaten butter, about ¼ cup at a time, mixing well after each addition. Mix in vanilla.
4. Switch to the paddle attachment. With mixer on medium-low speed, very slowly pour in caramel; beat 5 minutes. Scrape down sides of bowl, and continue to beat until caramel is fully incorporated. Keep buttercream at room temperature if using the same day, or transfer to an airtight container and refrigerate up to 3 days or freeze up to 1 month. Before using, bring to room temperature and beat with paddle attachment on low speed until smooth again, about 5 minutes.
The lovely white shade of this frosting belies the bright mint flavor, achieved by first steeping fresh mint in milk when making the custard base, and then adding extract at the end.
MAKES ABOUT 3½ CUPS
2 large eggs, separated
½ cup sugar
⅔ cup milk
⅓ teaspoon pure vanilla extract
⅔ cup coarsely chopped fresh mint leaves
1 pound (4 sticks) unsalted butter, room temperature
¼ teaspoon pure peppermint extract
1. In the bowl of a standing electric mixer fitted with the whisk attachment, mix egg yolks and ¼ cup sugar on high speed until pale and thick, 2 to 3 minutes.
2. Prepare an ice-water bath. Bring milk, vanilla, and mint leaves just to a boil in a medium saucepan. Remove from heat. Whisk about one third of milk mixture into yolk mixture (this is called tempering, which keeps the yolks from curdling). Pour yolk mixture into pan with remaining milk mixture, and whisk to combine. Clip candy thermometer to side of pan. Cook over medium heat, stirring constantly, until mixture registers 185°F. Remove from heat; strain through a fine sieve into a heatproof bowl (discard solids). Set bowl in ice bath, stirring mixture until cool.
3. In another bowl of an electric mixture fitted with the paddle attachment, cream butter on medium-high speed until pale and fluffy. Beat in chilled egg-yolk mixture.
4. Heat egg whites and remaining ¼ cup sugar in the clean heatproof bowl of an electric mixer set over a pan of simmering water, whisking constantly by hand until mixture is warm to the touch and sugar has dissolved (the mixture should feel completely smooth when rubbed between your fingertips). Attach bowl to the mixer fitted with the clean whisk attachment; starting on low speed and gradually increasing to medium-high speed, whisk until stiff (but not dry) peaks form and mixture is completely cool (test by touching bottom of bowl), about 10 minutes.
5. Add egg-white mixture to butter mixture; switch to the paddle attachment, and beat on medium-high speed until smooth. Beat in peppermint extract. Keep buttercream at room temperature if using the same day, or transfer to an airtight container and refrigerate up to 3 days or freeze up to 3 months. Before using, bring to room temperature, and beat with the paddle attachment on low speed until smooth again, about 5 minutes.
Before adding the maple syrup to the beaten eggs, it should be heated to 240 degrees. If you don’t have a candy thermometer, you can test by adding a drop of syrup to cold water; it should immediately form a soft ball. Be sure to buy only pure maple syrup, not a brand labeled “pancake syrup” or “maple-flavored syrup,” which is actually corn syrup flavored with maple extract. Pure maple syrup is graded according to color and flavor; grade B has a robust flavor that works well in baking and other recipes.
MAKES 4 CUPS
6 large egg yolks
2 cups pure maple syrup, preferably grade B
1 pound (4 sticks) unsalted butter, chilled and cut into tablespoons
1. In the bowl of a standing electric mixer fitted with the whisk attachment, mix egg yolks on high speed until pale and thick, about 5 minutes.
2. Meanwhile, bring maple syrup to a boil in a saucepan over medium heat; clip a candy thermometer to side of pan. Cook until syrup registers 240°F, about 15 minutes. Remove from heat.
3. With mixer on medium speed, carefully pour the syrup in a slow, steady stream down the side of the bowl until it is completely combined, about 1½ minutes. Continue mixing until the bottom of the bowl is only slightly warm to the touch, 5 to 6 minutes.
4. Add the butter, a few tablespoons at a time, mixing until completely incorporated after each addition. Once all butter has been added, scrape down sides of bowl with a flexible spatula, and continue beating until buttercream is fluffy, about 4 minutes more. Keep buttercream at room temperature if using the same day, or transfer to an airtight container and refrigerate up to 3 days or freeze up to 1 month. Before using, bring to room temperature and whisk on low speed until fluffy again, about 5 minutes.
Made with mascarpone cheese, this frosting is similar to cream-cheese frosting, but with a slightly richer flavor.
MAKES ABOUT 2 CUPS
1 cup heavy cream
8 ounces mascarpone cheese, room temperature
½ cup confectioners’ sugar, sifted
With an electric mixer on medium speed, whisk heavy cream until stiff peaks form (be careful not to overbeat, or cream will be grainy). In another bowl, whisk together mascarpone and confectioners’ sugar until smooth. Gently fold whipped cream into mascarpone mixture until completely incorporated. Use immediately.
MAKES 2½ CUPS
½ cup (1 stick) unsalted butter, room temperature
8 ounces cream cheese, room temperature
1 cup packed light-brown sugar
With an electric mixer on medium-high speed, beat butter, cream cheese, and brown sugar until smooth. Use immediately, or refrigerate up to 3 days in an airtight container. Before using, bring to room temperature, and beat on low speed until smooth.
MAKES ABOUT 3 CUPS
6 ounces cream cheese, room temperature
⅓ cup confectioners’ sugar
½ teaspoon salt
1 cup creamy peanut butter
½ teaspoon pure vanilla extract
½ cup heavy cream
1. With an electric mixer on medium-high speed, beat cream cheese and confectioners’ sugar until pale and fluffy. Add salt and peanut butter, and beat to combine. Beat in vanilla.
2. In another bowl, with an electric mixer on medium speed, whisk cream until medium-stiff peaks form. Fold cream into peanut-butter mixture. Use immediately, or refrigerate, covered tightly, up to 2 days. Before using, bring to room temperature and stir with a flexible spatula until smooth.
Similar to dark chocolate frosting, this topping gets its intense color from the addition of semisweet chocolate. Sour cream and cream cheese impart tangy flavor and ultra-creamy consistency. This frosting would pair well with any chocolate cupcake, particularly devil’s food (also made with sour cream), as well as those made with banana, such as the roasted banana cupcakes.
MAKES ABOUT 8 CUPS
1 pound (4 cups) confectioners’ sugar, sifted
½ cup unsweetened Dutch-process cocoa powder
¼ teaspoon salt
12 ounces cream cheese, room temperature
¾ cup (1½ sticks) unsalted butter, room temperature
18 ounces bittersweet chocolate, melted and cooled
1½ cups sour cream
Sift together confectioners’ sugar, cocoa, and salt. With an electric mixer on medium-high speed, beat cream cheese and butter until pale and fluffy. Reduce speed to low. Gradually add sugar mixture; mix until combined. Mix in melted and cooled chocolate and then sour cream; scrape down sides of bowl and continue beating until smooth. Use immediately, or frosting can be stored in the refrigerator up to 5 days, or frozen up to 1 month, in an airtight container. Before using, bring to room temperature and beat on low speed until smooth.
MAKES ABOUT 4 CUPS
3 large egg yolks
1 can (12 ounces) evaporated milk
1¼ cups packed light-brown sugar
¾ cup (1½ sticks) unsalted butter, cut into small pieces, room temperature
1 teaspoon pure vanilla extract
¼ teaspoon salt
1 package (7 ounces) sweetened flaked coconut
1½ cups pecans (6 ounces), toasted and coarsely chopped
1. Heat egg yolks, evaporated milk, brown sugar, and butter in a saucepan over medium, stirring constantly, until thick, about 10 minutes (it should reach the consistency of sour cream). Strain through a fine sieve into a bowl.
2. Stir vanilla, salt, coconut, and pecans into frosting. Let cool completely, stirring occasionally. Frosting can be refrigerated up to 1 day in an airtight container. Before using, bring to room temperature and stir with a flexible spatula until smooth.
This rich, thick chocolate glaze may remind you of hot fudge sauce in its flavor and consistency. Avoid overmixing when stirring the chocolate into the hot-cream mixture, as this can cause the ganache to become dull and grainy. To make a thinner glaze for coating the handwritten valentine cupcakes, see variation below.
MAKES ABOUT 1 ¼ CUPS
6 ounces semisweet chocolate, finely chopped
⅔ cup heavy cream
1 tablespoon light corn syrup
1. Place chocolate in a medium heatproof bowl. Bring cream and corn syrup just to a simmer in a small saucepan over medium-high heat; pour mixture over chocolate. Let stand, without stirring, until chocolate begins to melt.
2. Using a flexible spatula, gently stir chocolate and cream until totally combined; begin near the center of the bowl and gradually work your way toward the edge, pulling in as much chocolate as possible, until the mixture is smooth and glossy. (If any chocolate pieces remain, strain mixture through a fine sieve and discard solids.) If not using immediately, glaze can be refrigerated up to 5 days in an airtight container. Reheat gently before using.
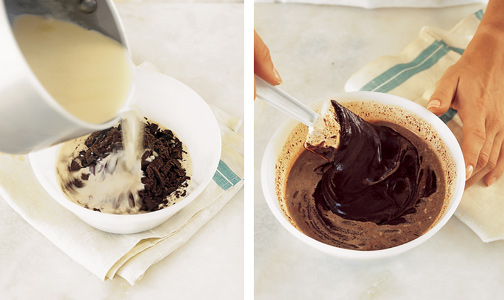
POURING WARM CREAM MIXTURE OVER CHOCOLATE
STIRRING UNTIL CHOCOLATE IS COMBINED
SHINY CHOCOLATE GLAZE VARIATION: Reduce amount of chocolate to 2 ounces. Follow step 1 of recipe above, letting mixture stand 5 minutes before slowly whisking until smooth and combined. Use immediately, without straining.
Ganache—a smooth mixture of chocolate and cream—is one of the richest, most luscious of all chocolate frostings. The frosting is made in the same manner as the chocolate ganache glaze, and then allowed to thicken until the frosting is spreadable. Achieving the perfect consistency can be tricky; if the frosting becomes too firm to spread, reheat in a bowl over a pan of simmering water until it begins to melt around the edges, then remove from heat and stir until smooth.
MAKES 4 CUPS
1 pound good-quality bittersweet chocolate, finely chopped
2⅓ cups heavy cream
¼ cup corn syrup
1. Place chocolate in a large heatproof bowl. Bring cream and corn syrup just to a simmer over medium-high heat; pour mixture over chocolate. Let stand, without stirring, until chocolate begins to melt.
2. Beginning near the center and working outward, stir melted chocolate into cream until mixture is combined and smooth (do not overstir).
3. Refrigerate, stirring every 5 minutes, until frosting just barely begins to hold its shape and is slightly lighter in color. Use immediately (ganache will continue to thicken after you stop stirring).
MAKES ABOUT 2 CUPS
½ cup (1 stick) unsalted butter, room temperature
8 ounces cream cheese, room temperature
¼ cup good-quality honey
Blend butter, cream cheese, and honey with a flexible spatula until smooth. If not using immediately, frosting can be refrigerated up to 5 days in an airtight container; before using, stir with a flexible spatula until smooth.
This delicious icing has a tendency to separate. If it does, warm it in a heatproof bowl over a pan of simmering water; whisk until smooth, adding a bit more milk, if necessary, to achieve the right consistency.
MAKES 1 CUP
½ cup (1 stick) unsalted butter
2 cups sifted confectioners’ sugar
2 teaspoons pure vanilla extract
2 tablespoons milk, plus more if needed
1. Melt butter in a small saucepan over medium heat, swirling pan occasionally, until nut-brown in color, about 10 minutes. Remove from heat, and pour butter into a bowl, leaving any burned sediment behind.
2. Add confectioners’ sugar, vanilla, and 2 tablespoons milk to brown butter; stir until smooth. If necessary, add more milk (up to 2 tablespoons) a little at a time, just until icing is spreadable. Use immediately.
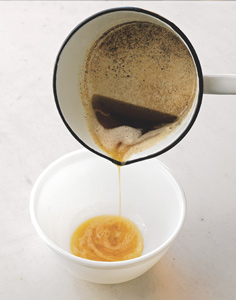
POURING OFF BROWN BUTTER
Follow this recipe to make a glaze with any citrus flavor, such as orange, lemon, or lime.
MAKES ABOUT 1 CUP
1½ cups confectioners’ sugar, sifted, plus more if needed
¼ teaspoon finely grated citrus zest
3 tablespoons fresh citrus juice, plus more if needed
Whisk together all ingredients until smooth. If necessary, add more sugar to thicken or more juice to thin the glaze. Use immediately.
Using meringue powder (or powdered egg whites), instead of raw egg whites, eliminates food-safety concerns. Look for the powder at baking-supply stores and many supermarkets. Royal icing hardens quickly, so if not using immediately, transfer to an airtight container and store in the refrigerator, up to one week; before using, stir with a flexible spatula until smooth.
MAKES ABOUT 2½ CUPS
1 pound (4 cups) confectioners’ sugar, sifted
¼ cup plus 1 tablespoon meringue powder
Scant ½ cup water, plus more as needed
With an electric mixer on low speed, beat all ingredients until smooth, about 7 minutes. If icing is too thick, add more water, a little at a time, beating until icing holds a ribbon on the surface for a few seconds when beater is lifted; if too thin, continue mixing 2 to 3 minutes more.
Contrary to its name, pastry cream—a classic custard filling for cakes, tarts, pastries, and other baked goods—contains no cream, only milk. Be sure to bring the mixture to a full boil to activate the cornstarch and ensure proper thickening.
MAKES ABOUT 3 CUPS
4 large egg yolks
½ cup sugar
¼ cup cornstarch
Pinch of salt
2 cups milk
1¼ teaspoons pure vanilla extract
1. Whisk egg yolks until smooth in a large bowl. Combine sugar, cornstarch, and salt in a medium saucepan, and heat over medium. Stirring constantly, gradually add milk in a slow, steady stream, and cook until mixture thickens and begins to bubble, about 5 minutes.
2. Whisking constantly, slowly pour one third of the milk mixture into egg yolks (this step is called tempering, which keeps the yolks from curdling). Pour mixture into remaining milk mixture in saucepan. Cook over medium heat, whisking constantly, until mixture comes to a full boil and is thick enough to hold its shape when lifted with a spoon, 2 to 4 minutes. Remove from heat; stir in vanilla.
3. Strain mixture through a fine sieve into a heatproof bowl. Cover with parchment paper or plastic wrap, pressing it directly on surface to prevent a skin from forming. Refrigerate until chilled and firm, at least 2 hours (or up to 2 days).
This familiar dessert topping makes a versatile last-minute embellishment for cupcakes. It can be dolloped on top as an alternative to heavier frostings, or used as a filling for split cupcakes. Whether you use a handheld whisk or an electric mixer to whip the cream, be sure not to overmix, or the consistency can become grainy. For unsweetened whipped cream, simply omit the sugar.
MAKES ABOUT 4 CUPS
2 cups heavy cream
¼ cup confectioners’ sugar, sifted
Whisk heavy cream until soft peaks form. Add confectioners’ sugar, and whisk until combined. If not using immediately, whipped cream can be refrigerated, covered tightly, up to 3 hours in an airtight container.
A high proportion of lemon juice gives curd its intense flavor. As an acid, the juice also prevents the yolks from curdling when heated (unlike when making pastry cream, which requires the extra step of tempering). You can substitute an equal amount of juice from other citrus, such as lime, grapefruit, or blood orange.
MAKES ABOUT 2 CUPS
2 whole eggs plus 8 egg yolks
1 cup sugar
⅔ cup fresh lemon juice (about 6 lemons)
2 tablespoons unsalted butter, cut into small pieces, room temperature
Combine whole eggs and yolks, sugar, and lemon juice in a heatproof bowl set over a pan of simmering water. Cook, whisking constantly, until mixture is thick enough to coat the back of a spoon. Remove from heat. Add butter, a few pieces at a time, whisking until smooth after each addition. Strain through a fine sieve into another bowl, and cover with parchment paper or plastic wrap, pressing it directly on surface to prevent a skin from forming. Refrigerate until chilled and firm, at least 2 hours (or up to 2 days).
This billowy meringue is used to pipe the “mushrooms” for the fruitcakes as well as the flowers for the meringue bouquet cupcakes. (It is also serves as the foundation for Swiss meringue buttercream.)
MAKES ABOUT 4 CUPS
4 large egg whites
1 cup sugar
Pinch of cream of tartar
1 teaspoon pure vanilla extract
1. Combine the egg whites, sugar, and cream of tartar in the heatproof bowl of a standing electric mixer; set over a pan of simmering water. Clip a candy thermometer to side of bowl. Cook, whisking constantly by hand, until the mixture registers 140°F and the sugar is dissolved (it should feel completely smooth when rubbed between your fingertips), about 3 minutes.
2. Transfer bowl to a mixer fitted with the whisk attachment. Starting on low and gradually increasing to high speed, mix until the meringue is completely cool (test by touching the bottom of the bowl), and forms stiff, glossy (but not dry) peaks, about 10 minutes. Mix in the vanilla. Use immediately.
This all-purpose dough bakes rich and dark cutouts, and it can be rolled again and again with little compromise in texture. Follow the recipe below to make your own designs, or cut and bake as directed in specific cupcake recipes.
MAKES 3 TO 4 DOZEN 3-INCH COOKIES
1½ cups all-purpose flour, plus more for work surface
½ cup plus 2 tablespoons unsweetened Dutch-process cocoa powder
⅛ teaspoon salt
¼ teaspoon ground cinnamon
¾ cup (1½ sticks) unsalted butter, room temperature
1½ cups sifted confectioners’ sugar
1 large egg, lightly beaten
½ teaspoon pure vanilla extract
1. Sift together flour, cocoa, salt, and cinnamon. With an electric mixer on medium-high speed, cream butter and confectioners’ sugar until pale and fluffy. Add egg and vanilla, and beat to combine. Reduce speed to low. Gradually add flour mixture, beating until just combined.
2. Divide dough in half; flatten each half into a disk, and wrap in plastic. Refrigerate until firm, at least 1 hour (or overnight). Dough can be frozen, wrapped tightly in plastic and placed in a resealable plastic bag, up to 3 months; thaw overnight in the refrigerator before using.
3. On a lightly floured work surface (or a piece of parchment paper), roll out one disk of dough to just under ¼ inch thick. Transfer to a baking sheet; freeze until firm, about 15 minutes.
4. Preheat oven to 350°F, with racks in upper and lower thirds. Using a 3-inch cookie cutter, quickly cut out shapes from dough (if dough begins to soften, chill in freezer 5 minutes), and transfer shapes to parchment-lined baking sheets, spacing them 2 inches apart, as you work. Reroll scraps and cut out more shapes. Brush off excess flour. Freeze until firm, about 15 minutes. Repeat with remaining disk of dough.
5. Bake cookies until crisp, about 8 minutes, firmly tapping down sheets once and rotating them halfway through. Let cool completely on sheets on wire racks before decorating as desired. Cookies can be stored up to 1 week at room temperature in an airtight container.
Buttery and crunchy, sugar cookies are delicious on their own and make delightful cupcake toppers when decorated with royal icing. This dough is a favorite of Martha Stewart Living food editors for its flavor and texture, which is just right for rolling out and cutting into shapes. Follow the recipe below to make your own designs, or cut and bake as directed in specific cupcake recipes.
MAKES 4 DOZEN 2-INCH COOKIES
4 cups sifted all-purpose flour, plus more for work surface
1 teaspoon baking powder
½ teaspoon salt
1 cup (2 sticks) unsalted butter, room temperature
2 cups sugar
2 large eggs, room temperature
2 teaspoons pure vanilla extract
1. Sift together flour, baking powder, and salt. With an electric mixer on medium-high speed, cream butter and sugar until pale and fluffy. Add eggs and vanilla, and beat to combine. Reduce speed to low. Gradually add flour mixture, beating until just combined.
2. Divide dough in half; flatten each half into a disk, and wrap in plastic. Refrigerate until firm, at least 1 hour (or overnight). Dough can be frozen, wrapped tightly in plastic and placed in a resealable plastic bag, up to 3 months; thaw overnight in the refrigerator before using.
3. Let one disk of dough stand at room temperature until soft enough to roll, about 10 minutes. On a lightly floured work surface (or a piece of parchment paper), roll out dough to just under ¼ inch thick, adding more flour as needed to keep dough from sticking. Transfer to a baking sheet; freeze until firm, about 15 minutes.
4. Preheat oven to 350°F, with racks in upper and lower thirds. Using a 2-inch cookie cutter, quickly cut out shapes from dough (if dough begins to soften, chill in freezer 5 minutes), and transfer shapes to parchment-lined baking sheets, spacing them 2 inches apart, as you work. Reroll scraps and cut out more shapes. Brush off excess flour. Freeze until firm, about 15 minutes. Repeat with remaining disk of dough.
5. Bake until edges turn golden, 15 to 18 minutes, firmly tapping down sheets once and rotating them halfway through. Let cool completely on sheets on wire racks before decorating as desired. Cookies can be stored up to 1 week at room temperature in an airtight container.
Use this dough to make gingerbread boys and girls—or other shapes, such as giant dinosaurs—for topping cupcakes (adjust baking time as necessary). The crisp cookies are flavored with a blend of spices—ginger, cinnamon, cloves, and nutmeg—and sweetened with a combination of molasses and brown sugar. Follow the recipe below to make your own designs, or cut and bake as directed in specific cupcake recipes.
MAKES 4 TO 5 DOZEN 2-INCH COOKIES
5½ cups all-purpose flour, plus more for work surface
1 teaspoon baking soda
1½ teaspoons salt
1 tablespoon plus 1 teaspoon ground ginger
1 tablespoon plus 1 teaspoon ground cinnamon
1½ teaspoons ground cloves
1 teaspoon freshly grated nutmeg
1 cup (2 sticks) unsalted butter, room temperature
1 cup packed dark-brown sugar
2 large eggs
1½ cups unsulfured molasses
1. Whisk together flour, baking soda, salt, and spices. With an electric mixer on medium-high speed, cream butter and brown sugar until pale and fluffy. Add eggs and molasses, and beat to combine. Reduce speed to low. Gradually add flour mixture, beating until just combined.
2. Divide dough into thirds; flatten each piece into a disk, and wrap in plastic. Refrigerate until firm, at least 1 hour (or overnight). Dough can be frozen, wrapped tightly in plastic and placed in a resealable plastic bag, up to 3 months; thaw overnight in the refrigerator before using.
3. On a generously floured piece of parchment paper, roll out one disk of dough to just under ¼ inch thick. Brush off excess flour and freeze until firm, about 15 minutes.
4. Preheat oven to 350°F, with racks in upper and lower thirds. Using a 2-inch cookie cutter, quickly cut out shapes from dough and transfer to parchment-lined baking sheets, spacing them 2 inches apart, as you work. Freeze until firm, about 15 minutes. Repeat with remaining disks of dough.
5. Bake cookies until crisp but not darkened, 8 to 10 minutes, firmly tapping down sheets once and rotating them halfway through. Transfer cookies to wire racks to cool completely before decorating as desired. Cookies can be stored up to 1 week at room temperature in airtight containers.
MAKES ENOUGH FOR 24 CUPCAKES (ABOUT 6 LEAVES PER CUPCAKE)
1 to 2 bunches fresh mint, leaves picked from stems
8 ounces bittersweet chocolate, melted and tempered (see below)
1. Gently clean leaves with a damp paper towel, and let dry completely. Using a small, dry pastry brush, coat underside of each mint leaf with a thick layer of tempered chocolate. (If chocolate drips onto top of leaf, gently wipe it away with your fingertip.)
2. Drape leaves, chocolate sides up, over a large skewer or the handle of a wooden spoon set on a parchment-lined baking sheet. Refrigerate until set, about 10 minutes.
3. Gently grasp the chocolate layer of each leaf with kitchen tweezers (to prevent melting, don’t touch the chocolate with your hands). Holding the stem, peel the leaf away with your fingers. Chocolate leaves can be refrigerated up to 2 days in a single layer in airtight containers.
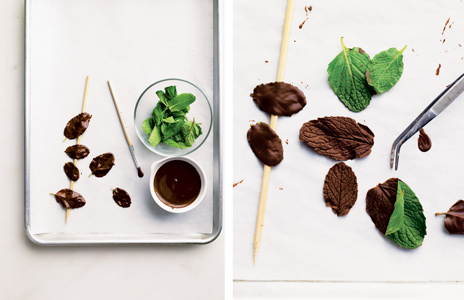
COATING AND SHAPING LEAVES
PEELING MINT LEAVES FROM CHOCOLATE
All chocolate is in temper when you buy it: It breaks cleanly, melts smoothly, and has a lovely sheen. But as soon as you melt chocolate, it goes out of temper, so when making leaves or other designs with chocolate, you need to follow these steps to ensure the proper results. Temper only the best-quality brands, such as chocolate made by Valrhona, Callebaut, or El Rey. Start by finely chopping 8 ounces chocolate. Reserve ½ cup chopped chocolate; transfer remaining chocolate to a medium heatproof bowl set over (not in) a pan of barely simmering water. Heat, stirring occasionally, until melted and a chocolate or candy thermometer registers 131°F. (Many brands of dark chocolate should not be heated to more than 118°F; check the label.) Remove from heat; stir in reserved ½ cup chopped chocolate until melted. Continue stirring until it cools to 82°F to 84°F. Return to pan of warm water; reheat to 88°F. Use immediately.
This recipe is used to make the brownie hearts; some of the batter is baked in muffin tins, the rest in an 8-inch pan for cutting into heart-shaped toppers.
MAKES 24 CUPCAKES PLUS 24 HEARTS
Nonstick cooking spray
3 cups all-purpose flour
1½ teaspoons baking powder
1½ teaspoons coarse salt
1 cup (2 sticks) plus 1 tablespoon unsalted butter, cut into pieces, room temperature
12 ounces unsweetened chocolate, coarsely chopped
3 cups sugar
6 large eggs, room temperature
1 tablespoon pure vanilla extract
1. Preheat oven to 350°F. Line 24 cups of standard muffin tins with paper liners. Spray an 8-inch square pan with nonstick cooking spray. Line bottom of pan with parchment paper; spray parchment. In a mixing bowl, whisk together flour, baking powder, and salt.
2. Heat butter and chocolate in a heatproof mixing bowl set over (not in) a pan of simmering water, stirring occasionally, until melted. Remove from heat, and add sugar. With an electric mixer on medium-high speed, whisk until mixture is smooth. Add eggs, one at a time, beating until each is incorporated, scraping down sides of bowl as needed. Add vanilla, and beat 3 minutes more. Reduce speed to low. Gradually add two thirds of the flour mixture; beat until just combined. Remove bowl from mixer. Add remaining flour mixture, and fold in by hand, just to combine.
3. Divide batter evenly among lined cups, filling each two-thirds full. Spread remaining batter in prepared baking pan, smoothing top with an offset spatula. Bake, rotating tins and pan halfway through, until just set (but still feels soft), and top is shiny, about 17 minutes for cupcakes and 25 minutes for square pan. Transfer tins and pan to wire racks and let cool completely before removing cupcakes and square.
MAKES ABOUT 2 CUPS
2½ cups sugar
⅔ cup water
1 tablespoon light corn syrup
¾ cup heavy cream
2½ teaspoons sea salt, preferably fleur de sel
Heat sugar with the water and corn syrup in a heavy saucepan over high, stirring occasionally, until syrup is clear; clip a candy thermometer to side of pan. Stop stirring, and cook until syrup comes to a boil, washing down sides of pan with a wet pastry brush as needed. Boil, gently swirling pan occasionally, until mixture is caramelized and just reaches 360°F. Remove from heat; slowly pour in cream (mixture will spatter) and stir with a wooden spoon until smooth. Stir in sea salt. Use immediately; if at any time caramel begins to harden, reheat gently until pourable.
MAKES 24 CHIPS
½ cup pure maple syrup, preferably grade B
1 slender carrot, peeled and sliced into 24 very thin rounds
Bring maple syrup to a simmer in a saucepan over medium heat. Working in four batches, add carrot rounds to pan, and submerge to coat with syrup. Cook until edges curl and centers are slightly translucent, about 2 minutes. Using a slotted spoon, transfer to a sheet of parchment paper, and flatten with a spatula. Let cool completely. Carrot chips can be stored up to 3 days at room temperature in an airtight container.
MAKES ENOUGH FOR 24 CUPCAKES
1 large egg white
1 teaspoon water
Pesticide-free edible flowers, such as pansies and violas, stems removed (6 per cupcake)
Superfine sugar, for sprinkling
Whisk egg white with the water in a small bowl. Working with 1 flower at a time and holding it with kitchen tweezers, brush egg wash over entire surface of flower using a small paintbrush. Sprinkle with superfine sugar to coat completely. Transfer to a baking sheet or wire rack; let set. Crystallized flowers can be stored up to 3 months at room temperature, in single layers between waxed paper, in airtight containers.
MAKES 24 FLOWERS
2 large or 4 small pineapples, peeled
Preheat oven to 225°F. Line two baking sheets with nonstick baking mats or parchment paper. Using a small melon baller, remove and discard pineapple “eyes.” Use a sharp knife to cut pineapple crosswise into very thin slices. Place slices on baking sheets. Bake until tops look dried, about 30 minutes. Flip slices; bake until completely dried, 25 to 30 minutes more (or longer, depending on their thickness). Pinch center of each pineapple slice to shape into a cone; let cool in a clean muffin tin to form flower shown. Once cool, flowers can be stored (stacked) up to 3 days at room temperature in an airtight container.
MAKES ABOUT 2 CUPS
½ cup sugar
¼ cup water
1 cup coarsely chopped pecans (4 ounces)
Line a rimmed baking sheet with a nonstick baking mat. Heat sugar and the water to a simmer in a heavy saucepan over medium heat, stirring occasionally, until sugar is dissolved. Stop stirring; cook until syrup comes to a boil, washing down sides of pan with a wet pastry brush to prevent crystals from forming. Boil, gently swirling pan occasionally, until mixture is light amber. Remove from heat. Stir in pecans with a wooden spoon to coat completely. Immediately remove pecans from caramel; spread in a single layer on prepared baking sheet. Let cool completely before using or storing; break into small pieces, if necessary.
Preheat oven to 350°F. Spread nuts evenly on a rimmed baking sheet; toast, stirring occasionally, until fragrant, 8 to 10 minutes. (Watch carefully to prevent burning.) Transfer nuts to a plate; let cool completely.
Preheat oven to 250°F. Spread hazelnuts on a rimmed baking sheet. Toast in oven, stirring halfway through, until fragrant and skins begin to crack, about 20 minutes. Remove from oven. While nuts are still hot, place in a kitchen towel; rub to remove skins. Return any unskinned nuts to oven for a few minutes, then rub again. Let cool completely.
Preheat oven to 350°F. Spread coconut evenly on a rimmed baking sheet; toast, stirring occasionally, until starting to brown, about 10 minutes (or longer if darker color is desired). Transfer sheet to a wire rack; let cool completely.
Place finely chopped (white or dark) chocolate (or use whole chocolate chips if called for in a recipe) in a heatproof bowl set over (not in) a pan of simmering water (do not let any water come into contact with the chocolate, or it may seize, or harden). Heat until chocolate is almost melted, then stir with a flexible spatula until completely melted. Remove bowl from pan, and let chocolate cool, stirring occasionally, about 30 minutes before using.
Use a vegetable peeler to slice strips from a slightly warm block of good-quality chocolate (heat in microwave for 5‑second intervals, checking after each, until just warm to the touch; do not overheat). To produce tight curls, start from the far edge of the chocolate and move the peeler toward you. The delicate curls are best used immediately; you can even shave the curls right onto a cupcake.