MATERIALS
Lumber
2" ×8" cedar (two 8’ lengths)
2" ×4" cedar (6’ length)
1" ×4" cedar (10’ length and 12’ length)
Supplies
3" exterior wood screws (26 or so)
2" exterior wood screws (50 or so)
Tools
Tape measure
Pencil
Speed square
Wood saw
Power drill
⅛" twist drill bit
Driver bit to match screws
80-grit sandpaper
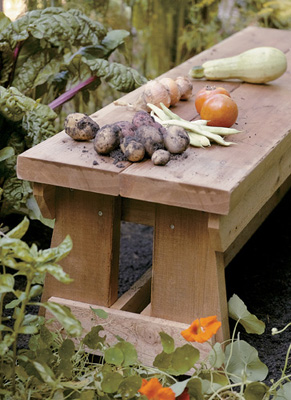
Every garden needs a bench, whether it’s simply a place to set your trowel and other hand tools (so you won’t waste time looking for them minutes later) or a holding spot for a bucket of peas, a pile of fat squashes, or bunches of carrots. Even better, it provides a great seat, after hours of work, for reflecting on the wonders of gardening.
A Simple Seat and Sturdy Stand
Of the many different styles of garden seating you can choose from, the classic backless bench is arguably the most versatile. Besides being portable, it allows you to sit facing whichever direction you like and can be placed at the end of a picnic table to provide additional seating for outdoor gatherings. It also comes in handy for container gardening. Instead of placing pots directly on the ground, you can set them on benches, where they will drain well.
GARDEN BENCH. Basic wood cuts and simple joinery make this solid garden seat a cinch to assemble.
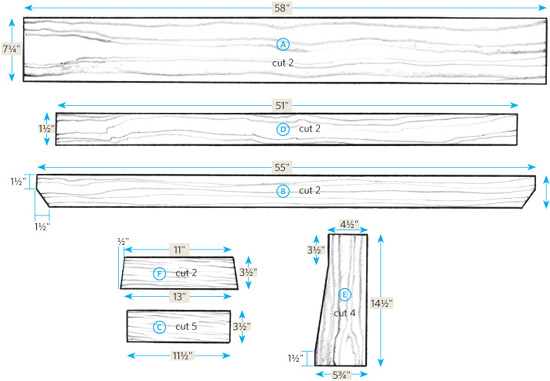
cutting diagram
Cutting the lumber. From the 2"×8", cut two 58" lengths for the seat  and four 14½" lengths for the legs
  , trimmed as shown in the cutting diagram. From the 2"×4", cut five 11½" lengths for the blocks
  ; from the 1"×4", cut two 55" lengths for the top rails
  ; two 51" lengths for the bottom rails
  ; and two 13" lengths for the leg battens
  , trimmed as shown in the cutting diagram.
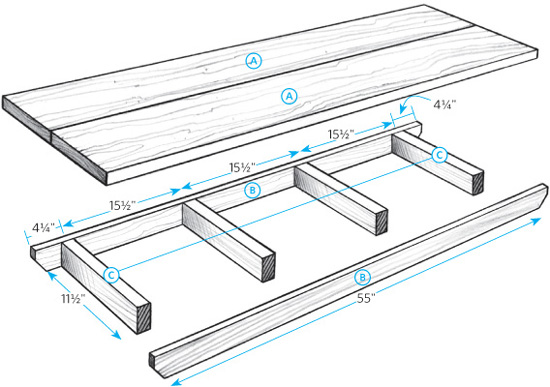
FIG. 1
Constructing the bench. Make up the frame for the seat by attaching the two top rails to the seat blocks . Center the two seat boards atop the frame, and fasten them to the tops of the blocks. Flip the seat assembly over. (See fig. 1.)
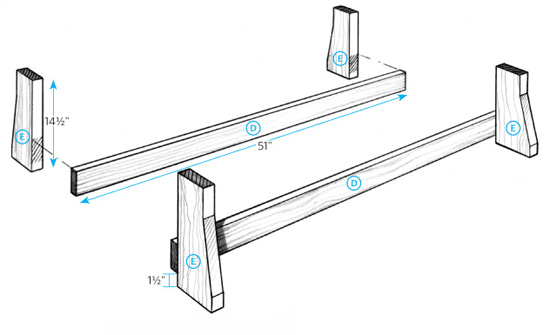
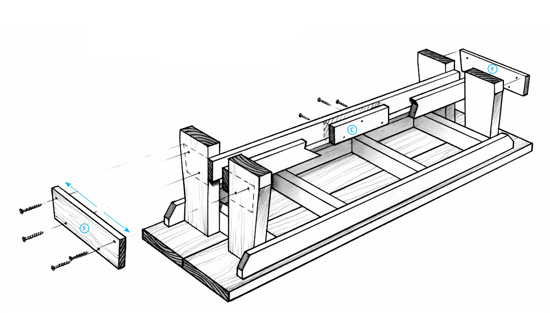
Next, make up each of the two leg assemblies. Attach a bottom rail to each pair of legs , 1½" from the bottom, as shown in fig. 2. Fasten the tops of the legs to the outside of the end seat blocks. (See fig. 3.) Reinforce the connection by screwing through the face of the upper rails into the legs as well.
Finally, connect the two leg assemblies with a leg batten on each end and a block inserted between the centers of the bottom rails. Round all the edges with sandpaper.
FIG. 2
FIG. 3