MATERIALS
Lumber
1" ×12" mahogany (8’ length)
Supplies
Eighteen 2¼" stainless steel trim-head screws
Four 1⅝" stainless steel trim-head screws
Tools
Tape measure
Pencil
Carpenter’s square
Wood saw
Jigsaw
Power drill
⅛" twist drill bit
⅜" spade drill bit
Driver bit to match screws
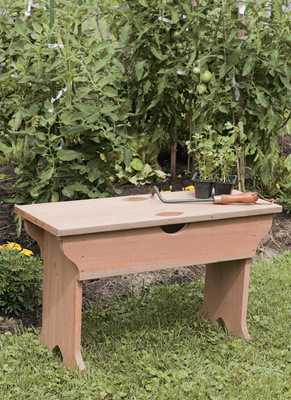
With a handhold cut right into the edge of the seat, this lightweight bench is easy to tote around to different sections of the garden. When constructing it, drawing the curved cutting lines is handily done by tracing around a CD. Just be sure to double-check your measurements; they need to be precise for the pieces to screw together properly.
BUILDER’S TIP
When predrilling the screw holes, use a ⅛" drill bit. Then fasten all the pieces with 2¼" trim-head screws — but use 1⅝" screws for the four seat corners to avoid hitting the screws in the apron boards.
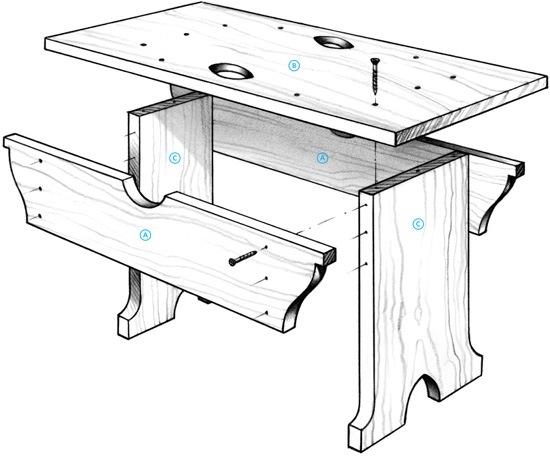
HANDY LIGHTWEIGHT BENCH. Constructed of exterior-grade mahogany, this durable bench will last through many gardening seasons.
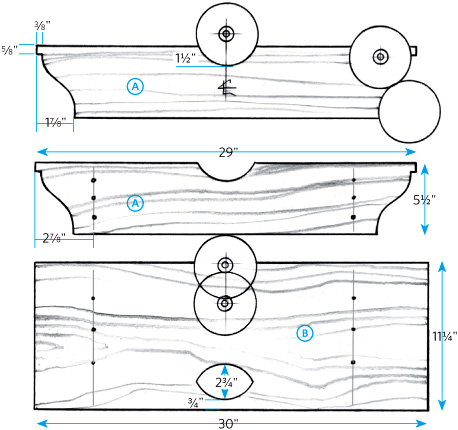
Cutting the lumber. From the 1"×12", cut two 29" lengths for the aprons  , one 30" length for the seat
  , and two 17¼" lengths for the legs
  . Use an old CD as a template to cut the openings for the handholds in the seat and aprons and the shaping at the bottom of the legs, as shown in the cutting diagram.
cutting diagram

Constructing the bench. Connect the legs by attaching the aprons on either side (there should be a 2½" overhang on each end). Next, center the seat atop the leg assembly, and fasten it to the tops of the legs and aprons. (See fig. 1.)
FIG. 1
BUILDER’S TIP
When creating the handhold in the seat, use a ⅜" bit to drill a starter hole for the jigsaw blade.