MATERIALS
Lumber
1"×12" (6’ length)
⅜" dowel (13¼" length)
Supplies
⅛" acrylic (6"×10½" piece)
Eighteen 1½" exterior wood screws
Lazy Susan turntable (9" diameter) with pre-drilled holes
Twelve ¾" #10 pan-head screws (for installing the lazy Susan)
Continuous hinge (cut to 12½" length) and screws to go with it
1" threaded galvanized pipe (8’ to 10’ length)
Galvanized pipe flange
Tools
Tape measure
Pencil
Carpenter’s square
Circular saw
Screwdriver
Hacksaw
Power drill
¾" twist drill bit
Driver bits to match screws
Jigsaw
Sandpaper (optional)
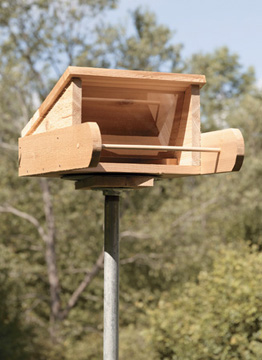
Mounted to a turntable, the weather vane feeder rotates in the breeze and protects the seeds, although it may make your bird-watching dependent on which way the wind blows.
Locating and Maintaining Pole Feeders
As tempting as it is to locate a bird feeder close to a window, remember that birds don’t recognize glass the way we do and will often fly right into it. Therefore, it is good practice to set a feeder at least several feet away from windows. To ensure the seed is reserved for birds only, install a squirrel baffle on the pole under the feeder, 3 or more feet above the ground. This is a better option than greasing or oiling the pole, since birds can’t remove these substances from their feathers. Keep in mind that, like birdhouses, feeders should be cleaned regularly. This means removing moldy seeds and hulls as well as bird droppings.
WEATHER VANE FEEDER. Designed to swivel away from the worst elements of weather, this feeder will minimize waste.
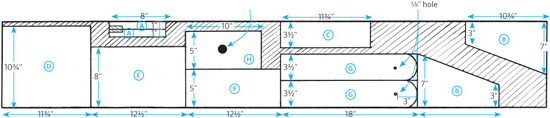
Cutting the lumber. Refer to the cutting diagram to cut all pieces according to the following key:
 stops (cut 2)
 sides (cut 2)
 back
back
 floor
floor
 front roof
 back roof
 vanes (cut 2)
 mounting board
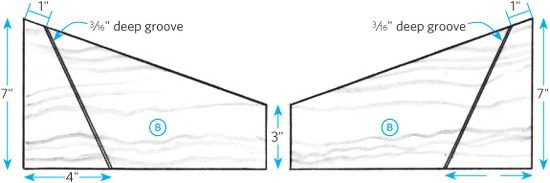
Cut grooves  " deep in each side , as shown in fig. 1.
Cutting diagram
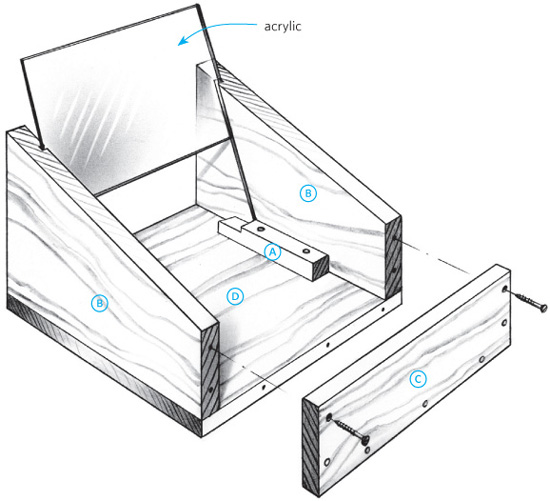
Constructing the feeder. Attach the stops , sides , and back to the feeder floor . Insert the acrylic into the grooves (see fig. 2). It is important that the opening between the acrylic and the back of the box be no more than ½" to prevent birds from slipping through and getting caught inside. Trim the stops if necessary.
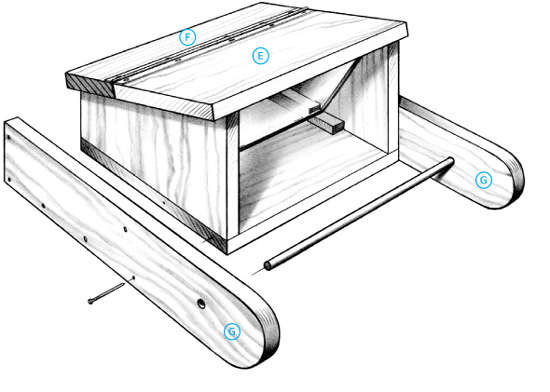
Use the continuous hinge to join the two roof sections & . Screw the roof in place atop the sides (it should overhang the front by ½" and both sides by ⅜"), being careful to avoid the acrylic window. (See fig. 3.)
Attach the vanes to the sides of the feeder, and tap in the dowel to connect them, as shown in fig. 3.
FIG. 1
FIG. 2
FIG.3
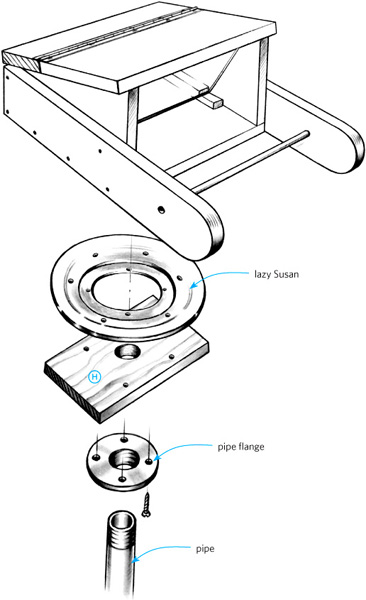
Mounting the weather vane feeder to the lazy Susan. To install the feeder on the lazy Susan, you must first find the feeder’s center of balance. You can do this by balancing it on a bottle cap set on a flat surface. Mark the point on the underside of the feeder. Next, center and attach the top plate of the turntable atop the mounting board .
With the feeder upside down, set the top plate assembly on top of it. To be sure the pieces are properly aligned, line up the mark you made on the feeder with the hole in the mounting board. Attach assembly to bottom of feeder. Screw the pipe flange to the board (around the center hole). (See fig. 4; for more detail on installing the lazy Susan, refer to manufacturer’s directions.)
Set the bottom of the pipe into the ground, then screw the flange (and feeder) onto the pipe.
BUILDER’S TIPS
When driving the pipe into the ground, hit a board placed over the top of it; if you hit the pipe directly, you will damage the threads.
FIG. 4