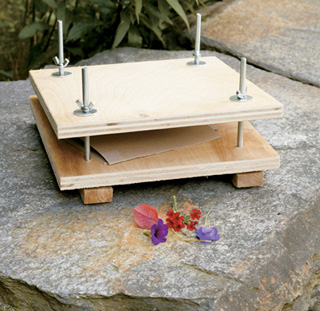
It’s certainly simple enough to press a blossom or two by tucking them between the pages of a thick book. But a press such as this one is very easy and inexpensive to make, and because it applies even pressure, you will get better results. Once the flowers are dried, remove them from the press and store them for use in your projects.
FLOWER PRESS. This hand-built model is a bit larger and heavier than most of those that are commercially available, so you can press a fair number of blossoms at a time.
Lumber
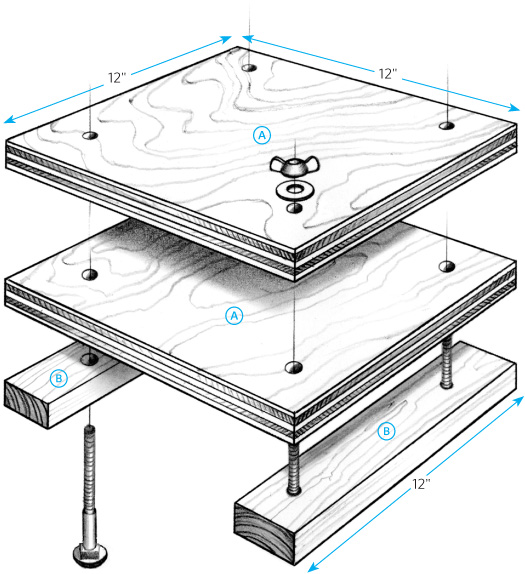
¾" plywood (two 12" squares)
1"×2" pine or cedar (two 12" lengths)
Supplies
Four 6"×¼" carriage bolts (with rounded heads for flush mounting)
Four 1" flat washers with ¼" hole
Four ¼" wing nuts (with large wings for easy tightening)
1½" wood screws
Tools
Tape measure
Pencil
Carpenter’s square
Power drill
⅜" twist drill bit
Driver bit to match screws
Wood saw
Hammer
Constructing the flower press. Mark and drill the locations for the four carriage bolts on the two plywood squares  and two wood strips
  . (See fig. 1.) Insert the bolts through the holes in the wood strips, and use a hammer to tap the heads until they are flush with the boards. Place the strips parallel to each other with the thread ends of the bolts up, as shown in fig. 2, and fit the plywood squares in place, threading the bolts through the corner holes. Slip a washer onto each bolt, and tighten the assembly with the wing nuts.
Using the press. Cut two or more pieces of corrugated cardboard 8" square. Place one piece of cardboard on the bottom plywood square and cover it with a piece of paper towel or other absorbent material. Lay out your botanical material on the paper towel, cover with another piece of paper towel, followed by a piece of cardboard. Add as many additional layers of cardboard and paper as you wish, then put the top plywood square in place and use the wing nuts to apply pressure to the layers. If you’re interested in drying only one or two layers at a time, use shorter carriage bolts.
FIG. 1
FIG. 2