PROJECT 3
Makey Makey Marble Maze
SOMETIMES AS AN EVIL GENIUS you must challenge your old arch nemesis to a timed maze game. Or maybe you want to trap your nemesis in a maze and pretend that escape is impossible? Either way, this is a superquick and fun project build, which integrates scoring and creating a timer with variables in Scratch, that is sure to dazzle and puzzle your greatest enemy (see Figure 1-35).

Figure 1-35 Makey Makey marble maze.
Cost: $
Make time: 30 minutes
Skill level: 

Supplies

Build a Maze and Switches
Step 1: Find a Big Flat Box and Design a Maze
A pizza box lid or other large flat box will work great for this marble maze. Use a pencil to draw out a complicated maze with many hidden traps and false endings.
Step 2: Build Walls with Straws and Hot Glue
Use hot glue to attach milkshake straws to your box as the walls of your maze. (Milkshake straws are oversized and will help to keep your marble from jumping the walls of your maze.) Cut the ends of straws at an angle to make nice perpendicular corners for your walls.
Step 3: Create Switches at Traps
You can create switches as you create your maze or after all the walls of your maze are built. Any good game should have a hidden point score, a trap that costs you points, and a signal that you’ve reached the end of the maze. Determine where you want your traps, and let’s get started designing switches.
Because the metal marble will complete the circuit, you’ll need to place your EARTH and key press very close together. For the “hidden star” switch in Figure 1-36, we actually ran an aluminum foil EARTH and then placed our key press over this EARTH foil. You can do this by creating an insulating layer with regular clear tape to keep the switches from constantly connecting. Make sure to test as you build so that your key press doesn’t press over and over. You can also insulate with paper, masking tape, or any nonconductive material you have on hand. Get experimental with this and incorporate your ideas to coordinate your maze design. To achieve the points of the hidden star, the maze runner makes the connection by getting the metal ball to touch both pieces of copper tape at one time, as shown in Figure 1-36. To keep the maze path clear, run the copper tape trace to the outer edge of the box, making sure as you do so that the two copper tape traces are far apart. If your tape traces get too close, it might cause a key press as the ball travels other parts of the maze. In Figure 1-36, the copper tape trace connects to the foil to create more surface contact for the “hidden star” switch.

Figure 1-36 “Hidden star” switch.
The “dead end” switch, as shown in Figure 1-37, will let racers know that they’ve gone the wrong way and deduct points accordingly. This switch is a little more straightforward. The foil on the cardboard will be connected to an EARTH input on the Makey Makey, and the foil on the straw will connect to a key press. Use copper tape to extend the tape traces (the tape is taking the place of the wiring) to the back of your maze. (This step will be explained in step 6.)
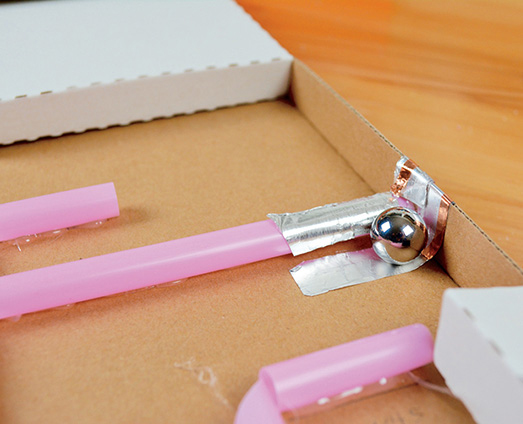
Figure 1-37 “Dead end” switch.
The “finish line” switch will let Scratch know that the racer has reached the end of the maze (see Figure 1-38). It is similar in construction to the “dead end” switch. Make sure that the foil is very close together but not touching. You’ll want to make a long runway for your ball to cross. Otherwise, the Makey Makey may not register the ball as a key press.
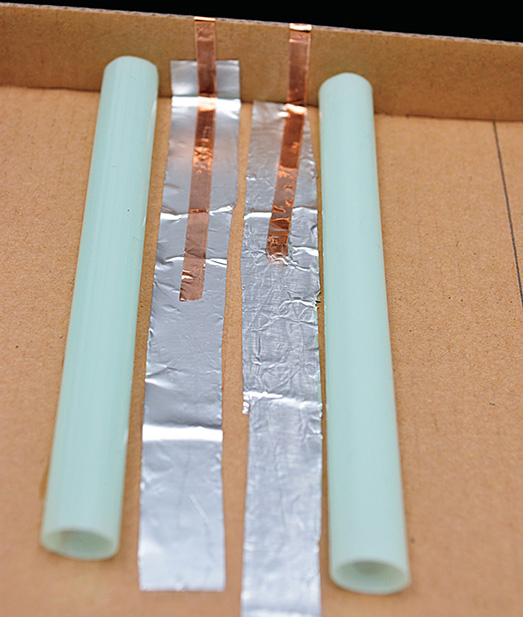
Figure 1-38 “Finish line” switch.
Step 4: Test Switches/Debug
Test these switches by hooking up an alligator clip to one foil lead and the other end to the EARTH input on your Makey Makey. Hook a second alligator clip to the other foil lead on your other trace, and clip it to any key input on your Makey Makey. Roll your metal marble over the switch to test connectivity. If it doesn’t make a connection, here are a few debugging tips. First, will it work if the marble is placed across the connections? If your switch is working when the marble is slow but doesn’t register a key press when the marble is moving fast, then you need to extend the length of time that the marble will cross the connections and complete the circuit. Because metal and foil are not flexible, the ball may only create the contact during one threshold of the sampling rate on the Makey Makey. If this happens, the controller might think that this interaction is just noise and not an actual key press. Since the metal ball touching the foil traces doesn’t cover enough surface area, the signal might glitch, and you need the ball to cross the threshold for more samples on the Makey Makey. If this is so, increasing the length of time the ball crosses the connections will help. You can also try plugging your computer power into the wall to increase the difference for EARTH (not plugged in, EARTH is only the computer battery, but plugged in, the house becomes part of the grounding for EARTH.) Lastly, sometimes it helps to try switching which foil lead is EARTH and which lead is the key press.
Step 5: Power LEDs
If you don’t want to power LEDS, you can skip this step, but since our box had two traps where the ball could actually get stuck, we thought it would be quirky and fun to have a LED light up to signal danger, as shown in Figure 1-39. This Chibitronics LED will only light up when the ball makes the connection across the LED traces and the foil switch. To wire this up, you’ll need to lay down two copper tape traces for the positive and negative leads on your LED, as in Figure 1-39. For the switch, you’ll need a small piece of foil that you’ll continue wiring with copper tape traces to the back of your box. Following the template in Figure 1-40, the top tape trace will be attached to your EARTH input, therefore grounding your LED. To power your LED, the second tape trace will lead to the key press input of your choice on your Makey Makey. Lastly, to make the LED light up only during this specific key press, you’ll attach a copper tape trace to the aluminum foil switch, and carry the copper tape to the back of the box, where you can attach a jumper wire. Since we have two outputs, we used a jumper wire to connect these outputs on the back of our maze, as shown in Figure 1-41. We insulated our positive and negative copper tape traces with a piece of regular nonconductive clear tape. Then we secured the jumper wires with some fabric tape from the Makey Makey Booster Kit. The jumper wires are twisted together as in Figure 1-41 and then connected to the KEY OUT input pin on the back of the Makey Makey, as in Figure 1-42.

Figure 1-39 LED placement with switch.
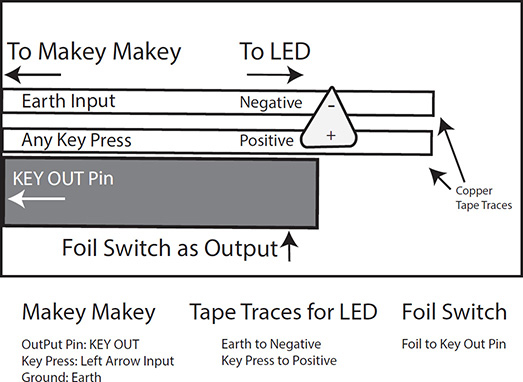
Figure 1-40 Template for wiring output with switch.

Figure 1-41 Output wiring extended on back of maze.
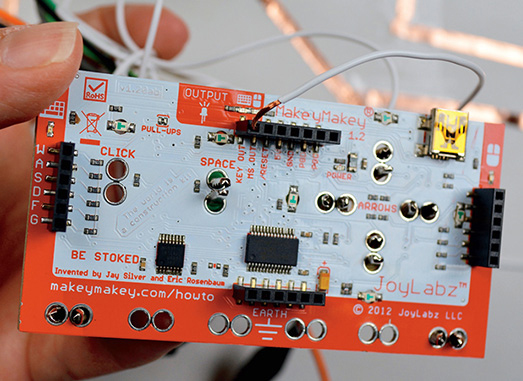
Figure 1-42 Output wiring to Makey Makey.
Optional Tinkering: Chibitronics and LED Powered with Makey Makey
This is actually a pretty strange hack that might seem like it shouldn’t really work. The cool thing is that it will only light up with this key press instead of lighting up with any and all key presses (as we wired up our motor in Project 1 and the Morse code machine in Project 8). What is happening here is that the Makey Makey OUTPUT pin is actually always sending a little bit of a signal out, but the LED is only fully powered when the connection between the KEY OUT and OUTPUT pins are bridged. You can continue your conductive tape trace to the other side of the EARTH trace, add another LED if you’d like to tinker with this output trick, and see the difference by placing a metal washer across the different tape traces (see Figures 1-43 and 1-44). You can also try this trick with a regular LED, but you will want to use at least a 100-ohm resistor (also shown in Figure 1-43).

Figure 1-43 Chibitronic output tinkering.

Figure 1-44 LED output tinkering.
Step 1: Extend Wiring
Use copper tape to extend the conductive traces to the center of the back of your box, as in Figure 1-45. In this way, you’ll be able to tuck away your Makey Makey and wiring in the original packaging and keep wires out of the way of the minions’ little fingers as they are playing this game. Make sure to write the names of each key press by copper tape traces. Plug alligator clips to each tape trace, as shown in Figure 1-46. Secure the wires of your alligator clips to the maze box with pieces of regular nonconductive clear tape. This tape will insulate your clips and keep them in place. Your maze and switches will be in completely different places than ours, but see the template in Figure 1-45 for a suggested circuitry layout.
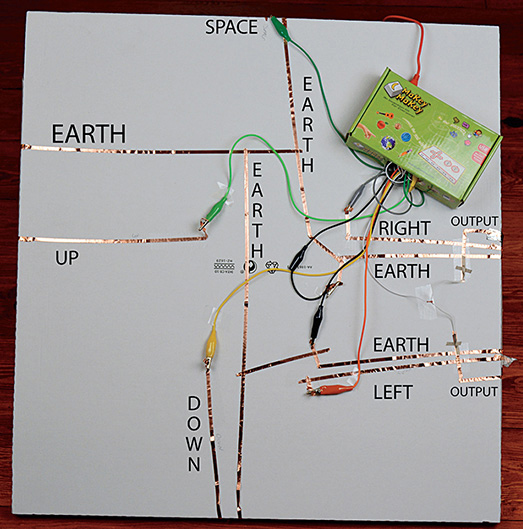
Figure 1-45 Back view of marble maze (labeled).
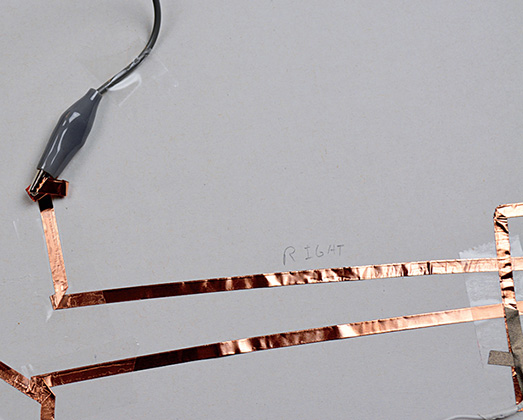
Figure 1-46 Close-up of alligator clip to copper tape trace.
Step 2: Hook Up the Makey Makey
Hook up all the alligator clips to the Makey Makey, and cut a hole for your USB as in Figure 1-47 so that you can easily plug your Makey Makey into the computer. Then hide your clipped Makey Makey in the box, and hot glue the Makey Makey box to the bottom of your maze box. Now you are ready to program your maze with Scratch.
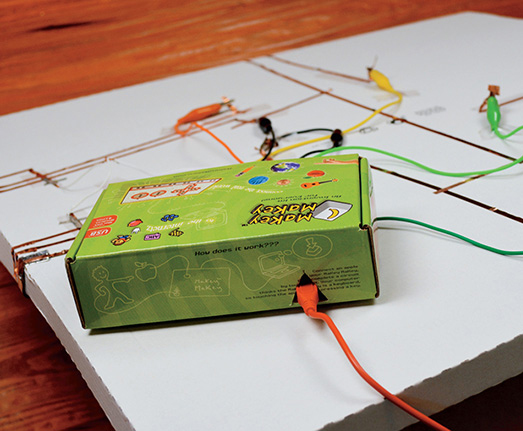
Figure 1-47 Hiding the Makey Makey in the box.
Program in Scratch
Step 1: Key Press Scripts
Take a picture of your maze to include as the backdrop in Scratch using the “Camera” feature. (Make sure to allow camera and microphone settings for Adobe Flash Player.) Program key presses as you did in Project 2 with the “When key press” and “Play sound” blocks. You can add a “Go to x: y:” script if you want the Scratch interface to show where the ball is in your maze. If you want your Scratch sprite to go to the ball’s placement in your game, drag your sprite to a switch pictured in the backdrop. Now use the “go to” block located in the “Motions” palette, and connect it with the key press you want triggered with that switch. Move your sprite for each switch, and notice how the x,y coordinates change as you move your sprite around the stage. You will need a different “When _____ key pressed” block for each switch, along with a “Go to x: y:” block and a “Play sound” block. See the full scripts for key presses in Figure 1-48. You’ll see that we’ve added a scoring variable, but we’ll take care of that in the next step.
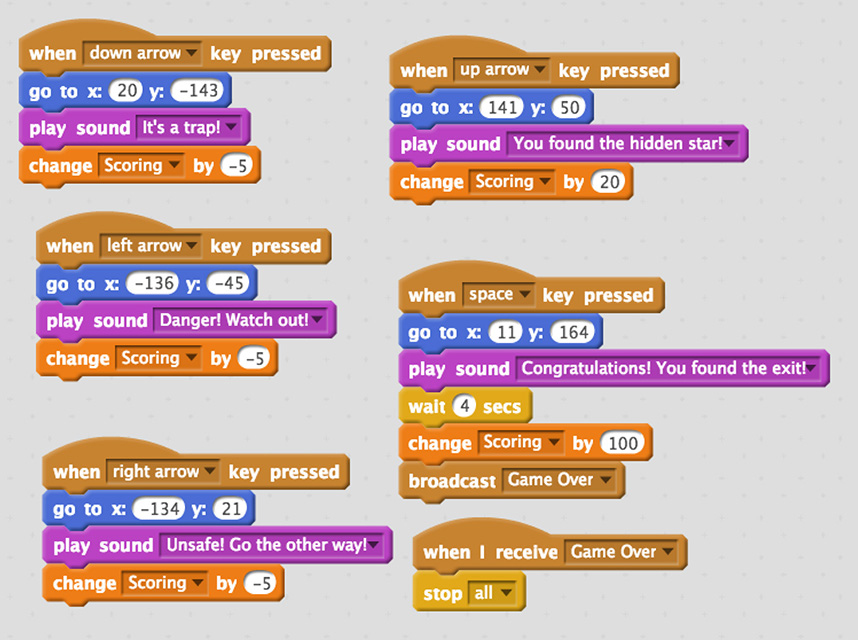
Figure 1-48 Key presses programmed in Scratch.
Step 2: Add Variables
Variables, which you can create in the “Data” palette, will allow switches to track scoring and create a timer for your game. In Scratch, variables allow you to store values and can help to make your games infinitely complex. Open the “Data” palette, and click “Make a variable.” We only have one sprite for this game, but notice that you can create variables “For all sprites” or “For this sprite only.” Choose “For all sprites,” click “Okay,” and name your first variable “Scoring.” While you are here, go ahead and create “minutes,” “ms,” and “seconds.” Your “Data” menu should now look like Figure 1-49. Now you can add “Change scoring by ____” to each key press. Remember to deduct points for traps and reward points for finding the “hidden star” switch and, of course, a big point payout for completing the game. (Refer back to Figure 1-48.)

Figure 1-49 Adding variables.
Add a Timer
Step 1: Set the Timer to Start
You need to add your variables to “Show” and set each variable back to zero under the event “When flag clicked.” This will reset scoring to zero and can create a timer. First, you’ll want to set each variable to “Show” underneath your sprite’s initial “Go to x: y:” block on the “When flag clicked” script. Next, drag a “Set ____ to 0” block for each variable to the script, as in Figure 1-50.
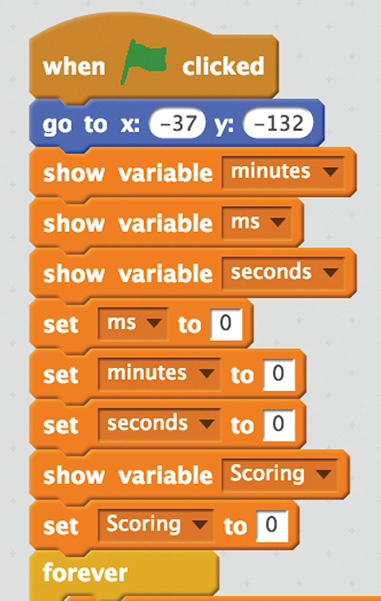
Figure 1-50 Add variables to scripts.
Step 4: Make Seconds
You aren’t done yet! To make your timer work, you’ll have to add a conditional statement called a “forever” loop to your “When flag clicked” script. This will keep your time going forever until you stop the game by clicking the “Stop” sign. To make the seconds function like a second in Scratch, add a “Change seconds by” block inside the “forever” loop and a “Wait 1 secs” block underneath that as in Figure 1-51. You’ll find the addition operation under the “Operators” palette. Drag it into the circle located inside the “Change seconds by” block. When the circle is highlighted, it will click into place. Your timer will now create seconds once you click the green flag. Try it to check it out!

Figure 1-51 Adding timed sounds.
Step 5: Make Minutes
To make seconds turn into minutes, you’ll have to add a conditional “if/then” statement inside your “forever” loop. This will tell your game that if the timer hits 60 seconds, it should change the minute variable by one. Drag the operation block “ =
=  ” into the hexagon shape of your “if/then” statement. Click back to your “Data” menu to add the variable “seconds,” and type “60” on the other side of the equals sign. Drag the “Set seconds to 0” and “Change seconds” blocks into the “if/then” statement. Click the dropdown arrow to make your block read “Change minutes by,” and go back to your “Operation” menu to add “0 + 1” as the operation, as shown in Figure 1-51.
Step 6: Add Timed Sounds
If you’d like a sound at a certain time in your game to get your maze runner moving more quickly, you just have to add an “if/then” statement and the same hexagon-shaped operation block “ =
=  ” into the “if/then” statement. Set your operation to read when you want your sound effect to start. In Figure 1-51, we set a sound effect at 30 seconds and 45 seconds and ended our game at 1 minute. Place a “Play sound” block inside each “if/then” statement, and record the sound effect you want to play at each timed instance. We also added a “Broadcast message” block to the “When space key pressed” script that would signal the end of the game if your ball makes it to the end of the maze. Make sure that you add a “When message received” event block to your work area as well and a “Stop all” script to officially end your game (see Figure 1-48).
Debug the Timer
If your timer is acting quirky, you may want to change your variable from the “=” operator to a “>” operator. Do this only if Scratch isn’t changing time the way you want it to. Programmers use the “>=” variable in case the program isn’t catching the number at the equal sign; it will eventually catch the number that is greater than the variable in the comparison. Since Scratch doesn’t have a “>=” operator, you can use the “>” operator if you need to debug your timer (see Figure 1-52). However, you won’t want to use this comparison in your timed sounds or they will all sound off at once! In that case, you’ll want to start the message between times, for example, if seconds is greater than 30 but less than 34.
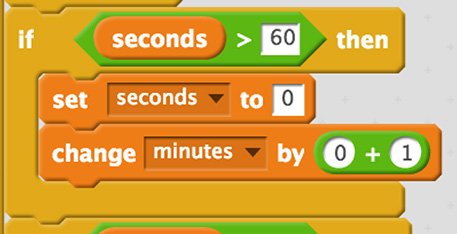
Figure 1-52 Greater-than comparison.
Now you are ready to play your maze game!
Taking It Further
Creating variables in Scratch and using operations to control your game or animations will make your creations surprisingly more complex very quickly! What other iterations could you make of this marble maze? Could you create a complex evil plot about your nemesis told throughout Scratch as the ball travels the cardboard pathway? Can you tinker with physical computing and the idea of the ball traveling from the maze seemingly into the computer screen and back out again?