PROJECT 4
Makey Makey Arcade Coin Slot
EVEN AN EVIL GENIUS NEEDS cash flow, and in this project, you are going to learn how to quickly create a coin slot box that you can add to almost any arcade project (see Figure 1-53). It’s a great way to raise funds quickly for that Makey Makey activated laser you so desperately want.

Figure 1-53 Makey Makey coin slot.
Cost: $
Make time: 30 minutes
Skill level: 

Supplies

Step 1: Create a Slot
Take your small box, leave the top of the box open, and turn it to the side. This will allow you to access the inside of the box later to remove coins and adjust the switch, if needed. Create a coin slot in the center of the side of a cardboard box by cutting two parallel 1-inch lines about 1⁄8 inch apart. You can adjust the size of the slot to fit any size coin. This one is designed for a U.S. quarter.
Step 2: Z-Shaped Paperclip Swing Switch
Pry a large paperclip open, separating the small and large sides as shown in Figure 1-54. Unbend the curved ends so that the paperclip forms the letter Z. Bend the paperclip back toward the center to let the top and bottom of the Z rest on your work surface with the center elevated. Cut a ¾-inch strip of corrugated cardboard about 1½ inches long. Slide the large end of the paperclip into the corrugated folds of the cardboard about ¾ inch from the bottom of the strip, as shown in Figure 1-55. Bend the clip just slightly up as it passes through the cardboard to hold it in place. The clip should pivot freely.

Figure 1-54 Z clip.

Figure 1-55 Clip in cardboard.
Step 3: Placement and Fine Tuning
Place the cardboard and paperclip in the box just above the top of the slot, as shown in Figure 1-56. Align the smaller part of the clip so that it is just above the center of the slot. Hold the strip in place, and test the alignment by pushing a coin into the slot. You will notice that the Z clip pivots. Remember how you bent the large end of the paper clip to hold it in place in the cardboard? You will need to bend that piece of the paper clip so that when a coin pivots the clip, this section will touch the side of the box. Once you are sure of the placement of where the paperclip touches the box, as shown in Figure 1-56, mark the contact area and position of the switch. Remove the switch, and strip about 3⁄4 inches of insulation off of a 3-foot length of hookup wire. Curl the end, and position it underneath or near the contact area. Use several strips of copper tape to make a contact area and to cover the end of the exposed hookup wire. Secure the wire to the side of the box with duct tape.

Figure 1-56 Coin slot in action.
Before installing the switch, weight must be added to the bottom of the paperclip to ensure that it returns to its resting position. You can slip a washer or small bolt onto the corner of the bottom of the switch. Strip 1 inch of a 3-foot length of hookup wire. Use the exposed hookup wire to secure the weight onto the bottom of the switch. Make sure that you wrap it tightly so that you have a good connection to the paperclip. Hot glue the cardboard switch in place, and test how much movement the wires will need before securing them to the box. Test the switch several times before you tape the box closed to ensure that your switch is reliable. Remember, you will need to periodically adjust the switch and remove the coins, so be mindful of the need to open the box when you decorate it.
Step 4: Use the Coin Slot with Existing Games
Many online games already require you to press a specific key to start the game. If you are using one of these types of games, route the wire from the coin box to the corresponding key input on the Makey Makey. If that key is not listed, you can remap the keys on your Makey Makey by going to http://makeymakey.com/remap/ (full instructions on remapping the Makey Makey classic are also given in Project 12).
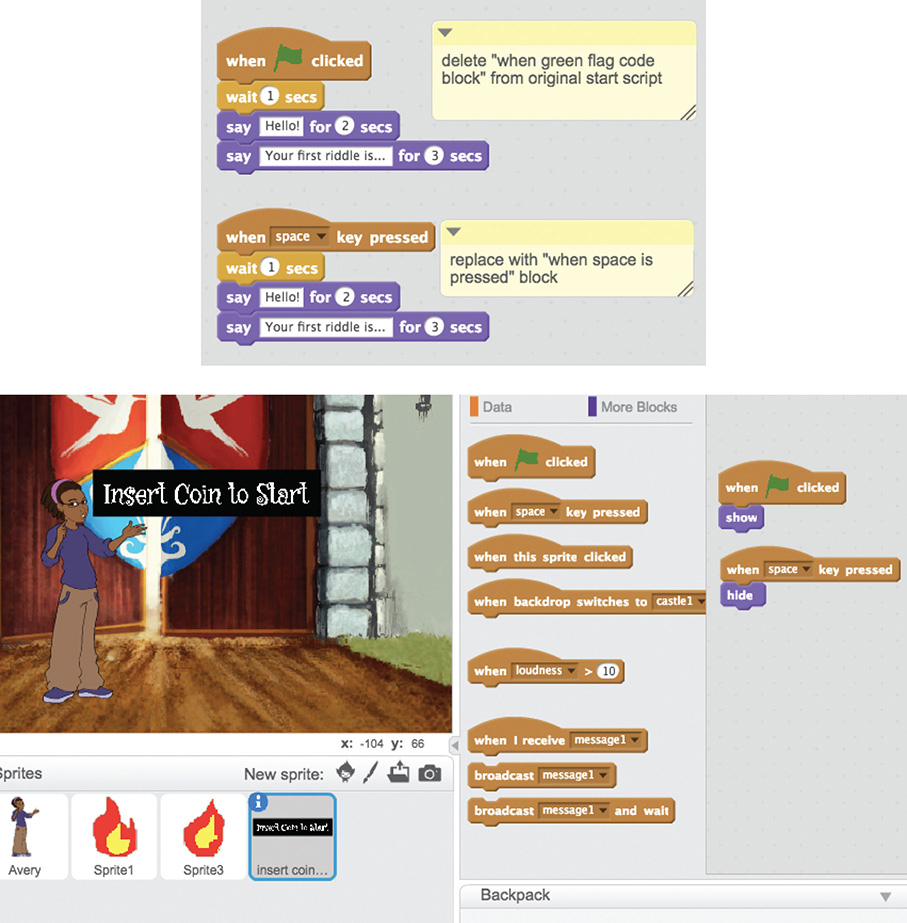
In many Scratch games, the action is started by pressing the green flag. In some instances, you can look at the scripts created for the sprites in the game and switch out all the existing “When green flag clicked” blocks with “When space clicked” or another key press of your choice. After exchanging blocks, create a new sprite with a costume that has the text “Insert coin to start.” For this sprite, drag a “When green flag clicked” block to the “Scripts” area, and follow it with a “Show” block, as shown in Figure 1-57. Add a “When space clicked” block, and follow it with a “Hide” block from the “Looks” menu. Now when the green flag is clicked, the game will start with a message to insert a coin, and all former actions that were triggered by the green flag click will be activated by pressing the space key.

Figure 1-57 Programming for the coin slot.
Taking It Further
This is a great way to turn your own games into money makers! How could you change the code to create a 50-cent or 75-cent game? Is there a way to sort out pennies and other coins?