RESPECT HIDDEN STRENGTHS
Cynthia Tinapple and Lindly Haunani
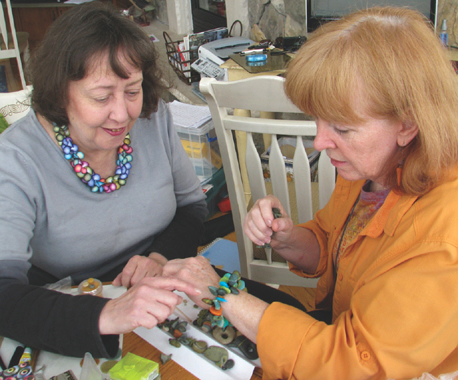
Cynthia Tinapple and Lindly Haunani have been friends for more than twenty years. They worked closely during the formative years of the National Polymer Clay Guild, frequently bouncing ideas back and forth during retreats and gatherings. Surprisingly, the two had never formally collaborated on a piece until now. Given the depth of their personal relationship, the challenge for this pair was distillation. Would each be able to recognize the particular strengths—both in herself and in her partner—that would make this collaboration a success?
Lindly always considers color and form first. When an idea strikes, she sets about making hundreds of components, sometimes backing herself into a corner, not knowing exactly how the pieces will fit together. Cynthia relies on her eye and a gut response to design, and admits that she can sometimes be “accommodating to a fault.” Lindly’s penchant for making many pieces and Cynthia’s need to explore gave them many options, but in the end it was their respect for each other’s strengths and the ability to be honest with one another that brought the piece together. Even down to the last day they were adding new and interesting elements—seemingly not wanting the journey to end.
|
SHOWCASE CYNTHIA TINAPPLE |
My impulse to create got rerouted into a communications career for practical reasons, but at home I have always been a maker and a visual artist. My dual-channel career continues to this day, even in my retirement—I work in the studio with polymer, and I communicate about it daily online through my blog,
PolymerClayDaily.com. I claim both as my art forms.
Polymer has a physicality that immediately appealed to me when my daughter and I were making miniatures for her dollhouse in the late 1980s. Polymer is portable and easy to access. Mixing color in my hands is tactile and powerful, similar to the feeling I have when working on the computer.
While I enjoy wearing polymer jewelry, integrating polymer into objects in my home is what gives me the greatest pleasure. Two things make my decorating easier. First, my husband can do wonders with wood. Second, he grew up in a military family that moved frequently, and he refuses to move again. We don’t worry about what prospective buyers might think about the embellishments we make to our home. Together we have made furniture, lamps, sinks, bowls, and wall decor that incorporate polymer. Living with our handiwork and sharing our art with visitors is our best reward.
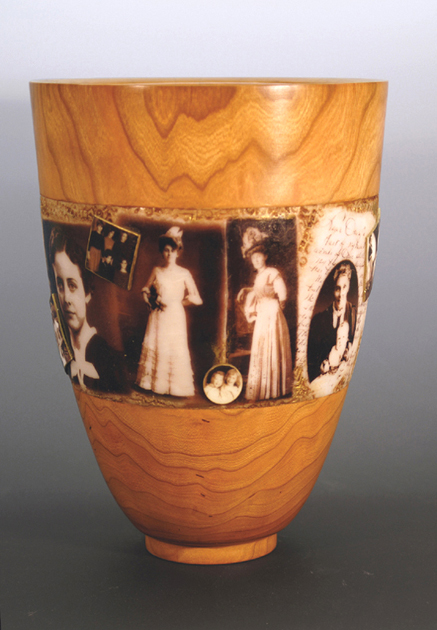
It Is Well, 2009; polymer and cherry; 10 × 8 × 8 inches (25.5 × 20.5 × 20.5cm). Photograph by
Blair Davis and Cynthia Tinapple This cherry vase with transfers, created for the Synergy2 exhibit, celebrates the women in my family’s history. Blair Davis turned the bowl.
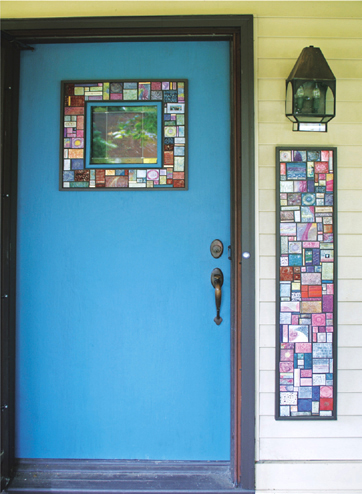
The polymer mosaic helped update the look of our front door and covered damaged wood. Realtors say that the entry sets the tone for a home, and visitors remark that “artists must live here” when they approach our door. Photograph by Blair Davis and Cynthia Tinapple
Shisha, 2011, polymer and walnut, 4 × 11 × 11 inches (10 × 28 × 28cm). Photograph by Blair Davis and Cynthia Tinapple. I created this Shisha bowl in anticipation of my trip to Nepal l to visit women working in polymer there. My head was spinning with Indian and Nepali embroidery designs. The bowl was turned by Blair Davis.
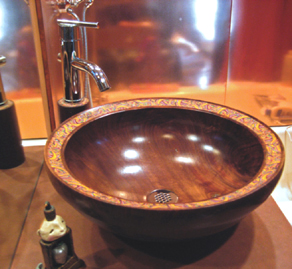
Our casbah-style bathroom glows with a copper tub surround, polymer pendant lights, and an inlaid walnut bowl. Drawer pulls in the room match the inlay. Photograph by Blair Davis and Cynthia Tinapple.
|
SHOWCASE LINDLY HAUNANI |
My fascination, appreciation, and reverence for all things related to food was ignited in me when I was very young by my patient Hawaiian grandmother who lovingly gave me cooking lessons. Even now, I will hear Tutu’s calm, wise voice telling me, “Wait until the bubbles on the edge pop before turning them over” or “The edge of a ripe mango will yield here when pressed gently.” And now, more than fifty years later, I am still passionately inspired by food—both in the kitchen and in my studio.
I make my jewelry much in the same way I cook. I strive to respect and highlight the ingredients, while keeping things simple. Before putting a series of necklaces together I will amass hundreds of components in complementary shapes, colors, or variations (much in the same way a chef would prepare her mise-en-place) before embarking on the final stages of the pieces. Unlike a tray of carved vegetable crudités, the polymer pieces I fashion individually by hand have a tendency to last a lot longer.
Spring Bud Earrings, 2009; polymer and sterling silver wire; 3¼ × ¾ inches (8.5 × 2cm). Photograph by Hap Sakwa. I used lightly tinted translucent polymer to make three different round canes that could be overlapped to resemble budding petals.
Ripple Leaf Necklace, 2009; polymer with base metal-covered clasp; 1½ × 24 × ¼ inches (3.8 × 61 × 0.6cm). Photograph by Hap Sakwa. The spectacular leaf necklaces that Pier Volkous made in the early 1990s inspired this piece. The wavy leaf vein insert was designed to reiterate the wavy edges of the leaves.
Purple Petal Rope Necklace, 2008; polymer and elastic cording; 1½ × 60 inches (3.8 × 152.5cm). Photograph by Hap Sakwa. This necklace may be worn three different ways: as a long rope; doubled up, as a medium-length necklace; or tripled up, as a clustered choker. The long, curved tube beads allow for visual rest and flow between the clusters of petals.

Cynthia Tinapple,
Rock On! Bowl, 2011; polymer and acacia; 3 × 5½ × 5½ inches (7.5 × 14 × 14cm). Photograph by Richard K. Honaman Jr.
“Once you see how easy it is to drill a hole and fill it with polymer, no floor or door or unsuspecting table will be safe. They can all become part of your canvas.”
Rock On! Bowl
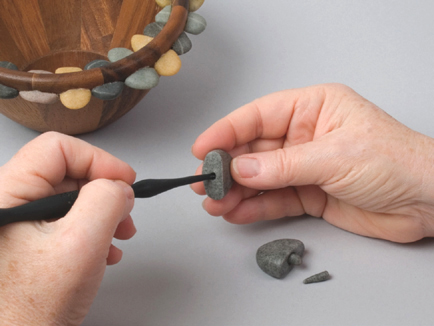
Many people assume that the polymer inlays that I have done in wood bowls (or on cabinet trim, sinks, and stairways) are the result of a laborious process. While it helps to have a woodworker spouse cut and drill pieces to perfect specifications, shortcuts can provide simple ways to integrate polymer into your decor. Be forewarned, however: Once you see how easy it is to drill a hole and fill it with polymer, no floor or door or unsuspecting table will be safe. They can all become part of your canvas.
I recommend that you choose an old piece of furniture or a thrifted wooden item for your first inlay project. Since you’re experimenting, you’ll have more fun if you stay away from precious bowls or furnishings. I purchased this wooden salad bowl for very little at a big box store. One of the joys of making faux pebbles is that there’s no waste. Simply roll leftover pieces of one color into the next color. You get greater variety in your rocks and use up all your scraps.
SUPPLIES
- polymer: 6 oz. (170g) translucent (I used Premo! Sculpey because it is easy to condition and cures with a matte finish.)
- wooden bowl
- pencil
- nail or center punch
- hammer
- masking tape
- drill bit, ¼-inch (6mm)
- variable-speed drill
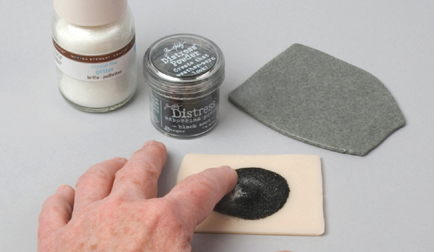
- embossing powders: Ranger’s black soot and seafoam white (see other color suggestions in
Making Rock Colors)
- circle cutter, ⅝-inch (16mm)
- cardstock
- wood glue
Optional
- rocks (for texture)
- needle tool
- removable painter’s tape
1. Take a look at your wooden item and figure out how it would be best enhanced with rocks. In a regular pattern? Scattered randomly? Close to each other? Should the rocks be big or small or varied in size? Flat or rounded?
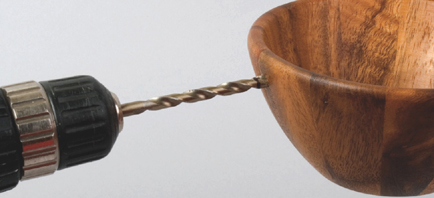
Using a pencil, sketch your design or pattern, right onto the bowl. Place a nail or center punch in the center of the pencil mark and strike with a hammer to create a starter hole. The starter hole will give the drill bit a place to grip the wood. Wrap a piece of tape around the drill bit about ⅛ to ¼ inch (3 to 6mm) from the end of the bit. The tape will be your guide for how deep to drill into the wood; a shallow hole is sufficient.
2. Brace the bowl against a sturdy object, center the drill bit on the starter hole and begin drilling. Take care not to go entirely through the wood with the drill bit. (Should this happen, simply adjust your design!) Repeat, drilling 1 hole for each rock.
THE ROCKS
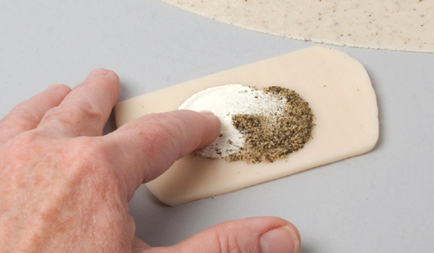
1. Condition 1 oz. (28g) of translucent polymer and cut a 3-inch- (7.5cm-) square sheet. Pour ¼ tsp. (1.2mL) black soot embossing powder onto the polymer. Using a finger, spread the powder over the polymer. Fold and roll the polymer by hand or in the pasta machine until the powders are evenly distributed through the polymer.
TIP: Vary the amount of powder used and you’ll be able to create a range of grays that make quite convincing rocks. (See Making Rock Colors for additional recipes.)
2. To create a wishing stone or a stone with a line running through it, mix a small amount of translucent polymer, some seafoam white embossing powder, and ground pepper. Blend using the same method as in step 1.
3. Roll out the colored translucent polymer from step 1 on the thickest setting of your pasta machine. Using the circle cutter, cut out 5 circles. More layers will equal larger rocks.
Roll out a thin sheet of the wishing-stone blend from step 2, and then cut out a circle or two. Layer the circles into a stack, placing the wishing-stone layers somewhere in between the layers of colored-translucent circles.
4. Round the edges of the stack. Begin to form the stack into a barrel shape; then continue rolling it between the palms of your hands until you have a ball shape and you can no longer see the individual layers. Flatten the ball between your palms. An irregular shape is more believable than a perfectly smooth, symmetrical one.
If the vein layer becomes wavy, tease it back into more of a straight line by pinching and pushing the surrounding polymer. Look at beach pebbles (if available) to see how lines usually form.
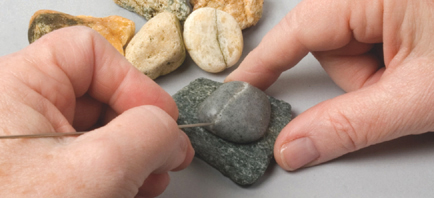
If you want surface texture on your faux rock, press the polymer onto a real rock to pick up roughness. Often the vein line is pitted on real rocks; you can simulate this by poking the light vein layer with a needle tool.
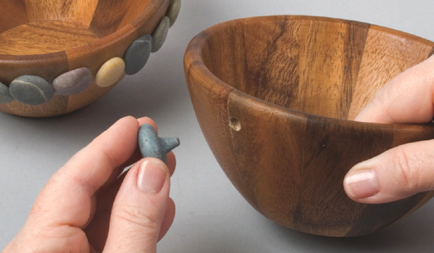
5. Add a nub of polymer the size of the drill hole; the nub will be used to glue the rock into the bowl. You may want to temporarily position the unbaked polymer pebbles on your bowl to see how it’s going to look and to make sure the nubs or tabs on the rocks fit easily into the holes. Repeat steps 1–5 to create as many rocks as you would like for your bowl.
Place the rocks on cardstock and cure according to the manufacturer’s instructions. Allow them to cool to room temperature. Apply a bit of wood glue into a hole and insert a rock into it. You may want to temporarily tape it in place while the glue dries.
OPTIONAL
If you want it to appear as though the rocks are passing through the bowl, drill holes completely through the bowl; cut the “rocks” in half, and then follow step 5 to finish the rocks and add them to your bowl.
Lindly Haunani,
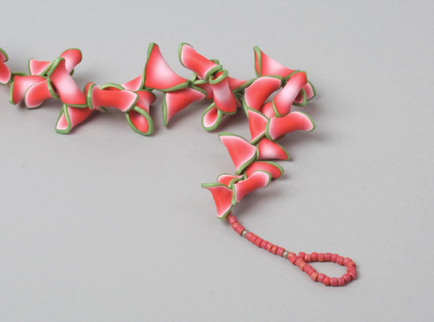
Folded Bead Lei, 2011; polymer and glass beads; 2 × 21 inches (5 × 53.5cm). Photograph by Richard K. Honaman Jr.
“Simple, graphic canes appeal to me as design components—as the relationships between the individual beads and the stringing rhythm take center stage in a design.”
Folded Bead Lei
My lifelong passions for color, cooking, and Hawaiian leis are recurring themes for me as an artist. One of my fondest memories from childhood is folding and pinching Chinese pot stickers. While working in my studio I often “sketch” by pinching and folding cane slices as a way to design new petal-like bead forms. What excites me most about the bead in this necklace is how it interlocks with the adjoining beads when strung and how the pearlized edges subtly reflect light.
Simple, graphic canes appeal to me as design components—as the relationships between the individual beads and the stringing rhythm take center stage in a design. After I designed the initial folded bead component and determined the scale of the beads, I experimented with five different food-inspired color combinations, literally making hundreds of components. I especially enjoy making the same design in different colors as a way of exploring the relationship between the chosen colors and the overall impact of the design. Three color combinations are listed on the pages that follow. Choose one or use them as inspiration to design your own.
-
polymer: see
Making Bead Colors for amounts and colors (I used Premo! Sculpey because I like its range of primary colors and how well the colors blend together.)
- pin tool (I used a 1mm hat pin for its thin diameter and sharp point.)
- flexible beading wire, .018/.019 49-strand
- wire cutters
- crimp beads, 1 × 1mm (5)
- crimping pliers
- matte finish seed beads in a coordinating color, size 6/0 (45)
- crimp covers (4)
Optional
- chain-nose pliers
1. Create a Skinner Blend following the Two-Color Skinner Blend
instructions for each component of your chosen fruit/color combination. Cut the blend in half to create 2 sheets with equal blends.
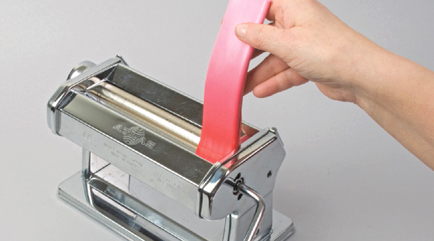
Fold one of your blended sheets into thirds, matching the colors, and align the darkest end to your pasta machine. Roll the polymer through at the thickest setting. Change the setting on the pasta machine to medium, and roll the polymer through to elongate your blend. This will transform the Skinner Blend sheet into a long ribbon and add to the illusion of a subtle ombré pattern, or gradually shaded blend, in the finished cane.
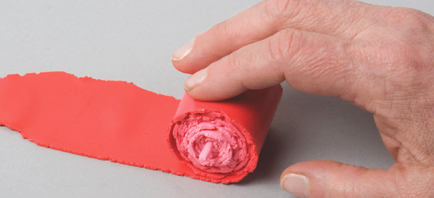
2. Starting with the lightest end, trim to square off the short end of the ribbon. Using the polymer you trimmed off, fashion a 1/32-inch- (0.8mm-) diameter snake and align it to the squared-off end of the ribbon. This makes it easier to roll up the cane and decreases the possibility of air pockets occurring when the cane is reduced in size. Slowly roll the sheet up into a Skinner Blend jelly roll. Gently squeeze this cane to consolidate the polymer; then roll it on your work surface until the seam disappears.
3. Repeat step 1, folding the remaining half of your blended sheet and rolling it through the pasta machine to create a ribbon. Repeat step 2 to create a second Skinner Blend jelly roll, but this time start with the darkest end.
4. Create a sheet of polymer for the outline color, rolling it to the medium setting of your pasta machine; trim the front edge even. Place one Skinner Blend jelly roll on the front edge of this sheet of polymer; then gently roll this assembly forward, past where the seam of the outline color
should be. Roll the polymer backward, which will create a line of demarcation where the sheet of polymer overlaps itself; trim the polymer at this mark. Join the two edges of the outline sheet in a butted seam and roll gently to smooth the polymer so no seam is evident.
Repeat to add an outline layer to the second Skinner Blend jelly roll cane.
5. Using an acrylic rod, exert firm pressure on the cylindrical cane to change it to a squared log. Flatten along the top of the log; then flip and repeat on the opposite side. Give the log a quarter turn, roll to flatten that side, and then flip it to the opposite side. Alternate rolling on each side until the cane is reduced to 1 × 1–inch (2.5 × 2.5cm) square. Repeat for the second cane.
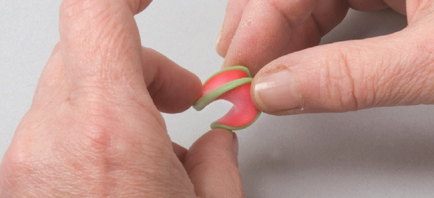
6. Cut a ⅛-inch (3mm) slice from a square cane and coax the 2 opposing edges of the square together, and then flare the outer edges.
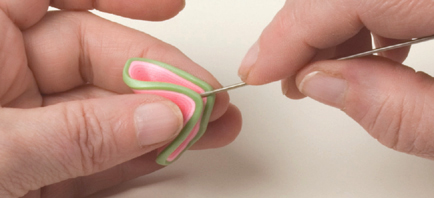
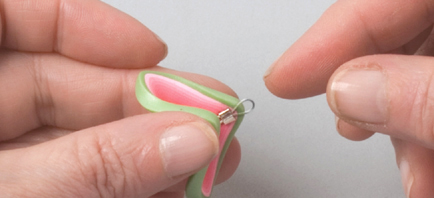
7. Insert a pin tool into the folded edge and continue coaxing and flaring the edges until it is anchored on the tip of the pin tool. The pin tool creates the stringing hole.
Repeat steps 6 and 7 to create more beads. To make a 22-inch- (56cm-) long necklace you will need about 50 beads—25 with the light centers and 25 with the dark centers. When slicing the cane, I like to reduce it further after a few slices are made, so the beads are formed in graduated sizes.
8. Cut a 2-inch (5cm) piece of the beading wire and thread on 1 crimp bead. Pass the end of the wire back through the crimp bead to form a loop. Place the crimp into the rear notch of the crimping pliers (the notch closest to the handles). Separate the wires inside the crimp. Close the pliers so the crimp bead is compressed and forms a crescent shape. Move the crescent into the notch in the front of the crimping pliers. Close the pliers to shape the crimp bead into a rounded bead shape. Trim any excess wire from the short end.
Cut a thicker (¼-inch [6mm]) slice from the cane to be used as the toggle bar for the necklace closure. Fold the cane slice in half diagonally and embed the wire loop into the polymer where the edges of the slice meet so that the loop of the crimped wire faces out. Cure the beads and the toggle according to the manufacture’s instructions and allow them to cool before stringing.
9. Cut a 30-inch (76cm) length of beading wire. Thread on a crimp bead, and then pass the end of the wire through the loop of beading wire embedded in the toggle bar made in step 8. Pass the end of the wire back through the crimp bead. Slide the crimp bead toward the toggle bar, keeping one end of the wire 1 inch (2.5cm) long. Crimp the crimp bead as you did in step 8.
Thread on about 1½ inches (3.8cm) of seed beads and then a crimp bead. Push the seed beads and crimp toward the first crimp bead so there is little space between them. Crimp the crimp bead. The crimp beads will offer more strength to the end of your necklace, and the extra seed beads will provide the length needed for passing the toggle bar through the toggle loop.
String on the petals in graduated order (if you chose to make smaller petals) as well as alternating dark- and light-center petals for interest in the finished piece. String enough petals to complete your finished length.
10. String on a few seed beads, 1 crimp bead, about 1 inch (2.5cm) of seed beads, 1 crimp bead, and then about 2 inches (5cm) of seed beads. Pass the beading wire back through the first crimp to form a loop of seed beads on the end. Test the loop to see if it will fit over the toggle bar. Adjust the amount of seed beads to either increase or decrease the size of the loop so the toggle bar can pass through the loop but not fall through easily once connected. Continue to pass the beading wire down the seed beads and through the second crimp bead. Tighten up the beads so there is little space between the bead and the loop, yet the necklace has a nice (not stiff) drape. Crimp the crimp beads to secure.
Using wire cutters, trim any excess beading wire from each end of the necklace. Using chain-nose pliers or the front notch of your crimping pliers, close crimp covers over the 4 crimped crimp beads for a nice finish.
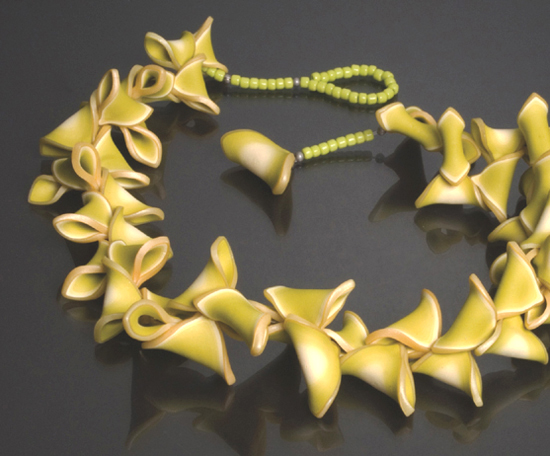
Lindly’s passion for food is brought to life in this alternative color combination—star fruit. The “recipe” for this colorway appears on
this page. Photograph by Richard K. Honaman Jr.
Embracing an Open-Ended Approach
Cynthia and Lindly were inspired by the colors offered by Mother Nature (even in March during a nor’easter) and agreed they would work well for their palette. Neither was worried about formulating some kind of project from their work together. Lindly, a natural teacher, thought through what they were doing and quickly laid out the process as if she were creating steps for a workshop. Cynthia was used to presenting a critical snapshot every day on her blog, so she was confident she would visualize the project. A walk on the beach and a close look at how beach stones, shells, and debris piled up sparked ideas, but the two agreed the final design would evolve in its own time.
Acknowledging Differences in Process
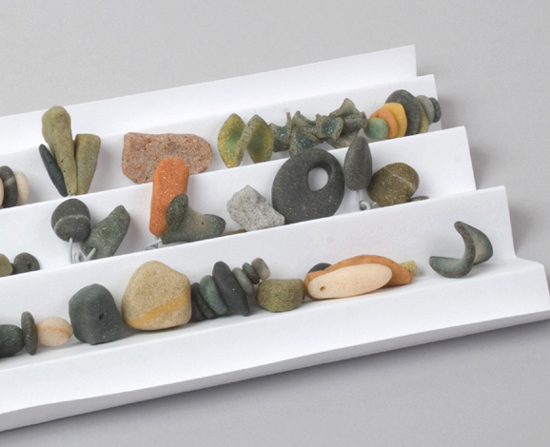
Cynthia and Lindly decided that beach stones would provide the cornerstone of their project. However, when preparing their polymer ingredients for the stones, they realized that they have totally different approaches. Lindly started with measuring and building a systemized palette, as is her norm. By contrast, Cynthia looked at various rocks, determined what she liked, and then “reverse engineered,” figuring out what she needed in order to arrive at a similarly pleasing mix or blend. Lindly’s approach was proactive, while Cynthia’s was more reactive. Cynthia allowed Lindly the time and space she needed to orient herself with the beach-stone palette.
“As all chefs know—good ingredients in, great dish out. Cynthia and Lindly are makers. Their process was one of creating through playful, yet systematic, experimentation with a minimum of preplanning. Their history as friends provided the confidence to create, then edit and amend, their explorations, birthing new directions en route.”
—Jeff
Cynthia and Lindly shared a table with Dayle and Sarah. This not only gave both teams a chance for more input on their respective projects but also offered a delightful opportunity for Lindly and Sarah to try out new comedic material. Laughter was abundant.
Editing and Refining Color Concepts
After working independently for a while, the two compared palettes and agreed that Lindly’s chosen colors were not usually found in rock material. It was difficult for Cynthia to watch Lindly struggle with stone colors, but then she realized she had not told Lindly that the embossing powders they were mixing changed the color significantly when cured. She suggested mixing small batches of translucent polymer with the different embossing powders and recording on the back of the cured samples the color and amount of embossing powder that was mixed in. After doing this, and discussing their colorways further, they edited their color selection, decided on a palette, and then experimented with form and shape, creating beach stones, cairnlike stacks of faux stones, lichens on a branch, and folded mosslike petals.

To the left is the palette in its raw state; the right shows the eight rounds after they were baked. Note the different ways Lindly and Cynthia recorded their discoveries—Cynthia with samples glued to the top of the embossing powder container, Lindly with pinches of samples baked together.
Lindly and Cynthia cured the beads and then evaluated what they had made. Was it enough for a bracelet? A necklace? Lindly suggested that if Cynthia would only make a few more beach stones in a particular shape or size it would make a particular group of beads they were evaluating really sing. After several rounds of discussing the need for “just a few more,” they had amassed a significant pile of components, but still something was missing.
On the last working day, they both realized what their palette of subtle neutrals was missing—color. (Robert suggested stringing the beads with red waxed linen, which they tried but then dismissed as too bright.) Cynthia had noticed some tinted translucent pieces Seth was experimenting with and was intrigued. Where Seth was talking about water and waves, she saw an opportunity for adding color with “sea glass.” Lindly thought this was a natural addition to the beach stones, adding precisely the color element and textural contrast they both wanted. She had a great feel for what colors could be mixed to replicate the glass. Cynthia quipped with a laugh, “I only wished that Lindly had studied beach stones that way!” Considering how much Cynthia and Lindly had discussed color at various points in the process, it was serendipitous that their piece came to life through their last-minute addition of sea glass.
Accordion-folded cardstock keeps beads separated and cradled while they’re baking.
Lindly had spent years collecting and examining sea glass from the Outer Banks, so fashioning these pieces came naturally.
“I learned to appreciate my skills—a basic and profound shift for me. Since I’ve loved rocks all my life, their shapes and colors come so easily to me that I didn’t acknowledge the time and effort I had put into developing that skill. I understand their shapes in the same intuitive way that Lindly understands color.”
—Cynthia
Making use of the
paper-clip finding and the plethora of beads made during the week, Lindly and Cynthia created these bracelets, combing polymer rocks, lichen, and sea glass to complement the assembled necklace. Photograph by Richard K. Honaman Jr.
“I became more aware of my propensity to barge ahead into the making of the components before prototyping possibilities for finished pieces. Recently I have been auditioning components prior to production. I am pleased with this approach because I’ve found that little tweaks can greatly improve the stringing rhythm and design of the finished necklaces.”
—Lindly
Dayle Doroshow and Sarah Shriver,
Tribal Circus, 2010; polymer, fiber, and leather cording; 3 × 18 × 1½ inches (7.5 × 45.5 × 3.8cm). Photograph by Richard K. Honaman Jr.
