We’re living in a fast-paced society where time is of the essence. Whether running the kids between all their activities or getting to work early to put the final additions on a presentation, we all wish we had more time. Cooking is usually one of the first things to go when we are pressed for time, especially with the numerous quick options on every corner. In this section, a little preparation will go a long way at every meal. Breakfasts (Maple Vanilla Baked Oatmeal Squares), sides (Cilantro Lime Cauliflower Rice), dinners (Lemon Basil Pasta with Cherry Tomatoes), and more can be made in 30 minutes or less. There’s no reason to give up whole foods with these quick recipes.
Tofu scrambles are like stir-fries for breakfast. You can basically throw in whatever you like (or whatever you have on hand) and it will just work. I love the combination of mushrooms and spinach here. The earthiness of the mushrooms and the sweet yet bitter flavor of the spinach pair well together. Feel free to add other veggies if you want. Red peppers and avocado would be a nice addition. You can eat this scramble as is, or serve it over toast. This doesn’t last long in our house, so you might consider doubling the recipe.
Makes 5 servings
Prep and cook time: 30 minutes
½ cup (80 g) diced yellow onion
2 teaspoons minced garlic (or 2 to 3 garlic cloves, minced)
2 tablespoons avocado oil (or olive oil)
3½ cups (225 g) sliced button mushrooms (about 8 ounces)
One 12-ounce (340 g) package extra-firm tofu, drained and patted dry
½ cup (30 g) nutritional yeast
3 cups (55 g) loosely packed baby spinach
1 teaspoon salt (or to taste)
1 In a large sauté pan, add the onion, garlic, and avocado oil. Cook on medium heat for 5 to 7 minutes, just long enough for the onions to soften.
2 Add the mushrooms, cover, and cook for another 5 minutes. Make sure to stir a couple times during this process.
3 Using your hands, crumble the tofu into the pan (see Note), then add the nutritional yeast. Stir well and cook for another 5 minutes.
4 Add the spinach, cover, and cook until the spinach starts to wilt. Sprinkle in the salt.
5 Serve immediately or refrigerate for later. This should last in the fridge for at least a week (I don’t recommend freezing it).
Note
When crumbling the tofu, it’s a good idea to cube it first. If you’re holding the whole block while trying to crumble it, overly large chunks could fall into the pan. If that does happen, there’s no need to panic or reach into the pan. Simply use a spatula to break it apart.
I’ll be honest—I used to struggle when it came to eating enough veggies. My solution: I work them into my breakfasts. A chickpea omelet is a great way to do just that. These “omelets” are almost more like pancakes, but they satisfy that craving for eggs. Plus, they feature one of my favorite ingredients: chickpea flour. You can use these chickpea omelets as a base and mix in a variety of vegetables, but my standby is this tomato basil version. They are best served fresh, and though they reheat well, some of the texture is lost when reheated.
Makes 6 omelets
Prep and cook time: 30 minutes
1 cup plus 1 tablespoon (255 ml) water
1 cup (110 g) chickpea flour
¼ cup (15 g) nutritional yeast
2 teaspoons flaxseed meal
1½ teaspoons baking powder
½ teaspoon salt (or to taste)
¼ teaspoon ground turmeric
1¼ cups (190 g) cherry tomatoes, halved
6 basil leaves
2 tablespoons avocado oil
1 In a large bowl, mix the water, chickpea flour, nutritional yeast, flaxseed meal, baking powder, salt, and turmeric.
2 Add the cherry tomatoes and basil to the bowl and combine.
3 Place a medium frying pan on medium-low heat. Pour a small amount of avocado oil into the pan.
4 Using a ½-cup (120 ml) measuring cup, scoop out some of the mixture and place it in the pan. Let it cook for several minutes. Much like a pancake, you’ll be able to tell when it’s ready to flip: The edges will bubble a bit and you should be able to get a spatula underneath easily. Once flipped, cook for another 1 to 2 minutes. When it’s done, place the omelet on a serving dish.
5 Repeat the previous step until all the mixture is finished, adding more oil to the pan as needed.
6 Serve immediately or refrigerate for later. You can also freeze the omelets for up to 6 months.
Notes
• When I make this recipe, I make a big batch so I can have quick breakfasts all week.
• I like to eat my omelet with a side of roasted vegetables, but it can stand on its own as well.
Baked oatmeal squares are a good way to eat your oats on the go. With delicious maple syrup and vanilla, this recipe creates a wonderful morning pick-me-up that will keep you satisfied. It also makes a good treat for brunch. You can pack these in your kid’s lunches, or carry them with you for an after-school or after-sports snack. This recipe is very adaptable to add in whatever you like—raisins or dried cranberries would work well, and maybe even some coconut shavings, too.
Makes 9 large squares or 16 small squares
Prep and cook time: 20 minutes
3 cups (280 g) gluten-free rolled oats
½ cup (70 g) raw almonds
2 teaspoons ground vanilla beans (see Notes)
½ teaspoon ground cinnamon
½ teaspoon salt
½ cup (120 g) applesauce
½ cup (120 ml) maple syrup
2 flax eggs
1 Preheat the oven to 350°F (180°C). Line an 8 x 8-inch (20 x 20 cm) glass baking dish with parchment paper. Make sure you leave a little paper sticking out of the sides. This will make it easier to remove the whole thing once it’s baked.
2 In a large bowl, combine the oats, almonds, vanilla, cinnamon, and salt. Give the mixture a quick stir with a spatula.
3 Add the applesauce and maple syrup and mix until everything is well incorporated, about 1 minute by hand. Add the flax eggs and stir for another 30 seconds.
4 Transfer the mixture to the parchment-lined baking dish. Using your hands and the extra paper sticking out of the sides, press down on the mixture to pack it in well.
5 Bake in the oven for about 15 minutes, until the edges look golden.
6 Remove from the oven and let the baked oatmeal cool completely. Use a pizza cutter or knife to cut it into squares.
7 Store in the fridge in an airtight container. It should last about 2 weeks that way. You can also freeze it for up to 6 months.
Notes
• The ground vanilla beans really help give this oatmeal its strong flavor. You may use 2 teaspoons vanilla extract in place of the vanilla beans, but the flavor may not be as robust.
• You can also bake these in muffin tins for easy single servings. I find that making them in a baking dish works well for gatherings so people can pick their own size.
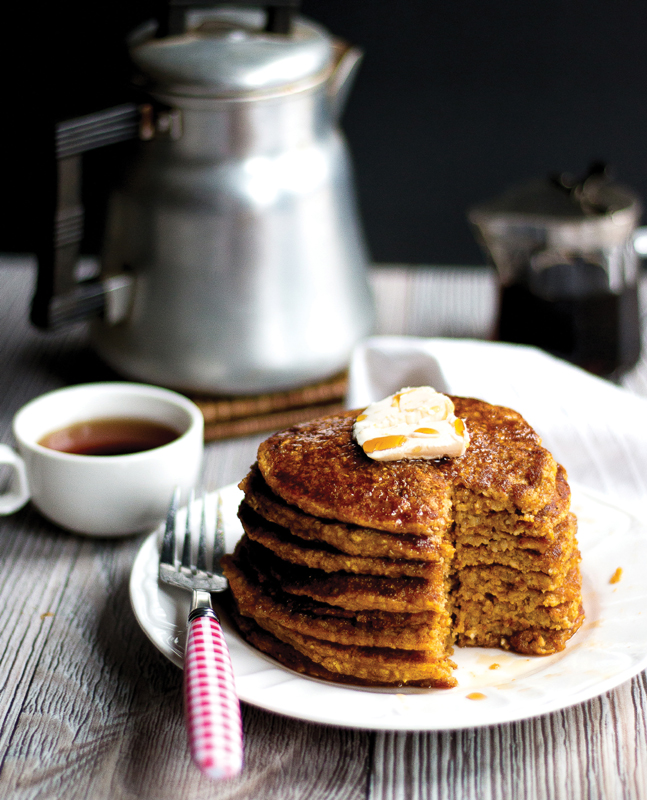
I’m always looking for ways to sneak veggies into my recipes. These pancakes are a perfect example: They’re kid-friendly and healthy at the same time. They can be made ahead of time and frozen for a quick breakfast option as well. If I’m making these for a weekend breakfast, I spend 5 minutes preparing the dry ingredients the night before. Then I can quickly whip these up in the morning when I’m still groggy. Quickness seems to be an important thing when you’re feeding hungry kids in the morning. Plus, with these pancakes, your kids will think they’re eating dessert for breakfast. To make it an extra-special treat for the kids, add a handful of chocolate chips or top with a dollop of Coconut Whipped Cream or pat of vegan butter.
Makes 8 to 10 pancakes
Prep and cook time: 25 minutes
2 cups (210 g) gluten-free oat flour
2 teaspoons baking powder
1 teaspoon ground cinnamon
½ teaspoon ground ginger
½ teaspoon salt
¼ teaspoon ground nutmeg
1½ cups (360 ml) almond milk
1 cup (240 ml) sweet potato purée (see Note)
2 flax eggs
2 tablespoons maple syrup
1 teaspoon vanilla extract
2 tablespoons melted coconut oil
1 In a large bowl, mix together all the dry ingredients.
2 In a medium bowl, mix all of the wet ingredients except the coconut oil.
3 Add the dry ingredients to the wet ingredients and mix until just combined. I use a spatula and do this by hand, but you can use a stand mixer if you prefer.
4 Heat a large sauté pan on medium heat. Add the coconut oil. Using a ¼-cup (60 ml) measuring scoop, drop the batter onto the sauté pan. Once you see the edges start to brown a little, you know it’s ready to flip (1 to 2 minutes). Repeat until the batter is used up.
5 Serve immediately or, once cool, refrigerate or freeze for later use. These should last for 2 weeks in the fridge and up to 6 months in the freezer.
Note
To make the sweet potato purée, peel and cube 1 large sweet potato or 2 small sweet potatoes, then place them in a large pot of boiling water. Boil until soft, 15 to 20 minutes. Drain the water and place the sweet potatoes back in the pot. Use an immersion blender or mash them a potato masher to purée the sweet potatoes. This step can be done in advance. It should keep in the fridge for about 2 weeks. You can also freeze it for up to 6 months.
The beet is one of those vegetables people either love or hate. I happen to love them almost any way they’re prepared. Sometimes making great-tasting food is just about keeping it simple and letting the flavors of the few ingredients you use stand out and shine. The citrus in this dish adds a nice tanginess, and, as a result, it goes perfectly with the beets. If you like beets and ginger, this dish is for you.
Makes 4 servings
Prep and cook time: 30 minutes
2 large beets, peeled and roughly chopped
2 tablespoons avocado oil
Juice of 1 large orange (or ¼ cup [60 ml] orange juice)
2 to 3 garlic cloves, minced
1 teaspoon minced fresh ginger
1 teaspoon grated orange zest
½ teaspoon salt (or more to taste)
¼ cup (30 g) slivered almonds
¼ cup (15 g) freshly chopped flat-leaf parsley
2 tablespoons chopped green onions
1 In a food processor, add the roughly chopped beets and pulse until you see a rice-like consistency, 1 to 2 minutes. If you have a smaller food processor (a 7-cup food processor or smaller), you may need to process the beets in two batches.
2 Add the beets and avocado oil to a large sauté pan. Cook on medium heat, stirring often, for about 5 minutes. Then add the orange juice, garlic, ginger, orange zest, and salt and continue to cook for another 3 to 4 minutes so the flavors develop.
3 Remove from the heat and garnish with slivered almonds, fresh parsley, and green onions. Serve immediately or refrigerate for later (it should last up to 3 days in the fridge).
In the same family as broccoli, arugula is an incredible vegetable associated with lowering your risk of cancer, and just two cups of arugula contain 50 percent of your recommended daily intake of vitamin K. This is truly a wonderful little leaf. Fennel, a plant with a licorice-like flavor, has been used in natural remedies since ancient times and is used in a variety of ways today given its versatile bulb, foliage, and seeds. The apples bring everything together with their sweet crunchiness. This salad has such an amazing flavor that you’ll forget you’re eating a healthy dish.
Makes 3 to 4 servings
Prep time: 10 minutes
SALAD
5 cups (100 g) loosely packed arugula
1 apple, diced
1 cup (150 g) halved cherry tomatoes
1 cup (130 g) peeled and chopped cucumber
½ cup (50 g) thinly sliced fennel bulb, with any wilted outer layers removed (reserve the fennel fronds for garnish, if desired)
¼ cup (40 g) pepitas (pumpkin seeds)
DRESSING
2 tablespoons olive oil (or avocado oil)
2 tablespoons lemon juice
½ teaspoon salt (or to taste)
1 Add all the salad ingredients to a large serving bowl.
2 In a small bowl, whisk together the dressing ingredients.
3 Pour the dressing over the salad and toss it until evenly coated.
4 If using the fennel fronds, chop them and add as garnish. Serve immediately.
Variation
Another great dressing to try with this salad is the Creamy Avocado & Cilantro Dressing. It offers a slightly different take on the same recipe.
This salad features bell peppers of all kinds, making it a colorful addition to any summer pool party. For the spice, use whatever kind of spicy pepper you and your guests can handle. The recipe calls for two serrano chile peppers, which are the thin green ones 2 to 4 inches (5 to 10 cm) in length. They make the salad a bit spicy but still tolerable to most people. If you don’t like spicy food, don’t fret—simply remove the seeds (which are the hottest part), or omit the spicy peppers all together.
Makes 5 to 6 servings
Prep and cook time: 25 minutes
2 serrano chile peppers, diced
1 teaspoon avocado oil
2 cups (300 g) sweet corn kernels (2 ears sweet corn)
2 cups (330 g) chopped mango (about 1 mango)
1 red bell pepper, chopped
1 yellow bell pepper, chopped
1 green bell pepper, chopped
1 orange bell pepper, chopped
½ teaspoon minced garlic (or 1 garlic clove, minced)
½ teaspoon ground coriander
½ teaspoon salt (or to taste)
1 In a pan on medium-low heat, sauté the serrano chile pepper in the avocado oil for 2 to 3 minutes.
2 Reduce the heat to the lowest setting and mix in the other ingredients. Cook for 4 to 5 minutes. The peppers should be crunchy but warmed through.
3 Place the contents of the pan in a bowl and serve immediately. This should keep for at least a week in the fridge. It’s also just as tasty served cold.
Notes
• If you do this just right, the spice level should be tolerable to those who don’t like the heat of a raw chile pepper.
• If you have leftovers, be sure to use a slotted spoon to move them to a storage container, as the mango releases a lot of liquid.
• If you’re going to refrigerate this immediately for later enjoyment, let it cool completely before covering the container, or else it will steam up in the refrigerator and become a soggy mess.
This Moroccan carrot salad is an easy recipe for the beginner cook and a perfect summer meal. It has wonderful, uniquely bold flavors that make it stand out. Since it’s raw and doesn’t involve any actual cooking, it can be prepared quickly.
Makes 4 servings
Prep time: 20 minutes
3 cups (330 g) shredded carrots (about 8 medium carrots, shredded)
⅔ cup (80 g) thinly sliced red onion
2 Medjool dates, pitted and chopped (see Variations)
2 tablespoons lemon juice (or the juice of 1 small lemon)
1 tablespoon freshly chopped flat-leaf parsley
1 tablespoon freshly chopped mint
½ teaspoon ground cinnamon
1 teaspoon ground coriander
½ teaspoon salt (or to taste)
1 Mix together all the ingredients in a large serving bowl.
2 Serve immediately or refrigerate for later. The flavors will develop even more the longer it sits. This salad should last for about a week in the fridge.
Variations
• If dates prove too hard to come by, raisins are a great substitute. Use about 2 tablespoons.
• If you wanted to make this more of a main dish, you could add 1 cup (165 g) chickpeas. You’ll also be adding some protein that way.
Kale is the one of the most popular leafy green vegetables for health buffs. Some people, however, have an issue with the taste. Raw kale can be chewy and bitter, especially for picky eaters. Massaging kale helps it wilt, turning it darker green, making it easier to chew, and giving it a sweeter flavor. If you haven’t tried this technique before, you’ll be amazed at the transformation before your eyes. If you’re unsure whether the massage worked, just take a bite. Keep massaging if it’s still too fibrous.
Makes 4 servings
Prep time: 20 minutes
SALAD
10 to 12 curly kale leaves
4 cups (650 g) cooked chickpeas (see Notes)
⅓ cup (50 g) thinly sliced red onion
3 tablespoons freshly chopped flat-leaf parsley
DRESSING
Juice of 1 medium lemon (or 2 tablespoons lemon juice)
1 tablespoon balsamic vinegar
1 tablespoon pomegranate molasses (see Notes)
1 garlic clove, minced
¼ teaspoon salt (or to taste)
1 Remove the kale leaves from the stems and place the leaves in a large bowl. Once all the stems are removed, rip the leaves into bite-size pieces. Next, begin to massage the kale by using your hands to scrunch up the leaves. Do this for about 2 minutes until the kale begins to soften.
2 Once the kale is massaged, add the chickpeas, red onion, and parsley to the bowl.
3 In a small bowl, mix together the lemon juice, balsamic vinegar, pomegranate molasses, minced garlic, and salt to make the dressing.
4 Pour the dressing over the salad and mix for about a minute, until everything looks well combined.
5 Serve immediately or refrigerate for later. Personally, I think this salad gets better as it sits in the fridge. It should last for about 4 to 5 days in the fridge.
Notes
• Save the kale stems for juicing or for vegetable broth.
• If you cook dried chickpeas, measure out 2 cups (400 g) dried chickpeas.
• If you can’t find pomegranate molasses, you can substitute with 1 tablespoon balsamic vinegar plus 1 teaspoon of maple syrup.
Fruit salads are a great summertime tradition at parties everywhere. This one is mainly a berry salad, with delicious blueberries, blackberries, and raspberries, all of which are very high in antioxidants. Blueberries are known to be good for the mind, and blackberries are good for oral health as well as heart health. They even contain more fiber per cup than bran flakes. Blackberries and raspberries are a great snack, too, if you’re trying to lose weight. Overall, this salad is good for the body and soul. The dressing really sets it apart; it can be a bit thin, though, so before you help yourself, be sure to mix it around well.
Makes 4 servings
Prep and cook time: 30 minutes
FRUIT SALAD
1 pint (about 2 cups [340 g]) blueberries
½ pint (about 1 cup [170 g]) blackberries
½ pint (about 1 cup [170 g]) raspberries
2 cups (380 g) mandarin orange slices
DRESSING
1 cup (240 ml) water
¼ cup (60 ml) balsamic vinegar
2 tablespoons maple syrup
1 teaspoon grated lemon zest
1 In a large bowl, mix all the fruit together.
2 In a small saucepan on medium heat, add the water, balsamic vinegar, and maple syrup. Cook for 7 to 10 minutes, until slightly reduced. Remove from the heat and let cool for 5 minutes.
3 Add the lemon zest, then pour the dressing over the fruit. Serve immediately or refrigerate for later (it should last up to 3 days in the fridge).
Variation
This would be delicious topped with some Coconut Whipped Cream or served over homemade ice cream.
If you are looking for a no-fuss side dish, this one is for you. From start to finish it takes about 30 minutes, has very little prep, and packs a punch in terms of flavor. The smoky seasonings combined with the cinnamon stand out to give this dish a flavor that keeps you wanting just one more bite. The canned coconut milk adds the fat and creaminess you find in traditional American mashed potato dishes that use butter and heavy whipping cream. Don’t worry, though, the coconut flavor doesn’t come through in the final product. These mashed sweet potatoes are a great addition at the Thanksgiving or Christmas table (or any other time of year!).
Makes 7 to 8 servings
Prep and cook time: 30 minutes
3 small sweet potatoes (about 10 ounces [300 g]), peeled and cubed (see Notes)
One 13.5-ounce (400 ml) can full-fat coconut milk (see Notes)
½ teaspoon minced garlic
½ teaspoon salt (or to taste)
½ teaspoon smoked paprika
¼ teaspoon ground cinnamon
¼ teaspoon onion powder
1 Add the sweet potatoes and the coconut milk to a large pot. Cover and cook on low heat for about 20 minutes, until the potatoes are soft.
2 Add the garlic and spices and then use an immersion blender to whip them into a smooth texture. If you don’t have an immersion blender, you can use a potato masher to mash them, although they may not get completely smooth.
3 Serve immediately. This should last at least a week in the fridge, or you can freeze it for up to six months.
Notes
• I use small sweet potatoes for this recipe, but you could use yams if you prefer them. Butternut squash would work well, too; use 1 small squash instead of the sweet potatoes.
• If you want to make this dish a little lighter, you can cook the potatoes in almond milk instead of coconut milk.
I love sweet corn—I feel like a kid in a candy store as I shuck and boil it during the summer season. Sweet corn is typically a non-GMO crop, unlike its cousin field corn, which has a more industrial use. This recipe combines the goodness of sweet corn with the peppery flavor of arugula and the earthiness of thyme. I don’t eat a lot of thyme, but it transforms this dish, so don’t omit it. Try it and I’m sure you won’t be disappointed.
Makes 4 servings
Prep and cook time: 25 minutes
6 ears sweet corn (see Note)
2 to 3 cups (40 to 60 g) loosely packed arugula, roughly chopped
2 to 3 tablespoons white wine vinegar
1 teaspoon dried thyme
½ teaspoon salt (or to taste)
¼ teaspoon ground black pepper
1 Remove the husks, silk, and ends from the corn.
2 Fill a large stockpot with water and bring to a boil. Add the corn and boil for 7 to 10 minutes. The corn will turn bright yellow when done.
3 Remove the corn and wait for it to cool, about 10 minutes.
4 Using a serrated knife, remove the corn kernels from the cobs.
5 Place the kernels in a large serving bowl with the remaining ingredients and mix well.
6 Serve immediately or refrigerate for later. The salad gets better the longer it sits. It should last at least a week in the fridge.
Variation
Cherry tomatoes and avocado would make a nice addition to this salad. If you decide to add them, I suggest using 1 cup (150 g) cherry tomatoes and 1 small avocado, sliced.
Note
If you want to save time, you could use frozen corn kernels in this and cook according to the package instead of boiling 7 to 10 minutes. Some of the fresh crunchiness of the corn will be lost, though.
If you haven’t tried cauliflower rice before, it’s life changing! I’m not even a huge fan of cauliflower, but I love cauliflower rice. You’re probably thinking, What is cauliflower rice? Well, it’s when you pulse cauliflower florets in a food processor to give it the appearance of rice. Once it’s cooked, the texture is pretty similar to rice, too. I find the best way to flavor cauliflower rice is with a mild seasoning, as heavy sauces tend to turn it to mush. It makes a perfect side dish for any meal and is a great alternative to rice for those who are avoiding grains.
Makes 5 to 6 servings
Prep and cook time: 20 minutes
1 head cauliflower, cut into florets
2 tablespoons avocado oil (see Note)
1 or 2 garlic cloves, minced
2 tablespoons freshly chopped cilantro
2 tablespoons lime juice (or the juice of 1 lime)
1 tablespoon freshly chopped flat-leaf parsley
1 teaspoon salt (or to taste)
½ teaspoon dried oregano
1 In a food processor, add half of the florets and gently pulse a few times. You want to break up the cauliflower into rice-size pieces, not process it into mush. Put it in a bowl and repeat with the other half of the cauliflower.
2 Add the cauliflower to a large sauté pan with the avocado oil and garlic. Sauté on medium heat for about 5 minutes, until the cauliflower is toasty and slightly browned.
3 Place the cauliflower in a large serving bowl and add the remaining ingredients. Mix well.
4 Serve immediately for optimal results. This should last about 4 to 5 days in the fridge but probably won’t freeze well.
Variation
This dish is excellent with avocado slices on top.
Note
I use avocado oil because I like the flavor it adds, but you can use another oil if you prefer. Olive oil or coconut oil would work well, too. If you don’t use oils, you can cook the cauliflower in a little water instead.
There’s something so comforting about pasta dishes. This Lemon Basil Pasta is no exception. I simply love how all the flavors come together in this dish. The lemon freshens everything up while the tomatoes keep the flavors traditional, and the basil and capers add sweet and sour bursts that excite your senses. This meal can be made pretty quickly, but make sure to not overcook the pasta.
Makes 3 to 4 servings
Prep and cook time: 30 minutes
6 cups (1.4 L) water
One 8-ounce (227 g) package quinoa spaghetti (see Note)
1 pint (about 2 cups [300 g]) cherry tomatoes, halved
¼ cup (60 ml) lemon juice (or the juice of 1 large lemon)
1 tablespoon olive oil
1 garlic clove, minced
⅔ cup (30 g) freshly chopped basil, plus extra leaves for garnish, optional
2 tablespoons chopped green onions
1 tablespoon capers
1 teaspoon salt (or to taste)
1 In a large sauté pan (or large pot), bring the water to a boil. Once the water is boiling, add the pasta.
2 Cook the pasta for 7 to 10 minutes, stirring as often as needed to be sure the pasta stays separated. Once the pasta looks mostly cooked (slightly less than al dente), remove from the heat and drain, cover the pasta, and set it aside.
3 In the same pan you cooked the spaghetti, add the tomatoes, lemon juice, olive oil, and garlic and cook for 2 to 3 minutes.
4 Once the mixture is heated through, stir in the spaghetti. Cook partially covered on low heat for 5 to 7 minutes. Check and stir a few times to be sure the pasta does not stick to the bottom of the pan or overcook.
5 Remove from the heat and stir in the basil, green onion, and capers. Season with salt.
6 This dish is best served immediately, garnished with basil leaves, if desired. It will last at least a week in the fridge (if you even have leftovers). I don’t recommend freezing it.
Note
I used quinoa pasta for this recipe, but you can use any pasta you like. I do recommend staying away from brown rice pasta, though, as it seems to fall apart and clump while cooking. If you choose to use whole wheat pasta, you’ll probably need to cook it a minute or two longer. You can make this grain-free by using zucchini pasta: Simply spiralize two zucchini and give them a quick sauté with all the ingredients, just a minute or two, to warm it up and let the basil wilt slightly.
The spiralized sweet potatoes give a bit of heartiness to a light dish. The spinach adds some great flavors, and its nutritional benefits can’t be emphasized enough—it’s a good source of iron, boosts skin and bone health, and the list just keeps going. The tomatoes help round out this dish, making it a truly delicious treat. And while it doesn’t necessarily seem like a lot of food, it will leave you full for quite some time. If you’re new to spiralizing, this dish will make you feel good about getting a spiralizer. To save some time, spiralize the sweet potatoes in advance.
Makes 4 servings
Prep and cook time: 30 minutes
2 small sweet potatoes (about 6 ounces [170 g]), peeled
2 tablespoons olive oil
1 onion, thinly sliced
2 garlic cloves, minced
5 ounces (140 g) baby spinach
2 cups (300 g) halved cherry tomatoes
¼ cup (30 g) pepitas (pumpkin seeds)
2 tablespoons hemp hearts
1 teaspoon salt (or to taste)
1 Spiralize the sweet potatoes with a spiralizer. Set aside.
2 In a large sauté pan on medium heat, add the olive oil, onions, and garlic. Cover and cook for 5 to 7 minutes, stirring occasionally.
3 Add the spinach, cover, and cook for a few more minutes, just until the spinach starts to wilt.
4 Add the sweet potatoes and cherry tomatoes and cook for another 3 to 4 minutes, until soft.
5 Garnish with the pepitas and hemp hearts. For best results, serve immediately. This should last in the fridge for 4 to 5 days.
Variations
• If you want some additional protein in this, you can add 2 cups (330 g) cooked chickpeas or 2 cups (340 g) cooked black beans.
• If you don’t own a spiralizer, you can make this dish with brown rice pasta or quinoa pasta. Cook according to the package, skip the sweet potato, and toss everything with the pasta before garnishing.
• I think fresh basil would be a nice addition. If you decide to use it, I suggest ¼ cup (4 g) loosely packed basil. You can add it at the same time as the spinach.
Popcorn is a big hit at our house, especially with the kids. Like any snack, though, the popcorn you find at most grocery stores is not very good for you, containing fake butters and artificial flavors. Before the microwave came along, the stove was the most common way to make popcorn, and this is the method I prefer when making popcorn for my family. I also like to use organic kernels. This is a great snack when you’re on the go; just throw a bag into the car and off you go into the sunset, easy-peasy.
Makes 4 cups (40 g)
Prep and cook time: 15 minutes
2 tablespoons melted coconut oil
¼ cup (50 g) popcorn kernels
2 tablespoons nutritional yeast
1 teaspoon salt (or to taste)
½ teaspoon garlic powder
1 In a large stockpot, add the coconut oil and 1 popcorn kernel. Cover and put the heat on medium-high.
2 Once you hear the kernel pop, add the rest of the kernels and place the cover on the pot. Pick the pot up and shake it constantly until all the kernels are popped.
3 Once all the kernels are popped, turn off the heat, remove the cover, add the remaining ingredients, and stir well. This is best if eaten immediately.
Variation
If you want a sweet version, you can omit the nutritional yeast and garlic powder, then add 2 tablespoons maple syrup and 1 teaspoon ground cinnamon.
This recipe is easy to make, but the presentation will still wow your dinner guests. Best served as an appetizer, these little bite-size stuffed cucumbers pack a lot of flavor with minimal effort. Before you start, be sure you have some toothpicks on hand, as they not only help the cucumbers keep their shape, but also allow your dinner guests to pick them up without much mess.
Makes 30 cucumber rolls
Prep time: 20 minutes
2 medium cucumbers (see Notes)
3 cups (500 g) cooked chickpeas
2 avocados, pitted and peeled
2 tablespoons lemon juice (or the juice of 1 lemon)
1 tablespoon freshly chopped flat-leaf parsley
1 garlic clove, minced
1 teaspoon salt (or to taste)
1 Peel and cut the cucumbers down the middle lengthwise, splitting them into two pieces.
2 Using a vegetable peeler or mandoline, slice the cucumbers lengthwise down the middle, from one end to the other. Put the strips aside.
3 Place the remaining ingredients in the food processor and pulse until small chunks form. You may need to scrape down the sides a few times.
4 Lay a cucumber strip flat on a cutting board and spread some of the stuffing on one end.
5 Roll the cucumber up. You can place a toothpick in the roll to keep it together.
6 Repeat steps 4 and 5 until all the cucumber strips are used. There will be stuffing left over (see Notes).
7 Serve immediately—these are best made and eaten quickly (as they sit, the cucumber tends to get soggy).
Notes
• Although the recipe is written for two cucumbers, there’s enough stuffing to make many more of these. If you don’t plan on using more cucumbers, the stuffing works well as a sandwich spread or just eaten plain by the spoonful.
• There will also be a good amount of cucumber scraps. There’s no need to throw these away; in my house we cut up the scraps and add them to a salad.
Kale chips seem to be all the rage these days. I first made them as one of my go-to snacks when I started eating a whole food diet. This spicy version is for all those people who get turned off by the sight of kale. A light coating with a bit of sriracha and lime juice add a flavor spicy-food lovers won’t be able to pass up. If you like heat, these are right up your alley; if heat isn’t your thing, replace the sriracha with a roasted red pepper sauce in its place. Either version will delight your senses.
Makes 2 to 3 servings
Prep and cook time: 30 minutes
6 to 7 kale leaves, stems removed, cut or torn into 4-inch (10 cm) pieces
¼ cup (60 ml) sriracha
2 tablespoons lime juice (or the juice of 1 lime)
1 Preheat the oven to 300°F (150°C). Line a baking sheet with parchment paper.
2 Place the kale pieces the baking sheet.
3 Mix the sriracha and lime juice together in a small bowl.
4 Using a silicone brush, coat each kale piece with the sriracha-lime mixture.
5 Bake for 20 to 22 minutes, until the chips are crispy.
6 To keep any extra chips crispy, store them in an airtight container with rice scattered on the bottom (the rice will absorb moisture). The chips should last at least 4 days in a container in the pantry.
Variation
Another delicious way to enjoy kale chips is to use a mix of white balsamic vinegar and avocado oil. In a small bowl, mix together ¼ cup (60 ml) white balsamic vinegar and 1 tablespoon avocado oil. Brush the mixture onto each kale chip. Then sprinkle with a little salt. Bake as directed. So good!
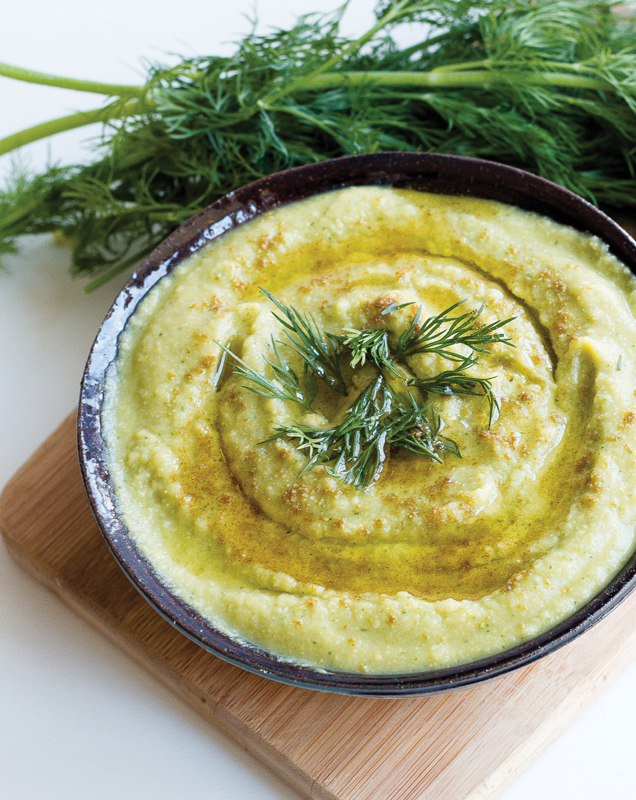
Hummus is always great for a healthy snack. It’s also one of the easiest things to make yourself, is inexpensive, and even freezes well. There’s really no reason to buy store-bought brands. All varieties and flavors of hummus are eaten in my household, but this particular dill and cucumber combo is near and dear to my heart. Dill is one of those herbs that just seems to light up everything it touches. My personal favorite pairing with hummus is, of course, raw veggies such as carrots and red bell peppers.
Makes 2 cups (500 g)
Prep time: 10 minutes
1½ cups (250 g) cooked chickpeas (or one 15-ounce [425 g] can of chickpeas, drained and rinsed)
¾ cup (100 g) peeled and chopped cucumber
¼ cup (8 g) freshly chopped dill
¼ cup (75 g) tahini (see Variations)
2 garlic cloves, minced
1½ teaspoons ground cumin
Juice of 1 lemon (2 to 3 tablespoons lemon juice)
½ teaspoon salt (or to taste)
1 to 3 tablespoons water
1 tablespoon olive oil, optional (see Variations)
1 Place the chickpeas, cucumber, and dill in a food processor. Blend for 1 minute.
2 Add the remaining ingredients except the water and olive oil and blend until smooth, 1 to 2 minutes.
3 Add the water 1 tablespoon at a time, until you reach your desired consistency. It should be very creamy.
4 Serve immediately or refrigerate for later. This hummus should last at least a week in the fridge. You can also freeze it for up to 3 months.
Variations
• If you don’t like tahini or can’t find it, you can use sunflower butter instead. Some people also just omit the tahini altogether, although I personally don’t recommend it, since it adds such great flavor to the hummus.
• If you want, you can drizzle about 1 tablespoon olive oil over the hummus right before serving it. The olive oil adds more flavor and also makes a pretty presentation. You can also sprinkle some extra cumin on top, if you like.
Right after a workout, I always eat some type of snack with nuts and fruit. It could be anything from apples and almond butter, a date stuffed with cashew butter, or a handful of dried fruits and nuts. The snacks are usually small, compact, and full of protein. This snack encompasses all of the above, and it’s a cinch to make, with only four ingredients. The dried apricots and almonds complement each other’s unique flavors. These travel quite well and make a great homemade snack on the road.
Makes 20 snack bites
Prep and chill time: 20 minutes
1½ cups (210 g) raw almonds (see Notes)
1 teaspoon ground cinnamon
1¼ cups (165 g) dried apricots (see Notes)
2 to 4 tablespoons water
1 In a food processor, combine the almonds and cinnamon. Blend for 1 minute.
2 Add the apricots and blend for about 2 minutes.
3 Slowly add the water, a little at a time, until you see the mixture start to clump together.
4 Once the mixture is ready, roll it into bite-size balls. The dough will be a bit sticky, so using wet hands helps.
5 Set the balls on a parchment paper–lined baking sheet or plate and place them in the fridge to firm up. It should take about 10 minutes.
6 These snack balls should last at least 2 weeks in the fridge. You can also freeze them for up to 6 months.
Notes
• The nuts and dried fruits are substitutable in this recipe. Any nut/fruit combo will work as long as you use dried fruits (as opposed to fresh).
• If you have a nut allergy, you can use sunflower seeds in place of the almonds.
These baked pears are simply amazing. Pears release so much sugar when baked that you’ll think you’re eating candy. The cinnamon and nutmeg add a bit of spice. As an added benefit, pears are actually higher in fiber content than their apple cousins, so this isn’t a total loss in terms of health. I recommend leaving the skin on the pears, as it helps hold the pears together under the heat of baking. If you don’t have or don’t like pecans, walnuts or almonds are also great to use.
Makes 8 pear halves
Prep and cook time: 30 minutes
4 Bosc, Anjou, or Bartlett pears
½ cup (60 g) pecan pieces (see Variations)
¼ cup (40 g) raisins
2 to 3 tablespoons maple syrup
1 teaspoon ground cinnamon
Pinch of ground nutmeg
1 Preheat the oven to 350°F (180°C).
2 Cut the pears in half lengthwise and then remove the cores (I used a melon baller to do this).
3 Slice a small sliver off the back of each pear half to create a flat surface so they can sit in a baking dish without sliding around.
4 Place all the pears face up in a baking dish. I use a 9 x 13-inch (23 x 33 cm) baking dish (the pears may not fit in anything smaller).
5 Fill the center of each pear with the pecan pieces and raisins, then drizzle 1 teaspoon of the maple syrup over each pear half. Sprinkle with cinnamon and a pinch of nutmeg.
6 Bake the pears for about 25 minutes, until the sugar begins to caramelize.
7 Serve while still warm. Keep any leftovers up to a week in the fridge.
Variations
• These would be great topped with Coconut Whipped Cream or Salted Caramel Sauce.
• If you need a nut-free option, you can use gluten-free rolled oats instead of pecans.
If you’ve been trying to get your kids to eat more beans, then you must try these chocolate peanut butter cookies. They’re flourless thanks to the black beans, and they also provide a good boost of unexpected protein and fiber. My kids love these and have never suspected the main ingredient. All you taste is chocolate and peanut-buttery goodness. This recipe makes a great start for kids transitioning to a whole food, plant-based diet, too.
Makes 20 cookies
Prep and cook time: 30 minutes
1½ cups (255 g) cooked black beans (or one 15-ounce [425 g] can black beans, drained and rinsed)
1 cup (270 g) unsalted peanut butter (see Variations)
½ cup (40 g) cocoa powder
½ cup (120 ml) maple syrup
2 teaspoons vanilla extract
1 teaspoon baking powder
½ teaspoon salt
⅓ cup (60 g) chocolate chips for the tops of the cookies, optional
1 Preheat the oven to 350°F (180°C). Line two baking sheets with parchment paper.
2 Add all the ingredients except the chocolate chips to a food processor and mix until smooth, about 2 minutes. You may have to scrape down the sides a few times. The mixture will be very thick.
3 Using a medium cookie scoop or a couple of spoons, drop the cookies onto the baking sheets, about 1 inch (2.5 cm) apart.
4 Flatten each cookie slightly with the palm of your hand. If you choose to garnish with the chocolate chips, do so now.
5 Bake for 10 minutes. Let the cookies cool for about 10 minutes before removing from the baking sheet. Store in an airtight container.
Variations
• You can use a different nut butter if you want; I suggest almond or cashew butter.
• If you have a nut allergy, you can use sunflower butter as a substitute.
• If you use salted peanut butter, then omit the salt, although the cookies still might turn out a bit too salty.
Nothing compares to homemade ice cream. Not only is it much cheaper to make it yourself, but you can also control the ingredients that go into it. One of my favorite kitchen gadgets is my ice cream maker. If you eat ice cream regularly, an ice cream maker will save you money within just a few batches. Most store-bought ice creams are expensive and have unnecessary fillers and additives to keep them shelf-stable. On the other hand, this healthy ice cream recipe contains just five simple ingredients. Plus it becomes a family affair while we all sit around the ice cream maker waiting to get a taste of our next concoction—the experience is more than just a tasty treat! (Just make sure the bowl has been chilled in the freezer for at least 24 hours before attempting this recipe.) This recipe produces a soft-serve ice cream. If you like a harder ice cream, add 1 teaspoon vodka just before you blend all the ingredients together to keep it from becoming a solid block when you freeze it.
Makes 4 cups (960 ml)
Prep and chill time: 25 minutes
One 13.5-ounce (400 ml) can full-fat coconut milk (see Notes)
1 pint (about 2 cups [340 g]) fresh blackberries, plus a few more for mixing in (see Notes)
3 tablespoons maple syrup
1 vanilla bean, cut open and seeds scraped out (see Notes)
Pinch of salt
1 In a blender, mix all the ingredients for at least 1 minute.
2 Pour the contents into the properly chilled bowl of your ice cream maker.
3 Turn the ice cream maker on. It should take about 20 minutes to make a soft-serve ice cream. When there are 5 minutes left, add a handful of whole blackberries. Use a spatula to guide the ice cream around so the blackberries mix in evenly.
4 Serve immediately for soft-serve ice cream, or place in the freezer for 1 hour to make a harder ice cream. Store in the freezer in an airtight tub. This should last up to 6 months in the freezer.
Notes
• If you use almond milk or another nondairy milk rather than full-fat coconut milk, this will be icy in texture.
• If you want to use frozen blackberries, let them thaw first.
• Use only the vanilla seeds. You can use ½ teaspoon vanilla extract instead of a vanilla bean.
Coffee and chocolate were just made for each other, as you’ll see in this super-rich pudding recipe. I add a few chocolate chips to make it even more of a treat. The secret ingredient, avocado, gives it a rich and velvety texture. Plus the avocado contains healthy fats and other added health benefits (did you know that avocado contains more potassium than a banana?). You won’t really know the avocado is there, either, because the coffee and chocolate combination mask the flavor entirely. Learning secrets like this makes vegan cooking easier and allows you to think of other ways you can utilize the same tricks.
Makes 4 servings
Prep time: 15 minutes
2 ripe avocados, pitted and peeled
⅓ cup (35 g) cocoa powder
⅓ cup (80 ml) maple syrup
¼ cup (45 g) chocolate chips
1 teaspoon coffee extract (see Notes)
1 In a high-power blender or food processor, blend the avocados until there are no lumps. This can take several minutes, and you may need to stop and scrape down the sides a few times.
2 Add the remaining ingredients and blend until smooth. This should take about 5 minutes, and you may need to scrape down the sides a few times here, too.
3 Serve immediately or refrigerate for later. This should last about 4 days in the fridge.
Notes
• This recipe calls for coffee extract, which may be located in the baking section of most grocery stores. If you can’t find coffee extract, you can also use 1 teaspoon instant coffee granules for a similar flavor.
• This recipe is wonderful topped with homemade Coconut Whipped Cream.