Many of my recipes refrigerate and freeze well, but these cook up great in batches and store well for the week ahead. When leading a healthy lifestyle, meal planning and preparation are the keys to success. Otherwise, it’s too easy to stray with temptation at every turn. Dishes such as the Carrot Cake Granola for breakfast, Eggplant & Chickpeas with Tomato for lunch, and Lentil Shepherd’s Pie for dinner can be stored in the refrigerator for plenty to eat all throughout the week. Just make them when you have a bit more time and pack them into individual containers. Things are that much easier for to-go breakfasts, lunches, snacks, and dinners during the week. Try these and drive right past temptation!
If you’ve never had chia pudding, you simply have to try it—this is a perfect example of a whole food alternative that’s better than the boxed pudding we all grew up eating. You can use nondairy milk with what you have on hand—granola, berries, and more—to make it to your liking. Chia pudding is just as easy to make as my overnight oats recipe; however, unlike the overnight oats, this can be ready to eat in about half an hour. The instant stuff you find in the stores promises pudding in about the same time, but chia pudding is far healthier. Since I love most fruits, I had to make this blueberries and cream option for you. The richness of the Basic Cashew Cream pairs very well with the blueberries.
Makes 4 servings
Prep time: 35 minutes
2 cups (480 ml) almond milk
¼ cup (40 g) chia seeds
3 tablespoons Basic Cashew Cream
1 teaspoon ground vanilla beans
1 Medjool date, pitted and chopped (see Notes)
1 cup (150 g) fresh blueberries
1 In a large bowl, mix all the ingredients except the blueberries together. Make sure you stir very well, because the chia seeds tend to clump together at the bottom of the bowl. Add the blueberries and stir to incorporate.
2 Cover and place in the fridge for at least 30 minutes to set.
3 If you want to make travel-size portions, put each serving in an 8-ounce mason jar. Then you can just grab and go on those busy mornings.

Variations
• If you don’t like dates, use 2 teaspoons maple syrup.
• To add some extra protein, mix in 1 tablespoon hemp hearts.
• Cacao nibs or chocolate chips could also be added for a nice crunch. Use about 1 tablespoon.
If you’re anything like my family and have a deep-seated affinity for carrot cake, this granola can help curb those carrot cake urges. You can eat this in the morning, by the handful or with some almond milk in a bowl. The carrots are a great source of beta-carotene. The pineapple adds a sweetness but also an extra energy boost in the morning with its B vitamins and manganese. There’s no need to feel guilty about this one, no matter how you enjoy it.
Makes 8 servings
Prep and cook time: 50 minutes
3 cups (285 g) gluten-free rolled oats
1 cup (110 g) shredded carrots (about 2 medium carrots)
1 cup (120 g) chopped raw pecans
½ cup (80 g) diced dried pineapple
½ cup (80 g) raisins
⅓ cup (50 g) pepitas (pumpkin seeds)
1½ teaspoons ground cinnamon
¼ teaspoon ground nutmeg
½ teaspoon salt
½ cup (120 ml) maple syrup
⅓ cup (80 g) applesauce
1 Preheat the oven to 350°F (180°C). Line a baking sheet with parchment paper.
2 In a large bowl, mix together all the ingredients except the maple syrup and applesauce.
3 Stir in the maple syrup and applesauce using a spatula, and mix until everything is moist and well coated.
4 Spread the mixture on the baking sheet. Bake for 20 minutes, pull out the pan, and mix the granola around with a spatula. Put the baking sheet back in the oven for another 10 to 15 minutes. You can tell it’s done when the edges are a light golden brown.
5 Let the granola completely cool before removing from the baking sheet. Store it in an airtight container in the pantry or on the counter. The granola will last about 2 weeks that way. It will keep in the fridge for several weeks, or you can freeze it for up to 6 months.
My husband and I both love sweet potatoes. Besides being tasty, they’re a great source of vitamins, potassium, and carotenoids (the stuff, also in carrots, that’s good for your eyes and immune system). The sweetness of the sweet potato combined with hearty black beans goes well with the smoked paprika and chili powder. Take care to man the fort while preparing this one. The sweet potatoes, if left unattended in the covered pan for too long, can turn to mush. I highly recommend adding avocado to get some healthy fats in the mix as well.
Makes 5 to 6 servings
Prep and cook time: 35 minutes
2 tablespoons avocado oil
½ cup (80 g) diced yellow onion
½ cup (40 g) diced red pepper (about ½ large red bell pepper)
4 cups (535 g) diced sweet potatoes (about 2 large sweet potatoes cut into ½-inch [1.25 cm] cubes)
1½ cups (255 g) cooked black beans (or one 15-ounce [425 g] can black beans, drained and rinsed)
2 teaspoons chili powder
2 teaspoons smoked paprika
½ teaspoon salt (or to taste)
Half an avocado, pitted, peeled, and sliced, optional
1 Add the avocado oil to a sauté pan on medium-high heat. Add the onion and pepper and cook until they are moderately soft, 5 to 7 minutes.
2 Reduce the heat to medium and add all the remaining ingredients except the avocado. Mix well, then cover. Cook, stirring occasionally, until everything is soft, 13 to 15 minutes.
3 Remove from the heat and serve immediately, topped with avocado slices, if desired, or refrigerate for later. This will last for about a week in the fridge.
Note
If you don’t have black beans, pinto beans would be a perfectly good substitute, although this will alter the flavor a bit.
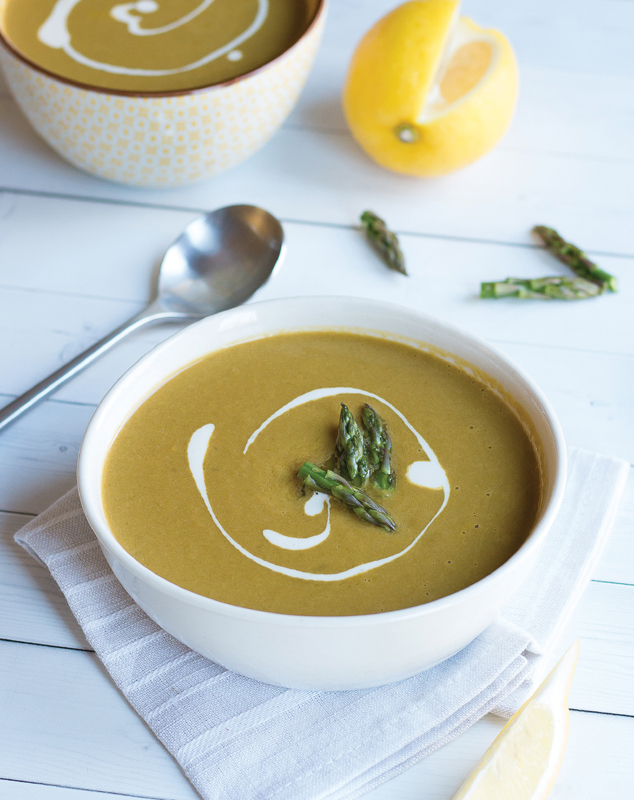
Asparagus was considered an aphrodisiac in ancient times; today it’s known to aid in the transport of glucose through the bloodstream and to help remove carcinogens, making it an awesome cancer-fighting veggie. This soup can be prepped in about 10 minutes. All you need to do is let it simmer.
Makes 4 servings
Prep and cook time: 1 hour 30 minutes
1 large onion, diced
3 garlic cloves, chopped
2 tablespoons olive oil (see Variations)
2 bunches asparagus, trimmed
6 cups (1.4 L) vegetable broth
1 teaspoon salt (or to taste)
1 cup (240 ml) Basic Cashew Cream (see Variations)
1 In a large stockpot, add the onion, garlic, and olive oil. Cook on medium heat until the onions start to soften, about 5 minutes.
2 While that’s cooking, chop the asparagus into 1-inch (2.5 cm) pieces. You can reserve some of the tips for a nice garnish.
3 Add the vegetable broth, chopped asparagus, and salt to the stockpot. Turn on high and bring to a boil. Reduce the heat to medium-low and let the soup simmer for about 1 hour, covered.
4 Once everything has softened, use an immersion blender to purée the soup, then add most of the Basic Cashew Cream and purée until well combined.
5 Top with the remaining dollops of cashew cream and the asparagus tips, if using. Serve immediately or refrigerate for later. This should last at least 2 weeks in the fridge and up to 6 months in the freezer.
Variations
• If you don’t use oil, you can cook the onions and garlic in a little vegetable broth. To do this, pour a small amount of broth in the pan, about ¼ inch (6 mm) or less. Bring the broth to a low simmer on medium heat and add the vegetables. Turn the heat up slightly, taking care to move the vegetables around often so they don’t burn. Once the liquid has evaporated, the vegetables should be done.
• If you have a nut allergy, you can use coconut cream instead of the cashew cream.
• If you want an extra fresh zing to this soup, add a little lemon juice at the very end, 1 teaspoon at a time to taste.
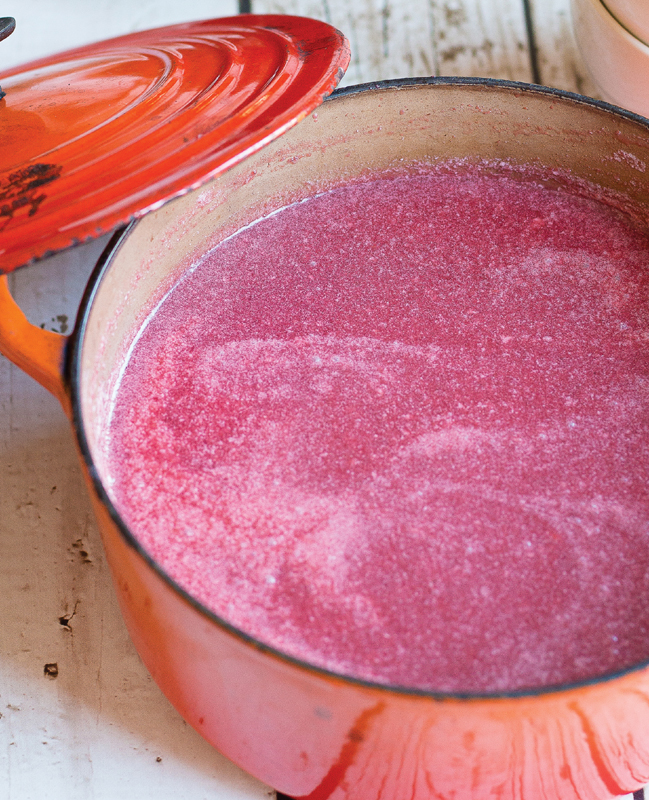
Beets and ginger are two superfoods that seem as if they were made for each other. The earthy tones of the beets pair well with the spicy sweetness of the ginger. As a bonus, beets and ginger are good for the liver and stomach, respectively. The Coconut Whipped Cream puts this healthy recipe over the top, adding a depth and richness that’s simply divine. If you’re new to beets, new to ginger, or new to both, this is a perfect place for you to start. If you’ve never peeled a beet before, I suggest reading the Notes for some helpful hints.
Makes 5 servings
Prep and cook time: 2 hours 30 minutes
4 cups (960 ml) vegetable broth
1 cup (240 ml) water
3 medium beets, trimmed and peeled, chopped into 1-inch (2.5 cm) cubes
1 yellow onion, diced
2 or 3 garlic cloves, minced
1½ teaspoons to 1 tablespoon minced ginger (depending on how much of a kick you want)
1 teaspoon salt (or to taste)
½ cup (120 ml) unsweetened Coconut Whipped Cream (see Note)
1 Add everything except the Coconut Whipped Cream to a large stockpot. Bring to a boil, then turn the heat to low and simmer, covered, for at least 2 hours, until the beets are tender. The longer the soup cooks, the more developed the flavor will be.
2 Add the Coconut Whipped Cream and use an immersion blender to blend the soup. If you don’t have an immersion blender, you can transfer the soup to a standing blender and blend in batches.
3 Serve immediately or refrigerate for later. This soup should last at least 2 weeks in the fridge. You can freeze it for up to 6 months.
Notes
• Make the Coconut Whipped Cream, but do not add the maple syrup or ground vanilla beans.
• If you’ve never peeled a beet, I suggest doing it in a plastic bag in the sink. It can be quite the messy endeavor, as the beets will drip a deep reddish-purple juice. Since that liquid is known to stain a lot of surfaces, the plastic bag allows you to just pick it up and throw the scraps away with ease. It’s best to be prepared with beets. Also be sure to wash your hands immediately afterward to keep your skin from staining.
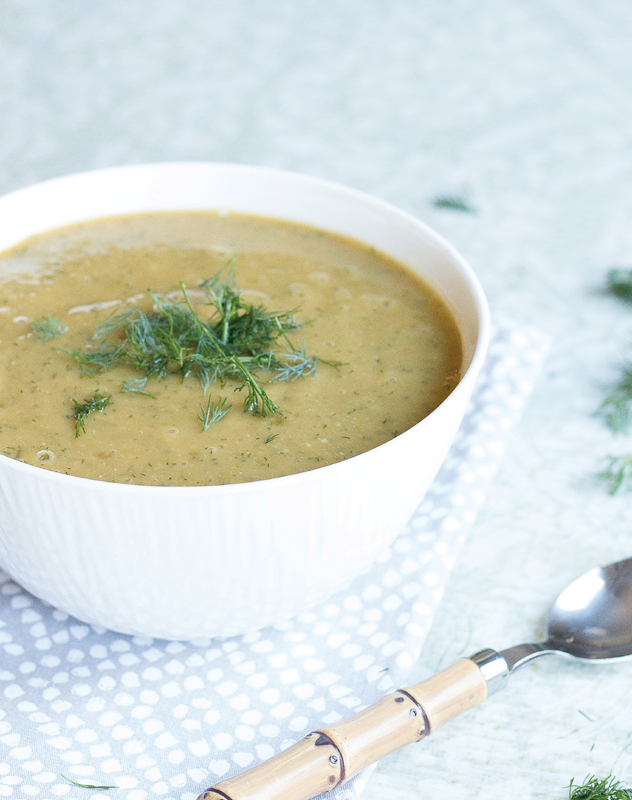
There are two kinds of lima beans: the small, flat, kidney-shaped, green-colored bean, and the larger and usually whiter one, which is often called a butter bean. This soup can be made with either. Known for their smooth, buttery texture, these beans go beautifully with the dill, making this a delightful soup—and it’s also easy to make. Lima beans are high in soluble fiber, known to reduce cholesterol, and a wonderful source of protein. Just one cup of lima beans contains almost 25 percent of your daily iron needs. This is truly a soup you can feel good about serving to your family.
Makes 5 to 6 servings
Prep and cook time: 1 hour 30 minutes
4 cups (760 g) cooked lima beans
4 cups (960 ml) vegetable broth
1 cup (160 g) chopped onion (or 1 small onion, chopped)
½ teaspoon minced garlic (or 1 garlic clove, minced)
1 teaspoon salt (or to taste)
½ cup (15 g) freshly chopped dill (see Notes), plus extra for garnish, optional
1 Put the lima beans, vegetable broth, onion, minced garlic, and salt in a large stockpot. Bring to a boil, cover, and then reduce the heat to low and let simmer for 1 hour.
2 Remove from the heat and add the chopped dill.
3 Use an immersion blender to blend the soup until smooth. If you don’t have an immersion blender, you can transfer the soup to a standing blender and blend in batches.
4 Garnish with fresh dill, if using, and serve immediately or refrigerate for later. This soup will keep in the fridge for at least 10 days. If you choose to freeze it, it should last up to 6 months.
Notes
• You can replace the fresh dill with dried dill, but use ¼ cup dried dill instead.
• If the soup is not thick enough for your liking, you can add a couple tablespoons of arrowroot after blending until you reach your desired thickness. The soup does thicken more as it stands, so keep that in mind.
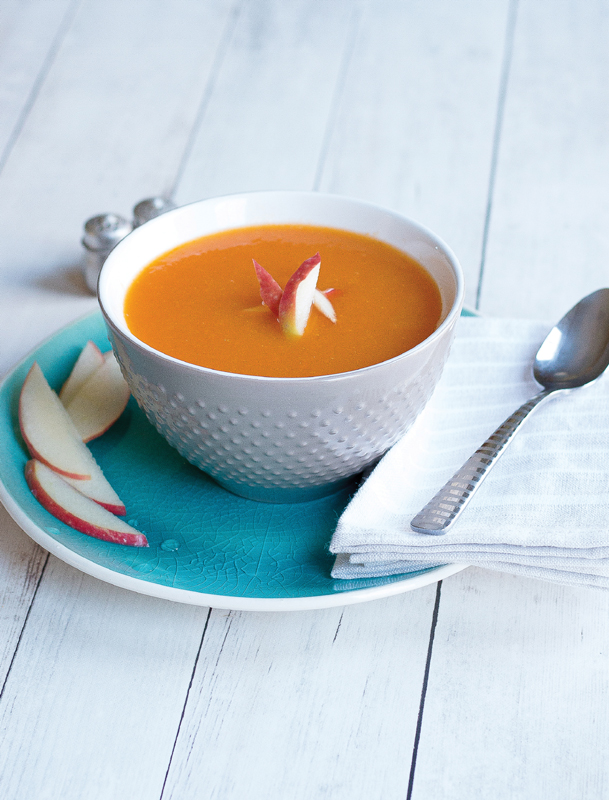
This carrot soup is a no-fuss dish that can be prepped in 15 to 20 minutes. The remaining time is simply a waiting game as it cooks on the stove. I love carrot soups for this very reason—it always seems I get a ton of flavor out of the soup without much effort. The apples and carrots provide a sweetness, while the garlic and onion remind you that this is a meal. Given its simplicity, if you’re new to cooking or to healthier eating, this is a wonderful recipe to try. It’s easy to make and the flavors are very enjoyable.
Makes 5 to 6 servings
Prep and cook time: 1 hour 50 minutes
4 pounds (1.8 kg) carrots, peeled and chopped
6 Pink Lady apples (Gala would also work; see Notes), plus extra apple slices for garnish, optional
6 cups (1.4 L) vegetable broth
1 yellow onion, chopped
3 garlic cloves, chopped
1 to 2 teaspoon salt (or to taste)
1 Place all the ingredients in a stockpot. Turn the stove to just above low heat, cover, and let simmer for an hour and half, until the vegetables and apples are softened.
2 Take off the lid and remove from the heat.
3 After the soup cools a bit, use an immersion blender to purée the ingredients together. If you don’t have an immersion blender, you can use a standing blender, but be careful not to overfill it, and be sure the soup is not too hot when you transfer it to the blender. If the recipe needs a bit more salt, this a great time to add it.
4 Serve warm. Garnish with apple slices, if desired. This will keep in the refrigerator for 1 week, and in the freezer for up to 6 months.
Notes
• If you don’t want this to be as sweet, simply remove an apple or two from the ingredients.
• This can be made in a slow cooker, too. Cook it on high for at least 4 hours, until the vegetables and apples are soft.
Tempeh is one of my favorite plant-based proteins. Like tofu, it’s made from soybeans, but it differs in that it’s made by fermenting cooked soybeans. It also has an earthier flavor than tofu, so it happens to pair nicely with the wild rice in this recipe. The baby kale provides an unexpected sweetness, and the ginger adds a little spice to make this dish truly memorable. I suggest cutting the tempeh into smaller pieces to allow it to be better coated with the sauce.
Makes 4 to 5 servings
Prep and cook time: 50 minutes
2 cups (480 ml) water
1 cup (160 g) uncooked wild rice blend
One 8-ounce (227 g) package tempeh
¼ cup (60 ml) apple cider vinegar
¼ cup (60 ml) mirin (see Notes)
2 tablespoons toasted sesame oil (see Notes)
1 tablespoon Bragg Liquid Aminos (see Notes)
2 teaspoons freshly minced ginger
1 teaspoon garlic powder (or 1 garlic clove, minced)
3 cups (50 g) baby kale or spinach, loosely packed
1 In a large saucepan, add the water and wild rice blend and bring to a boil. Reduce to a simmer, then cover and cook for about 40 minutes, until all the liquid is absorbed.
2 Add everything else except the kale and cook for 5 to 7 minutes.
3 Add the kale and mix until it’s slightly wilted.
4 Serve immediately or refrigerate for later. This will last at least a week in the fridge.
Notes
• If you can’t find mirin, check the Pantry section for a good substitute.
• If you don’t use oil, you can probably omit the toasted sesame oil, but I think it adds great flavor.
• If you avoid soy, you can use coconut aminos in place of the Bragg Liquid Aminos.
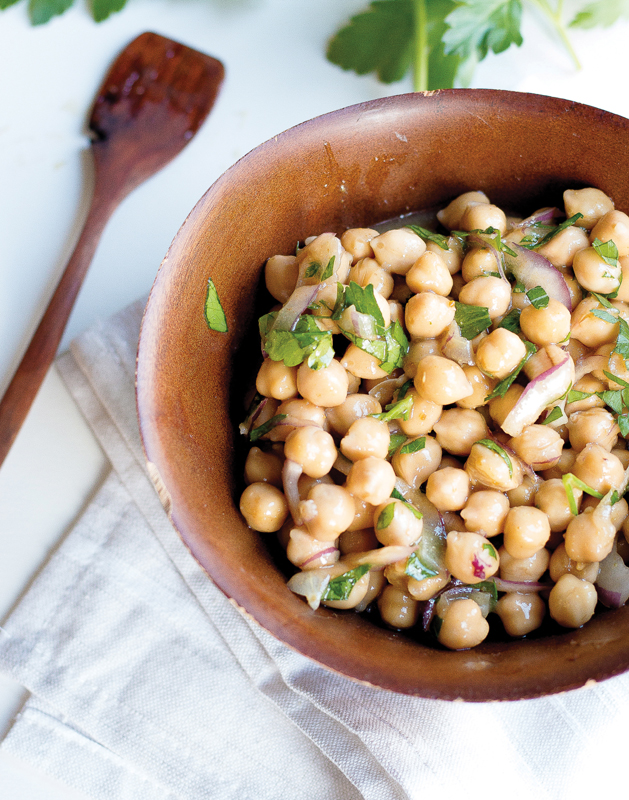
Like many of the recipes I make, this is a great example of using simple ingredients and letting their flavors shine through. The onion and the pomegranate molasses mix well with the simplicity of the chickpeas—you won’t be able to take just one bite. This recipe will quickly become a staple in your house, just as it is in ours, as an easy go-to when you’re craving light, summery salad flavors.
Makes 4 servings
Prep time: 40 minutes
4 cups (650 g) cooked chickpeas (or two 15-ounce [425 g] cans chickpeas, drained and rinsed)
½ cup (60 g) thinly sliced red onion (see Notes)
¼ cup (60 ml) orange juice (or the juice of 1 medium orange)
1 tablespoon pomegranate molasses (see Notes)
1 teaspoon salt (or to taste)
½ teaspoon ground cumin
¼ cup (15 g) freshly chopped flat-leaf parsley (or 2 teaspoons dried parsley)
1 teaspoon olive oil
1 Mix all the ingredients in a large bowl until everything is well incorporated. I used a spatula to mix it for about 1 minute.
2 Cover and place in the fridge for about 30 minutes to allow the flavors to marinate. The longer this sits, the better it gets. This salad should last at least 5 days in the fridge.
Notes
• Be sure to slice the red onion very thinly. If it’s too thick, the onion flavor will overpower each bite. I use a mandoline to keep the onions a consistent thickness. If you can’t slice them thin enough, use very small-diced red onions, almost minced.
• If you can’t find pomegranate molasses, you can use balsamic vinegar in its place.
• If you want to play up the pomegranate flavor even more, add ½ cup (90 g) pomegranate seeds.
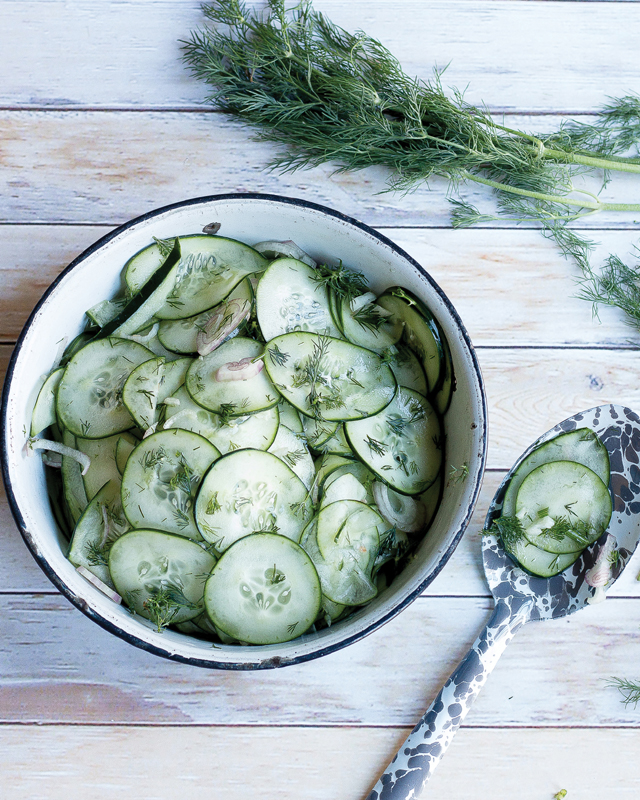
Cucumber salads are a staple dish in spring and summer. The traditional cucumber salad this recipe seeks to replace is often bogged down with too much sugar, with some versions calling for as much as a cup of white sugar. Recipes like those stop being healthy, much as a taco salad loaded with beef, cheese, and sour cream in a deep-fried shell can’t claim to be a salad anymore. This recipe calls for far less sugar, allowing the dill to be the star of the show. Easy to make with simple ingredients, this salad is a great addition to any meal.
Makes 4 to 5 servings
Prep time: 1 hour 10 minutes
2 large cucumbers, trimmed
¼ cup (8 g) freshly chopped dill
¼ cup (30 g) thinly sliced red onion
3 tablespoons water
3 tablespoons white wine vinegar
1½ tablespoons coconut sugar
¼ teaspoon salt (or to taste)
1 Peel the cucumbers, if desired (I prefer to leave the skin on), then thinly slice them about ¼ inch (6 mm) thick. I suggest using a mandoline for this to make sure the slices are all the same thickness. Add the cucumbers to a large serving bowl with the dill and red onion.
2 In a small bowl, combine the water, vinegar, coconut sugar, and salt.
3 Pour the dressing over the cucumbers and mix well. Make sure all the cucumbers are evenly coated.
4 Cover and chill in the fridge for at least 1 hour. The flavors will get better the longer it sits. This salad should last at least 5 days in the fridge.
Broccoli salad is a staple at many summer parties. Traditionally it comes with a mayonnaise base and is topped with bacon. To make this vegan, I started with my cashew cream for the base. I substituted pepitas (pumpkin seeds) for the crunch and fat factor in lieu of bacon. The cranberries add that hint of sweetness and are an interesting twist from the more traditional apples. This salad gets better the longer it sits, so I highly recommend making it at least 30 minutes before you plan to eat it. If refrigerating overnight, mix in ½ teaspoon water before serving to help the cashew cream reconstitute a bit.
Makes 4 servings
Prep time: 20 minutes
SALAD
2 large heads broccoli, cut into florets (or 5 cups [450 g] broccoli florets)
1 large carrot, peeled and shredded (or 1½ cups [165 g] shredded carrots)
1 cup (120 g) dried cranberries
½ cup (60 g) pepitas (pumpkin seeds; see Variations)
¼ cup (30 g) thinly sliced red onion
DRESSING
½ cup (120 ml) Basic Cashew Cream (see Variations)
1 tablespoon apple cider vinegar
1 tablespoon maple syrup
½ teaspoon salt (or to taste)
1 Mix together all the salad ingredients in a large bowl and toss well.
2 In a small bowl, mix together the dressing ingredients and stir well.
3 Pour the dressing over the salad ingredients and mix until everything is evenly coated, for about 1 minute.
4 Serve immediately or refrigerate for later. This should keep in the fridge for at least a week.
Variations
• Feel free to use sunflower seeds or any nut you like in place of the pepitas. I think pecans would work nicely here as well.
• Those with nut allergies can use a vegan plain yogurt as a base instead of the cashew cream.
Wild rice is a great base in recipes. It adds that classic earthy, nutty flavor while extending the number of meals you can get out of your efforts in the kitchen. The spinach and mushrooms go well with the wild rice in this dish. The white wine vinegar really adds the special touch that makes it all worth your time, too. We’ve eaten this cold and warm, and both ways work, although I prefer eating it warm.
Makes 4 to 5 servings
Prep and cook time: 45 minutes
3 cups (720 ml) vegetable broth
1½ cups (240 g) uncooked wild rice blend
1 tablespoon avocado oil
1 garlic clove, minced
½ yellow onion, chopped
2 tablespoons white wine vinegar
8 ounces (225 g) mushrooms, thinly sliced
Salt and pepper to taste
3 to 4 cups (55 to 75 g) loosely packed baby spinach
1 In a saucepan, bring the vegetable broth and wild rice blend to a boil. Lower to a simmer and cook until all the broth is absorbed, about 40 minutes.
2 In another saucepan, combine the oil, garlic, onion, and white wine vinegar on medium-high heat and cook for 6 to 8 minutes, until the onions begin to soften.
3 Add the mushrooms and stir for another 5 minutes or so, until softened.
4 Once the rice is done, add it to the saucepan with the mushroom and onion mixture.
5 Add salt and pepper, then mix in the spinach. Cook until the spinach is slightly wilted, 2 to 3 minutes.
6 Remove the dish from the heat and serve immediately or refrigerate for later. This should last at least 4 days in the fridge. You can also freeze it for up to 6 months.
Shepherd’s pie is a traditional comfort food. I know I had my share as a child. Made with ground beef and white potatoes, the conventional version can hardly be considered a healthy meal. To make mine vegan, I use lentils in place of the ground beef, and instead of white potatoes, I use a cauliflower mash. Both these substitutions make for a far healthier alternative. The results are so good, we’ve been known to eat this out of the serving dish.
Makes 5 to 6 servings
Prep and cook time: 1 hour 15 minutes
LENTIL MIXTURE
2 cups (320 g) diced onion (or 1 onion, diced)
2 cups (480 ml) vegetable broth
1 cup (200 g) cooked green or brown lentils
1 cup (150 g) sweet corn kernels
1 cup (160 g) green peas
1 teaspoon dried parsley
½ teaspoon dried sage
½ teaspoon salt (or to taste)
CAULIFLOWER MASH
1 head cauliflower, cut into florets
1½ cups (360 ml) coconut milk (or one 13.5-ounce [400 ml] can full-fat coconut milk)
1 garlic clove, minced
½ teaspoon salt (or to taste)
Chopped flat-leaf parsely for garnish, optional
1 Place all the ingredients for the lentil mixture in an ovenproof 9-inch (23 cm) sauté pan (see Note). Cover and cook on medium to low heat, simmering for 30 minutes.
2 Preheat the oven to 350°F (180°C).
3 While the lentil mixture is simmering, add all the ingredients for the cauliflower mash to a food processor and blend until smooth, 1 to 2 minutes.
4 Once the lentil mixture is cooked through and all the water has been absorbed, add the cauliflower mash on top.
5 Place the pan in the oven and bake for 45 minutes. You can tell it’s done when the cauliflower mash is golden brown around the edges.
6 Garnish with parsely, if desired, and serve or refrigerate for later. This should last at least a week in the fridge. It also freezes for up to 6 months.
Note
If you don’t have an ovenproof pan, cook this in a regular pan and transfer to a 9 × 13-inch (23 × 33 cm) baking dish.
This classic Mediterranean dish is perfect to make when you’re busy with other things. The whole process takes 45 minutes, but most of that time is spent letting the dish stew on the stove or waiting for the eggplant to drain its excess moisture. If you’ve never used eggplant, this is a great place to start. An extremely versatile vegetable, it’s sort of like a natural tofu, with a mild taste that likes to soak up any flavor you cook it with. It’s also considered “brain food” and helps lower LDL (often referred to as “bad cholesterol”).
Makes 4 servings
Prep and cook time: 45 minutes
1 medium eggplant, diced
1 teaspoon salt (or to taste) plus extra for salting eggplant
3 cups (540 g) chopped tomatoes
2 cups (320 g) chopped onions (about 1 large yellow onion)
¼ cup (60 ml) vegetable broth
1 teaspoon minced garlic (about 1 garlic clove)
3 cups (500 g) cooked chickpeas (or two 15-ounce [425 g] cans chickpeas, drained and rinsed)
½ teaspoon ground cumin
½ teaspoon ground turmeric
1 Place the eggplant in a colander. Salt the eggplant and let it sit in the colander for at least 15 minutes. This removes some of the bitterness and also draws out liquid. Don’t skip this step.
2 After about 10 minutes into salting the eggplant, place the tomato, onions, and vegetable broth in a large pan on medium to medium-low heat and begin to soften the onion.
3 Place the eggplant and remaining ingredients in the pan, reduce the heat to low, and cover. Cook for approximately 30 minutes, stirring occasionally.
4 Serve immediately or refrigerate for later. This should last at least a week in the fridge. I don’t recommend freezing it.
Stir-fries are a great way to off-load whatever vegetables are sitting around the house. As a twist, I use cauliflower rice as a substitute for the grain. This dish is packed with nutrients from the peppers, cauliflower, broccoli, and more. Moreover, because it uses coconut aminos, it’s soy-free. One thing that stands out to me about this dish is how beautiful it looks. If you’re looking to “eat the rainbow,” this is a great place to start.
Makes 4 servings
Prep and cook time: 40 minutes
1 head cauliflower
2 tablespoons toasted sesame oil
½ to 1 tablespoon minced ginger (or to taste)
2 garlic cloves, minced
2 carrots, shredded
1 red bell pepper, thinly sliced
1 yellow bell pepper, thinly sliced
1 head broccoli, cut into florets and chopped
1 cup (160 g) green peas
¼ cup (60 ml) coconut aminos
Juice of 1 lime
1 teaspoon salt (or to taste)
2 green onions, chopped
1 Remove the stem from the cauliflower and roughly chop the florets. Place them in a food processor and pulse a few times until the cauliflower takes on a rice-like consistency.
2 Add 1 tablespoon of the toasted sesame oil to a large sauté pan on medium heat. Add the cauliflower rice and sauté for 5 to 6 minutes, or until the rice starts to look slightly toasted. Set aside.
3 In the same pan, add the remaining 1 tablespoon toasted sesame oil, along with the ginger and garlic. Sauté for 1 to 2 minutes. Add the carrots, peppers, broccoli, and green peas. Sauté for another minute.
4 Add the cauliflower rice, coconut aminos, lime juice, and salt. Sauté for a minute and then cover. Cook just long enough for the broccoli to soften a bit, about 2 minutes.
5 Garnish with the green onions and serve immediately. This should last for about a week in the fridge. I don’t recommend freezing it.
Variations
If you want to add protein to this, add some baked tofu or about 1 cup (140 g) toasted cashews:
• To bake tofu, preheat the oven to 350°F (180°C). Drain a block of firm tofu and pat it dry, then cube it and place on a lined baking sheet. Brush with sesame oil and sprinkle with a little salt. Bake for 35 minutes, until the edges are golden.
• To toast cashews, preheat the oven to 400°F (200°C) and bake on a baking sheet for 5 to 10 minutes, turning once, until lightly browned. Watch them closely after the first 5 minutes to make sure they don’t burn.
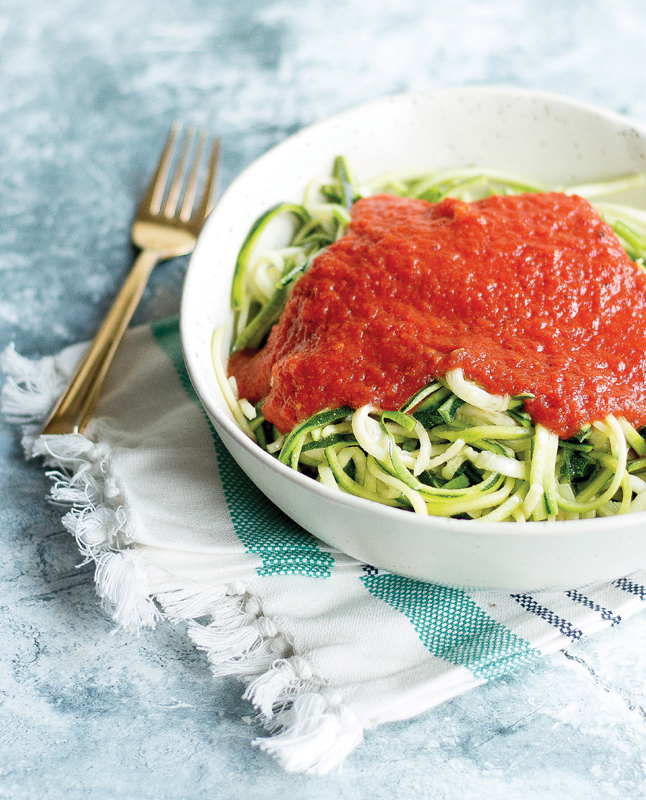
Spiralizing zucchini is a great alternative for those trying to reduce their grain intake. It can take a heavy pasta dish and turn it into an enjoyable meal that doesn’t leave you feeling bloated. This dish is all about the sauce, and while it might seem like a lot of work, it makes a lot of sauce. To save time, you can buy the roasted red peppers and roasted tomatoes in most grocery stores.
Makes 6 to 7 servings
Prep and cook time: 50 minutes
9 vine-ripened tomatoes
5 large red bell peppers
2 tablespoons plus 1 teaspoon avocado oil
1 teaspoon chili powder
1 teaspoon salt (or to taste)
½ teaspoon onion powder
½ teaspoon smoked paprika
¼ teaspoon ground coriander
¼ teaspoon ground cumin
3 medium zucchini
1 Preheat the oven to 350°F (180°C). Line a baking sheet with parchment paper.
2 Core the tomatoes and remove the insides of the bell peppers. Slice the peppers in half and place them on the baking sheet. Place the tomatoes on the baking sheet whole. Brush the tomatoes and peppers with 2 tablespoons of the avocado oil. Roast for 40 to 45 minutes.
3 Fill a large bowl with ice water. When the tomatoes are done roasting, place them into the ice bath. This will make it easy to peel the skins without burning your fingers.
4 Once the tomatoes are peeled, put them and the peppers in a large stockpot with the chili powder, salt, onion powder, smoked paprika, coriander, and cumin. Use an immersion blender to blend the sauce until smooth. If you don’t have an immersion blender, you can transfer to a standing blender and purée in batches. Set aside.
5 Using a spiralizer, slice each zucchini into pasta. If you don’t have a spiralizer, you can use a julienne peeler to make the pasta.
6 Place the zucchini in a large sauté pan with the remaining 1 teaspoon avocado oil. Quickly sauté on medium heat for about 1 minute, just long enough to warm up the pasta a little.
7 Pour the sauce over the pasta and serve immediately. If you plan to refrigerate for later, you should keep the sauce and pasta separate, as the zucchini pasta might release water once it’s stored.
Note
This recipe makes a lot of sauce. If you have some left over, it freezes great. It should last up to 6 months in the freezer. I like to freeze this in serving-size containers so I only need to pull out what I need.
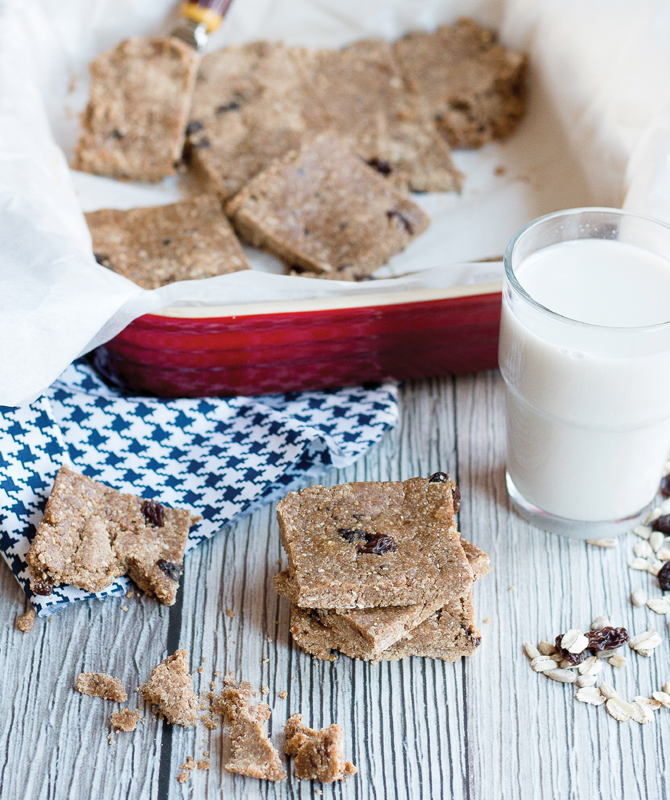
A decent healthy snack can be hard to come by these days. I’m always looking for healthy snack foods that are good on the go. These oatmeal snack bars fit the bill—and no baking required! They taste amazing, travel well, and provide the needed pick-me-up without the crash. Not only are these snack bars easy to make, but they’re packed with protein and fiber that will keep you full until you get home from a busy day.
Makes 9 large squares or 16 small squares
Prep and chill time: 35 minutes
2 cups (190 g) gluten-free rolled oats (see Variations)
1 teaspoon ground cinnamon
1¼ cups (340 g) unsalted peanut butter (see Variations)
½ cup (120 ml) maple syrup (see Variations)
¼ cup (30 g) pepitas (pumpkin seeds) or sunflower seeds
½ teaspoon salt
2 tablespoons water (if needed)
⅓ cup (50 g) raisins
1 In a food processor, pulse the oats and cinnamon a few times.
2 Add the remaining ingredients except the water and raisins. Blend until the mixture comes together, 1 to 2 minutes. If it seems dry, add a little bit of water at a time until it is the consistency of peanut butter. You just want the dough to hold together, so don’t make it too wet.
3 Add the raisins and pulse a few times to get them evenly dispersed.
4 Line an 8 x 8-inch (20 x 20 cm) glass baking dish with parchment paper. Make sure you leave a little paper sticking out of the sides of the dish. This will make the bars easier to remove once chilled.
5 Using a spatula, spoon the mixture into the lined baking dish. The dough will be pretty sticky, so wetting the spatula helps. Press the mixture down using the sides of the parchment paper.
6 Place the dish in the fridge to chill and firm up, about 30 minutes.
7 Once the mixture is firm, use the ends of the parchment paper to pull it out of the pan. Cut into bars with a pizza cutter. These bars should be stored in the fridge in an airtight container. They will last about 2 weeks. You can also freeze them for up to 6 months.
Variations
• For a grain-free option, use quinoa flakes in place of the gluten-free rolled oats.
• To make these nut-free, use sunflower butter in place of the peanut butter.
• If you are using a salted peanut butter, omit the salt.
• If you would like to cut down the amount of maple syrup, you can use applesauce in place of half the maple syrup.
We’re an on-the-go family, so I make sure to carry lots of snacks to keep us satiated. This trail mix is perfect for road trips, picnics, and long days running errands. It doesn’t need refrigeration and provides you with healthy fat, protein, and some carbs to keep you going. You can use it as a base and add in whatever flavors you like—the combinations are endless.
Makes 5 cups (750 g)
Prep and cook time: 35 minutes
1½ cups (210 g) raw almonds
1 cup (180 g) chopped dried apricots
1 cup (140 g) raw cashew pieces
1 cup (120 g) pepitas (pumpkin seeds) or sunflower seeds
½ cup (90 g) Medjool dates, pitted and chopped
1 teaspoon ground cinnamon
1 teaspoon ground vanilla beans
⅓ cup (80 ml) maple syrup
½ teaspoon salt
1 Preheat the oven to 350°F (180°C). Line a baking sheet with parchment paper.
2 In a large bowl, mix together the almonds, apricots, cashews, pumpkin seeds, dates, cinnamon, and ground vanilla beans. Stir until everything looks well mixed.
3 Add the maple syrup and stir until everything is evenly covered, about 1 minute.
4 Spread the mixture on the baking sheet and sprinkle the salt on top.
5 Bake for 20 minutes, stopping halfway through to shake the pan.
6 It’s important to let this cool completely, which could take a couple hours. Store the trail mix in an airtight container in the pantry. It should keep for several weeks. You can also freeze it for up to 6 months.
Variations
• The fruit and nuts are substitutable, so feel free to use what you have on hand.
• Unsweetened shredded coconut would go nicely in here. Start with ½ cup (30 g).
Notes
• If the mixture starts to clump together after baking and cooling, just break it up with your hands.
• I would avoid adding chocolate chips if you plan on taking this in the car. They tend to melt and can be quite messy. If you do add them, wait for the mixture to cool, and store it in a cool location.
Making fruit chips or fruit leathers can take a bit of time, but it’s much cheaper than buying store-bought versions. Plus, you can make a variety of flavors that you probably won’t find in the stores. Don’t let the long prep and cook time scare you—it’s really very easy; it just takes a while to dry the chips. The key is cooking them at a very low temperature to preserve as many nutrients as possible. A dehydrator takes very little energy to run, and it won’t heat up your house like the oven would. Much like a slow cooker, a dehydrator can run without you being home. My kids love these chips and they often don’t even make it into a storage container!
Makes 50 to 60 banana chips
Prep and cook time: 23 hours
2 bananas, thinly sliced
1 teaspoon ground cinnamon
½ teaspoon salt, optional
1 Line your dehydrator trays with parchment paper. Place the banana slices on top of the parchment and sprinkle with cinnamon and the salt, if using.
2 Turn on the dehydrator and set it to 135°F (57°C). Dry for 23 hours, or until the chips are completely dried and easy to remove from the paper. If the chips still stick to the paper, they’re not quite done yet.
3 Store the chips in a glass jar with rice scattered on the bottom to absorb extra moisture. They should keep in the pantry for several weeks.
Note
If you don’t have a dehydrator, you can make these in the oven. Bake them for at least 8 hours in a 215°F (100°C) oven.
The flavors of coffee, chocolate, and raspberry work so well together, especially in this easy brownie recipe. They’re quick to make, with little cleanup, and are irresistible. Substitute the raspberries with other berries, if you like.
Makes 18 brownies
Prep and cook time: 35 minutes
2 cups (210 g) gluten-free oat flour
1 cup (90 g) cocoa powder or ¾ cup (80 g) cacao powder (see Variations)
1 teaspoon baking powder
½ teaspoon salt
2 flax eggs
½ cup (120 ml) maple syrup
¼ cup (60 ml) almond milk
¼ cup (60 g) applesauce
¼ cup (60 ml) melted coconut oil (see Variations)
1 teaspoon coffee extract (see Variations)
1 teaspoon vanilla extract
¾ cup (180 ml Raspberry Vanilla Chia Jam
1 Preheat the oven to 350°F (180°C). Line an 8 x 8-inch (20 x 20 cm) glass baking dish with parchment paper. Make sure you leave some parchment paper sticking out of the sides. This will make the whole thing easier to lift out once it’s cooked.
2 In a medium bowl, mix all the dry ingredients.
3 In a large bowl, mix all the wet ingredients except the jam.
4 Add the dry ingredients to the wet and mix only until combined, using a hand mixer or a spatula.
5 Gently fold the raspberry jam into the batter.
6 Spoon the batter into the baking dish.
7 Bake for about 25 minutes, until a toothpick comes out clean.
8 Let the brownies cool completely, about 30 minutes, before removing them from the dish and cutting into bars. I use a pizza cutter to cut mine.
9 Keep these brownies stored in the fridge, where they should last a couple weeks. You can also freeze them for up to 6 months.
Variations
• If you prefer to use cacao powder instead of cocoa powder, make sure to reduce the amount. Also keep in mind that the cacao will make the brownies taste a little bitter.
• If you avoid oil, you can replace the coconut oil with more applesauce. If you do that, you need to grease the parchment paper so the brownies don’t stick.
• If you can’t find coffee extract, you can use instant coffee granules or omit altogether.
• Another great addition to this might be ½ cup (90 g) chocolate chips for an extra chocolate punch.
My kids love ice pops, but I refuse to buy most store-bought brands, since they’re laden with food dyes, are high in sugar, and lack real nutritional value. You can easily make your own pops much more cheaply, and they’ll be much more nutritious. I’m a firm believer that kids can’t turn down anything in pop form, so this is a great opportunity to sneak some veggies in. Two vegetables you can easily sneak into these pops are carrots and sweet potatoes. Since they’re the same orange color, they’ll go virtually undetected! I suggest adding 1 large carrot, chopped, or ½ cup (70 g) raw chopped sweet potato.
Makes 8 ice pops
Prep and chill time: 6 hours 5 minutes
One 13.5-ounce (400 ml) can full-fat coconut milk
1 large navel orange, peeled and sliced
2 to 3 tablespoons maple syrup
1 Place all the ingredients in a blender and blend until smooth.
2 Pour into ice pop molds and place in the freezer to firm up. It will take about 6 hours.
3 Enjoy! These should last in the freezer for up to 6 months.
Note
When you’re ready to eat a pop, just run the mold under hot water for a few seconds to loosen the mold.
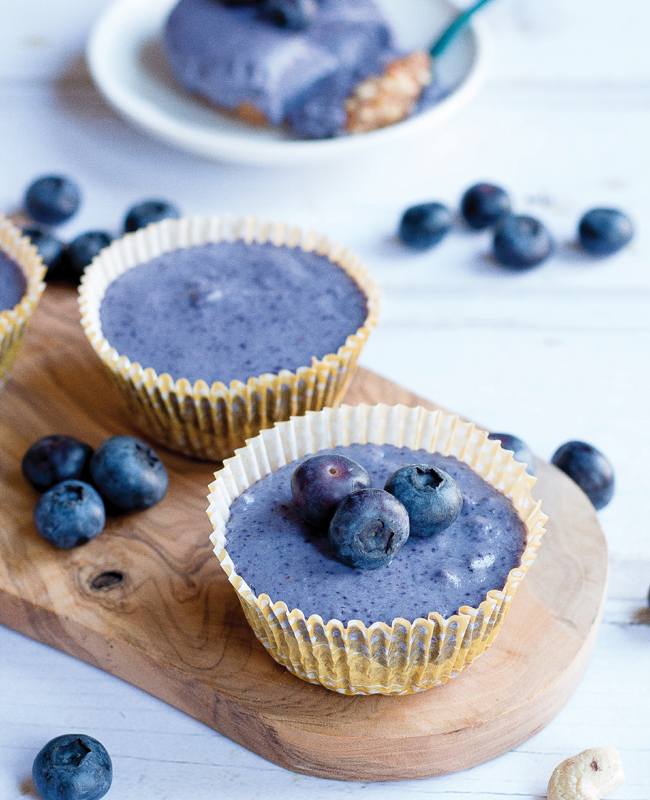
Cashews are an amazing ingredient. They can mimic so many non-vegan ingredients that they’ve become a staple in my kitchen despite their expense. If you want to enjoy cheesecake as a vegan, more than likely you’ll eat something with a cashew base. This blueberry cheesecake is so rich and decadent, you’ll forget there isn’t any actual cream cheese or other form of dairy in it. The blueberries will melt in your mouth and keep you coming back for more. The best part of this recipe is its versatility—any type of berry, from strawberries to blackberries, would work great.
Makes 18 mini cheesecakes
Prep and cook time: 6 hours 15 minutes
CRUST
1½ cups (210 g) raw almonds
8 to 10 Medjool dates, pitted
1 to 2 teaspoons water
CHEESECAKE
2 cups (280 g) raw cashews, soaked in water overnight
1½ cups (225 g) fresh blueberries (or frozen blueberries, thawed), plus more for optional topping
½ cup (120 ml) maple syrup
⅓ cup (80 ml) melted coconut oil
Juice of 1 lemon (or 2 tablespoons lemon juice)
½ teaspoon salt
1 In a food processor, combine the almonds and dates. Slowly add the water, 1 teaspoon at a time as needed, until the mixture clumps together.
2 Place liners in a muffin pan (I used standard-size muffin cups with silicone liners). Press a little bit of crust into each muffin cup. Place in the fridge while you make the cheesecake filling.
3 In a food processor, combine the cheesecake ingredients until the mixture is smooth, 1 to 2 minutes.
4 Spoon the cheesecake mixture into each muffin cup, filling it all the way to the top. Once all the muffin cups are filled, place the muffin pan into the fridge to firm up. It will take a good 6 hours until completely firm. You can also put the cheesecakes into the freezer for about 1½ hours to speed up the process.
5 Serve topped with fresh blueberries, if desired. These can be kept in the fridge or the freezer. They should last about 2 weeks in the fridge and up to 6 months in the freezer.
Variations
• If you want to make one big cheesecake instead of the mini cheesecakes, you can use a 6-inch (15 cm) springform pan.
• As mentioned, any berry can be used in place of the blueberries.
Don’t let the quinoa scare you away from these delicious bars. Quinoa flakes are very similar to quick oats in texture, and they can be used interchangeably. This dish requires few ingredients and is easily adapted by adding in your own favorites, such as seeds or dried fruit. The quinoa flakes give these bars a nutty taste and texture that go very well with the peanut butter and chocolate. Then again, doesn’t everything taste better with chocolate?
Makes 9 large squares or 16 small squares
Prep and chill time: 35 minutes
2 cups (210 g) quinoa flakes (see Variations)
1½ cups (405 g) unsalted peanut butter (see Variations)
½ cup (120 ml) maple syrup (see Variations)
½ teaspoon salt
⅓ cup (60 g) chocolate chips plus 2 tablespoons for sprinkling on top
1 Combine all the ingredients except the chocolate chips in a food processor for 1 to 2 minutes.
2 Once everything looks well combined, add ⅓ cup chocolate chips and pulse a few times to mix them in.
3 Line an 8 x 8-inch (20 x 20 cm) baking dish with parchment paper. Leave enough paper to stick out of the sides to make it easy to lift the entire thing out at once.
4 Using your palms, press the mixture down into the baking dish. Make sure you press down very well to ensure everything sticks together.
5 Press the remaining 2 tablespoons chocolate chips on the top of the mixture.
6 Place the baking dish in the fridge for about 30 minutes to firm up.
7 Once it’s firm, use a knife or pizza cutter to cut into squares.
8 These bars need to be kept in the fridge, where they should last up to 2 weeks. You can also freeze them for up to 6 months. If you decide to freeze them, I highly suggest wrapping them individually in plastic wrap before placing in the freezer.
Variations
• You can use gluten-free quick oats in place of the quinoa flakes if you want.
• If you have a nut allergy, you can use sunflower butter in place of the peanut butter.