Sure, we all splurge from time to time—there’s no better time to splurge than when having guests over. A point of constant stress when entertaining is, of course, what kinds of food to serve. Whether you’re having a dinner party or just want to put out some hors d’oeuvre for friends dropping by, these recipes are fun, healthy twists on classic party food. There’s no reason to ditch your healthy lifestyle when you’re having guests over for a meal. Recipes such as the Stuffed Sweet Potato Skins, Stuffed Peppers, and Three-Ingredient No-Bake Almond Butter Cookies are sure to please.
Despite how awesome traditional cinnamon rolls are, they can be quite time-consuming to make from scratch as well as loaded with sugar, and they don’t exactly inspire thoughts of healthy eating. I wanted to create a muffin recipe that would provide all the flavor of a cinnamon roll—the sweet bread, the unmistakable taste of cinnamon, the gooeyness in each bite—without sacrificing health. The other nice thing about these? They aren’t nearly as messy to make or to eat. You won’t feel like you need give your kids a bath after they’re done eating. These are fun to make and share with family and friends. I hope you enjoy them as much as we do!
Makes 12 standard-size muffins
Prep and cook time: 45 minutes
8 Medjool dates, pitted and soaked in water for at least 30 minutes
1½ teaspoons ground cinnamon
2 cups (210 g) gluten-free oat flour
1 teaspoon baking powder
1 teaspoon baking soda
½ teaspoon salt
½ cup (120 g) applesauce
¼ cup (60 ml) maple syrup
2 tablespoons almond milk
1 teaspoon vanilla extract
2 flax eggs
1 Preheat the oven to 350°F (180°C). Prepare the muffin pans: I use silicone liners so there’s no need to grease them. If you use paper liners, you will need to grease them before you add the muffin mixture (if you don’t, the muffins will stick to the paper). You can also skip the liners altogether and just grease the muffin pans.
2 Drain the dates and place them in a small blender or food processor along with ½ teaspoon of the cinnamon. Blend until you get a syrupy consistency. You may need to add a little water if the mixture seems thick. Start with ½ teaspoon at a time. Set aside.
3 In a large bowl, add the remaining teaspoon of cinnamon and the other dry ingredients. Stir quickly. Add the applesauce, maple syrup, almond milk, and vanilla extract to the bowl with the dry ingredients and combine. Mix in the flax eggs.
4 Once the ingredients in the bowl are all mixed, slowly fold in the cinnamon-date syrup. Don’t mix it in entirely; just lightly swirl it in with a spatula.
5 Using a large cookie scoop or spoon, place the batter into lined muffin pans.
6 Bake for 10 to 12 minutes, until a toothpick comes out clean. Let the muffins cool completely before removing them from the muffin pans (about 20 minutes).
7 Serve immediately or refrigerate for later. They should last a couple of weeks in the fridge. You can also freeze them for up to 6 months.
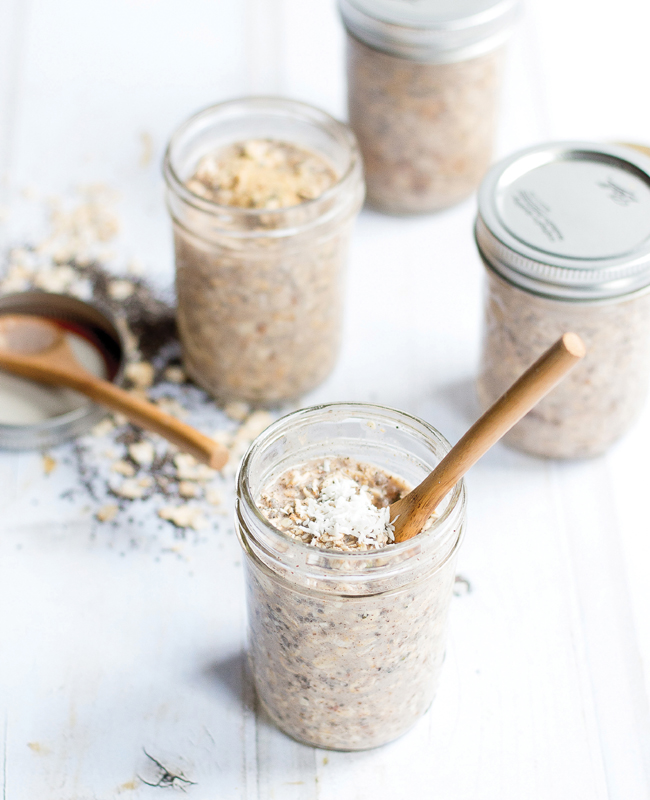
When I first began eating a whole food vegan diet, I never thought caramel would be something I would enjoy again. Discovering how to make a vegan salted caramel sauce changed that. This healthy breakfast tastes like a dessert but with less guilt. When I make overnight oats for myself, I like to make four servings at a time so I have breakfast for the week. But this breakfast is also easy enough to prepare for guests; just double the recipe. This way breakfast requires no cooking or preparation, which is great when we’re all in a hurry in the morning or when out-of-town guests are visiting. The oats are made in jars, so they travel well to work; you can eat them hot or cold, whatever your preference. Overnight oats are extremely versatile, simple, and one of my favorites.
Makes 4 servings
Prep time: 10 minutes
2½ cups (600 ml) almond milk (see Variations)
2 cups (350 g) gluten-free steel-cut oats or 2 cups (190 g) gluten-free rolled oats (see Variations)
¼ cup (60 ml) Salted Caramel Sauce
2 Medjool dates, pitted and chopped (or 1 teaspoon maple syrup)
1 tablespoon plus 1 teaspoon chia seeds
1 tablespoon plus 1 teaspoon hemp hearts
2 teaspoons ground vanilla beans
1 Mix all the ingredients in a large bowl and stir well.
2 Either leave in the bowl or spoon into separate 8-ounce jars. Cover and place in the fridge overnight.
3 You can eat this hot or cold. If you want to warm it up, put a portion in the microwave for 30 seconds, or warm it in a saucepan on medium-low heat for a few minutes.

Variations
• If you have a nut allergy, any dairy-free milk will work.
• I like to use gluten-free steel-cut oats for this because the steel-cut oats retain a crunch. If you prefer a smoother oatmeal, you can use gluten-free rolled oats.
• Feel free to add other ingredients—this recipe is very adaptable. A couple teaspoons of shredded coconut on top would work nicely with these flavors. You can also add a couple teaspoons of flaxseed meal for extra healthy good fats.
Sweet breakfasts don’t always hit the spot . . . sometimes you just need a good savory breakfast to fill up your tank in the morning. This recipe should do the trick. The classic south-of-the-border black bean and corn combination goes great with some avocado and a bit of fresh cilantro on top—and it makes a nice presentation when serving guests. If you’re looking to increase your vegetable intake, look no further. This recipe contains a decent variety of vegetables, so dig in and enjoy.
Makes 4 burritos
Prep and cook time: 45 minutes
2 cups (360 g) diced tomatoes (about 4 tomatoes)
1½ cups (360 ml) water
1 cup (160 g) diced yellow onion (about 1 small onion)
½ cup (80 g) uncooked wild rice blend
1 tablespoon avocado oil
2 cups (345 g) cooked black beans (or one 15-ounce [425 g] can black beans, drained and rinsed)
1 cup (150 g) sweet corn kernels
½ cup (75 g) diced green pepper (about 1 green bell pepper)
1½ teaspoons salt (or to taste)
¾ teaspoon ground cumin
1 garlic clove, minced
4 large gluten-free tortillas
1 Put the tomatoes, water, onion, rice, and oil in large sauté pan on medium-low heat. Cover and cook for about 40 minutes. You’ll need to check on this periodically to make sure the water doesn’t all get absorbed too soon. If the water gets too low and the rice isn’t done cooking, add more water—¼ cup (60 ml) at a time—until the rice is cooked. If it finishes before 40 minutes, continue to the next step.
2 Stir in the rest of the ingredients except the tortillas, cover, and cook for about 5 minutes on medium heat.
3 Remove from the heat, then place the filling in the tortillas. Wrap them up into burritos and serve. These should last in the fridge for at least a week.
Variations
• Get creative with your burritos by adding sliced avocado, cilantro, salsa, dairy-free sour cream, and/or lime juice.
• For a lower-carb option, wrap the filling in lettuce or serve on a bed of greens such as spinach, arugula, and baby kale.
Note
If you want to freeze these, wrap the burritos in plastic wrap first. Then you can just grab and reheat when you want them. You can also freeze the filling by itself. Frozen, these should last for up to 6 months.
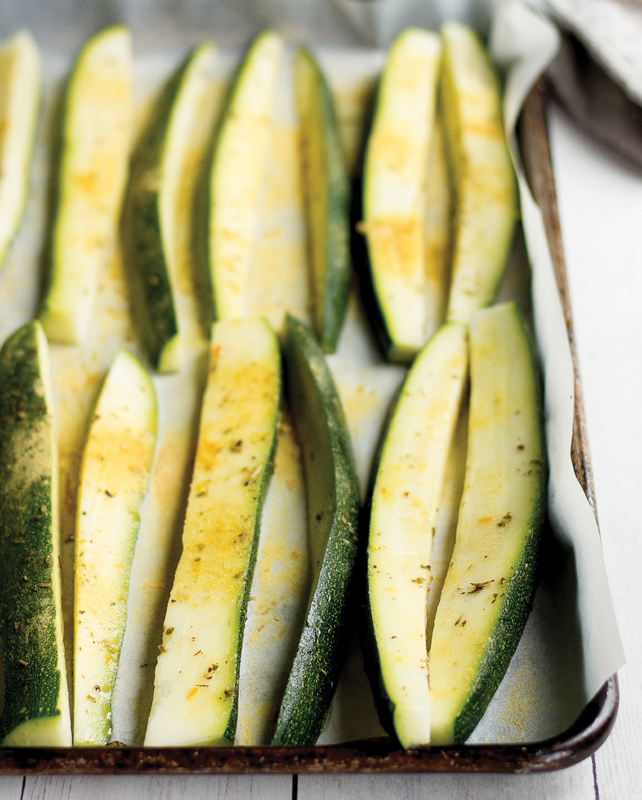
Zucchini is one of those vegetables that can go into just about any kind of recipe. While the combinations are endless for such a versatile vegetable, pairing it with lemon and garlic will keep your taste buds singing. It doesn’t hurt that zucchini is low in calories, with only 17 calories per 100 grams. It’s also high in antioxidants, and the skins are high in fiber. This is a healthy, tasty treat you can feel good about feeding to your family, especially since these zucchini sticks aren’t fried or dipped in bread crumbs, as in more traditional recipes.
Makes 24 zucchini sticks
Prep and cook time: 45 minutes
3 medium to large zucchini
⅓ cup (80 ml) lemon juice
1 tablespoon olive oil
½ teaspoon minced garlic
¼ teaspoon dried basil
¼ teaspoon onion powder
¼ teaspoon salt (or to taste)
2 tablespoons nutritional yeast (see Notes)
1 Preheat the oven to 375°F (190°C). Line a baking sheet with parchment paper.
2 Cut the ends off the zucchini, then slice the zucchini widthwise down the middle, leaving you with two pieces half the length of the original zucchini. Quarter each half lengthwise and place on the baking sheet.
3 In a small bowl, mix the lemon juice, olive oil, garlic, dried basil, onion powder, and salt. Using a silicone brush, brush the mixture onto the zucchini.
4 Using your fingers, dust each zucchini stick with a little nutritional yeast, covering it completely.
5 Bake the zucchini sticks for 40 minutes. They will be lightly golden brown when done.
6 Remove from the oven and let cool slightly before serving. These should last 1 week in the fridge.
Notes
• These will not turn out super-crispy, as there isn’t any breading on them and they’re not pan-seared or fried. If you want to make them crispy, turn your oven to broil for the last 2 to 3 minutes of cooking.
• You can add a bit more nutritional yeast if you want a stronger cheese flavor.
• You might have some leftover lemon garlic sauce at the end; I find sauces like this can double as salad dressing.
Stuffed potato skins are an all-American favorite, but when made in the traditional style, they’re far from healthy. They normally come loaded with cheese, bacon, and sour cream. I wanted to show that with a little ingenuity, even some of the unhealthiest dishes can be reinvented. This healthy twist doesn’t compromise what we all love about the original, with crispy potato skins, a bunch of crunch, and a cool, sour flavor.
Makes 10 potato skins
Prep and cook time: 1 hour 30 minutes
5 small sweet potatoes
½ cup (120 ml) Basic Cashew Cream
1 tablespoon apple cider vinegar
1 tablespoon lemon juice
1 garlic clove, minced
½ teaspoon salt (or to taste)
2 tablespoons pepitas (pumpkin seeds; see Notes)
2 tablespoons nutritional yeast
⅓ cup (30 g) chopped green onions
2 tablespoons freshly chopped flat-leaf parsley, optional
1 Preheat the oven to 400°F (200°C).
2 Place the sweet potatoes on a lined baking sheet and bake for 60 minutes.
3 In a small mixing bowl, combine the cashew cream, apple cider vinegar, lemon juice, garlic, and salt. Set aside in the refrigerator.
4 Remove the potatoes from the oven and let cool so you can handle them easily. Cut each potato lengthwise down the middle. Using a small spoon, scoop out 1 tablespoon of the sweet potato from each skin (see Notes).
5 Place 5 to 7 pepitas in the middle of each skin, then sprinkle nutritional yeast on top. If desired, salt the middle of each skin. Bake in the oven for 15 minutes.
6 Remove from the oven and place a dollop of the cashew cream mixture in the middle of each skin. Sprinkle some green onions and chopped parsley, if using, on top.
7 These are best served immediately, but they will keep in the fridge for at least 4 days.
Notes
• The pepitas are there to add crunch, like the bacon does in the traditional recipe. If you don’t have pepitas, you can use sunflower seeds.
• You can use the leftover sweet potato flesh in Sweet Potato Pancakes.
• If you want to have some garlic sour cream left over for dipping, double the recipe.
Coleslaw is a staple at most family gatherings across America. Some fast-food restaurants serve it, traditional Southern restaurants always seem to have it on the menu, and many families have an old recipe that’s passed down from one generation to the next. I find that the problem with most recipes is the mayo—there’s lots (and lots) of it. I love a good coleslaw like anyone else, but I cleaned this one up a bit. This recipe literally comes together in just minutes. It also gets better when it’s left to sit in the fridge overnight.
Makes 6 servings
Prep and chill time: 40 minutes
3 large carrots, shredded
One 12-ounce (340 g) bag broccoli slaw (about 4 cups)
2 garlic cloves, minced
2 tablespoons tahini (see Note)
1½ tablespoons apple cider vinegar
2 teaspoons lemon juice (or the juice of ½ small lemon)
2 teaspoons maple syrup
1 teaspoon salt (or to taste)
1 In a large serving bowl, mix together the shredded carrots and broccoli slaw.
2 In a large liquid measuring cup or a small bowl, add the garlic, tahini, apple cider vinegar, lemon juice, maple syrup, and salt. Whisk well and pour over the slaw. Mix with a spatula until everything is well combined and the slaw is evenly coated.
3 Cover and place in the fridge for 30 minutes for the flavors to blend together a little.
4 Serve or continue to refrigerate for later. This should keep in the fridge for at least a week.
Note
You can use sunflower butter in place of tahini if you prefer, or if you have a sesame allergy.
This Asian-inspired quinoa salad is packed with vegetables. While the recipes calls for red and yellow peppers, all varieties of peppers work well in this dish. You can also use red onions in place of the green onions if you’re looking for a more intense onion flavor. Since the vegetables are all raw, you don’t lose any of the health benefits that you normally would during cooking. With that in mind, let the quinoa cool before adding the rest of the ingredients so as not to inadvertently heat the vegetables.
Makes 5 to 6 servings
Prep and cook time: 45 minutes
SALAD
2 cups (480 ml) water
1 cup (170 g) uncooked quinoa (see Notes)
2 cups (180 g) shredded purple cabbage (or ¼ head cabbage, thinly sliced)
1½ cups (235 g) cooked and shelled edamame (or green peas)
2 to 3 green onions, chopped
2 large carrots, shredded
1 red bell pepper, thinly sliced
1 yellow bell pepper, thinly sliced
DRESSING
2 tablespoons coconut aminos (or gluten-free soy sauce; see Notes)
2 tablespoons toasted sesame oil
2 tablespoons mirin (see Notes)
Juice of 1 large lime
½ teaspoon salt (or to taste)
1 In a small saucepan, bring the water and quinoa to a boil. Turn the heat down to medium-low, cover, and let simmer until all the water is absorbed, 10 to 15 minutes. Let the quinoa cool.
2 Once the quinoa has cooled, add it to a large bowl with the remaining salad ingredients. Mix until everything looks well combined.
3 To make the dressing, add all the ingredients to a small bowl. Whisk together.
4 Pour the dressing over the salad and mix well. This should last for at least a week in the fridge.
Notes
• To make things easier, you can prepare the quinoa the day before. This way, it will be completely cooled when you add the rest of the ingredients.
• If you use soy sauce in place of the coconut aminos, make sure to omit the salt. Soy sauce is very salty, so there will be no need for extra salt.
• If you have trouble locating mirin, check the Pantry section for a good substitute.
One of the unique flavor combinations of Mediterranean cuisine is the brine of olives and feta cheese. Greek foods often contain these two ingredients in abundance—we’ve all had a Greek pasta salad loaded with them. This recipe keeps the same flavor profile but is a healthier version, substituting the carb-heavy pasta with gluten-free buckwheat. The saltiness of the kalamata olives with the fresh touch of the lemon juice really makes this dish. The variety of crisp, raw vegetables adds a nice crunch with each bite, too. This simple dish will be in constant rotation for those who love all things Mediterranean.
Makes 5 to 6 servings
Prep and cook time: 25 minutes
3 cups (720 ml) water
1½ cups (275 g) uncooked buckwheat groats
1 cup (150 g) sliced cherry tomatoes
½ cup (50 g) chopped green onions
½ cup (75 g) diced yellow bell peppers
½ cup (90 g) pitted and chopped kalamata olives
½ medium cucumber, chopped, optional (see Notes)
1 tablespoon lemon juice
2 teaspoons minced roasted garlic (about 5 garlic cloves; see Notes)
1 teaspoon olive oil
1 teaspoon salt (or to taste)
1 In a large pot, bring the water to a boil. Add the buckwheat and cook for 15 minutes or until soft.
2 Drain the water from the buckwheat, then run cool water over it to cool it off.
3 Place the cooled buckwheat in a large bowl and stir in the other ingredients. Serve chilled or at room temperature.
Notes
• The cucumbers are optional depending on how you serve this. If you plan to serve it chilled, the cucumbers are a great addition. If you’re serving it at room temperature, I find the cucumbers can get a bit slimy and ruin the dish.
• Fresh flat-leaf parsley would be a great addition. I suggest using ¼ cup (15 g) coarsely chopped parsley.
• The roasted garlic adds a great touch to the whole dish. While you can buy roasted garlic at most grocery stores these days, making your own is easy. Simply cut the top off a bulb of garlic, brush with some oil, wrap it in foil, and place it in the oven for 20 minutes at 350°F (180°C). Once you remove it from the oven, let it cool a bit before removing the garlic from the skins. To mince the garlic, I use a Microplane grater.
I could live on roasted vegetables—I eat them almost every single day. No matter what marinade you use, they always taste perfect. While brussels sprouts are my favorite vegetable to roast, broccoli is a close second—it is simply an amazing plant. One cup of this little tree provides your entire day’s worth—and more—of vitamins C and K. (Who says you need sugary orange juice to get your vitamin C?) This recipe is super-simple and turns out wonderfully. You’ll want to devour the whole pan! While you’re doing that, you can take comfort in eating a food that’s considered one of the healthiest for you.
Makes 4 servings
Prep and cook time: 30 to 40 minutes
2 large heads broccoli, cut into florets
2 tablespoons avocado oil (or olive oil)
Juice of 1 small lemon
½ teaspoon garlic powder
½ teaspoon salt (or to taste)
1 Preheat the oven to 350°F (180°C). Line a baking sheet with parchment paper.
2 Toss all the ingredients together in a large mixing bowl, making sure the broccoli is evenly coated.
3 Spread on the baking sheet and bake for 15 minutes.
4 Remove the pan from the oven and shake the broccoli around, then bake for another 10 minutes. The broccoli will still be a little crunchy. If you’d like it to be softer, cook an extra 10 minutes or so.
5 Enjoy! This will last at least a week in the fridge.
Note
Don’t discard the broccoli stalks. You can save them to make vegetable broth.
Stuffed peppers are always a crowd pleaser. They’re simple to make, taste great, and easy to clean up. This recipe calls for just a handful of ingredients, so if you’re new to stuffed peppers, this would be a great start. Just be sure the rice is cooked well. The rice at the top of the pepper tends to dry out in the oven, so I like to sprinkle some water on top with my fingers halfway through the baking process, since hard rice is never a good thing.
Makes 4 servings
Prep and cook time: 50 minutes
4 cups (760 g) cooked brown rice (see Variations)
⅔ cup (100 g) diced yellow onion
3 garlic cloves, minced
¼ cup (40 g) raisins
2 tablespoons dried parsley
2 tablespoons olive oil
1 bay leaf
1 teaspoon salt (or to taste)
4 red or yellow bell peppers
1 Put all the ingredients except the peppers in a large sauté pan on medium heat. Cook for 10 to 15 minutes. The onions should be soft but not brown. Remove the bay leaf.
2 While the rice mixture is cooking, preheat the oven to 400°F (200°C). This is also a good time to prep the peppers.
3 Cut the tops off the peppers and scoop all the seeds out. Rinse them to get all the seeds out.
4 Stand the peppers in a baking dish, brush the outsides with oil, and fill each pepper with the rice mixture. Bake for about 20 minutes.
5 Serve while they’re still warm. They’ll keep in the refrigerator for a day or two.
Variations
• If you prefer, you can use quinoa in place of the rice.
• If you want to spice this up a bit, add ¼ teaspoon ground cumin to the rice mixture as it cooks.
• Chickpeas are a nice protein addition. I recommend using 1 cup (165 g) cooked chickpeas and only 3 cups (570 g) rice.
Notes
• You can make the rice mixture the day before and then cook the peppers right before you serve them.
• When you refrigerate these, they’ll soften a bit overnight with all the moisture inside the pepper.
Meet the Southwestern Quinoa Casserole: vegan comfort food. Quinoa is a plant-based complete protein, so this dish packs a real nutritional punch. It’s great for potlucks, parties, and those cold days when you just want something to help warm up. The Macadamia Nut Cheese Sauce makes this dish to die for and adds some great fats to the recipe. You load it all up with tons of fresh veggies and anyone will enjoy this dish.
Makes 5 to 6 servings
Prep and cook time: 1 hour 40 minutes
2 cups (480 ml) water
1 cup (170 g) uncooked quinoa
1 cup (150 g) diced green bell peppers
1 cup (150 g) diced red bell peppers
½ cup (35 g) diced mushrooms
½ cup (80 g) diced yellow onion
1 jalapeño, diced (optional; see Notes)
1 garlic clove, minced
2 tablespoons avocado oil
1 teaspoon chili powder
1 teaspoon salt (or to taste)
2½ cups (600 ml) Macadamia Nut Cheese Sauce
2 cups (300 g) chopped cherry tomatoes
1½ cups (255 g) cooked black beans (or one 15-ounce [425 g] can black beans, drained and rinsed)
¼ cup (35 g) chopped roasted red peppers
Chopped cilantro, for garnish
Chopped green onions, for garnish
1 Add the water and quinoa to an ovenproof 9-inch (23 cm) sauté pan (see Notes). Bring to a boil, then turn the heat down to a simmer, cover, and cook until all the water is absorbed, about 10 minutes.
2 Add the green peppers, red peppers, mushrooms, onion, jalapeño, garlic, avocado oil, chili powder, and salt to the pan. Cover and cook for about 7 minutes, stirring often.
3 Preheat the oven to 350°F (180°C).
4 Turn the flame off, add the cheese sauce, tomatoes, black beans, and roasted red peppers, and stir well.
5 Transfer the pan to the lower oven rack and bake for 1 hour.
6 Garnish with cilantro and green onions and serve. This casserole should last at least a week in the fridge.
Notes
• If you don’t want this to be spicy, remove the seeds from the jalapeño or just omit it altogether.
• If you don’t have an ovenproof pan, cook this in a regular pan and transfer to a 9 × 13 (22 × 33 cm) baking dish.
• This recipe is best served fresh; I don’t recommend freezing it.
Veggie burgers from a box have always let me down. They usually have a rubbery texture and cardboard taste, which is why I prefer homemade veggie burgers. This recipe is super-easy to make with ingredients that won’t break the bank, and it allows for so many possibilities. Use a bun or lettuce wrap, or do I as do: Eat them as is, topped with a spread such as Dijon mustard and a side of roasted veggies.
Makes 6 small burgers
Prep and cook time: 1 hour
1 small zucchini, chopped
2 cups (360 g) cooked white beans (or one 15-ounce [425 g] can white beans, drained and rinsed)
2 tablespoons diced onion
½ teaspoon garlic powder
½ teaspoon smoked paprika
¼ teaspoon salt (or to taste)
¼ cup (30 g) flaxseed meal
¼ cup (25 g) gluten-free oat flour
1 Preheat the oven to 350°F (180°C). Line a baking sheet with parchment paper.
2 Add the zucchini and white beans to a food processor and mix for 1 to 2 minutes, until they break down into a coarse texture. You may have to scrape down the sides a few times.
3 Add the diced onion, garlic powder, smoked paprika, and salt and mix for another minute. Next, add the flaxseed meal and the oat flour and mix until everything is incorporated, about 1 minute.
4 Using your hands, form the mixture into small patties and place them on the baking sheet.
5 Bake for 25 to 30 minutes. Let the burgers cool before removing from the baking sheet, about 20 minutes.
6 Serve immediately or refrigerate for later. Store them in an airtight container in the fridge. These should last a couple weeks in the fridge. You can also freeze them for up to 6 months.
Crackers are a fantastic snack, even for very young kids. However, if you buy gluten-free vegan crackers at the store, you know how pricey they can get. You can easily make your own at home, where you get to control the ingredients, flavors, and budget. Although this recipe takes a bit of time, it’s worth it.
Makes 28 to 30 crackers
Prep and cook time: 50 minutes
1½ cups (285 g) cooked brown rice
½ cup (95 g) cooked quinoa
½ cup (25 g) sun-dried tomatoes, soaked in water for 30 minutes
2 teaspoons dried basil
2 teaspoons dried parsley
2 teaspoons maple syrup
½ teaspoon dried oregano
½ teaspoon salt (or to taste)
1 to 2 teaspoons water (if needed)
1 Preheat the oven to 350°F (180°C).
2 In a food processor, blend the brown rice and quinoa for 1 minute. Drain the sun-dried tomatoes and add them to the food processor. Blend for another minute. Add the basil, parsley, maple syrup, oregano, and salt. Blend for 30 seconds. Add the water, 1 teaspoon at a time, if the mixture looks dry. You want the mixture to clump together but not be too wet.
3 Tear three sheets of parchment paper the length of one baking sheet. Lay one sheet of parchment paper on the countertop. Take half of the cracker dough and place it in the middle of the parchment paper. Place another sheet of parchment paper on top of that.
4 Using a rolling pin on top of the parchment paper, roll out the mixture until it’s about ¼ inch (6 mm) thick (it should cover most of the paper). Transfer the paper with the rolled-out mixture onto a baking sheet. Repeat the same steps with the second half of the dough, placing it on a second baking sheet.
5 Place the baking sheets in the oven and bake for 15 minutes.
6 Pull the baking sheets out of the oven. Using a pizza cutter or knife, cut the dough into squares and then flip each square over.
7 Place the baking sheets back in the oven for another 15 minutes. If the crackers are not crispy at that point, bake them for 5 minutes more.
8 Let the crackers cool completely (about 35 minutes) before storing in an airtight container (see Note). These should last several weeks in the pantry.
Note
Store these crackers in an airtight container with rice scattered on the bottom. The rice will absorb moisture and keep them crispy.
Roasted chickpeas are a huge favorite in our house. Both of my girls inhale the sweet version I make, which is nothing short of amazing given their proclamations of hating beans! Roasted chickpeas don’t have to be sweet, though. The chickpea has a very distinct but mild flavor that makes it incredibly versatile. The combination of sweet, sour, and salty flavors in these Salt & Vinegar Roasted Chickpeas is out of this world. We never have leftovers—they get scooped up and eaten right off the baking sheet! If you’re trying to move away from potato chips, this is a great alternative.
Makes 6 servings
Prep and cook time: 3 hours 50 minutes
3 cups (500 g) cooked chickpeas (or one 25-ounce [708 g] can organic chickpeas, drained and rinsed)
1 cup (240 ml) apple cider vinegar
1 cup (240 ml) water
2 tablespoons avocado oil
2 teaspoons salt (or to taste)
1 In a large bowl, combine the chickpeas, apple cider vinegar, and water. Let the mixture marinate for 3 hours.
2 Preheat the oven to 350°F (180°C). Line a baking sheet with parchment paper or grease it lightly.
3 When the chickpeas are done marinating, drain them in a fine-mesh strainer, then put them back in the bowl they were soaking in.
4 Toss in the avocado oil and salt and mix.
5 Spread the chickpeas on the baking sheet.
6 Bake for 45 minutes, stopping to shake the chickpeas every 10 to 15 minutes.
7 Let the chickpeas cool completely before storing them in an airtight container. These should last for at least 2 weeks in the pantry.
Note
To keep the chickpeas crunchy, scatter some rice at the bottom of the container you store them in. The rice will absorb any excess moisture.
This is a super-easy appetizer that party or dinner guests will love. You can make the filling ahead of time and then bake the mushrooms right when the party starts so the dish will be fresh. While most stuffed mushrooms have bread crumbs on top, I decided to use quinoa flakes for that same crunchy effect. This unique twist is my favorite part of the whole recipe; it shows how you can make easy substitutions and not lose what you love about the original.
Makes 30 stuffed mushrooms
Prep and cook time: 30 minutes
1 pound (450 g) mushrooms (about 30 mushrooms)
2 tablespoons olive oil
1 teaspoon salt
1 cup (240 ml) Basic Cashew Cream
½ cup (80 g) diced yellow onion
¼ cup (15 g) freshly chopped flat-leaf parsley
½ cup (50 g) quinoa flakes, plus more for topping (see Variations)
1½ teaspoons dried oregano
1 Preheat the oven to 350°F (180°C). Line a baking sheet with parchment paper.
2 Using a damp kitchen towel, clean the tops of the mushrooms. Grab the stems and give them a little twist to remove them from the caps. Set the stems aside and place the caps on the baking sheet.
3 Brush the caps with the olive oil and sprinkle with ½ teaspoon of salt.
4 In a food processor, combine the cashew cream, mushroom stems, onion, parsley, and the remaining salt. Pulse a few times to mix everything up, but not too much (you don’t want to completely purée it). Add the quinoa flakes and pulse a few more times.
5 Spoon the stuffing into the caps of each mushroom. I like to pile a little of the stuffing on top, too.
6 When all the mushrooms are stuffed, sprinkle some quinoa flakes and the oregano on top.
7 Bake for about 20 minutes. The tops should be lightly golden brown.
8 Serve immediately for best results, although they can also be stored in the fridge for about 1 week.
Variations
• If you don’t have gluten issues, you can use panko bread crumbs instead of quinoa flakes.
• Another twist is to add 2 tablespoons nutritional yeast to the mixture for a cheesy, nutty flavor.
I love when I can trick my kids into eating healthy food. While both of them claim to hate beans, they gobble these right up without one complaint. These rich treats come with a hidden ingredient full of protein: the lovable chickpea. I use chickpeas in a variety of ways, including sweet recipes. They’re so versatile and provide a texture and moisture similar to dairy-based goods when used in baked goods. It also happens that I love snickerdoodle-flavored anything, so this recipe is a perfect fit for me.
Makes 9 large squares or 16 small squares
Prep and cook time: 45 minutes
2 cups (330 g) cooked chickpeas (or one 15-ounce [425 g] can chickpeas, drained and rinsed)
1 cup (95 g) gluten-free rolled oats
½ cup (125 g) unsalted almond butter
⅓ cup (80 ml) maple syrup
2 teaspoons ground cinnamon
1 teaspoon vanilla extract
½ teaspoon baking powder
½ teaspoon salt
2 flax eggs
2 tablespoons coconut sugar
1 Preheat the oven to 350°F (180°C). Line an 8 × 8-inch (20 × 20 cm) baking dish with parchment paper. Make sure you leave some paper sticking out of the sides to make it easier to remove.
2 In a food processor, grind up the chickpeas for 1 minute, then add the oats, almond butter, maple syrup, 1½ teaspoons of the cinnamon, the vanilla extract, baking powder, and salt. Add the flax eggs and blend again until smooth, about 2 minutes.
3 Spoon the mixture into the baking dish. It will be very sticky; using a wet spatula helps.
4 Sprinkle the coconut sugar and the remaining ½ teaspoon cinnamon on top.
5 Bake for 15 minutes, until golden on top.
6 Let it completely cool (about 20 minutes) before removing from the baking pan. Then lift the whole thing out by grabbing the ends of the parchment paper. Use a pizza cutter or knife to cut into bars.
7 Store them in an airtight container in the fridge. They should last about 2 weeks. You can also freeze them for up to 6 months.
The peaches and maple syrup are the perfect combination of sweet and tart in this crumble, and the oats give it that crisp texture. If you want to add a creamy flavor to this dish, some Coconut Whipped Cream would go really well with it. This dessert makes the house smell absolutely divine and doesn’t last long around my family. Be prepared for everyone to hang over the dish trying to get the last bite.
Makes 6 servings
Prep and cook time: 1 hour
5 peaches, pitted and thinly sliced
1 tablespoon flaxseed meal
¼ cup (60 ml) plus 2 tablespoons maple syrup
1½ cups (145 g) gluten-free rolled oats (see Variations)
3 tablespoons melted coconut oil
2 tablespoons applesauce
2 teaspoons ground cinnamon
1 teaspoon almond extract
½ teaspoon salt
1 Preheat the oven to 350°F (180°C).
2 Place the sliced peaches in an 8-inch (20 cm) glass pie pan. Sprinkle the flaxseed meal over the peaches and toss with a spatula, then pour 2 tablespoons of the maple syrup over the peaches.
3 In a large mixing bowl, add the oats, the remaining ¼ cup maple syrup, the coconut oil, applesauce, cinnamon, almond extract, and salt. Pour the oat mixture over the peaches.
4 Bake for about 45 minutes. You will see the edges and top turn a slight golden brown once done.
5 Serve immediately. This crumble should last a couple weeks in the fridge.
Variations
• This recipe would work great with apples as well.
• For a grain-free version, you can use chopped almonds or pecans in place of the rolled oats.
My favorite part of holiday meals is dessert, and my favorite desserts are the ones with fruit as the centerpiece. While I love all varieties of fruit, berries really have a special place in my heart. Soft, sugary, and sour-sweet, berries always hit the spot. Filled with strawberries, blackberries, and blueberries, this mixed berry crisp may look fancy but is actually super-easy to make. It would be especially delicious with some creamy vanilla ice cream on top.
Makes 10 to 12 servings
Prep and cook time: 40 minutes
1 pint (about 2 cups [340 g]) blackberries
1 pint (about 2 cups [340 g]) blueberries
2 cups (330 g) sliced strawberries
¼ cup (60 ml) plus 2 tablespoons maple syrup
¼ cup (60 ml) water
Juice of ½ lemon
1 teaspoon grated lemon zest
1 teaspoon salt
2 tablespoons chia seeds
1½ cups (170 g) almond flour (see Notes)
2 tablespoons melted coconut oil (see Notes)
½ to 1 teaspoon almond extract (see Notes)
1 Preheat the oven to 350°F (180°C).
2 In a large ovenproof sauté pan, add the blackberries, blueberries, strawberries, ¼ cup of the maple syrup, the water, lemon juice, lemon zest, and ½ teaspoon of the salt. Cook on medium heat for 5 to 7 minutes; you want the fruit to still hold its shape but be a little softer.
3 Remove the berries from the heat and add the chia seeds. Stir well and let the mixture stand for about 5 minutes.
4 In a food processor, combine the almond flour, coconut oil, remaining 2 tablespoons maple syrup, ½ teaspoon salt, and the almond extract. Pulse until the mixture starts to come together.
5 Sprinkle the almond flour mixture over the fruit.
6 Place in the oven and bake for about 15 minutes, until golden.
7 Let the crisp cool completely (about 10 minutes) before serving on its own or topped with some Blackberry Ice Cream or Coconut Whipped Cream. This should last about 1 week in the fridge.
Notes
• If you have a nut allergy, you can use gluten-free rolled oats in place of the almond flour and vanilla instead of almond extract.
• If you don’t use oil, you can use applesauce instead of the coconut oil at the same ratio.
• I add about 1 teaspoon almond extract, but if you prefer a more subtle almond flavor, just add ½ teaspoon.
My three-ingredient peanut butter cookies, one of my favorite recipes on my blog, were the inspiration for these almond butter cookies. With just three ingredients, they are super-easy to make, and they’re even easier to eat. The dates provide a nice caramel flavor, and I can’t say enough good things about almond butter. A cousin to peanut butter, almond butter is rich in flavor, protein, and iron. For once, you can feel pretty good about eating cookies.
Makes 12 cookies
Prep and chill time: 35 minutes
8 Medjool dates, pitted and soaked in water for 30 minutes (see Notes)
1 cup (250 g) unsalted almond butter (see Notes)
½ teaspoon salt
1 Drain the dates and add them to a food processor with the almond butter and salt. Blend for 1 to 2 minutes, until everything looks well combined. Be careful not to overblend.
2 Line a baking sheet with parchment paper. Using a small cookie scoop, drop the dough onto the baking sheet. Flatten the cookies with a fork, making a crisscross pattern.
3 Place the cookies in the fridge to set up, about 30 minutes.
4 Keep these cookies stored in the fridge. They should last a couple weeks. You can also freeze them for up to 6 months.
Notes
• If you can’t find Medjool dates, you can use another kind of date. You will need to use about 12 total, since Medjool are the largest variety.
• If you have a nut allergy, you can use sunflower butter in place of the almond butter. If you prefer peanut butter, that will also work.
• If you use salted nut butter, skip the salt in the recipe.