Getting the Garden in the Ground
Remember this: Whoever sows sparingly will also reap sparingly, and whoever sows generously will also reap generously.
2 CORINTHIANS 9:6
Getting all your seed packets out is akin to a fashionista getting the latest runway collection. There’s something special and exciting when the air is almost pregnant with the flavor and colors of all the crops you’ll soon be harvesting.
One of the biggest woes for most gardeners is the winter season (though sometimes it’s a welcome rest period), when not much grows and your garden feels barren. While most gardeners won’t be able to plant out much in those cold months (unless they’re using season extenders), this is when you’ll begin seed starting.
You can choose to purchase starts from a local greenhouse or garden center, but starting seeds at home is fairly easy and can save you quite a bit of money. It also means you get to pick and control the exact varieties you want to grow. Call me a control freak, but this plays a big part in my seed starting.
Most greenhouses and big garden centers will only have a few varieties of each plant type to pick from, usually the most popular. In my decades of gardening, I’ve only once seen a San Marzano Lungo heirloom tomato start for sale near me. For my heirloom-loving peeps, you’ll most likely need to seed start your own to get the varieties you want. I will try not to gush at all the choices, but seriously—one must spend at least one afternoon thumbing through the tomato section of your favorite seed company.
Seed starting indoors is a great way to extend your growing season and get a harvest that much sooner. I wouldn’t be able to plant tomato seeds outdoors until mid-May on a warm year, and since they take about 80 days to harvest, I’d just get tomatoes when the cold weather would set in, cutting off my harvest time. This doesn’t work so well when your goal is to harvest enough tomatoes to preserve and take you through an entire year of tomato products for your family. So I seed start all my peppers and tomatoes to extend my growing season and ensure I get a large crop.
SUPPLIES FOR SEED STARTING
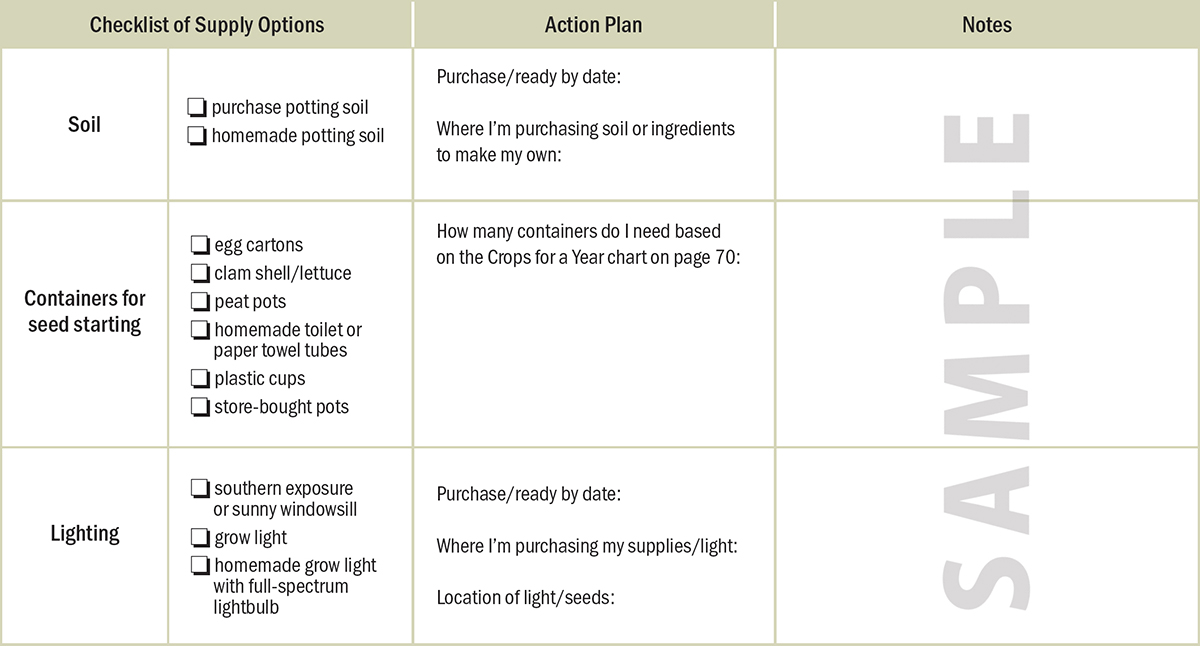
Here are a few items you will need to ensure success with your seed starting.
• Containers. More on this in the next section.
• Soil. We’ll discuss this more in depth shortly, since soil is often overlooked and one of the biggest reasons for seedling failure.
• Light. Unless you live in a southern climate, a sunny windowsill won’t provide enough light for healthy plants. I recommend a grow light. I have a four-foot grow light that fits into a corner of our living room, and I’ve been growing more than 20 tomato and pepper plants under it for going on five years (with the same lightbulb too).
• Heat. This is more important for heat-loving plants like peppers, but the soil temperature plays a key role in germination of all seeds, aka sprouting and growing. If you’re starting seeds in your home, it will likely be warm enough for most plants, but if you’re using a garage or other unheated area (or you just like to keep the house cold) you may need seed heating mats or other heat options.
Seed-Starting Containers
No matter what container you use, you’ll need to make sure it’s been washed and dried. If it had plants in it previously, sanitize the pots with a solution of one part bleach to ten parts water, soaking the containers for ten minutes. Wash with regular soap and water, scrub, rinse well, and allow to dry.
If you don’t properly wash and sanitize your containers, you can introduce disease to your starts, which are more susceptible than older plants. We’re not saving any money if our efforts die because we didn’t take a simple step, right?
• Paper egg cartons work well for starting seeds. They’re free and will biodegrade down if you decide to plant them in the ground. However, they’re porous, they dry out faster, and, due to size, seedlings need to be transplanted within a few weeks. I keep mine on a rimmed metal cookie sheet to avoid any of the water leaking out and ruining the surface they’re sitting on.
• Plastic clamshells and lettuce containers. These are some of my favorites because they create the natural greenhouse effect we need when starting seeds by simply shutting the lid. Lettuce containers with the lid are deep, so I don’t need to replant many starts, especially lettuce, when using these containers. Plus, it gives new use to something I’d normally throw out. Score!

• Milk cartons. These have a handle for easy moving and are quite deep.
• Newspaper pots. Most newspapers use a soy-oil-based ink along with other additives. Though newspaper will break down, the ink (depending upon what additives are used) may not. I prefer not to put it in my garden and would remove the newspaper from the seedlings before planting. (Many gardeners do use newspaper, though. Best thing about gardening? You get to decide what works for you.) To make a newspaper pot, fold a sheet of newspaper in half longways (so you have a long skinny strip). Use a cylinder—a drinking glass, Mason jar, or tin can—and place it on the short, skinny edge of the newspaper leaving a few inches of the newspaper overhanging on the end of the container (the top ⅓ of the container will be sticking out at the top with no newspaper covering it). Roll the newspaper around the container. Turn it upside down (ends of the newspaper facing upwards) and push the loose part of the newspaper down to create a bottom. Carefully pull your rolled newspaper pot down off of your container, maintaining the cylindrical shape, and you have a little seedling pot.
• Toilet paper or paper towel rolls. Save these up over the year and at planting time, cut the paper towel roll into thirds (depending on how deep you want your container), then fold one end closed to hold the soil. I tried cutting a toilet paper roll in half to get two pots out of it, but found it didn’t leave much room for soil and I had a harder time getting my folds to stay put. To fold, on one end bring two sides together to meet in the middle, then fold the two end points back down on top of each other. You can use a pencil to push down any ends flat from the inside if need be, before filling with soil. They’ll stay upright easier if you put them in a rimmed box or container that keeps them clustered together.
• Plastic cups. I’m not a huge fan of buying plastic throwaway cups, but if you have some, put them to use growing your plants before recycling them.
• One-gallon pots. You can reuse any pots you get when purchasing plants from a nursery or garden center. You can also order new ones online or find them for sale in garden centers or departments. I keep the same pots, washing them out each year, and I use them over and over. This size pot comes in handy if you have a shorter growing season and need to let your plants grow for quite a while before putting them outside in the ground.
My tomato plants live in the one-gallon pots for close to two months after their first three weeks of life in their nursery containers. They spend close to three months inside, so they must be potted into larger one-gallon containers.
HOW TO START SEEDS SUCCESSFULLY
Use Correct Soil
Young plants are just like infants; they’re more susceptible to disease and illness. If you use dirt straight out of your garden, you’re introducing any disease, bacteria, or fungus that’s in the soil to a baby without an immune system. This is often the cause of dampening off—a form of blight on seedlings and one of the biggest culprits of seedling death.
If you’ve ever started seeds indoors and suddenly they shriveled up and died, you’ve most likely experienced dampening off.
When using dirt out of the garden, you’re also bringing insects and their eggs into the house or gardening shed. You don’t want the bugs on your baby seedlings or flying and crawling about your living room, trust me.
Here are some solutions.
1. Purchase potting soil. I only use organic potting soil. It holds the correct ratios and has been pasteurized to kill any disease and/or fungus.
2. Pasteurizing soil in the oven. I’ll be honest, I don’t want to deal with trays and trays of dirt in my oven and haven’t personally used this method. Pennsylvania State University advises to put 4 inches of moist soil (use a rimmed appropriate baking dish) in a 180 degrees Fahrenheit preheated oven, covered with foil. Insert a candy or oven thermometer into the center of the soil. When it reaches 180 degrees, bake for 30 minutes, then remove from oven and allow to cool. It’s important not to let the soil reach a temperature greater than 200 degrees Fahrenheit because if soil reaches 212 degrees (we’re keeping a safe buffer here) it becomes sterile and won’t support plant life.[1]
3. Make a mix of equal parts compost, top soil, and sand. Again, you’ll need to pasteurize the top soil, but this is a DIY solution.
Correct Soil Temperature
For warm-weather crops, your soil must be at least 60 degrees Fahrenheit, or warmer, for the seeds to germinate. The general rule of thumb is between 65 to 75 degrees, though your hot peppers may need to be over 80 degrees for best germination rates.
The optimal soil temperature for best germination is the temperature at which almost 100 percent of your seeds will germinate. The cooler the soil temperature, the fewer seeds will germinate. If you get too cold, none will germinate; but I’ve had good success with around 65 degrees for everything except hot peppers.
You can use a soil thermometer for absolute accuracy or go by the average temperature in your home. Because the soil in your home is in a container above ground, it will be closer to the indoor temperature than outdoor conditions. In outdoor conditions, just because the air temperature is 70 degrees does not mean the soil temperature will be; but in my experience the indoor air temperature will be the soil temperature as well.
I don’t use seedling mats or hot pads, the temperature in our living room is usually 65 to 75 degrees (cooler in early morning before the fire is built back up), and I haven’t had an ounce of problems getting my seeds to germinate. I will place my trays of seeds about 8 inches from the fireplace while they’re germinating.
Take care not to leave seedlings near a window or drafty area that will cool down at night. Once seeds are sprouted, they don’t require extra heat as long as the indoor temperatures stay above 55 degrees Fahrenheit.
HOW TO START YOUR SEEDS INDOORS
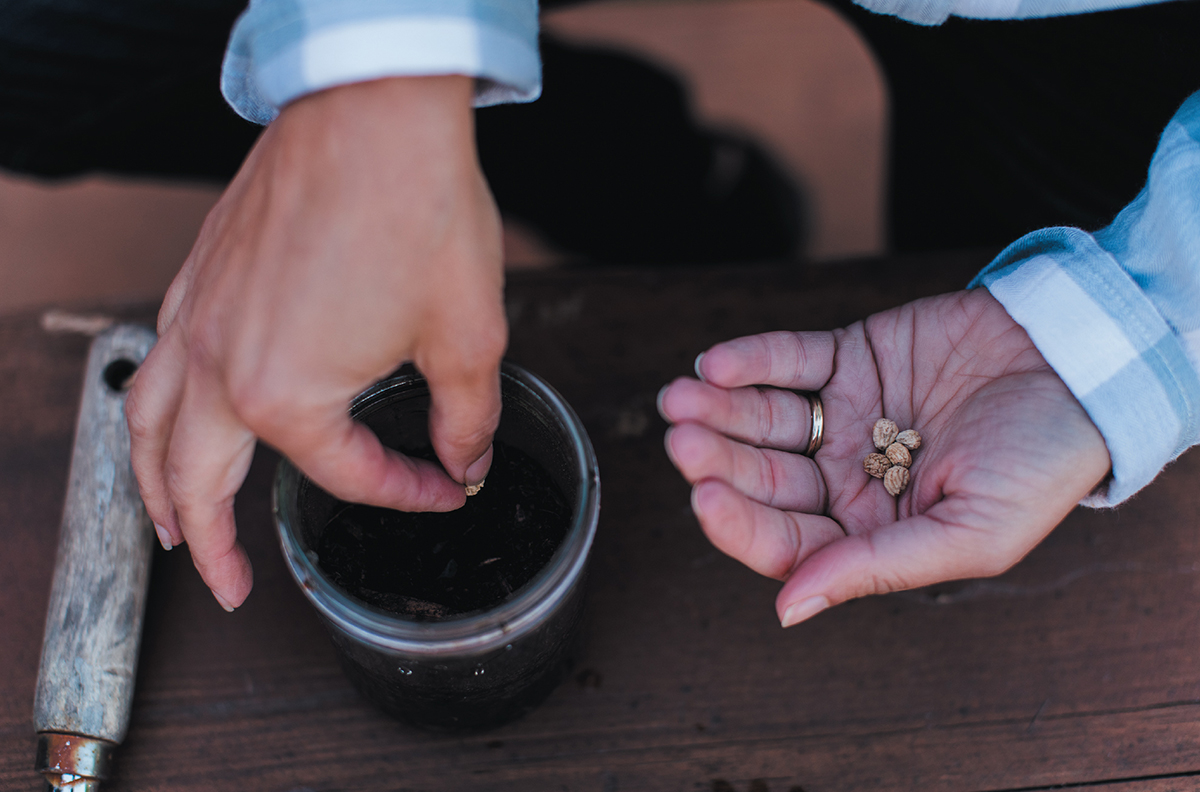
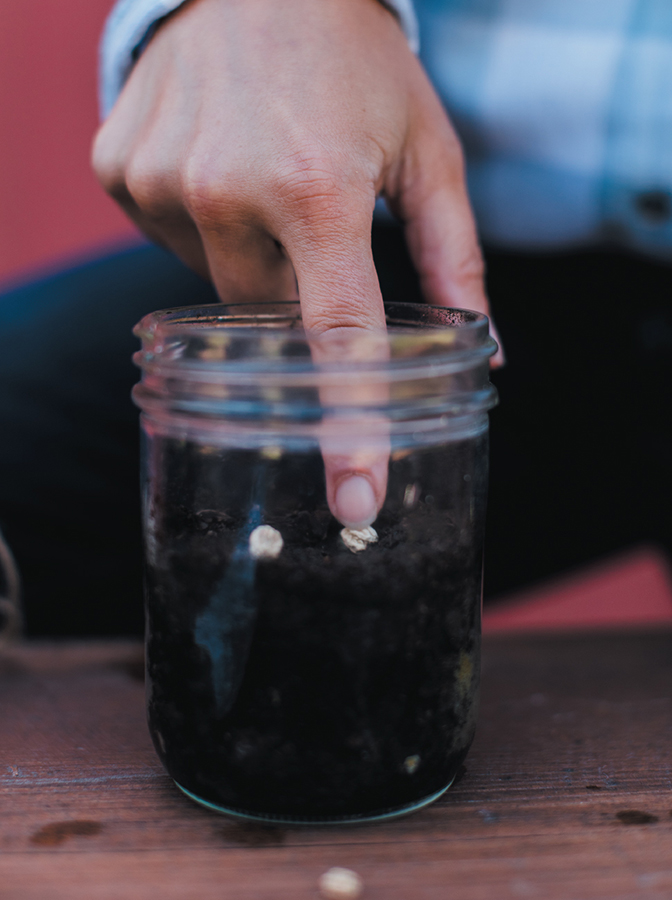
Fill your prepared and chosen containers with soil. Plant your seeds according to package directions for depth. A general rule of thumb is to put the seed in the soil the same depth of the length of the seed. In other words, the smaller the seed, the shallower you plant. I place my tomato, lettuce, and pepper seeds right on the surface of the soil and thoroughly saturate the dirt. The water pushes the seed down into the soil sufficiently.
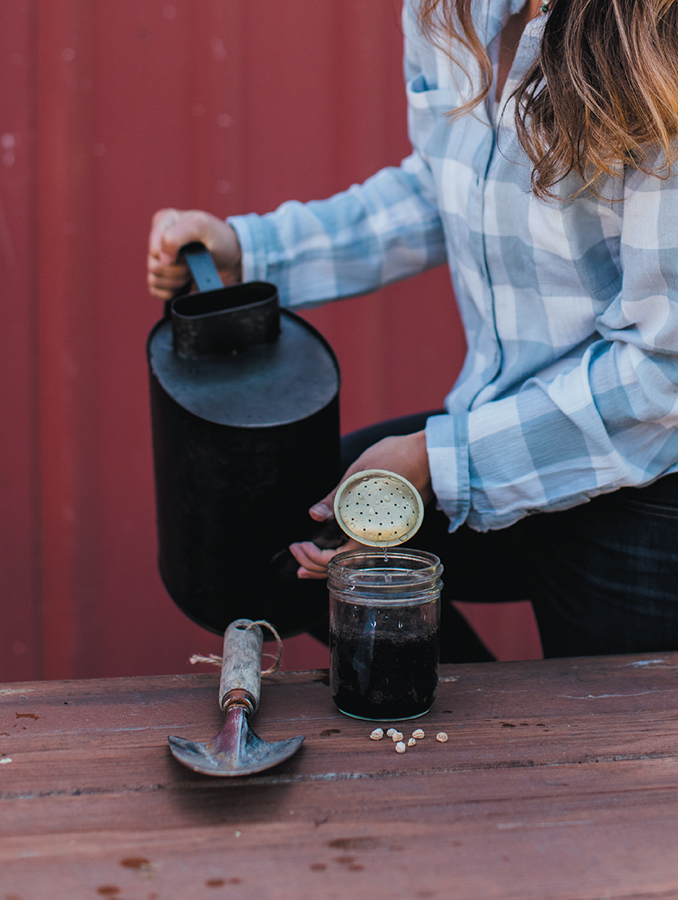
I will plant more seeds than I need in case germination rates aren’t 100 percent. Don’t worry; you’ll thin them out later if need be. After you’ve placed the seeds in the dirt, water thoroughly. When germinating seeds, it’s important the soil doesn’t dry out. We don’t want the soil to be oversaturated, just moist.
Create a greenhouse effect for germination. The best way to do this is to either cover the top of the soil with plastic wrap or use a container with a plastic lid. Vegetable seeds don’t need a grow light or direct sunlight until after the seed has sprouted. I sprout all my seeds in the corner of our living room next to our woodstove, no additional light or lamps needed.
If the top of the dirt is drying out, I spray the top of the soil once a day with a spray bottle of warm water while seeds are germinating.
Once the seeds have sprouted, remove the cover and place your plants either under the grow light or in a southern-facing window. Generally, the majority of my seeds sprout at the same time; but sometimes a few will sprout later, even after removing the cover and placing them under the light. It’s more important to get newly sprouted seedlings under the light and give them proper air flow by removing the covering than it is to wait for straggling seeds.
Correct Lighting
Providing your seedlings with the proper kind and amount of light is crucial to the health and growth of your seedlings after they’ve germinated.
Let’s discuss your two options for light:
1. Sunny windowsill
2. Grow light
For most people, especially if you live in a northern climate, a sunny windowsill will not provide enough hours of daylight for your plants. You’ll need six to eight hours of direct sunlight for plants a day.
If your plants are leggy, they’re not receiving enough light or the light is too far away.
If you’re using an artificial grow light, which is what I do, then you’ll need sixteen to eighteen hours of artificial light for vegetables. I turn mine on when I get up first thing in the morning, and off when I go to bed. The light is best about four to six inches above the plants. Raise the light as the plants grow taller, keeping the distance of four inches or so above the plants.
Make sure you’re using a full-spectrum lightbulb; this provides a balance of warm and cool light, mimicking the sun and nature. Many people prefer LED full spectrum because it uses less electricity.
If your plants are leggy, they’re straining for more light and you need to deliver it as soon as possible to avoid weak-stemmed plants that are likely to break when put outdoors.
Create Strong Plants
Many people start seeds indoors but when they go to plant them outdoors the plants die. One possible reason is that they haven’t toughened up their plants.
In nature seedlings have rain hitting them; the wind is blowing, and there is movement. This helps the stem and the roots grow deep. It develops a strong plant. It’s like working out; your muscles don’t grow unless they’re forced to work and move against something, even if it’s your own body weight for resistance.
Mimic nature
1. Place a fan on the plants periodically to mimic the wind. Make sure you only use it for short amounts of time and keep the fan on low.
2. Run your hand over the leaves and the tops of the plants. This serves the same purpose as the fan. Whenever you walk by or turn the light on or off, run your hands over the plants.
3. Use a spray bottle periodically to mimic rain. This also helps if you have low humidity in your area, and it means you don’t have to water as often. Make sure your plants and the top part of the soil dry fully between misting sessions, after the seedlings have sprouted (germinated) and have their first sets of leaves.
Note of caution when using a spray bottle to water: In outdoor settings, we don’t want to use overhead watering on tomatoes (or other plants susceptible to blight, a fungal disease), but I’ve never had an issue when using this method indoors with seedlings. It’s important your seedlings have adequate air flow and you let the top of the soil dry out before watering again. I only use the spray bottle periodically, mainly when the seedlings are small and I don’t want the stream of water from a larger container washing away the dirt from the still tiny root system before they’ve been repotted into large containers.
Let’s talk mold and fungal growth. It is very common to see a white, mold-looking substance on the surface of the soil, especially for seedlings that spend weeks inside. This is usually a sign of high humidity and too much moisture. It’s not actually mold, but a fungus.
To combat it, don’t water as often, let the top of the soil dry out more than you have been, and give the plants more air flow. I’ve found some of my plants will begin to grow fungus toward the end of their time indoors. As soon as I begin the hardening-off period (“hardening off” means gradually conditioning your seedlings to outdoor conditions), when I set the pots outside for short periods to acclimate the plants to their new environment, the fungus will be gone by the next day.
Alternatively, you can use the fan on low for an hour or so.

When to Thin Seedlings and Move to Larger Containers
What’s the point of thinning out all these seeds you worked so hard to get growing? And while we’re at it, why not just plant them all in big containers to begin with and skip this extra step?
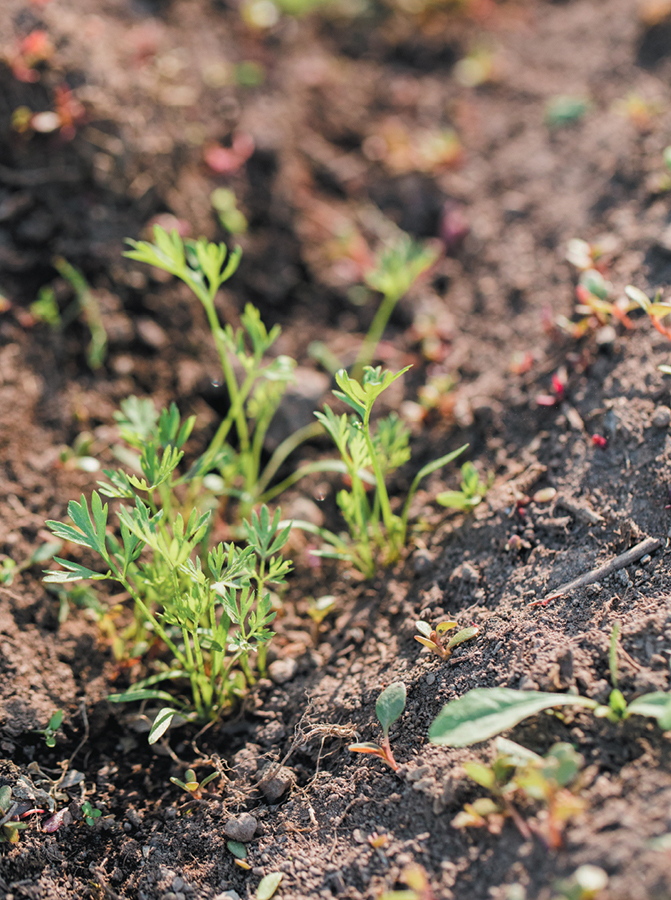
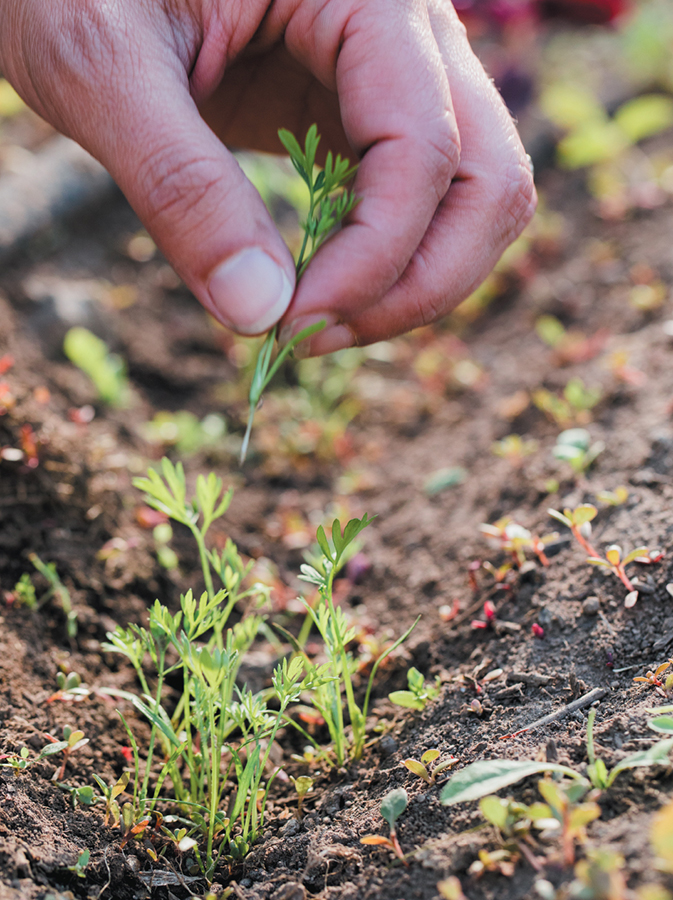
It can be hard to thin out your seedlings, or any garden crop (I’m talking to you, beets and carrots), but it’s necessary if you are to give each plant the space it needs to grow. If you don’t thin them, you’ll hamper the growth of all the plants. With seedlings, there’s simply not enough soil or room in containers to sustain them all, both in nutrients and root development. So you must thin.
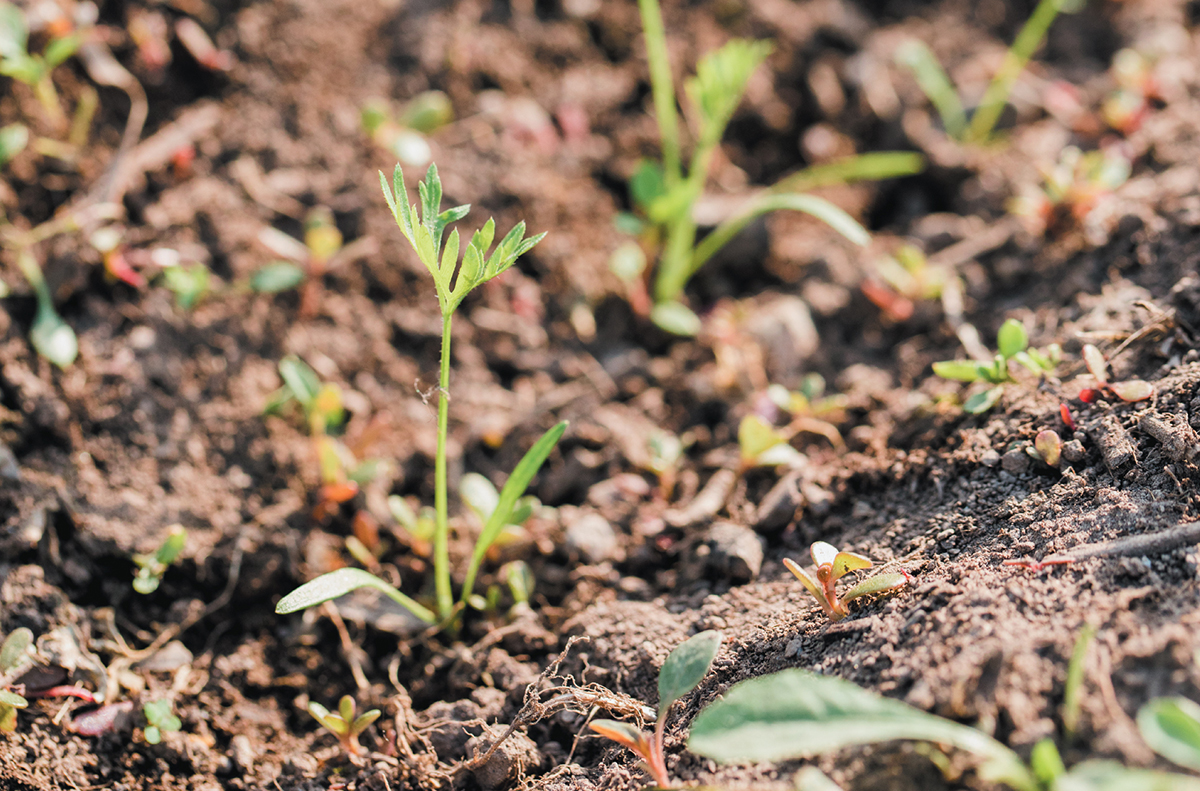
We don’t plant in large containers to begin with because it’s much harder to regulate temperatures, humidity, and soil warmth with large pots of soil. Also, it can be hard to keep those tiny seeds evenly spaced. I watch out for when my seedlings have developed their first set of true leaves (not the very first leaves you see when they sprout—their true leaves are actually the second set and will have the shape of that plant; think more saw-toothed if a tomato, frilly fingers for carrots, and ruffled curls for curly kale). Then I transplant them to larger containers to continue growing indoors under their grow light.
At this time, I can separate out each plant from their sprouting cells (I often have two or even three tomato seeds per egg carton hole) and I plant each plant in its own pot rather than thinning and tossing them. If a few don’t make it through the transplanting process (normally I don’t lose many, but occasionally one or two don’t make it out of the 20 or so I plant), I still have a buffer. I’d rather have too many plants than not enough. I can give some away or decide to cull them when it’s time to plant outdoors.
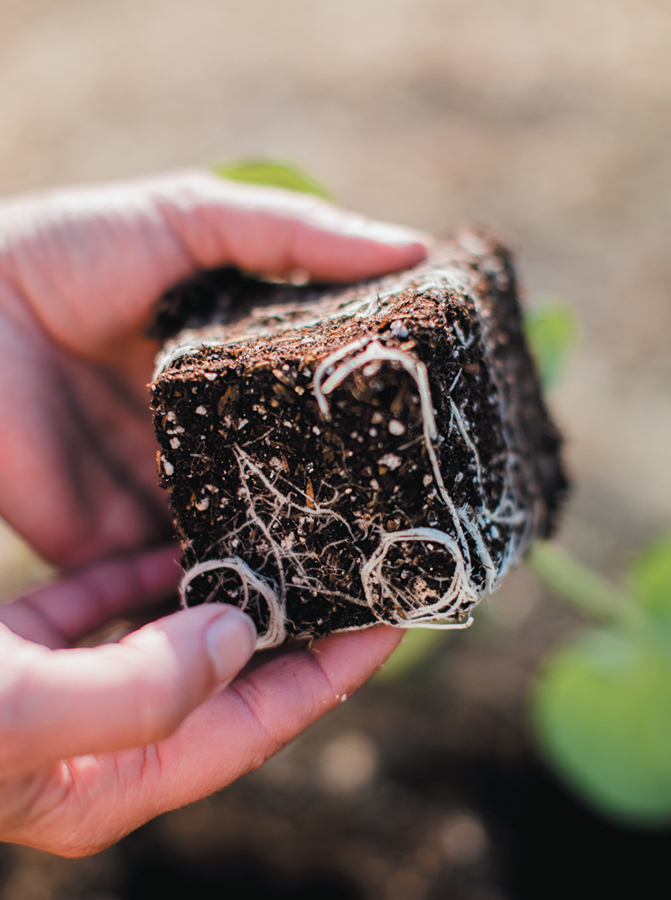
When transplanting your new little sprouts, take care not to damage their roots. Make a well inside a new, larger pot of dirt, making sure it’s deep enough for you to set the roots in it, and then backfill with extra soil. It should be deep enough that the soil line hits the seedling on the same place of the stem it did in their smaller pot. Tomatoes are an exception; bury them deeper because they’ll sprout new roots from the stem and create a stronger plant.
Gently tamp the soil down around the plant to help anchor it until the roots can extend and do their job. Always water plants when transplanting and add in more dirt if needed. Sometimes water will wash the dirt down into air pockets and cause it to settle, possibly leaving the top roots exposed.
Correct Hardening Off
This is where I see many people make the biggest mistake with their seedlings. They don’t harden them off properly or for long enough.
If you take your plants from the protected and controlled environment of indoors or the greenhouse and plop them outdoors, you’re going to put them into shock and most likely kill all of them. You must slowly introduce the plants to the outdoors, for short periods of time. Here’s how I do it.
Pick a sheltered spot outdoors. Start somewhere out of direct, hot sunlight that isn’t out in the open where they’ll be whipped by the wind and elements. If it’s 85 degrees Fahrenheit outside and your plants are used to being indoors in partial sun at 70 degrees, they’re going to be stressed by the shock, even for only two hours the first day.
If it is really hot out when you start, find a spot in the shade for the first few days. Begin at least one week in advance before planting outdoors.
Seedling Hardening-Off Schedule
• Start in a protected area 2 hours the first day
• Increase by 1 to 2 hours each day over 7 to 10 days
• Gradually move them to their final planting spot (by day 5 of the hardening-off schedule, I’ll place the plants where I’ll be planting them, which is in direct sunlight and without any wind protection)
It can be hard to increase the hours per day your seedlings spend outdoors when you’re working away from home. I start my plants on a Friday afternoon or evening, increasing the schedule according to the times above over Saturday and Sunday. By Monday I can leave them outdoors for almost eight hours. When I worked away from home, I set them out right before I left for work, and my husband (who got home before I did) brought them in when he first arrived home.
Consequently, if the weather changes drastically (we’ve had a few years when a cold spell came in unexpectedly), I bring the tomatoes back in the house and start the process over again once the conditions change back to the positive. It’s better to have more days of hardening off before setting them out and planting them than it is to hurry up the process.
By slowly hardening off your seedlings, you’ll help them gain strength and resistance—without shocking them.
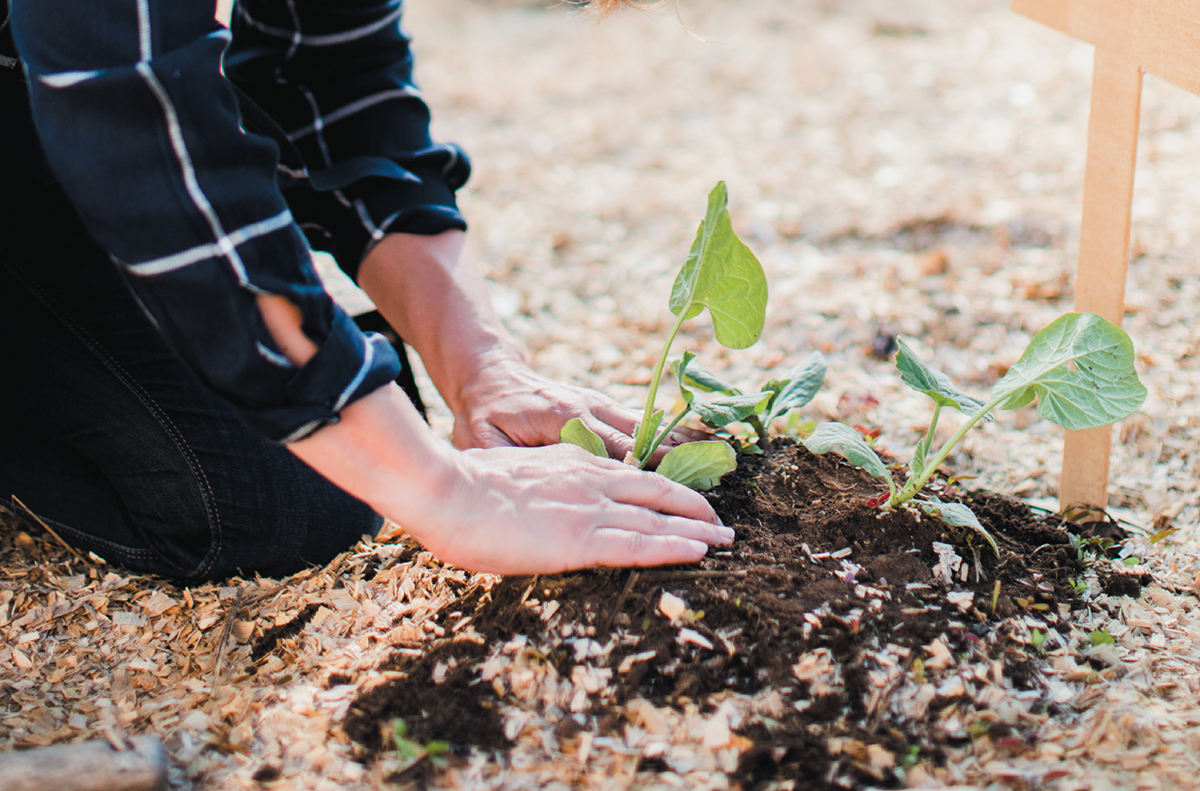
How to Transplant Seedlings Successfully Outdoors
You’ve done it! You’ve grown your plants from a seed, nurtured them indoors, hardened them off, and are ready to put them in their final growing spot. From chapter 1, you’ve already determined it’s the right time to plant and picked the best locations for your garden based on your property, gardening zone, and microclimates.
Now it’s time to plant. Picking the correct spot now will save a lot of trouble later. Remember, with your hard work and the help of the information within these pages, your seedlings are going to grow and become large, productive plants.
Just as we looked at trees and different landscape items blocking light or causing adverse reactions to our plants, we now need to think about what other garden plants will be going in around our seedlings. My pole beans grow to over six feet tall if provided enough support. Certain varieties of corn will reach heights upwards of ten feet, and sunflowers are known to tower. This means if you plant them in front of your peppers and summer squash, as the season continues, they can block the sun from anything directly behind them.


While this is advantageous for cool-weather crops in the height of summer heat—like kale, lettuce, spinach, and brassicas—it’s not desirable for heat-loving plants like tomatoes and peppers.
Take care to plan out the best spot for your transplants in relation to your entire garden before nestling them into the ground in their final growing space.
To plant, dig a hole a little bit wider and deeper than the container your seedling is in. When the hole is dug, set the pot down into it to measure if it’s deep enough or too deep (if you’re using an egg carton or other multi-cell container, eyeball it to your best ability). We want the soil to be at approximately the same spot above the root crown as it is in the pot, or just slightly above it.
Take the end of your spade and break up the dirt at the bottom of the hole if it’s compacted. If your seedling is not root-bound (you don’t see the roots circling the bottom of the pot, sticking out the bottom drain holes, or in a tight web of white up the sides), gently remove the seedling with as much dirt as possible and set it inside the planting hole. Our goal is to disturb the roots as little as possible.
If your plant is root-bound, you’ll know it when you remove it from the container; the roots will likely keep the dirt in the same shape as the pot, even when free. If the roots are small, you can use your fingers to tear them loose; if larger, use a gardening knife or the side of your spade to cut them free. I will make four cuts—think north, east, south, west—along the side of the roots and spread them out. It’s also a good idea to make note that next year you need to either put them in larger pots or plant them sooner, if possible, to avoid them becoming root-bound.
You don’t want to leave them in the root-bound shape, or the roots will continue to grow this way, never spreading out and down to establish a good root system or reaching new soil to provide better nourishment to the plant. To avoid this, I make a small cone of soil in the bottom of the hole and spread the roots out and down around it. This helps support the plant and the roots’ optimal growth pattern.
Backfill soil into the hole, covering the roots, until the hole is completely filled. Firm down the dirt around the base of the plant to help fill in any air pockets and keep the plant upright until its roots are established. This is a gentle press, not a deep compression of the dirt.
Give your newly planted starts a good drink of water. It’s best to use a watering can or something producing small, individual streams of water. If you use a large bucket or splash of water, you may wash away the soil and expose the roots.
I prefer to amend with any needed fertilizer to the entire bed or garden area (a single row versus a single hole) before planting and occasionally provide a top dressing if needed. For further information on amending your soil, see chapter 9.
The slight exception to this is with my tomatoes.
Planting Tomatoes
Tomatoes are somewhat fussy plants compared to others in the garden, especially if you live in a cool or wet climate. But with these troubleshooting tips, I’ve turned my tomato woes into a tomato harvest that takes us through an entire year of not having to buy tomato and spaghetti sauce, salsa, or stewed tomatoes from the store.
1. Never plant tomatoes in the same spot of soil you had tomatoes, peppers, or potatoes in the year before.
2. Plant tomatoes deep—all the way up to their first set of leaves—to encourage a large root system for a healthier plant.
3. Add some compost to the bottom of the hole when you plant, if needed.
4. Tomatoes like a soil pH of 6.5 to 7.2 and need calcium to combat blossom-end rot. If your soil shows low calcium levels (a soil test is best to determine your levels—see chapter 9), you can add lime or crushed-up egg shells to help bring acidic soil (lower numbers on the pH scale) up and add calcium to the soil. Place up to three-quarters of a cup of gardening lime on the bottom of the hole or one to two crushed-up eggshells, and work into the soil. Gardening lime will increase alkalinity of soil so only use if you know your current pH level and doing so won’t change soil from optimal pH range.
Note: if you don’t have slightly acidic soil to begin with, egg shells may not break down enough to provide extra calcium to your tomatoes. If using egg shells, it’s best to powder them in a coffee or spice grinder or, alternatively, soak them in vinegar, let dry, and crush up before putting them in soil. You can also do a top dressing by working crushed-up eggshells or gardening lime into the soil around the drip line of the plant.
5. If using cages or support systems that go into the ground around the plant, put them in upon planting so you don’t pierce the root system when the plant is bigger.
6. Make sure tomatoes are planted in full sun; they don’t do well in shady or damp areas.
DIRECT SOWING
Direct sowing seed is pretty, well, direct. You’re taking the seed and putting it directly into the soil. However, you can follow a few basic tips to improve your germination rate (how long from when you put the seed in the dirt to when it sprouts).
You’ll want to follow the Seed Starting and Planting Chart on page 97 and make sure your soil temperature is warm enough for direct sowing. We watch the forecast and prefer to plant when it’s sunny (or cloudy but dry) with rain due the next day.
When I was growing up, my father always soaked his bean seed before planting. We’ve additionally found it helpful to soak several types of seed for faster sprouting. It tends to work best with larger seeds such as peas, beans, corn, and beets.
How to Soak Seeds
Place seeds in a shallow container or small bowl. Fill with cool, fresh water (we’re on a private well, so chlorine isn’t an issue) until seeds are covered.

Soak larger seeds overnight or for approximately eight hours in room-temperature water before planting. We soak beans, peas, corn, and beet seeds (beets especially perform better when soaked). Some sources say not to let beet seed soak in water overnight but instead to place them on a damp towel. We haven’t experienced any issues with germination, but you may want to test it yourself. I don’t generally bother soaking the smaller seeds like lettuce or carrots. Drain seeds right before planting.
Your seed packets should have instructions for planting depth, but again, as a general rule of thumb, however large the seed, that’s how deep you plant it. Small seeds like carrot, dill, and lettuce only need a light covering of soil.
Either poke a hole in the ground to the appropriate depth (first knuckle works great for things like squash and bean seed) or dig a shallow trench the correct planting depth and drop the seeds in. After placing the seed in the dirt, cover back with soil and water.
It’s very important that your seeds not dry out during the germination period; they need to stay moist. You don’t want to drown them, but moisture is key in getting them to sprout.
Seed-Sowing Depth
• small seeds, like carrot, dill and lettuce: ⅛ to ¼ inch deep
• beets, parsnips, and turnips: ¼ to ½ inch deep
• beans, cucumber, peas, and squash: approximately 1 inch deep
• corn: 1½ to 2 inches deep
WINTER SOWING
Winter sowing seeds is an excellent way to get a jump-start on the growing season without the aid of grow lights, heat, or hardening off.
For winter sowing, begin by creating little mini greenhouses with plastic containers to grow your vegetables outdoors. You set the seeds out in the middle of winter or late spring (some people do it when there’s still a lot of snow on the ground) inside their little greenhouses and let nature do its thing.
Common containers are used milk jugs, plastic clam shells from apples, or plastic lettuce containers with the hinged lids. Make sure the container is at least three inches deep.
If using a milk jug or container that doesn’t have a lid, take the scissors about two-thirds or three-quarters of the way up from the bottom and cut approximately two-thirds of the way around, leaving a hinge portion around the handle so you can place soil and seeds inside and still seal the container back up.


Containers need both drain holes on the bottom and air holes on the top for ventilation. Make sure the holes on top are large enough for rain water to get inside and provide moisture for the seeds and plants.
For a milk jug, I use a pair of scissors and stab four decent-sized holes in the bottom of the jug. Leave the lid off and stab about three to four more holes along the top for extra ventilation and water access.
I tried it last year with tomatoes, peppers, lettuce, kale, and cabbage. While the tomatoes and peppers did sprout, it wasn’t until mid-June, which is much too late for my area to expect any type of harvest. If you have a longer growing season, you can try this method with warm-weather plants, but I am only doing it for cool-weather crops.
Note: Whenever trying something new, if it’s a crop you depend upon like we do with our tomatoes, always make sure you use a tried-and-true method with the majority of your crop during the first test.
How to Plant Your Seeds
Once you have your containers prepared, fill them up with approximately three inches of potting soil. It’s still important to use sterile soil to help keep any pathogens or disease away from the young seedlings.
Spray water over the soil both to get it wet and test your drain holes. Make sure they’re big enough for the water to get out.
Sow your seeds. After seeds are sown, seal up your container. If using a hinged lettuce container or clam shell, simply snap it closed. For your milk jugs, use a couple of strips of duct tape to secure the openings.
Use a permanent marker on the container to record the seed type you have planted. You may choose to mix a few seeds in the same container or have each container dedicated to one type of plant. Up to you!
Set the container in your garden area, or somewhere it won’t be disturbed but will receive natural rainfall for the next weeks or months.
Care of Seedlings Once Sprouted
Once seeds have sprouted, open the lid during warm, sunny days, but close it at night until outdoor temps are warm enough for the specific plant. The beauty of winter sowing is you don’t have to harden it off; simply plant it right into the soil.
Seeds will naturally sprout when conditions are right. Most cool-weather seeds will sprout about three weeks before the last average frost date, though you can set the winter-sown seeds out any time of year.
Transplant out of the little greenhouses following the outside planting dates found on the seed packet or in your Seed Starting and Planting Chart on the next page.
Seed starting can be a great advantage to your garden, allowing you a much longer harvest time. In some climates, it’s the only way you’ll successfully be able to grow a crop. It’s the only way I can grow enough tomatoes and peppers to take us through a whole year.
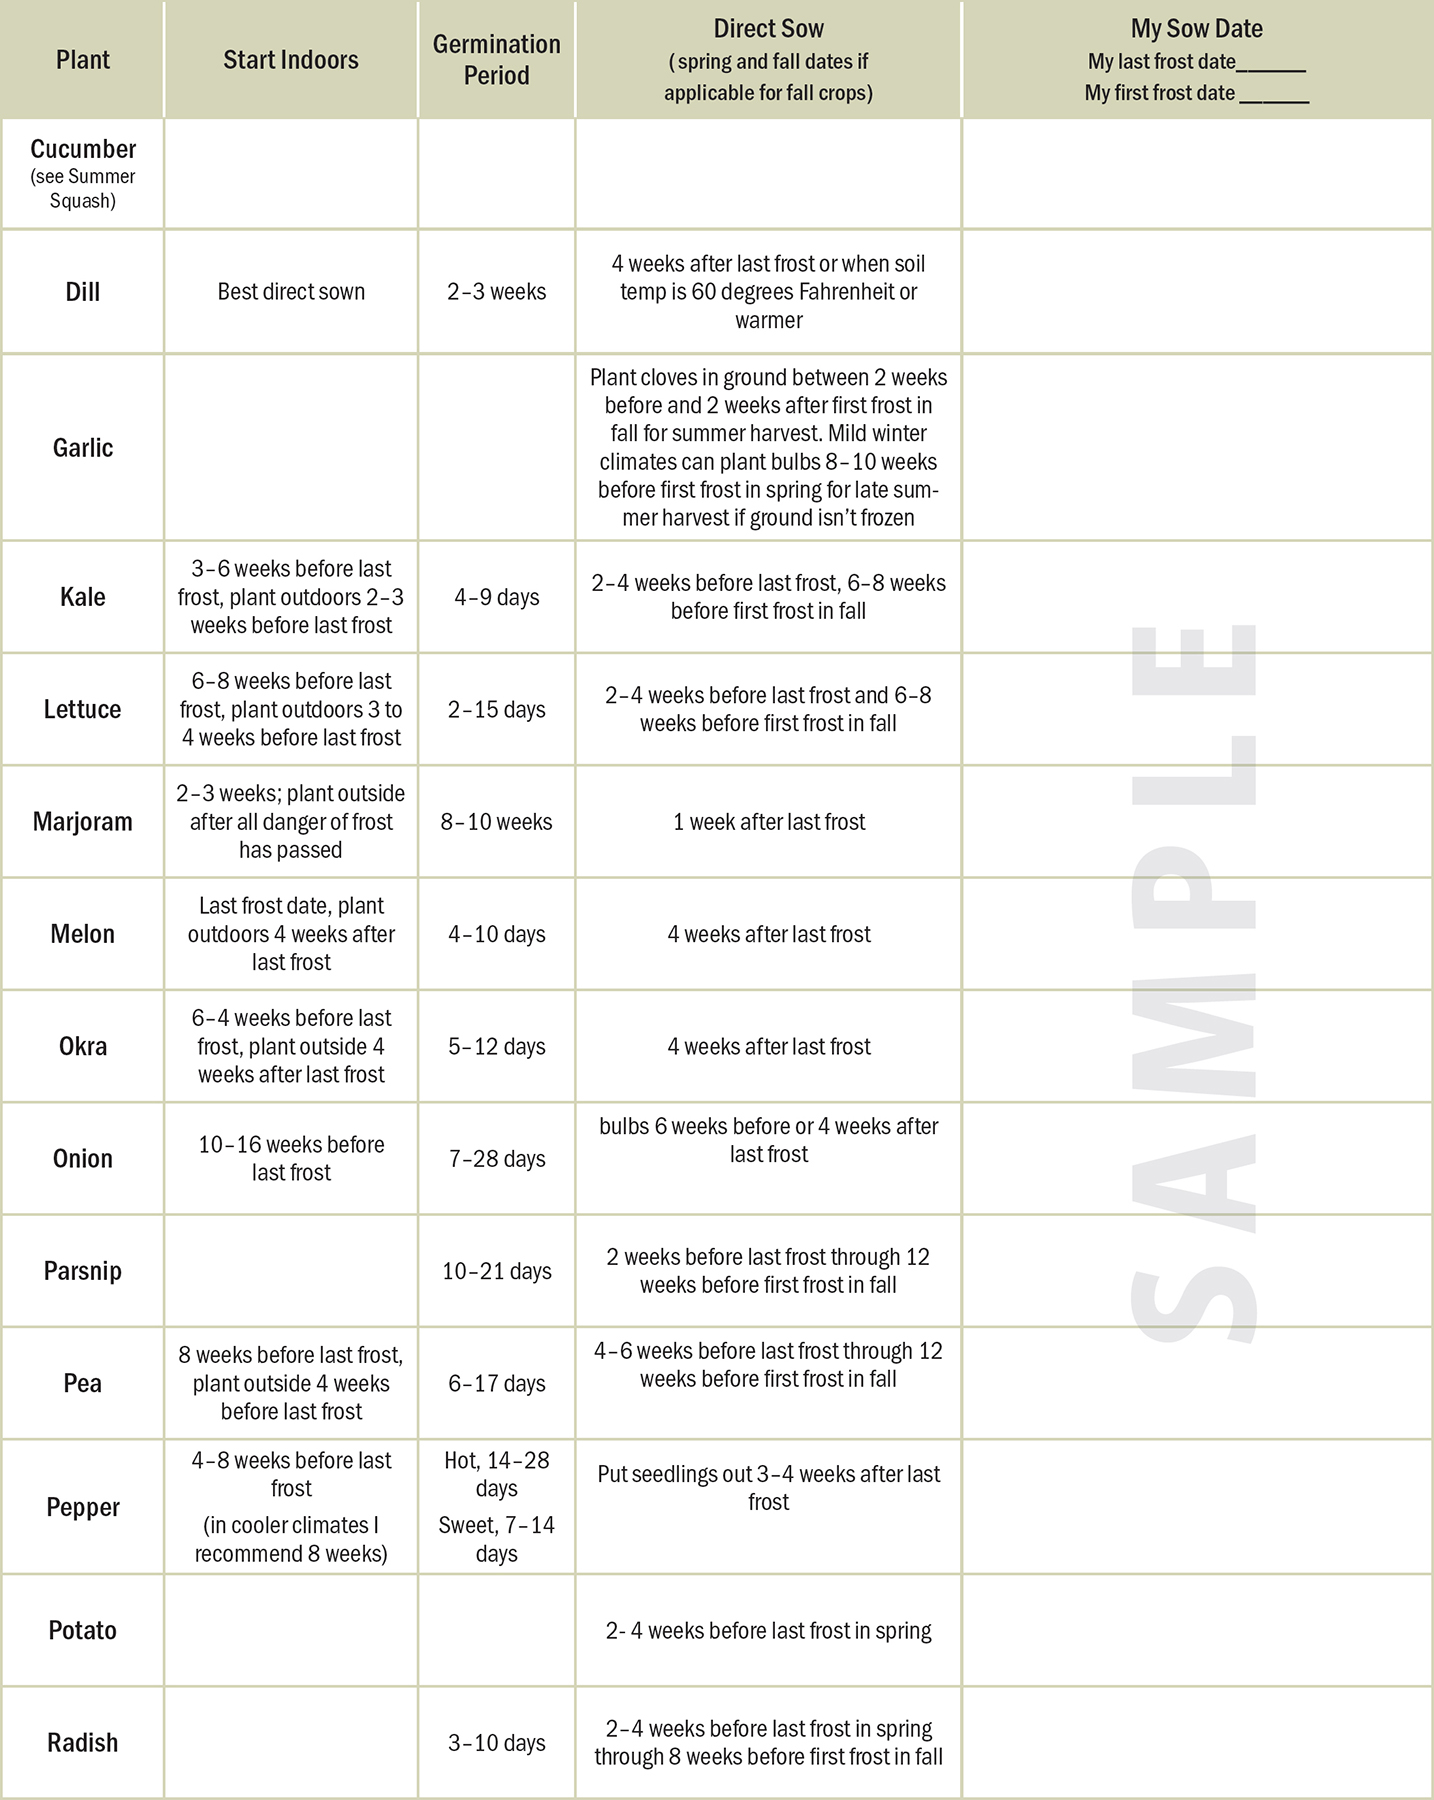
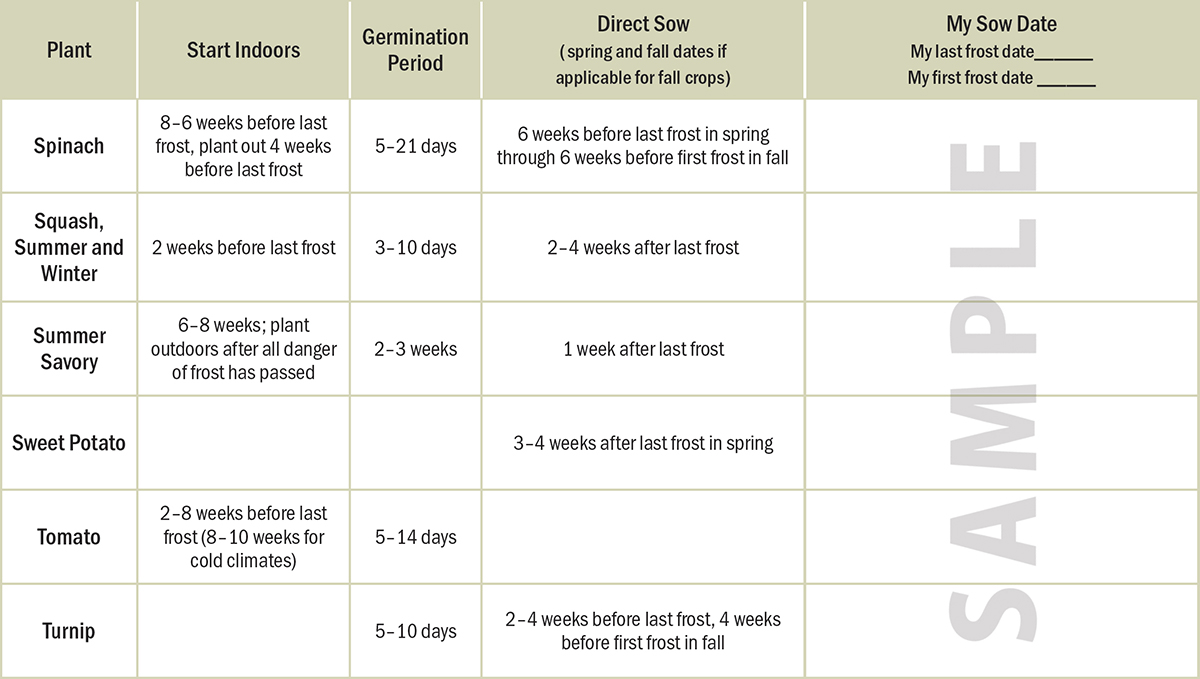
Below is the seed starting and planting chart I use. You won’t find all vegetables listed because some plants don’t do well started indoors or don’t warrant the work for only a few days earlier harvest.
SEED STARTING AND PLANTING CHART

Seed Starting Checklist
Now that you’ve established the crops you’ll be seed starting, here’s an easy sample checklist and worksheet to help make sure you have all the supplies you’ll need to get those darlings started!