[Jesus] said to his disciples, “The harvest is plentiful but the workers are few. Ask the Lord of the harvest, therefore, to send out workers into his harvest field.”
MATTHEW 9:37–38
The harvest is the promise of all your work fulfilled. It’s what makes gardeners replant when seeds don’t sprout, get up early to weed and water before work, and wash dirt from beneath fingernails multiple times a day.
There’s nothing like the flavor or the feeling of picking your own food right outside your back door. But the harvest window isn’t always a long one. If you’ve ever picked zucchini and missed one, you know what I mean. In a few days’ time it can go from a slender squash to huge caveman bat.
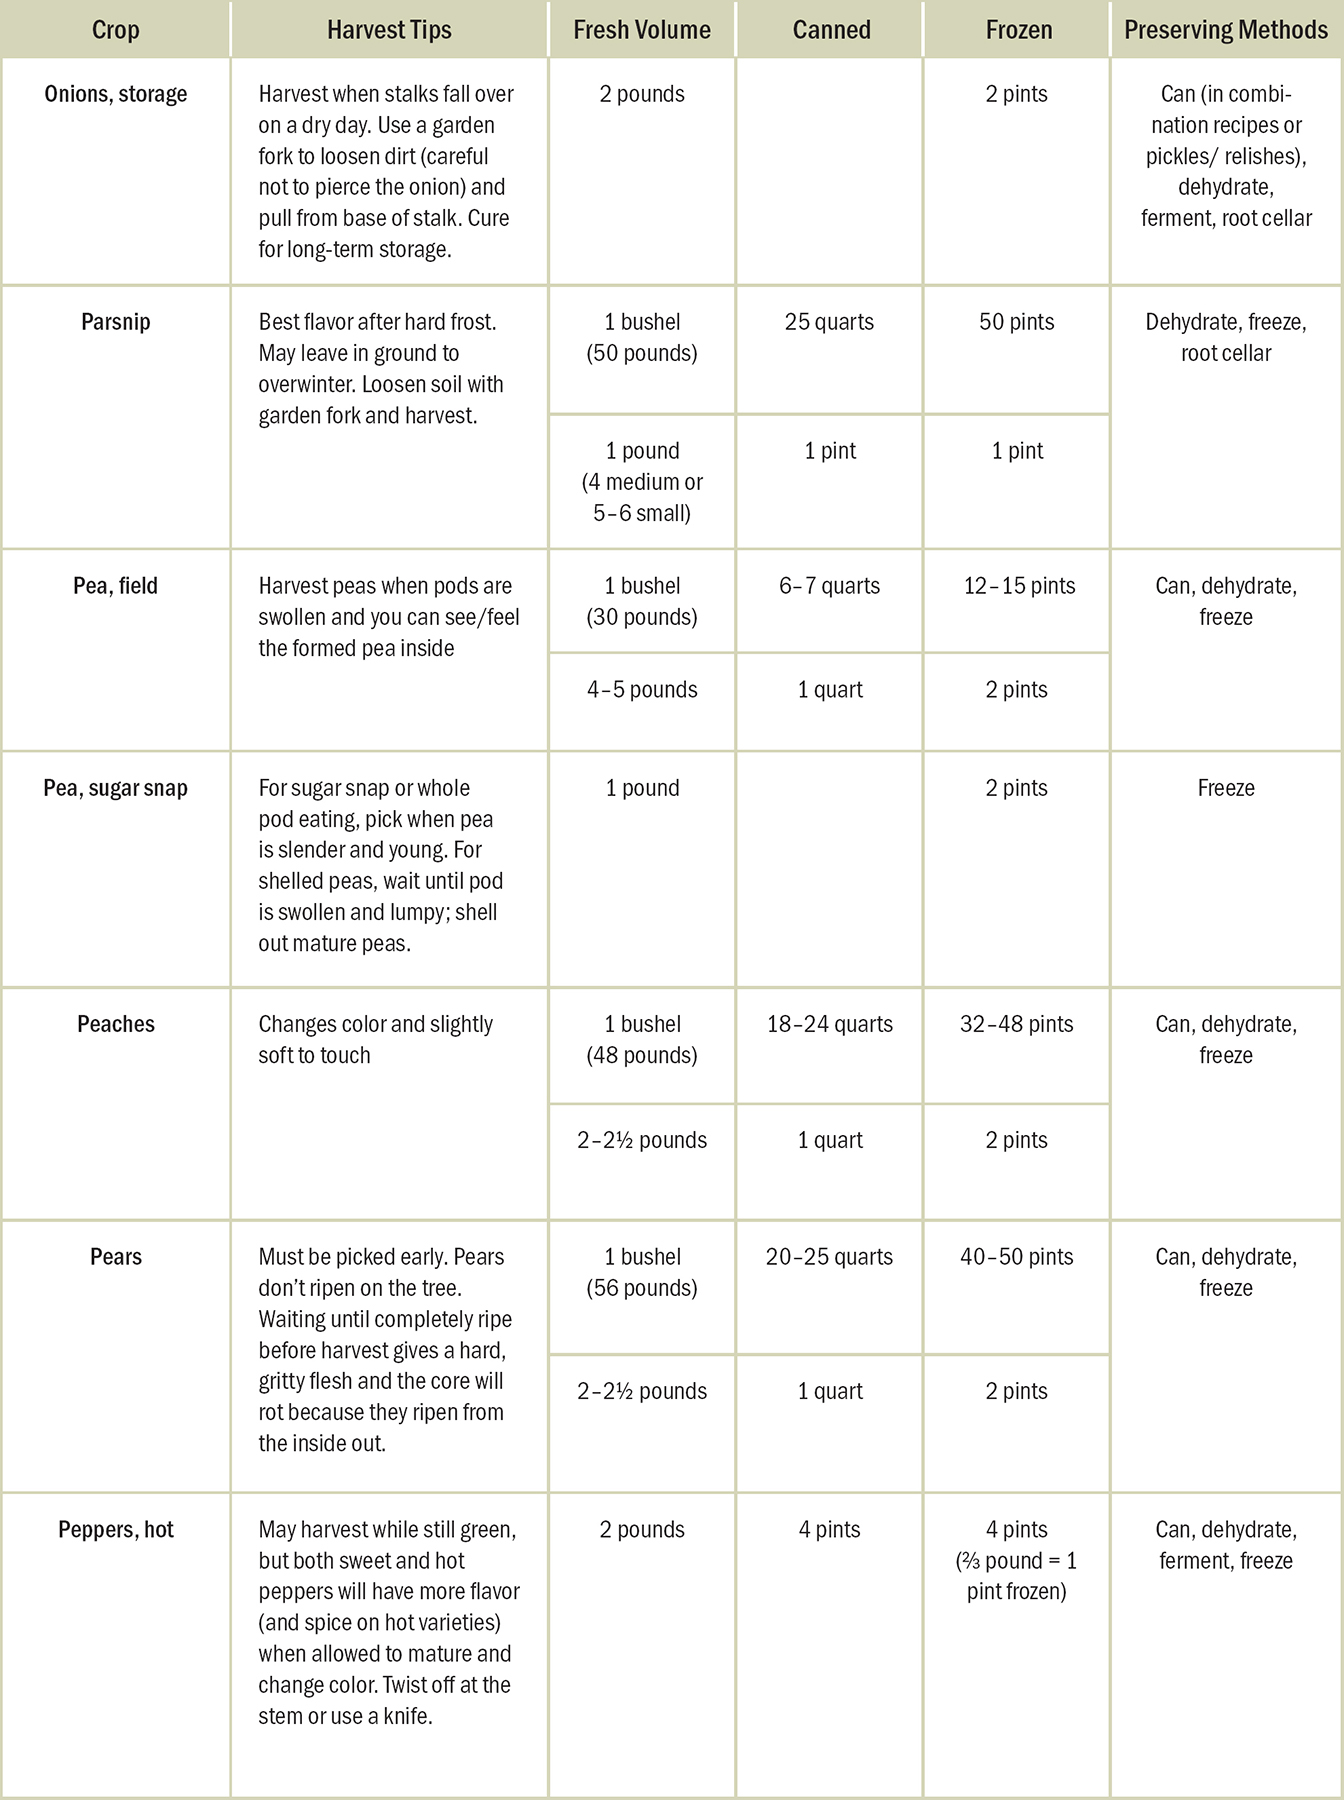
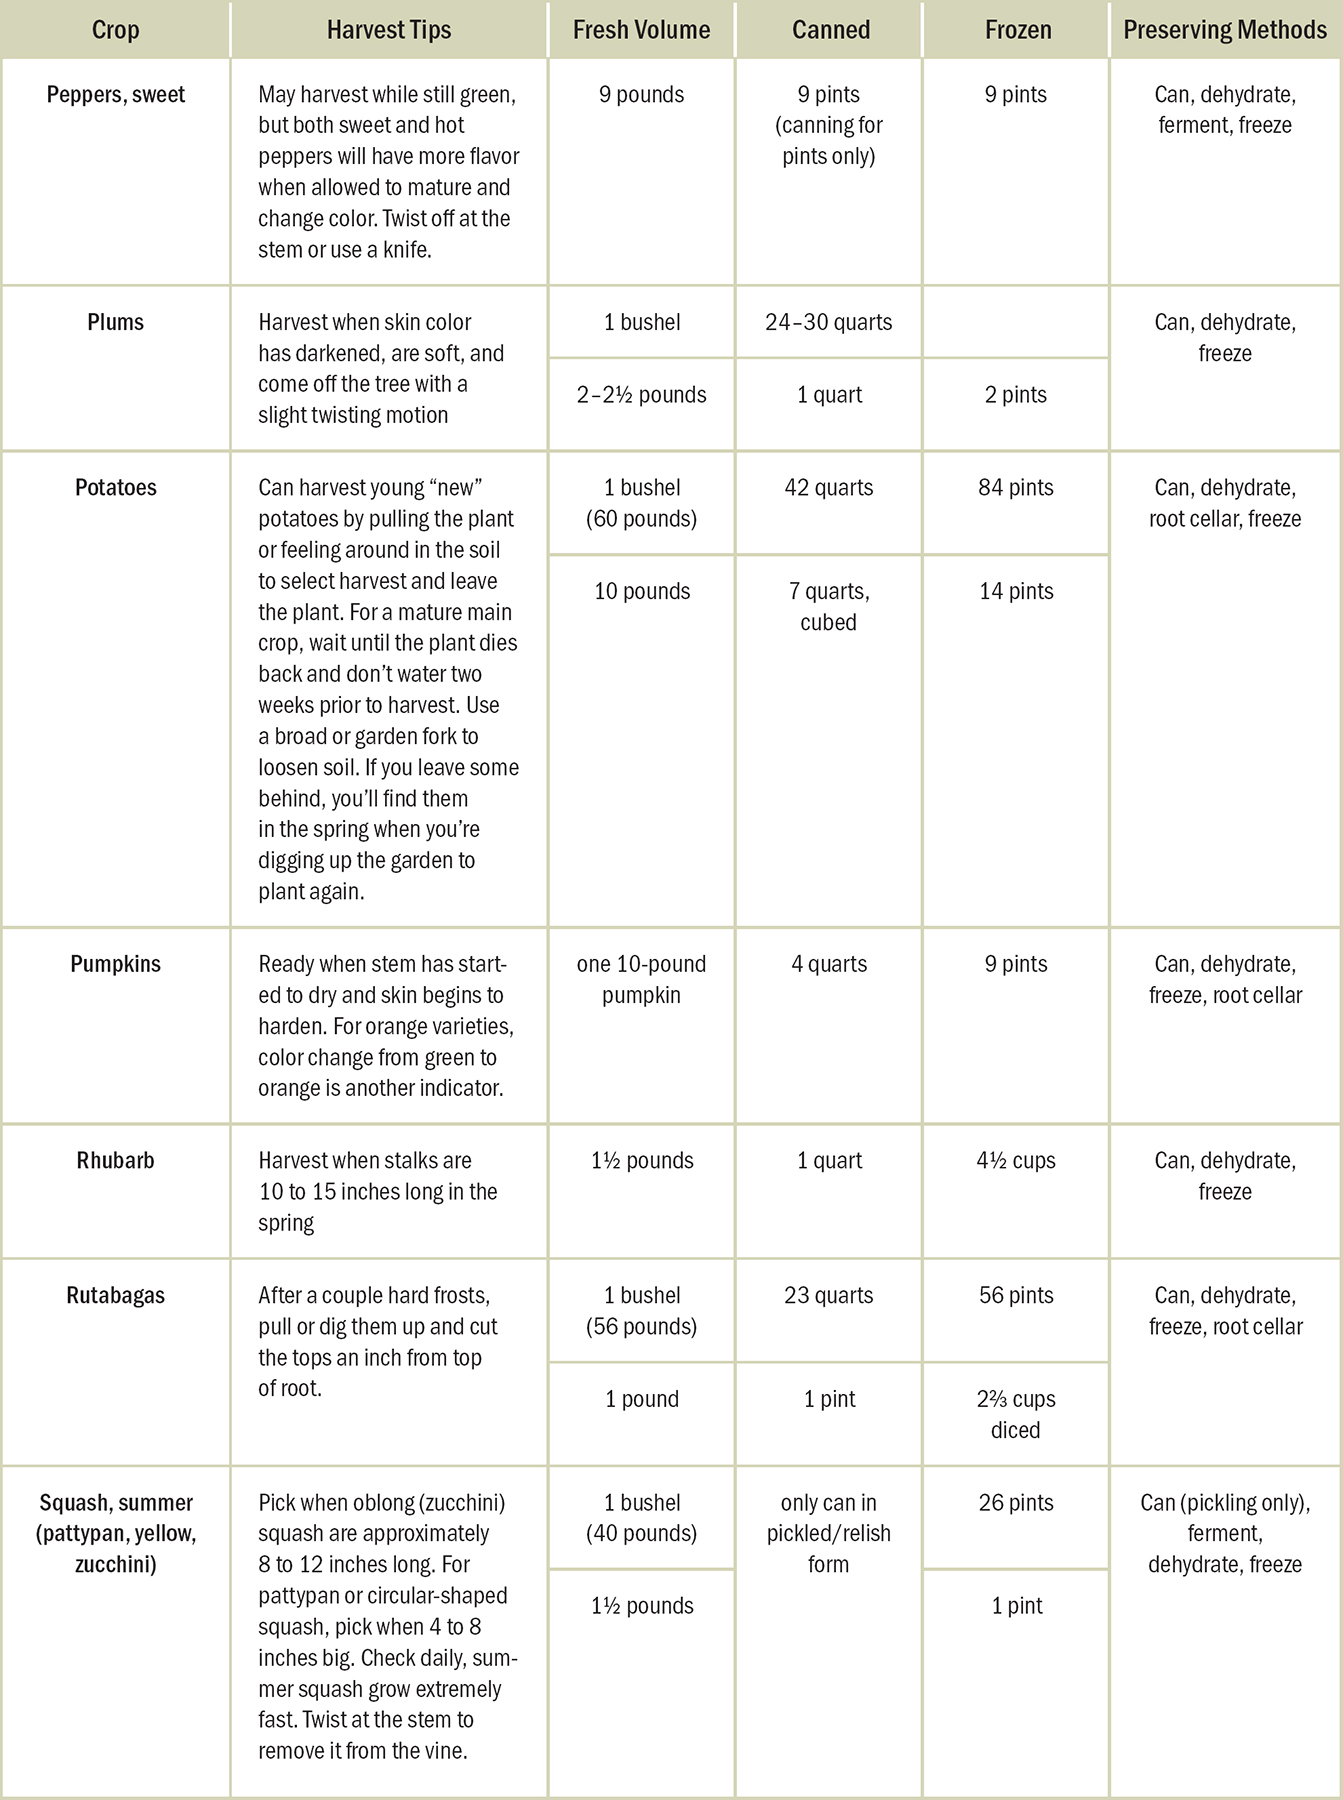
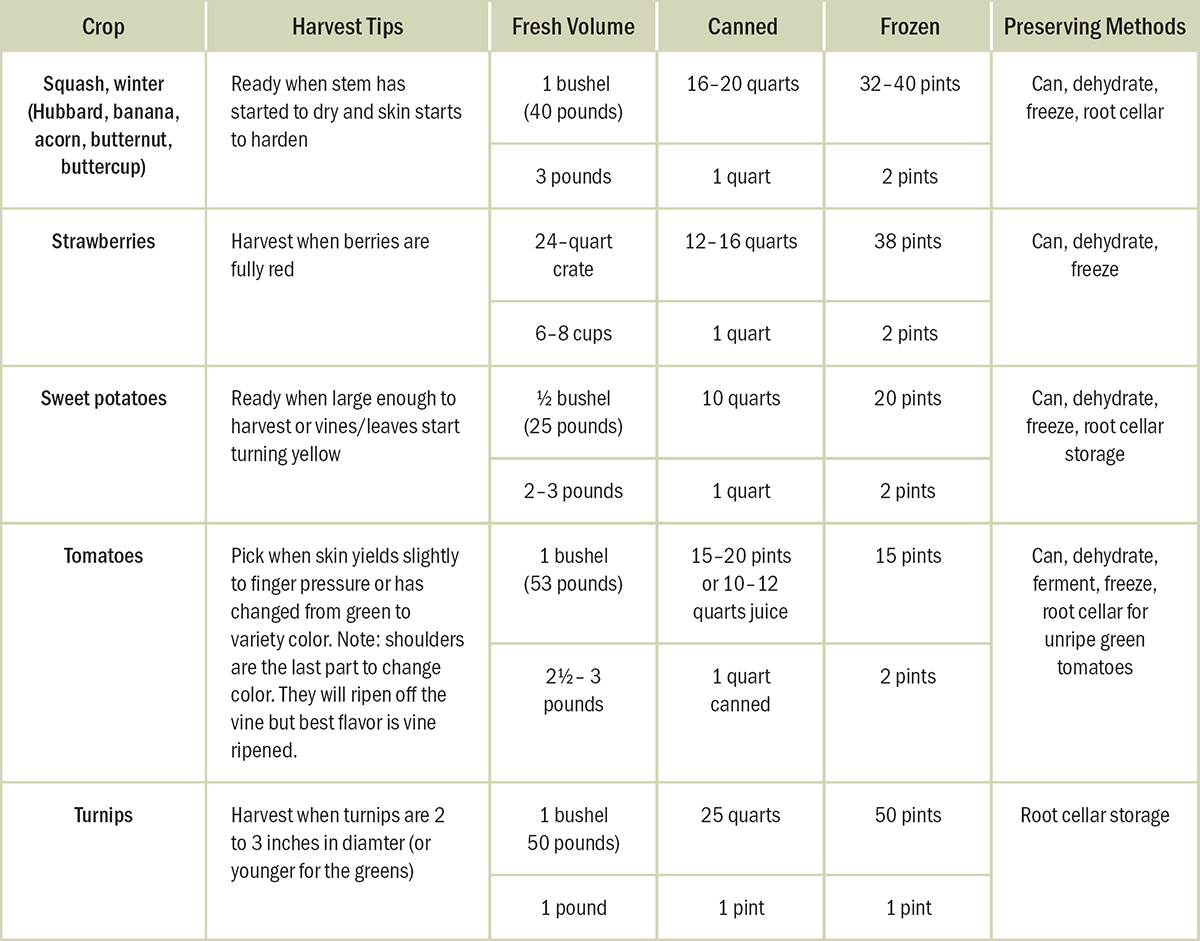
When bringing in your harvest, it’s helpful to know when the food is ripe and the best harvesting tips. After all, you want the produce at its peak of flavor and texture—not too early and not too far over.
WHEN TO HARVEST
How do you know when those plants are ready to be harvested? And when your crop is so bountiful you have more than you can eat fresh, what are the best (and safest) ways to preserve those foods so you can eat the benefits of your work year-round?
Never fear; I’ve created the chart below for you, followed by written-out steps for specific methods or crop requirements.

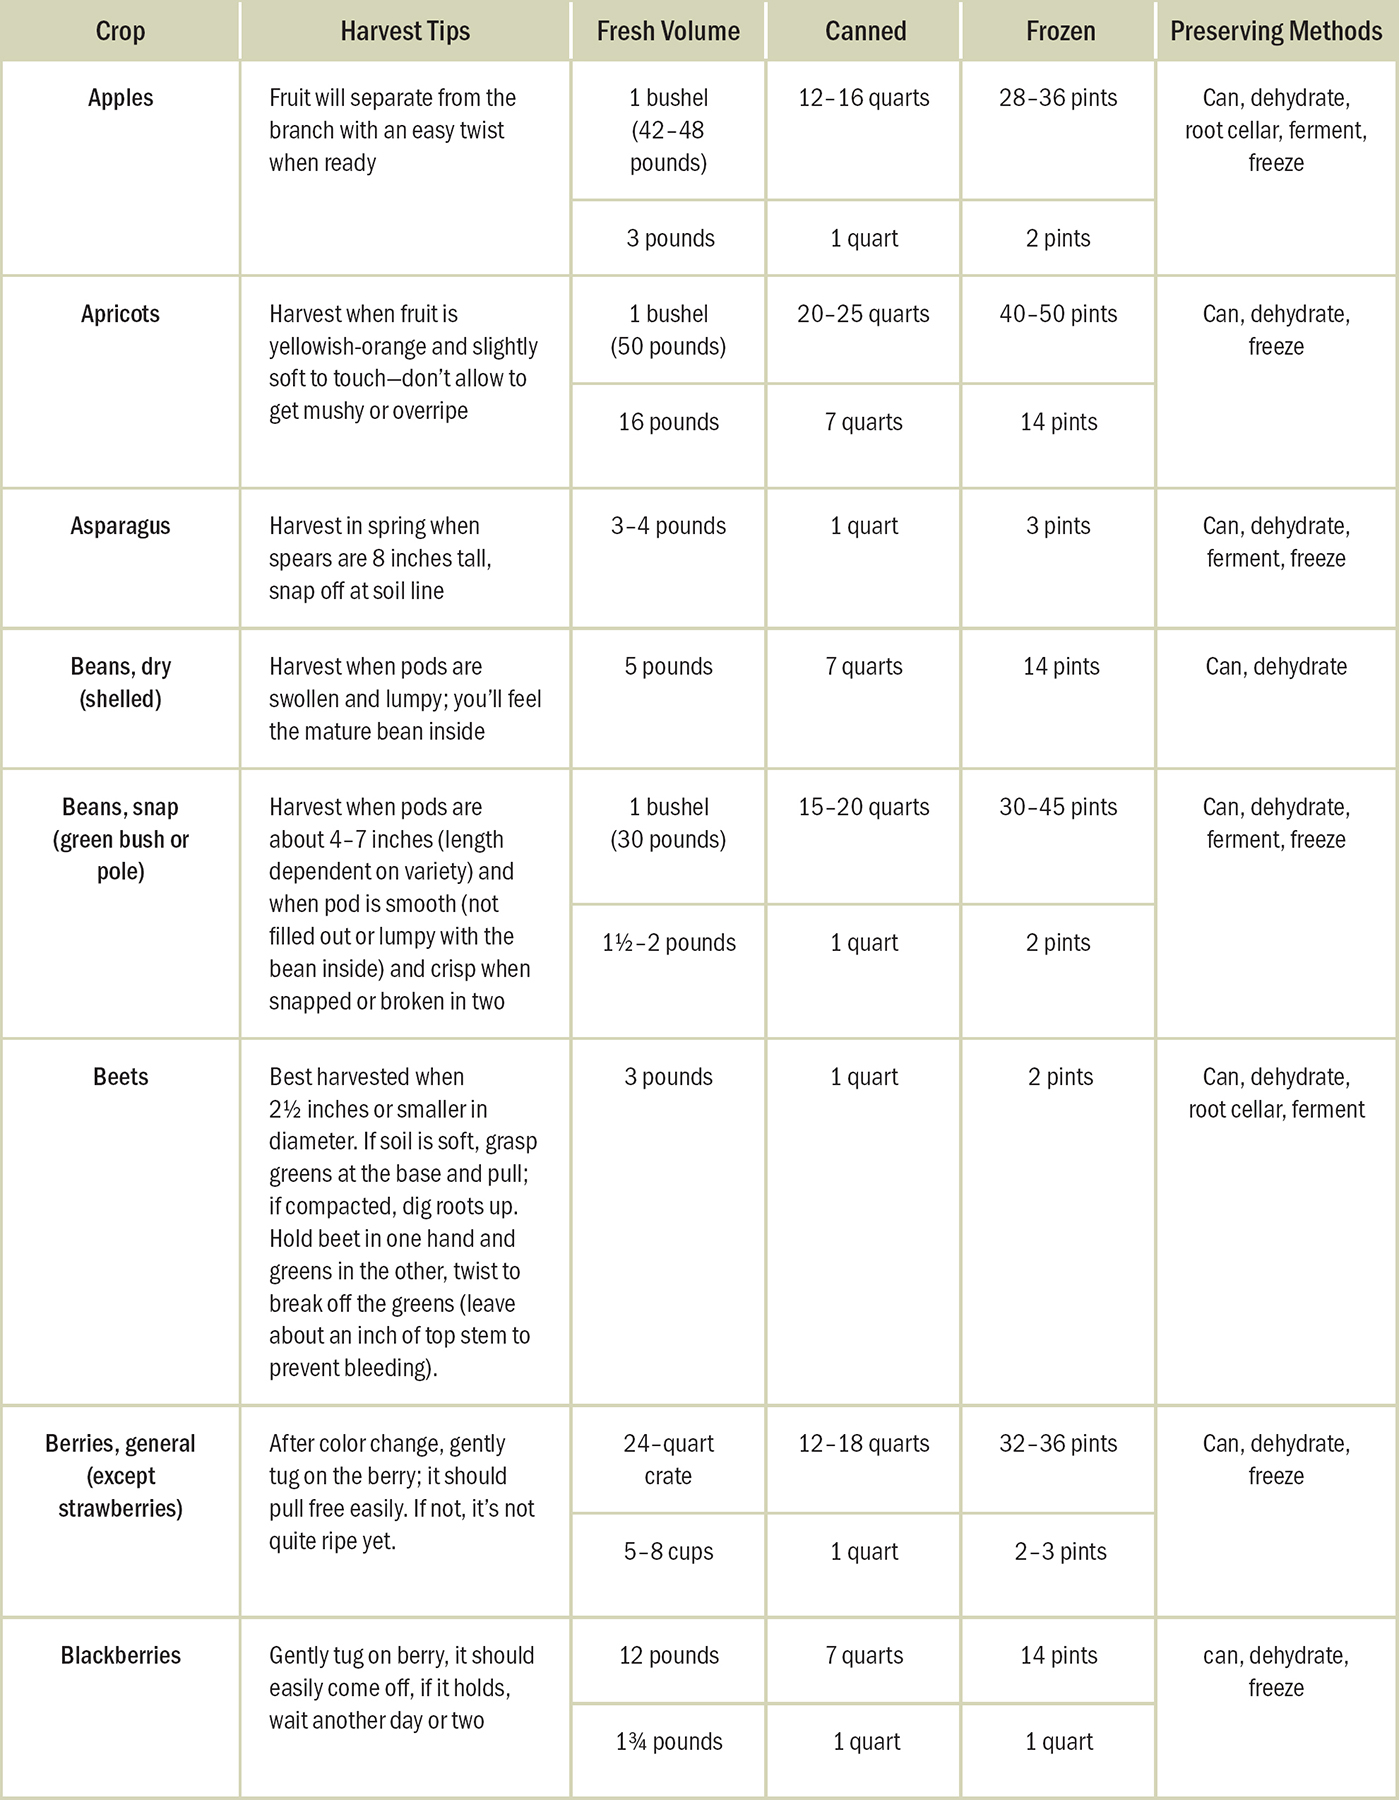
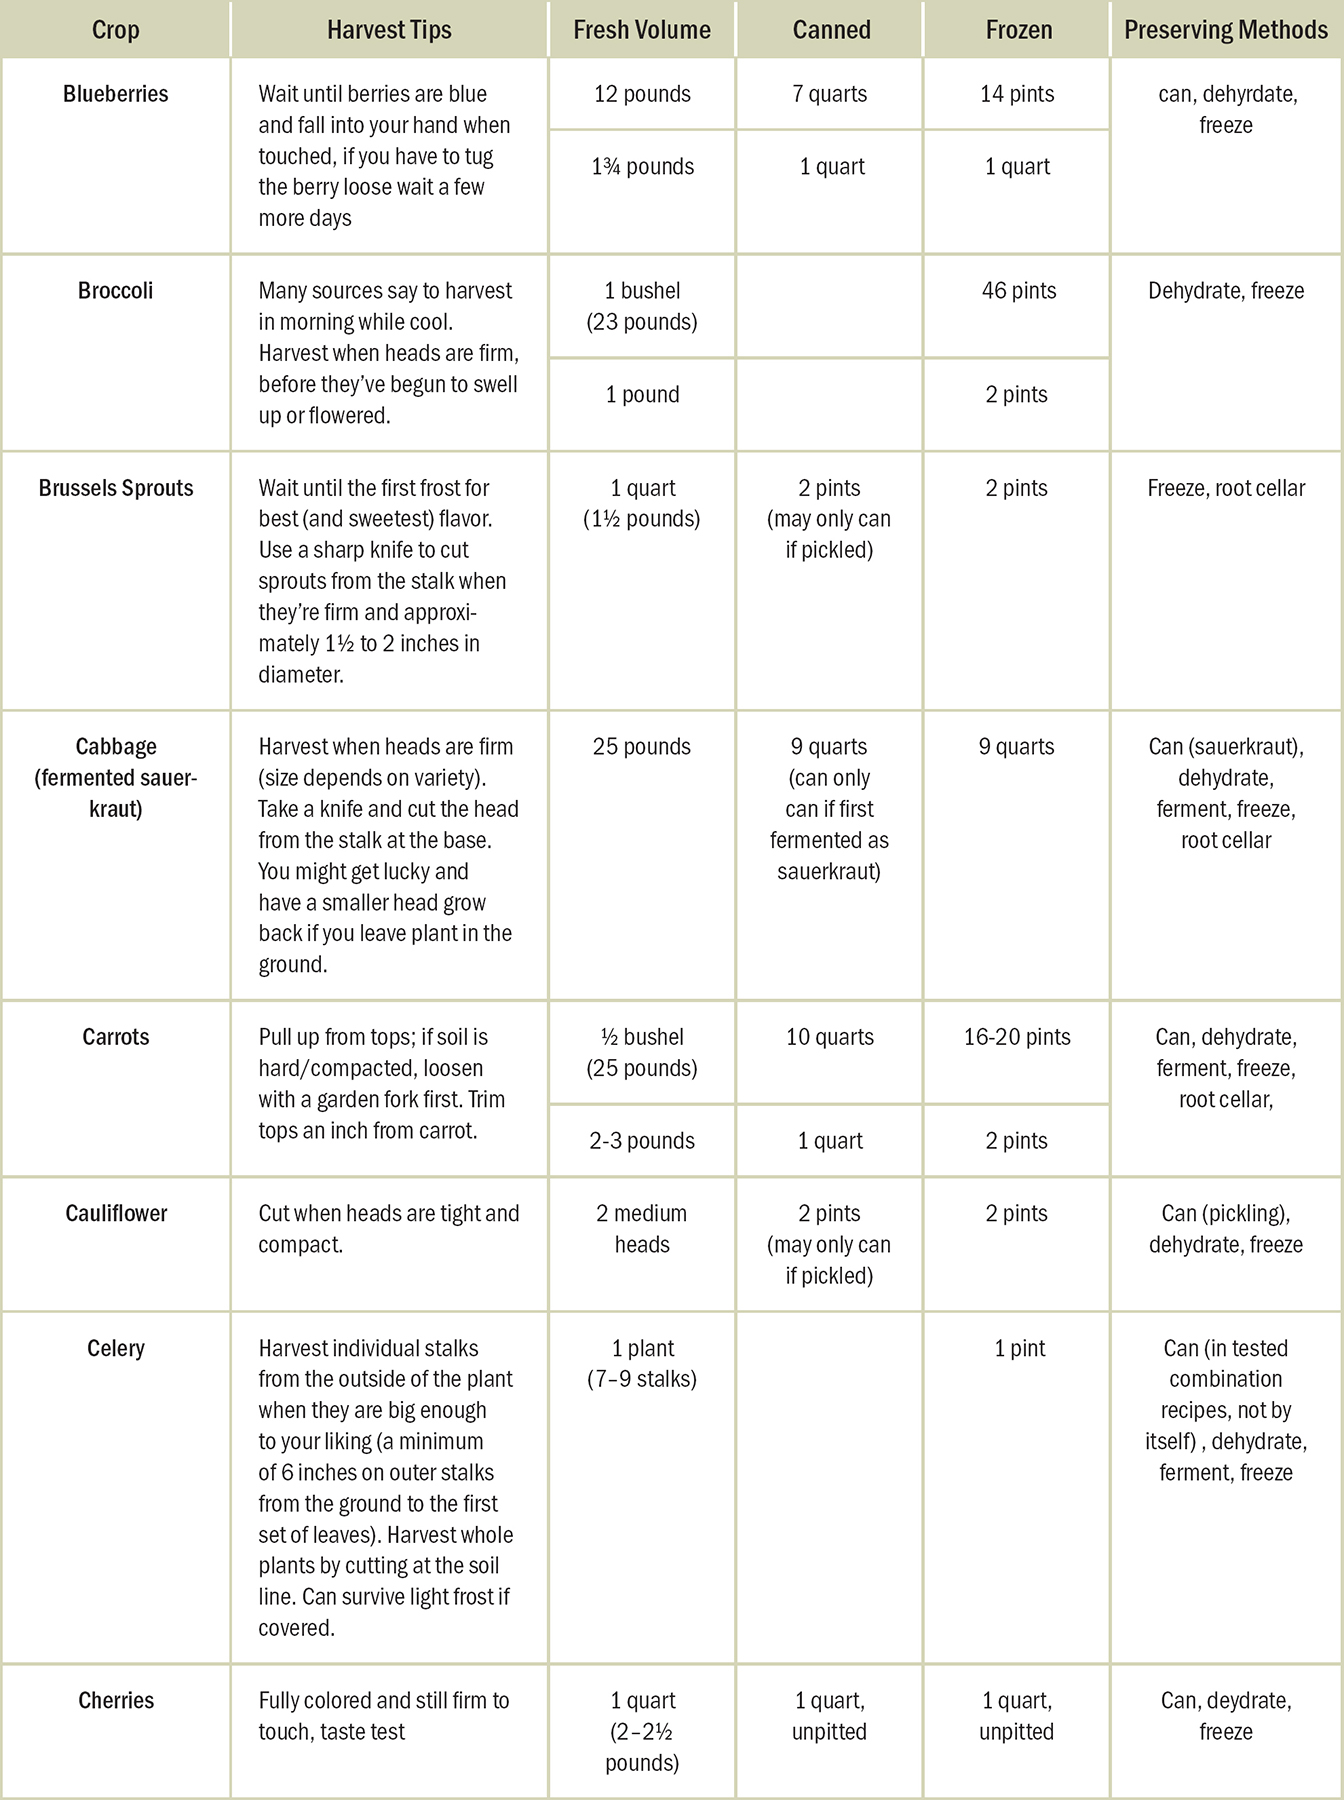
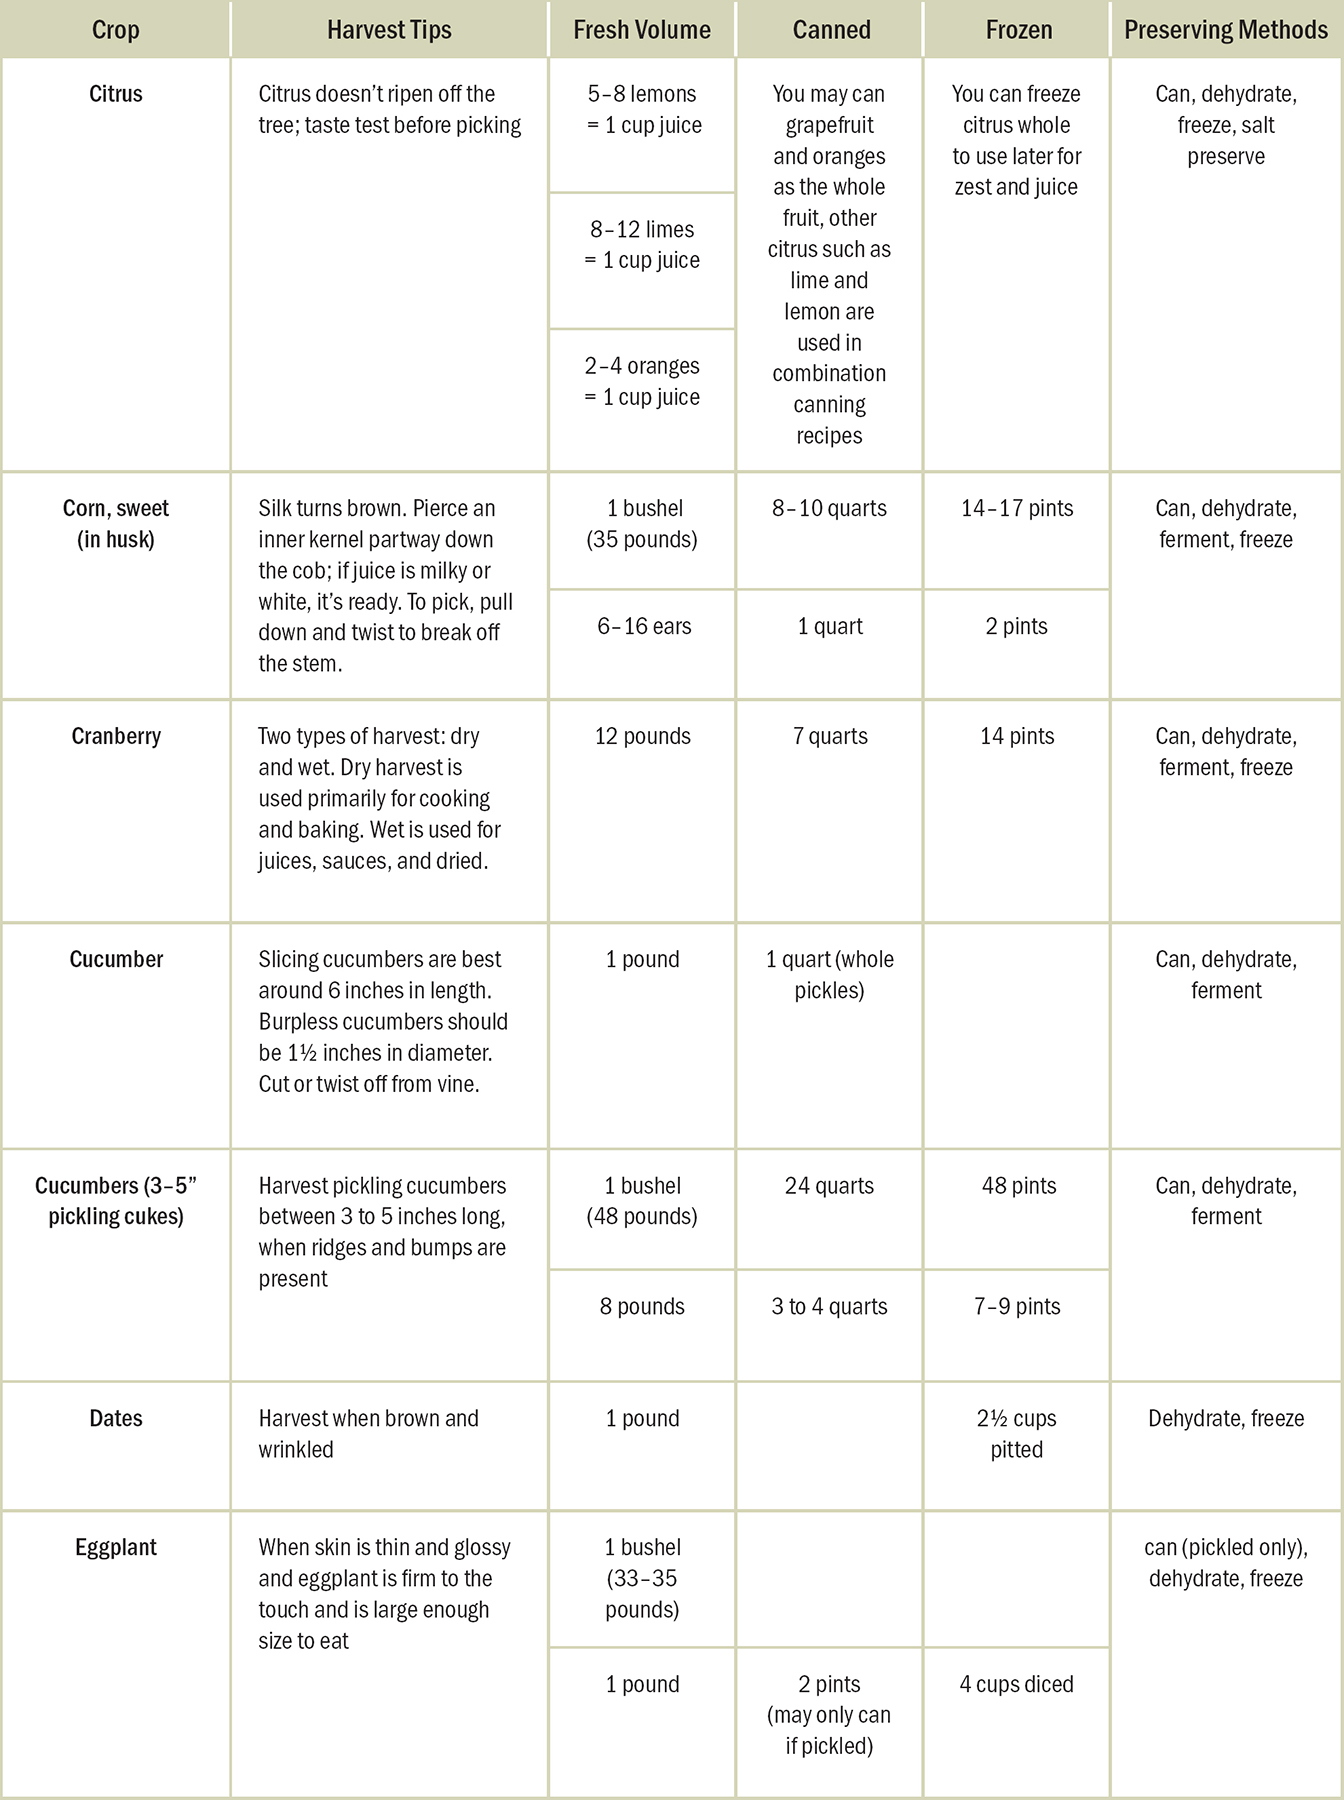
Harvest and Preserving Chart


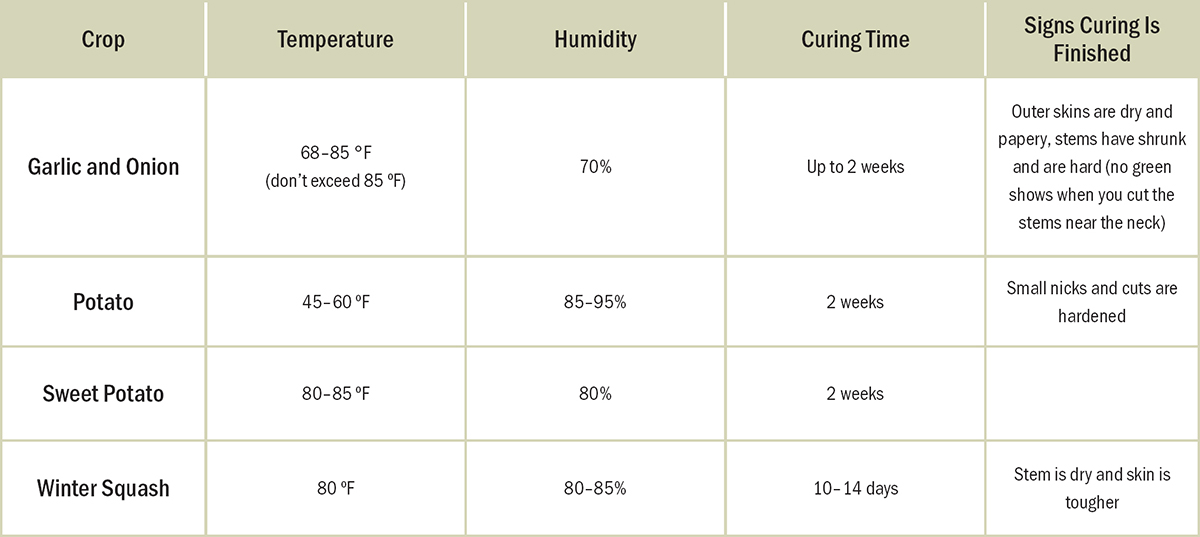
Curing Vegetables
You must cure vegetables for long-term storage. This process is not to be confused with salt or meat curing. Below is a chart of vegetables that do best when cured, along with temps, humidity levels, time, and signs for quick reference. After the chart you’ll find a detailed explanation of the curing process, along with more tips.
Curing allows the outer skin to dry out and harden, making it harder for pathogens or decay to set in. If you’re not planning on storing the vegetables and you want to eat them immediately, you can skip the curing process.
If possible, harvest on a dry day at the beginning of a sunny stretch. Here in the Pacific Northwest, I watch the weather carefully to find a long enough stretch come fall.
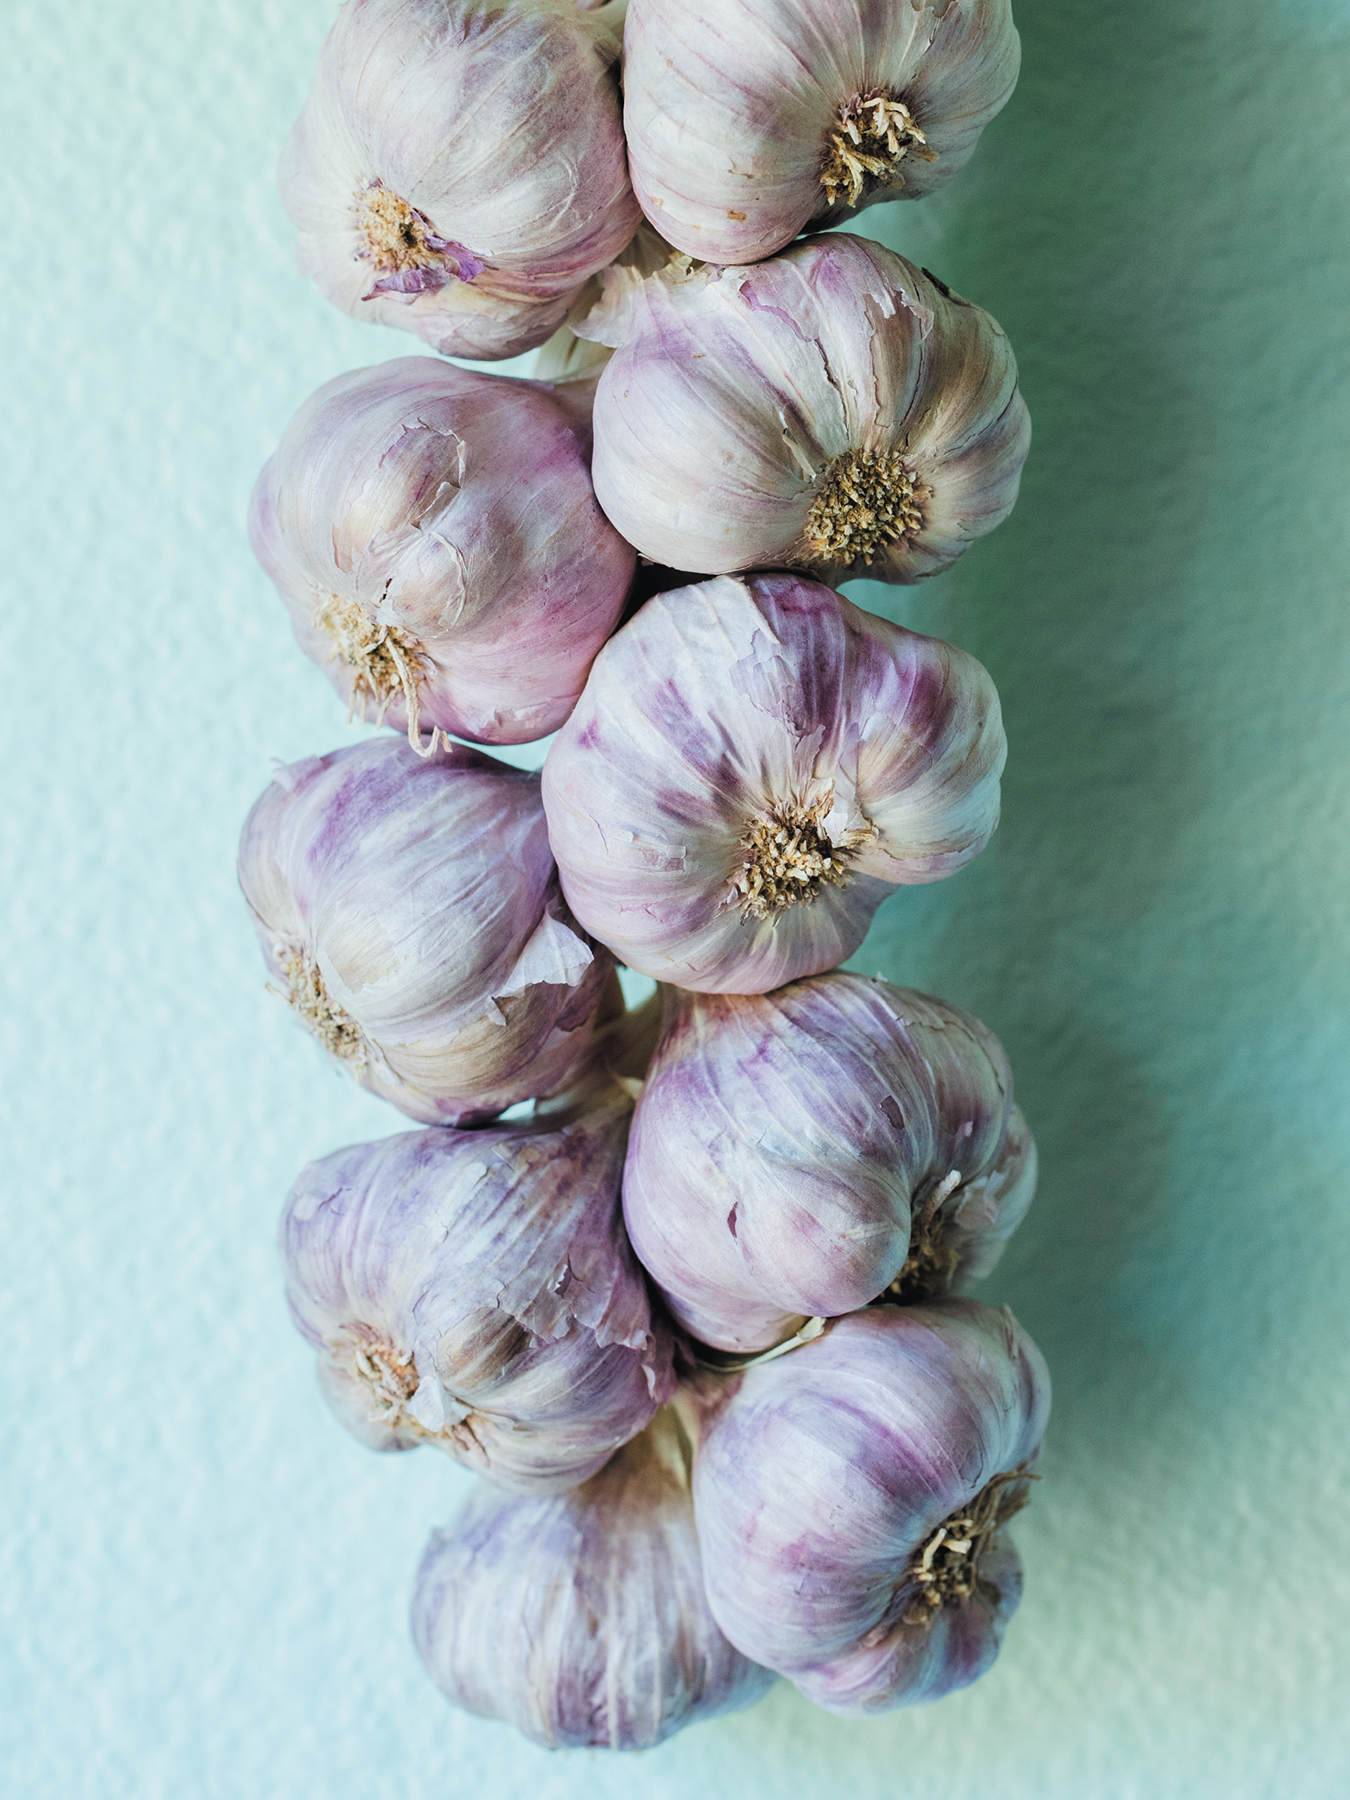
If you have good-draining soil and dry conditions, you can pull your onions and lay them out in the garden to dry. We never have dry enough conditions for this, so I pull mine and lay them out on old window screens or wire for air flow. Do not wash your vegetables when curing. Brush off any large dirt clumps and lay them out in a single layer with good ventilation.
Onion and garlic curing temps should not exceed 85 degrees Fahrenheit, with optimal temps between 68–85°F and 70 percent relative humidity. Temperatures over 90 degrees and direct sunlight can cause sun scald; avoid this. The curing process can take up to two weeks (or longer if temps are cooler and humidity is higher). You know your onions and garlic are cured when the outer skins are dry and papery and the stems have shrunk and are hard (no green shows when you cut the stems near the neck).
Long-term storage for onions and garlic is 32 degrees Fahrenheit (don’t let them freeze) with 60 to 70 percent humidity and out of direct sunlight. However, I braid mine and store them in our back pantry with an average of 60 to 65 degrees Fahrenheit, and my garlic lasts a full year.
Potatoes, both sweet and regular, require curing. To help toughen the skins, stop watering a few weeks before harvest. Don’t wash, but brush off dirt before curing. If you must wash your potatoes, make sure they dry thoroughly before laying them out to cure.
All varieties of potatoes, except sweet potatoes, are best cured at 45 to 60 degrees Fahrenheit with 85 to 95 percent humidity for two weeks. You’ll notice that small nicks and cuts will harden up.
Potatoes should be stored out of the light (or they’ll turn green due to chlorophyll, which can mean the presence of solanine, a toxic alkaloid in large amounts) at 40 to 45 degrees Fahrenheit with 90 percent humidity. They’ll shrivel up in drier conditions and sprout in warmer conditions. We tried storing ours in our unheated camper trailer, but the fluctuating temperatures and lower humidity resulted in shriveled and sprouted potatoes after three months, with several turned bad.
For sweet potatoes, lay out the tubers (be careful not to bruise or puncture them) and allow them to dry for up to two weeks at 80 to 85 degrees Fahrenheit with 80 percent humidity. The higher the temperature the faster they’ll cure, so if temps are lower than 80 degrees, go the full two weeks. The curing time and higher temperatures also help develop the starches and sugars that make sweet potatoes, well, sweet. Store sweet potatoes between 55 to 60 degrees Fahrenheit.
Even if you don’t have perfect temperatures for curing, don’t worry about it; just do your best. We rarely have a full two weeks of exactly correct temps for onions and garlic in the fall. Erring on the cooler side, simply increase the curing time to three to four weeks.
To cure winter squash, pick when squash is ripe; indicators or ripeness are color change, skin toughening, and a drying stem. When picking, leave about two inches of the stem; this helps prevent oxygen from getting into the squash and improves storage time. Wipe off dirt and dry thoroughly (I will often use a vinegar-dampened towel) and lay in a well-ventilated area at 80 degrees Fahrenheit with the humidity 80 to 85 percent for 10 to 14 days. If you don’t have those types of temperatures (come harvest time in September and October we’re never this warm), you can cure winter squash in a corner of your house at cooler temps; optimal is around 50 degrees, making sure you turn them over and no rot sets in.
After curing winter squash for two weeks, store in a cool, dry area at around 55 degrees Fahrenheit. I store the majority in my back pantry with a few in the kitchen where the temps are closer to the lower to mid-sixties, and my butternut, acorn, and spaghetti squash last between four and six months. Squash in the cooler part of the house will last six months plus, with our spaghetti squash lasting the longest. Make sure to check them routinely in case one does go bad.
During storage, make sure garlic, onions, potatoes, and sweet potatoes have adequate air flow and aren’t exposed to light. I hang up my braids of onions and garlic and store potatoes in mesh bags in our pantry closet. Any containers used to hold potatoes or onions should be breathable; cardboard boxes and paper bags also work well. If using plastic containers, make sure they’re not sealed and have a way to breathe or vent.
Never store your potatoes near fruit; the gasses from fruit will cause the potatoes to sprout. It’s also not recommended to store your onions and potatoes together.
Check your cured food in storage often. One potato, onion, or garlic starting to rot will quickly spread to the rest. You know the saying, “One bad apple will spoil the barrel”? It applies to these crops as well.
Preserving Crops
Going into harvest time with a plan will help keep your sanity and make sure you’re putting to good use all of the food you’ve grown.
As you’ve seen from the Harvest and Preserving Chart, there are several ways to preserve most crops based on the equipment you have, preferred method of eating, and storage.
Some methods will require more equipment and know-how than others. The main methods are:
• canning (water bath and pressure)
• dehydration
• freezing
• refrigerating (includes fermentation methods)
• root cellar (cold storage)
Canning involves placing prepared foods in glass jars, processing them in a boiling water bath or pressure canning, to create an anaerobic environment that makes the food shelf stable at room temperature for months. It’s important that you understand the science and safety of canning to avoid botulism, a fatal form of food poisoning. Acidic foods that are 4.6 pH level or lower may safely be canned via a water bath (provided you still follow updated recipes—don’t use grandma’s tomato sauce recipe or older canning books printed on or before 1988 for procedures and times) while other vegetables and meats need to be processed via a pressure canner. I offer a free online home canning safety class that walks you through safe procedures and sets a solid foundation for canning. You can access it at melissaknorris.com/canningclass.
Dehydration involves removing the moisture content from food so it doesn’t break down and decay, creating a shelf-stable and lightweight food. You’ll be amazed at how a large bowl of fresh cherries turns into a few cups once dehydrated. You can dehydrate food by using an oven, (provided it lets you select a low enough temp) and leaving the door propped open, but a dehydrator that allows you to select the temperature and uses a fan will give you a better outcome.
The freezer can work well for some fruits and vegetables. I will often toss my berries in the freezer during harvest time to later make jams, jellies, and syrups so I can focus on preserving the vegetables that need to be processed at picking time. I’ll also use the freezer for vegetables like zucchini (any summer squash) and greens that aren’t good candidates for canning due to safety or texture.


The fridge will hold vegetables and fruits for a few days for fresh use, of course, or until you can get to preserving them using your preferred method. Fermentation of vegetables is one of my favorite ways to preserve because the food is still raw, is teeming with good bacteria for our gut health, and after it’s fermented it will stay preserved in the fridge (or a cool environment around 40º F) for months.
Root cellar techniques will allow you to store some fruits and vegetables for many months, even if you don’t have a root cellar or basement. Curing improves the shelf life of these vegetables, as we covered in the previous section.
Most gardeners will use several, if not all, of the above methods. We use all of them here on our homestead.
Preserving Supplies Checklist
Canning (water bath)
 Large pot with lid or water bath canner with rack
Canning rack (can use extra bands or twisted towel to keep jars up off the bottom of the pot)
Canning jars, lids, and bands
Canning (pressure canning)
Pressure canner with rack (you cannot can in an electric pressure cooker; must be a stove-top pressure canner)
Canning jars, lids, and bands
Canning supplies that are nice to have but not essential:
• Jar lifter
• Headspace measuring tool
Dehydrating
Dehydrator and trays
Mason jars or sealable, air-tight bags
Dehydrating supplies that are nice to have but not essential:
• Silicone nonstick mats or parchment paper for fruit puree, sticky fruit, or small pieces of food
• Vacuum sealer, bags, and mason jar attachment
Freezing
Freezer containers or bags
Steamer basket to blanch some vegetables
Mason jars make excellent freezer containers for many fruits (I freeze quart jars full of berries).
Freezing supplies that are nice to have but not essential:
• Vacuum sealer, bags, and Mason jar attachment
Fermenting
Mason jars or fermenting crock
Airlock system for jars
Fermenting weight (can use a plastic bag or small jar filled with water as a homemade weight)
Root Cellar
Screen or wire to lay crops on during curing
Breathable containers, bags, or bins to store cured vegetables in
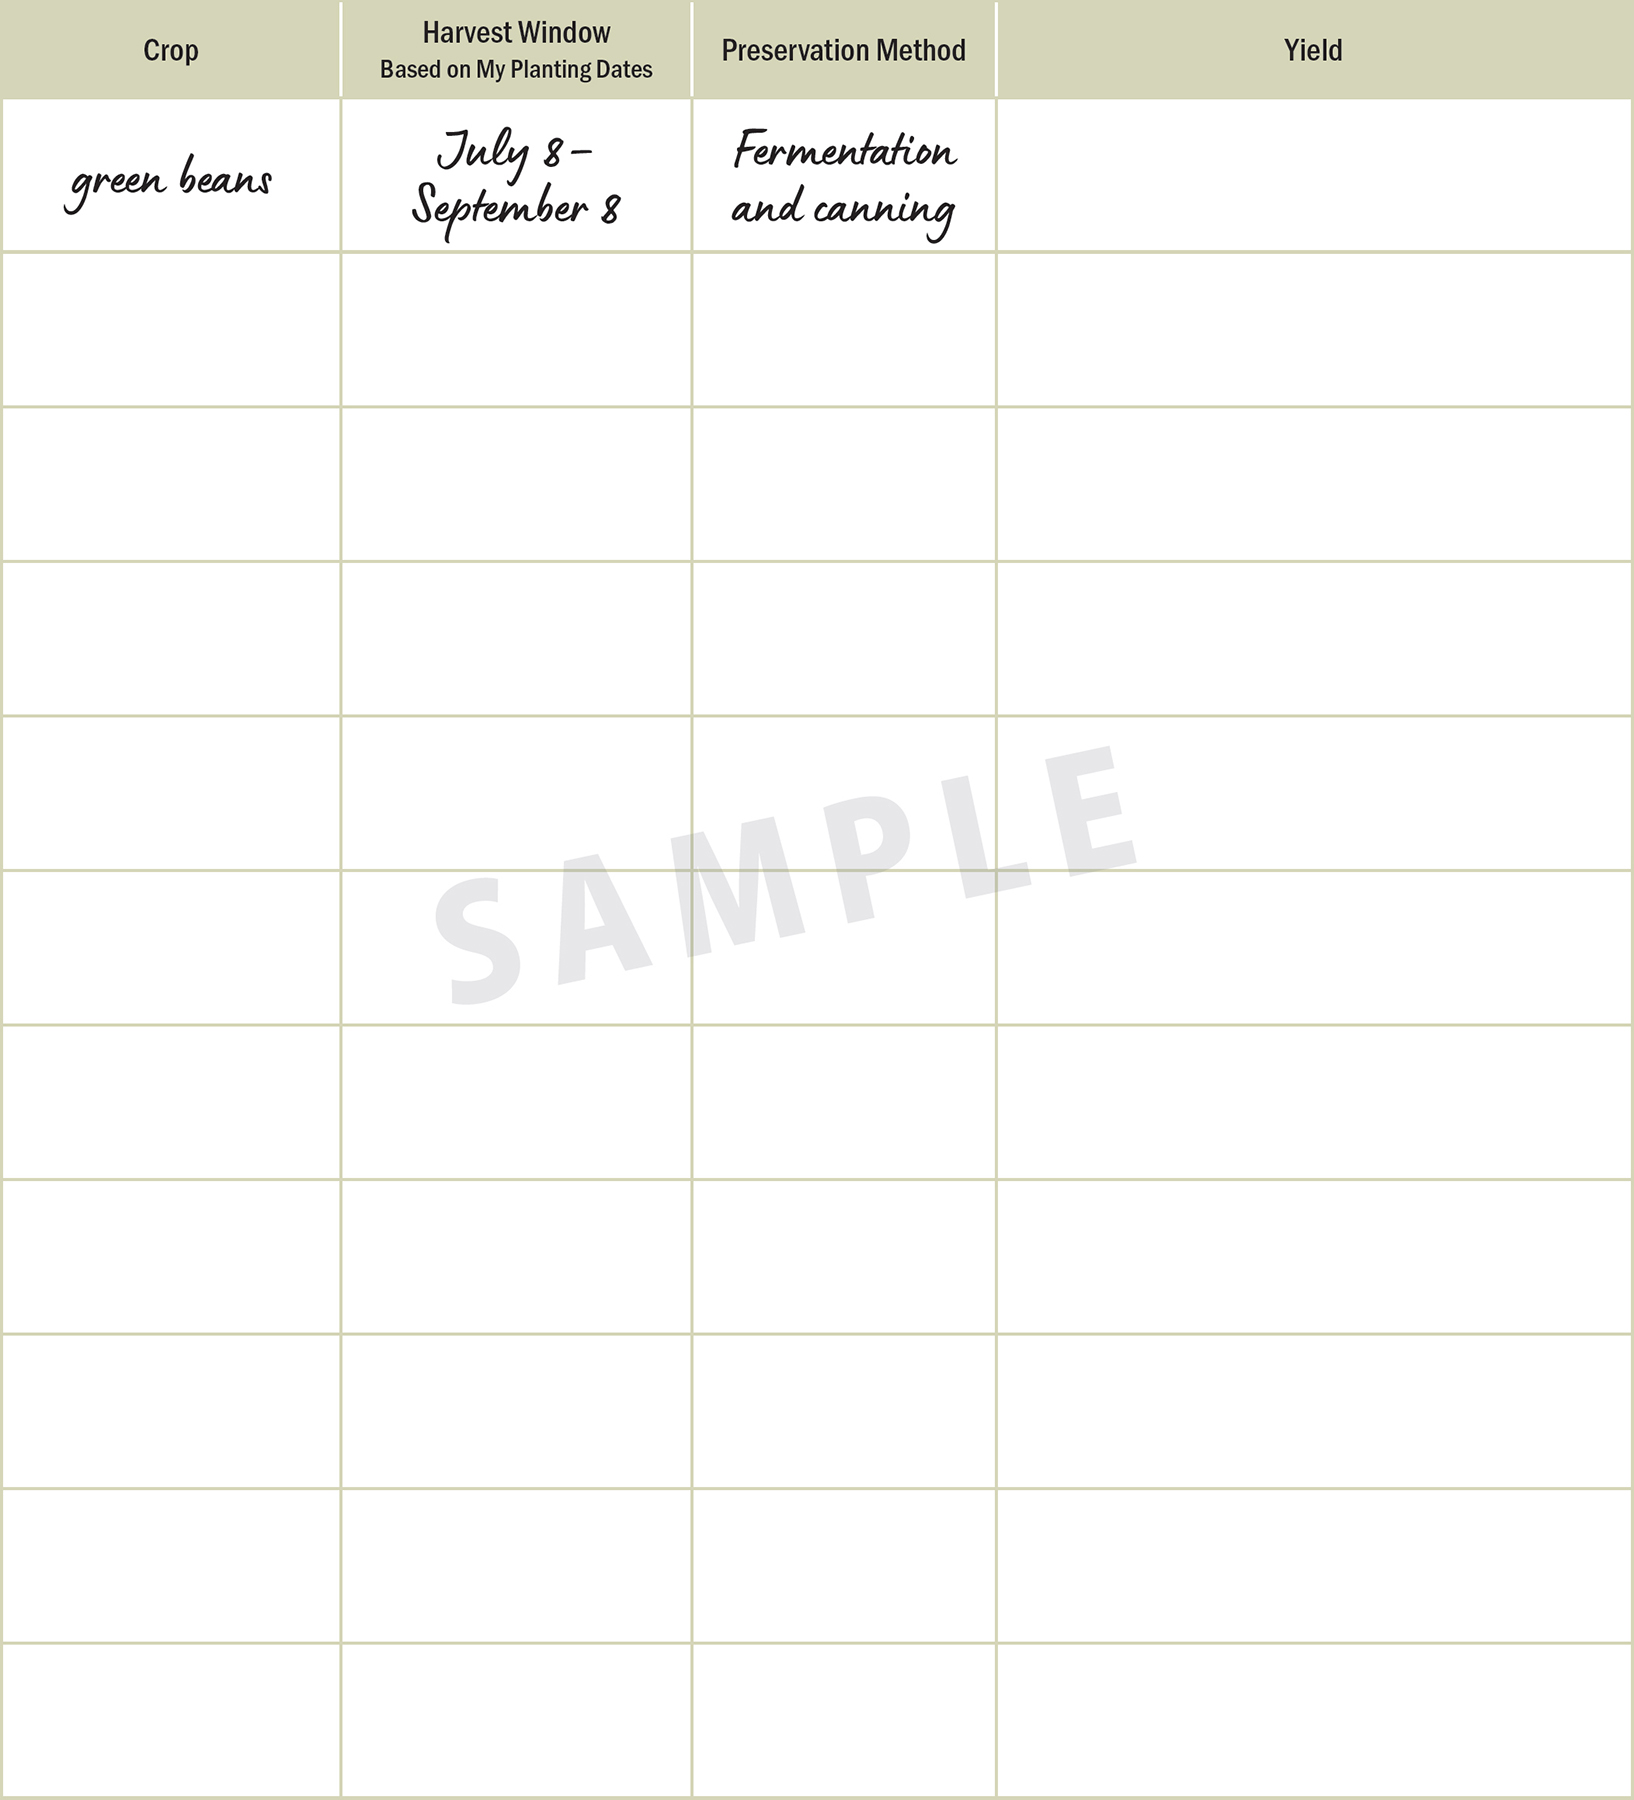
HARVEST PRESERVATION WORKSHEET
This worksheet is designed to help you map out your preservation plan, because going in with a plan will help you stay on top of the harvest and have supplies ready. Using the Harvest and Preservation Chart starting on page 129, fill in a worksheet like the sample below.