
The following techniques are essential for the successful outcome of the projects in this book. The techniques covered are those I prefer, but experienced knitters can feel free to modify techniques according to their own preferences. There is always more than one path up a mountain!
This method allows precise placement of the bead in an individual stitch and is the method used for most of the projects in this book. Although it’s easier to put the bead on the stitch before it is worked, doing so can compromise the tension on that stitch.
Work to the stitch designated for bead placement, work the stitch as specified in the instructions, slip a bead onto the shaft of a crochet hook, remove the knitted stitch from the knitting needle by lifting the stitch just worked with the hook (Figure 1). Slide the bead onto the stitch just worked, return that stitch to the left needle, adjust the tension, then slip that stitch onto the right knitting needle (Figure 2).
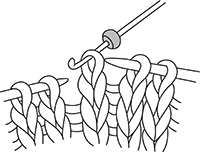
FIGURE 1

FIGURE 2
With a double-pointed needle, cast on the desired number of stitches. *Without turning the needle, slide the stitches to the other end of the needle, pull the yarn around the back, and knit the stitches as usual; repeat from * for desired length.
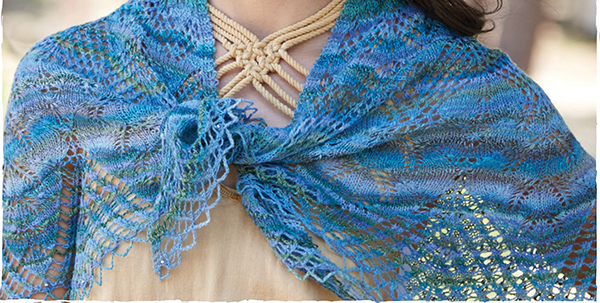
Because each skein of a hand-dyed yarn is unique, any project that uses more than one skein runs the risk of having a visible line where you change skeins. This is not a defect in the yarn, but simply the nature of hand-dyed yarns. You can simply accept that and embrace the color change. That works sometimes for a piece worked in the round, such as a square or a circle. And it also can work for a top-down triangle such as the Mount Elbrus project on page 86. But if you want to avoid a visible color shift, you can simply “feather” the second skein in, by alternating rows from the first skein and then the second. I only do this for 5–10 rows when I switch skeins (more if the two skeins are less alike). You can alternate for the entire project, but that never appeals to me.
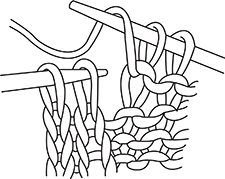
Place stitches to be joined onto two separate needles. Hold them with right sides of knitting facing together. Insert a third needle into the first stitch on each of the other two needles and knit them together as one stitch. *Knit next stitch on each needle the same way. Pass first stitch over second stitch. Repeat from * until one stitch remains on third needle. Cut yarn and pull tail through last stitch.
A loose bind-off is critical for the proper blocking of lace. The following methods will provide a sufficiently loose edge. The project instructions will specify which type to use.
See page 18 for crochet instructions.
Insert hook through the back legs of specified number of stitches (Figure 1; three stitches shown) to gather them, pull a loop through (Figure 2) so there is one loop on hook, work a crochet chain the specified length (Figure 3; eight stitches shown), *insert crochet hook through the back legs of the next group of stitches (Figure 4), pull the yarn loop through these stitches as well as through the stitch of the chain (Figure 5), work a crochet chain for the specified number of stitches; repeat from *.

FIGURE 1

FIGURE 2
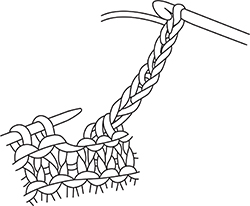
FIGURE 3

FIGURE 4
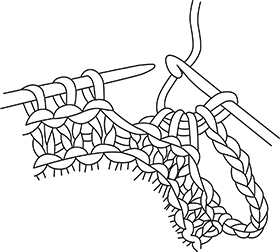
FIGURE 5
If working in rounds, finish by joining the final chain to the base of the first gathered group, then pull the yarn through the final loop leaving a 9" (23 cm) tail.
If working in rows, finish by pulling the loop through the final group of stitches, then pull the yarn through the final loop leaving a 9" (23 cm) tail.
This smooth and stretchy method is ideal for edges that will be stretched during blocking. Be sure to work loosely but evenly; use a needle one or two sizes larger than you knit with if desired.
Slip 1 stitch, knit 1 stitch, *insert the left needle tip into the front of both of these stitches and knit them together through the back legs (Figure 1), return resulting stitch to the left needle tip; repeat from * until all stitches have been worked and one stitch remains on right needle. Cut yarn leaving a 5" (12.5 cm) tail, bring tail through remaining stitch and pull tight to secure.
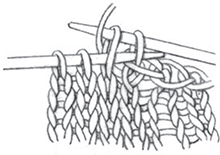
FIGURE 1
Several of the pieces in this book are worked outward from the center and require Circular cast-ons:
I learned this method from Elizabeth Zimmerman’s Knitter’s Almanac (Dover Publications, 1981).
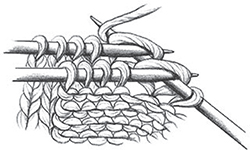
Make a simple loop of yarn with the short end hanging down. With a crochet hook, *draw a loop through the main loop, then draw another loop through this loop. Repeat from * for each stitch to be cast on. Divide the stitches evenly on four double-pointed needles.
After several inches of the pattern have been worked, pull on the short end to tighten the loop and close the circle.

This method comes from Marianne Kinzel’s First Book of Modern Lace Knitting (Dover Publications, 1972). It’s especially good when using fine yarn.
You’ll need a set of five double-pointed needles in the size needed for the specified gauge and a crochet hook that’s close to the same size as the knitting needles. See page 18 for crochet instructions.
With the crochet hook, make a crochet chain the specified number of stitches long (Figure 1; eight stitches shown), then use a slip stitch to join the chain into a loop (Figure 2). Work a single crochet into each of the next three chain stitches (four stitches on the crochet hook), divide these four stitches evenly on two double-pointed needles, work a single crochet into each of the next four chain stitches (again four stitches on crochet hook; Figure 3), then divide these four stitches evenly on two other double-pointed needles (Figure 4).

FIGURE 1

FIGURE 2

FIGURE 3
FIGURE 4
Many of the pieces in this book begin with a provisional cast-on. This allows for an elastic edge and seamless pick-up of new stitches:
Make a loose slipknot of working yarn and place it on the right needle tip. Hold a length of contrasting waste yarn (of about the same diameter as the working yarn) next to the slipknot and around your left thumb; hold the working yarn over your left index finger. *Bring the right needle forward under the waste yarn, over the working yarn, grab a loop of working yarn (Figure 1), then bring the needle back behind the working yarn and grab a second loop (Figure 2). Repeat from * for the desired number of stitches. When you’re ready to work in the opposite direction, carefully pull out the waste yarn as you place the exposed loops onto a knitting needle.
FIGURE 1

FIGURE 2
Because lace needs blocking to really show its beauty, you need a nice stretchy cast-on. Stretchy cast-ons:
Make a slipknot of working yarn and place it on the left needle tip. *Insert the right needle tip knitwise into the slipknot, wrap the yarn around the needle as if to knit, and pull the loop through (Figure 1). Keeping the slipknot on the left needle tip, place the new loop onto the left needle in front of it to form a new stitch (Figure 2). Repeat from *, always working into the last stitch made (only work into the slipknot for the first stitch).
FIGURE 1

FIGURE 2
To ensure that this cast-on is suitably stretchy, I work this method over two needles of the size needed to get gauge.
Leaving a long tail (about 1⁄4" [6 mm] per stitch), make a slipknot and place it on the right needle tip. Place the thumb and index finger of your left hand between the yarn ends so that the working yarn is around your thumb. Secure both yarn ends with your other fingers. Hold your palm upward, making a V of yarn (Figure 1). *Bring the needle up through the loop around your thumb (Figure 2), catch the first strand around your index finger, and bring the needle back down through the loop on your thumb (Figure 3). Drop the loop off your thumb and place your thumb back in the V configuration while tightening the resulting stitch on the needle (Figure 4). Repeat from * for the desired number of stitches.

FIGURE 1

FIGURE 2

FIGURE 3

FIGURE 4
Blocking may be the most critical step in a lace project. Just off the needles, a lace project can look like a worn-out rag. Only through blocking will its full beauty be revealed. I always wet-block my lace by soaking it in cool water for at least 30 minutes (perhaps longer for silk) so that the fibers are thoroughly wet, pressing the project down into the water a few times as it soaks to ensure uniform water penetration. If desired, you can add a mild soap to gently wash the piece at this time, but be careful to rinse it well to remove the soap.
Press out the excess water with your hands and then roll the piece in a thick towel to remove the extra water. Lay it on a flat padded surface and use wires and T-pins to block as directed in the pattern. Allow it to air-dry completely before removing the blocking wires and pins. I generally weave in the loose ends before I block a piece, but I don’t trim the remaining tails until after it has completely dried.
It’s important to note that the dimensions of the knitting right off the needles will be considerably smaller than after the piece has been stretched during blocking. It’s equally important to note that the blocked dimensions are the maximum dimensions the piece will measure—most will relax a little with handling.
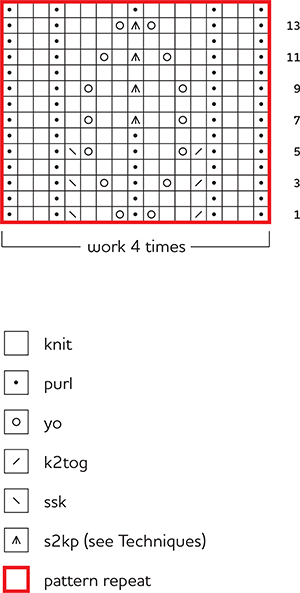
If you’re new to reading charts, don’t be intimidated. Charts represent the knitted fabric in a very logical way. Each symbol is designed to represent how the stitches will appear (when viewed from the right side) after they’ve been worked. For example, a right-leaning decrease is represented by a right-leaning symbol on the chart; a yarnover, which forms an open eyelet, is represented by an open circle on the chart. Charts will help you learn to read your knitting, and as you get better at reading your knitting, charts will become easier. As you gain experience with both, you’ll learn to recognize mistakes and fix them quickly. Start with the simpler projects and practice comparing what’s on your needles with what’s shown in the chart. The sidebar below gives general rules for working with charts.
To help keep your place on a chart, it’s a good idea to mark the row being worked. For charts in which there are no row repeats, my favorite technique is to make a photocopy of the chart and use a highlighter to color each row as I complete it. Not only does this mark my place, but it also allows me to compare the row I’m working on with those I’ve already completed. If the chart involves a series of rows that are repeated (outlined in red), the highlighter method only works for the first repeat. In these cases, I fix removable highlighter tape to the row being worked, and I move the tape up the chart as I progress from row to row. This allows me to start afresh with the first row of each repeat.
*Yarn over hook and draw through a loop on hook. Repeat from * for the desired number of stitches.

*Insert hook into the next stitch, yarn over hook and draw through a loop, yarn over hook (Figure 1), and draw it through both loops on hook (Figure 2). Repeat from * for the desired number of stitches.

FIGURE 1

FIGURE 2
*Insert hook into stitch, yarn over hook and draw a loop through both the stitch and loop already on the hook. Repeat from * for the desired number of stitches.
This type of decrease slants to the right—one stitch decreased.
Knit two stitches together as if they were a single stitch.
This type of decrease slants to the left.
Slip two stitches individually knitwise (Figure 1), insert the left needle tip into the front of these two slipped stitches, and use the right needle to knit them together through their back loops (Figure 2)—one stitch decreased.
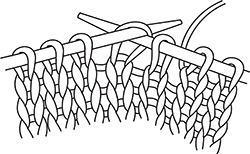
FIGURE 1
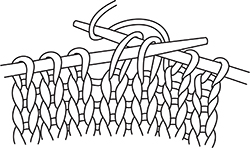
FIGURE 2
This type of decrease has a vertical alignment.
Slip two stitches together knitwise (Figure 1), knit the next stitch (Figure 2), then pass the slipped stitches over the knitted stitch (Figure 3)—two stitches decreased.

FIGURE 1

FIGURE 2
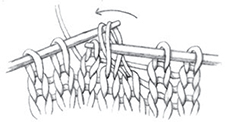
FIGURE 3
This type of decrease slants to the right.
Knit three stitches together as if they were a single stitch—two stitches decreased.
Purl three stitches together as if they were a single stitch.
This type of decrease slants to the left.
Slip three stitches individually knitwise, insert the left needle tip into the fronts of these three slipped stitches, then use the right needle to knit them together through their back loops—two stitches decreased.

FIGURE 1
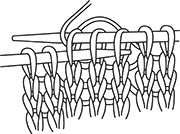
FIGURE 2
Yarnover:
Beginning with the working yarn in the back of the needles, bring the yarn to the front of the work between the needles, then over the right needle and again to the front—wrapping the needle—and ready to purl the next stitch.

Beginning with the working yarn in front of the needles, bring the yarn over the right needle to the back, ready to knit the next stitch.
Beginning with the yarn in the back of the needles, bring the yarn to the front of the work between the needles, then over the right needle to the back, ready to knit the next stitch.

Beginning with the working yarn in front of the needles, bring the yarn over the top of the right needle to the back, then between the two needles to the front—wrapping the needle—and ready to purl the next stitch.

Wrap the yarn twice around the needle as described above. On the return row or round, work the two loops as purl 1, knit 1 when working back and forth, and knit 1, purl 1 when working in the round.
When you are working in the round and a double yarnover spans the beginning of round (one of the yarnovers is at the start of the round and the second is at the end of the round), you need to decide if you want to work both at the beginning of the round or at the end. They must be worked together if you want your hex-mesh to be consistent. I like to work them at the beginning of the round. To do this, work a double yarnover at the beginning of the round, where the chart shows a single yarnover, and at the end of the round omit the final charted yarnover. When you work the return row remove the beginning-of-round marker, knit the first yarnover, replace your marker, and purl the second yarnover. Your start of round stays the same and your hex-mesh is uninterrupted and looks great!
If you work one of the yarnovers at the beginning and one at the end, you will have two yarnovers rather than a double yarnover, so your mesh will be interrupted at the beginning of round.
This forms a smaller hole than a regular yarnover.
Use the left needle tip to lift the strand between the needle tips from front to back (Figure 1), then knit the lifted loop without twisting it—one stitch increased.
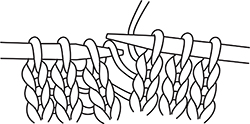
FIGURE 1
There are two ways this is done. In some instances the knitter alternates knitting and purling into the same stitch the specified number of times. If the number is 3, then knit 1, purl 1, knit 1 into the same stitch. If the number is 4, then knit 1, purl 1, knit 1, purl 1 into the same stitch, and so on. In some instances the knitter alternates knitting and making a yarnover into the same stitch the specified number of times, always ending with a knit. Review the chart key, which will give you details for each pattern, before beginning.
When knitting lace, it’s best to join a new ball of yarn as inconspicuously as possible.
This type of join works well with all types of yarn and is especially good when changing colors.
Thread the smallest needle possible with a 4" (10 cm) tail of the old yarn. Make a loop by inserting the needle back through the plies of the same yarn for about 1" (2.5 cm), then let the tail hang free, leaving a loop at the fold. Thread the end of the new yarn onto the needle, bring it through the loop in the old yarn, then insert it inside the plies of the new yarn in the same way to connect the two loops (Figure 1). Pull the loose ends to tighten the loops (Figure 2). Trim the remaining tails.

FIGURE 1

FIGURE 2
This method works only with feltable yarns such as wool and alpaca. It doesn’t work for superwash wool, cotton, silk, or linen.
Untwist the plies from both the old and new ends of yarn for about 2" (5 cm) (Figure 1), moisten the loose ends with saliva, overlap the loose ends (Figure 2), then rub them vigorously between your palms (Figure 3). The moisture and friction will cause the two yarn ends to felt together.

FIGURE 1

FIGURE 2

FIGURE 3
With right side facing and working from right to left, *insert needle tip into the center of the stitch below the cast-on (or bind-off) edge (Figure 1), wrap yarn around needle, and pull through a loop (Figure 2). Repeat from * for the desired number of stitches.

FIGURE 1
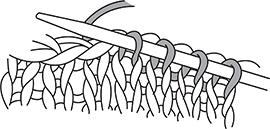
FIGURE 2

With wrong side of work facing and working from right to left, *insert needle tip under edge stitch from the far side to the near side (Figure 1), wrap yarn around needle, and pull through a loop (Figure 2). Repeat from * for the desired number of stitches.

FIGURE 1
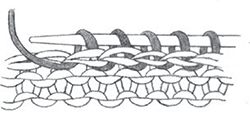
FIGURE 2
Some patterns that are worked in rounds require that the beginning-of-round marker be shifted to the left or right on specific rounds. The charts for such patterns are clearly labeled. If the shift is to the left, just work the required number of stitches past the end of the round, then relocate the marker and resume with the first stitch of the next round. If the shift is to the right, simply stop working the required number of stitches before the end of the round, relocate the marker to this position, then continue with the first stitch of the next round.
Except to mark the beginning of the round when I’m working in rounds, I rarely use stitch markers other than for very specific situations. Although some designers advocate placing a marker at the end of every pattern repeat, I find that they can get in the way if the pattern repeat straddles a double decrease or the beginning of the round shifts from one position to another. In addition to the beginning-of-round marker, every other marker would have to be shifted as well. For example, if the instructions say to move the beginning of the round one stitch to the left, all the other markers will have to shift one stitch to the left as well.
When I do use markers, I choose smooth, thin markers that won’t snag delicate yarn or affect the neighboring stitches. Otherwise, telltale “ladders” may appear in the finished piece. I also prefer markers that dangle a bit so that they won’t inadvertently slip through yarnovers. Some of my favorite markers are ones that I’ve made from crochet cotton. Just cut crochet cotton that’s finer than your working yarn into 3" (7.5 cm) lengths. Fold the lengths in half, then tie an overhand knot about halfway up the doubled thread to make a loop that’s about 3⁄4" (2 cm) long with 3⁄4" (2 cm) tails.
I have written the patterns to reflect the method I feel works best for working in the round: When you work on the double-pointed needles, use the yarn end from your cast-on to mark the beginning of the round. A locking marker can be used to indicate the beginning of the round if that is your preferred method. There are drawbacks to this, such as the locking marker getting in your way when you begin at the center of a lace piece, the marker getting snagged on your yarn, and the time it takes to unlock and move the marker as you knit. Where you can choose to place a marker will be indicated in the pattern.
When working in the round, dealing with stitch markers when the beginning-of-round shifts can be challenging. I find it easier to use only one marker, at the beginning of round. If you want to use a marker between every chart repeat, I have two suggestions:
Bring threaded needle down front to back through fabric on one side of seam, then up from back to front on other side; repeat from *, striving for even spacing of stitches.

Bring threaded needle through front stitch as if to purl and leave stitch on needle (Figure 1).
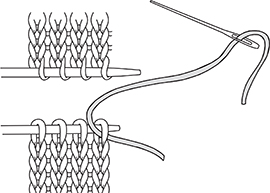
FIGURE 1
Bring threaded needle through back stitch as if to knit and leave stitch on needle (Figure 2).

FIGURE 2
Bring threaded needle through first front stitch as if to knit and slip this stitch off needle. Bring threaded needle through next front stitch as if to purl and leave stitch on needle (Figure 3).
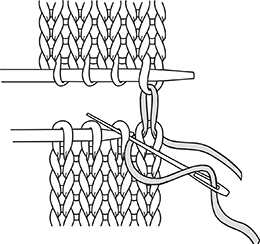
FIGURE 3
Bring threaded needle through first back stitch as if to purl and slip this stitch off needle. Bring needle through next back stitch as if to knit and leave stitch on needle (Figure 4).

FIGURE 4
Repeat Steps 3 and 4 until no stitches remain on needles.

In addition to knits and purls, the following stitches are used in many of the projects in this book.
Insert right needle through the loop on the back of the left needle from front to back (Figure 1), wrap the yarn around the needle, and pull a loop through while slipping the stitch off the left needle (Figure 2). This is similar to a regular knit stitch, but is worked into the back loop of the stitch instead of the front.

FIGURE 1
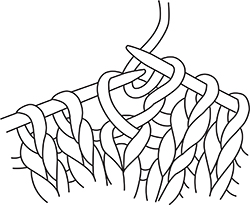
FIGURE 2
Insert right needle through the loop on the back of the left needle from back to front (Figure 1), wrap the yarn around the needle, and pull a loop through while slipping the stitch off the left needle (Figure 2). This is similar to a regular purl stitch, but is worked into the back loop of the stitch instead of the front.
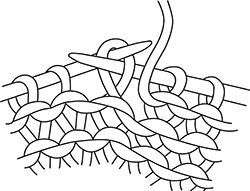
FIGURE 1

FIGURE 2
Many knitters like to work a selvedge by slipping the first stitch of every row. However, I believe that slipped selvedge stitches are less elastic than knitted (or purled) stitches and can inhibit full blocking of a lace piece. Blocking is critical for all of the projects in this book and shouldn’t be compromised by tight edges.
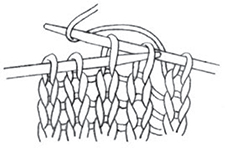
With the right side of the work facing, work to the desired nupp stitch. Working very loosely knit into the designated stitch, but leave that stitch on the left needle. *Yarn over, then knit the stitch again (Figure 1); repeat from * until the desired number of loops are on the needle (typically 7 or 9), ending by knitting into the stitch again to secure the last yarnover (Figure 2; 7 nupp loops shown). If working in rows, purl the 7 or 9 nupp loops together on the following wrong-side row (Figure 3; p7tog shown). If working in rounds, knit the 7 or 9 nupp loops together on the following round through their back loops.
FIGURE 1

FIGURE 2
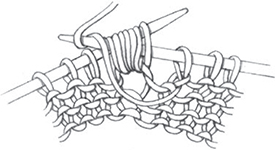
FIGURE 3
Insert the tip of your right-hand needle between the first and second stitch on the left-hand needle. Knit the second stitch in the usual way (Figure 1). Knit the first stitch (Figure 2). Slip both stitches off the left-hand needle.

FIGURE 1

FIGURE 2
