Chapter 5
Exercises for Seniors
In This Chapter
 Improving blood circulation throughout your body
 Strengthening your spine and improving your range of motion
 Concentrating on your coordination and focus
No matter your age, Yoga with Weights exercises can help you stay strong and supple. Therefore, the exercises in this chapter are designed specifically for seniors. Here, you find a workout that emphasizes the importance of stretching, relaxing, and strengthening for promoting the general health and well-being of seniors. Still not convinced? Okay, the exercises also slow down and prevent premature aging!
Reaping the Rewards of the Senior Workout
An old saying in the yoga tradition says that you’re as youthful as your spine is supple and flexible. The exercises in this workout increase the strength and suppleness of your spine. It feels great to have a limber spine that’s free to move in all directions, but a spine that moves with ease is important for safety reasons, too. For example, you’ll be able to sit on the floor and get up without assistance, and you’ll feel more youthful so you can do the physical activities that you really love.
The exercises in this workout also increase bone density. An excessive loss of bone density in the process of aging leaves your bones weakened and susceptible to fracturing and breaking. However, there is good news: Because bone is living tissue, it’s in a constant state of regeneration. In a Yoga with Weights workout, your muscles have to work against the weights you carry, which puts stress on your bones and therefore increases bone density. You increase blood circulation to your muscles as well, which also builds bone density and muscle strength.
Along with building up your bone and muscle, the exercises in this chapter improve your coordination. Maintaining good coordination reduces your risk of falling and allows you to be more confident and sure of yourself. How’s that for a feel-good prescription?
 To ensure that you get the maximum benefit from the exercises in this chapter, keep these points and suggestions in mind:
- Try to do these exercises every other day. When you begin to practice the exercises, you’ll notice a greater level of mobility and strength. And the exercises help you maintain the strength and mobility that you already have, giving you healthy support for years to come.
- Use a sturdy chair for these exercises. The chair should be short enough so you can sit on it without leaving your feet dangling (if you’re short, you may need to place a footstool under your feet) and have a strong back. (You’ll grasp the back of the chair in some exercises.)
- Maintain a concentrated focus on the alignment of your spine. Imagine or visualize your spine lengthening and realigning as you gently breathe in each exercise.
- Use the gentle, empowering Complete Breaths as you do this workout (go to Book II, Chapter 1 for details). Remember, breathing is a barometer of how you’re doing. If you’re breathing too rapidly or holding your breath, you’re probably working too hard, but if your breathing is steady and calm, you’re probably working just right.
- Use light weights to start. As you get stronger, gradually increase the size of the weights. Always work at your own level of ability and take into account the energy you have that day.
- Engage in a moment or two of silent meditation at the end of your workout. Head to Book VII for more on meditation.
- Never force yourself or push too hard as you do this workout. Use your experience to recognize when you should rest or press forward. The goal is to challenge yourself to do the exercises with a little more intensity and concentration each time you do them.
Candle Blowing
Candle blowing warms you up for all the exercises in the senior Yoga with Weights workout. In this exercise, you focus on your breathing. Throughout the exercise, you breathe in and out with pursed lips as if you’re blowing out the candles on a birthday cake. As you concentrate on your breathing and warming up your body, you work your bicep muscles and increase your blood circulation.
You need hand weights for this exercise. Follow these steps:
-
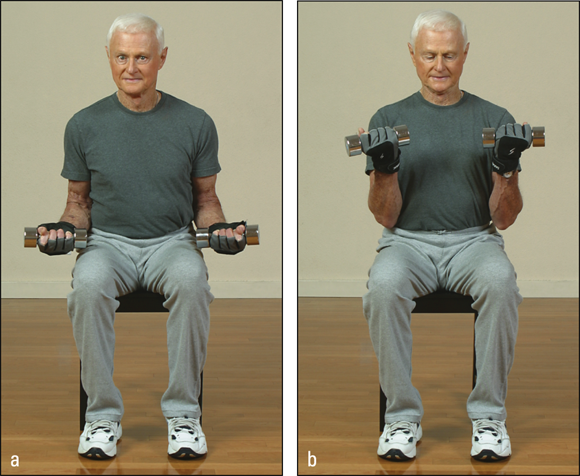
Sit in a chair with your elbows bent and the weights held at your thighs, palms facing upward (see Figure 5-1a).
This is the starting position. Sit upright with your shoulders squared, but don’t allow your shoulders to creep up to your neck. Purse your lips for the proper breathing technique.
-
Exhaling to a count of four, curl the weights to the level of your shoulders (see Figure 5-1b).
In weightlifting, this action is called a bicep curl. Pull your belly in, and use your belly as well as your arms to support the weights. Feel the air leave your lungs as you exhale.
-
Inhaling to a count of four, lower the weights to the starting position (see Figure 5-1a).
Inhale slowly and deeply into your abdomen as you slowly lower the weights in rhythm with your breathing.
Repeat this exercise four to six times, pause to rest, and then do four to six more repetitions.
The Mirror
The mirror opens your chest and lungs, as well as the sides of your body, aiding in free breathing and improved flexibility. It also creates better range of motion in your neck and shoulders, making the exercise excellent for people who suffer from stiff necks and “frozen shoulders.” Having more room to breathe deeply makes it easier to relax.
You need hand weights for this exercise. Follow these steps:
-
Sit in a chair with your elbows bent and the weights held at your thighs, palms facing upward, and fix your gaze on your right hand (see Figure 5-2a).
This is the starting position.
-
Inhaling to a count of four, lift your right arm in a half-arc position until your hand is above your right shoulder, watching your right hand along the way (see Figure 5-2b).
Draw your belly in and up as you lift the weight, and reach only to a comfortable height. If you can, raise your hand straight up, as the model does in Figure 5-2. The goal is to reach as high as you can without forcing or straining.
 Always keep your eyes on the weight you’re lifting. This keeps you focused on what you’re doing.
-
Exhaling to a count of four, lower your right arm and turn your head forward to return to the starting position (see Figure 5-2a).
Don’t slump your shoulders; keep them wide open so it feels as if your chest is smiling.
Repeat this exercise four to six times with each arm, pause to rest, and then do four to six more repetitions with each arm.
The Ticking Clock
Smooth, rhythmic movements are known to massage away stiffness in the body and aid in your ability to balance. The ticking clock gets its name because you move your body similarly to a clock pendulum. This exercise is about timed movement and the timeless quality of “being.” It warms up the sides of your body and helps your neck and spine feel more flexible. It also stretches your shoulders and tones the muscles of your torso.
Grab your hand weights for this exercise and follow these steps:
-
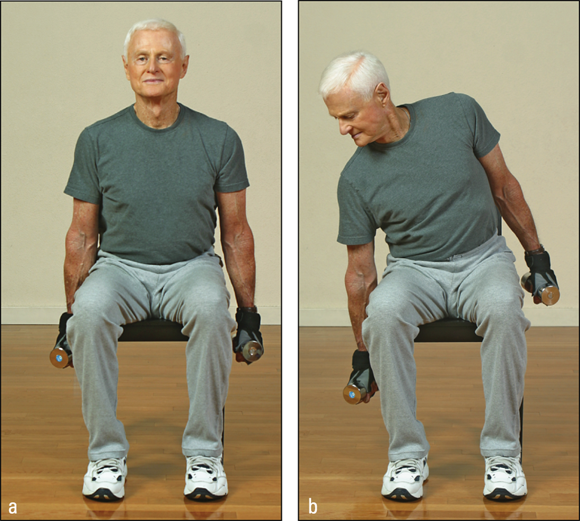
Sit in a chair with your arms hanging at your sides, the weights in your hands, and your palms facing inward (see Figure 5-3a).
This is the starting position. Look straight ahead.
-
Turn your head to look over your right shoulder.
As you turn, keep your shoulders squared.
-
As you exhale to a count of four, gently arc your torso to your right side (see Figure 5-3b).
Look down at the weight in your right hand, and feel your spine stretching.
-
As you inhale to a count of four, return to the upright starting position (see Figure 5-3a).
Turn your head and look forward as you return to the starting position.
Alternating sides with each repetition, repeat this exercise four to six times on each side of your body, pause to rest, and then do four to six more repetitions on each side of your body.
The Wave
The wave stretches your back and spine and releases tension from your head, neck, and shoulders. The rhythmic motion of the exercise also teaches you balance, coordination, and stability. For muscle benefit, the wave strengthens and tones your abdominal muscles.
You need hand weights to do the yoga wave. Follow these steps:
-
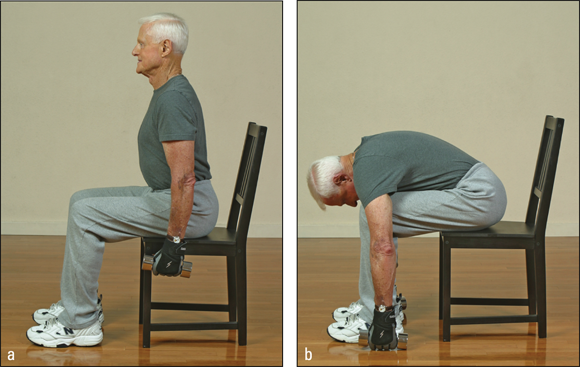
Sit in a chair with your back separated from the back of the chair and your arms hanging down at your sides, holding the weights with your palms facing inward (see Figure 5-4a).
This is the starting position. Look straight ahead. If your back is touching the back of the chair, you may be tempted to rely on the chair for support, which would defeat the purpose of this exercise.
-
Exhaling to a count of four, roll your shoulders up and over as you slowly lower the trunk of your body onto your thighs; let the weights hang beside your body as you lean forward (see Figure 5-4b).
Allow the weights to slowly pull you down. As you exhale, slowly push the air from your lungs so that by the time your body touches your thighs, you’re pushing out the last bit of air.
Anchor your buttocks to the chair to keep from slipping forward.
 Your head can hang down in this position. If you can’t hang your head all the way, hang it as far as is comfortable, or lift your head slightly as you bend forward.
-
Inhaling to a count of four, sit up and roll your shoulders up and back down again to return to the starting position (see Figure 5-4a).
 Move your feet forward or backward if it helps you maintain your balance.
Repeat this exercise four to six times, pause to rest, and then do four to six more repetitions.
The Egyptian
If your declining range of motion is starting to make everyday tasks — like grabbing objects out of the cupboard — difficult to manage, you can fight back with exercises like the Egyptian. This exercise tones and strengthens your back, arms, chest, and shoulders. It also expands your chest and gives your shoulders a wider range of movement.
 Draw your belly in and up throughout this exercise. Engaged belly muscles help you lift the weights and maintain stability.
Use your hand weights for this exercise and follow these steps:
-
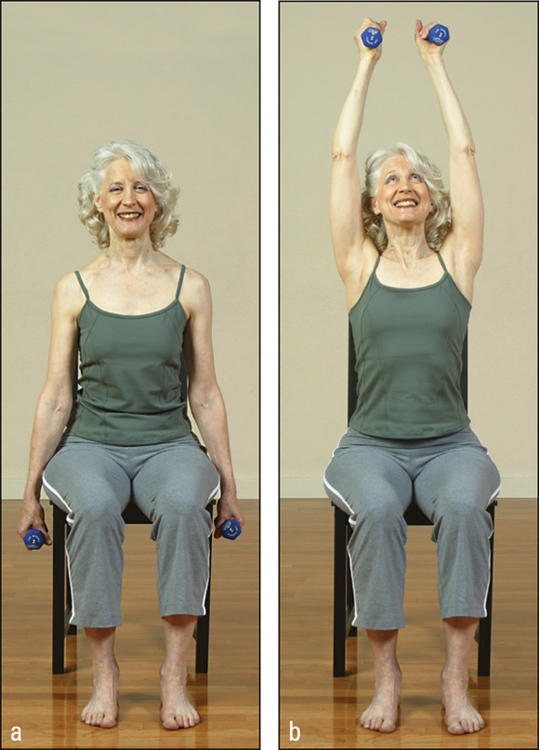
Sit in a chair with your arms hanging down to your sides, the weights in your hands, and your palms facing inward (see Figure 5-5a).
This is the starting position. Look straight ahead. Don’t shrug your shoulders, lean against the back of the chair, or lean forward during this exercise.
-
Inhaling to a count of four, lift your arms out to the sides until you join your hands above your head (see Figure 5-5b).
Rotate your hands so that your palms are facing up by the time your arms are halfway lifted. Look up so that you’re gazing at your hands above your head.
 If you can’t reach above your head, lift your arms as high as you comfortably can.
-
Exhaling to a count of four, slowly lower your arms to the starting position (see Figure 5-5a).
Rotate your hands again as you lower your arms so they end up facing inward at the starting position. Lower your gaze so that you’re looking straight ahead as you lower your arms.
Repeat this exercise four to six times, pause to rest, and then do four to six more repetitions.
The Pigeon
The Yoga with Weights pigeon increases the range of motion in your hips; if you’re tight in this area, the pigeon opens you up. The exercise also increases blood circulation to your hips and pelvic girdle, which helps you when you’re climbing stairs or walking your dog.
 Don’t attempt this exercise without the permission of your primary caregiver if you’ve recently had a hip replacement.
Pick up both your hand weights and grab one ankle weight for this exercise. When you’re ready, follow these steps:
-
Sitting in a chair, place your right ankle over your left knee, and place the ankle weight on your right thigh.
The ankle weight helps anchor your thigh in place. By placing one leg over the other, you open and stretch out your hip and groin.
 If you can’t lift your ankle onto your knee, cross your ankles instead or put your foot on a footstool.
-
Grab your hand weights, separate your arms as far apart as you can, and lift them to shoulder height with your elbows bent and palms facing forward (see Figure 5-6a).
This is the scarecrow position, and also your starting position. Make sure your spine is erect and that you’re relaxed.
-
Inhaling to a count of four, lift your arms overhead (see Figure 5-6b).
Lift to a place that’s comfortable for you. In weightlifting terminology, this action is called an overhead press or military press.
-
Exhaling to a count of four, lower the weights to the starting position (see Figure 5-6a).
Lower the weights slowly so you can feel your muscles working. Keep your belly muscles engaged for stability and balance.
Repeat this exercise four to six times with each leg, pause to rest, and then do four to six more repetitions with each leg.
The Heart Lift
The heart lift is a great exercise for people of all ages, but it’s especially helpful for seniors because it brings a balance of oxygen and blood to your heart. The exercise opens and expands your chest and helps you to breathe more deeply. It also strengthens your spine, abdominal muscles, and quads.
You need ankle weights for this exercise. Follow these steps:
-
Sit on the edge of a chair, and reach backward to grasp the back of the chair with your hands.
 If you can’t hold the back of the chair, hold the sides of the chair seat.
-
Roll your shoulders up, back, and down; lift your chest; and raise your chin (see Figure 5-7a).
This is the starting position. Sink your buttocks deeply into the chair so you can lean forward slightly. Feel the front of your body stretching, and enjoy breathing in this position as your heart opens up.
-
Exhaling to a count of four, lift your right knee a few inches and then straighten your right leg (see Figure 5-7b).
Press forward through your heel, and continue to hold on to the chair for balance.
-
Inhaling to a count of four, lower your right leg to the starting position (see Figure 5-7a).
Lower your leg slowly to the rhythm of your breathing; don’t drop it.
Alternating legs with each repetition, do this exercise four to six times with each leg, pause to rest, and then do four to six more repetitions with each leg.
The Hacker
The hacker is a simple exercise that builds strength and flexibility in your lower body. The exercise works your quad and hamstring muscles while toning your belly and increasing the range of movement in your hips. The hacker helps build the necessary strength for climbing up and down stairs and ladders.
Strap on your ankle weights for this exercise. Adding hand weights is an option for people who feel strong enough (the model in Figure 5-8 explores this option). When you’re ready, follow these steps:
-
Sit on a chair with your back separated from the back of the chair, your feet flat on the floor, and your arms hanging at your sides (see Figure 5-8a).
This is the starting position. Make sure your spine is erect and your shoulders are squared. If you want to use hand weights, hold them with your palms facing inward.
-
Exhaling to a count of four, lift your right knee toward your chest (see Figure 5-8b).
Engage your belly muscles; you should feel these muscles working as you lift. Keep your foot flexed to engage your leg muscles.
-
Inhaling to a count of four, lower your leg to the starting position (see Figure 5-8a).
Lower your leg slowly; keep your leg muscles fully engaged all the way down.
Be careful not to lean forward as you do this exercise. Breathe deeply into your lower back.
Alternating legs with each repetition, do this exercise four to six times with each leg, pause to rest, and then do four to six more repetitions with each leg.
The Champion
The Yoga with Weights champion strengthens, conditions, and tones the trunk of your body, your shoulders, and your arms; refines the integrity of your muscles; contributes to the structure of your bones; and brings more blood to your pelvic girdle, which helps with movement.
You need hand weights and ankle weights for this exercise. Follow these steps:
-
Straddle the right corner of a chair seat with your bent right knee in front of you over the chair, your left leg bent and at your side, and the toes of your left foot curled under for support.
Your left knee should be a couple of inches from the floor in this position. Make sure you have the hand weights in your hands at this point.
-
Twist the trunk of your body slightly to the left, and lift and extend both of your arms to shoulder height, palms facing upward (see Figure 5-9a).
This is the starting position. Your shoulders should be directly above your hips. Look ahead toward the arm in front of you — your right arm in this case.
-
Exhaling to a count of four, bend your elbows and lift the weights toward your shoulders (see Figure 5-9b).
In weightlifting terminology, this action is called a bicep curl.
- Inhaling to a count of four, extend your arms and return to the starting position (see Figure 5-9a).
Repeat this exercise four to six times, pause to rest, and turn your body to the opposite side of the chair to do four to six more repetitions for the other side of your body.
The Body Builder
The body builder exercises your buttocks and tones your legs, back, and thighs. This part of the workout builds the bone density in your back, spine, and legs, which allows you to feel free to be active without worrying about injury.
Wear ankle weights for this exercise. Follow these steps:
-
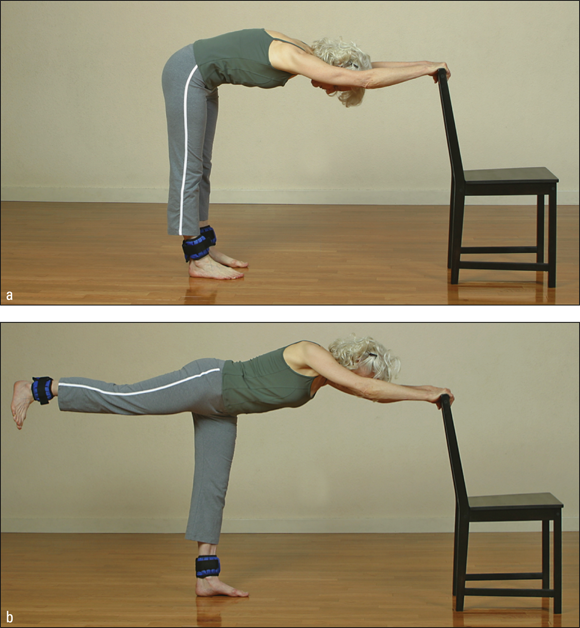
Standing behind a chair, hold the top of the chair with both hands and, bending at your waist, step backward far enough so that your trunk and arms are parallel to the floor (see Figure 5-10a).
This is the starting position.
 Put the chair against a wall so that it doesn’t slide when you do this exercise, which could cause you to slip and fall. (The model in Figure 5-10 didn’t take this advice, but she’s a daredevil.)
-
Inhaling to a count of four, lift your right leg behind your body as high as you can without straining or causing too much discomfort (see Figure 5-10b).
 Ideally, your leg should be parallel to the floor, but if you can’t lift it that high, don’t worry about it. You can bend your knee if you need to.
-
Exhaling to a count of four, lower your leg to the starting position (see Figure 5-10a).
Lower your leg slowly and gently; don’t drop it down.
Alternating legs with each repetition, do this exercise four to six times with each leg, pause to rest, and then do four to six more repetitions with each leg.
The Triangle
The triangle gives you the chance to really challenge your muscles and build strength. The exercise stretches the sides of your body and creates strength and stability in your arms, legs, and trunk.
You need both ankle weights and one hand weight for this exercise. Follow these steps:
-
Stand behind a chair with your legs apart, your right foot pointing to the chair, and your left foot at a 45-degree angle with respect to the chair.
Your body should be facing left when positioned behind the chair in this position. Your feet should be a little wider than your hips.
-
Grasp the top of the chair with your left hand; with your right hand, hold the hand weight at your side, palm facing your body (see Figure 5-11a).
This is the starting position.
-
Exhaling to a count of four, stretch the right side of your body by lifting the hand weight over and around your head. As you lift, turn your head to the left and bend your left elbow (see Figure 5-11b).
Press into your legs as you lift the hand weight, and try to arc the weight over the back of the chair.
 If you can’t lift the weight over your body or over the chair, lift it as high as you comfortably can, or don’t use the hand weight.
- Inhaling to a count of four, slowly return to the starting position (see Figure 5-11a).
Repeat this exercise four to six times, pause to rest, and turn around to do four to six repetitions with the other side of your body.
The Lift
The lift is a full-body exercise that lengthens the quad muscles in your legs and opens your groin. The exercise also tones and strengthens your spine and chest. As it tones your lower-body muscles, the lift also exercises your arms — specifically your triceps.
You need both ankle weights and one hand weight for this exercise. Follow these steps:
-
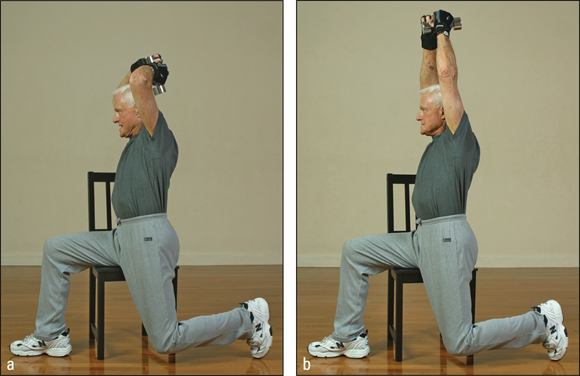
Straddle the right corner of a chair seat with your bent right knee in front of you over the chair, your left leg bent and at your side, and the toes of your left foot curled under for support.
Your left knee should be close to the floor in this position. Make sure you’re seated firmly in the chair with your right leg.
-
Holding the hand weight with both hands, lift your hands above your head and bend your elbows so the weight goes behind your head (see Figure 5-12a).
This is the starting position. Your elbows should be near your ears; don’t drop your head.
 If you can’t reach your arms back far enough, reach them as far as you feel comfortable. You can also do this exercise without the hand weight.
- Inhaling to a count of four, straighten your arms and raise the weight over your head (see Figure 5-12b).
-
Exhaling to a count of four, lower the weight to the starting position (see Figure 5-12a).
 Be careful not to hit yourself in the head on the way down.
Repeat this exercise four to six times, pause to rest, and then do four to six more repetitions.
The Seated Twist
The seated twist aims to wring your body out like a wet rag to make you feel more relaxed. The exercise loosens your neck and spine and releases tension from your shoulders and neck. It also increases the circulation in your legs, because when you cross and uncross your legs, you stimulate blood flow. Twisting and releasing your torso does the same.
Strap on your ankle weights and follow these steps:
-
Sitting toward the front of a chair, cross your right leg over your left leg.
The weights on your ankles help anchor you into the chair.
-
Place your left hand on the outside of your right knee, and reach your right hand behind you so you can hold the back of the chair at a location and level that’s comfortable for you (see Figure 5-13a).
This is the starting position. Draw your belly in and up for support, and make sure that your spine is erect and your chin is slightly lifted.
-
Exhaling to a count of four, turn your back, neck, and head one vertebra at a time to look over your right shoulder (see Figure 5-13b).
Start your twist in the area behind your navel, and move upward in a spiraling direction. Imagine that your spine is twisting like a spiral staircase, with your mind climbing the stairs one step at a time. Twisting with an engaged abdomen protects your lower back and neck.
 You can use your left hand, holding your crossed leg back, as leverage, which lengthens your spine and engages your core muscles even more.
-
Inhaling to a count of four, rotate your back, neck, and head to the starting position (see Figure 5-13a).
Slowly unwind as you return to the starting position; don’t jerk.
Repeat the exercise four to six times with this side of your body, pause to rest, and turn your body to the opposite side of the chair to do four to six more repetitions with the other side of your body.
 Improving blood circulation throughout your body
 Strengthening your spine and improving your range of motion
 Concentrating on your coordination and focus
 To ensure that you get the maximum benefit from the exercises in this chapter, keep these points and suggestions in mind:

 Your head can hang down in this position. If you can’t hang your head all the way, hang it as far as is comfortable, or lift your head slightly as you bend forward.
 Don’t attempt this exercise without the permission of your primary caregiver if you’ve recently had a hip replacement.


