Star Brocade
Designed by Evelyn A. Clark
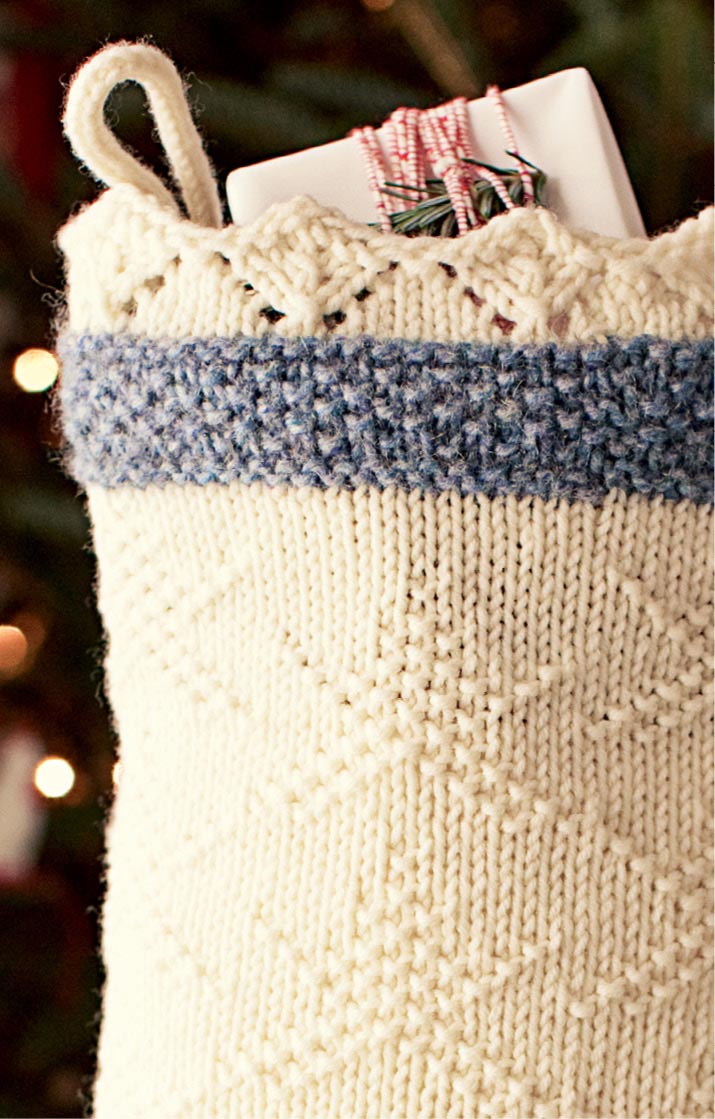
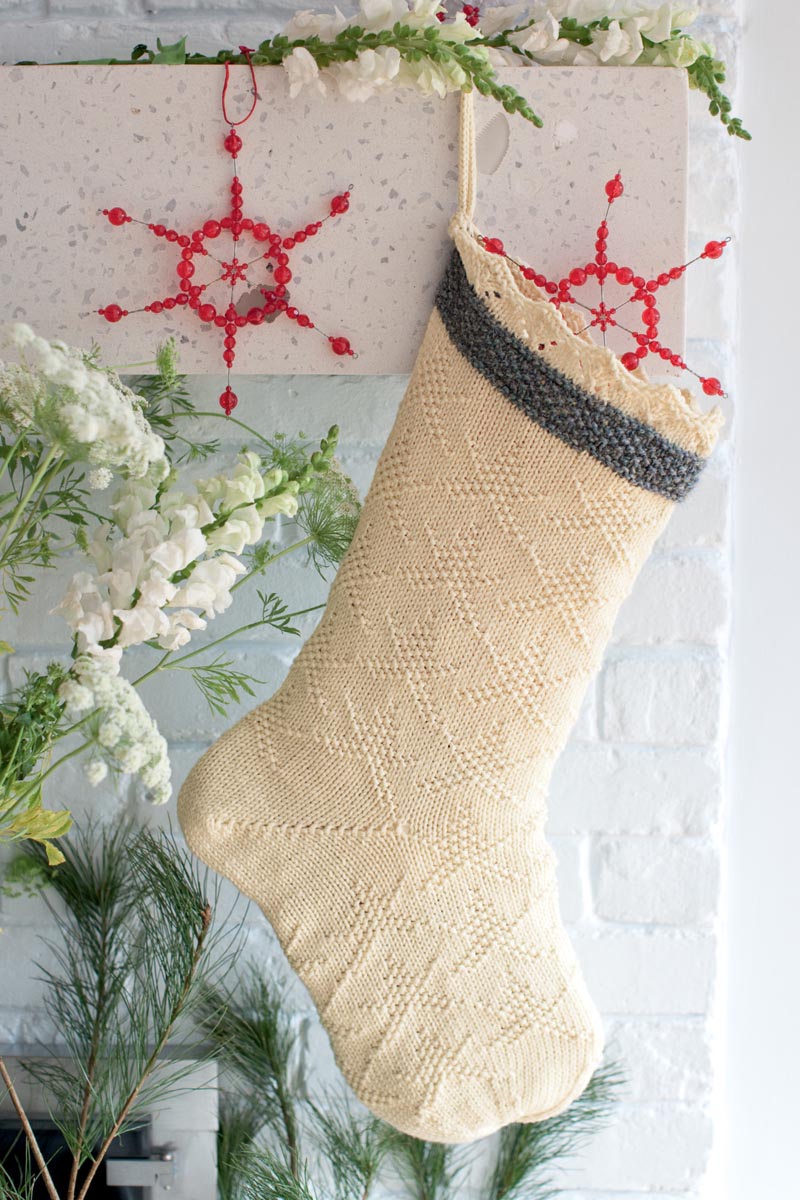
Seed-stitch stars are scattered across a stockinette-stitch background on this elegant stocking. You can choose between a straight edge or a scalloped edge (shown opposite) for the top. The stocking also features a seed-stitch band in a contrasting color, an easy short-row heel, and a round, gathered toe.
Finished Measurements
- 73⁄4" wide x 21" long
Yarn
- MC: Plymouth Select, 100% superwash Merino, worsted weight, 31⁄2 oz (100 g)/218 yd (200 m), Natural, 2 skeins
- CC: Zealana Aspire’s Heron, 80% Merino/20% possum, worsted weight, 1.75 oz (50 g)/109 yd (100 m), Cloud Blue (H01), 1 skein
Needles
- One US 6 (4 mm) circular needle, 16" long, or size you need to obtain correct gauge
- One set of US 6 (4 mm) double-pointed needles or size you need to obtain correct gauge
Gauge
- 20 stitches = 4" on US 6 (4 mm) needles in pattern stitch
Other Supplies
- Stitch marker, yarn needle
Abbreviations
CC: contrasting color
K: knit
K2tog: knit 2 stitches together
MC: main color
P: purl
psso: pass slipped stitch over
ssk: slip, slip, knit the 2 slipped stitches together
W&T: wrap and turn
yo: yarn over
Knitting the Cuff
Scallop-Top Version (shown)
Setup: With circular needle and MC, cast on 80 stitches.
Place stitch marker on the needle and join into a round, taking care not to twist the stitches. (See Getting Around, for information about knitting in the round.)
Round 1: Purl to the end of the round.
Round 2: *K1, yo, K2, slip 1 knitwise, K2tog, psso, K2, yo; repeat from * to the end of the round.
Rounds 3 and 5: Knit to the end of each round.
Round 4: *K2, yo, K1, slip 1 knitwise, K2tog, psso, K1, yo, K1; repeat from * to the end of the round.
Round 6: *K3, yo, slip 1 knitwise, K2tog, psso, yo, K2; repeat from * to the end of the round.
Round 7: *K38, K2tog; repeat from * to the end of the round.
You now have 78 stitches.
Straight-Top Version
Setup: With circular needle and using CC, cast on 78 stitches.
Place a stitch marker on the needle and join into a round, taking care not to twist the stitches.
Knitting the Seed-Stitch Band
Rounds 1 and 3: Using CC, knit to the end of each round.
Round 2: Purl to the end of the round.
Rounds 4, 6, and 8: *P1, K1; repeat from * to the end of each round.
Rounds 5 and 7: *K1, P1; repeat from * to the end of each round.
Round 9: Knit to the end of the round.
Round 10: Purl to the end of the round. Break off CC yarn.
Knitting the Star Brocade
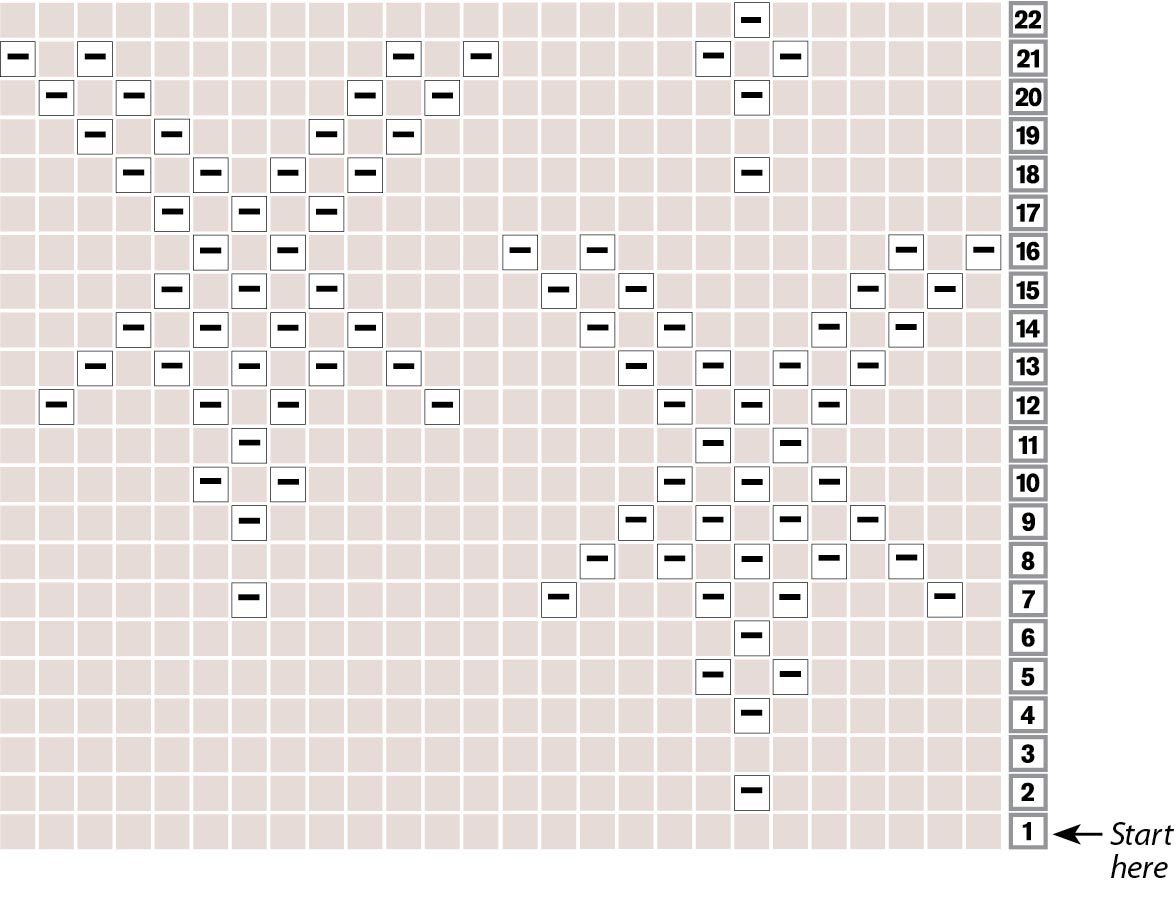
Rounds 1–70: Using MC, follow Star 1 chart on page 84 for the stitch pattern. Begin with line 1 at bottom of chart and work from right to left, repeating the pattern three times around the stocking. Work Lines 1–22 once, then repeat Lines 7–22 three more times.
Shaping the Top of the Heel
Setup: Slip the stitch marker, slip and wrap the first stitch, place both the marker and the stitch back on the left needle, and turn the work (see Wrap & Turn, page 9). The heel is worked flat on short rows, turning after each row; the rest of the stitches can stay on the needle, but you won’t need them again until the heel is finished.
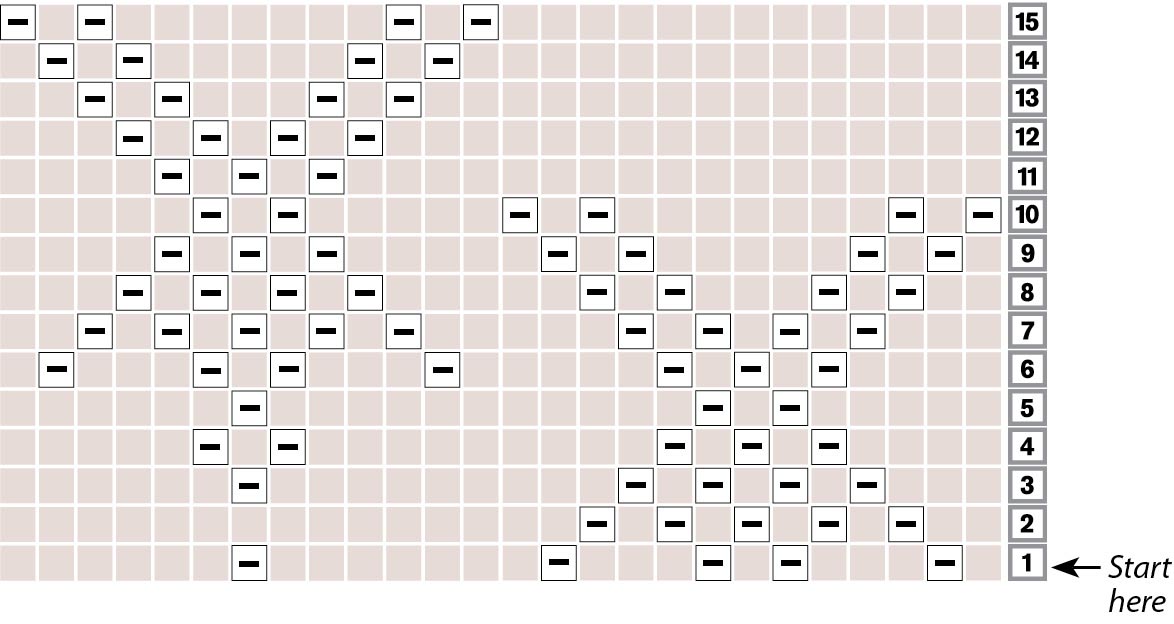
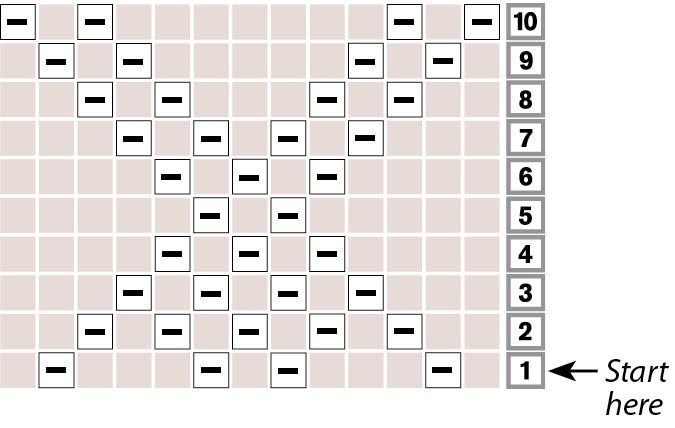
You will be working a single star pattern while shaping the heel. Follow Star 2 chart on page 85 for the stitch pattern where indicated, starting at the bottom with line 1 and working from left to right. Remember that you are now working flat, so wrong-side rows are worked from left to right, with knits and purls reversed. Since you are starting with a wrong-side row, begin at the left of the chart.
Row 1 (wrong side): P13, Star 2 chart, P13, W&T.
Row 2 (right side): K13, Star 2 chart, K12, W&T.
Row 3: P12, Star 2 chart, P12, W&T.
Row 4: K12, Star 2 chart, K11, W&T.
Row 5: P11, Star 2 chart, P11, W&T.
Row 6: K11, Star 2 chart, K10, W&T.
Row 7: P10, Star 2 chart, P10, W&T.
Row 8: K10, Star 2 chart, K9, W&T.
Row 9: P9, Star 2 chart, P9, W&T.
Row 10: K9, Star 2 chart, K8, W&T.
Row 11: P29, W&T.
Row 12: K28, W&T.
Continue in stockinette stitch, working on 1 fewer stitch each row, ending with P13, W&T.
Shaping the Bottom of the Heel
Note: To make the bottom of the heel, you will pick up a wrapped stitch at the end of each row and then turn the work. Remember to knit the wrapping and the stitch together. Slip all stitches purlwise.
Row 1: K14.
Row 2: Slip 1, P14.
Row 3: Slip 1, K15.
Continue in stockinette stitch, working 1 more stitch each row, beginning a new star as follows on row 25.
Row 24: Slip 1, P36.
Row 25: Slip 1, K17, P1, K19.
Row 26: Slip 1, P38.
Row 27: Slip 1, K18, P1, K20.
Row 28: Slip 1, P18, K1, P1, K1, P19.
Row 29: Slip 1, K19, P1, K19. Slip next stitch and replace beginning of round marker.
All the stitches should now be live. Do not turn the work, but begin knitting in the round again.
Knitting the Foot
Rounds 1–32: Follow Star 1 chart on page 84 for the stitch pattern, beginning with line 7 and working from right to left. The pattern is repeated three times around the stocking. Work lines 7–22 twice.
Rounds 33–47: Follow Star 3 chart on page 85 for the stitch pattern, beginning with line 1 at the bottom of the chart and working from right to left. The pattern is repeated three times around the stocking. Work chart once..
Shaping the Toe
Note: When stitches become too tight for the circular needle, switch to double-pointed needles. Divide stitches evenly among three needles.
Round 1: Knit to the end of the round.
Round 2: *K1, ssk, K8, K2tog, repeat from * to the end of the round.
You now have 66 stitches.
Rounds 3–6: Knit to the end of each round.
Round 7: *K1, ssk, K6, K2tog; repeat from * to the end of the round.
You now have 54 stitches.
Rounds 8–10: Knit to the end of each round.
Round 11: *K1, ssk, K4, K2tog; repeat from * to the end of the round.
You now have 42 stitches.
Rounds 12 and 13: Knit to the end of each round.
Round 14: *K1, ssk, K2, K2tog; repeat from * to the end of the round.
You now have 30 stitches.
Round 15: Knit to the end of the round.
Round 16: *K1, ssk, K2tog; repeat from * to the end of the round.
You now have 18 stitches.
Round 17: *Slip 1, K2tog, psso; repeat from * to the end of the round.
You now have 6 stitches.
Cut yarn, thread it through a yarn needle and draw it through the remaining stitches, and pull snugly.
Making the Loop
With a double-pointed needle and MC, cast on 3 stitches, leaving an 8" tail.
Make a 6" I-cord, following the instructions for We’ve Got Hang-Ups.
Cut yarn, thread it through a yarn needle and draw it through the remaining stitches, and pull snugly.
Finishing
Double the I-cord to make a loop, and use the tails to sew the cord to the top of the stocking at the center back.
Weave in all loose ends on the wrong side of work.
KEY
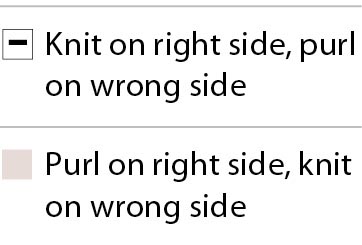
Note: It is customary in knitting books for charts to be followed from bottom to top, and, when knitting circularly, from right to left. Although this results in some charts apparently being presented upside down, the designs will be right side up when the stocking is completed.
