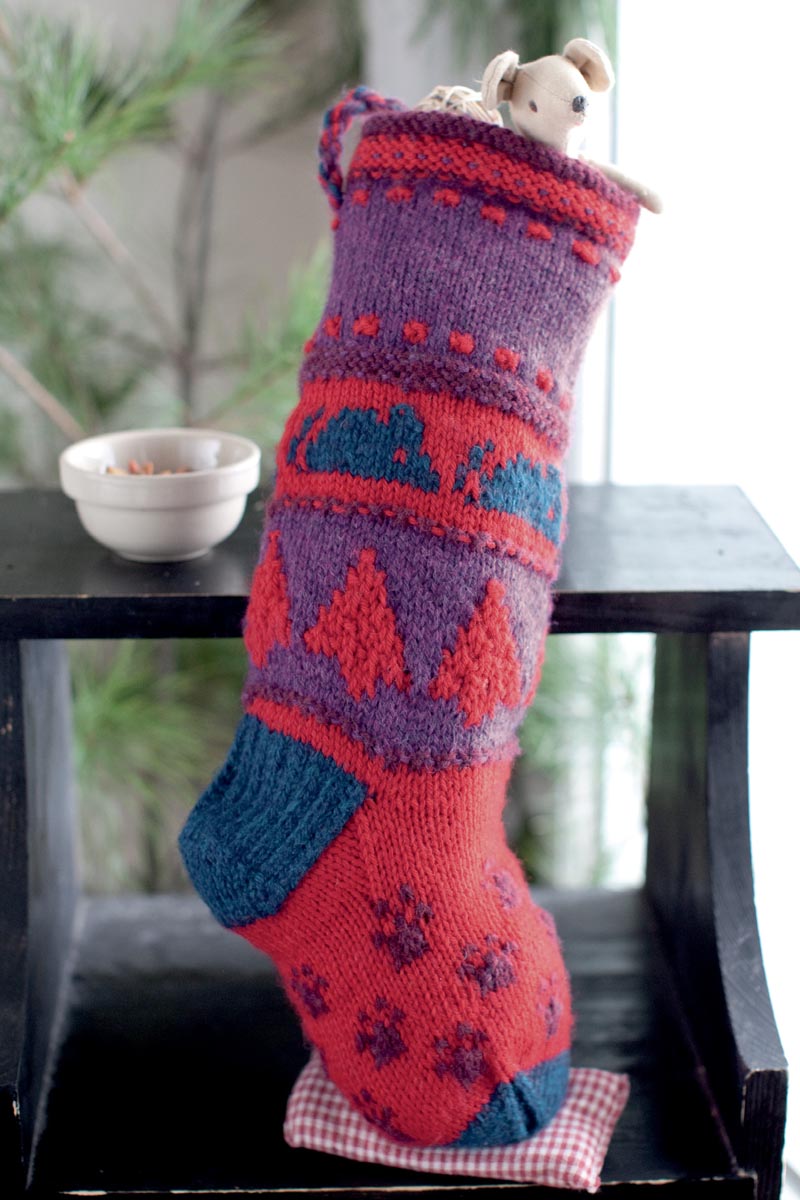
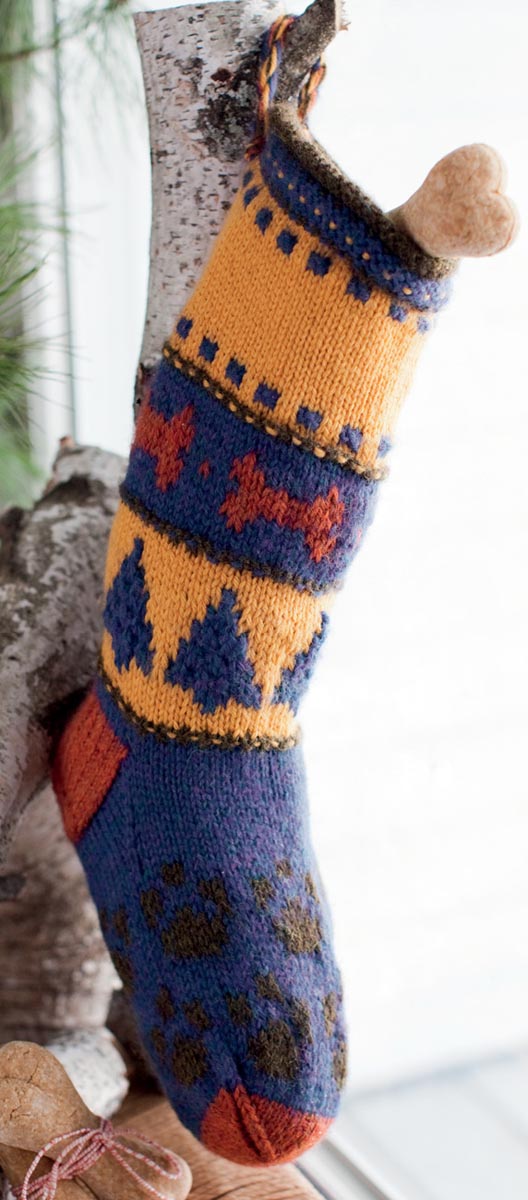
Pampered Pets
Designed by Louise Silverman
Every family pet deserves his or her own stocking filled with special treats at the holidays. Customize these colorful knits by adding your pet’s name in duplicate stitch in the band at the top after the stocking is completed. (See Alphabet chart, page 69.) This project features textural interest created by a few simple reverse-stockinette and slipped-stitch techniques.
Finished Measurements
- 51⁄2" wide x 161⁄2" long
Yarn
Cascade 220, 100% Peruvian Highland wool, worsted weight, 31⁄2 oz (100 g)/220 yd (200 m) skeins
Kitten
- MC: Garnet Heather (9341), 90 yds
- CC A: Christmas Red (8895), 110 yds
- CC B: Heather (2420), 80 yds
- CC C: Mallard (2448), 70 yds
Puppy
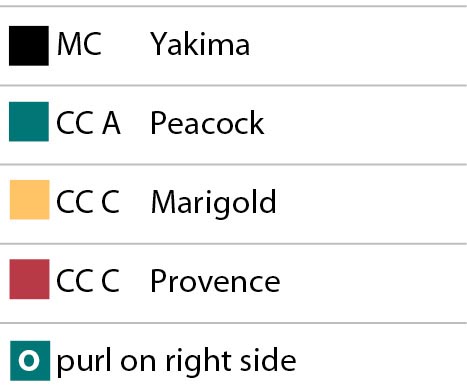
- MC: Yakima (9459), 90 yds
- CC A: Peacock (2447), 110 yds
- CC B: Marigold (7826), 80 yds
- CC C: Provence (2425), 70 yds
Needles
- One set of US 5 (3.75 mm) double-pointed needles or size you need to obtain correct gauge
- One US 5 (3.75 mm) circular needle, 16" long, or size you need to obtain correct gauge
Gauge
- 22 stitches = 4" on US 5 (3.75 mm) needles in stockinette stitch
Other Supplies
- Stitch markers, stitch holder, crochet hook, yarn needle
Abbreviations
CC: contrasting color
K: knit
K2tog: knit 2 stitches together
MC: main color
P: purl
P2tog: purl 2 stitches together
ssk: slip, slip, knit the 2 slipped stitches together
Knitting the Cuff
Setup: With circular needle and MC, cast on 60 stitches. Place a stitch marker on the needle and join into a round, taking care not to twist the stitches. (See Getting Around, for information about knitting in the round.)
Note: All slipped stitches in the following rounds should be worked purlwise, with yarn at back.
Rounds 1–6: Knit to the end of each round.
Round 7: Using CC A, *K1, slip 1; repeat from * to the end of the round.
Rounds 8 and 9: Purl to the end of each round.
Round 10: Using CC B, *K1, slip 1; repeat from * to the end of the round.
Rounds 11 and 12: Using CC A, purl to the end of each round.
Round 13: Using MC, *slip 1, K1; repeat from * to the end of the round.
Round 14: Purl to the end of the round.
Round 15: *K1, slip 1; repeat from * to the end of the round.
Knitting the Name Band
Rounds 1 and 2: Using CC B, knit to the end of each round.
Round 3: *K2 with CC B, K2 with CC A; repeat from * to the end of the round. (See The Joy of Color, for information about multicolor, or stranded, knitting.)
Round 4: *K2 with CC B, P2 with CC A; repeat from * to the end of the round.
Rounds 5–16: Using CC B, knit to the end of each round.
Rounds 17 and 18: Repeat rounds 3 and 4.
Rounds 19 and 20: Using CC B, knit to the end of each round.
Round 21: Using MC, *K1, slip 1; repeat from * to the end of the round.
Rounds 22 and 23: Purl to the end of each round.
Round 24: Using CC B, *slip 1, K1; repeat from * to the end of the round.
Round 25: Using MC, purl to the end of the round.
Round 26: Using CC A, *K1, slip 1; repeat from * to the end of the round.
Knitting the Pet Patterns
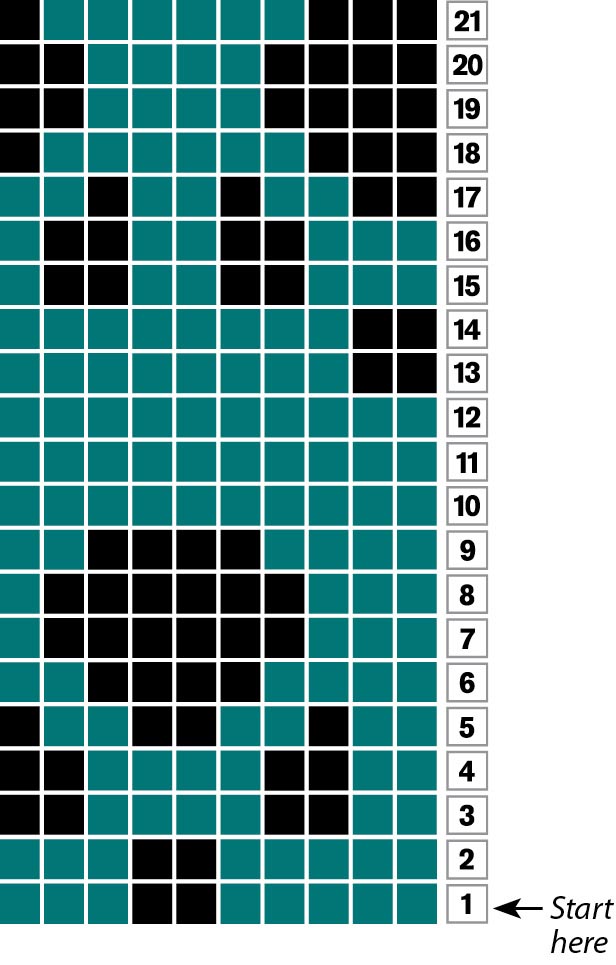
Rounds 1–13: Follow the Puppy Bone or Mouse chart for the color and stitch patterns. Begin where indicated on line 1 at the bottom of the chart and work from right to left, repeating the pattern four times around the stocking.
Round 14: Using MC, *K1, slip 1; repeat from * to the end of the round.
Round 15: Purl to the end of the round.
Round 16: Using CC B, *slip 1, K1; repeat from * to the end of the round.
Rounds 17–34: Follow the Tree chart on page 51 for color and stitch patterns. Begin where indicated on line 1 at bottom of chart and work from right to left, repeating the pattern six times around stocking. Note that some interesting texture is created by purl stitches as indicated on chart.
Round 35: Using MC, *K1, slip 1; repeat from * to the end of the round.
Round 36: Purl to the end of the round.
Round 37: Using CC A, *slip 1, K1; repeat from * to the end of the round.
Rounds 38 and 39: Knit to the end of each round.
Making the Heel Flap
Setup: Using CC A, K14, place the next 32 stitches on a stitch holder.
You now have 28 stitches left on the needle.
With CC C, work flat (back and forth on the circular needles) on the remaining stitches to make the heel flap, turning after each row.
Row 1 (wrong side): Slip 1, P27.
Row 2 (right side): *Slip 1, K1; repeat from * to end of row.
Rows 3–20: Repeat rows 1 and 2.
Turning the Heel
Row 1: Slip 1, P15, P2tog, P1, turn. (9 stitches remain unworked on needle.)
Row 2: Slip 1, K5, ssk, K1, turn. (9 stitches remain unworked on needle.)
Row 3: Slip 1, purl until 1 stitch remains before the gap formed by the last turning, P2tog, P1, turn.
Row 4: Slip 1, knit until 1 stitch remains before the gap, ssk, K1, turn.
Rows 5–12: Repeat rows 3 and 4, working in stockinette stitch, slipping the first stitch and decreasing 1 stitch to bridge the gap until you have worked all stitches, and 16 stitches remain on the needle. End with a knit row. This is the bottom of the heel.
Knitting the Instep
Setup: Using CC A, knit the 32 stitches from the stitch holder, pick up and K11 from the left-hand side of the heel, K8 from the bottom of the heel, place a stitch marker to indicate the beginning of the round, K8 remaining stitches from the bottom of the heel, and pick up and K11 from the right-hand side of the heel. (see Picking Up Stitches.)
You now have 70 stitches on the needle.
Knit to the stitch marker to begin the next round.
Round 1: K16, K2tog, place stitch marker, K34, place stitch marker, ssk, K16.
You now have 68 stitches.
Rounds 2, 4, 6, and 8: Knit to the end of each round.
Round 3: Knit until 2 stitches remain before the first stitch marker, K2tog, knit to the next stitch marker, ssk, knit to the end of the round.
You now have 66 stitches.
Rounds 5, 7, and 9: Continue in the same manner as round 3, decreasing 2 stitches every other round, keeping 34 stitches between the decreases, until you have 60 stitches.
Remove the two stitch markers for the decreases, leaving the stitch marker at the beginning of the round.
Knitting the Foot
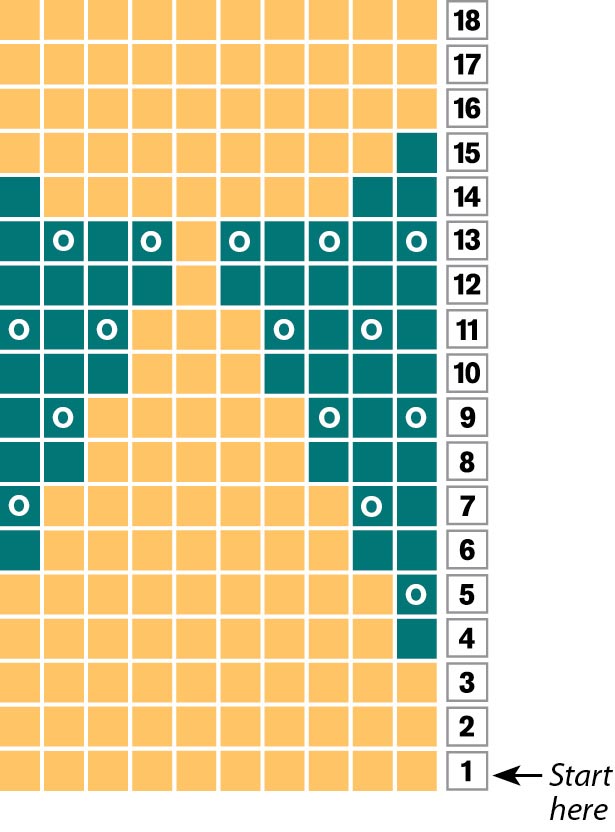
Follow appropriate paw chart (page 50 or 51) for color and stitch patterns. Begin where indicated on line 1 at the bottom of the chart and work from right to left, repeating the pattern six times around the stocking. Work the Puppy Paws chart from rounds 1–21; work the Kitten Paws chart from rounds 1–16, then repeat rounds 1–6.
Next 3 Rounds: With CC A, knit to the end of each round.
Shaping the Toe
Round 1: Using CC C, K13, K2tog, place stitch marker, ssk, K26, K2tog, place stitch marker, ssk, K13. You now have 56 stitches.
Rounds 2–10: Continue in stockinette stitch, working K2tog before and ssk after each stitch marker. Change to double-pointed needles when necessary.
At the end of round 10, you now have 20 stitches.
Round 11: Knit to the first stitch marker. Place the next 10 stitches on one double-pointed needle and the remaining 10 stitches on another double-pointed needle.
Cut yarn, leaving a 24" tail, and graft the two sides together with the tail, using Kitchener stitch.
Finishing
Cut yarn and thread it through a yarn needle. Weave in all loose ends.
Work the desired name in the name band with Duplicate Stitch, using the Alphabet chart on page 69 for guidance.
Make a 6" hanger following the instructions for Twisted Bundles.
Key for Kitten Charts

Note: It is customary in knitting books for charts to be followed from bottom to top, and, when knitting circularly, from right to left. Although this results in some charts apparently being presented upside down, the designs will be right side up when the stocking is completed.

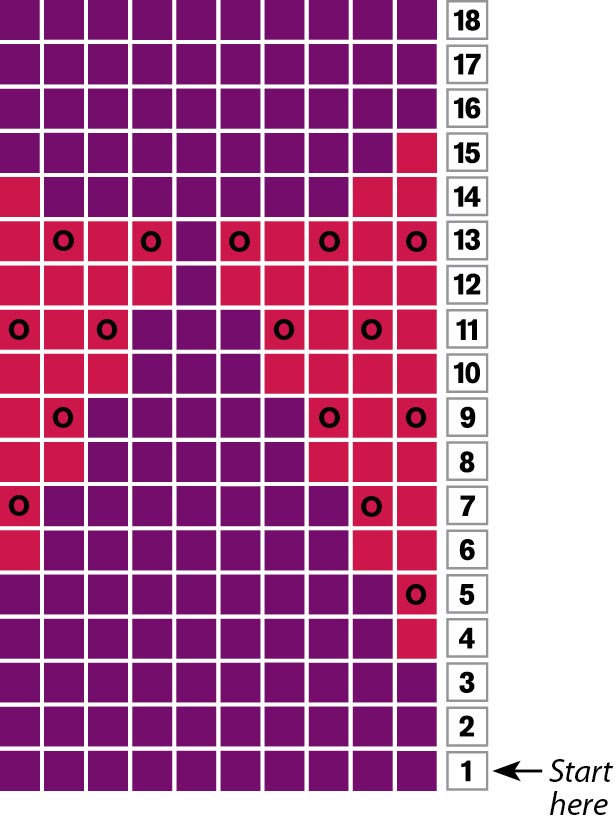

Key for Puppy Charts
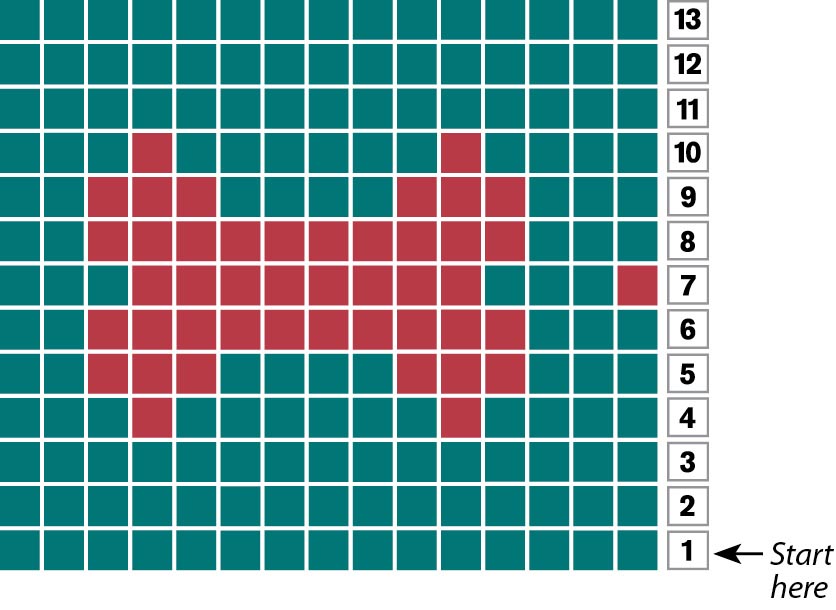
Puppy Paws