Christmas Sampler
Designed by Gwen Steege
Who said that monochromatic color schemes are dull? In this fiery-bright worsted-wool stocking, three shades of red, sparked by delicate lines of white, let you show off nine different color combinations.
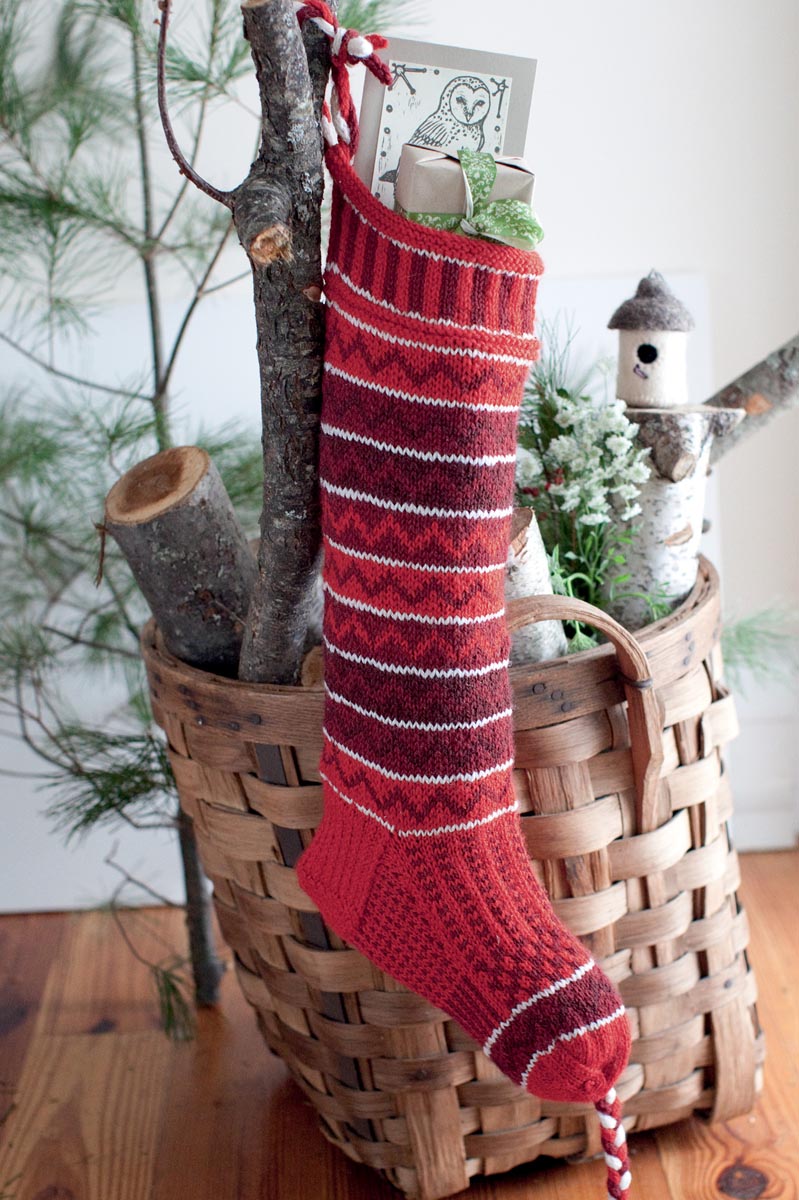
Finished Measurements
- 61⁄2" wide x 22" long
Yarn
Brown Sheep Nature Spun, 100% wool, worsted weight, 31⁄2 oz (100 g)/245 yd (224 m) skeins
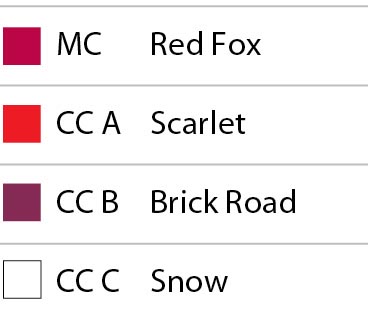
- MC: Red Fox, 2 skeins
- CC A: Scarlet, 2 skeins
- CC B: Brick Road, 1 skein
- CC C: Snow, 1 skein
Needles
- One set of US 7 (4.5 mm) double-pointed needles or size you need to obtain correct gauge
Gauge
- 22 stitches = 4" on US 7 (4.5 mm) needles in any Flame Band pattern stitch
Other Supplies
- Stitch marker, stitch holder, I-9 (5.5 mm) crochet hook, yarn needle
Abbreviations
CC: contrasting color
K: knit
K2tog: knit 2 stitches together
MC: main color
P: purl
P2tog: purl 2 stitches together
ssk: slip, slip, knit the 2 slipped stitches together
Knitting the Cuff and Leg
Setup: With double-pointed needles and MC, cast on 72 stitches.
Knit the first 18 stitches onto Needle 1. Knit the next 18 stitches onto Needle 2. Knit the next 18 stitches onto Needle 3. Slide the remaining 18 stitches onto Needle 1 with the first 18 stitches, and knit to where you began.
You now have on
- Needle 1: 36 stitches
- Needle 2: 18 stitches
- Needle 3: 18 stitches
Note: The beginning of each round will be at the center back, which is in the middle of Needle 1. Place a stitch marker to help you keep track. As you begin round 1, be sure the stitches aren’t twisted around the needle anywhere.
Rounds 1 and 3: Purl to the end of each round.
At the end of round 3, you now have 2 garter-stitch ridges.
Round 2: Knit to the end of the round.
Round 4: Using CC C, knit to the end of the round. Join CC A.
Rounds 5–14: *K2 with CC A, K2 with MC; repeat from * to the end of each round.
Round 15: Using CC C, knit to the end of the round.
Round 16: Using MC, knit to the end of the round.
Rounds 17–19: Repeat rounds 1–3.
At the end of round 19, you now have 2 garter-stitch ridges.
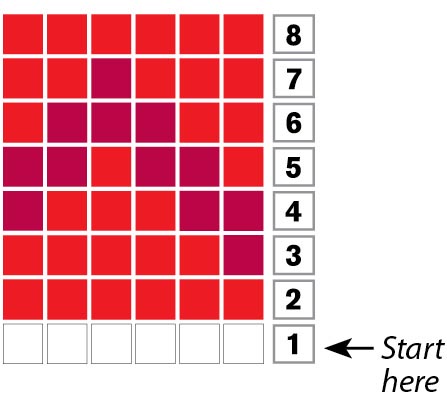
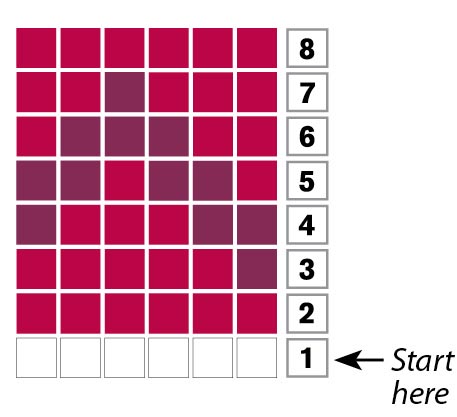
Rounds 20–91: Work the charts for the Flame Bands on page 59. Begin where indicated on line 1 at the bottom right of each chart. Work charts in this order: 1, 2, 3, 4, 1, 4, 3, 2, 1 (nine color bands in all). For advice about working with two colors, see The Joy of Color.
Round 92: Using CC C, knit to end of round. Break off CC C.
Making the Heel Flap
Setup: Place stitches from Needles 2 and 3 on a stitch holder. Slip the remaining 36 stitches onto one needle. Join MC. You will be working these 36 stitches back and forth in rows on two needles to knit the heel.
Row 1 (right side): Using MC, *slip 1, K1; repeat from * to the end of the row.
Row 2 (wrong side): Slip 1, purl to the end of the row.
Next Rows: Repeat rows 1 and 2 until work measures 3", ending with a purl row.
Turning the Heel
Row 1: Slip 1, K18, ssk, K1, turn. (14 stitches remain unworked on needle.)
Row 2: Slip 1, P3, P2tog, P1, turn. (14 stitches remain unworked on needle.)
Row 3: Slip 1, K4, ssk, K1, turn. (12 stitches remain unworked on needle.)
Row 4: Slip 1, P5, P2tog, P1, turn. (12 stitches remain unworked on needle.)
Next Rows: Continue to work the pattern as established, knitting or purling together the 2 stitches on each side of the gap formed in the previous row until you have worked all the stitches in the row. End with a purl row.
You now have 20 stitches.
Knitting the Instep
Setup: Redistribute the stitches as follows: Divide the 20 heel stitches by placing 10 stitches on Needle 1 and 10 stitches on Needle 3. Slide the 36 stitches from the holder (instep stitches) onto Needle 2. Break the yarn and join it again at the beginning of Needle 1.
Round 1:
- Needle 1: With MC, knit the 10 stitches on the needle, then pick up and knit 18 stitches from along the left-hand side of the heel. (See Picking Up Stitches.)
- Needle 2: Knit to the end of the needle.
- Needle 3: Using an empty needle, pick up and knit 18 stitches along the right-hand side of the heel, then knit the remaining 10 stitches from Needle 3. You now have a total of 92 stitches.
Round 2 (with MC only):
- Needle 1: Knit to the last 3 stitches on the needle, K2tog, K1. You now have 27 stitches on Needle 1.
- Needle 2: K1, ssk, knit to the last 3 stitches on the needle, K2tog, K1. You now have 34 stitches on Needle 2.
- Needle 3: K1, ssk, knit to the end of the needle. You now have 27 stitches on Needle 3.
Note: In the following rounds, you will be following the Sampler charts on page 59, and at the same time decreasing at the end of Needle 1 and at the beginning of Needle 3 every other row to form the gusset. The decreases at the beginning of Needle 3 will affect the color order that follows. Be sure to keep CC A stitches in a vertical line throughout the section. Drop CC A on the even-numbered rounds, where it is not used.
Round 3:
- Needle 1: *K1 with CC A, K1 with MC; repeat from * to the last 2 stitches, K2 with MC. (Refer to Sampler 1 on page 59 for the stitch pattern.)
- Needle 2: *K2 with CC A, K2 with MC; repeat from * to the end of the needle, ending K2 with CC A. (Refer to Sampler 2 on page 59 for the stitch pattern.)
- Needle 3: K2 with MC, *K1 with MC, K1 with CC A; repeat from * to the end of the needle.
Round 4 (with MC only):
- Needle 1: Knit to the last 3 stitches, K2tog, K1.
- Needle 2: Knit to the end of the needle.
- Needle 3: K1, ssk, knit to the end of the needle.
Rounds 5–22: Repeat rounds 3 and 4. In odd-numbered rows, maintain 2 MC stitches at the end of Needle 1 and the beginning of Needle 3. In even-numbered rows, knit with MC only.
At the end of round 22, you now have 17 stitches remaining on Needles 1 and 3 and 34 stitches on Needle 2, for a total of 68 stitches.
Completing the Foot
Note: Refer to Sampler Stripe chart on page 59 for color pattern on Needles 1 and 3, and Sampler Checkerboard chart for color pattern on Needle 2 in this section.
Rounds 1 and 2:
- Needle 1: *K1 with CC A, K1 with MC; repeat from * to the last stitch, K1 with MC.
- Needle 2: *K2 with CC A, K2 with MC; repeat from * to the last 2 stitches, K2 with CC A.
- Needle 3: K2 with MC, *K1 with MC, K1 with CC A; repeat from * to the last stitch, K1 with MC.
Rounds 3 and 4:
- Needle 1: *K1 with CC A, K1 with MC; repeat from * to the last stitch, K1 with MC.
- Needle 2: *K2 with MC, K2 with CC A; repeat from * to the last 2 stitches, K2 with MC.
- Needle 3: K2 with MC, *K1 with MC, K1 with CC A; repeat from * to the last stitch, K1 with MC.
Next Rounds: Repeat rounds 1–4 until work measures 5" from the back of the heel.
Shaping the Toe
Round 1:
- Needle 1: Using MC, knit to the last 3 stitches, K2tog, K1. You now have 16 stitches on the needle.
- Needle 2: Knit to the end of the needle.
- Needle 3: K1, ssk, knit to the end of the needle. You now have 16 stitches on the needle.
Rounds 2–9: Work Flame Band 2 on page 59.
Round 10: Change to CC C, and knit to the end of the round. Cut CC C, and join MC.
Round 11:
- Needle 1: Knit to the end of the needle. You now have 16 stitches on the needle.
- Needle 2: K1, ssk, knit to the last 3 stitches, K2tog, K1. You now have 32 stitches on the needle.
- Needle 3: Knit to the end of the needle. You now have 16 stitches on the needle.
Round 12: Knit to the end of the round.
Round 13:
- Needle 1: Knit to the last 3 stitches, K2tog, K1.
- Needle 2: K1, ssk, knit to last 3 stitches, K2tog, K1.
- Needle 3: K1, ssk, knit to end of needle.
Next Rounds: Repeat rounds 12 and 13 until 16 stitches remain (4 stitches on Needles 1 and 3, and 8 stitches on Needle 2).
Knit the stitches from Needle 1 onto Needle 3. Use Kitchener stitch to graft the remaining toe stitches together.
Making the Hanger and Tassel
For the hanger, you need one 10" I-cord in each of the following colors: MC, CC A, and CC B. For the tassel, you need one 7" I-cord in each of the same colors. Using 3 cast-on stitches, follow directions for making I-cord on page 77.
The Hanger:
Braid the three 10" I-cords together, then use a crochet hook to pull the braid through the stocking at the back, just below the top garter-stitch band. Make an overhand knot to secure the braids into a loop.
The Tassel:
Braid the three 7" I-cords together, then use a crochet hook to pull the braid through the toe of the stocking at the very tip. Tie an overhand knot on the inside to secure the braid. Take three 10" lengths of MC, CC A, and CC C yarns, and wrap them several times around the braid about 11⁄2" from the end to secure it. Tie overhand knots at the end of each separate I-cord on the outside.
Key
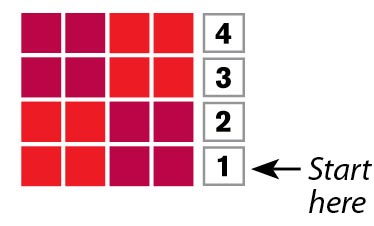
Sampler Checkerboard
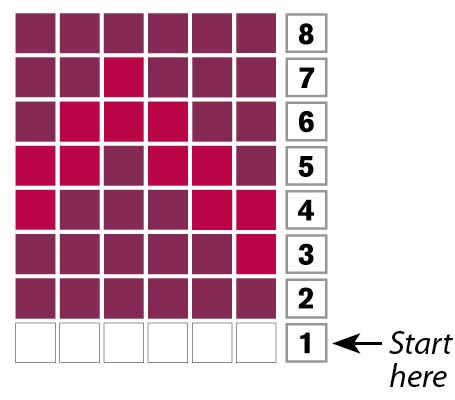
Flame Band 3
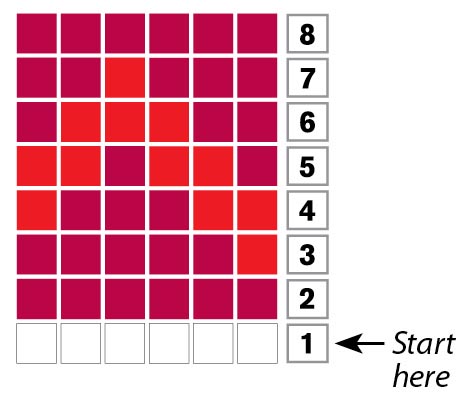
Flame Band 4


