Chapter 9
Getting Fit
IN THIS CHAPTER
 Setting activity and exercise goals
Tracking walks, runs, rides, and more on your Fitbit
Tracking walks and runs on the Fitbit app
Viewing your exercise history
Logging exercises manually
Lots of people use a Fitbit to help them achieve a number of health-related goals, including getting more sleep, eating better, and reducing stress. Worthy goals all, but the truth is that most folks strap on a Fitbit because of the fit part. That is, their goal is to improve their overall fitness, which leads to feeling better, having more energy, a drastically reduced chance of contracting cardiovascular disease, and eating cake and ice cream without feeling guilty.
If your goal is to get or stay fit, or to improve your already-fit self, you can get there with the help of the apps and settings on your Fitbit tracker and Fitbit account. In this chapter, you explore all the fitness-related tools that are part of the Fitbit system, from setting goals to tracking exercise sessions to analyzing your workout history. By the time you’ve finished this chapter, you’ll be ready to put the fit into Fitbit.
Setting Your Fitness Goals
Okay, I’m not going to sugar-coat this: If you’re getting a new fitness regimen started but you don’t include any concrete goals, that program will almost certainly fail. Harsh words, I know, but about a billion studies over the years have shown that people who exercise without a goal in mind almost never stick with the program. If you don’t have a goal, you have nothing to shoot for, and if you have nothing to shoot for, you’ll eventually stop shooting.
 If you’re just starting your fitness program and you’re over 50, or if you suffer from heart disease, kidney disease, diabetes, high blood pressure, or arthritis, talk to your doctor before you start doing any aerobic workouts such as running, biking, or swimming.
Although Fitbit is great at setting up goals for daily activity, it’s not so good with longer-term goals. For example, if you’re a runner or cyclist, you probably have weekly or monthly distance targets you want to shoot for. Fitbit can help by tracking your distance (and other metrics) over that time (see “Viewing Your Exercise History,” later in this chapter), but you can’t set up goals for those longer timeframes.
Setting an activity goal
Here are the steps to follow to set some daily goals for four fitness-related activities that you might want to incorporate into your fitness program:
-
In the Fitbit app, click Dashboard ⇒ Account.
The Account screen appears.
-
In the Goals section, click the Activity tab.
Fitbit displays the Activity Goals screen.
- Click Steps and then type the number of steps you want to tread daily.
- Click Distance and then enter your daily distance goal.
- Click Active Minutes and then type the number of minutes you want to be active each day.
- Click Floors Climbed and then type the number of floors you want to ascend daily.
-
Click the Back icon (<) to return to the Account screen.
The Fitbit app syncs the new goals to your Fitbit device.
Setting an exercise goal
Fitbit defines an exercise as a moderate-intensity activity that lasts at least 15 minutes. You can change that time threshold, and I show you how later in the “Configuring Fitbit to automatically recognize exercises” section. For now, you can configure your Fitbit account with a goal for the number of days each week that you get in at least 15 minutes of moderate-intensity movement. Here’s how:
-
In the Fitbit app, click Dashboard ⇒ Account.
The Account screen appears.
-
In the Goals section, click the Exercise tab.
Fitbit displays the Exercise Goals screen.
-
In the Goals section, click X Days (where X is the current goal).
Fitbit displays the Weekly Exercise Goal screen, shown in Figure 9-1.
- Click the number of days per week that you want to get in at least one exercise session.
-
Click the Back icon (<) until you reach the Account screen.
The Fitbit app syncs the new goal to your Fitbit.

FIGURE 9-1: Set the number of days per week that you want to perform at least one exercise session.
Understanding Your Cardio Fitness Score
How fit are you? That might sound like a vague question that deserves a vague answer such as “not very” or “reasonably” or “impressively.” If all you have to go by are fuzzy metrics such as how much energy you have or how good you feel mentally, any answer you give to the “How fit are you?” question will be equally fuzzy. The situation improves somewhat if you try to answer the question by looking at more concrete metrics such as distance and pace. However, even these hard numbers can still tell you only how fit you are relatively (by, say, improving over time).
If you want an objective measure of your fitness — that is, a measure that tells you not only how fit you are today compared to, say, a year ago, but also how fit you are compared to people with the same gender and age range — you need to look elsewhere. That elsewhere is a metric that exercise scientists call VO2 max and that Fitbit calls the cardio fitness score.
VO2 what?
The term VO2 max (or, often, VO2 max) comes from volume (V), oxygen (O2), and maximum (max), and it refers to the maximum rate of oxygen consumption that occurs when a person performs exercise of increasing intensity. (This is why VO2 max is also called maximal oxygen uptake or maximal aerobic capacity.) VO2 max measures how efficiently or readily your body uses oxygen when you’re exercising as hard as you can, which means it’s an excellent measure of your cardiovascular (that is, aerobic) fitness.
To wit: Fit people are better able to distribute oxygen (via the bloodstream) to their hard-working muscles than less fit people, meaning they can run (or cycle or swim or whatever) faster and longer than the less fit.
VO2 max is notoriously difficult to measure and usually requires you to perform a treadmill test to exhaustion while wearing a ventilation mask that measures oxygen breathed in and carbon dioxide breathed out. The difficulty of the traditional VO2 max test is why the folks at Fitbit came up with the cardio fitness score alternative. Fitbit takes your resting heart rate, age, gender, and weight, and combines them to calculate your cardio fitness score, which is an estimate of your VO2 max.
 People with higher VO2 max scores can run a given distance at a given speed with a lower heart rate than people with a lower VO2 max, so Fitbit can also use heart rate and GPS data from a run to calculate a more precise cardio fitness score. If you have a Fitbit with a built-in heart rate monitor and access to GPS, use the Fitbit to track a run of at least ten minutes (see “Tracking exercises on your Fitbit,” later in this chapter).
Checking out your cardio fitness score
With your cardio fitness score in hand, Fitbit then slots you into a cardio fitness level, which tells you where you rate in relation to people of the same gender and age range. There are six levels in all: poor, fair, average, good, very good, and excellent. To see how you rate, follow these steps:
-
In the Fitbit app, click the Dashboard’s Heart Rate tile.
The Heart Rate screen appears.
-
Swipe left on the graph (Android or iOS) or click Next twice (Windows 10).
The Cardio Fitness graph appears, as shown in Figure 9-2. A marker on the graph shows your current cardio fitness level and cardio fitness score.

FIGURE 9-2: The Cardio Fitness graph shows you where you rate compared to your peers.
Improving your cardio fitness score
If your cardio fitness score relegated you to the average, fair, or even poor cardio fitness level, you should just give up, right? Don’t be silly! You can bump up your VO2 max in just a few months in many ways. Here are a few suggestions:
- If your activities and exercise sessions are low intensity, crank them up to medium intensity, meaning three METs or higher. (See Chapter 5 if you have no idea what MET means.)
- Increase the number of weekly minutes you spend doing at least medium-intensity exercise. If you’re an adult, you should be doing at least 150 minutes a week. If you’re already at the 150-minute level, do more.
- If you’ve been working out for at least a little while, sprinkle some high-intensity activities (at least six METs) and interval workouts into your fitness regimen. See “Setting up interval training,” later in this chapter.
- Lose some weight, especially body fat. Ideally, your goal weight should be achieved by keeping your lean mass the same (or higher), reducing your body fat percentage, and keeping your BMI in the healthy range. (For more details on concepts such as lean mass, body fat percentage, and BMI, see Chapter 8.)
Getting Your Fitbit Ready to Track Exercise
Your Fitbit can be a big part of your exercise program because it can not only track what you’ve done today but also show you a history of your exercises and activities. Before you get to Fitbit’s features for tracking and recording exercises and workouts, you should run through a few configuration chores to make sure that your device is ready for whatever you throw at it.
Configuring Fitbit to automatically recognize exercises
One of Fitbit’s handiest features is exercise auto-recognition, where your tracker automatically recognizes when you’re doing an exercise such as a walk, run, or bike ride. Fitbit tracks that exercise for the duration and then adds it to your activities log. Sweet!
Fitbit recognizes seven modes of exercise: walking, running, outdoor cycling, using an elliptical machine, playing a sport, doing an aerobic workout, and swimming. In each case, the default minimum time it takes for Fitbit to recognize the activity as an exercise session is 15 minutes. As the next two sections show, you can customize the time for each activity.
If you have a tracker that supports GPS, be warned that Fitbit doesn’t turn on GPS for auto-recognized exercises. Because GPS gives you greater accuracy for both distance and your cardio fitness score, it’s better to track the activity by using the Exercise app, which does use GPS (see “Tracking Exercise Sessions,” later in this chapter).
Configuring exercise auto-recognition by using the Fitbit app
Here are the steps to follow in the Fitbit app to set up custom time minimums for Fitbit’s exercise auto-recognition feature:
-
Click Dashboard ⇒ Account.
The Account screen appears.
-
In the Goals section, click the Exercise tab.
Fitbit displays the Exercise Goals screen.
-
In the Auto Recognized Exercises section, click the exercise mode you want to customize.
Fitbit displays the controls for the selected mode, such as the Walk screen shown in Figure 9-3.
-
If you don’t want Fitbit to auto-recognize the activity, click the Auto-Recognize switch to off (the switch is no longer green) and skip to Step 6.
In the Windows 10 app, click Auto-Detect to Off, instead.
- Set the minimum number of minutes that Fitbit should wait before auto-recognizing the activity.
- Repeat Steps 3 through 5 for any other activities you want to configure.
-
Click the Back icon (<) until you reach the Account screen.
The app syncs the new auto-recognition settings to your Fitbit.

FIGURE 9-3: You can toggle an activity’s auto-recognition on and off, as well as set the minimum duration.
Configuring exercise auto-recognition by using Fitbit.com
Here are the steps to follow online with Fitbit.com to set up custom time minimums for the exercise auto-recognition feature:
- Go to
www.fitbit.comand log in to display your Dashboard. - Click View Settings and then click your Fitbit device.
-
Click Auto-Exercise Recognition.
Fitbit displays a list of the exercises it can auto-recognize, as shown in Figure 9-4.
-
Next to the exercise mode you want to customize, use the Longer Than list to select the minimum number of minutes that Fitbit should wait before auto-recognizing the activity.
If you don’t want Fitbit to auto-recognize the activity, select Ignored in the Longer Than list.
-
Repeat Step 4 for every exercise you want to configure.
Fitbit applies the new settings the next time you sync your Fitbit.

FIGURE 9-4: The exercises that Fitbit can auto-recognize.
Setting up exercise shortcuts on your Fitbit
An exercise shortcut is a mode that appears as a separate screen in the Exercise app. The idea is that you scroll through the Exercise app screens until you find the activity you want to perform, and then select that activity. Fitbit tracks the activity for you and, when you’re done, adds the session to your exercise history.
The problem is that Fitbit recognizes 20 exercise modes, but who has the time or patience to scroll through as many as 20 different screens in the Exercise app to find the mode you want? Not I, dear reader, not I. To solve this too-many-modes-too-little-time problem, Fitbit enables you to set a maximum of seven exercise shortcuts in the Fitbit app. You can also change the order of the modes, which means you can choose the seven (or fewer) exercises that you do most often, and then order them any way you want.
 Exercise shortcuts apply only to Fitbit trackers that can run the Exercise app: Charge 3, Inspire HR, Ionic, and Versa.
Setting up exercise shortcuts by using the Fitbit app
Follow these steps in the Fitbit app to choose and sort your exercise shortcuts:
-
Click Dashboard ⇒ Account.
The Account screen appears.
- Click your Fitbit device.
-
Click Exercise Shortcuts.
If you don’t see the Exercise Shortcuts command, it means your Fitbit can’t run the Exercise app.
Fitbit displays the Exercise Shortcuts screen. Figure 9-5 shows the iOS version.
- (iOS only) Tap Edit.
-
To remove a shortcut, click its Delete icon (-) and then click the Delete button that appears.
In Android, you delete a shortcut by swiping left on it.
-
To add a shortcut, click the Add icon (+) and then click the exercise you want to add.
If you don’t see the Add icon (+), it means your Fitbit already has the maximum number of shortcuts, so you’d need to delete one before you can add another.
-
Drag the shortcuts up or down to get the order you prefer.
Shortcuts that appear at the top of the list appear first in the Exercise app.
-
Click the Back icon (<) until you reach the Account screen.
The app syncs the exercise shortcut settings to your Fitbit.

FIGURE 9-5: Configure your exercise shortcuts.
Setting up exercise shortcuts by using Fitbit.com
Follow these steps online using Fitbit.com to select and order your exercise shortcuts:
- Browse to
www.fitbit.comand log in to display your Dashboard. - Click View Settings and then click your Fitbit device.
-
Click Exercise Shortcuts.
Fitbit.com displays your current shortcuts.
-
Click Edit.
Fitbit.com displays check boxes for every activity it can track, as shown in Figure 9-6.
- To remove a shortcut, click to deselect its check box.
- To add a shortcut, click to select its check box.
- Click Save.
-
Drag the shortcuts up or down to get the order you prefer.
Shortcuts that appear at the top of the list appear first in the Exercise app.
Fitbit applies the new settings the next time you sync your Fitbit.
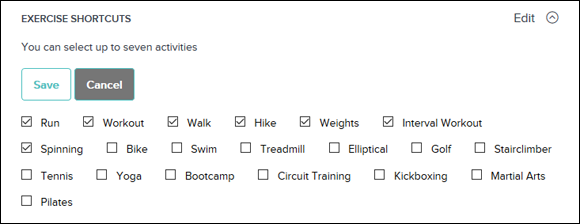
FIGURE 9-6: Fitbit.com displays check boxes for every activity it can track.
Setting up cues
A cue is an update during a workout that gives you a kind of progress report. If you’re running, for example, a cue might chime in every mile to tell you your total distance, elapsed time, and average pace (in minutes per mile). Having periodic reminders of how you’re doing is a handy way to stay on track and saves you from having to memorize mile markers on your route, look at your watch when you reach each marker, and then calculate your pace in your head.
Fitbit offers two types of cues:
- Lap: A cue that’s shown on the screen of your Fitbit device when you use the Exercise app to track a workout. In Fitbit land, a lap is a portion of your exercise session, which could be a distance (such as a mile) or a time (such as 10 minutes). This type of cue is supported by the Charge 3, Ionic, and Versa. To learn how to configure lap cues, see “Configuring exercise mode settings,” later in this chapter.
- Voice: A cue that’s heard on your smartphone when you use the Fitbit app to track and exercise session. To learn how to configure voice cues, read on.
Voice cues have three properties:
- The specific metrics output by the voice cue: These metrics can be one or more of the following: distance, elapsed time, average pace, split pace (that is, your pace since the last voice cue), and calories burned.
- The frequency of the voice cues: The frequency can either be distance-based — such as every half mile or every mile — or time-based — such as every two minutes or every 10 minutes.
- The volume level of the voice cues: You have three choices: low, medium, or high.
If you track an exercise session by using the Fitbit app, you hear the app’s voice cues, which use default settings: the distance, time, and average pace metrics, a frequency of every mile (or kilometer, if you’ve gone over to the metric side), and a volume level of medium.
Follow these steps in the Fitbit app to configure your voice cues:
-
Click Dashboard ⇒ Account.
The Account screen appears.
-
Click Exercise Tracking.
The app displays the Voice Cues screen, shown in Figure 9-7.
- If you don’t want to hear voice cues while you exercise, click the Play During Exercise switch to off (green isn’t showing) and skip the rest of these steps.
- To set the metrics output during each voice cue, click Cues, select each metric you want to include, and then click the Back icon (<) to return to the Voice Cues screen.
- To set the frequency of the voice cues, click Frequency, click the distance- or time-based frequency you want to use, and then click the Back icon (<) to return to the Voice Cues screen.
- To set the volume level of the voice cues, click Volume, click the level you prefer, and then click the Back icon (<) to return to the Voice Cues screen.
-
Click the Back icon (<) until you reach the Account screen.
The app syncs the voice cue settings to your Fitbit.
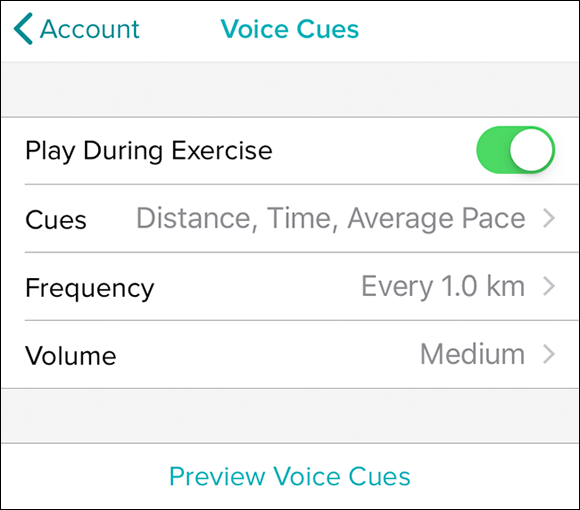
FIGURE 9-7: Configure your exercise voice cues.
Configuring exercise mode settings
The exercise modes available in the Exercise app have a few useful settings that you might want to run through before tracking an exercise. You can adjust these settings by using either the Fitbit app or the Exercise app itself.
Configuring exercise settings by using the Fitbit app
Follow these steps to adjust exercise mode settings by using the Fitbit app:
-
Click Dashboard ⇒ Account.
The Account screen appears.
- Click your Fitbit device.
- Click Exercise Shortcuts.
- Click the exercise shortcut you want to configure.
- Configure the mode using the following settings (not all of these are available for every exercise mode):
- GPS: Ionic watch only. Toggles the use of GPS during the exercise.
- AutoPause: When on, automatically pauses the exercise timer whenever the Fitbit detects that you haven’t been moving for a few seconds. AutoPause is handy if you have your Fitbit inaccessibly buried under layers of clothing during winter exercising. The exercise timer resumes automatically when your Fitbit detects that you’ve been moving again for a few seconds.
- Show Cues: Select Automatic to have lap cues appear automatically according to the frequency you set in the following two settings. Select Manual to display lap cues yourself by tapping a button that appears in the upper-right corner of the Fitbit screen during the exercise; select Off to turn off lap cues.
- Cue Type: If you’re using automatic lap cues, select the kind of lap cue you want: Miles, Kilometers, Minutes, or Calories.
- Cue Every: If you’re using automatic lap cues, select the frequency of the lap cues.
-
Click the Back icon (<) until you reach the Account screen.
The app syncs the exercise settings to your Fitbit.
Configuring exercise settings by using the Exercise app
In the Exercise app, each exercise mode offers a few settings that you can adjust to taste. To work with these settings, open the Exercise app, and swipe left until you reach the exercise mode you want to use. For the Ionic or Versa watch, tap the Settings icon (gear), in the top-left corner of the screen, as labeled in Figure 9-8; for the Charge 3 or Inspire HR wristband, swipe up to scroll through the mode’s settings.

FIGURE 9-8: Display the exercise mode you want to configure, then tap Settings.
The settings you see depend on the exercise mode, but most modes offer one or more of the following settings:
- Show Laps: Determines when your Fitbit displays stats for each completed lap. There are three possible values:
- Automatically: Your Fitbit displays lap stats each time you complete a lap as defined in the Automatic Lap Settings item described next.
- Manually: You see lap stats only when you tap the Lap icon (oval with an upward-pointing arrow), in the upper-right corner of the screen, during the exercise.
- Off: Your Fitbit doesn’t display lap data.
- Automatic Lap Settings: Defines a lap to use when you select Automatically in the preceding Show Laps setting. In the Lap Type option, choose a distance (Miles or Kilometers), Minutes, or Calories. In the Lap Every option, select what distance, time, or number of calories your Fitbit should use to define a lap.
- Customize Stats: Determines up to three metrics to display on the screen during the exercise: one at the top of the screen, another in the middle, and a third at the bottom.
- GPS: Ionic watch only. Toggles the watch’s GPS on and off for the exercise.
- Use Phone GPS: Versa, Charge 3, or Inspire HR only. Toggles the tracker’s connection to your smartphone’s GPS on and off for the exercise.
- Auto-Pause: Toggles the Auto-Pause feature on and off.
- Always-On Screen: When On, leaves the screen display visible during the entire exercise.
Unless you’re exercising for a very short time (say, less than 10 minutes), having your screen on full-time is a huge drain on the battery, so I don’t recommend it.
Setting up interval training
In recent years, a boatload of studies have shown that one of the best exercises you can do is the interval workout, where you alternate periods of relatively hard effort with periods of relatively low effort (or even rest). For example, a typical interval workout would be to alternate running hard for 30 seconds and resting for 10 seconds, repeating this fast/slow pattern perhaps 10 or 15 times.
An interval workout has two main advantages: It produces results because it includes vigorous exercise, and it enables you to achieve those results relatively safely because each bout of hard effort is separated by a period — called the interval, hence the name of this workout — of easy or no effort. Interval workouts have been proven to produce significant improvements in cardiovascular fitness and VO2 max.
Interval workouts are really, really tough and put quite a strain on your heart, lungs, and muscles. Don’t try an interval workout if you’re just getting started exercising, if you’re over 50, or if you suffer from heart disease, kidney disease, diabetes, high blood pressure, or arthritis.
Your Fitbit is happy to help you track an interval workout in the Exercise app by vibrating twice at the end of each period. In Fitbit lingo, segments where you’re running (or whatever) hard are called move periods, and the intervals are called rest periods. Fitbit has a default interval workout already set up for you:
- Move period: 30 seconds
- Rest period: 10 seconds
- Repeats: 14
Adding up the move and rest times and multiplying by the number of repeats gives you a tough 9-minute, 20-second workout. You can customize the interval workout by using either the Fitbit app or Fitbit.com.
Setting up an interval workout in the Fitbit app
Follow these steps to use the Fitbit app to create a custom interval workout:
-
Click Dashboard ⇒ Account.
The Account screen appears.
- Click your Fitbit device.
-
Click Exercise Shortcuts.
If you don’t see the Exercise Shortcuts command, your Fitbit can’t run the Exercise app.
-
Click Interval Workout.
Fitbit displays the Interval Workout screen. Figure 9-9 shows the iOS version.
- (iOS only) Tap Edit.
- Click the GPS switch to on (green) if you want to track the interval workout by using GPS.
- Click Move and set the length of the move period.
- Click Rest and set the length of the rest period.
- Click Repeat and set the number of times you want to repeat the move and rest periods.
-
Click the Back icon (<) until you reach the Account screen.
The app syncs the interval workout settings to your Fitbit.
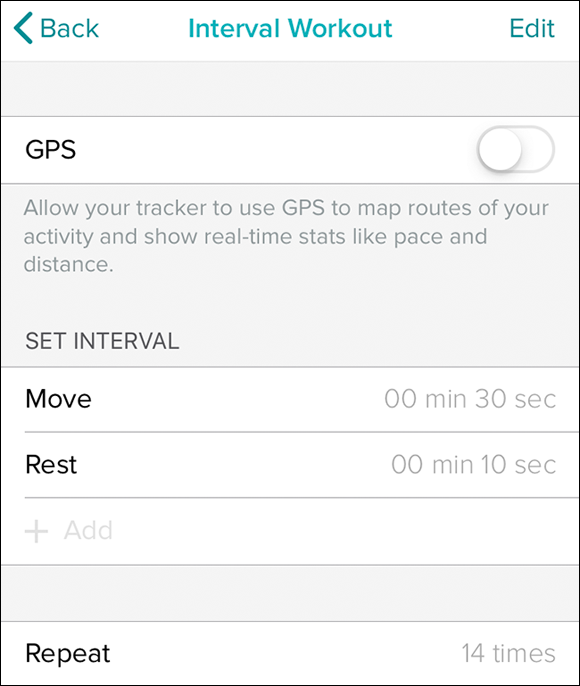
FIGURE 9-9: Configure your interval sessions.
Setting up an interval workout by using Fitbit.com
Here are the steps to follow online with Fitbit.com to set up a custom interval workout:
- Go to
www.fitbit.comand log in to display your Dashboard. - Click View Settings and then click your Fitbit device.
- If you want to track the interval workout by using GPS, click GPS and then select the Interval Workout check box.
- Click Interval Workout.
- In the Move text box, set the length of the move period.
- In the Rest text box, set the length of the rest period.
-
In the Repeats list, select the number of times you want to repeat the move and rest periods.
Fitbit applies the new interval workout settings the next time you sync your Fitbit.
Tracking Exercise Sessions
Your Fitbit automatically tracks metrics such as steps taken and floors climbed, and earlier in this chapter you discovered how to set up your Fitbit to automatically recognize activities such as runs, bike rides, and aerobic workouts (see “Configuring Fitbit to automatically recognize exercises”). However, you can get your Fitbit to track your exercise sessions in two other ways:
- Track the activity using the Exercise app in Fitbit devices that support it. The Exercise app gives you access to many more exercise modes, including classes such as spinning, yoga, and Pilates; gym sessions such as weight workouts and circuit training; and sports such as tennis and golf.
- Track the activity using the Fitbit app. As long as you’re running the app on a mobile device (ideally a smartphone), you can use the Fitbit app to track walks, runs, and hikes.
Whether you track an exercise session by using the Exercise app on your Fitbit or the Fitbit app, Fitbit uses GPS to track your location and provide real-time pace and distance stats. GPS tracking is a big advantage over just letting Fitbit auto-recognize exercise sessions because GPS improves the accuracy of both the tracking and your cardio fitness score.
Tracking exercise on your Fitbit
If you have the Charge 3 or Inspire HR wristband or the Ionic or Versa watch, you can track a workout by using the Exercise app, shown in Figure 9-10 (this is the Ionic version).

FIGURE 9-10: Use the Exercise app to track workouts on the Charge 3, Inspire HR, Ionic (shown here), or Versa.
To get started, tap the Exercise app to open it, then swipe left (or right, if needed) to locate the exercise mode you want to use, and then tap that mode.
The screen you see depends on the mode and on the Fitbit you’re using. For example, Figure 9-11, left, shows the run mode screen for the Ionic watch. Note the following four items on this screen:
- Satellite icon: The satellite icon and Searching text in the upper-left corner tell you that the Fitbit is looking for a GPS signal. You see this GPS info for modes such as walk, run, hike, and bike. For the most accurate tracking, wait until you see the Connected message, shown in Figure 9-11, right, before starting the session.
- Set Goals icon: Tap this icon to set goals for the exercise session, such as distance or time.
- Lap setting: The value that your Fitbit will use to display lap stats. See “Configuring exercise mode settings,” earlier in this chapter.
- Start icon: Tap this icon to begin the exercise session.

FIGURE 9-11: The Ionic looks for a GPS signal (left) and displays Connected when it locks in (right).
As you exercise, your tracker displays various metrics, such as distance, current pace, and elapsed time (Figure 9-12 shows a typical Ionic screen during a run). On an Ionic or a Versa watch, you can press the Back button to see other metrics, such as heart rate, average pace, and calories burned.
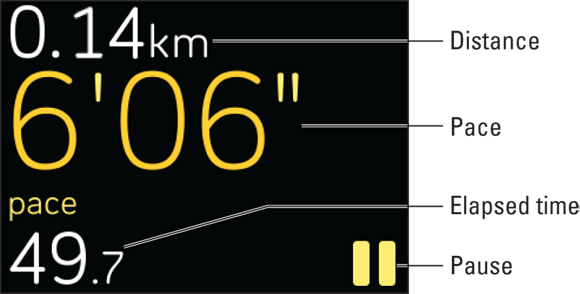
FIGURE 9-12: The Ionic screen displays various metrics as you exercise.
To pause the tracker during the exercise, use either of the following techniques:
- Charge 3 or Inspire HR: Press the tracker’s Back button.
- Ionic or Versa: Tap the Pause icon (labeled in Figure 9-12).
In either case, tap the Start icon to resume tracking your workout.
To complete your workout, use either of the following techniques:
- Charge 3 or Inspire HR: Press the tracker’s Back button twice and then tap Finish.
- Ionic or Versa: Tap the Pause icon, tap the Finish icon (labeled in Figure 9-13), and then tap End.
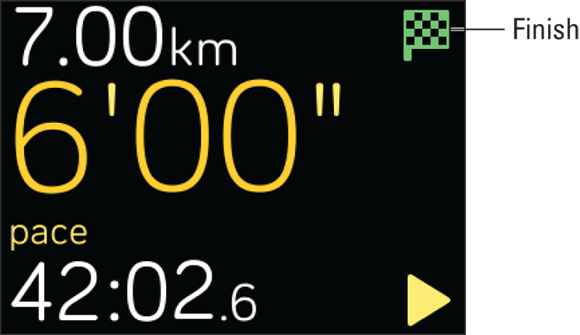
FIGURE 9-13: To complete your workout, tap the Finish icon.
Tracking a walk, hike, or run with the Fitbit app
If your Fitbit doesn’t support the Exercise app, or if you don’t have your Fitbit with you, you can still track a walk, hike, or run by using the Fitbit app on your smartphone. Here’s how:
-
In the bottom-right corner of the Fitbit app screen, tap the Log icon (+), and then tap Track Exercise.
Or tap the Weekly Exercise tile and then tap the Track icon (stopwatch).
Fitbit displays the Track screen or tab, the configuration of which depends on which Fitbit you’re using. Figure 9-14 shows the Track tab that appears for an Ionic watch.
- Select the type of exercise: Walk, Hike, or Run.
-
To use voice cues during the exercise, tap the Voice Cues switch to on (green).
If your Fitbit supports custom voice cues, after you turn on the Voice Cues switch, you can customize the cue types, frequency, and volume.
- If your Fitbit supports music and you want to use the Fitbit app to control music playback during the exercise, tap Music Control and then tap the Music Control switch to on.
-
Tap Start.
The Fitbit app starts tracking your exercise and displays your progress, which includes distance, time, and pace. Figure 9-15 shows a typical screen. Note, too, that you can swipe left to see a GPS-generated map of your route and current location.
Tap Pause at any time to temporarily stop the tracking, and then tap Start when you’re ready to resume.
-
When you’ve finished the exercise, tap and hold down the Finish button to complete the tracking.
Fitbit adds the exercise to your log.
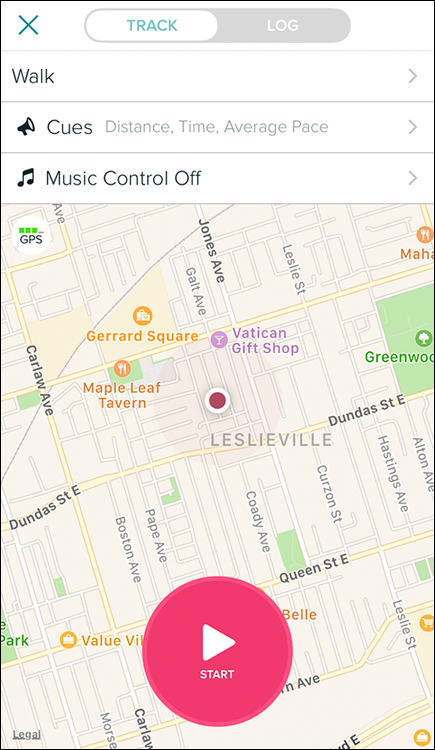
FIGURE 9-14: Use the Track tab or screen to track a walk, hike, or run using the app.

FIGURE 9-15: During the exercise, the Fitbit app tracks your distance, time, and pace.
Working with Your Activities Log
Whether your Fitbit auto-recognizes an exercise or you use your tracker or the Fitbit app to track an exercise, everything ends up in your activities log, which you can access as follows:
- Fitbit app: Open the Dashboard and click the Weekly Exercise tile. Fitbit opens the Exercise screen.
- Fitbit.com: The website gives you three ways to get to your activities log:
- Log in to your account to display the Dashboard, hover the mouse pointer over the Recent Exercise tile, and then click See More.
- Click Log in the main navigation header, and then click the Activities tab.
- Surf directly to
www.fitbit.com/activities.
Besides using the log to review your exercise history, you can also manually log, edit, and delete exercises, as the next few sections show.
Viewing your exercise history
One of the keys to getting in shape and improving your fitness is to slowly increase your workload. For example, if running is your fitness drug of choice, you improve fitness by slowly increasing one or more of the following:
- Distance of your individual runs
- Total distance you run each week
- Number of runs per week
- Pace of your runs
The operative word here (not only for running but for any type of exercise) is slowly. By a country mile, the most common cause of injury in both new and experienced exercisers is ramping up distance, frequency, or speed (or any combination thereof) too quickly.
The prudent exerciser creates a workout plan that includes modest increases each week, plus down weeks every month or two, where you drastically reduce your exercise (or even take the week off; don’t worry, it’ll be fine) to give your body a well-deserved break.
To ensure that you not only increase your exercise workload at a snail’s pace but also take regular down weeks, take advantage of your exercise history to track your progress.
Viewing your exercise history in the Fitbit app
To check out your exercise history in the Fitbit app, display the Exercise screen, as I described earlier and as shown in Figure 9-16 (this is the iOS version).

FIGURE 9-16: Examine your exercise history.
The top part of the Exercise screen is a series of graphs that display your weekly exercise days, your monthly exercise days, your exercise durations for the past month, your exercise distances, the minutes you spent in each heart rate zone (if your Fitbit has a heart rate monitor), and your calories burned each day.
Below the graph, you see an entry for each exercise or activity. Click the exercise to see details such as your route (if your Fitbit has access to GPS), heart rate info, and calories burned.
Viewing your exercise history by using Fitbit.com
To peruse your exercise history online by using Fitbit.com, open the activities log as I described earlier. In the Activity History section, locate the exercise you want to view and then click its View Details button. Fitbit displays the Exercise Details page, which shows exercise data such as a map and pace (if the exercise was GPS-tracked), heart rate, and calories burned.
Logging an exercise
What happens if during an exercise session you forget to wear your Fitbit and you don’t bring your smartphone so you can’t use the Fitbit app? If you tracked your exercise in some other way (say, by using a sports watch or stopwatch), you can add the exercise manually by using the activities log.
Logging an exercise by using the Fitbit app
In the Fitbit app, follow these steps to log an exercise manually:
-
In the bottom-right corner of the screen, click the Log icon (+) and then click Track Exercise.
Or tap the Weekly Exercise tile, and then in Android or iOS, tap the Track icon (stopwatch).
-
In Android, tap the Log Previous tab; in iOS, tap the Log tab.
In Windows 10, skip this step.
-
In the Exercise Type box, start typing the mode of exercise you performed.
As you type, Fitbit displays a list of matching exercise modes.
-
Click the type of exercise you performed.
Fitbit displays the Log Exercise screen with fields for the exercise data, as shown in Figure 9-17.
-
Enter the exercise data.
The fields you see depend on the exercise, but usually include the exercise date, time, duration, distance, and calories, if known.
-
Tap Log It (Android), Add (iOS), or Log (Windows 10).
Fitbit adds the exercise session to your Activities log.

FIGURE 9-17: Use the Log Exercise screen to log an exercise session manually.
Logging an exercise by using Fitbit.com
You can add an exercise to your log by using Fitbit.com as follows:
-
Go to
www.fitbit.comand open your Activities log.For details, see the beginning of the “Working with Your Activities Log” section.
-
In the Log Activities section, use the text box to start typing the mode of exercise you performed.
As you type, Fitbit displays a list of matching exercise modes.
The Log Activities section also includes several default icons representing common activities, such as walking and running; you can click one of these icons and skip to Step 4.
- Click the type of exercise you performed.
-
Enter the exercise data.
The fields you see depend on the exercise, but usually include the exercise date, time, duration, distance, and calories, if known.
-
Tap Log.
Fitbit adds the exercise session to your Activities log.
Editing an exercise
If an exercise has the wrong date, time, duration, or other incorrect data, you can edit the exercise to make things right.
If you entered an exercise session manually, you can edit any of its details. If the session was tracked by Fitbit, you can edit only the starting and ending dates and times.
Here are the steps to follow to edit an exercise by using the Fitbit app:
- In the Dashboard, click the Weekly Exercise tile.
- Click the exercise you want to edit.
-
Edit the exercise entry:
- Android: Tap the Edit icon (pencil) to open the Log Activity screen, enter the updated stats for the exercise, and then tap Log It.
- iOS: Tap the More icon (three horizontal dots in the upper-right corner), and then tap Edit Exercise Details to open the Edit Exercise Details screen. Enter the correct data, and then tap Done.
- Windows 10: Click the Edit icon (pencil) to open the Edit Exercise screen, enter the new data for the session, and then click Log.
Fitbit updates the exercise to your log.
Deleting an exercise
If your Activities log contains an unneeded entry, it’s best to remove the exercise to avoid cluttering the log with entries that shouldn’t be there.
Deleting an exercise by using the Fitbit app
Here are the steps to follow to delete an exercise from your log by using the Fitbit app:
- In the Dashboard, click the Weekly Exercise tile.
- Click the exercise you want to remove.
-
Delete the exercise entry:
- Android: Tap the Delete icon (trash can).
- iOS: Tap the More icon (three horizontal dots) in the upper-right corner, and then tap Delete Exercise.
- Windows 10: Click the Delete icon (trash can).
The app asks you to confirm the deletion.
-
Click Delete.
Fitbit deletes the exercise from your log.
Deleting an exercise by using Fitbit.com
You can remove an exercise from your log using Fitbit.com as follows:
-
Go to
www.fitbit.comand open your activities log.For details on opening the activities log, see the beginning of the “Working with Your Activities Log” section.
- Hover the mouse pointer over the exercise you want to get rid of.
-
Click the Delete icon (trash can) to the right of the exercise.
Fitbit asks you to confirm.
-
Click Delete.
Fitbit removes the exercise from your log.