Chapter 5
Tracking Your Daily Activity Levels
IN THIS CHAPTER
 Setting your activity goals
Tracking steps and active minutes
Setting hourly reminders to move
Tracking distance floors climbed
Earning badges to commemorate your hard work
“ Use it or lose it.” “No pain no gain.” “The hardest part is walking out the front door.” “The only bad workout is no workout.”
“Turn fat into fit.” “It never gets easier. You just get strong.” “Pain is just weakness leaving your body.”
The fitness world has never found a cliché or bromide that it wouldn’t put on a poster and slap on a gym wall.
Ah, but here’s the thing: If you could scrub the encrusted triteness and staleness off each of these platitudes, you’d be left with a shining gem of truth. Yep, as hackneyed as these slogans appear, each of them is unarguably, unassailably true. You really do lose mobility and muscle if you don’t give your body movement and resistance. Your body really does improve only if you stress it a little. Doing nothing really is worse than doing something.
In this chapter, you bring these slogans off the gym wall and into your life. In the pages that follow, you explore all the Fitbit features and settings related to tracking your daily activities, including steps, hourly activity, active minutes, distance, and floors climbed.
“Just do it.”
Setting Activity Goals
Undertaking an exercise program without setting a goal is like taking the family on a driving trip without choosing a destination. Sure, it will probably be fun at the beginning, but eventually it will devolve into aimless wandering and sullen silence. Your health is too important to let that happen, so you need to define goals for the Fitbit metrics you want to track.
 If you’re not sure what goal to set for yourself, skip this step for now and use your Fitbit for a few days to see what stats you generate. If you find that, say, you’re doing 5,000 steps most days, try setting your daily step goal at 6,000 to challenge yourself a bit.
Setting your daily activity goals
Here are the steps to follow to set your daily activity goals:
-
In the Fitbit app, click Dashboard ⇒ Account.
The Account screen appears.
-
In the Goals section, click the Activity tab.
Fitbit displays the Activity Goals screen. Figure 5-1 shows the iOS version of the screen.
- Click Steps and then type the number of steps you want to shoot for each day.
- Click Distance and then enter the daily distance you want to reach.
- Click Calories Burned and then type the number of calories you want to expend each day.
- Click Active Minutes and then type the number of minutes you’d like to be active daily.
-
Click Floors Climbed and then type the number of floors you hope to ascend each day.
Wait: What about hourly activity? Yup, I cover that; see the section “Staying Regular: Setting Hourly Activity Goals and Reminders,” later in this chapter.
-
Click the Back icon (<) to return to the Account screen.
The Fitbit app syncs the new goals to your Fitbit device.
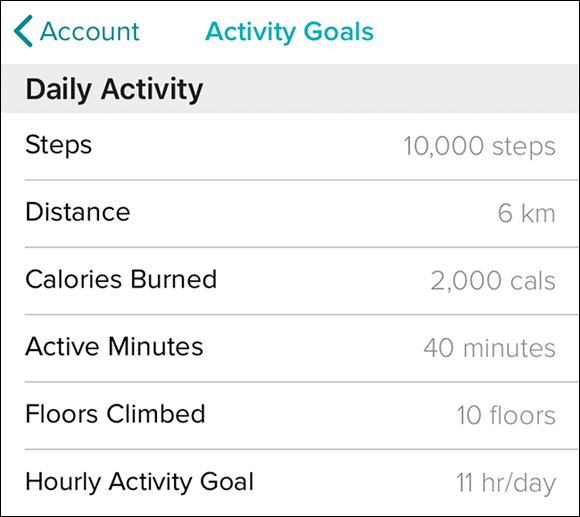
FIGURE 5-1: The iOS version of the Activity Goals screen.
Setting your main activity goal
In Fitbit land, your main goal is the metric that Fitbit tracks most closely, which means two things:
- In the Fitbit app’s Today section, Fitbit.com’s Today tile, and the Today app on the Ionic or Versa watch, the main goal is the metric you see first.
- When you reach your main goal, your Fitbit vibrates in a celebratory way and displays a notification congratulating you on reaching your goal.
The steps metric is the default main goal, but you can follow this procedure to specify a different main goal:
-
In the Fitbit app, click Dashboard ⇒ Account.
The Account screen appears.
- Click your Fitbit device.
-
Click Main Goal.
The Main Goal screen appears.
- Click the activity you want to use as your main goal.
-
Click the Back icon (<) until you return to the Account screen.
The Fitbit app syncs the new main goal to your Fitbit device.
Left, Right, Left, Right: Counting Your Steps
The simplest and most basic activity you can do is to put one foot in front of the other, and then repeat as often as possible or as necessary. The humble step might seem too humble to serve as an engine of health or fitness, but make no mistake: Walking is fantastic exercise that has both physical and mental benefits. Yes, generally speaking, the faster you take those steps, the greater the benefits, but even a modest stroll or amble is way better than plopping yourself, potato-like, on your couch.
The idea that walking at any speed is superior to sitting at no speed is inherent in the default stat monitored by all Fitbit trackers: the step. To your Fitbit, a step is a step, whether it’s taken during a leisurely saunter or a full-on sprint. What your Fitbit really cares about is the number of steps you take each day, not the speed at which you take them. That makes sense because the more steps you take, the more time you’re active during the day, so the less time you’re sitting around. (That said, your Fitbit does differentiate between slow and fast activities; see “Earning Active Minutes,” later in this chapter.)
Monitoring today’s steps
You’ll want to keep an eye peeled on your step count throughout the day to make sure you reach your goal. Fortunately, Fitbit gives you many ways to do this:
-
Ace, Alta, or Alta HR: Wake the Fitbit and then tap the screen until you see the step count.
On most of the Fitbit platforms, the steps metric is indicated by the two footprints icon, which is labeled in Figure 5-2, left. - Charge 3, Inspire, or Inspire HR: Wake the device and then swipe up.
- Flex 2: Four of the five LEDs indicate your progress. One LED lights up when you hit 25 percent of your goal; a second LED lights when you hit 50 percent; a third LED lights when you get to 75 percent, and all four LEDs are lit and the fifth LED turns green when you reach your goal.
- Ionic or Versa: You have two choices:
- Wake the device, display the clock (if it’s not displayed already), and then tap the screen. Figure 5-2, left, shows the step count as it appears on the Ionic watch. Note, too, the steps goal circle in the upper-right corner, which shows you how much of your daily steps goal you’ve achieved so far.
- Wake the device, display the clock (if it’s not displayed already), and then swipe up from the bottom of the screen to open the Today app, which initially shows the step count and the steps goal circle, as shown in Figure 5-2, right. (If you see some other metric, then steps isn’t defined as your main goal; see “Setting your main activity goal,” earlier in this chapter.)
- Fitbit app: Open the Dashboard. Today’s step count appears near the top of the screen, as shown in Figure 5-3.
- Fitbit.com: Log in to your Fitbit account to open the Dashboard. Today’s step count appears in the Today tile. To see what percentage of your steps goal you’ve achieved, hover the mouse pointer over the Today tile, as shown in Figure 5-4.
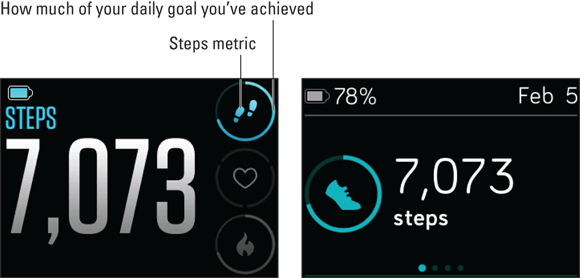
FIGURE 5-2: See the current step count by tapping the watch clock (left) or opening the Today app.

FIGURE 5-3: In the Fitbit app, today’s step count appears near the top of the Dashboard screen.

FIGURE 5-4: In the Fitbit.com Dashboard, hover the mouse over the Today tile to change the counts to percentages.
Viewing your steps history
Although it’s important to regularly check your progress towards your daily steps goal, it’s just as important to occasionally glance back at your past step counts. In this way, you can detect patterns, see when it’s time to increase your daily steps goal, and set appropriate challenges.
Assuming you’ve synced your Fitbit device recently, you can view your steps history by using the Dashboard on either the Fitbit app or the Fitbit.com website:
- In the Dashboard, click the Previous icon (<) to go back one day (see Figure 5-5). After you’ve gone back one or more days, you can click the Next icon (>) to move forward a day.
- In the Dashboard, click the steps metric. Fitbit opens the Steps screen, which displays a chart of the previous seven days’ step counts and how they compare to your steps goal, as shown in Figure 5-6. You can also scroll down to see the step counts from previous days, and you can click any day to see a timeline of when the steps occurred during the day, as shown in Figure 5-7.

FIGURE 5-5: In the Dashboard, click the Previous and Next icons to navigate your steps history.
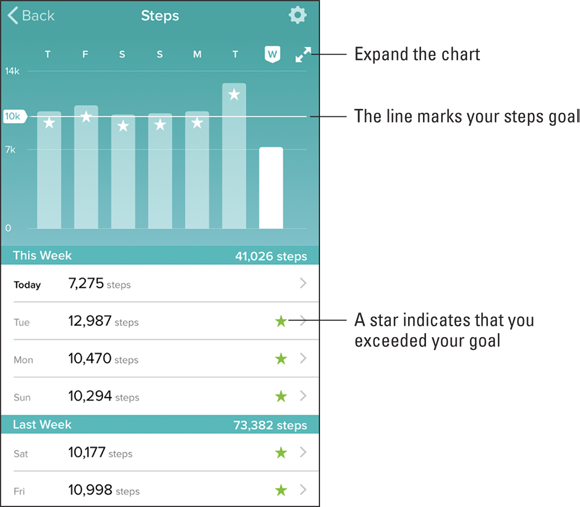
FIGURE 5-6: The Steps screen displays your historical steps data.

FIGURE 5-7: Click a day to see a timeline of when your steps occurred that day.
Staying Regular: Setting Hourly Activity Goals and Reminders
Being active during the day involves two components:
- The total activity you perform during the day
- The activity you perform regularly throughout the day
It’s important to separate these two components of activity because each is crucial to your health. For example, suppose you set a goal of 8,000 steps each day and you then go out on a single long walk that gets you over the 8,000-step hump. Nice work! However, if you then sit around for the rest of the day, all that sitting negates the benefits of your walk! It’s unfair, I know, but sitting really is that bad for you.
So what’s the solution? You need to move throughout the day, not just in a single burst. Fortunately, Fitbit’s got your back on this one because you can set up your tracker to give you hourly nudges to get up and move. It works like this: Fitbit tracks the number of steps you take each hour. If your step count is less than 250 as the end of the hour approaches (specifically, at ten minutes to the hour), your Fitbit vibrates and displays a reminder, similar to the one shown in Figure 5-8.

FIGURE 5-8: If you haven’t reached 250 steps this hour, Fitbit tells you to get a move on.
If you have a Fitbit Flex 2, your reminder to move is a vibration accompanied by a single purple light and two white lights.
250 steps is just two or three minutes walking for most people, so why not take a short break and move around a bit? As a reward, if you hit 250 steps before the hour is up, your Fitbit offers a brief celebratory message, as shown in Figure 5-9).
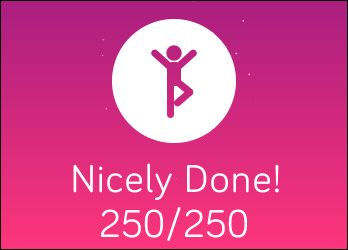
FIGURE 5-9: Your Fitbit celebrates if you reach 250 steps before the hour ends.
Checking your hourly steps
If you don’t want to wait until ten minutes to the hour to check your hourly steps, you can monitor your progress if you have one of the following Fitbit devices:
- Charge 3, Inspire, or Inspire HR: Wake the device, and then swipe up until you see a person walking icon with the caption x of 250, where x is the number of steps you’ve taken so far this hour.
- Ionic or Versa: Wake the device, display the clock, and swipe up from the bottom of the screen to launch the Today app. Then swipe up until you see a screen similar to the one in Figure 5-10 with the text x Steps This Hour, where x is the number of steps you’ve taken so far this hour.

FIGURE 5-10: Use your tracker (such as the Ionic shown here) to monitor your hourly steps.
If you don’t see your hourly steps on your Fitbit device, it means you’ve already met your goal for this hour. Good work!
Setting up hourly reminders to move
Your Fitbit’s hourly prods to get up and move are one of its best features because — let’s face it — most of us need prodding! Even better is the fact that you can customize which hours during the day your hourly steps goal is in effect.
Here are the steps to follow using either the Fitbit app or Fitbit.com to configure your hourly reminders to move:
-
Click Dashboard ⇒ Account.
The Accounts screen appears.
- Click your Fitbit device.
-
Click Reminders to Move.
The Reminders to Move screen appears. Figure 5-11 shows the iOS version of the screen.
- If you want to receive reminders each hour, make sure the Reminders to Move switch is on (green).
-
Use the Start Time list to specify the first hour you want Fitbit to track your hourly steps. Use the End Time list to specify the last hour you want Fitbit to track your hourly steps.
In the Android app, tap Start & End Time, enter the start and end hour, and then tap OK.
Each hour from the start time until the end time, Fitbit will check whether you’ve taken at least 250 steps. If you haven’t reached 250 by ten minutes before the hour is done, your Fitbit will vibrate and display a reminder.
- If you are using the Fitbit app, click Days.
- Select which days of the week you want Fitbit to track your hourly steps.
-
If you’re using Fitbit.com, click Save.
Fitbit saves your settings.

FIGURE 5-11: Set the consecutive hours you want reminders to move.
Monitoring today’s hourly activity
When you’re just starting out with your fitness program, it’s easy to forget to move each hour, mostly because not moving is such a habit for most of us. So at first your hourly activity will only be “hourly-ish.” To improve, you need to monitor this metric and let the gaps in your activity motivate you to do better tomorrow.
Here are the various ways that Fitbit offers to monitor today’s hourly activity:
- Ace, Alta, Alta HR, or Flex 2: These devices don’t show hourly activity, so you need to use the Fitbit app or Fitbit.com, as I describe later in this list.
- Charge 3, Inspire, or Inspire HR: Wake the device and then swipe up until you see the x of y value (where x is the number of hours you’ve met your goal and y is the total number of hours you’re tracking).
-
Ionic or Versa: Wake the device, display the clock (if it’s not displayed already), and then swipe up from the bottom of the screen to open the Today app. Swipe up until you see the x of y Hours Today value (where x is the number of hours you’ve met your goal and y is the total number of hours you’re tracking), as shown in Figure 5-12, left. If, instead, you see x Steps This Hour, swipe left on it.
On most Fitbit platforms, the hourly activity metric is indicated by an icon showing a person with arms raised and one foot braced against the other leg (the Tree pose in yoga), as labeled in Figure 5-12, right. - Fitbit app: Open the Dashboard and view the x of y Hrs value, as shown in Figure 5-12, right.
- Fitbit.com: Log in to your Fitbit account to open the Dashboard, and then view the x of y Hrs tile.

FIGURE 5-12: The hourly activity metric in the Today app (left) and in the Fitbit app’s Dashboard (right).
Viewing your hourly activity history
After you’ve tracked your hourly activity for a while, a question might arise: Are there particular hours when I’m regularly inactive? For example, perhaps you always miss your 250-step goal between 4 p.m. and 5 p.m. (presumably because you hunker down at your desk to complete some work before leaving at 5).
You could figure this out by using the Dashboard on the Fitbit app or on Fitbit.com to navigate through the previous days, looking for patterns. However, a much easier way is to open the Dashboard and then click the hourly activity metric. Fitbit opens the Hourly Activity screen shown in Figure 5-13, which displays a chart of the previous seven days, broken down by hour, with a dot placed on each hour you met your 250-step goal. This display gives you a quick way to see persistent gaps in your activity.
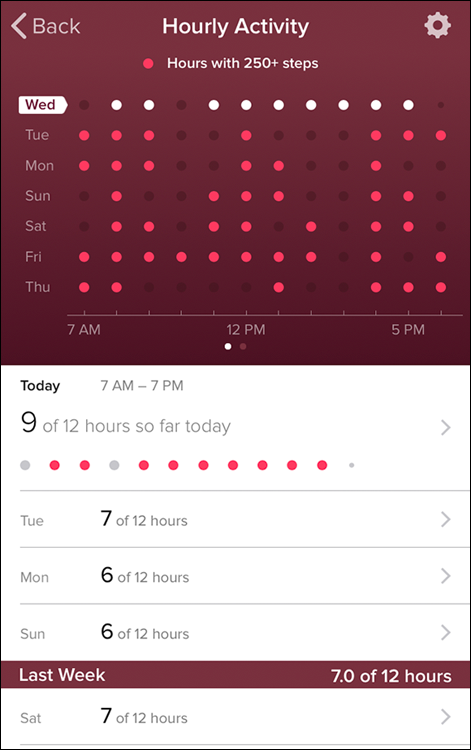
FIGURE 5-13: The Hourly Activity screen breaks down the last week by hour.
Viewing your stationary time
It’s hard to get through the day without seeing a headline of the form “Sitting is the new x,” where x is smoking or sugar or cancer or some other very bad thing. I talk about this in greater detail in Chapter 11, but for now let me just say that about a billion studies have proven that sitting too much is extremely bad for you. Therefore, although being active throughout the day is vital to your overall health, it’s also important to keep an eye on how much time you don’t move during the day. You should be aware of two stats when you monitor your stationary time:
- The longest stationary period during the day
- The total amount of time you’re stationary during the day — expressed as the number of hours and minutes you don’t move or as a percentage of the total time
To monitor these stats, follow these steps:
- Open the Dashboard on either the Fitbit app or Fitbit.com.
-
Click the hourly activity metric.
The Hourly Activity screen appears.
-
Click the day you want to examine.
Fitbit displays a summary of that day’s hourly activity, as shown in Figure 5-14. The summary includes values for Longest Stationary Period and All Day Breakdown, which displays the stationary time as a total and as a percentage.
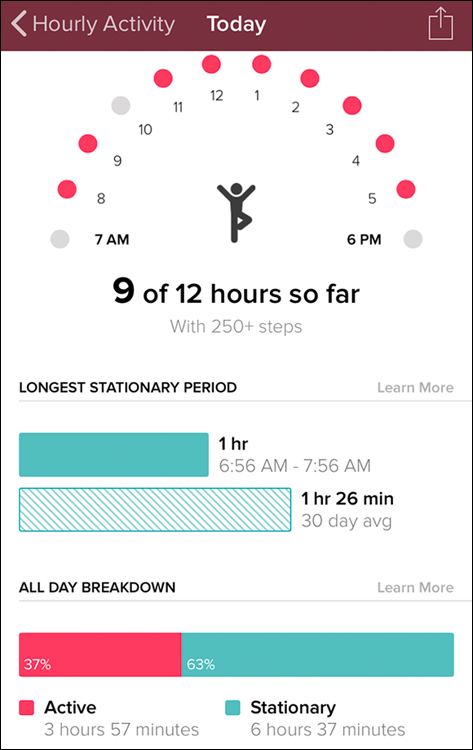
FIGURE 5-14: The hourly activity summary includes stats for longest and total stationary time.
Earning Active Minutes
Earlier in this chapter I mentioned that any activity is good for heart and mind because moving is always better than sitting down or standing in one place. I stand by (walk with?) that, but it doesn’t tell the entire story. Yes, it’s true that moving is good, but moving moderately faster is better than moving slowly. When you pick up the pace to a brisk walk, a determined march, or even a slow jog, your heart rate goes up, your muscles work a bit harder, and you burn more calories.
Whatever your goal — getting fit, losing some fat, or dropping a few pounds — you won’t get there unless some of your activity can be characterized as moderately intense. Fitbit describes time spent in moderate intensity (or faster) activities as active minutes, and in this section I tell you all you need to know about this crucial metric.
Understanding metabolic equivalents
Okay, so let me start with the question that I’m sure you’re shouting at the book right now, “How do I define moderately intense?” One straightforward way is to compare the energy (calories) you use during an activity with the energy you use when you’re not doing anything. A body at rest still expends some energy to keep the lights on, so to speak (that is, keep the heart beating, the lungs breathing, food digesting, and so on). The rate of energy you expend is called your metabolic rate.
To compare different types of activities, exercise eggheads came up with a measure called metabolic equivalent of task, or MET. One MET is defined as the amount of energy you expend when you’re at rest. If you do something that expends twice as much energy as you do at rest, that activity is said to require two METs of energy expenditure.
Okay, we’re almost there. We can now use METs to define three types of activity intensity based on how much energy they require you to expend:
- Easy intensity: Any activity that requires less than three METs. For example, walking at two miles per hour (very slow indeed) expends 2.5 METs. On an effort scale of 0 to 10 (where 0 is doing nothing and 10 is as hard as you can go), easy activities feel like a 3 or a 4. Your breathing and heart rate should stay normal or show at most a slight increase.
- Moderate intensity: Any activity that requires at least three METs but less than six METs. For example, walking at three miles per hour (a decent pace) expends 3.5 METs, while kicking it up to four miles per hour (very brisk) expends 5 METs. On an effort scale of 0 to 10, moderate activities feel like a 5 or a 6. Your breathing and heart rate should show a noticeable increase.
- Vigorous intensity: Any activity that requires at least six METs. For example, jogging at six miles per hour (ten minutes per mile) expends 9.8 METs. On an effort scale of 0 to 10, vigorous activities feel like a 7 or an 8. Your breathing and heart rate should show large increases, but you shouldn’t feel completely out of breath.
Okay, so you go out and walk at three or four miles per hour for 60 seconds and you earn yourself an active minute on your Fitbit Dashboard, right? Not so fast, friend. For a moderate intensity (or vigorous intensity) activity to do you good, it must be maintained for at least ten minutes. Therefore, you get credit for active minutes on your Fitbit only if you perform a moderate or vigorous intensity activity for at least ten minutes.
Table 5-1 shows a few activities and the METs they expend.
TABLE 5-1 Example Activities and Their METs
|
Activity |
METs |
|
Easy intensity (< 3.0) | |
|
Light household cleaning (dusting, sweeping, and so on) |
2.3 |
|
Walking at 2.0 mph |
2.5 |
|
Walking at 2.5 mph |
2.9 |
|
Moderate intensity (>= 3.0 and < 6.0) | |
|
Walking at 3.0 mph |
3.5 |
|
Moderate outdoor work (digging, spading, and so on) |
3.5 |
|
Moderate household cleaning (vacuuming, mopping, cleaning windows, and so on) |
3.5 |
|
Moderate outdoor work (raking leaves, trimming shrubs, weeding, and so on) |
4.0 |
|
Pushing a stroller at 3.0 mph |
4.0 |
|
Climbing stairs (slow) |
4.0 |
|
Golf (no cart; carrying your clubs) |
4.3 |
|
Chopping wood (moderate effort) |
4.5 |
|
Walking at 4.0 mph |
5.0 |
|
Kayaking (moderate effort) |
5.0 |
|
Skiing or snowboarding (moderate effort) |
5.3 |
|
Canoeing (moderate effort) |
5.8 |
|
Swimming (moderate effort) |
5.8 |
|
Vigorous intensity (>= 6.0) | |
|
Vigorous outdoor work (hand mowing, shoveling snow, and so on) |
6.3 |
|
Dancing |
7.8 |
|
Hiking with a daypack |
7.8 |
|
Walking at 3.0 mph uphill (6% to 15% grade) |
8.0 |
|
Climbing stairs (fast) |
8.8 |
|
Swimming (vigorous effort) |
9.8 |
|
Running at 6 mph (10 minutes per mile) |
9.8 |
|
Running at 6.7 mph (9 minutes per mile) |
10.5 |
|
Running at 7.5 mph (8 minutes per mile) |
11.8 |
|
Running up stairs |
15 |
Monitoring today’s active minutes
Most health and fitness professionals recommend that children, adults, and seniors should perform a minimum number of minutes of moderate intensity activity per week. The specific minimums vary, but the following are the most common:
- Children (ages 6 and up): At least 60 minutes per day
- Adults: At least 150 minutes per week (about 22 minutes per day)
- Seniors: At least 150 minutes per week, or as many minutes as health and physical ability will allow
Use these numbers to set your daily goal for the active minutes metric (see “Setting your daily activity goals,” earlier in the chapter), and then use Fitbit to monitor your active minutes throughout the day:
-
Ace, Alta, or Alta HR: Wake the Fitbit and then tap the screen until you see the active minutes.
On most Fitbit platforms, the active minutes metric is indicated by the lightning bolt icon. - Charge 3, Inspire, or Inspire HR: Wake the device and then swipe up until you see the active minutes.
- Flex 2: This device doesn’t show active minutes, so you need to use either the Fitbit app or Fitbit.com, as I describe later in this list.
- Ionic or Versa: Wake the device, display the clock (if it’s not displayed already), and then swipe up from the bottom of the screen to open the Today app, which initially shows today’s step count. Swipe left until you see the active minutes value, shown in Figure 5-15, left.
- Fitbit app: Open the Dashboard and view the active minutes metric, pointed out in Figure 5-15, right.
- Fitbit.com: Log in to your Fitbit account to open the Dashboard, and then view the Active Minutes tile.

FIGURE 5-15: Active minutes in the Today app (left) and as it appears in the Fitbit app’s Dashboard (right).
Viewing your active minutes history
If you want to get a larger sense of how you’re doing with the active minutes metric, you need to go beyond what’s happening today and dive into your historical data. By studying the active minutes you’ve accumulated on previous days, you can see how often you’re meeting your goal and whether you need to adjust that goal up or down.
Assuming you’ve synced your Fitbit device recently, you can view your active minutes history by using the Dashboard on either the Fitbit app or the Fitbit.com website:
- In the Dashboard, click the Previous icon (<) to go back one day. After you’ve gone back one or more days, you can also click the Next icon (>) to move forward a day.
- In the Dashboard, click the active minutes metric. Fitbit opens the Active Minutes screen, which displays a chart of the previous seven days’ worth of active minutes and how they compare to your goal, as shown in Figure 5-16. You can scroll down to see the active minutes from previous days, and you can click any day to see a timeline of when the active minutes occurred.

FIGURE 5-16: The Active Minutes screen displays your historical active minutes data.
Going the Distance: Measuring How Far You Walked or Ran
Unless you’re a runner or a cyclist, the distance you cover during the day is less important than either the number of steps you take or the active minutes you chalk up. However, that doesn’t mean that you should ignore Fitbit’s distance metric, because it can be a good indicator of improving fitness. For example, suppose when you were starting out you walked for 30 minutes and your Fitbit said that you covered 1.5 miles during that walk. Now, six months later, for that same 30-minute walk, your Fitbit says that you covered 2 miles. That 33 percent distance increase means you’re walking faster, which tells you you’re getting fitter.
How does your Fitbit know how far you’ve propelled yourself during the day? It depends:
- All Fitbit devices that track distance do so by multiplying the number of steps you take by the length of your stride. That stride length is an educated guess on Fitbit’s part based on your height and gender. Note, too, that Fitbit stores two stride lengths for you: one for walking and another for running
- The Fitbit Ionic watch comes with its own GPS (Global Positioning System) receiver, so it uses that signal to track your location and calculate the distance you travel. Note that the device uses GPS for only certain activities that you initiate using the Exercise app, such as running and walking. (See Chapter 9 for details.) The Ionic doesn’t use GPS for regularly tracked activities.
- The Fitbit Versa watch and the Charge 3 and Inspire HR wristbands piggyback on your smartphone’s GPS receiver and calculate your distance using that signal. As with the Ionic, these trackers use GPS only for activities initiated through the Exercise app.
Setting your stride length
Given the height and gender info that you gave when setting up your Fitbit account (see Chapter 3), Fitbit uses some standard calculations to come up with lengths for your walking and running strides. Those calculations usually work fine for most people, but some of us have legs that are shorter or longer than average, while others have walking or running mechanics that dictate a stride length that’s shorter or longer than average. Any of these anomalies could cause the distance calculation to be too short or too long. Fortunately, if that’s the case for you, Fitbit enables you to edit your calculated stride lengths with your actual stride values.
 If you have a Fitbit that uses GPS, each time you go on a run of at least ten minutes, the device compares the distance you ran (determined via GPS) to the distance the device thinks you ran (calculated by multiplying your steps by your running stride length). If there’s a discrepancy, Fitbit adjusts your running stride length measure so that the distance calculation matches the GPS value.
How do you figure out the lengths of your walking and running strides? Here’s the easiest method:
- Find a running track or some other route or trail where you know the exact distance.
- Walk at you’re your normal pace one lap around the track (or whatever) and count your strides (both left and right) as you go.
- Divide the distance you walked — in feet or centimeters, depending on which measurement you’re using — by the total number of strides you took to traverse the distance. For example, if the lap is 440 yards (5,280 feet) and you took 1,800 strides, your stride length is 5,280 ÷ 1,800, or 2.9 feet.
- Repeat Steps 1 through 3 for your running stride, but run instead of walk in Step 2.
You’re now ready to enter your custom stride lengths in your Fitbit account.
Entering custom stride lengths by using the Fitbit app
Follow these steps to use the Fitbit app to plug in your custom stride lengths:
- Click Dashboard ⇒ Account.
- Click Advanced Settings.
-
Click Stride Length.
The Stride Length screen appears.
-
Click the Set Automatically switch to off.
In the Windows 10 app, click the Auto switch to off.
- In the Walking Stride Length box, enter the length of your walking stride.
- In the Running Stride Length box, enter the length of your running stride.
-
Click the Back icon (<) until you reach the Account screen, click your device, and then click Sync.
Your Fitbit device now uses your custom stride lengths for its distance calculations.
Entering custom stride lengths by using Fitbit.com
Follow these steps to use Fitbit.com to specify your custom stride lengths:
- Surf to
www.fitbit.comand log in to display the Dashboard. - Click View Settings ⇒ Settings.
-
Under the Advanced Settings heading, click Stride Length.
The Stride Length screen appears.
- Select the Set Your Own button.
- In the Walking box, enter your length of your walking stride.
- In the Running box, enter your length of your running stride.
-
Click Submit.
The next time you sync your Fitbit, the device will use your custom stride lengths for distance calculations.
Monitoring today’s distance
Following are the various ways that Fitbit offers to monitor your daily distance:
-
Ace, Alta, or Alta HR: Wake the Fitbit and then tap the screen until you see the distance value.
On most Fitbit platforms, the distance metric is indicated by the map marker icon (similar to the location marker in mapping software such as Google Maps), labeled in Figure 5-17, left. - Charge 3, Inspire, or Inspire HR: Wake the device and then swipe up until you see the distance.
- Flex 2: This device doesn’t show distance, so you need to use either the Fitbit app or Fitbit.com, as I describe later in this list.
- Ionic or Versa: Wake the device, display the clock (if it’s not displayed already), and then swipe up from the bottom of the screen to open the Today app, which initially shows today’s step count. Swipe left until you see the distance metric, shown in Figure 5-17, left.
- Fitbit app: Open the Dashboard and view the distance metric, as shown in Figure 5-17, right.
- Fitbit.com: Log in to your Fitbit account to open the Dashboard, and then view the Distance tile.

FIGURE 5-17: The distance metric in the Today app (left) and in the Fitbit app’s Dashboard (right).
Viewing your active minutes history
If you’ve set a daily distance goal (see “Setting your daily activity goals,” earlier in the chapter), you can monitor how you’re doing by eyeballing your distance history using the Dashboard on either the Fitbit app or the Fitbit.com website:
- In the Dashboard, click the Previous icon (<) to go back one day. After you’ve gone back one or more days, you can also click Next icon (>) to move forward a day.
- In the Dashboard, click the distance metric. Fitbit opens the Distance screen, which displays a chart of the previous seven days of distance values and how they compare to your goal, as shown in Figure 5-18. You can also scroll down to see the distances from previous days, and you can click any day to see a timeline of when the distances occurred during the day.
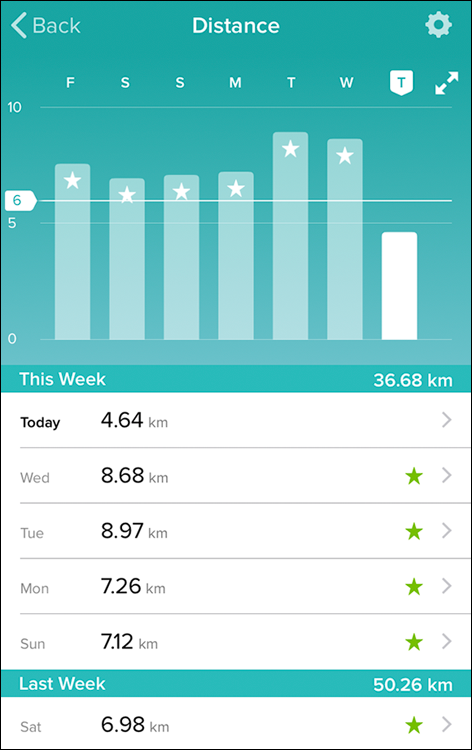
FIGURE 5-18: The Distance screen displays your historical distance data.
Moving on Up: Tracking Floors Climbed
If you glance back at Table 5-1, you’ll see that although slow walking (at two mph) expends a mere 2 METs, climbing the stairs at a slow pace requires double the energy: 4 METs. Climb those same stairs at a quick pace, and your energy output climbs to an impressive 8.8 METs.
Clearly, climbing — whether it’s ascending one or more flights of stairs or going up a hill or an inclined road — is great exercise. All the more reason to monitor Fitbit’s floors climbed metric, where Fitbit (using its built-in altimeter) defines a floor as a climb of ten vertical feet.
Monitoring today’s floors climbed
Assuming you’ve set your daily goal for the floors climbed metric (see “Setting your daily activity goals,” earlier in this chapter), here’s how to use Fitbit to monitor your floors climbed throughout the day:
-
Ace, Alta, or Alta HR: Wake the Fitbit and then tap the screen until you see the floors climbed.
On most Fitbit platforms, the floors climbed metric is indicated by the stairs icon. - Charge 3, Inspire, or Inspire HR: Wake the device and then swipe up until you see the floors climbed.
- Flex 2: This device doesn’t show floors climbed, so you need to use either the Fitbit app or Fitbit.com, as I describe later in this list.
- Ionic or Versa: Wake the device, display the clock (if it’s not displayed already), and then swipe up from the bottom of the screen to open the Today app, which initially shows today’s step count. Swipe left until you see the floors climbed value, shown in Figure 5-19, left.
- Fitbit app: Open the Dashboard and view the floors climbed metric, labeled in Figure 5-19, right.
- Fitbit.com: Log in to your Fitbit account to open the Dashboard, and then view the floors climbed tile.

FIGURE 5-19: The floors climbed metric in the Today app (left) and in the Fitbit app’s Dashboard (right).
Viewing your floors climbed history
To look for patterns in your floors climbed data and to see how you’re doing with respect to your floors climbed goal, you can view your floors climbed history by using the Dashboard on either the Fitbit app or the Fitbit.com website:
- In the Dashboard, click the Previous icon (<) to go back one day. After you’ve gone back one or more days, you can also click the Next icon (>) to move forward a day.
- In the Dashboard, click the floors climbed metric. Fitbit opens the Floors Climbed screen, which displays a chart of the previous seven days of floors climbed and how they compare to your goal (see Figure 5-20). You can also scroll down to see the floors climbed from previous days, and you can click any day to see a timeline of when the floors climbed occurred during the day.

FIGURE 5-20: The Floors Climbed screen displays your historical floors climbed data.
Achievement Unlocked: Earning Activity Badges
To help motivate and challenge you, Fitbit offers a large collection of badges that you earn by performing certain activities, such as reaching a particular number of steps in a day, surpassing a specified number of floors in your lifetime (that is, since joining Fitbit), or reaching a weight goal. Dozens of badges are available. Here’s a sampling:
- Sneakers: Walk or run 10,000 steps in a day
- Urban boots: Walk or run 15,000 steps in a day
- Olympian sandals: Walk or run 100,000 steps in a day
- Marathon: Walk or run 26 miles since joining Fitbit
- London: Walk or run 250 miles since joining Fitbit
- Pole to pole: Walk or run 12,430 miles since joining Fitbit
- Happy hill: Climb 10 floors in a day
- Redwood forest: Climb 25 floors in a day
- Skyscraper: Climb 100 floors in a day
- Helicopter: Climb 500 floors since joining Fitbit
- Skydiver: Climb 1,000 floors since joining Fitbit
- Satellite: Climb 35,000 floors since joining Fitbit
- Weight goal met: Reach your weight goal
- 10-pound weight loss: Lose 10 pounds since setting your weight goal
- 100-pound weight loss: Lose 100 pounds since setting your weight goal
To see the full list of badges, go to https://blog.fitbit.com/fitbit-badges/.
Viewing your badges using the Fitbit app
To see the badges you’ve earned so far, follow these steps in the Fitbit app:
- Click Dashboard ⇒ Account.
- Click View Your Profile.
-
Click Badges and Trophies.
The Fitbit app displays your top four badges.
-
Click Badge Collection.
The Fitbit app displays every badge you’ve earned.
Viewing your badges using Fitbit.com
Follow these steps to use Fitbit.com to see the badges you’ve earned:
- Surf to
www.fitbit.comand log in to display the Dashboard. - Hover the mouse pointer over the Badges tile and click the Next icon (>) or Previous icon (<) to navigate your top four badges.
-
Hover the mouse pointer over the Badges tile and click See More.
Fitbit.com displays every badge you’ve earned. Note that you can also display this page directly by heading to
www.fitbit.com/badges.