Chapter 3
Getting Started
IN THIS CHAPTER
 Taking the first steps with your new Fitbit device
Treating yourself to a Fitbit account
Getting familiar with the Fitbit app
Setting up the Fitbit app to suit your style and goals
Learning some useful techniques for working with your Fitbit
Well begun is half done, as the old saying goes, so it pays to set aside some time at the start of your soon-to-be illustrious Fitbit career to learn some crucial basics and take care of important details. Sure, the all-but-impossible-to-resist temptation is to rip your shiny, new Fitbit out of its packaging, slap it on your wrist, and start stepping out. I did exactly that when I got my first Fitbit, and as fun as it was to jump into the deep end of the self-tracking world, I soon found myself perplexedly scratching my head over a few things.
This chapter helps you avoid the same sorry fate by showing you some basics, such as charging your device, setting up a Fitbit account, and installing the Fitbit app and connecting it to your device. You also learn some useful account and app customizations, set up your health and fitness goals, and find out how to work with your device. It might seem like a lot of effort compared to just putting on your tracker, but you’ll thank me in the end.
Charging Your Fitbit
Right out of the box, your Fitbit’s battery is partially charged, so your first order of business is to get your device’s battery topped up and ready for action. How you charge your Fitbit depends on the device:
- Ace, Alta, Alta HR, Charge 3: Plug the USB end of the charging cable into a powered USB slot. Clip the other end of the cable to the back of your Fitbit, making sure that the pins inside the clip align with the gold connectors on the back of the Fitbit. When the charging cable is connected properly, the device vibrates briefly and the Fitbit logo or the battery icon appears.
- Aria 2: The Aria ships with three AA batteries preinstalled, so no charging is required. To enable the initial power-up of the Aria, pull to remove the plastic tab poking out of the battery compartment.
- Flex 2: Plug the USB end of the charging cable into a powered USB slot. Remove the Flex 2 from its wristband, clip the other end of the charging cable to the back of your Fitbit, making sure that the pins inside the clip align with the gold connectors on the back of the Fitbit. When the charging cable is connected properly, the device vibrates briefly and the charge indicator lights blink.
- Inspire, Inspire HR, or Ionic: Plug the USB end of the charging cable into a powered USB slot. Hold the other end of the cable near the back of the tracker and let the built-in magnet guide the cable’s connector into the tracker’s port. When the tracker is connected properly, the Fitbit logo and then the current battery percentage appear onscreen.
- Versa: Plug the USB end of the charging cable into a powered USB slot. Pinch the spring clip on the other end of the cable and then lay the Versa into the charging cradle with the front of the watch facing you and the gold contacts on the back of the watch aligned with the pins in the cradle. Release the spring clip. When the Versa is connected properly, you see the current battery percentage onscreen.
- Zip: The Zip comes with a CR2025 battery that you need to install, so no charging is required. To install the battery, insert the battery door tool into the slot on the back of the Zip, rotate counterclockwise until the arrow on the door aligns with the unlock icon on the device, and then remove the battery door. Insert the battery, making sure the side with the + icon is facing you. Align the arrow on the battery door with the unlock icon on the back of the Zip, and then use the battery door tool to rotate the door clockwise until the door arrow aligns with the lock icon.
 For Fitbit devices that require charging, allow two or three hours for the charge to complete before using the device.
Getting the Fitbit App
Here are a few questions about Fitbit that may or may not have occurred to you:
- Fitbits such as the Ace and the Alta display only your daily stats. How can you configure these devices?
- Your Fitbit seems happy to track your health and fitness numbers, but is there a way to save each day’s results?
- You gave Fitbit some vital statistics (such as your weight) during the setup process, but how do you change that info later?
- Fitbit can play music, but how does Fitbit know whether to use your own music or a service such as Deezer or Pandora?
These are great questions, and they all have the same answer: Use the Fitbit app, which is a program that you download to your smartphone, tablet, or PC. The Fitbit app connects to your Fitbit device, which then enables you to configure the device, save your stats, change your personal info, and set up third-party services such as a music provider.
Okay, so what do you need to get the Fitbit app? Either of the following:
- A smartphone or tablet that meets one of these qualifications:
- An Android phone or tablet running Android 5 or later
- An iPhone or iPad running iOS 10 or later
- A Windows 10 PC running Windows 10 version 1607 or later
- If you have one of these devices, go to your device’s app store, search for the Fitbit app, and install it.
- An older Windows PC or a Mac: If you don’t have a device that can run the Fitbit app, you can still do the Fitbit thing using an application called Fitbit Connect, which works with a variety of operating systems, including the following:
- All versions of macOS
- OS X Leopard or later
- Windows XP
- Windows 7
- Windows 8.1
- Early versions of Windows 10 (that is, versions prior to 1607).
- Point your web browser to
www.fitbit.com/setup, click the Download link, and then double-click the downloaded file to install Fitbit Connect on your computer.
Either way, your first app task is to sign up for a Fitbit account, as I describe next.
Signing Up for a Fitbit Account
When you first open the Fitbit app (or Fitbit Connect), you’re prompted to sign up for a Fitbit account (or to log in with your Fitbit credentials, if you already have an account). Figure 3-1 shows the initial screen that appears for the Fitbit app on an iPhone.

FIGURE 3-1: The iPhone version of the Fitbit app’s initial screen.
Follow these steps to join Fitbit:
-
Select Join Fitbit.
If you already have a Fitbit account, select Log In instead, enter your account email and password, and then select Log In again. You’re done here, so feel free to merrily skip over the rest of these steps.
The app displays a list of Fitbit devices.
-
Select the type of Fitbit device you’re setting up.
In some cases, you see a second screen that displays a list of device subtypes. If you see such a screen, select the subtype of the device you’re setting up.
- Select a button to continue:
- Android: Select Set Up Your Fitbit Device, where Device is the name of the device you selected in Step 2. The Fitbit app displays the Let’s Get Started screen, which is similar to the screen shown in Figure 3-2 except that it doesn’t include the First Name and Last Name fields.
- iOS: Select Set Up. The Fitbit app displays the Enter Your Account Details screen, as shown in Figure 3-2.
- Windows 10: Select Set Up Your Device, where Device is the name of the device you selected in Step 2. The Let’s Get Started screen appears, which is similar to the screen shown in Figure 3-2, without the First Name and Last Name fields.
-
Enter the email address and password you want to use for your Fitbit account.
If you’re running the Fitbit app on an iOS device, enter your first and last names, as well.
- Select the I Agree to the Fitbit Terms of Service check box.
- (Optional) If you want to receive the latest Fitbit announcements and special offers, select the Keep Me Updated about Fitbit Products, News and Promotions check box.
-
Select Next.
If you’re using the Windows 10 version of the Fitbit app, select Create Account, instead.
If you’re using the iOS version of the app, on the next screen tap Let’s Go.
The Fitbit app prompts you to enter some info about yourself, such as your birthday, height, weight, and sex. How you enter this data depends on the version of the app. In the iOS version, you run through a series of screens. In the Android and Windows 10 version, you see the About You screen. Figure 3-3 shows the About You screen that appears in the Windows 10 version of the Fitbit app.
Why does Fitbit want to know such intimate details about your life? It’s all in the service of enabling you to better track your health and fitness. Knowing your age, height, weight, and sex means Fitbit can generate more accurate statistics such as how far you walk or run each day and the number calories you burn during this activity. You might be tempted to fudge the data a bit, but you’ll get more out of your Fitbit investment if you enter accurate data. -
Enter your personal data, then select Create Account (iOS), Create an Account (Android), or Save (Windows 10).
If you see an alert asking you to turn on Bluetooth, go ahead and select OK.
The app displays the Fitbit terms and policies.
-
Pretend to read the legalese and then tap I Agree.
The Fitbit app now starts the process of configuring the device you selected way back in Step 2. I talk about this configuration stage in more detail in the section that follows.

FIGURE 3-2: The Enter Your Account Details screen as it appears on an iPhone.
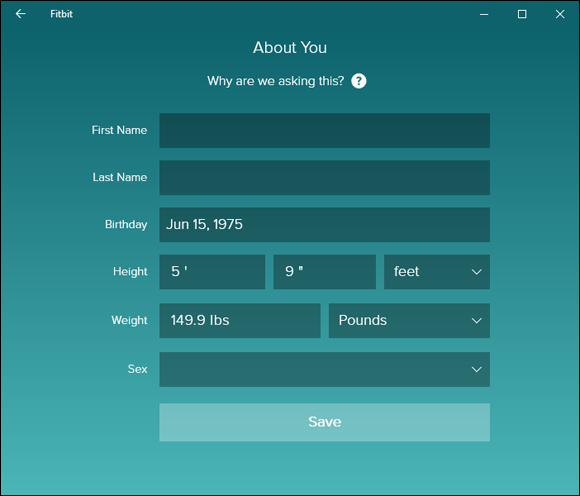
FIGURE 3-3: Windows 10 users see this version of the About You screen.
Connecting Your Fitbit Device
The setup process has two main stages: getting you signed up for a Fitbit account and configuring your Fitbit device. I went through the steps for getting your Fitbit account in the preceding section, so now it’s time to look at configuring your device.
If you’re setting up a Fitbit Ace for a child, you don’t set up the device directly as I describe in this section. Instead, you need to create a family account and then add your child’s Ace from there. See Chapter 4 for details.
First, you need to check the following:
- Make sure your Fitbit device is charging, as I described earlier in the “Charging Your Fitbit” section.
- For most Fitbit devices, make sure the device that’s running the Fitbit app has Bluetooth enabled.
- For some Fitbit devices — particularly the Ionic and Versa watches and the Aria 2 smart scale — make sure the device that’s running the Fitbit app is connected to Wi-Fi.
 Wait, what if the device that’s running the Fitbit app doesn’t have Bluetooth? That’s a drag, but you’re not out of luck. You need to purchase Fitbit’s wireless sync dongle, which is available from
 www.fitbit.com/store#accessories.
There are two ways to get started:
- If you’re setting up your first Fitbit device, you should have completed the first part of the setup process, as I discussed in the preceding section.
- If you’re configuring another Fitbit device, note that you can connect to only one Bluetooth-based device at a time, so connecting to a second device will replace the original device in your account. If that’s cool with you, use the Fitbit app to launch the setup process by selecting the Dashboard tab, selecting the Account icon in the top-right corner of the app window, and then selecting Set Up a Device. In the device list displayed by the Fitbit app, select the device you’re setting up and then select a device subtype, if asked. Select Set Up (or Set Up Your Device) or, if you’re setting up a second device that will replace the original, select Switch to Device. Select I Agree when the terms and policies show up.
Now follow these steps:
-
For most Fitbit devices, you first see one or more screens that explain the basic device components and charging instructions. Select Next on each screen.
After the introductory formalities, the Fitbit app uses Bluetooth to look for your Fitbit device. Make sure your Fitbit device and your app device are within 33 feet of each other. When the app locates your Fitbit device, the app displays a four-digit number of the device screen.
-
In the Fitbit app, enter the four-digit code that you see on the Fitbit device display.
The Fitbit app device asks whether you want to allow the device to connect to — that is, pair with — the Fitbit app.
- Select Pair (iOS) or Allow (Windows 10).
-
For Fitbit devices that use Wi-Fi, select Next to display a list of nearby Wi-Fi networks. Select your Wi-Fi network, enter the network password, and then select Connect (iOS) or OK (Android).
At this point, the Fitbit app checks to see if your Fitbit device is using the latest software. If not, the app will prompt you to update the device:
- For devices connected to Wi-Fi, the update occurs over the Wi-Fi network’s internet connection.
- For all other devices, the update occurs over the Internet connection of the device running the Fitbit app. This process requires a Bluetooth connection between the devices, so make sure the devices are close to each other.
-
Select Update Device (iOS; where Device is the type of Fitbit device you’re configuring) or Next (Android or Windows 10) to perform the update.
After the update is complete, the rest of the setup process consists of one or more screens that introduce you to your new Fitbit.
- Select Next on each screen to run through introduction.
Removing a Fitbit Device from Your Account
If you sell, give away, or lose your Fitbit device, you need to remove it from your account:
- Android: In the Dashboard, tap the Account icon in the top-right corner, tap the device you want to get rid of, and then tap Remove (the trash can icon in the top-right corner). When the app asks you to confirm, tap Unpair.
- iOS: In the Dashboard, tap the Account icon in the top-right corner, tap the device you want to get rid of, and then tap Remove This Device (where Device is the Fitbit device type). When the app asks you to confirm, tap Remove This Device.
- Fitbit.com: Surf to
www.fitbit.com, log in to your account, select View Settings, and then select your Fitbit device. Select Remove This Device From Your Account (where Device is your Fitbit’s device type). When you are asked to confirm, select Remove.
Taking a Tour of the Fitbit App
Before going any further (both literally and figuratively), you should take a minute or three to acquaint yourself with the layout of the Fitbit app land. To get some landmarks in view, Figure 3-4 shows the iPhone version of the app — the Android version is nearly identical — and Figure 3-5 shows the Windows 10 version.

FIGURE 3-4: The iPhone version of the Fitbit app.

FIGURE 3-5: The Windows 10 version of the Fitbit app.
As pointed out in both Figures 3-4 and 3-5, the Fitbit app offers the following features:
- Fitbit device: This icon represents your connected Fitbit device. See “Working with Your Fitbit,” later in this chapter.
- Account: Tap this icon to access the Account page, which you can use to view and edit your Fitbit profile, set up a family account, add devices, set goals, adjust privacy and security options, and adjust app settings.
- Dashboard: Select this icon to display the Dashboard screen, which displays a summary of the progress of today’s health and fitness metrics. Each metric appears in a special rectangle called a tile. You can use the Previous Day and Next Day arrows to navigate your historic data.
- Challenges: Select this icon to open the Challenges screen, which you can use to sign up for races and adventures, and compete against family and friends (see Chapter 4).
- Guidance: Select this icon to see the Guidance screen, which gives you access to Fitbit-generated workouts.
- Community: Select this icon to open the Community page, where you can connect with friends, join Fitbit groups, and share your latest health or fitness achievements with other Fitbit users. See Chapter 4 to learn the details.
- Notifications: Select this icon see your most recent notifications from the app. Select the Messages tab to see your latest messages from your Fitbit friends.
Customizing Your Fitbit Account
The Fitbit app offers lots of ways to customize your Fitbit experience to help you get the most out of your tracker and your account. You can configure the dashboard, customize your profile, change app settings, and more.
Configuring the Fitbit app dashboard
When you’re using the Fitbit app, you’ll spend the bulk of your time obsessing over — er, I mean, studying — the metrics to track your progress today and to compare your recent data with past achievements. However, right out of the box, the Dashboard is set up with a generic collection of tiles, some of which might not interest you. If that’s the case, it makes sense to simplify your life by customizing your Dashboard to show only the tiles you want to see and to rearrange the tiles to put the most important ones at the top for easy viewing. Just follow these steps:
- Select the Dashboard.
- Open the Dashboard for editing:
- Android: Scroll down to the bottom of the Dashboard screen and tap Edit. The Fitbit app displays a Remove (–) icon in the upper-left corner of each displayed tile and an Add (+) icon in the upper-left corner of each hidden tile.
- iOS: Scroll down to the bottom of the Dashboard screen and tap Edit. The Fitbit app displays a Remove icon (X) icon in the upper-left corner of each displayed tile and an Add (+) icon in the upper-left corner of each hidden tile.
- Windows 10: Select the Edit icon (pencil), which is labeled in Figure 3-5. The Fitbit app displays a Remove (X) icon in the upper-left corner of each displayed tile and an Add (+) icon in the upper-left corner of each hidden tile.
- Select the Remove icon (-) for each displayed tile you want to hide.
- Select the Add icon (+) for each hidden tile you want to display.
- To move a tile, drag it to the position you prefer.
- When you’re finished, turn off Dashboard editing:
- Android or iOS: Tap Done at the bottom of the screen.
- Windows 10: Select the Edit icon to turn it off.
Configuring your online Fitbit Dashboard
The Fitbit app’s Dashboard is the handiest way to monitor your health and fitness metrics, but what’s a numbers nerd to do if she doesn’t have the app handy? First, don’t panic! Second, calmly check to see if you have a web browser nearby. You do? Good. Now you can get your Fitbit fix by using the online version of the Dashboard.
Surf to www.fitbit.com and then log in to your Fitbit account. You see your Dashboard, which will look similar to the one in Figure 3-6.

FIGURE 3-6: Log in to Fitbit.com to see your online Dashboard.
Here are the techniques you can use to configure this Dashboard to suit your style:
- To rearrange the tiles, drag any part of a tile to the position you prefer.
- To hide a tile, hover the mouse cursor over the tile, select the Settings icon (gear) that appears just below the tile, select the Remove Tile button (or the trash can icon, if you don’t see the button), and then select Remove when Fitbit asks you to confirm.
- To display a hidden tile, first make sure that you’re displaying today’s metrics. Select the Menu icon (labeled in Figure 3-6), select the check box beside the tile you want to add, and then select Done.
Customizing your Fitbit profile
When you first signed up for a Fitbit account, the setup program asked you for some personal info, such as your birthday, weight, and height. Together, these and a few other stats and settings make up your Fitbit profile. To make changes to your existing profile data and to add personal info such as a flattering picture, your home country, and a short description of yourself, follow these steps:
- In the Fitbit app, select Dashboard ⇒ Account.
-
Select View Your Profile.
In the Android app, you don’t see the View Your Profile command, so instead tap your name near the top of the Account screen.
-
Select the camera icon that appears beside the default profile picture, give the app permission to use your device’s photos and camera, and then either take a new picture or select an existing picture.
You can also choose an image that appears in the header at the top of your profile page by selecting the camera icon that appears beside the default header image.
-
Select Personal.
The app displays the Personal screen, which contains your profile data.
- For each piece of info you want to edit, select the info and then make your changes. If you see a Save button, be sure to select it to save your changes.
To customize your profile online instead of in the app, point your trusty web browser to www.fitbit.com and log in to your account to display the Dashboard. Select View Settings (labeled in Figure 3-6), and then select Settings. You should now see the Personal Info page; if you don’t, select Personal Info.
Adjusting Fitbit app settings
As a final configuration chore before getting to the good stuff, you should adjust a few settings for the Fitbit app itself. These settings include the measurement units you prefer (such as miles or kilometers), your time zone, and on what day your week begins.
- In the Fitbit app, select Dashboard ⇒ Account.
-
Select Advanced Settings.
The Advanced Settings screen appears. Figure 3-7 shows the Android version.
-
To set the time zone:
 Don’t adjust the time zone unless you really have to, especially if the new time zone would roll back the time because you’ll lose all generated data between now and the new earlier time. A new time zone that rolls the time forward is problematic as well because it creates a gap in your data between now and the new later time.
 - Android: Tap the Automatic Time Zone switch to Off, tap Select Time Zone, and then tap the time zone you want to use.
- iOS: Tap the Set Automatically switch to Off, tap Time Zone, and then tap the time zone you want to use.
- Windows 10: Select Time Zone, select the Auto switch to Off, tap Time Zone, and then tap the time zone you want to use.
- To set your location (that is, your country):
- Android: Tap the Automatic Location switch to Off, tap Select Location, and then tap your country.
- iOS: Tap Location, tap the Automatic switch to Off, and then tap your country.
- Windows 10: Select Country, select the Auto switch to Off, and then tap your country.
-
To set the measurement units, select Units, and then select your preferred units for length, weight, and water consumption.
In the Android and iOS version of the Fitbit app, you can also select a measurement unit for swimming.
- To set the start of the week, select Start Week On and then select either Sunday or Monday.

FIGURE 3-7: The Android version of the Advanced Settings screen.
The Advanced Settings screen has quite a few other app settings, but I’ll hold off covering them here and instead tell you about them in the relevant sections of the book. (For example, I talk about setting the food database in Chapter 10.)
Setting Your Health and Fitness Goals
Every health and fitness expert worthy of the name will tell you that good intentions aren’t worth the proverbial hill of beans unless those intentions are anchored by realistic and measurable goals. Anyone can learn to shoot an arrow, but you know you’re getting better at it only if you aim for the bull’s-eye.
What kinds of goals should you set? The answer depends on what you’re trying to accomplish with your Fitbit. Following are six general categories of goals:
- Activity: The number of steps you take and the number of minutes you’re active each day
- Exercise: The number of days you exercise, that is, walk, run, bike, play sports, or perform some other aerobic exercise
- Weight: The body weight you’re shooting for
- Calories: The number of calories you consume each day
- Water: The number of glasses of water you drink each day
- Sleep: The number of hours you sleep each night
Setting your initial goals
The folks at Fitbit know the importance of goals, so the Fitbit app prompts you at the beginning to set some health and fitness targets. Here’s the procedure to follow:
- Launch the goal-setting process:
- Android: Tap the Let Us Help You Set Some Goals message.
- iOS or Windows 10: Select the Set Goals button.
-
In the initial screen, select Let’s Go.
As shown in Figure 3-8, the Fitbit app displays a list of goals, such as Manage My Weight and Up My Daily Steps and Activity.
-
Select the goal that means the most to you or is the best fit.
The app asks why that goal is important to you and offers several answers.
-
Select an answer.
The app presents several statements and asks which of them is most true about your health and fitness.
-
Select the statement that most accurately or strongly reflects how you feel.
The app lets you know that it has three recommended goals based on your answers.
-
Select Take a Look.
The app shows you the first goal. To describe this goal as “recommended” is disingenuous, to say the least, because the app offers no way to not choose this goal!
-
Adjust the goal, as needed (for example, by increasing or decreasing the number of steps), and then select Make This My Goal.
The app displays several more goals and asks you to choose two. Fortunately, these goals are optional, so you can choose as many or as few as you like.
- Select each goal you want to add, and then select Let’s Do This.
-
For each goal you selected, adjust the goal’s target value as needed and then select Make This My Goal.
Examples of target values include the number of minutes of activity each day and the number of days of exercise each week. When you’re finished, the app displays a summary of your goals.
When setting up the specifics of your goals, be realistic. If you make your goals too ambitious, you might get discouraged if you fall short each time. On the other hand, don’t make your targets too easy, or you might get bored. If you’re just starting out, it’s probably best to set the targets a little on the easy side; you can make them harder as you get into the swing of things. -
Select Looks Good.
The app sets your goals, and you can track your progress using the Goals section of the app’s Account page.

FIGURE 3-8: The Fitbit app asks you to select an initial goal.
Adjusting your goals
As you get healthier and more fit, you’ll want to nudge up your goal targets to keep improving and stay motivated. Similarly, if you find that your initial goals are too hard or too easy, you should adjust your targets accordingly so that you have proper goals to shoot for.
I go into more details about specific goals in the relevant sections of the book. If you’re not sure where to set your targets, see the chapters for activity, sleep, and so on in Part 2.
Here are the steps to follow to adjust your goal values:
- In the Fitbit app, select Dashboard ⇒ Account.
-
In the Goals section, select Activity to open the Activity Goals screen (see Figure 3-9). For each metric, tap the activity and then enter a new value.
In the Android or iOS app, when you’re finished, tap Back to return to the Account screen.
-
In the Goals section, select Exercise to open the Exercise Goals screen. Select the Weekly Exercise Goals value, and then select the number of days of exercise you want to shoot for each week. In the Android app, tap Save.
In the Android or iOS app, when you’re done, tap Back until you return to the Account screen.
-
In the Goals section, select Nutrition & Body to open the Nutrition & Body Goals screen. For each metric, select the goal and enter the new value.
In the Android or iOS app, when you’re done, tap Back until you return to the Account screen.
-
In the Goals section, select Sleep to open the Sleep Goals screen. Select the Time Asleep goal, and then follow the onscreen instructions.
For details, see Chapter 6.
In the Android or iOS app, when you’re done, tap Back until you return to the Account screen.

FIGURE 3-9: Set activity targets such as your daily steps, distance, and active minutes.
Working with Your Fitbit
I open this chapter by cautioning you to not just slap your new Fitbit onto your wrist and head out the door. If you heeded that advice, wow, thanks! Your patience will now be rewarded because it’s time for your wrist and your Fitbit to get acquainted. The rest of this chapter takes you through a few useful techniques and tips for getting you and your Fitbit on familiar terms.
Setting your Fitbit’s wrist placement
You wear your Fitbit on your wrist, but does it matter which wrist you use? Nope, not at all, as along as the Fitbit app knows two things: which wrist you’re using and which is your dominant hand (also known as your handedness). These tidbits are needed because Fitbit alters its tracking slightly if you’re using your dominant hand, which not only tends to get more overall use during the day but is also used for potentially tracker-confounding activities such as throwing a ball and giving a high five.
If you have the Alta HR, Charge 3, Inspire HR, Ionic, Versa, or another Fitbit device that monitors heart rate, position the tracker about a finger-width above your wrist bone for the most accurate heart rate readings. During exercise, shift the tracker to about three finger-widths above the wrist bone — and wear the device slightly tighter than usual — to keep the heart rate readings accurate.
You specified which wrist you’re using for your Fitbit during setup, but if you change wrists or if you want to make sure Fitbit is using the correct handedness value for you, following these steps:
- In the Fitbit app, select Dashboard ⇒ Account.
- Select your Fitbit device.
- Use the Wrist setting to choose the wrist on which you’re wearing your Fitbit: Left or Right.
- Tell Fitbit which is your dominant hand:
- Ace, Alta, or Alta HR: Use the Handedness setting to specify your handedness: Righty (that is, your right hand is dominant) or Lefty (your left hand is dominant).
- Charge 3, Flex 2, Inspire, Inspire HR, Ionic, or Versa: Use the Wrist Placement setting (or just Wrist on the Flex 2) to specify which wrist you’re using for your Fitbit: Dominant or Non-Dominant.
Navigating your Fitbit’s interface
Whether you want to see the current time, view your daily health and fitness stats, or crank up an app, you need to know how to wake and navigate your Fitbit. Here are the basics:
- Waking the screen automatically: When the Quick View or Screen Wake feature is on (the name depends on the Fitbit), you can wake your Fitbit device by turning your wrist towards you. To control the Quick View or Screen Wake feature:
- Ace, Alta, or Alta HR: In the Fitbit app, select Dashboard ⇒ Account, select your Fitbit device, and then toggle the Quick View switch On or Off.
- Charge 3, Ionic, Inspire, Inspire HR, or Versa: Press and hold down the Back button (see the next section), and then tap Screen Wake to toggle this setting between Auto (the feature is on) and Manual (the feature is off).
- Waking the screen manually: Double-tap the screen. If you have the Ace, Alta, Alta HR, or Flex 2, it’s best to double-tap the screen near the bottom edge (or the top edge) where it meets the wristband.
- Navigating the screen: After your Fitbit is awake, how you navigate the screen depends on the device:
- Ace, Alta, or Alta HR: Tap the display to jump to the next screen of your daily stats.
- Charge 3, Ionic, Inspire, Inspire HR, or Versa: Swipe up or down to navigate the screen vertically and view your daily stats; swipe left or right to navigate the screen horizontally and access your device’s apps.
Pushing your Fitbit’s buttons
Fitbit devices such as the Ace, Alta, and Alta HR have a pleasingly simple design consisting of a tappable display that connects to a wristband. But newer Fitbits — particularly the Inspire wristband and the Ionic and Versa watches — come with one or more buttons that you can press or hold down to navigate the device screen. Here’s a quick look at these buttons, where they’re located, and what you can do with them:
- Charge 3, Inspire, or Inspire HR: These devices have a single button on the left side of the display, as shown in Figure 3-10. You can press this button to wake the device and put it to sleep. Also, pressing this button while the device is awake takes you back to the previous level in the hierarchy. Press and hold down on the button for about two seconds to access the device’s quick settings.
- Ionic and Versa: These devices have three buttons: one on the left side of the display and two on the right, as shown in Figure 3-11:
- Back: Press this button to wake and sleep the device. Pressing this button when the device is awake takes you back to the previous level in the hierarchy. Press and hold down the button for about two seconds to access the device’s quick settings.
- Top: Press this button to wake the device. Pressing this button when the clock is displayed opens the app located in the top-left corner of the first app screen (see “Using apps on your Fitbit watch,” later in this chapter). You can also press and hold down the button for about two seconds to access the device’s notifications.
- Bottom: Press this button to wake the device. Pressing this button when the clock is displayed opens the app located in the bottom-left corner of the first app screen.
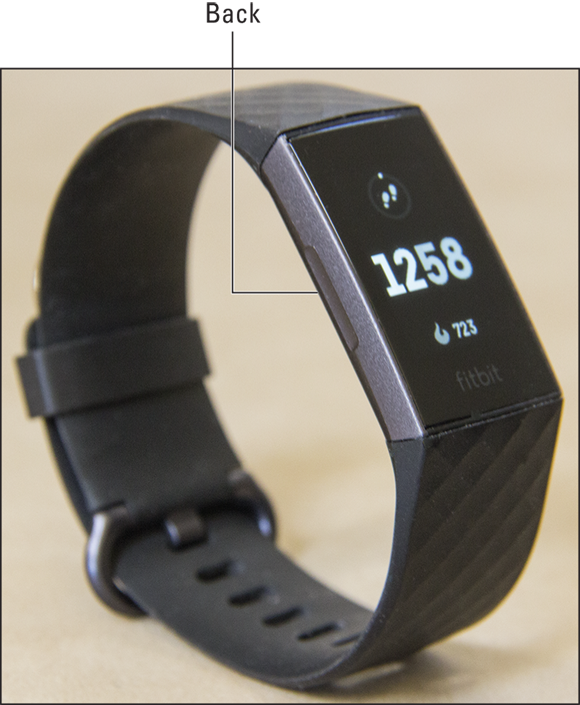
FIGURE 3-10: The Fitbit Charge 3 tracker has a single button.
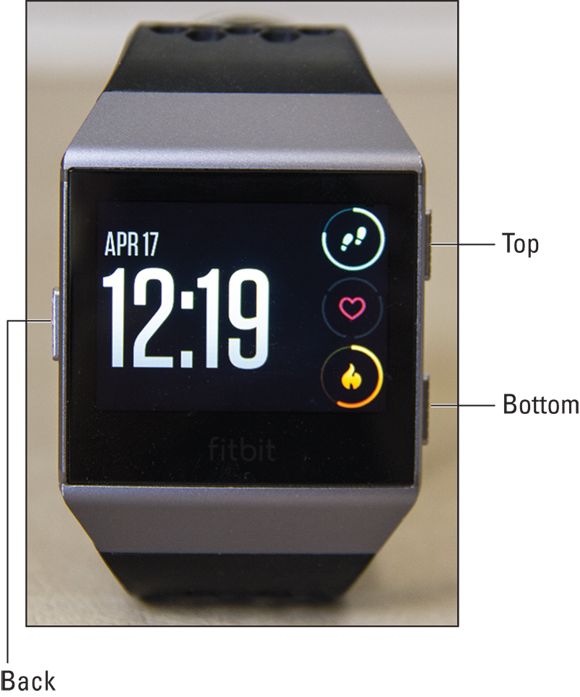
FIGURE 3-11: The Fitbit Ionic watch has three buttons.
Getting app notifications on your Fitbit
If your Fitbit is close enough to your phone, tablet, or computer for a Bluetooth connection, you can receive notifications for events such as an incoming call or text message, or a calendar alert. Getting notifications on your tracker can be handy because if you can’t see the screen of your other device, a quick glance at your wrist lets you know what’s going on. If you miss a notification, swipe down from the top of the device screen to see past notifications.
Customizing notifications
To set up which apps can send notifications to your Fitbit and to set a few other notification-related options, follow these steps:
- In the Fitbit app, select Dashboard ⇒ Account.
- Select your Fitbit device.
- Select Notifications.
-
If you see a message asking you to give Fitbit permission to make and manage phone calls, contacts, and text message, select Allow in each case.
Figure 3-12 shows the Android version of the Notifications screen that appears.
-
Use the Calls, Text Messages, and Calendar Events settings to enable, configure, or disable notifications for these events.
In the Android app, you can also set up notifications for Emails.
- To add notifications for other apps on your Android or iOS device, tap App Notifications and then select which apps you want to use.
- In the Android app, tap Quick Replies to set up reply shortcuts for each app currently displaying notifications on your Fitbit.
- In the Android app, if you want to receive notifications even if your device is in Do Not Disturb mode or Silent mode, tap the Always Vibrate switch to On.

FIGURE 3-12: You can customize Fitbit notifications.
Disabling notifications
In the Android app, you can disable all notifications by tapping the More icon (labeled in Figure 3-12) and then tapping Disable Notifications. In the Charge 3, Ionic, Inspire, Inspire HR, or Versa, you can disable notifications by pressing and holding down the device’s Back button to display the quick settings, and then tapping the Notifications setting to Off, as shown in Figure 3-13.
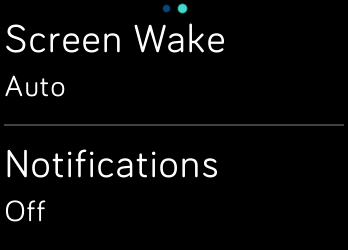
FIGURE 3-13: In the device’s quick settings, you can tap Notifications to Off.
Syncing your Fitbit
Your Fitbit device spends its day gathering info about your activities and body states, such as your heart rate. How does all that data get from your Fitbit to the Fitbit app? In a behind-the-scenes process called syncing, the device and the app connect to each other and the device passes along its latest hoard of data (and the app might send the device some stuff, too, such as updated settings or personal data).
Fortunately, you don’t have to worry about syncing most of the time because it’s set up by default to happen automatically, as follows:
- Every time you open the Fitbit app, as long as the app and the device are paired.
- Periodically throughout the day, as long as the app device and the Fitbit device are within range and you have the All-Day Sync option turned on. To check the latter, open the Fitbit app’s Dashboard, select the Account icon (labeled in Figures 3-4 and 3-5), select your Fitbit device, and then make sure the All-Day Sync switch is set to On.
If you don’t think you’re seeing the latest data in your Dashboard, you can make sure by syncing your Fitbit device manually. Make sure the Fitbit app device and the Fitbit device are within about 20 feet of each other, and then use the technique appropriate to your device’s operating system:
- Android or iOS: Display the Dashboard, pull down the screen until you see the Release to Sync message, and then release the screen. Alternatively, tap the Fitbit device icon and then tap Sync Now.
- Windows 10: Display the Dashboard, select the Fitbit device icon (labeled in Figure 3-4) and then select the Sync icon, shown in Figure 3-14. Alternatively, select the Account icon, select your Fitbit device, and then select Sync Now.

FIGURE 3-14: After you select the Fitbit device icon, select Sync to perform a manual sync.
Using apps on your Fitbit watch
Some Fitbit devices — notably the Ionic and Versa watches and the Charge 3 tracker — can run apps (or applications), which are mini-programs that perform specific tasks. Six default apps are installed on these devices:
- Alarms: Set up silent alarms that trigger at a time and day you specify. See Chapter 11.
- Exercise: Tell Fitbit that you’re performing a specific exercise session, such as a run or a weight workout. See Chapter 9.
- Relax: Perform guided deep-breathing for a specified time. See Chapter 11.
- Settings: Display settings and options for customizing the device.
- Timers: Set a countdown timer (discussed in Chapter 11) or use a stopwatch to time an event.
- Weather: Display the current weather in your area.
The Ionic and Versa watches have even more apps, including a few apps for connecting to third-party services such as Deezer, Strava, and Starbucks (see Chapter 14). In addition, the following apps help you get more out of your Fitbit:
- Coach: Access guided video workouts.
- Music: Play music that you’ve stored on your watch, as described in Chapter 14.
- Tips: Display a series of quick tips to help you learn more about your device.
- Today: Peruse your steps, heart rate, and other daily metrics. With the clock displayed, swipe up from the bottom of the screen to launch the Today app.
- Wallet: Use Fitbit Pay to make contactless payments.
That’s awesome, for sure, but you’ll no doubt be amazed to learn that there are thousands more apps available and you can install any of them on your Ionic or Versa watch (alas, these extra apps can’t be installed on the Charge 3).
Installing an app
Follow these steps to install an app:
- In the Fitbit app, select Dashboard ⇒ Account, and then select your Fitbit device.
- Select Apps.
- Select the All Apps tab.
- Locate an app that looks interesting or useful, and select Install.
-
If the app requests permissions, select the check box for each permission and then select Install.
The Fitbit app installs the app and adds it to the watch the next time it performs a sync.
Arranging apps
If you have an Ionic or Versa watch, you can change the order of the apps. This feature is useful if you use two apps most of the time: When the clock is displayed, pressing the Top button (refer to Figure 3-11) automatically opens the app that appears in the top-left corner of the first app screen, and pressing the Bottom button automatically opens the app that appears in the bottom-left corner of the first app screen.
To change the order of the app icons, follow these steps:
- Turn on the watch and make sure the clock is displayed.
- Swipe left until you get to the app screen you want to organize.
-
Press and hold down on the icon of the app you want to move.
The watch vibrates briefly and the app names disappear.
-
Drag the app icon to the location you want.
To navigate to the previous or next app screen, drag the icon to the left or right edge of the screen, respectively.
-
Release the icon.
Your Fitbit device places the app into the new position and rearranges the other app icons accordingly.
Uninstalling an app
If an app you installed has become bothersome or boring, get rid of it by following these steps:
- In the Fitbit app, select Dashboard ⇒ Account, and then select your Fitbit device.
- Select Apps.
- Select the My Apps tab.
-
Select Remove.
The Fitbit app uninstalls the app. Note that if you don’t see the Remove button, it means you can’t uninstall the app (which is the case for many default apps, such as Exercise and Settings).