Chapter 14
Ten Ways to Connect to Third Parties
IN THIS CHAPTER
 Sharing Fitbit data with services such as Strava and Weight Watchers
Exporting your Fitbit data
Connecting Fitbit to the Siri and Cortana voice assistants
Listening to music and podcasts on your Fitbit
When you monitor your personal stats throughout the day by using your Fitbit device, the Fitbit app, and the Fitbit.com online Dashboard, it’s easy to fall into a Fitbit-only mindset. Being stuck in Fitbit-land isn’t a terrible thing because your Fitbit and its associated software can tell you a ton about your fitness and health and how it’s progressing. That said, it’s a big world out there and Fitbit isn’t the only fitness and health game in town. There are other apps such as Strava and Weight Watchers; there are other devices such as Alexa and Cortana; and there are other types of content, such as music and podcasts.
Fortunately, because Fitbit is by far the most popular activity tracking company, many third parties have been eager to set up ways to connect their products to the Fitbit ecosystem. In this chapter, you explore the myriad ways that you can connect your Fitbit to these third-party apps, devices, and content.
Share Fitbit Data on Strava
As I show in Chapter 4, it’s easy to connect with friends and groups to share your latest and greatest achievements. But if you’re a dedicated exerciser or athlete, chances are you already have an account on Strava, which means it probably makes more sense to share data between your Fitbit account and your Strava account.
After you connect Fitbit and Strava, two things happen:
- All GPS-related activities that you track with your Fitbit are synced to your Strava account.
- All the activities that you track via Strava are added to your daily and weekly Fitbit stats.
Note that none of the preceding includes activities prior to making the connection between your two accounts. If you want to get your historical Fitbit data into Strava, you need to export the data, as I describe later in the “Export Your Fitbit Data” section.
 If you have a Fitbit watch, open the Strava app to see your ten most recent runs or rides.
Connecting Fitbit and Strava by using the Strava app
To connect your Fitbit and Strava accounts by using the Strava app, follow these steps:
- Get started in the Strava app:
- Android: Tap Menu ⇒ Settings ⇒ Link Other Services. Then tap Connect a Device to Strava.
- iOS: Tap More ⇒ Settings ⇒ Applications, Services, and Devices. Then tap Connect a New Device to Strava.
- Tap Fitbit.
-
Tap Connect Fitbit.
Strava prompts you to log in to your Fitbit account.
-
Type your Fitbit email address and password, and then tap Log In.
Strava prompts you to log in to your Strava account.
- Type your Strava email address and password, and then tap Log In.
-
Tap Authorize.
Fitbit asks you to choose which data you want to allow Strava to access, as shown in Figure 14-1.
-
Tap the Allow All check box.
Note that you don’t have to share everything with Strava. For example, there’s probably not much point sharing your weight or your Fitbit profile with Strava.
- Tap to deselect the check box beside each item you don’t want to share.
-
Tap the Allow button.
Strava displays an overview of the sharing process.
- Tap OK, Got It.
-
Tap Done.
Fitbit and Strava share any GPS-based activities that you track with one or the other.
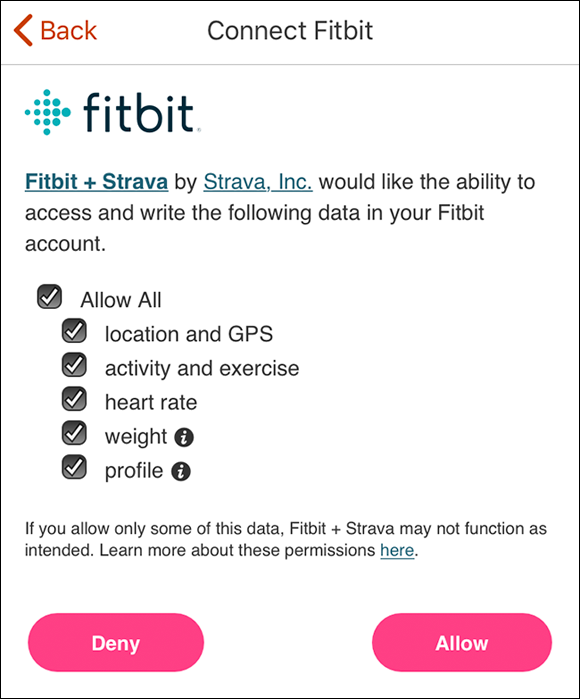
FIGURE 14-1: Choose which Fitbit data you want to allow Strava to access.
Connecting Fitbit and Strava on the web
To connect Fitbit and Strava online by using a web browser, follow these steps:
- Surf to
https://strava.fitbit.com. -
Click Connect.
Strava prompts you to authorize Fitbit to connect to Strava.
-
Click Authorize.
Fitbit prompts you to log in to your Fitbit account.
-
Type your Fitbit email address and password, and then tap Log In.
Fitbit asks you to choose which data you want to allow Strava to access.
-
Click the Allow All check box (or select the check box beside only those items you want to share), and then tap the Allow button.
Strava displays an overview of the sharing process.
-
Click OK, Got It.
Fitbit and Strava share any GPS-based activities that you track with one or the other.
Share Fitbit Data on Weight Watchers
If you’re a member of Weight Watchers, wouldn’t it be great if you could convert your Fitbit activities into Weight Watchers activity points, or FitPoints in Weight Watchers lingo? Why, yes, it would — and you can. Just connect your Fitbit account with your Weight Watchers account and your Fitbit activities will be automatically synced to your Weight Watchers profile. Sweet!
Connecting Fitbit and Weight Watchers by using the Weight Watchers app
To connect your Fitbit and Weight Watchers accounts by using the Weight Watchers app, follow these steps:
- Get started in the Weight Watchers app:
- Android: Tap Profile ⇒ Settings. Then tap Activity Settings ⇒ Activity Sync.
- iOS: Tap Profile ⇒ Settings. Then tap Activity Settings ⇒ Device.
-
To connect a Fitbit activity tracker, tap Device.
To connect a Fitbit Aria 2 smart scale, tap Wireless Scale.
-
Tap Fitbit.
Weight Watchers prompts you to log in to your Fitbit account.
-
Type your Fitbit email address and password, and then tap Log In.
Fitbit asks you to choose which data you want to allow Weight Watchers to access (refer to Figure 14-1).
-
Tap the Allow All check box.
Note that you don’t have to share everything with Weight Watchers. For example, there’s probably not much point sharing your sleep, your friends, or your Fitbit profile with Weight Watchers.
- Tap to deselect the check box beside each item you don’t want to share.
-
Tap the Allow button.
Fitbit shares the data you selected with your Weight Watchers account.
Connecting Fitbit and Weight Watchers on the web
To connect your Fitbit and Weight Watchers accounts online by using a web browser, follow these steps:
-
Surf to
https://weightwatchers.com/.If you’re in Canada, go to
https://weightwatchers.ca; for the UK, go tohttps://weightwatchers.co.uk. - Log in to your account.
- Click Account ⇒ Settings.
-
Click Device.
If you’ve previously connected a device with your Weight Watchers account, you need to remove it because Weight Watchers allows only one connected device at a time. To remove the device, click the Device logo or click Disconnect.
Fitbit prompts you to log in to your Fitbit account.
-
Type your Fitbit email address and password, and then tap Log In.
Fitbit asks you to choose which data you want to allow Weight Watchers to access.
-
Click the Allow All check box (or select the check box beside only those items you want to share), and then tap Allow.
Fitbit shares the data you selected in Step 6 with your Weight Watchers account.
To get your Fitbit data synced to your Weight Watchers profile right away (and any time you feel like it), click Menu ⇒ My Day. Next, click the Activity tab, and then click the Sync with Your Fitbit App link, which appears at the bottom of the Activity tab (see Figure 14-2).
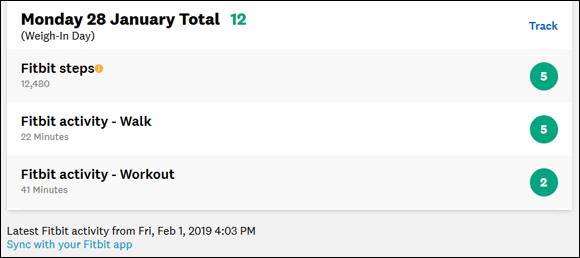
FIGURE 14-2: On the My Day page’s Activity tab, click Sync with Your Fitbit App to get the latest Fitbit data.
Share Fitbit Data with MyFitnessPal
MyFitnessPal is a calorie-counting app that enables you to track food (calories in) and exercises (calories out) to achieve a goal weight. It’s one of the most popular health and fitness apps, and you can connect it to your Fitbit for easier tracking.
Connecting Fitbit and MyFitnessPal by using the MyFitnessPal app
Follow these steps to connect your Fitbit and MyFitnessPal accounts by using the MyFitnessPal app:
- Get started in the MyFitnessPal app:
- Android: Tap Menu ⇒ Apps and Devices.
- iOS: Tap More ⇒ Apps and Devices.
- Tap Fitbit Tracker.
-
Tap Connect.
MyFitnessPal prompts you to log in to your MyFitnessPal account.
-
Type your MyFitnessPal email address and password, and then tap Log In.
MyFitnessPal prompts you to log in to your Fitbit account.
-
Type your Fitbit email address and password, and then tap Log In.
Fitbit asks you to choose which data you want to allow MyFitnessPal to access (refer to Figure 14-1).
-
Tap Allow All.
Unfortunately, MyFitnessPal insists that you share all your Fitbit data. If you try to share only some data, the connection with fail. Boo, MyFitnessPal!
-
Tap Allow.
Fitbit will now share your data with your MyFitnessPal account.
Connecting Fitbit and MyFitnessPal on the web
To connect your Fitbit and MyFitnessPal accounts online using a web browser, follow these steps:
- Surf to
https://myfitnesspal.com/ and then log in to your account. - Click Apps.
- Click Fitbit Tracker.
- Click Connect.
-
If prompted, type your Fitbit email address and password, and then tap Log In.
Fitbit asks you to choose which data you want to allow MyFitnessPal to access (refer to Figure 14-1).
-
Click the Allow All check box and then click the Allow button.
Fitbit now shares your data with your MyFitnessPal account.
Share Fitbit Data with Other Apps
In the previous three sections I talk about the specific steps to take to connect your Fitbit device and account with three apps: Strava, Weight Watchers, and MyFitnessPal. However, Fitbit trackers are so popular that just about every fitness, health, diet, and weight loss app offers a way to connect to a Fitbit device. To give you an idea, Table 14-1 offers a list of the apps that have official ties to Fitbit (current as of this writing).
TABLE 14-1 Apps That Work with Fitbit
|
App |
Category |
Website |
|
Dick's Sporting Goods |
Health | |
|
Endomondo |
Fitness | |
|
Fitabase |
Health | |
|
Fitline |
Fitness | |
|
FitTap |
Health | |
|
Fitwatchr |
Diet and weight loss | |
|
Habit |
Diet and weight loss | |
|
LFconnect |
Fitness | |
|
Lose It! |
Diet and weight loss | |
|
MapMyRun |
Fitness | |
|
MINDBODY |
Health | |
|
MyNetDiary |
Diet and weight loss | |
|
Nudge Health Tracking |
Fitness | |
|
Peloton |
Fitness | |
|
RunKeeper |
Fitness | |
|
Running for Weight Loss |
Diet and weight loss |
Search your device app store |
|
SparkPeople |
Fitness | |
|
Stridekick |
Fitness | |
|
Tactio Health |
Health | |
|
Thermos Hydration Bottle with Smart Lid |
Diet and weight loss | |
|
Trainerize |
Fitness | |
|
TrainingPeaks |
Fitness | |
|
Trendweight |
Diet and weight loss | |
|
VirZOOM |
Fitness | |
|
Walgreens Balance Rewards |
Health | |
|
Walkadoo |
Fitness | |
|
Waterlogged |
Diet and weight loss | |
|
Wokamon |
Fitness |
Yep: that’s a lot of apps! Unfortunately, I can’t offer a one-size-fits-all method that enables you to connect any one of these apps to your Fitbit device and account. However, I can do the next best thing and offer a general procedure to try for any app:
- Using the third-party’s app: Open the app’s Settings or main menu, and then look for a command named something like Apps, Devices, or Connect. Click Fitbit, log in to your Fitbit account if asked, and then choose which data you want to share with the app by using the screen shown previously in Figure 14-1.
- Using the third party’s website: Log in to your app account. Open the site’s main menu, and then look for a command named something like Apps, Devices, or Connect. Click Fitbit, log in to your Fitbit account if asked, and then choose which data you want to share with the app by using the screen shown previously in Figure 14-1.
Export Your Fitbit Data
Fitbits are so popular that almost all major fitness- and health-related apps and services have an option to connect to your Fitbit account. However, you might be using an app or service that doesn’t offer such a connection. Are you out of luck? Perhaps not. Fitbit offers a couple of ways to export your data to a file. If your app or service has a method for importing files, you might be able to import your Fitbit data.
Fitbit offers two types of file exports:
- Single activity TCX file: This Training Center XML (TCX) file includes the GPS data for a run or other activity, as well as data related to the activity such as average heart rate and calories burned.
- All activities ZIP file: This archive (ZIP) file contains all your Fitbit data. Most of the data comes as either a JavaScript object notation (JSON) file or a comma separated values (CSV) file.
In practice, you’ll almost always want a TCX file to import into a service. However, I also include the instructions for exporting all your data, just in case you want a record of what Fitbit has stored for you.
Export an activity as a TCX file
To export a GPS-tracked activity as a TCX file, follow these steps:
- Surf to
www.fitbit.comand log in to open your Dashboard. - In the navigation bar, click Log.
- Click Activities.
- Locate the GPS-tracked activity you want to export, and then click the activity’s View Details button.
-
Click the More icon, labeled in Figure 14-3, and then click Export as TCX file.
Fitbit gathers the activity’s data into a TCX file and then downloads that file to your PC.
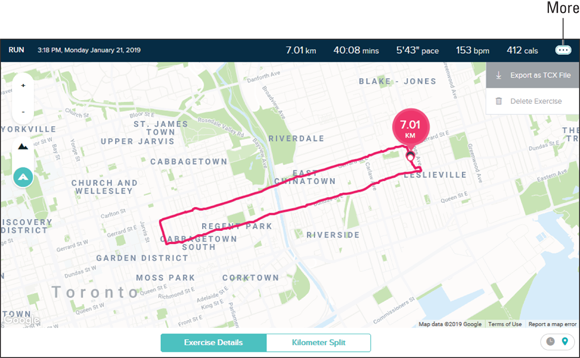
FIGURE 14-3: Open the activity, click More, and then click Export as TCX File.
 As an alternative to Steps 1 through 3, you can head directly to your Activities log by going to
 www.fitbit.com/activities.
Export all your Fitbit activities
To export all your Fitbit data, follow these steps:
- Point your web browser to
www.fitbit.comand log in to open your Dashboard. - Click View Settings ⇒ Settings.
-
Click Data Export.
Fitbit opens the Export My Fitbit Data page.
As an alternative to Steps 1 through 3, you can head directly to this page by going to www.fitbit.com/settings/data/export. -
Click Request My Data.
Fitbit sends an email to your Fitbit address asking you to confirm your data request.
-
In the Fitbit email, click Confirm Export Request.
Fitbit begins the process of exporting your data. In the Export My Fitbit Data page, you see a Current Export item with a percentage that tells you how far along things have progressed (see Figure 14-4). Click the Refresh icon to see the latest percentage.
-
When the export preparation is complete (that is, when the percentage in the Current Export item reaches 100), click the Download button.
Your web browser downloads the file, which is usually named MyFitBitData.zip.
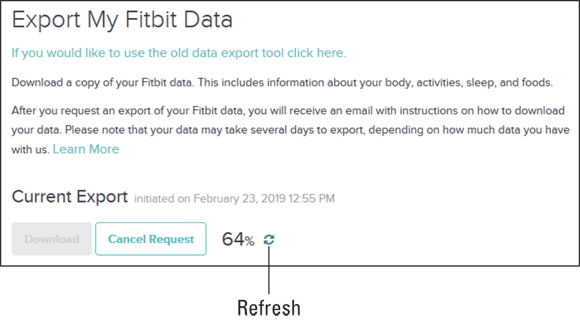
FIGURE 14-4: The percentage in the Current Export item tells you the progress of your export.
Connect Fitbit to Alexa
If you have an Alexa-enabled device at home — such as an Amazon Echo or a third-party speaker that includes Alexa — you can ask Alexa for your current Fitbit stats, including steps taken, flights climbed, and your resting heart rate. To make Alexa Fitbit-aware, you must first enable the Fitbit skill on your Alexa device.
To enable the Fitbit skill with your voice, use either of the following commands:
- “Alexa, enable Fitbit.”
- “Alexa, open Fitbit.”
If Alexa tells you it can’t find the Fitbit skill, it likely means the skill is not available in your country. Fitbit adds new countries every so often, so keep trying to enable the skill once a month or so.
You can also enable the Fitbit skill using the Alexa app, as shown in the following steps:
- In the Alexa app, choose Menu ⇒ Skills & Games.
- Click the Search icon (magnifying glass), and then type fitbit in the Search screen.
- Tap the Fitbit skill to open its information page.
-
Tap Enable.
Alexa enables the skill.
With the Fitbit skill enabled, you invoke the skill by saying “Alexa, ask Fitbit something”, where something can be any of the following:
- How many steps I’ve taken today
- How many flights I’ve climbed today
- How many active minutes I have today
- How many calories I’ve burned today
- How far I’ve walked today
- How I’m doing today
- How I slept last night
- If I’ve exercised today
- How much water I’ve had today
- What my resting heart rate is
- How much I weigh
- About my battery
Connect Fitbit to Window 10’s Cortana
If you a Cortana-enabled Windows 10 device, you can ask Cortana to tell you your current Fitbit stats, including steps taken, flights climbed, and your resting heart rate. To get Cortana connected to Fitbit, you must first enable the Fitbit skill on your Windows 10 device.
To enable the Fitbit skill, issue the following command:
“Cortana, ask Fitbit.”
With the Fitbit skill enabled, you invoke the skill by saying “Cortana, ask Fitbit something”, where something can be any of the following:
- How many steps I’ve taken today
- How many flights I’ve climbed today
- How many active minutes I have today
- How many calories I’ve burned today
- How far I’ve walked today
- How I’m doing today
- How I slept last night
- If I’ve exercised today
- How much water I’ve had today
- What my resting heart rate is
- How much I weigh
- About my battery
Get the Weather on Your Fitbit
If your Fitbit supports apps, one of those apps is called Weather, which can put the current conditions right there on your wrist. Nice. First, though, you need to follow these steps to configure your weather settings:
- Click Dashboard ⇒ Account.
- Click your Fitbit device.
-
Click Apps.
If you don’t see the Apps icon, your Fitbit doesn’t support running apps.
-
Click the Settings icon (gear) next to the Weather app.
Fitbit displays the Weather app’s Settings screen, shown in Figure 14-5.
- To change the temperature unit, click Unit and then click either Fahrenheit or Celsius.
- To add a city to the Weather app:
- Click Add City.
- Start typing the name of the city.
- Click the full name of the city when it appears in Fitbit’s list of cities that match what you’ve typed so far.
-
Click the Back icon (<) until you return to the Account screen.
Fitbit syncs the new settings to the Weather app.

FIGURE 14-5: The Settings screen for the Weather app.
If you add multiple cities to the Weather app, you can switch between cities in the app by swiping left or right.
Listen to Audio on Your Fitbit Watch
If you have an Ionic or Versa Fitbit watch, you can upload music and podcast playlists to your watch. Then, after you’ve connected a pair of Bluetooth headphones or speakers to the watch (see “Pair Bluetooth Headphones or Speakers,” later in this chapter), you can use your Fitbit to control the playback of your tunes or podcasts.
Before getting started, make sure you’ve installed Fitbit on the computer that contains the music and podcast playlists you want to transfer to your watch:
- Windows 10: You can use the Windows 10 version of the Fitbit app.
- Mac (or an older version of Windows 10 that can’t run the Fitbit app): You need to install Fitbit Connect, as I describe in Chapter 3.
Connecting your watch to Wi-Fi
The only way to upload audio playlists from your computer to your watch is through Wi-Fi, so your first chore is to connect your watch to the same Wi-Fi network that your PC or Mac is connected to. Follow these steps in the Fitbit app:
- Click Dashboard ⇒ Account.
- Click your Fitbit watch.
- Click the Media tile.
- Click Manage Wi-Fi Networks.
-
(iOS only) Click Next.
The Wi-Fi Setup screen appears with a list of nearby networks.
- Click the Wi-Fi network you want to use.
-
Type the network password, and then click Connect.
Fitbit connects your watch to the Wi-Fi network.
Uploading playlists to your watch
With your computer and your Fitbit watch eyeballing each other across your Wi-Fi network, as I describe in the preceding section, you’re ready to transfer a playlist or three to your watch. How you proceed depends on whether you’re using Windows 10 or a Mac.
You can transfer only playlists, not individual music tracks or podcast episodes. You can create on-the-fly playlists by using the Fitbit app or Fitbit Connect. However, you get more control if you create the playlists you want on your watch in advance by using Groove Music (Windows 10) or iTunes (Mac).
Uploading playlists from your Windows 10 PC
To transfer audio from your Windows 10 computer to your Fitbit watch, you use the Fitbit app. Follow these steps:
- In the main navigation bar at the top of the Fitbit app, click the Media icon (musical note).
-
Click Personal Music.
Fitbit sets up a connection with your watch, and then displays a list of your Groove Music playlists.
- Wake your Fitbit watch.
- Swipe left until you see the Music app, and tap Music to open the screen shown in Figure 14-6.
-
Tap Transfer Music.
Later, after you’ve added one or more playlists, you’ll need to scroll to the bottom of the Music app to see the Transfer Music button.
To create a new playlist by using the Fitbit app, click Create New Playlist, click the added playlist to open it, then drag music from Groove Music and drop it inside the playlist. -
Select the check box for each playlist you want to transfer to your watch.
 When you select a playlist, Fitbit immediately begins the process of uploading the audio! Therefore, don’t select a playlist unless you’re sure you want to upload it.
Depending on the number of music tracks and podcast episodes that you’re uploading to your watch, it can take an hour or more to complete the transfer.
Keep your eye on the watch storage meter at the top of the Fitbit app window. When that meter is full, you can’t add any more audio to your watch. The storage meter also doubles as a progress bar, displaying the progress of the transfer.
-
When Fitbit completes the audio transfer, return to your Fitbit watch, open the Music app, and then tap End Now.
You can now control audio playback on the Fitbit watch using the Music app.
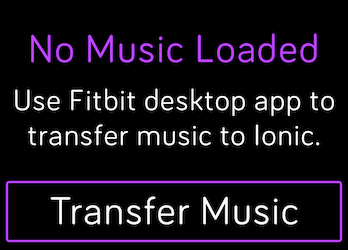
FIGURE 14-6: To put your watch into Transfer Mode, tap Transfer Music.
Uploading playlists from your Mac
To get one or more iTunes playlists from your Mac to your Fitbit watch, you use the Fitbit Connect app. Here are the steps to follow:
- Launch Fitbit Connect on your Mac.
-
Click Manage My Music.
Fitbit Connect prompts you to log in to your Fitbit account. Note that you don’t see this prompt if you’ve previously logged in, so in that case you can skip to Step 4.
-
Enter your Fitbit credentials, and then click Log In.
Fitbit Connect tells you to initiate Transfer Mode on your watch.
- Wake your Fitbit watch.
- Swipe left until you see the Music app, and then tap Music.
-
Tap Transfer Music (refer to Figure 14-6).
After you’ve added one or more playlists, you’ll need to scroll to the bottom of the Music app to access the Transfer Music button.
Fitbit Connect sets up a connection with your watch, and then displays a list of your iTunes playlists.
To create a new playlist from Fitbit Connect, click Create New Playlist, click the added playlist to open it, then drag music from iTunes and drop it inside the playlist. -
Select the check box for each playlist you want to transfer to your watch.
When you select a playlist, Fitbit Connect immediately starts uploading the audio! Therefore, don’t select a playlist unless you’re sure you want to upload it.Depending on the number of music tracks and podcast episodes you’re uploading to your watch, the transfer can take an hour or more to complete.
Keep your eye on the watch storage meter at the top of the Fitbit Connect window. When that meter is full, you can’t add any more audio to your watch. The storage meter also doubles as a progress bar, displaying the progress of the transfer.
-
When Fitbit Connect completes the music transfer, return to your Fitbit watch, open the Music app, and then tap End Now.
You can now control audio playback on your watch using the Music app.
Controlling audio on your watch
After you have your Fitbit watch loaded with your favorite audio (as described in the preceding section) and you’ve paired Bluetooth headphones or speakers with the watch (as described in the next section), you’re ready to feel the noise.
To get started, wake your Fitbit watch, swipe left from the clock until you see the Music icon, and then tap Music.
To start some audio, use either of these techniques:
- Tap Shuffle All to play all your audio in random order.
- Tap a playlist to display its audio, then tap a track or episode.
To display the audio playback controls, you again have two choices:
- Open the Music app, tap the current playlist, and then tap the current track.
- Press and hold down the watch’s Back button. If you don’t see the audio playback controls, swipe right.
With the playback controls onscreen, you can pause and play the audio, skip to the next track (tap >>), return to the beginning of the current track (tap <<), skip to the previous track (tap << twice), increase the volume (tap +), or decrease the volume (tap -).
Pair Bluetooth Headphones or Speakers
Your Fitbit watch can play, pause, and stop audio, but if you want to hear what’s being played (and I think you do), you need to connect your watch to headphones or speakers via Bluetooth. Here’s how to do it:
-
Put your Bluetooth headphones or speakers into pairing mode.
See the manual that came with your headphones or speakers to learn how to put the device into pairing mode.
- Wake your Fitbit watch.
- Swipe left from the clock until you see the Settings app, and then tap Settings.
- Tap Bluetooth.
-
Tap + Audio Device.
Your watch begins looking for nearby devices that are in pairing mode. When your watch locates your headphones or speakers, it displays the name of the device.
-
Tap the device name.
Your Fitbit watch pairs with the headphones and speakers.