Chapter 9. Webhooks
Webhooks are becoming an increasingly popular way of enabling other applications to integrate with yours, and they flip the traditional API model on its head. Rather than requesting the data from the API provider at the time that the consumer needs the information, the webhook on the provider notifies consumers when an event of interest occurs. While this is a little more complicated to implement in your application than just offering the ability to fetch data in machine-readable format, it can be an excellent solution for event-driven use cases. It also reduces the load of having many API clients polling a server to check for updates, since the server itself can just send out notifications when relevant events occur.
A good example of when to use a webhook could be when adding new comments to an article or photo. In order to show that comment data elsewhere, another system would need to keep polling for updates; by using a webhook instead, no polling is needed. The second system simply registers an endpoint that the information about a new comment should be sent to. When a comment is made, the first application sends information about the comment to all the other applications that requested to receive it.
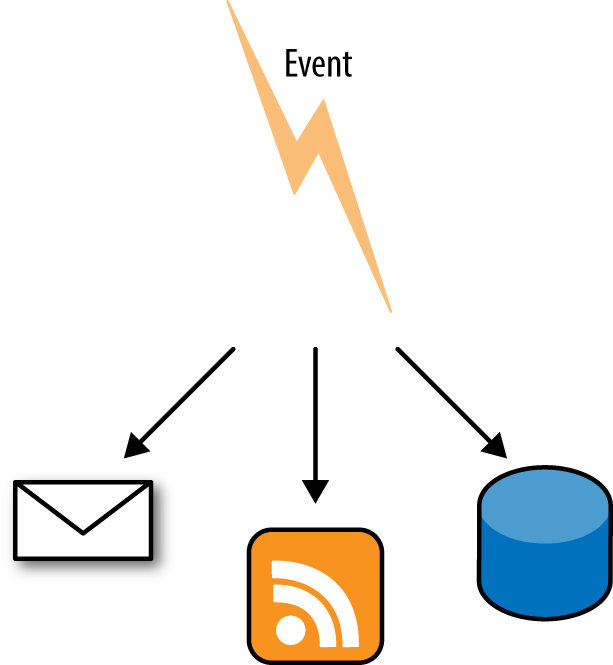
The overall idea of webhooks could be respresented along the lines shown in Figure 9-1.
When an event occurs, the server processes the event, and sends information about the event to any third party that has registered an interest in being notified about the event. Those webhooks may update a news feed, send emails, store information to a database, announce the event into a chat channel…or something else. Usually the webhook will consist of a POST request to an endpoint that you nominate, with a body that contains all the relevant data and representations of all affected records. You may still need to make some additional API calls to fetch related data, but often all the critical information needed to stay informed is included in the webhook.

Figure 9-1. One event being passed to a number of listening applications
If this reminds you strongly of the Publish-Subscribe or Observer design patterns, that isn’t a surprise, as it fits exactly that use case. The application allows interested parties to register themselves as needing to be informed when an event occurs or something changes. When that event does occur, it sends notification using the webhook.
GitHub’s Webhooks
The webhook functionality that I probably use the most is GitHub’s. They have a great API that you’ve seen examples of in Chapter 8 and Chapter 5 already, so it isn’t a surprise that their webhook features are also very good. GitHub itself also benefits hugely from offering webhooks, as they are very widely used by programmers: imagine if every continuous integration server in the world pinged GitHub’s API every minute! That would require a lot of server capacity even when there is no new data to return.
Receivers of webhooks are usually continuous integration platforms such as Jenkins or TravisCI, and I often use a Hubot (GitHub’s open source chatbot), which will notify a chat channel that a commit has been made or a comment added to a pull request. The possibilities are endless, so let’s look at a simple example of setting up a webhook and getting some data from it.
On GitHub, you can configure a webhook to be per-repository or per-organization, depending on whether you want to be notified of events on just one of your repositories or have the same webhook apply to all of them; the per-organization option is very handy if you have a lot of repositories. You can configure multiple webhooks for each organization or repository and you also have a choice of what they respond to.
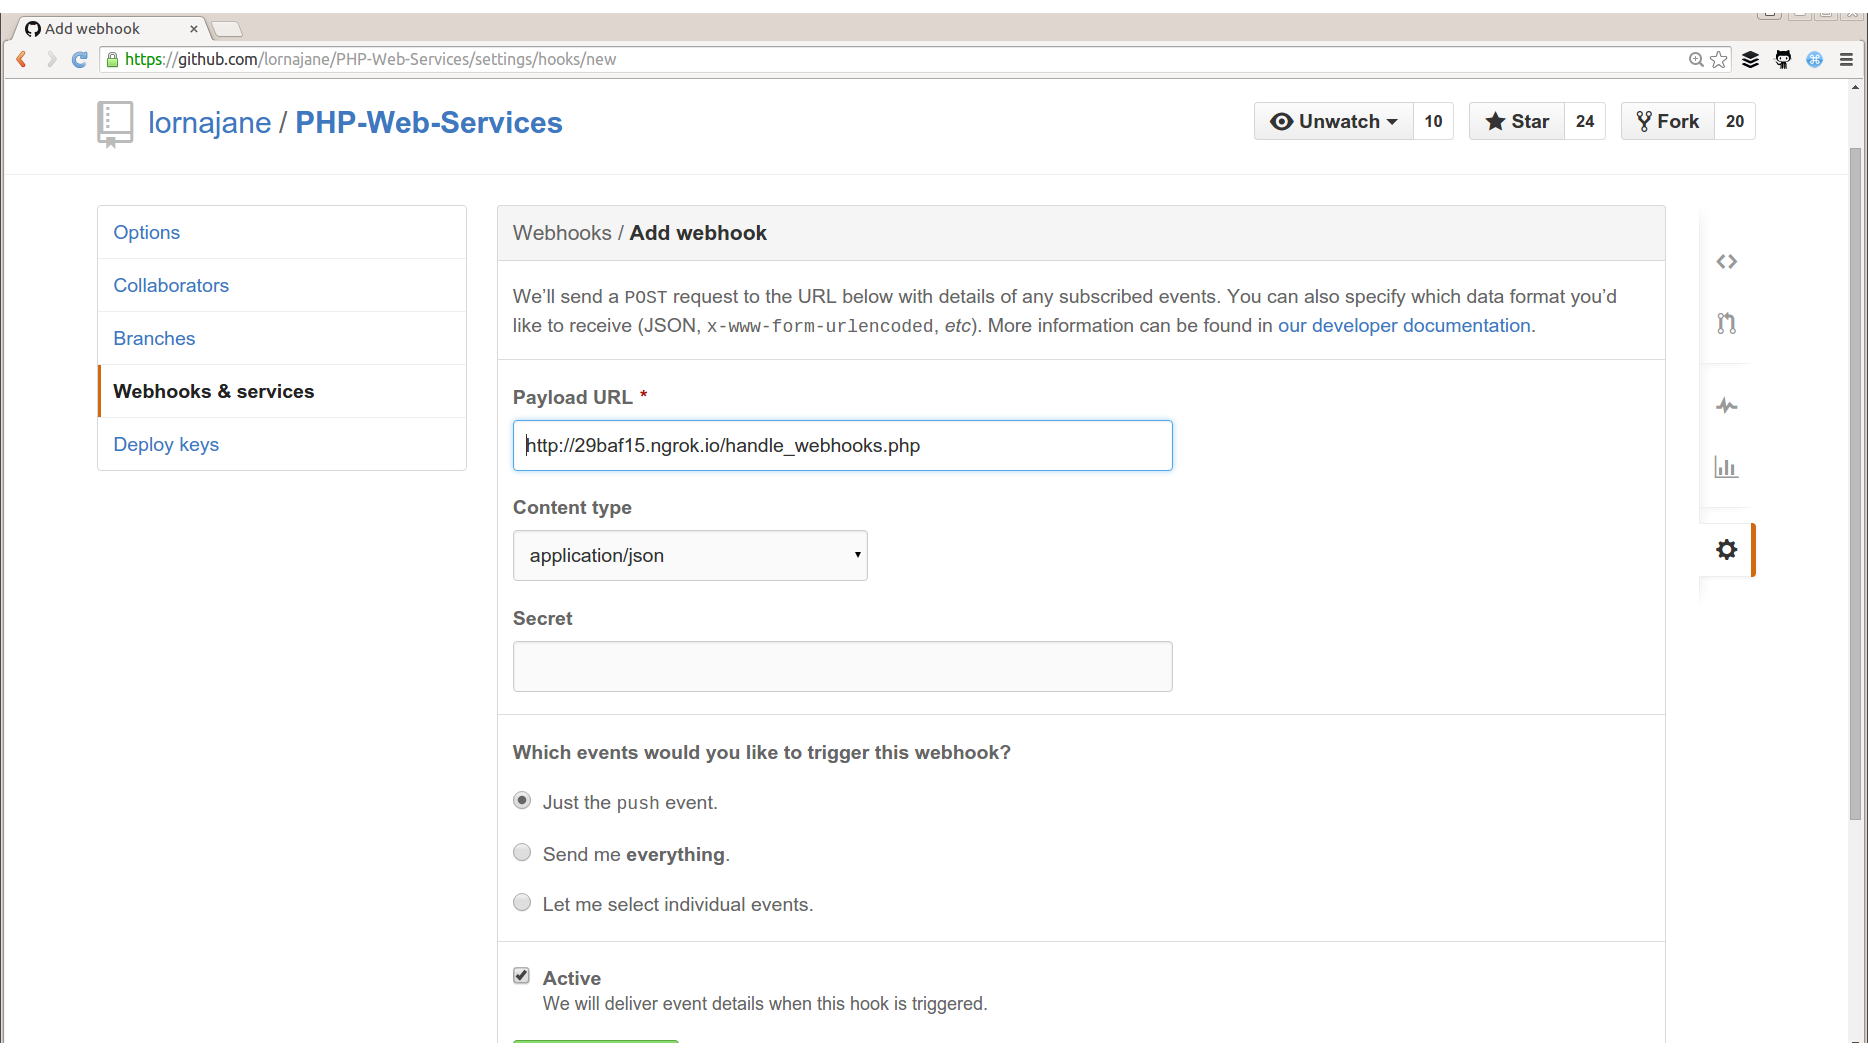
When adding a new webhook to a repository, a screen like that in Figure 9-2 appears.

Figure 9-2. Configuring a GitHub webhook
You can see an example of the data that will be sent for each type of event by checking the documentation. Depending on the event, this can be quite verbose, as it will include information about the author, any committers, the repository itself, and so on.
In the example, you can see that we can set an endpoint that the webhook should deliver its payload to. The file handle_webhooks.php is on my local development machine, so in order to allow the GitHub webhook to reach that, I’m using an ngrok tunnel. You can read more about ngrok in Chapter 10, but essentially it’s a tool that opens a tunnel from your development machine to the outside world, assigns you a URL to use, and allows you to inspect the traffic going over the tunnel. I’ve added that URL to my webhook, and chosen to be notified of all events. Most webhooks will give you some options as to what information you are interested in, so that if you are looking for particular changes or interested in particular data, you can choose that rather than discarding the information you don’t want. Along these lines, I have a tool that reports on the billable time we log through our project management tools at work; the webhook lets me configure what to receive and therefore the application knows not to send me a lot of information that I won’t use or may not know how to parse.
Once the webhook is created, you’ll see it listed at the bottom of the screen, and it will show a history of all the data that has been sent by this hook. It also shows whether the hook was successfully received and offers the option to retry a hook. This option to retry is invaluable when developing tools that consume webhooks and is one of the main reasons I love working with the GitHub API so much. In this case I’m also using the ngrok tunnel, which offers inspection of the request and response, and also includes the same ability to replay a request, which is really handy for other webhook sources that might not have all the tooling support that GitHub offers.
My code for handling the webhook is shown in Example 9-1.
Example 9-1. Webhook-handling code
<?php$data=json_decode(file_get_contents("php://input"),true);file_put_contents("example_webhook.txt",print_r($data,true));echo$data['zen'];
The first line actually does multiple things; let’s start at the deepest level inside the parentheses. We call file_get_contents() on the php://input stream; we’ve seen this in previous examples and it simply reads in the raw body of the incoming POST request (use this stream with PUT requests as well in RESTful services). We use this rather than $_POST because the webhooks are often in JSON or XML format rather than the form post that PHP’s $_POST superglobal expects. Now that we’ve got the content of the POST request body, it’s passed to json_decode() as the first parameter. That second parameter to json_encode() simply returns the result as an array rather than the default object, which I find easier to work with. The resulting array is then assigned to $data.
In order to inspect the data, we can simply write it to a file, which is what happens next in the example code. By passing a second parameter to print_r(), we cause it to return its output rather than echo it, and we then write it to the example_webhook.txt file. This can be a useful tactic if you need to capture the contents of an incoming hook and then put it somewhere to refer to while you build something specific that uses the data. Having an example of what you received from the previous request can be used as a handy reference.
Finally, and just for fun, this script outputs the value of the zen field, which is a little spiritual insight into your day provided by GitHub with your API response. You could access any of the data fields provided by the webhook and use them for your own purposes, but hopefully this gives you the idea.
Publishing Your Own Webhooks
If you’re publishing APIs, there’s no reason you shouldn’t be publishing webhooks as well. We just need a little more advance setup as we need people to be able to register which hooks they want to utilize beforehand. In most cases, it makes sense to offer both webhooks and a traditional API so that you can update consumers on events that have just happened, as well as allow them to access other data as needed.
Webhooks are fired in response to something happening, so they usually appear in code after a specific event is detected and handled, similar to where you would put the code in charge of sending an email notification, for example. To give you a very simple outline, I’ve created Example 9-2, which takes a form and then just POSTs the data to any interested parties.
Example 9-2. Code receives a form, and sends out a webhook
<?php$hook_endpoints=["http://29baf15.ngrok.io/handle_webhooks.php","http://localhost:8080/handle_webhooks.php"];if($_POST){// very lazily chuck the whole thing at json_encode// a Real Application would validate or look things up$post_body=json_encode($_POST);// send using streams$context=stream_context_create(['http'=>['method'=>'POST','header'=>'Content-Type: application/json','content'=>$post_body,]]);foreach($hook_endpointsas$endpoint){$success=file_get_contents($endpoint,false,$context);echo"<p>Send to:".$endpoint."</p>\n";}include("hook_thanks.html");}else{// display the templateinclude("hook_form.html");}
We start with a spot of initialization, creating an array of the endpoints to which we should webhook. Then there is a check to see if we received any POST data; if not then the input template is displayed. If there is data, then we simply turn it all into JSON, and POST it as a webhook to each endpoint in turn, using PHP’s stream handling.
In a more complicated application, it might be appropriate to first process the form data in some way, such as to update a record. Once that has been done, it is common to send a webhook that contains the new state of the resource, often including nested/related data, and sometimes including information about which fields changed and maybe even their previous values. When building your own webhooks it is very important to consider what your end users will actually want to achieve, so that you can design your webhooks to include the right amount of data. Along the same lines, I’d recommend offering to consumers some configuration of which webhook events to subscribe to.
The example here shows a webhook which is architecturally stuck at the end of a controller, after the data has been processed and before we return a response; it is comparable to sending an email notification of something happening on the system. This is an easy place to put the webhook and makes this example easy to follow, but there are some alternatives that are worth examining.
In a real application, we probably don’t want to wait for someone’s webhook endpoint to respond before we complete our own request. The email-sending analogy also bears out here as it’s unusual nowadays to send email synchronously from web applications. A better approach for either webhooks or email sending is to use a job queue and simply create a job with all the data required to send the email or hook. Your application can then essentially “forget” about the additional task as the queue will take care of it in due course. Detailed discussion of job queues are out of the scope of this chapter but a tool such as beanstalkd or gearman would be a good place to start if you want to add something like this to your own applications.
Whether you webhook on all actions, or just offer a few notifications in your application, take care to consider the use cases from the consumer’s point of view, and also think about how you can include these in your application. This chapter has shown you some examples of working webhooks, plus an example and discussion of how to design and build your own. As this style of integration between systems becomes increasingly common, I expect more and more of our PHP applications to include features like this.