3.4 System Landscape Directory Strategies
Given the role played by the SLD, it’s important to come up with a proper SLD strategy to be used in your organization. There are many approaches to run an SLD in your landscape. To start with, ask yourself if you need one or multiple SLDs in the landscape. To properly answer this question, you need to look at the organization’s landscape and requirements. Consider the following questions:
- How big is the landscape, and how many systems will be using the SLD?
- How spread out are these systems? Are all the systems part of the same network, or are they spread across the globe?
- Do you want to keep the data of your different environments or stages separated?
Depending on your answers to these questions, you may want to consider multiple SLDs. Having more than one SLD can bring some advantages:
- Data views are separated (the administrator of each group can only see a limited view or subset of data).
- Your SLD data and content are highly available.
- Any changes to a local SLD’s data will only impact a limited part of the organization. Because of the separation of SLDs, it becomes possible to choose the right time to reflect the changes in the rest of the organization (e.g., after a successful test of the performed changes and after you feel comfortable reflecting the changes in the rest of the organization).
With more than one SLD instance in your landscape, the need arises to distribute the data between the different SLDs and to set up a synchronization mechanism between them. There are different approaches to synchronize data between the SLDs, including the following:
- Manual export and import of data (full or delta) using the enhanced Change and Transport System (CTS+)
- Automatic forwarding of data suppliers
- Full automatic synchronization
In the next sections, we’ll explore each of these approaches.
3.4.1 Manual Export and Import of Data
If you facilitate the manual export of any selected data from your SLD, then the exported data can be manually imported into the next environment or local SLD. This approach has the major downside of requiring human manual action. It’s better to couple this approach with a CTS+. To manually export an SLD object (using a business system here as an example), follow these steps:
- From the System Landscape Directory landing page, select Business Systems.
- Filter and select the business system that you would like to export.
-
With the business system selected, click on the Export button (see Figure 3.16 1).
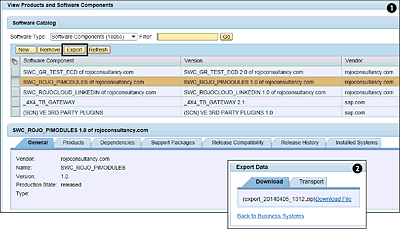
Figure 3.16 Steps to Manually Export an SLD to a Business System
- Click on Download File from the Download tab 2, and save the resulting TPZ file on your local file system.
- The saved TPZ file can then be imported into the target SLD system.
3.4.2 Automatic Bridge Forwarding
The automatic bridge forwarding approach copies all technical systems data in the source SLD and distributes them to the next SLD system. Most of the time, this approach is used to synchronize the central or master SLD with local SLDs. It’s also referred to as one-way distribution or SLD bridge forwarding. This approach only forwards data that is received in the SLD via a data supplier. The manually entered data isn’t propagated. To set up automatic bridge forwarding, follow these steps:
- From the System Landscape Directory landing page, select Administration and Data Suppliers.
- Under Update Other SLDs, click on the Add button (Figure 3.17 1).
- Fill in the details of the target SLD system 2.

Figure 3.17 Steps to Set Up an SLD Automatic Bridge Forwarding
3.4.3 Full Automatic Synchronization
The automatic synchronization mechanism ensures that all data entered manually in the local SLD and updated by the data supplier is automatically replicated and pushed to the target SLDs. This is a favorable mechanism because it reduces the need to manually keep the SLDs in sync and therefore reduces the risk of human error. It’s important to note that the automatic synchronization is supported as of SAP NetWeaver AS Java 7.1 SPS 1 and higher. A synchronization can be unidirectional or bidirectional:
-
Unidirectional
Data from the source SLD is synchronized with the target system. This implies that all the data present in the source SLD is also present in the target SLD, but the target SLD might have more data. -
Bidirectional
In this situation, both SLDs are identical. The SLDs can be seen as each other’s clones, in terms of their data. Bidirectional SLD synchronization can be used as a way to create an SLD backup or redundancy (see Figure 3.18).
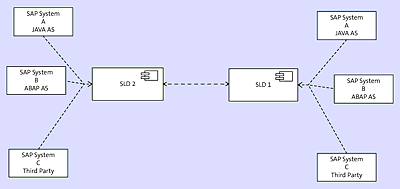
Figure 3.18 Bidirectional Full Automatic Synchronization Example
The automatic synchronization uses HTTP and is asynchronous. To configure the full automatic synchronization of your SLD, follow these steps:
- From the System Landscape Directory landing page, choose the Administration link on the top menu and then the Synchronization link in the resulting page.
- You’re then forwarded to a Maintain SLD Content Synchronization screen. Click the Add button (see Figure 3.19 1).
-
In the next screen, select the following values:
- For the Source, select the Remote (Sync with another SLD) radio button 2.
- Make sure the Bidirectional checkbox is selected.
- In the subsequent screen, maintain the hostname and logon details to be used to connect to the target SLD.

Figure 3.19 Steps to Configure the SLD Full Automatic Synchronization
After you’ve finished providing details in the second step of the wizard, follow these steps:
-
Define the source namespace and rank. The source namespace represents the namespace from the source SLD to be synchronized. By default, the sld/active namespace is selected. However, you can choose another namespace from the dropdown values. Follow the wizard’s steps.
The rank helps resolve conflicts. The namespace rank number specifies the priorities of SLD data in the synchronization process. A higher rank number means that the data of the source SLD namespace will “win” in conflicts with data of the target SLD’s namespace (see Figure 3.20 1). - Maintain the URL and login details of the local SLD. In addition, you need to choose the target namespace and its rank.
- You’ll be presented with a summary of all the values you entered. Click Finish after checking that the summary is correct.
- You can now check the status of the full sync by selecting the Full Sync (Active) link. You can also force a full sync by clicking on the Full Sync button 2.
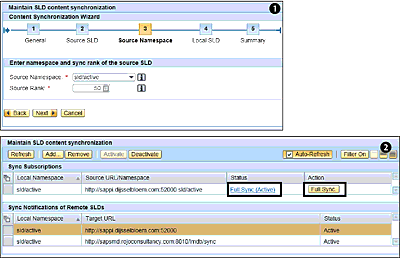
Figure 3.20 Configuring the SLD Full Automatic Synchronization: Defining Ranks