6.6 Exercise: Building an Integration Flow
In this exercise, we provide practical insight into working with SAP NetWeaver Developer Studio to build an iFlow, as well as deploying and monitoring iFlows.
6.6.1 Exercise Description
You’ve been informed that Reader’s Paradise’s book supplier, Book Fountain, only quotes prices in USD. However, because Reader’s Paradise has an internationally established chain of bookstores, you need to convert the price quoted in USD to various other currencies.
As a result, you’ve been asked to build an interface to enable currency conversion functionality in the various customer portals of Reader’s Paradise. With the interface that you’ll build, potential customers will be able convert book prices from USD to their local currency (e.g., EUR).
6.6.2 Exercise Solution Approach
You’ll be using an iFlow to build this SAP PO interface. For simplicity’s sake, we’ll make use of a freely available currency conversion web service. The service’s Web Service Description Language (WSDL) can be found at www.webservicex.net/CurrencyConvertor.asmx?WSDL.
The iFlow to be built should then connect the Reader’s Paradise stores’ portals via a web service (SOAP adapter), call the currency conversion service on the receiver side (WebserviceX), and return a conversion rate as the response. The scenario to be built and the system involved are presented in Figure 6.52.
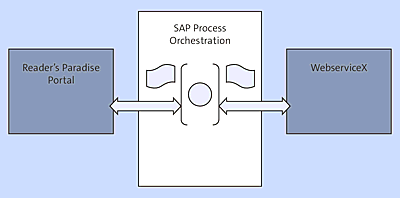
Figure 6.52 iFlow Scenario for Conversion between USD and Local Currencies on the Reader’s Paradise Portal
The currency conversion service requires two currency ISO codes as input and will return the conversion rate.
6.6.3 Exercise Step-by-Step Solution
To successfully complete this exercise, a step-by-step description of all the necessary actions and steps to be performed are discussed in the next sections. Start by downloading the WSDL of the external currency web service.
Download the Web Service Description Language
The web service to be consumed in this scenario for the currency conversion is a free web service provided by WebserviceX. WebserviceX serves about 6 million web transactions per day. The currency converter web service takes two inputs and returns an exchange rate as the result. The WSDL contains enumerations of different currencies with three-letter abbreviations (ISO codes).
Download the WSDL file for this scenario, provided by WebserviceX, via www. webservicex.net/CurrencyConvertor.asmx?WSDL. Save the WSDL in a directory on your local computer. The next step is to create all the required services interfaces to support the iFlow.
Create Service Interfaces in Enterprise Services Repository
You need to create two synchronous service interfaces: one for the sender systems (outbound) and one for the receiver system (inbound). Follow these steps to create these service interfaces:
- Go to the SAP PO landing page, and click on the Enterprise Services Repository Builder link.
-
Import the three SCs created during the exercise in Chapter 3:
- SWC_BOOKFOUNTAIN
- SWC_READERSPARADISE
- SWC_MAPPINGS
Note
If you worked through the Chapter 3 exercise, then you can skip this step.
-
Create three namespaces within the three SCs according to these specifications:
- “urn:readersparadise.com:currency:webservicex” for the SC SWC_BOOKFOUNTAIN
- “urn:readersparadise.com:currency:portal” for the SC SWC_READERSPARADISE
- “urn:readersparadise.com:currency:mapping” for the SC SWC_MAPPINGS
- By now, you should be familiar with how to create namespaces within a SC. Figure 6.53 summarizes the steps involved.
- Activate the namespaces created.
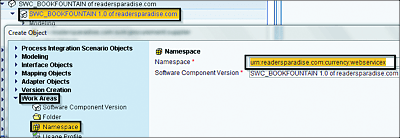
Figure 6.53 Creating a Namespace within a Software Component
Now that you have all the required namespaces, import the external WSDL. The WSDL will need to be imported as an external definition into the urn:readersparadise.com:currency:portal and urn:readersparadise.com:currency:webservicex namespaces. Follow these steps:
- On the menu bar, select Tools • Import External Definitions (see Figure 6.54). Follow the wizard until you have successfully imported the WSDL.
-
Save and activate the objects.
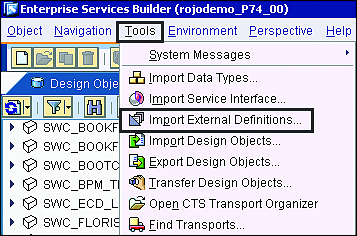
Figure 6.54 Importing External Definitions into the Enterprise Services Repository
-
Create an outbound service interface in the namespace “urn:readersparadise.com: currency:portal” (see Figure 6.55).
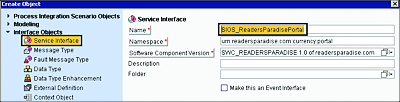
Figure 6.55 Service Interface Object Creation
-
Set the properties of the outbound service interface created earlier according to the details shown in Figure 6.56.
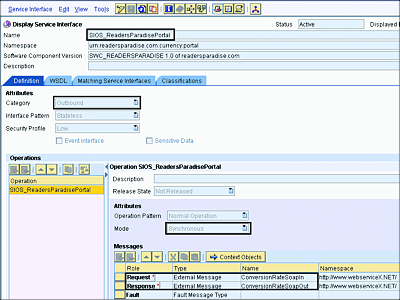
Figure 6.56 Outbound Service Interface Properties
- Create the inbound service interface with the name “SIIS_ReadersParadiseWebservicex” in the urn:readersparadise.com:currency:webservicex namespace, and set the properties as shown in Figure 6.57.
- Save and activate the objects created so far.
You’re now done creating objects in the Enterprise Services Repository.
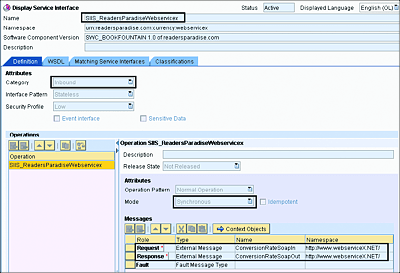
Figure 6.57 Inbound Service Interface Properties
Note
For this scenario, no mappings will be created because the structures of the outbound and inbound service interfaces are exactly the same.
Create and Configure the iFlow
Before starting, you need to make sure that SAP NetWeaver Developer Studio has been configured to point to your SAP PO machine. In particular, check that SAP NetWeaver Developer Studio is configured to connect to the ES Repository and to the SAP PI Configuration Tools node (refer to Section 6.1.2 for more details).
To create an iFlow, follow these steps:
- From SAP NetWeaver Developer Studio, switch to the SAP Process Integration Designer perspective, and log on.
- Import the two business systems (BS_READERSPARADISE and BS_ BOOKFOUNTAIN) created in the Chapter 3 exercise. Figure 6.58 shows how to start the import.
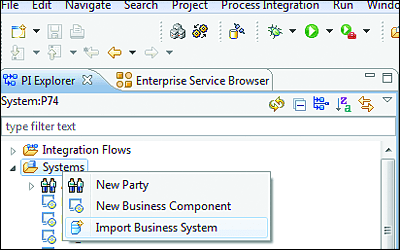
Figure 6.58 Importing the Business Systems from the SLD
With the business systems now available in SAP NetWeaver Developer Studio, you can create the iFlow by following these steps:
- Right-click on the Integration Flow node, and select the New Integration Flow option. Name the new iFlow “IF_ReadersParadiseCurrencyService”.
-
On the first screen of the wizard, select the options as shown in Figure 6.59.
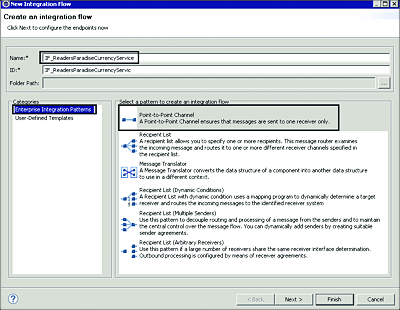
Figure 6.59 iFlow Properties Options to be Selected
- Click on the Finish button.
- Configure the sender system by right-clicking on the sender system component and selecting the Assign Business system option.
- Choose the BS_READERSPARADISE business system.
- Right-click on the interface component, and choose Assign Interface.
- Choose SIOS_ReadersParadisePortal.
-
Right-click on the channel adapter component, and select the Configure Channel option. Set the properties of the channel as shown in Figure 6.60.
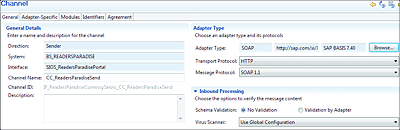
Figure 6.60 The iFlow’s Sender Communication Channel Configuration
- Configure the receiver system by right-clicking on the sender system component and selecting the Assign Business System option.
- Choose BS_BOOKFOUNTAIN as the business system.
- Select the interface component on the receiver, and choose the option Assign Interface.
- Choose SIIS_ReadersParadiseWebservicex.
- Right-click on the channel adapter component, and select the Configure Channel option. Set the properties of the channel as shown in Figure 6.61.
-
Configure the endpoint on the receiver channel by clicking on the Adapter-Specific tab and setting the Target URL to http://www.webservicex.net/CurrencyConvertor.asmx and the Action to http://www.webserviceX.NET/ConversionRate.
When you’re finished, the iFlow should look like Figure 6.62. -
Activate the iFlow by right-clicking on the IF_ReadersParadiseService entry (on the PI explorer view located on the left side of SAP NetWeaver Design Studio) and selecting the Activate option.
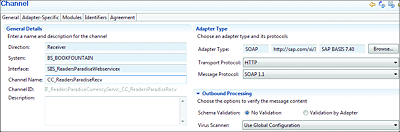
Figure 6.61 The iFlow’s Receiver Communication Channel Configuration

Figure 6.62 Overview of the Created and Configured iFlow
- When asked if you want to activate, click Yes to complete the iFlow activation.
- Right-click one more time on the iFlow, and select the Deploy option to deploy it into the server. When the deployment is triggered, click Yes in the popup that appears. This will deploy the iFlow into the SAP PO server.
Now that you’re done with the deployment, it’s time to test the iFlow.
Testing
To test the iFlow that has been deployed in the server, follow these steps:
- Log on to the Integration Directory, and expand the Integration Flow node.
- Open the ICO created as a result of the iFlow. From the ICO, click on the Integrated Configuration menu item, and select the Display WSDL option (see Figure 6.63).
-
Save the WSDL to your local machine.
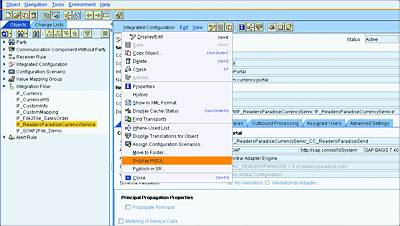
Figure 6.63 Displaying the iFlow WSDL
- Simulate the Reader’s Paradise portal with the SOAP UI client tool. SOAP UI is an external open source tool.
- Import the saved WSDL into the SOAP UI as a new project (see Figure 6.64).
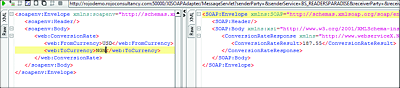
Figure 6.64 SOAP UI Client Request and Response Messages