8.4 Migrating Integration Directory Content
Because the SLD and ES Repository objects have already been migrated to the target SAP PO system, you now have all the required dependencies that you need to start migrating the configuration objects. To migrate configuration objects, you can use a manual method or use the Migration tool. Given that SAP PO is based on Java only, only ICOs and iFlows are supported as configuration objects. Therefore, all classic configuration objects will need to be migrated to ICOs or iFlows.
8.4.1 Manually
You can use the old-school method and manually move all required interfaces, which can be a useful approach if you don’t have the transport mechanism in place or decide not to use the Migration tool. Consider the following details:
- All configurations using an integration process (ccBPM) as a communication component will need to be redesigned. Note that SAP PO doesn’t use ccBPM.
- All configurations using the old “classic” method will need to be recreated as ICOs or iFlows, depending on your preference.
-
For each of the existing classic configurations, you need to determine the following:
- Sender system
- Sender interface used
- Sender communication channel
- Routing conditions
- Receiver system
- Operation mapping to be used (if any)
- Receiver interface
- Receiver communication channel
- All ICOs will need to be moved as is with the export and import functionality. The communication channels might need to be reworked because the version of the adapter engine might be different. It’s also possible that the adapter type in use isn’t available in SAP PO. See Table 8.2 for examples of adapter types that have been renamed.
| ABAP-Based Adapter Types | Java-Based Adapter Types |
|---|---|
| IDoc | IDoc AAE |
| HTTP | HTTP AAE |
| XI | SOAP adapter in combination with XI 3.0 message protocol |
| WS | Not yet supported |
Table 8.2 Conversion of ABAP and Java Adapter Types
8.4.2 Using the Migration Tool
The Integration Directory Migration tool is a standard application that supports automating the migration of Integration Directory content. The Integration Directory content in question includes communication channels, communication components, and traditional (classic) integration configurations. This tool is a standard application built by SAP and delivered as part of SAP PI or SAP PO. It makes use of the Directory application programming interface (API) and can be found under Configuration and Monitoring. You only need the Migration tool to be present in the target system—more specifically, in your SAP PO machine. The tool is available from SAP PI 7.30 SP 9 and SAP PO 7.31 SP 7 and newer versions.
Consider the following details when using the Integration Directory Migration tool:
- The tool converts classical scenario configurations and related objects to ICOs. iFlows aren’t used.
- Use of the tool assumes that all dependent ES Repository and SLD objects have already been migrated using a manual approach or the transport mechanism.
- The tool uses the sender agreement as the base from which configuration objects will be migrated. If your scenario doesn’t use a sender agreement, then it will be skipped. It also uses the receiver determination for scenarios that are based on a sender IDoc and proxy. This is because in the “classic” scenarios, sender agreements weren’t needed for IDoc and proxy scenarios.
- The tool ensures the consistency of a configuration scenario. As a result, when migrating a scenario, it will automatically create the related communication channel and communication component (party, business system, and business component).
- The tool provides facilities to rename configuration objects during the migration process.
- You can select one or multiple classic scenarios to be migrated at once.
- Support for bulk migration of communication components and updates of their properties are also provided.
The Integration Directory Migration tool can be directly accessed and launched via http://<hostname>:<port>/webdynpro/resources/sap.com/tc~pi~tools~dirmig~wd/DirectoryCockpit.
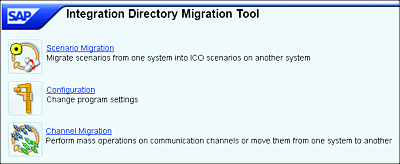
The Integration Directory Migration Tool landing page is shown in Figure 8.2. Communication channels are completely copied across, including their module properties. Only the password isn’t copied. Communication channels using ABAP-based adapter types are turned into their Java-only equivalents. See Table 8.2 for the specifics of conversions between ABAP-based and Java-based adapter types.
Note that <hostname> and <port> represent the hostname and port number, respectively, of your SAP PO target system. The tool is equipped with three main features:
-
Scenario Migration
Facilitates the migration of scenarios from one system into ICO scenarios on another system. -
Configuration
Facilitates the maintenance of additional systems in your landscape in the tool. You can also maintain renaming rules for Integration Directory objects. -
Channel Migration
Facilitates the mass migration of communication channels from one system to another.
Figure 8.2 Landing Page of the Integration Directory Migration Tool
Given that the Migration tool uses the Directory API in the background, you’ll need roles required to execute Directory API calls in both the source and target systems. See Table 8.3 for a list of some roles that you’ll need in both systems and their descriptions.
| Role Name | Description |
|---|---|
| SAP_XI_API_DISPLAY_J2EE | Gives the user authorization to perform directory operations, including Query, Read, Check, GetState, CheckContent, GetCacheState, and GetObjectIdentifier. |
| SAP_XI_API_DEVELOP_J2EE | Gives the user authorization to perform directory operations, including Change, Create, OpenForEdit, Revert, Delete, CreateFromTemplate, Activate, and Revert. |
Table 8.3 Roles Required for Using the Configuration API and Integration Directory Migration Tool
Scenario Migration
To perform a migration using the Migration tool, follow these steps:
- Launch the tool via http://<hostname>:<port>/webdynpro/resources/sap.com/tc~pi~tools~dirmig~wd/DirectoryCockpit. You can also launch it by going to the landing page of SAP PO (http://<hostname>:<port>/dir) and navigating to the Configuration and Monitoring link. You then need to select the Configuration and Administration tab and click on the Migration Tool link.
- Click on the Scenario Migration link.
-
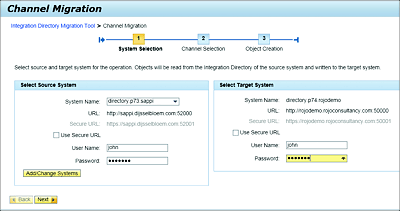
In the System Selection step, fill in the following details:
-
Select Source System
Select the source system from the dropdown list, and maintain the login details. The list of systems to select from is retrieved from the SLD. Note that if the source system that you’re looking for isn’t present in the dropdown list, you can always add it by choosing the Add/Change Systems button. -
Select Target System
The target system is preselected for you. It’s always the system where the tool is located. You just need to enter your user login details (see Figure 8.3). Click on the Next button.
Figure 8.3 System Selection Screen of the Integration Directory Migration Tool
-
Select Source System
-
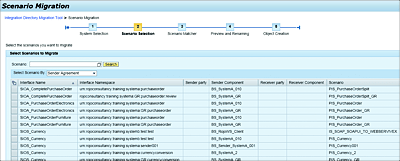
On the next screen, you can select the scenarios that you want to migrate in the Scenario Selection step. You can select from among the following scenario types:
-
Sender Agreement
Useful for selecting scenarios with a sender agreement. -
Configuration Scenario Name
This is an alternative option to the sender agreement selection method. The option is mostly used for ABAP-based interfaces that don’t contain a sender agreement. -
Receiver Determination
Use this option whenever your scenario doesn’t have a sender agreement. This is mostly relevant for the IDoc and SAP XI adapter types.
-
Sender Agreement
- Click on the Search button, which allows you to get results containing the classic scenario from the source system. After selecting the scenarios that you want to migrate, click on the Next button. See Figure 8.4 for an example screen.
-
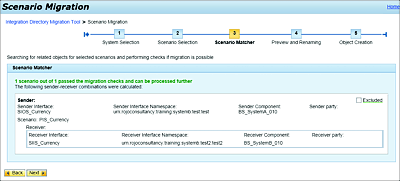
The next step in the wizard is called Scenario Matcher. This step automatically identifies all objects upon which the selected scenarios depend, performs checks to verify that all preconditions for the migration are matched and passed, and provides a detailed overview of passed and failed scenarios. An example of a passed check appears in Figure 8.5 (when the check fails, a detailed error is provided). When you’re done with this step, click on the Next button.
Figure 8.4 Selecting Classic Scenarios from the Source System to be Migrated to an SAP PO Target System
Figure 8.5 Example of a Scenario That Passed the Matcher Check
-
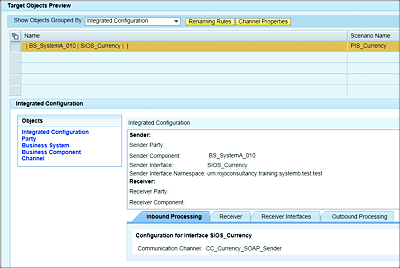
You now have an overview of the ICO to be created in the target system. This Preview and Renaming step gives you a preview of the end result in the target system (see Figure 8.6). In addition, you can adapt the communication channels’ properties (such as the adapter engine) or influence the names of the objects to be created. You can rename objects using the renaming rules. When you’re satisfied with the preview, click on the Next button.
Figure 8.6 Overview of the ICO to be Created in the Target System
-
In the Object Creation step, the tool suggests a change list to be created in the target system (into which the new object to be created will be added). Click on the Create button to create a change list object (see Figure 8.7). After that, you’re ready to click on the Next button.
Figure 8.7 Screen Enabling the Creation of a Change List in the Target System to Include the ICO-Related Objects
- You get an overview of the steps performed in the target system and their statuses. If some steps failed, then you view their details in this screen.
- You’re now ready to log in to the target SAP PO system and activate the change lists created as a result of the migration. You might be required to readjust some communication parameters with details such as passwords.
Note
If objects to be migrated already exist (with the same name) in the target, then they aren’t created; the implication is that the existing objects aren’t overwritten. You can use the renaming rules to name your new objects differently to avoid this conflict.
Tips and Tricks
Always make sure that your user has both the SAP_XI_API_DISPLAY_J2EE and SAP_XI_API_DEVELOP_J2EE roles in the source and target systems.
If this isn’t the case, then you’ll see the following error: Insufficient authorization to read from source system. Details: Your user needs additional authorizations.
Channel Migration
This tool enables the mass migration of communication channels from one system to another. Note that attributes (such as passwords) aren’t migrated.
This tool can also be used to change the metadata and properties of communication channels in the target system. You can change one attribute for multiple channels at the same time. A good example of this is to change the adapter engine to be used, in a case in which the landscape has decentral adapter engines. Values of adapter module properties can also be modified.
The steps involved to perform such a communication channel mass migration are as follows:
- From the main page of the tool, click on the Channel Migration link.
- Select the source and target systems, and then enter login credentials. Note that the target system is selected by default.
- Search for the desired communication channels using the name, component, or party. Note that you can further narrow your search criteria by choosing whether the channel is on the sender or receiver side. You can also use regular expressions for your search keywords. Click on the Search button.
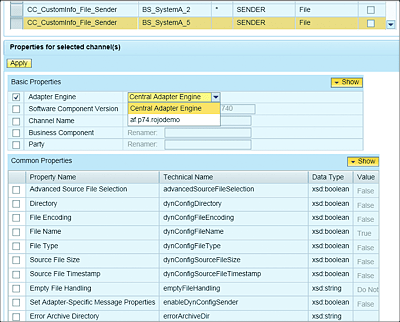
- From the search results, select the relevant communication channels. Details of the channels are displayed under Module Properties. You can also select a specific property’s checkbox and edit it (see Figure 8.8). When you’re finished, click Next.
- At the top of the screen, click on the Create button to start the creation process on the target system. Be aware that a change list will also be created to contain the migrated channels.
- You’ll get an overview of all performed steps and their statuses. The statuses can be OK, Warning, or Error. You have to activate the channels in the target system.
Figure 8.8 Example of the Channel Selection Step When Changing Adapter Properties
Note
Migrated communication channels aren’t always ready to be activated; some of them might still need to be adjusted, especially because attributes such as password and adapter engine need to be maintained.
Configuration
The configuration feature can be used to add additional systems from your landscape via the Migration tool. In addition, you can maintain renaming rules for Integration Directory objects.
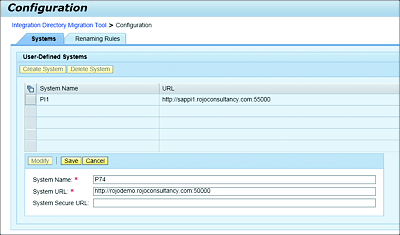
The Migration tool looks up the SLD that it’s connected to and retrieves all Integration Directory systems. If the source system that you’re interested in isn’t visible in the view, then you can manually add it, as shown in Figure 8.9. To add a new system, you’ll need to do the following:
- From the Migration tool main page, click on the Configuration link. Then, select the Systems tab.
- Click on the Create System button.
- Maintain the system name and URL, and click on the Save button (see the example in Figure 8.9).
- You can also modify or delete an existing system by selecting it from the table.
You’re now ready to use any of the systems in this list as your source system.
Figure 8.9 Maintaining Integration Directory Systems in the Migration Tool
You may also want to rename the directory objects to be migrated. The Migration tool provides the feature of creating a reusable renaming rule from a central place. This same rule can then be reused for different scenarios and configuration objects.
To create a new renaming rule, follow these steps:
- From the Migration tool main page, click on Configuration. Then, select the Renaming Rules tab.
- Click on the Create Rule button.
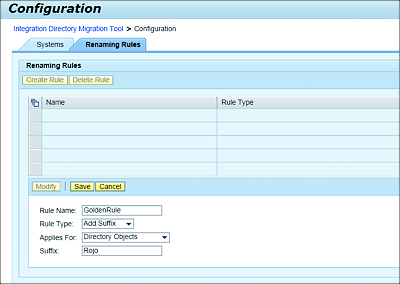
- You’re then presented with a new area, in which you can specify details of the renaming rule (see Figure 8.10). Note that you have a choice between adding a suffix to the object name or replacing an existing part of the name. The provided suffix is added when the Rule Type dropdown menu is set to Add Suffix. You can alternatively replace an existing part of the name by setting the value of the Rule Type dropdown menu to Value Map.
- When you’re done, click on the Save button.
You’re now ready to reuse this rule during the migration process.
Figure 8.10 Renaming Rule Creation Example
Renaming Rules
When using the renaming rules feature, take the following details into consideration:
- You can influence the name of objects such as party, communication component, and communication channel.
- If your routing rule is content based and uses a constant, then you can replace it.
- Business systems can be renamed to match the business system defined in your target system’s SLD.
Remember that not all objects can be migrated. Per the current version of the Migration tool, the following object migrations aren’t supported:
- Receiver rules
- ABAP-based scenarios (with ccBPM or ABAP mappings)
