10.3 Configuring the BPMN Model
In the previous sections, we modeled our process using BPMN. Now, it’s time to configure the different BPMN elements. To configure the process, we’ll create and add other supporting elements. In this section, we’ll explore these supporting elements and explain some concepts that play a role in such a configuration.
10.3.1 Data Objects
Data objects are artifacts used to store process-related data. In a typical process, data is modified and changed at different steps of the process. Different statuses need to be maintained as the process is executed. A data object is linked to a data structure or data type. These data types can be simple or complex and are supported by an XSD. The XSD needs to be defined according to the business object structure. SAP BPM provides the option to directly create an XSD in SAP NetWeaver Developer Studio. The XSD can alternatively be imported from an external source, such as the ES Repository or the local file system. In most cases, it’s common to import a WSDL from a service interface maintained in the ES Repository.
Given that data objects depend on data types, we’ll need to create the required XSD and, where relevant, import the WSDL. Most times, when your process needs to call an external web service, it becomes necessary to import the relevant WSDL from the ES Repository. This basically means that the web service is first imported into the ES Repository because SAP PI/AEX needs to act as the broker or ESB. Therefore, the web service calls from SAP BPM processes will transit via the AEX.
10.3.2 Creating Data Structures
Based on our demonstration scenario, we need to create an XSD to hold the data to be captured by the HR personnel. These two standards are used to define the structures required for holding data. More details can be found from the W3C at www.w3.org.
To create an XSD in SAP NetWeaver Developer Studio, follow these steps:
- On the left panel of your perspective, expand the pr_hireemployee/pr/pm DC, and then expand Process Modeling.
- Right-click on Data Types, and select New XSD. The XSD Editor will be launched automatically, allowing you to start creating the new structure. Name your XSD “EmployeeData.xsd”, and then click on Finish.
-
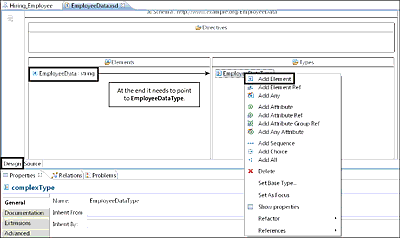
Select the Design tab in the bottom-left corner, as indicated in Figure 10.21. Right-click on the Elements section, and select Add Element from the dropdown menu.
Figure 10.21 Adding a Type in the Data Type Editor in SAP NetWeaver Developer Studio
- You need to maintain the properties of the new XSD element by renaming it to “EmployeeData”. This new element needs to point to a complex data type that represents the total structure of the employee. Because the complex data type doesn’t yet exist, leave the data type set to string for now.
- If you see a pop-up asking you to accept the changes, click on the Accept button.
- Create a data type by right-clicking on the Types section and selecting the Add Complex Type option. Name the new data type “EmployeeDataType”.
- If you see a pop-up asking you to accept the changes, click on the Accept button.
- Double-click on the newly created EmployeeDataType to maintain its elements. It opens a new view, in which you can add new elements by using the context menu. Name each element and give each a type. Note that you can use the dropdown to select the correct data type (Simple or Complex).
- Now that the EmployeeDataType has been created, go to the main view of the XSD Editor, and assign EmployeeDataType as the data type of the EmployeeData element.
- Save all changes. You’re now ready to use the XSD.
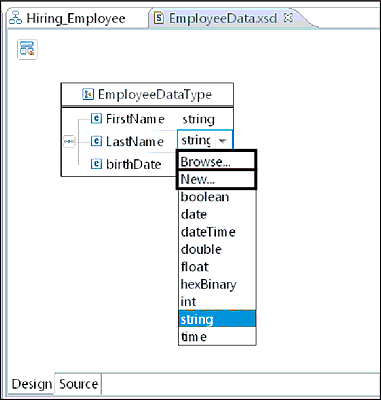
Note that when choosing a data type, you can choose data types that have been predefined by SAP. You’ll see, however, that the initial dropdown list only includes the following subsets: boolean, date, dateTime, double, float, HexBinary, int, string, and time. If you want to explore an extended list of provided data types, then you need to select the Browse option from the dropdown, as indicated in Figure 10.22. You can also create a new data type of your own via the New option.
Figure 10.22 Available Core Data Types
10.3.3 Importing XSD and WSDL
Given that we need to call two web services in our demonstration scenario, we need to import their corresponding WSDLs into our project. To import a WSDL, follow these steps:
- From the SAP NetWeaver Developer Studio menu, select File • Import.
- In the screen that appears, select XSD under the WSDL node, and click on Next.
-
You can choose one of the following options from which to import the WSDL file:
-
File System
Choose this if your WSDL is available on your local file system. You’ll then need to browse to the WSDL file and select Import. -
Remote Location
Choose this when the WSDL is provided by an external system, and you have the WSDL link or URL. In this situation, enter the URL of the WSDL, and select Import. -
Enterprise Service Repository
Choose this if you want to import the WSDL via a service interface that exists in your ES Repository. You’ll then need to enter your credentials for the SAP PO system. The next step will be to navigate to the service interface in question and click on Next.
-
File System
- Click on Finish. The imported WSDL and all its related XSDs are now available in your project under the Data Types folder.
These steps need to be repeated for each web service call step in your process—to order the car at the lease company (SpotLeaseCars) and to save the data in the SAP ERP HCM system.
10.3.4 Process Pool Properties
After the BPMN has been modeled, and the necessary XSDs have been created or imported, it’s time to move to the next step, configuring the pool associated with the process. The pool needs to be configured to specify its attributes. To configure the pool, make sure to select it in the BPMN diagram. After selecting a pool, its properties will be displayed at the bottom of the screen, as shown in Figure 10.23.
Figure 10.23 Pool Properties Displayed in the Properties Tab
Table 10.5 lists the attributes contained in the properties and explains their roles.
Table 10.5 A Pool’s Attributes and Their Roles
Administrator via Principals
When maintaining the attributes of the Administrator tab, you can define the administrators of a pool via the notion of principals. A principal represents any user, user role, or user group responsible for some aspects of the process. As explained in Table 10.5, you can directly choose the principals who can act as responsible administrators of your process from the UME of your SAP PO server.
It’s important to make sure that the connection to the SAP NetWeaver AS Java server is configured. The steps required to connect SAP NetWeaver Developer Studio to the SAP NetWeaver AS Java server were described in Section 10.1.2. It’s also required that the user used to connect to the SAP NetWeaver AS Java has the MY_SPML_FULL_ACCESS_ROLE role assigned. Otherwise, the server will throw an exception when attempting to look up principals.
To choose the desired administrator, follow these steps:
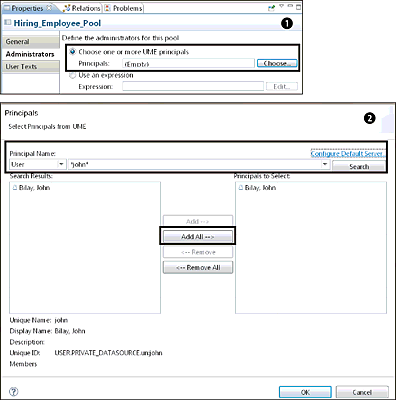
- Click on the Choose button on the right (see Figure 10.24 1).
-
From the pop-up screen, you can select principals based on roles, users, or groups 2. You can then enter the desired keyword and click on the Search button. SAP NetWeaver Developer Studio must be able to connect to SAP NetWeaver AS Java for this step to work.
Figure 10.24 Steps Involved in Configuring UME Principals as Administrators for the Pool
- A new pop-up appears, requesting login details.
- After the set of results is returned, you can select the desired results and move them to the right side of the screen by clicking on the Add or Add All button.
- Click on the OK button when you’ve finished your selection.
Note
You can select multiple users (principals) as administrators for your pool. Any of the selected principals can act as administrators for the pool.
When searching the desired principals to be configured as the administrators of the pool, you might see the error You are not authorized to search principals from UME. To fix this error, you’ll need to add the MY_SP ML_FULL_ACCESS_ROLE role to the profile of the user used to connect to the UME. Alternatively, you can apply SAP Note 1647157.
It goes without saying that specifying a principal as a specific user might not always be a good approach. This is because you’re required to know the names of the users in advance—that is, during the development time. This approach doesn’t provide much flexibility. If you hard-code the name of a specific user in a task, then only this specific person can perform the task in question. What if the user is absent? Be aware that changing this attribute’s value requires a transport—not very handy if your process is in production and you need to change it.
A better approach is to use roles or groups. In that way, you only need to add users to the appropriate role or group, and they will automatically be able to administer the process. Assigning a role to a user or adding the user to a group can be directly performed in the UME of the required environment (e.g., production) and doesn’t require objects to be transported. As a result, this approach has less risk and offers more flexibility.
Administrator via an Expression
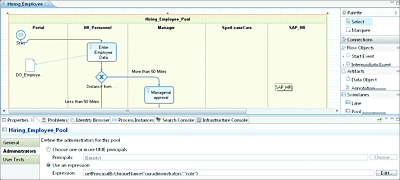
As mentioned in Table 10.5, you can use an expression instead of a principal, which can be an easy and flexible way to access the principals without having to connect to the server. Figure 10.25 shows an example of an expression that assigns all users with the ouradministrators role as administrators of the process.
Figure 10.25 Defining the Pool Administrator
Some expressions you can use are listed in Table 10.6.
Table 10.6 Expressions Used to Retrieve Principals
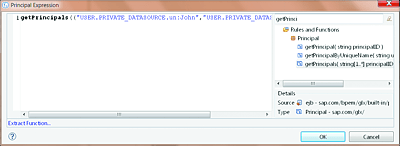
The expressions listed in Table 10.6 can be found under Rules and Functions • Principal, as shown in Figure 10.26.
Figure 10.26 Selecting Principal Expressions from the Rules and Functions
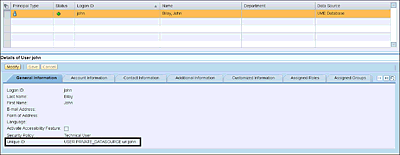
Remember that when using the getPrincipal or getPrincipals expression, you’re required to use the technical name or unique ID field of the principal, as indicated in the UME. Figure 10.27 shows an example of how to find this information. The following is an example of a unique ID for each principal type:
- USER.PRIVATE_DATASOURCE.un:john
- ROLE.UME_ROLE_PERSISTENCE.un:Administrator
- GRUP.PRIVATE_DATASOURCE.un:NWDI.Developers
Figure 10.27 Finding the Unique ID for a Principal in the UME
10.3.5 BPMN Flow Objects
We explored BPMN flow objects in Chapter 9. In the next sections of this chapter, we’ll dive into the technical aspects and configurations of these BPMN objects within the context of SAP BPM.
Properties
All flow objects of an SAP BPM process have property attributes that are used to configure their behaviors. Depending of the type of flow object in use, the attributes to be maintained might differ. By selecting any BPMN flow object, a Properties view is loaded that contains its attributes. Every BPMN object contains a General tab. This tab in the Properties view contains descriptive information fields, such as for the Name and Documentation of the start event (see Figure 10.28).
Figure 10.28 Flow Object Details in the General Tab
Format Lanes
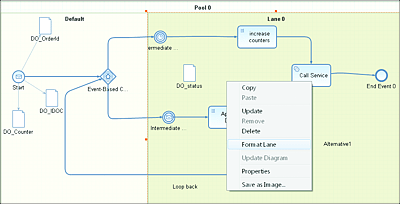
Any BPMN model can be formatted to rearrange its layout to make it more readable. A model can be easily formatted by bringing up the context menu on its pool or lane and selecting the Format Lane option, as shown in Figure 10.29.
Figure 10.29 Formatting a BPMN Model to Rearrange Its Layout and Increase Readability
