10.6 Advanced Mapping
Data mapping takes care of transforming and modifying the process context data for each flow step. Some flow objects are equipped with inbound and outbound mappings, which enable the process context data to be mapped to the activity and the event’s input data. In addition, the activity and event’s output data can be mapped and copied back to the process context. This section will explore some advanced functionalities of mapping techniques.
10.6.1 Mappings
When working with a mapping, there are always source (on the left side) and target (on the right side) structures. To create the mapping, the appropriate data object needs to be dragged from the left and dropped on the corresponding data object on the right.
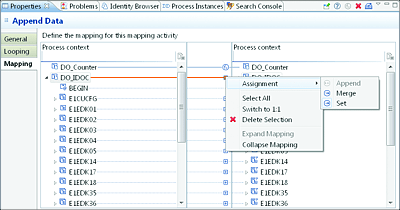
As Figure 10.62 shows, the lines between the different items indicate that there is a mapping between them. The value of the element on the left side is copied to the element on the right side. You can also modify the data before assigning it to the target by using rules and functions.
Figure 10.62 Mapping Data Objects in the Mapping Activity
Figure 10.62 also shows an Assignment menu on the right side of the screen. From this menu, you can pick the desired type of assignment that you want to use for a particular node element.
SAP provides a number of predefined rules and functions to cater to different commonly used transformations. These functions are categorized under different function groups. Table 10.13 lists the main categories and explains what they are used for.
Table 10.13 Categories of the Default Rules and Functions Provided with SAP BPM
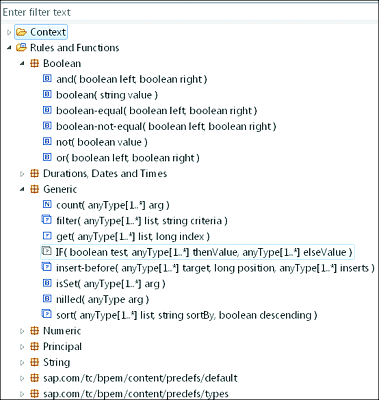
Figure 10.63 shows some of the rules and functions provided with SAP BPM. Each function grouping can be expanded to see the different included functions. You can mouse over each one of these functions to see a description of what the function does. You can also see the signature of the function, specifying the number of input parameters and their data types. You can further filter any of the functions by typing your filtering keyword(s) into the Enter filter text box at the top of the screen.
Figure 10.63 Default Rules and Functions Delivered with SAP BPM
10.6.2 Options in Mapping Assignment
When the nodes of the data objects have an unbounded cardinality (0..n or 1..n), you can use different types of mapping assignments.
Depending on your business requirements, you might need to set, merge, or append the new data:
-
Set
This type of assignment works like the equal operation in mathematics. It replaces the value of the target with the value of the source node or element. The data is basically overwritten. This is also the default assignment type. -
Append
This type of assignment adds or appends the source values to an existing target collection. The values are then appended to the last position (last item) of the collection. -
Merge
This type of assignment merges the data of the source node to the data in the target node. At the end, the target structure will include a new collection containing the data of the source and target node.
10.6.3 Automatic Mapping
With SAP BPM, there is a concept known as automapping, which tries to automatically create the appropriate mapping between source and target nodes or elements. This mapping automation feature dramatically reduces the time needed to transform large structures. The algorithm used for suggesting the mapping is referred to as a matcher.
To specify a matcher while mapping two nodes, follow these steps:
- Select the node from the left side that needs to be mapped to the right side.
- Right-click, and drag and drop to the target element on the left side.
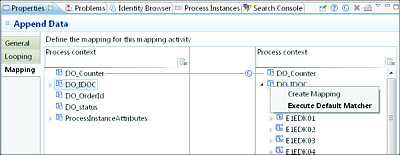
- You’ll see a pop-up with the options Create Mapping or Execute Default Matcher. Choose Execute Default Matcher, as shown in Figure 10.64.
Figure 10.64 Example of Enforcing the Execution of a Matcher
SAP BPM provides two automapping options: simple and advanced. Both will be explored next.
Simple Cases or Name-Based Automapping
The simple automapping automatically suggests a mapping between source and target elements with identical (matching) names.
Advanced Automapping
In more complex situations, a mapping is automatically created between the source and target elements using a predefined algorithm. This algorithm takes more into account than just matching names. It also creates the mapping suggestion based on the result of matching the data type, path, leaf, and parent elements of the element in question.
You can switch between using the simple and advanced automapping as the default approach from SAP NetWeaver Developer Studio. To do so, follow these steps:
- After launching SAP NetWeaver Developer Studio, select Window • Preferences.
- On the left side, select Data Mapping.
-
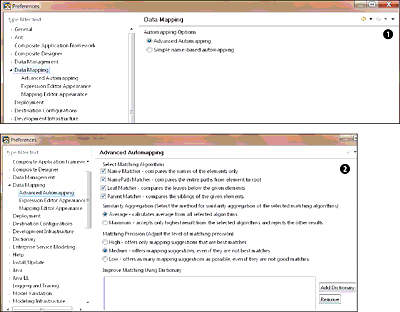
Select the radio box of the automapping option that you prefer (see Figure 10.65 1).
Figure 10.65 Changing the Default Automapping Matcher and Tuning the Algorithm of the Advanced Automapping
You can further adjust the settings of the algorithm used for the advanced automapping to better fit your needs. To do so, follow these steps:
- From SAP NetWeaver Developer Studio, select Window • Preferences
- On the left side, select and expand Data Mapping.
- Select Advanced Automapping.
- Deselect or select the matcher to suit your needs (see Figure 10.65 1).
You can further adjust the behavior of the advanced matcher algorithm by using the checkbox options 2.
10.6.4 Custom Functions
You might encounter situations in which the standard rules and functions don’t provide you with the functionality that you need to perform your mapping. You can consider such cases as complex mapping.
SAP BPM provides the flexibility to create your own functions to extend the existing function set. These custom functions can then be added in the function repository and reused by other SAP NetWeaver Developer Studio projects and SAP BPM processes. You can create custom functions as expressions, mappings, or EJBs. We’ll now explore for which situation or scenario each type of function is suited. Note that each function has a name, return type, and optional input parameters.
Expression and Mapping Function
You can use this type of function to build complex transformation rules using expressions or mappings.
Enterprise Java Bean Function
You can use this type of function to build a complex transformation function using an EJB. This approach involves writing the transformation in Java. You’ll need to deploy the Java code in the SAP NetWeaver server and define a reference using a Java Naming Directory Interface (JNDI) name to be used for looking up the EJB.
To create a new custom function, follow these steps:
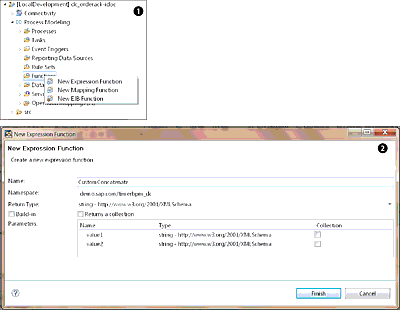
- Under your project, right-click on the Function node (Figure 10.66 1).
- In the resulting pop-up, select the desired type of function.
- Specify the name of the function.
- Select the data type of the parameter to be returned. This attribute is called the return type.
-
Add the input parameters and specify their data types (Figure 10.66 2).
Figure 10.66 Steps Involved in Creating the Custom Functions in an SAP BPM Project
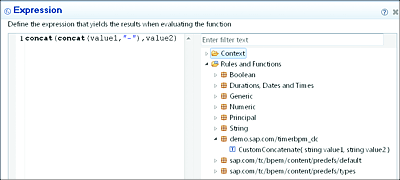
- Enter the expression or mapping, depending on the type of function that you chose. In Figure 10.67, an example expression function is shown based on the expression function started in Figure 10.66.
- The newly created function is now present and visible in the list of Rules and Functions.
The CustomConcatenate sample expression function in Figure 10.67 is created to concatenate two input values and to separate them with a dash (-) as a separator.
Creating an EJB function requires a few more steps and will be covered in Chapter 11.
Figure 10.67 Expression Used for the Custom Expression Function
Note
When creating a custom function, you can use generic parameters for input or return. This approach is useful and helps to create a flexible function in terms of the data types that might be used as parameters.
The approach lets you specify a parameter with a generic data type during the design time and only discover the specific data type of the parameter during runtime. To achieve this, you can use the data type anyType from the http://www.w3.org/2001/XMLSchema namespace.
