11.11 Exercise: Applying Advanced SAP BPM Concepts and Extensions
This exercise walks you through the process of building a custom EJB function to be used in an SAP BPM process.
In your daily development activities, you might encounter a situation in which the function that you need for your business process isn’t available as one of the default functions delivered by SAP. In this situation, you can build an EJB function that can be used as a mapping function. In this exercise, we’ll create our own custom function to concatenate two strings (although such a function already exists). This concatenation function has been chosen for its simplicity. The purpose of the exercise isn’t to create a complex function, but rather to learn how to create a custom function.
11.11.1 Exercise Solution Approach
To create a new EJB custom function for the purpose of being used in your SAP BPM process, you need to perform the following main high-level actions:
- Create EJB and enterprise DCs, and maintain their dependencies.
- Implement the logic of the function in Java.
- Build and deploy the implemented functionality to the SAP PO server.
- Verify the JNDI details of the implemented function.
- Use the developed custom function in your SAP BPM process.
The next section will focus on providing a step-by-step walkthrough of these actions.
11.11.2 Exercise Step-by-Step Solution
In the following sections, we will walk though the steps necessary to build a custom EJB function.
Create the Development Components
Follow these steps to create new DCs:
- Launch SAP NetWeaver Developer Studio, and ensure that it’s configured to point to the SAP PO server where the SAP BPM process was deployed.
- Create two DCs. In SAP NetWeaver Developer Studio, go to the Development Infrastructure perspective.
- Right-click on My Components SC, and select New • Development Component.
-
Select EJB Module under Java EE (Figure 11.35), and click on Next.
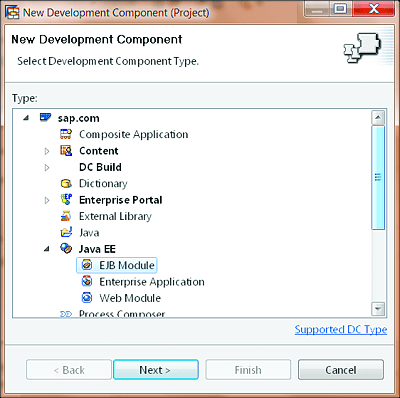
Figure 11.35 Selecting the DC Type
- Proceed with the wizard, and name your DC “dc_processfunctions”.
- Click on the Finish button. When asked to switch perspectives, choose the No button.
- Create another DC, this time of the Enterprise Application type. Name your DC “dc_processfunctions_ear”, and then click on the Next button.
- On the next screen, leave all default options as is, and click on Next.
- On the subsequent screen, select the DCs that the enterprise application DC will depend on, which are called the referenced projects. For this example, select the DC that you previously created: dc_processfunctions. Click on Finish. When asked to switch perspectives, choose No.
It’s now time to set up the dependencies between the EJB DC and other DCs that are required for the purpose of creating custom EJB functions for an SAP BPM process. Follow these steps:
- Select the previously created EJB DC (dc_processfunctions).
-
Go to the Dependencies tab, and choose the Add button (see Figure 11.36).
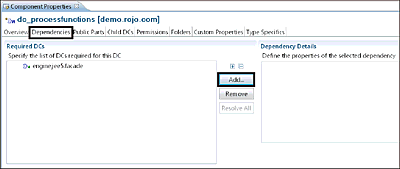
Figure 11.36 Adding Dependencies to the EJB DC
- When the pop-up appears, enter the filtering term “*mapping*”.
-
From the filtering results, expand the SERVICE-COMP [sap.com] SC, select the tc/bpem/mapping/facade entry, and click on Finish (Figure 11.37).
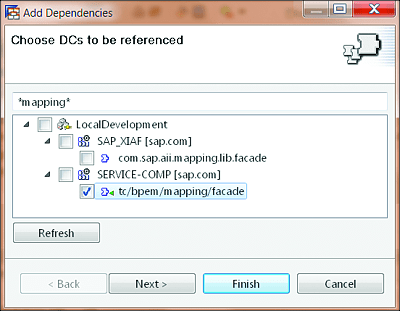
Figure 11.37 Adding the tc/bpem/mapping/facade Dependency
- Add another dependency by filtering for “*sdo21*”. From the results, expand the ENGFACADE SC, select tc/je/sdo21/api, and click on Finish (Figure 11.38).
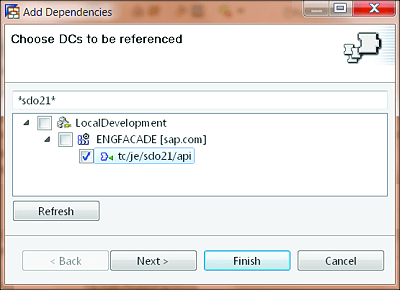
Figure 11.38 Adding the tc/je/sdo21/api Dependency
It’s now time to set up the dependencies between the EAR DC and the DCs that are required for the purpose of creating custom EJB functions for an SAP BPM process. Follow these steps:
- Select the previously created EAR DC (dc_processfunctions_ear), go to the Dependencies tab, and click on the Add button.
- Add a dependency to tc/bpem/mapping/facade as you did previously for the EJB DC. However, instead of clicking on the Finish button, click on the Next button, and select both the Deploy Time and Runtime options (Figure 11.39). Then, click on Finish.

Figure 11.39 Dependencies Details Options for the Enterprise Application DC
Implement the Functionality
Now that the different DCs and the relevant dependencies have been created, it’s time to create the source code needed to perform the desired concatenation function. Follow these steps:
- Open the Java EE perspective. Open the previously created EJB DC, and right-click on ejbModule.
-
From the subsequent menu, choose New • Session Bean (EJB 3.x) (Figure 11.40).
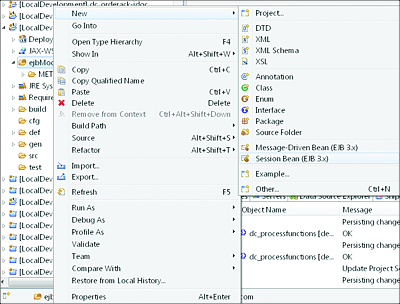
Figure 11.40 Creating an EJB Session Bean
-
In the new screen that appears, provide details of the session bean, as shown in Figure 11.41. Click on Finish.
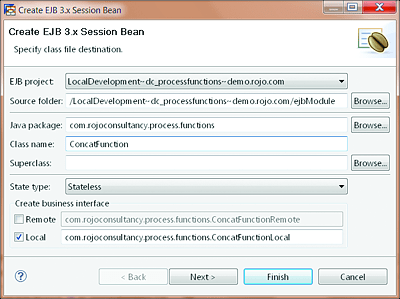
Figure 11.41 Details of the Session Bean to be Created
-
A new class is created, with very few lines of code. Add the import lines presented in Listing 11.5 to your code.
import javax.ejb.Stateless;
import javax.xml.namespace.QName;
import com.sap.glx.mapping.execution.api.function.Function;
import com.sap.glx.mapping.execution.api.invoker.SdoInvoker;
import com.sap.glx.sdo.api.SdoRenamingHelper;
import commonj.sdo.DataObject;
import commonj.sdo.Type;
Listing 11.5 Import Statements
-
Now, remove the generated default constructor code presented in Listing 11.6.
/**
     * Default constructor.
     */
    public ConcatFunction() {
        // TODO Auto-generated constructor stub
    }
Listing 11.6 Default Constructor to be Removed
-
Replace the default constructor with the source code provided in Listing 11.7.
private static final String NAMESPACE_FUNCTION_PARAM = " com.rojoconsultancy.process.functions/demoprocess";
private static final String PARAM1 = "param1";
private static final String PARAM2 = "param2";
private static final String RESULT = "result";
private static final String NAME_PROPERTY_INPUT_PARAM1 = SdoRenamingHelper.renameXsdElementToSdoProperty(new QName(NAMESPACE_FUNCTION_PARAM, PARAM1), false);
private static final String NAME_PROPERTY_INPUT_PARAM2 = SdoRenamingHelper.renameXsdElementToSdoProperty(new QName(NAMESPACE_FUNCTION_PARAM, PARAM2), false);
private static final String NAME_PROPERTY_OUTPUT_RESULT = SdoRenamingHelper.renameXsdElementToSdoProperty(new QName(NAMESPACE_FUNCTION_PARAM, RESULT), false);

public DataObject invokeSdo(DataObject inputDO,SdoInvoker.InvocationContext invocationContext) {
// get input
Type typeInput = inputDO.getType();
String string1 = inputDO.getString(typeInput.getProperty(NAME_PROPERTY_INPUT_PARAM1));
String string2 = inputDO.getString(typeInput.getProperty(NAME_PROPERTY_INPUT_PARAM2));
// build result
String result = string1.concat(" ").concat(string2);
// set output
DataObject outputDO = invocationContext.createOutputDataObject();
outputDO.setString(outputDO.getType().getProperty(
NAME_PROPERTY_OUTPUT_RESULT), result);
return outputDO;
}
Listing 11.7 Source Code to Perform the Concatenation
-
Open the ConcatFunctionLocal.java interface file, and change it to extends Function, SdoInvoker. You also need to add the needed import lines. The result is shown in Figure 11.42.
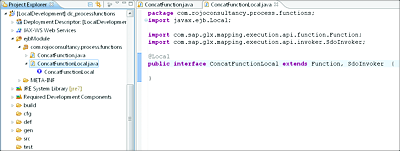
Figure 11.42 Extends Interface with Function, SdoInvoker
- Save everything by pressing (CTRL) + (Shift) + (S).
Build and Deploy to the Server
It’s now time to compile and deploy your work. Follow these steps:
- Go back to the Development Infrastructure perspective.
-
Right-click on the dc_processfunctions_ear EAR DC, and select the Build option (Figure 11.43).
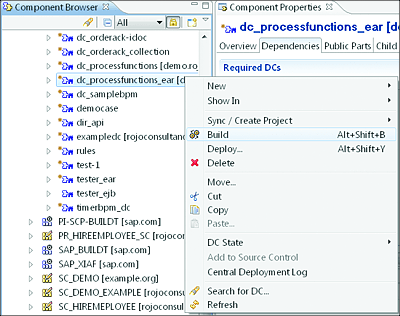
Figure 11.43 Build and Deploy the EAR DC
- After a successful build, right-click on the EAR DC one more time, and select the Deploy option (see Figure 11.43).
Verify in the Java Naming and Directory Interface
After a successful deployment of the custom EJB function, you want to ensure that the new function correctly reflect in the JNDI and retrieve its object name. Follow these steps:
- Go to http://<hostname>:<port>/nwa/jndi, and look up your new EJB function named concatFunction. Enter “concatFunction” as a search keyword in the Find text field (Figure 11.44).
- Select the correct entry from the returned search results.
- Copy the Object Name from the Object Info tab (see Figure 11.44). This name will be used in the next steps.
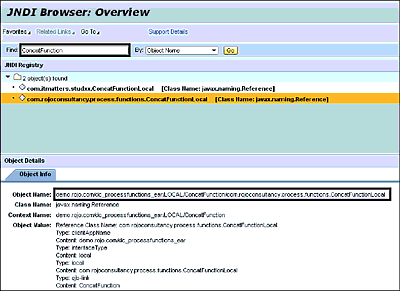
Figure 11.44 Looking Up the JNDI Name of the EJB Function
Use the Custom Mapping Function in the SAP BPM Process
You now need to add the newly created EJB custom function to the SAP BPM DC that will use it. Follow these steps:
- Launch SAP NetWeaver Developer Studio, and choose the Process Development perspective.
-
Right-click on the Functions folder, and choose the New EJB Function option from the context menu (Figure 11.45).
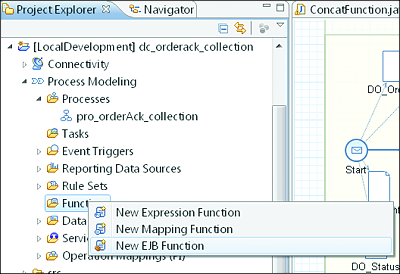
Figure 11.45 Using the New EJB Function Option
-
On the subsequent screen, name your function as shown in Figure 11.46. Be aware that the names of the parameters are exactly the same as the ones specified in the source code of the session bean.
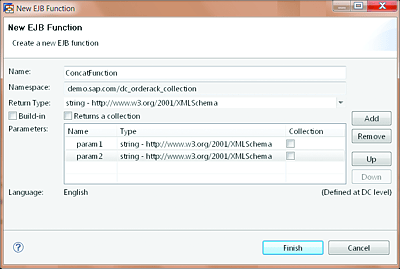
Figure 11.46 Creating an EJB Function
- Click on the Finish button.
- The overview page of the EJB function opens (Figure 11.47). Paste the object name that you copied from the Object (JNDI) Name field in Figure 11.44.
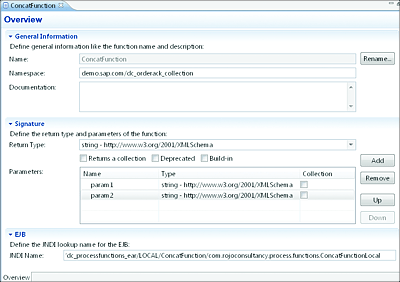
Figure 11.47 Maintaining the JNDI Name of the Custom EJB Function
After completing these steps, the newly created function is now available as part of the Rules and Functions folder and can be used normally in your SAP BPM process (Figure 11.48).
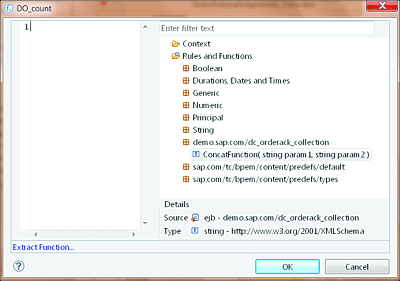
Figure 11.48 Newly Created EJB Custom Function Available to Use
Voilà! Congratulations for finishing this exercise.