13.3 Modeling Business Rules with Rules Composer
We’ve broadly elaborated the business needs and various benefits offered by automated business rules in SAP BRM, and now we’re ready to jump into the design time of SAP BRM and start developing some business rules. We’ll provide the step-by-step instructions you’ll need to build an entire ruleset and will discuss the different tasks required to implement rules in the Rules Composer.
13.3.1 Create the Rules Composer Development Component
Like any other SAP PO component in SAP NetWeaver Developer Studio, you need to create a new project and new DCs for SAP BRM; here, it will be a new DC of the Rules Composer type, which will contain the business rule objects in your SAP NetWeaver Developer Studio workspace.
Note
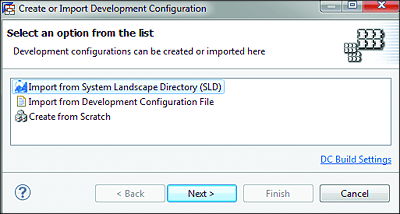
This step is optional when you’re working with SAP NetWeaver development infrastructure for version control, in which case, you’ll only need to download the previously configured development configuration, including software components (SCs) from the SLD. You do so via the Development Infrastructure perspective in SAP NetWeaver Developer Studio (Figure 13.12).
Figure 13.12 Importing Development Configuration
For the sake of simplicity, we assume that you’re working locally, and thus SAP NetWeaver development infrastructure hasn’t yet been configured.
Execute the following steps in SAP NetWeaver Developer Studio to create a new Rules Composer DC from local development:
- From SAP NetWeaver Developer Studio, choose File • New, and then select either Project or Other.
-
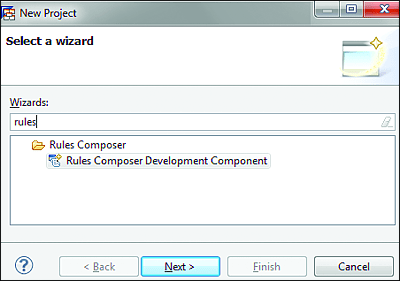
A new wizard opens. Enter “rules” as the type filter text (Figure 13.13), and select Rules Composer Development Component.
Figure 13.13 Creating New Rules Composer DC: Wizard 1
- Expand LocalDevelopment, and select your own local SC or the default local development, MyComponents [demo.sap.com].
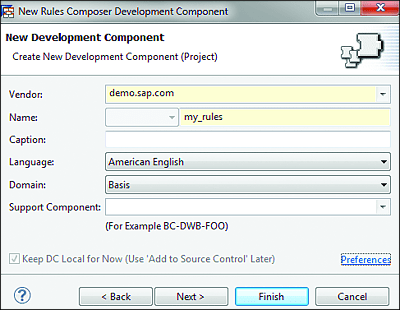
- In the New Development Component dialog, enter a valid name for the new rules DC, and click Finish when done (Figure 13.14).
If you already have SAP NetWeaver development infrastructure installed and development configuration properly configured for SAP PO, then you should create the Rules Composer DC in the SLD, including all necessary software dependencies for that type of DC. After that, you can start adding rule objects (flow ruleset, ruleset, etc.) directly into your preconfigured rules DCs.
Figure 13.14 Creating New Rules Composer DC: Wizard 2
13.3.2 Adding Context to the Rules
Now, it’s time to add the appropriate context to the new business rules, which means configuring or importing the data model that will serve as the backbone to execute the decision logic inside the business rule. An example of such a data model is provided in Listing 13.1 as an XML snippet. Note that the same structure serves as the input and output of the rule, so from that perspective, there is no distinction made between request and response. In this example, the ApprovalNeeded field with a Boolean value will be set by the rule every time the rule is successfully executed.
<?xml version="1.0" encoding="UTF-8"?>
<ns1:BudgetRequest xmlns:ns1="http://www.rojoconsultancy.com"
    xmlns:xsi="http://www.w3.org/2001/XMLSchema-instance"
    xsi:schemaLocation="http://www.rojoconsultancy.com Approval.xsd ">
    <ns1:ApprovalNeeded>false</ns1:ApprovalNeeded>
    <ns1:Amount>10000</ns1:Amount>
    <ns1:Region>EMEA</ns1:Region>
</ns1:BudgetRequest>
Listing 13.1 Approval.xsd
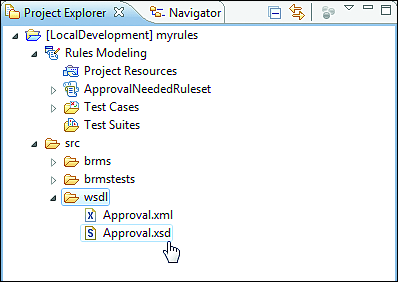
To add context to the business rule, you can either use XML Schema Definitions (XSDs) or Java classes, which is easily achieved by adding the XSDs or Java classes to the Rules Composer DC. You can also create a brand-new XSD within the same Rules Composer DC and use it as context; just make sure it’s created under the src folder and the wsdl subfolder, as shown in Figure 13.15.
Figure 13.15 Adding XSD to Rules Composer DC
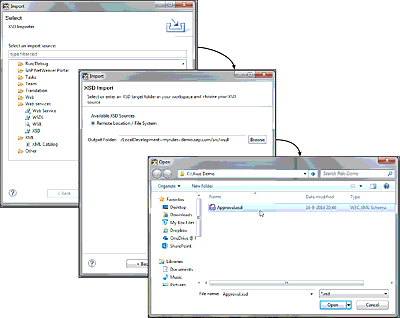
You can also extend a rule’s context with fixed and dynamic variables created as common definitions in Rules Composer. Figure 13.16 shows how to import an existing XSD file in the Rules Composer DC.
Figure 13.16 Import XML Schema in Rules Composer DC
Follow these steps to import an external XSD or WSDL file into your business rules DC:
- Right-click on the src folder inside your business rules DC, and select Import.
- A dialog box appears; navigate almost to the bottom of the screen, and expand the Web Services folder. Select XSD.
- The XSD import page appears. Leave the default values, and click on Next.
- Click on Browse to select the XSD file from your local or network system. Select the XSD file you want to import, and click on Open.
- Click on Finish.
To make the new context visible to the rules, first build the project and the Rules Composer DC. To build the project, select Build Project • Development Component • Build from the context menu of the Rules Composer DC.
13.3.3 Creating a Ruleset
A ruleset is in essence a logical container that holds different, related rule objects (if-then rules and decision tables) together. For example, all rule objects used to decide whether or not a customer has a VIP credit rating can be grouped into the CreditRateRuleset ruleset.
Open the Rules Composer DC from the Project Explorer, right-click on Rules Modeling, and choose New Ruleset. You should now see the new ruleset under the Rules Modeling node. Now, you can start building up your rules, either as if-then rules or as decision tables. We discuss each of these options in the following subsections.
Rules
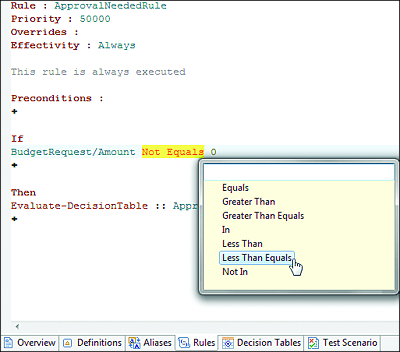
A rule is a set of conditions or logical evaluation statements with one or more associated actions. Rules are created and maintained as part of a ruleset, and you can have more than one if-then rule under the same ruleset. You construct rules using the rule editor, which is a text-based tool with built-in functions and predefined actions to write rules (Figure 13.17).
The if part of a rule is always represented by the conditions in the rule, and the then part is the action (or actions) that needs to be executed if a condition is satisfied.
Figure 13.17 Rule Definition in Rule Editor
Example
A business rule needs to be introduced for a company that wants to check whether approval from the CFO is needed for projects with a budget above a certain amount.
If the region is EU, and the budget request for a project is less than €10,000, then no additional approval is needed from the CFO. The corresponding if-then rule might look like this:
If Region = EU
AND
Amount <= 10000
Then
Approval = false
This example might seem trivial, but it’s complete enough to demonstrate the concept and style of logic applied in this type of rule. In the next paragraphs, we’ll come back to the topic of if-then rules.
Let’s now take a look what type of predefined actions we have available in the Rule Editor.
Rule actions are grouped into the following six different categories:
-
Assert
Use this action in combination with Java methods that return an object such as a collection, iterator, enumeration, and so on. You can use it to examine more than one object at a time—notice, the object tested by the assert action isn’t the collection, iterator, or enumeration, but rather the objects returned by looping through them. This functionality doesn’t work with a rule only configured with an XSD and requires a Java class as its data model or context. The syntax for an assert is as follows:- Assert:: [imported Java class with a method returning any object]
- Example: Assert:: BudgetRequest.getRequests
-
Assign
This type of action is used to assign a new value to a variable definition. The variable has been previously declared at the project resources level in the same Rules Composer DC. The new value could be the result of some calculation or method execution. The syntax for an assign is as follows:- Assign:: [Variable Definition] = new value
- Example: Assign:: Var_StandardRegion = EU
-
Execute
Execute is an action type that can be used to run methods on Java objects or to set values for XML elements in the ruleset’s context. The syntax for execute is as follows:- Execute:: [Any XML schema or public Java method on any of the classes available in the Ruleset context.]
- Example: Execute:: BudgetRequest/Region = AP
-
Re-evaluate
Re-evaluate is an action that is applied to let the rules engine reexamine all rules involving a previously asserted object. As a result of the re-evaluate action, any rules that were satisfied because of that object’s examination are removed from the firing queue. Then, the conditions that apply for that type of object are checked, and if any rules satisfy them, then they are added to the firing queue again. This type of action isn’t used frequently and should be applied with caution because it can introduce infinite loops into your rule. The syntax for re-evaluate is as follows:- Re-evaluate rules involving:: [object that must be re-evaluated]
-
Example: ..If BudgetRequest has changed = true
Then
Re-evaluate rules involving:: BudgetRequest ..
Note
As explained at https://help.sap.com, a firing queue is a collection of actions of all satisfied rules that are to be executed by the rules engine. When a rule is satisfied, the rules engine creates an entity that represents all the actions for that rule. The entity is then added to the firing queue at the correct place according to the rule’s priority. Finally, the engine then reads each entity from the firing queue and executes all the actions per entry.
-
Retract
As the name of this action indicates, it’s an action type used to pull back an earlier asserted object from the engine. The result of a retract action is that the engine will withdraw any inferences triggered by the object. Rules previously satisfied by the object are removed from the firing queue. However, if actions were fired as a result of that object, then those actions can’t be rolled back. Just as for the re-evaluate action, this action is also rarely used. The syntax for retract is as follows:- Retract :: object that must be retracted
-
Example: Assert:: BudgetRequest.getRequests
…
Retract :: requests
-
Evaluate decision table
This is probably the most common type of action you’ll be using when coding rules. With this action, you can execute a decision table in the same ruleset as the rule from which you’re calling it. It’s also possible to dynamically call different decision tables from the same rule using If-Then-Else-If statements. The syntax for evaluate decision table is as follows:- Evaluate-DecisionTable :: Name of DecisionTable to be called
- Example: Evaluate-DecisionTable:: ApprovalDecisionTable
Decision Tables
A decision table is a relatively easy yet effective way to represent different sets of related conditions and their associated actions in a tabular fashion. Due to that fact, decision tables play a prominent role in any business rules application, and SAP BRM applications aren’t an exception. In fact, you’ll be using them frequently when developing business rules in SAP BRM. They are also easy for non-IT users to maintain without having to change the decision logic.
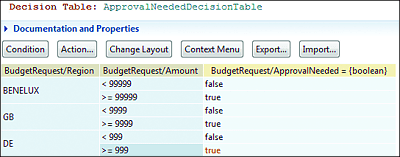
Conditions in a decision table can be grouped horizontally or vertically, always followed by their corresponding actions on the right side of the table. Conditions are allowed to have one or more actions when the rule they enforce is satisfied (see Figure 13.18 and Figure 13.19).
Figure 13.18 Decision Table with Double Vertical Condition
Figure 13.19 Decision Table with Multiple Values Condition
The following comparators can be used to declare your conditions in decision tables:
-
In
- For example: In EUR;USD;JPY
- True if any of the semicolon-separated values are found in the condition input
- Can’t be used for Boolean data types
-
Not In
- For example: Not In ZAR;RUB
- True if any of the semicolon-separated values aren’t found in the condition input
- Can’t be used for Boolean data types
-
Between
- For example: Between 100 AND 1000
- Range-match condition
- Can’t be used for String data types
-
Like
- For example: Like EU*
- Pattern-match condition
- If value compared is EUR, it returns true; if value is USD, it returns false
- Can’t be used for Numeric data types
-
Not Like
- Example: Not Like EU*
- Pattern-mismatch condition
- Can’t be used for Numeric data types
-
>, ⩽, <, ⩾
- Greater than, greater than or equals, smaller than, smaller than or equals
- Can’t be used for Boolean data types
-
= (equal)
- For example: = Rojo
- For example: = true
- This is the only comparator that can be used for Boolean data types
-
!= (not equal)
- For example: != Rojo
- For example: != true
- Can be used for Numeric and String data types
The data in a decision table can be exported and imported as a Microsoft Excel sheet (an XLSX file). In this way, non-IT users can actively participate in the maintenance and control of business rules without having to be totally aware of the technology around it.
You can import the XLSX file during design time in the Rules Composer or via the SAP NetWeaver Administrator Rules Manager tool. A requirement for the second approach is that the rules must be already deployed on the rules engine. Before your users can start using this type of function, you have to assign them to the appropriate default role for viewing and editing content in Rules Manager. To do so from SAP NetWeaver Administrator, follow these steps:
- Log in to SAP NetWeaver Administrator.
- Select Identity Management • Configuration Management • Identity Management.
- Search for and select the user, and double-click on the row to access details for the user.
- In the Details section, choose the Assigned Roles tab, and search for the default role, SAP_BRM_ADMIN.
- Select the role, and click on the Add button to assign that role to the user.
- Save your changes.
13.3.4 Flow Ruleset
A flow ruleset is a special type of ruleset that offers the ability to execute different types of business rules grouped in one process flow. It consists of one main flow and one or more rule elements, including other rule flows.
For those of you used to modeling business processes using Business Process Model and Notation (BPMN) flows, you’ll find the concept of rule flows very similar to process flows modeled using the BPMN 2.0 standard. However, as you can see in Figure 13.20, there are clear differences in terms of the available objects in the rule flow palette.
Figure 13.20 Rule Elements Palette in the Rule Flow Editor
A flow ruleset consists of the following elements:
-
Rule flows
A rule flow is a sequence of activities for evaluating business rules. The order of the execution of the rules is graphically represented in the form of a flow chart, very similar to a process flow in BPMN.
You can reuse it within a flow ruleset, and it’s based on activities associated with other SAP BRM elements, such as rule scripts, rule flows, rulesets, flow rulesets, rules, and decision tables. -
Rule scripts
A rule script is a reusable rule element that you use within a flow ruleset that contains a sequence of actions. It looks much the same as a standard rule, with some differences in the types of actions that you can perform inside it.
It’s associated with other artifacts (rules, rulesets, and decision tables) in a flow ruleset and is triggered when the conditions listed in the preceding activities are satisfied. -
If-then rules
A set of conditions followed by one or more associated actions that are executed when the conditions are met (Section 13.3.3). -
Decision tables
A tabular representation of related rules (Section 13.3.3).
A flow ruleset becomes very useful for the execution of related business rules, which require more flexibility and “orchestration” logic than is available with a traditional ruleset. It also has the advantage of representing the sequence of the rule execution in a graphical way, making it easier to follow and understand the logic executed by the rule. Consider the simple example of a rule flow presented in the following box.
Example
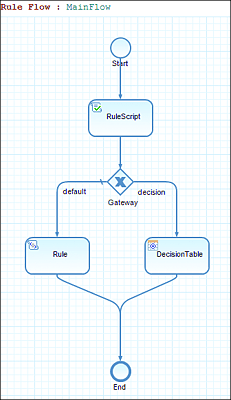
A rule flow is used to control the execution of steps inside a rule depending on specific predefined conditions and the input provided to the rule. Figure 13.21 shows how a simple rule flow has been modeled to execute different steps as part of the same business rule.
Let’s examine the steps inside the rule flow.
First, validate the input provided to the rule with a rule script before entering the decision table. You can think of different kinds of validation, such as format or the presence of a certain value in the context of the rule.
A gateway checks the output of the validation rule script and decides which path (default or decision) should be executed. In this case, the rule will continue to the default path if the input provided to the rule doesn’t need to be checked against the logic configured in the decision table.
The rule executed in the default path is used to apply less complex decision logic and returns a standard value as the response of the rule.
If the rule flow enters the path containing the decision table, it means that a more complex or specific decision logic needs to be applied to the provided input.
Figure 13.21 Flow Ruleset
