14.5 Exercise: Implementing Java Proxies
This exercise centering on Java Proxies builds on the scenario initiated in Chapter 6. In that scenario, you built an iFlow to convert the price quoted in USD to various currencies. This iFlow called an external web service that provides currency conversion rates. It took two currency input parameters and returned an exchange rate as a response.
Now, you need to extend the service with a third input parameter to hold the amount to be converted. Table 14.4 presents the list of input parameters that the new proxy needs to hold.
| Input Parameter | Data Type | Example |
|---|---|---|
| Source currency | xsd:string | USD |
| Target currency | xsd:string | EUR |
| Amount | xsd:double | 100 |
Table 14.4 Input Parameters for the Proxy
After calling the proxy, it needs to return the equivalent amount converted to the target currency (Table 14.5).
| Input Parameter | Data Type | Example |
|---|---|---|
| Converted amount | xsd:double | 87 |
Table 14.5 Output Parameter for the Proxy
As a result, you’ve decided to build a Java proxy to implement the required functionality.
14.5.1 Exercise Solution Approach
Because you already have an iFlow that returns a conversion rate based on two currency input parameters, you can leverage that iFlow. Your new proxy should act as a wrap around the existing iFlow. The new proxy should then work as follows:
- Upon the arrival of the new request message (with three input parameters), the two currency inputs are extracted.
- The two extracted currency inputs are then used to call the iFlow service (this service was provided as part of the Chapter 6 exercise).
-
Upon receiving the response from the iFlow (a conversion rate), you’ll need to multiply it by the third input of the original message (the amount to be converted). As a formula, the logic can be represented as follows:
Converted amount = conversion rate × amount
To achieve this goal, perform these high-level steps:
- Create a Java client proxy to call the existing currency conversion service (from the iFlow).
- Create a Java server proxy to host the implementation.
- Build the logic, and let the server proxy orchestrate the client proxy.
Each of these steps will be detailed in the next section, using a step-by-step solution approach.
Note
Be aware that the implementation of this exercise requires an understanding of and a background in Java development.
14.5.2 Exercise Step-by-Step Solution
This section will further explore the solution by detailing each step, including how to do the following:
- Create a Java client proxy
- Create a Java server proxy
- Build an orchestration logic
- Deploy the solution
- Configure the deployed service
Create a Service Interface in the Enterprise Services Repository
You need to create an inbound service interface to be used for the Java server proxy generation. You need to create the underlying data type and message interface. The request and response structures need to be built to match Table 14.4 and Table 14.5. You can use the names specified in Table 14.6 for the data type, message type, and service interface.
| ES Repository Object | Name |
|---|---|
| Request data type | DT_AmountConversionRequest |
| Request message type | MT_AmountConversionRequest |
| Response data type | DT_AmountConversionResponse |
| Response message type | MT_AmountConversionResponse |
| Inbound service interface | SIIS_AmountConversion |
Table 14.6 Details of the ES Repository Object to be Created
Note that the service interface needs to be of the inbound type because that is required for the Java server proxy.
After working through the book exercises so far, you’re already familiar with how to create the different ES Repository objects, so we won’t go over that portion again here.
Create the Java Client Proxy
The first step is to create a Java client proxy. This proxy acts as a wrapper to the service provided by the iFlow to call the external web service. However, you need to start by creating the EJB DC that will host the client proxy. Creating a client proxy requires couple of steps including:
- Creating an Enterprise Java Bean development component
- Importing a service interface
- Generating a client proxy
- Providing a wrapper class
- Exposing public parts
Each one of these steps will be explored next.
Create an Enterprise Java Bean Development Component
The steps involved to create a new EJB DC are as follows:
- Open SAP NetWeaver Developer Studio, and select the Development Infrastructure perspective.
- Expand the LocalDevelopment development configuration node.
- Then expand the MyComponents SC.
-
Right-click on the MyComponents SC, and select New. From the menu that opens, select Development Component. On the next screen, select the EJB Module under the Java EE node. Then, click on the Next button (see Figure 14.37).

Figure 14.37 Creating a DC of Type EJB
- On the next screen, fill in the vendor name and the name of the development component (see Figure 14.38). Click on Finish.
- When asked to switch to the Java EE perspective, click on Yes.
It’s now time to add the WSDL of the outbound service interface that your proxy will call.
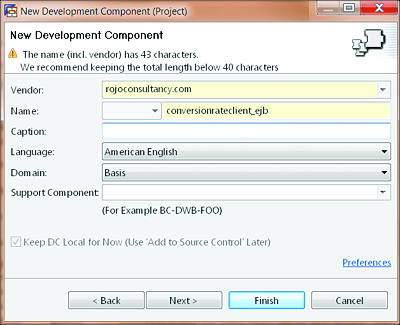
Figure 14.38 Details of the Client Java Proxy DC
Import the Service Interface
Now that the EJB DC is in place, it’s time to import the outbound service interface that was previously created in the ES Repository. This is the same outbound service interface that was used for the iFlow in the Chapter 6 exercise. Follow these steps:
- From the Java EE perspective, expand the EJB DC (conversionrateclient_ejb in this case), and navigate to the ejbModule node.
-
Right-click on ejbModule, and select the Import option from the context menu (see Figure 14.39).
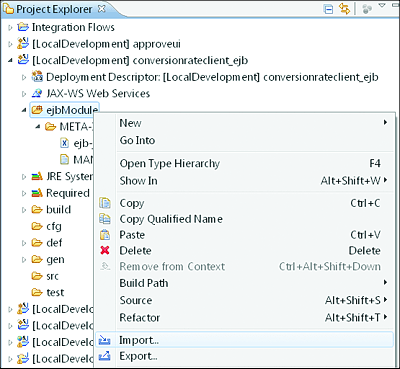
Figure 14.39 Importing the Outbound Service Interface
- On the next screen, select the WSDL option under the Web services node. Then, click on Next to proceed with the wizard.
- On the next screen, select Enterprise Service Repository. You’ll need to authenticate yourself.
-
Select the desired outbound service interface from the ES Repository on the next screen (see Figure 14.40).
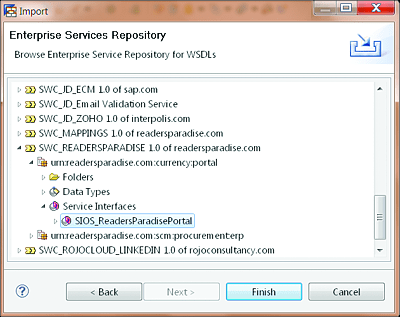
Figure 14.40 Picking the Outbound Service Interface from the ES Repository
- Click on Finish.
Now that the outbound service interface is available in the project, you can autogenerate Java classes based on its WSDL that will act as a Java client proxy.
Generate the Client Proxy
During this generation process, a number of Java classes are created to represent all the data types. In addition, a method is created for each operation in the outbound service interface. Follow these steps to generate the client proxy from the imported WSDL:
- Right-click on the imported WSDL, and select Web Services and then Generate Client (see Figure 14.41).
-
On the next screen, move the slider to the Assemble client level.
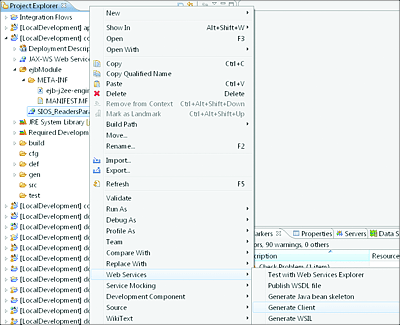
Figure 14.41 Generation of the Java Client Proxy from the Imported WSDL
- Follow the wizard, leaving all default values as is. You’ll see a pop-up prompting you to update the provided WSDL with endpoints; select Do Not Update WSDL. Because the WSDL has been imported from the ES Repository, there are no endpoints assigned to it. In SAP PO, the endpoints are only available from the directory and not in the ES Repository.
- Follow the rest of the wizard by clicking on Next and leaving the default values as is.
- On the last screen, when asked to select one or more options for the JAXB global customizations, select all options.
- Click on Finish.
A number of Java packages and classes will be created. You’re now ready to create a wrapper class to expose the functionality of the Java client proxy.
Provide a Wrapper Class for the Client Proxy
The generated Java client proxy can’t yet be called as a web service from Java server proxy. You need to add a wrapper Java class in front of the client proxy. The wrapper class will then expose the functionality of the client proxy as a web service, and this web service can in turn be called by the server proxy later on.
The steps required to add a wrapper are as follows:
- Add a new package in your project. For simplicity’s sake, add the suffix “.wrapper” to your existing package. As a result, the new package will be called com.readersparadise.scm.procurement.erp.wrapper (see Figure 14.42).
-
Create a session bean to wrap the generated code of the client. Right-click on the newly created package, and choose New and then Session Bean (EJB 3.x) (see Figure 14.42).
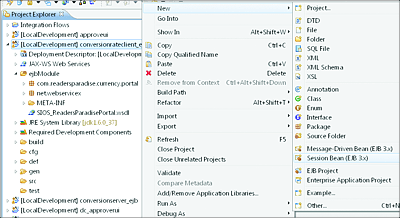
Figure 14.42 Creating a Package or Session Bean to Host the Wrapper Code
- A new wizard opens. Fill in the details of the wrapper class, as specified in Figure 14.43.
- Follow the wizard, and keep all the default values unchanged. At the end of the wizard, click on Finish.
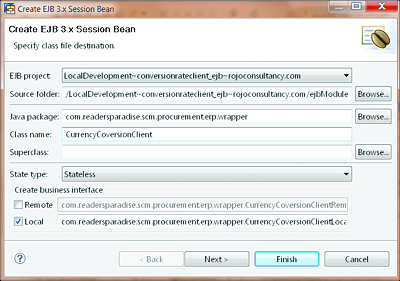
Figure 14.43 Details of the Session Bean to Wrap the Client Proxy
As a result, two classes are created: CurrencyConversionClient and CurrencyConversionClientLocal. In the newly created CurrencyConversionClient bean, you need to implement your wrapper for the method that exists in the SIOSReadersParadisePortal.Java class and which resides in the com.readersparadise.currency.portal package.
The content of the SIOSReadersParadisePortal.Java class is presented in Listing 14.5. This class contains a method called siosReadersParadisePortal. This generated method is responsible for calling or triggering the service call of the client proxy. You’ll now wrap this method with your own method to be provided in your newly created CurrencyConversionClient.
package com.readersparadise.currency.portal;

/**
 * Service Endpoint Interface (generated by SAP WSDL to Java generator).
 */
@javax.jws.WebService(name = "SIOS_ReadersParadisePortal", targetNamespace = "urn:readersparadise.com:currency:portal")
@javax.jws.soap.SOAPBinding(parameterStyle = javax.jws.soap.SOAPBinding.ParameterStyle.BARE, style = javax.jws.soap.SOAPBinding.Style.DOCUMENT, use = javax.jws.soap.SOAPBinding.Use.LITERAL)
public interface SIOSReadersParadisePortal {

  /**
   * Java representation of web method [SIOS_ReadersParadisePortal].
   */
  @javax.jws.WebMethod(operationName = "SIOS_ReadersParadisePortal", action = "http://sap.com/xi/WebService/soap1.1")
  @javax.jws.WebResult(name = "ConversionRateResponse", targetNamespace = "http://www.webserviceX.NET/", partName = "parameters")
  public net.webservicex.ConversionRateResponse siosReadersParadisePortal(@javax.jws.WebParam(name = "ConversionRate", targetNamespace = "http://www.webserviceX.NET/", partName = "parameters") net.webservicex.ConversionRate parameters);

}
Listing 14.5 Source of the SIOSReadersParadisePortal.Java Class
Now, add a new method in your newly created wrapper bean (CurrencyConversionClient). For simplicity’s sake, give this new method the same name and signature as the one presented in Listing 14.5. The resulting implementation of the wrapper class is presented in Listing 14.6.
package com.readersparadise.scm.procurement.erp.wrapper;
import javax.ejb.Stateless;
import javax.xml.ws.WebServiceRef;
import net.webservicex.ConversionRateResponse;
import com.readersparadise.currency.portal.SIOSReadersParadisePortal;
import com.readersparadise.currency.portal.SIOSReadersParadisePortalService;
/**
 * Session bean implementation class CurrencyCoversionClient
 */
@Stateless
public class CurrencyCoversionClient implements CurrencyCoversionClientLocal {
    @WebServiceRef(name = "SIOSReadersParadisePortal")
    SIOSReadersParadisePortalService currencyConvertorService;
    /**
    * Default constructor.
    */
    public CurrencyCoversionClient() {
        // TODO Auto-generated constructor stub
    }
    public net.webservicex.ConversionRateResponse siosReadersParadisePortal(net.webservicex.ConversionRate request)
    {
        ConversionRateResponse currencyConvertorResponse = null;
        SIOSReadersParadisePortal port = null;
        try {
            currencyConvertorService.getPort(SIOSReadersParadisePortalService.class);
        } catch (Exception e) {
            // TODO Auto-generated catch block
            e.printStackTrace();
        }
        //Call the client proxy
        currencyConvertorResponse = port.siosReadersParadisePortal(request);
        return currencyConvertorResponse;
    }
}
Listing 14.6 Implementation of CurrencyConversionClient.Java
Furthermore, to be able to access the wrapped method from outside, you need to list these methods in the CurrencyConversionClientLocal interface class, as shown in Listing 14.7.
package com.readersparadise.scm.procurement.erp.wrapper;
import javax.ejb.Local;

@Local
public interface CurrencyConversionClientLocal {

    public net.webservicex.ConversionRateResponse siosReadersParadisePortal(net.webservicex.ConversionRate request);
}
Listing 14.7 Implementation of the CurrencyConversionClientLocal Bean
Expose Public Parts for Client Development Component
For the request and response messages of the client DC (conversionrateclient_ejb) to be accessed from outside (server proxy), you need to expose the relevant (request and response) classes using public parts. To expose the classes as public parts, follow these steps:
- Open SAP NetWeaver Developer Studio, and select the Development Infrastructure perspective.
- Expand the LocalDevelopment development configuration node.
- Expand the MyComponents SC.
- Select the conversionrateclient_ejb client DC. The properties of the SC are displayed on the right side.
- Choose the Public Parts tab.
-
Right-click on the Client node, and choose the Manage Entities option (see Figure 14.44).
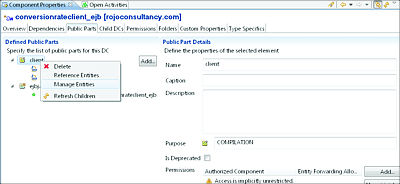
Figure 14.44 Managing the Reference of Entities
- Select the Java Package node and then the relevant package in which the request/response structure is located (in this case, webservicex; see Figure 14.45).
- Click on the Finish button.
The classes contained in the net.webservicex package can now be used by external classes with the help of the public part mechanism.
You’re now ready to create a Java server proxy.
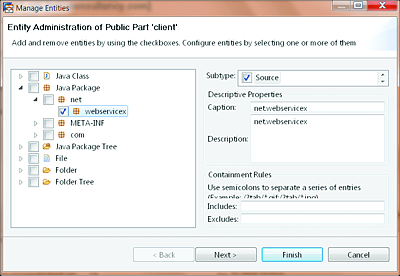
Figure 14.45 Selecting the Package to be Exposed with the Public Part
Create the Java Server Proxy
You need to create a Java server proxy that will hold and host the conversion logic and the orchestration of the Java client proxy. The steps required to create a Java server proxy will be explored next, including the following:
- Creating an enterprise Java Bean development component
- Creating dependencies
- Importing a service interface
- Generating the server proxy
Create an Enterprise Java Bean Development Component
The steps involved to create a new EJB DC are as follows:
- Open SAP NetWeaver Developer Studio, and select the Development Infrastructure perspective.
- Expand the LocalDevelopment development configuration node.
- Expand the MyComponents SC.
- Right-click on the MyComponents SC, and select New. From the next menu, select Development Component. On the next screen, select the EJB Module under the Java EE node. Click on Next.
-
On the next screen, fill in the vendor name and the name of the DC (see Figure 14.46). Click on Finish.
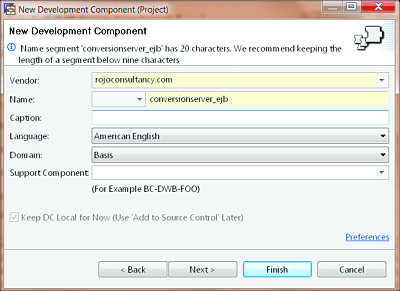
Figure 14.46 Details of the Server Proxy to Host Implementation
- When asked to switch to the Java EE perspective, click on No.
Create Dependencies
For the newly created server DC to be able to use the functionalities exposed by the client DC, you need to define dependencies between them. Follow these steps:
- Stay in the Development Infrastructure perspective, and select the server DC. The properties of the SC are displayed on the right side.
- Choose the Dependencies tab.
-
Click on the Add button. You’ll see a new pop-up screen where you need to select the client DC (see Figure 14.47).
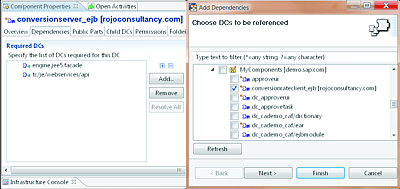
Figure 14.47 Adding Dependencies on the Server DC to the Client DC
- Click on the Finish button.
Import the Service Interface
Now that the EJB DC is in place, it’s time to import the inbound service interface that was created in the ES Repository. To do so, follow these steps:
- From the Java EE perspective, expand the EJB DC (conversionserver_ejb in this case) and navigate to the ejbModule node.
- Right-click on ejbModule, and select the Import option from the context menu.
-
On the next screen, select the WSDL option under the Web services node (see Figure 14.48). Click on Next to proceed with the wizard.

Figure 14.48 Select the Type of Object to be Imported
- On the next screen, select Enterprise Service Repository as your WSDL source. Click on Next.
- Navigate through the ES Repository, and select the inbound service interface that you previously created (see Figure 14.49). Click on the Finish button.
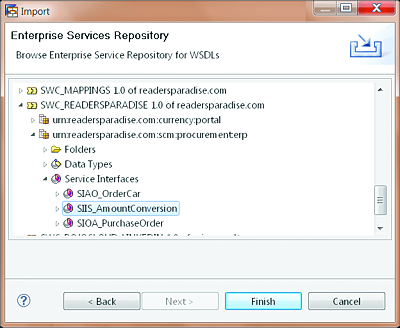
Figure 14.49 Selecting the Appropriate Inbound Service Interface
The newly imported service interface is now available within the DC. It can be seen under the ejbModule node of the project structure. It’s now time to autogenerate some skeleton Java source code.
Generate the Server Proxy
To generate skeleton Java code from the imported WSDL file, follow these steps:
- Right-click on the imported WSDL, and select Web Services • Generate Java bean skeleton.
- On the next screen, move the slider to the Assemble client level (see Figure 14.50).
- Follow the wizard, and leave all default values intact.
-
You’ll see a pop-up prompting you to update the provided WSDL with endpoints; select Do Not Update WSDL. Because you imported the WSDL from the ES Repository, there are no endpoints assigned to the service. In SAP PO, the endpoints are only available from the directory and not in the ES Repository.
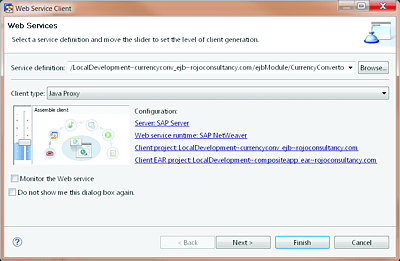
Figure 14.50 Set the Configuration of the Web Service to the Assemble Client Level
- Follow the rest of the wizard by clicking on Next and leaving the proposed default values.
-
On the last screen of the wizard, when asked to select one or more options for JAXB global customizations, select all options (see Figure 14.51).
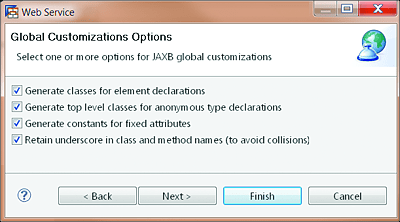
Figure 14.51 Global Customizations Options
- Click on the Finish button.
- If there are some name conflicts among the generated objects, then you’ll be prompted with a message. If this happens, click on the Resolve Collisions button.
- Click on the OK button to proceed to the Java code generation.
Now, several Java classes have been created. Figure 14.52 shows the new structure of the project with the new files.
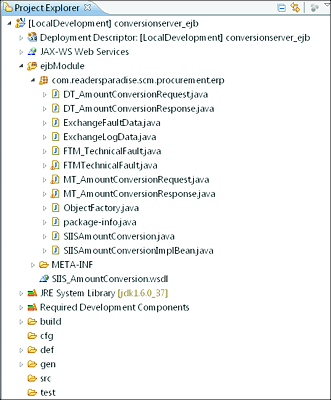
Figure 14.52 Generated Java Classes for the Server Proxy
Build the Logic and Orchestration
In the previous sections, both the server and client proxies were created and the source code skeleton generated. Now, you need to add some logic to the server proxy. Looking at the DC that contains the server proxy (conversionserver_ejb), you see that it contains a main class called SIISAmountConversionImplBean that represents the main entry point and is supposed to hold the logic.
Note that the name of the class to which the logic implementation needs to be added always ends with the suffix “ImplBean”. Listing 14.8 shows you what this generated class looks like.
package com.readersparadise.scm.procurement.erp;

import javax.ejb.Stateless;
import javax.jws.WebService;
import com.sap.engine.services.webservices.espbase.configuration.ann.dt.SessionHandlingDT;
import com.sap.engine.services.webservices.espbase.configuration.ann.dt.TransportGuaranteeDT;
import com.sap.engine.services.webservices.espbase.configuration.ann.dt.TransportGuaranteeEnumsLevel;
import com.sap.engine.services.webservices.espbase.configuration.ann.dt.AuthenticationDT;
import com.sap.engine.services.webservices.espbase.configuration.ann.dt.AuthenticationEnumsAuthenticationLevel;
import com.sap.engine.services.webservices.espbase.configuration.ann.dt.RelMessagingNW05DTOperation;

@AuthenticationDT(authenticationLevel = AuthenticationEnumsAuthenticationLevel.BASIC)
@TransportGuaranteeDT(level = TransportGuaranteeEnumsLevel.NONE)
@SessionHandlingDT(enableSession = false)
@WebService(portName = "SIIS_AmountConversion_Port", serviceName = "SIIS_AmountConversion_Service", endpointInterface = "com.readersparadise.scm.procurement.erp.SIISAmountConversion", targetNamespace = "urn:readersparadise.com:scm:procurement:erp", wsdlLocation = "META-INF/wsdl/com/readersparadise/scm/procurement/erp/SIIS_AmountConversion/SIIS_AmountConversion.wsdl")
@Stateless
public class SIISAmountConversionImplBean {

    @RelMessagingNW05DTOperation(enableWSRM = false)
    public com.readersparadise.scm.procurement.erp.DT_AmountConversionResponse siisAmountConversion(com.readersparadise.scm.procurement.erp.DT_AmountConversionRequest MT_AmountConversionRequest)throws com.readersparadise.scm.procurement.erp.FTMTechnicalFault {
     return null;
    }
}
Listing 14.8 Generated Source Code of the Standard Implementation Class
Note that the class in contains a method called siisAmountConversion. This method name matches the name of the operation in the inbound service interface from which it was generated (see Figure 14.53).
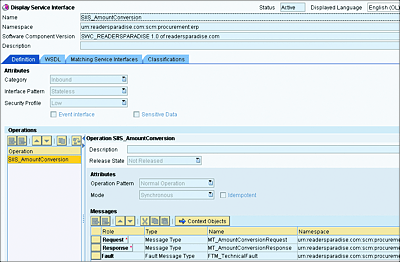
Figure 14.53 Inbound Service Interface Used for the Java Server Proxy Generation
Populate SIISAmountConversionImplBean with the required logic. A possible implementation is provided in Listing 14.9.
Note
This is a simplistic implementation. In a real-life implementation, you’ll need to add more exception handling.
package com.readersparadise.scm.procurement.erp;
import javax.ejb.EJB;
import javax.ejb.Stateless;
import javax.jws.WebService;
import net.webservicex.ConversionRate;
import net.webservicex.ConversionRateResponse;
import net.webservicex.Currency;
import com.readersparadise.scm.procurement.erp.wrapper.CurrencyCoversionClientLocal;
import com.sap.engine.services.webservices.espbase.configuration.ann.dt.SessionHandlingDT;
import com.sap.engine.services.webservices.espbase.configuration.ann.dt.TransportGuaranteeDT;
import com.sap.engine.services.webservices.espbase.configuration.ann.dt.TransportGuaranteeEnumsLevel;
import com.sap.engine.services.webservices.espbase.configuration.ann.dt.AuthenticationDT;
import com.sap.engine.services.webservices.espbase.configuration.ann.dt.AuthenticationEnumsAuthenticationLevel;
import com.sap.engine.services.webservices.espbase.configuration.ann.dt.RelMessagingNW05DTOperation;

@AuthenticationDT(authenticationLevel = AuthenticationEnumsAuthenticationLevel.BASIC)
@TransportGuaranteeDT(level = TransportGuaranteeEnumsLevel.NONE)
@SessionHandlingDT(enableSession = false)
@WebService(portName = "SIIS_AmountConversion_Port", serviceName = "SIIS_AmountConversion_Service", endpointInterface = "com.readersparadise.scm.procurement.erp.SIISAmountConversion", targetNamespace = "urn:readersparadise.com:scm:procurement:erp", wsdlLocation = "META-INF/wsdl/com/readersparadise/scm/procurement/erp/SIIS_AmountConversion/SIIS_AmountConversion.wsdl")
@Stateless
public class SIISAmountConversionImplBean {
    @EJB CurrencyCoversionClientLocal currencyClient;
    @RelMessagingNW05DTOperation(enableWSRM = false)
    public  com.readersparadise.scm.procurement.erp.DT_AmountConversionResponse siisAmountConversion(com.readersparadise.scm.procurement.erp.DT_AmountConversionRequest request)throws com.readersparadise.scm.procurement.erp.FTMTechnicalFault {
        //Retrieve input parameters
        double amount = request.getAmount();
        String sourceCurrency = request.getSourceCurrency();
        String targetCurrency = request.getTargetCurrency();
        //Call the external service
        ConversionRate conversionRate = new ConversionRate();
        if(sourceCurrency!=null)
            conversionRate.setFromCurrency(Currency.valueOf(sourceCurrency));
        if(targetCurrency!=null)
            conversionRate.setToCurrency(Currency.valueOf(targetCurrency));

        ConversionRateResponse conversionRateResp = currencyClient.siosReadersParadisePortal(conversionRate);
        //Create an empty response
        DT_AmountConversionResponse response = new DT_AmountConversionResponse();
        if(conversionRateResp!=null)
        {
            response.setConvertedAmount(conversionRateResp.getConversionRateResult());
        }

        return response;
    }
}
Listing 14.9 Simple Implementation Example for the Server Proxy
Now that you’ve completed the proxy implementation, it’s time to create the EAR DC.
Create an Enterprise Application Archive Development Component
It’s now time to create an EAR DC to hold the Java server proxy application. This is the DC that will need to be deployed to the SAP PO server.
- From SAP NetWeaver Developer Studio, right-click on the MyComponents SC, and select the New option. From the menu that opens, select the Development Component option.
- On the next screen, select Enterprise Application under the Java EE node. Click on Next.
-
On the next screen, fill in the vendor name and the name of the DC (see Figure 14.54). Click on the Next button.

Figure 14.54 Details of the EAR DC
- Leave all the default fields untouched, and click on Next.
- On the next screen, select the dependency (or referenced projects) for the EAR DC. For this scenario, you only need to select conversionrateclient_ejb and conversionrateserver_ejb.
- Click on the Finish button.
Build and Deploy
After completing the implementation of the wrapper class, it’s time to compile and deploy the EAR DC to the server. Follow these steps:
- Right-click on the EAR DC, and select Development Component and then the Build option from the menu (see Figure 14.55).
- You’ll see a pop-up prompting you to select the DCs to be built; be sure to select both the EJB and the EAR DCs.
- Click on OK. It might take a few seconds to compile the DCs.
- Go back to the EAR DC. Right-click on it, and select Development Component and then the Deploy option from the menu.
Now that all the deployed proxies are deployed to the server, it’s time to perform some SOA configuration.
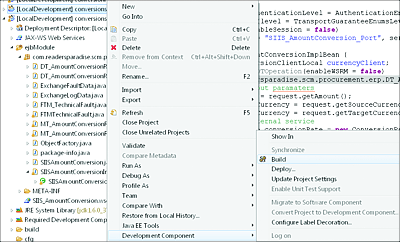
Figure 14.55 Build and Deploy the EAR Development Component
Configure the Deployed Service from SAP NetWeaver Administrator
For the deployed proxy to work properly, you need to perform some configurations on the client and server proxies.
Client Proxy Configuration
Start with the client proxy, which needs to point to the runtime endpoint of the iFlow. Follow these steps to apply the required settings:
- Go to SAP NetWeaver Administrator via http://<hostname>:<port>/nwa.
- Once logged in, navigate to the SOA tab and then the Application and Scenario Communication subtab.
- On the new page, click on the Single Service Administration link. The new page allows you to search for deployed web services.
-
Select Consumer Proxies tab, and search for the client proxy (see Figure 14.56). You need to search for the outbound service interface that was used to generate the client proxy (in this case, SIOS_ReadersParadisePortal).
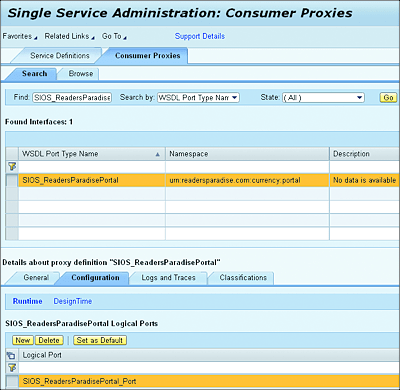
Figure 14.56 Consumer Proxies Configuration in the Single Service Administration Application
-
If you prefer to use plain SOAP, then click on the New button (above the Logical Port section; see Figure 14.56). This will launch a new wizard that will allow you to select SOAP Transport Binding (see Figure 14.57).

Figure 14.57 New Client Proxy Configuration Using SOAP Transport Binding
- Follow the wizard. When asked for an endpoint for the WSDL, provide the WSDL obtained from the iFlow. You need to provide a WSDL that contains an endpoint. You might also need to add login credentials.
- Follow the rest of the wizard until it’s completed.
The configuration of the client proxy is now complete!
Server Proxy Configuration
Now, it’s time to configure the server proxy. Follow these steps:
- In SAP NetWeaver Administrator, navigate to the SOA tab and then the Application and Scenario Communication subtab.
- On the new page, click on the Single Service Administration link. The new page allows you to search for deployed web services. Make sure to remain in the Service Definitions tab.
-
Enter the name of the inbound service interface that was used to generate the Java server proxy earlier. In this case, search for “SIIS_AmountConversion”, as shown in Figure 14.58.

Figure 14.58 Select the Inbound Service Interface from the Single Service Administration in SAP NetWeaver Administrator
- After filling in the search term in the Find text field, click on the Go button to trigger the search. You then need to select the returned entry (see Figure 14.58).
- Go to the Configuration tab, and click on the New button to start a new configuration.
- A wizard will be launched in which the first two steps are General and Security. Proceed with the wizard until the last step.
- Click on the Finish button to complete the web service configuration.
Congratulations! You’re now ready to run and test your proxy. A WSDL file of the server proxy can be downloaded from the WSDLs tab (see Figure 14.59).
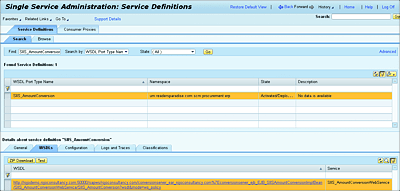
Figure 14.59 Downloading the WSDL or Testing the Service