18.6 Exercise: Create an SWCV
Imagine you’re starting a new SAP BPM project, and as the SAP PO expert, you’re responsible for executing all necessary preparation steps to support parallel team development in SAP NetWeaver Developer Studio, ensuring version control for the SAP BPM components and integration with CTS+ for transports across the SAP PO landscape.
In this chapter, you read about the component model concept that is applicable for software projects built on top of the SAP PO platform. As a result, you know that for this new SAP BPM project you have to create a new SWCV in SAP PO, including its dependencies in the SLD. After that, you also need to add the new SWCV to an existing development configuration in SAP NetWeaver development infrastructure. When you’re done with these tasks, your team members will be able to work simultaneously on the same SWCV and apply version control to their developed components.
18.6.1 Exercise Solution Approach
Instead of following the standard method of creating new SWCVs directly from the SLD, we’ll show you how to use a wizard in SAP NetWeaver Administrator to create the new SWCV, including all required dependencies with other SCs.
The wizard will also take you through the process of registering the new SC in the SLD. After completing the wizard, you’ll add your brand-new SC to an existing (standalone) development configuration previously created in SAP NetWeaver development infrastructure. Finally, you’ll be able to import the development configuration from the Development Infrastructure perspective in SAP NetWeaver Developer Studio. This last step isn’t part of this exercise, but you can read about how to accomplish it in Section 18.2.
We assume the following to be true for the purposes of this exercise:
- You have access with the required SLD and SAP NetWeaver development infrastructure rights to an SAP PO installation (sandbox or development system).
- SAP NetWeaver Developer Studio is installed and configured locally on your development PC.
- There is an existing standalone development configuration available in your SAP NetWeaver development infrastructure environment.
18.6.2 Exercise Step-by-Step Solution
We’ll execute the following steps in this exercise:
- Create a new SC using the Configuration Wizard in SAP NetWeaver Administrator.
- Add the SC to development infrastructure on the Development Configuration Management page.
Create a New Software Component
- Launch your SAP NetWeaver Administrator environment (go to http://<hostname:>port>/nwa).
- Select the Configuration tab, and then click on Scenarios.
-
Click on Configuration Wizard (see Figure 18.48).
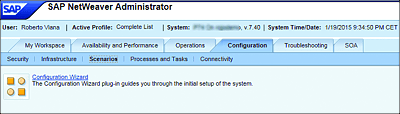
Figure 18.48 SAP NetWeaver Administrator: Configuration
-
Choose All Configuration Tasks from the Show dropdown menu, enter “define” in the Find search field, and press (Enter) (Figure 18.49).

Figure 18.49 Configuration Wizard
-
Select the Define New Software Component Version task, and click on Start if this is the first time you’ve run the task or on the Re-execute button if the task has been previously executed (Figure 18.50).
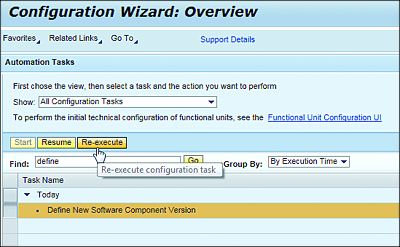
Figure 18.50 Configuration Wizard: Execute Configuration Task
-
Provide a valid SLD URL and a valid User Name and Password for the selected SLD, as shown in Figure 18.51. Click on Next.
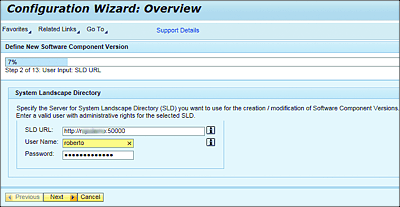
Figure 18.51 Configuration Wizard: SLD Configuration
-
Define the Name, Vendor, and Release version of the new SWCV, and click on Next (Figure 18.52).
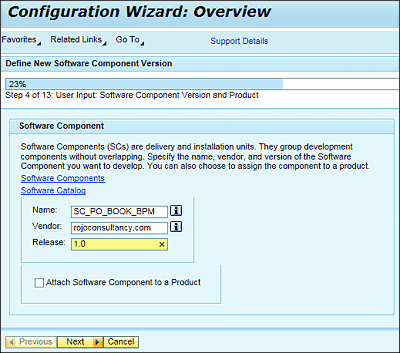
Figure 18.52 Configuration Wizard: Define Software Component Version
- Select Business Process Management Application 7.50 from the Application Template dropdown menu, and click on Next (Figure 18.53).
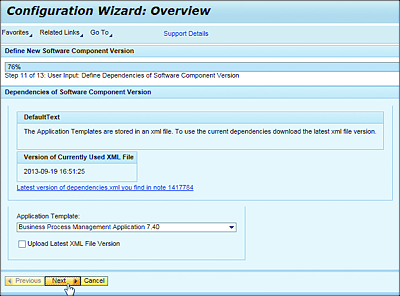
Figure 18.53 Configuration Wizard: Select Application Template
After the previous step, the configuration wizard will take care of registering the new SWCV in the SLD. Wait until you see the screens shown in Figure 18.54 and Figure 18.55. After that, you can click on the View Log link to examine all executed tasks by the wizard, as shown in Figure 18.56.
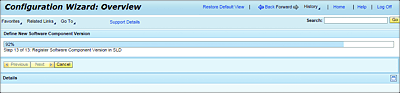
Figure 18.54 Configuration Wizard: Registering the New SWCV in the SLD

Figure 18.55 Configuration Wizard: Finish Screen
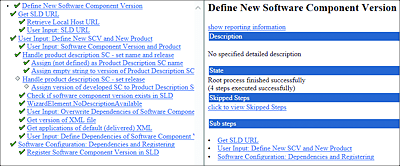
Figure 18.56 Configuration Wizard: View Log
Add Software Component
Launch your SAP NetWeaver Administrator environment (go to http://<hostname>: <port>/nwa), and then follow these steps:
- Select the Configuration tab, and then click on the Infrastructure link.
- Click on Development Infrastructure (Figure 18.57).
- Select Stand-alone from the Filter dropdown menu (Figure 18.58).
-
Choose one of the Stand-alone entries from the available development configurations. In Figure 18.59, we’ve selected SOFTCONF_D. Click on Add SC.
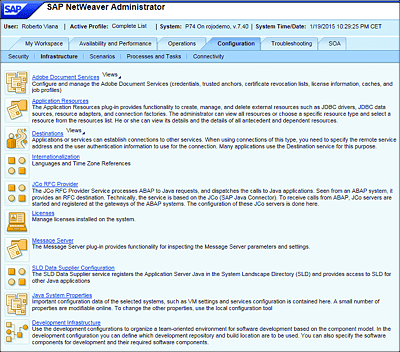
Figure 18.57 Development Infrastructure

Figure 18.58 Development Infrastructure: Edit Development Configuration
-
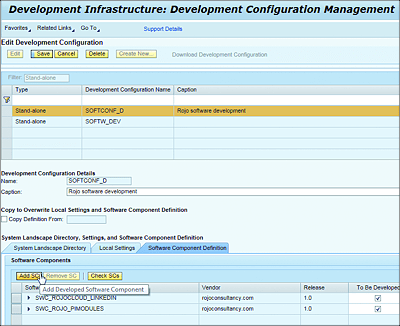
Figure 18.59 Development Infrastructure: Add SC
-
Select SC_PO_BOOK_BPM as the SC from the list shown, and click on the Add button (Figure 18.60).
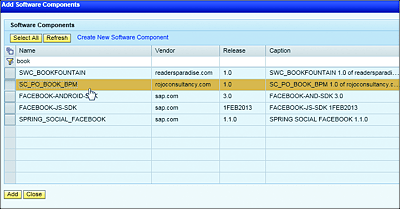
Figure 18.60 Development Infrastructure: Add Software Components
- Save the changes you made in the development configuration (Figure 18.61).
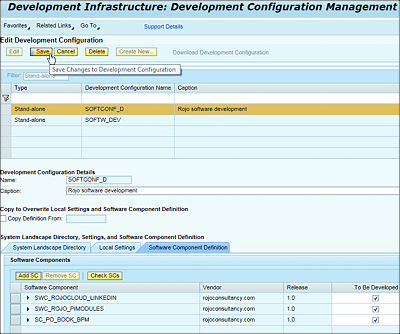
Figure 18.61 Development Infrastructure: Save Development Configuration
In Figure 18.62, you can see the final result of the saved development configuration. You’ve completed the configuration necessary to start building new SAP BPM DCs within the SAP NetWeaver Developer Studio platform. Well done!
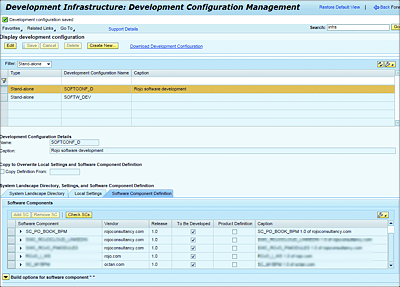
Figure 18.62 Development Infrastructure: Development Configuration