GettIng Started StargazIng
Whether you want to simply read a star map, step outside and find a particular constellation, or spend time outdoors becoming familiar with the layout of the night sky, this chapter provides tips on getting started. But first, let’s learn about celestial coordinates, which aid in understanding and reading star maps.
The celestial sphere is a concept that helps us understand the information on star maps. We can visualize it like Earth’s atmosphere, a sphere that surrounds our planet, or as two great domed ceilings covering the Northern and Southern Hemispheres. Like the great ceiling in New York City’s Grand Central Station, these domes are decorated with the constellations. As Earth rotates, the stars that we see on the celestial sphere appear to move, rising and setting like the sun. Where the northern and southern domes meet is called the celestial equator, which is directly above the physical equator on Earth. As mentioned in chapter 1, the celestial north and south poles are directly over their corresponding points on Earth. Our view of the celestial sphere is defined by the horizon. If we are in flat, open country, the horizon is larger than what is visible in a city. Directly overhead is an imaginary point called the zenith. An imaginary line drawn from north to south through the zenith divides the sky into east and west.
Coordinate points on Earth are called latitude and longitude. On a map of Earth these are indicated by lines that run east and west, and north and south. Latitude lines run east and west parallel to the equator. Marking the distance from the equator, latitude is measured in degrees. You will find more information on latitude in appendix A. Knowing your latitude will help you determine which constellations will be visible to you. The equator is zero latitude. Latitude lines north of the equator are indicated with a plus sign, and those south of the equator with a minus sign. On the celestial sphere, latitude is called “declination” and it is indicated in the same way using plus or minus signs to indicate positions north or south of the celestial equator, which is zero declination.
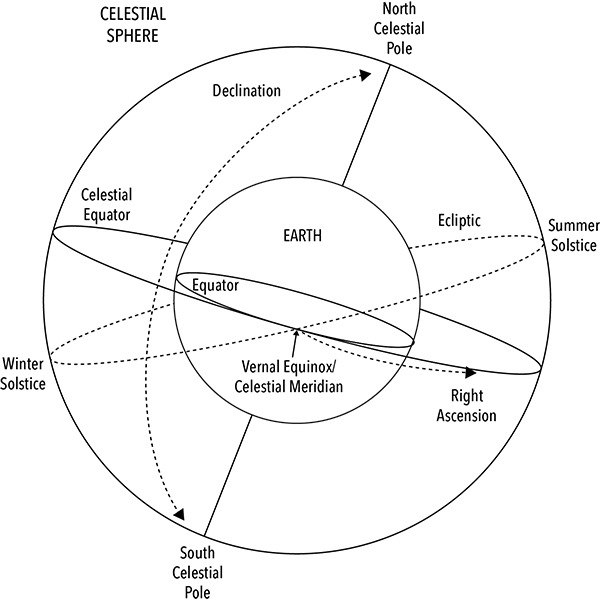
Figure 2.1. The concept of a celestial sphere and celestial coordinates helps us understand the information on star maps and how it relates to Earth.
Longitude on Earth is also measured in degrees from an imaginary line called the prime meridian, which runs from the North Pole to the South Pole. Like the equator, the prime meridian is zero degrees. It is no accident that this line passes through Greenwich, England, the home of the Royal Observatory. Founded in 1675 by King Charles II, the Royal Observatory was instrumental in establishing a common meridian for east/west coordinates and for calculating time worldwide. Time on this meridian is called Greenwich Mean Time.
The equivalent to longitude on the celestial sphere is called “right ascension,” and it is measured in hours. Just as our day contains twenty-four hours, right ascension runs eastward from zero to twenty-four. Zero right ascension is the point where the celestial equator and ecliptic cross. Sometimes called the celestial meridian, this point marks the spring equinox.
It is also important to understand star names. Although the traditional names of stars are frequently used, they also have a standardized scientific designation. As noted in chapter 1, astronomer Johann Bayer established a naming convention. This naming system uses the Greek alphabet starting with the brightest star in a constellation. For example, Alpha Centauri is the designation for the brightest star in the constellation Centaurus, and Beta Centauri is the second brightest. These designations use the Latin genitive or possessive form of the constellation’s name. For example, Aldebaran is the alpha star in the constellation Taurus, so its Bayer designation is Alpha Tauri, which means “the alpha of Taurus.” However, there are exceptions when it comes to the alpha designation, as is the case in the constellation Orion where Beta Orionis is actually brighter than Alpha Orionis. These two stars are better known by their traditional names of Betelgeuse (alpha) and Rigel (beta).
Because of the Bayer naming convention, it is helpful to become familiar with the Greek alphabet as star maps generally use only lowercase Greek letters to distinguish stars rather than spell out their names. Table 2.1 contains the Greek alphabet. The order of letters in this table runs vertically down the columns, i.e., alpha, beta, gamma, and so forth.
To accommodate the limited number of letters in the alphabet for constellations that have more than twenty-four stars, Bayer used lowercase and then uppercase Latin letters. For example, the twenty-sixth brightest star in Centaurus would be called “b Centauri.” The forty-ninth star would be “AA Centauri.” This cumbersome method of naming stars gave way to Flamsteed numbers.
Developed by English Astronomer John Flamsteed (1646–1719), stars are numbered in each constellation without regard to their brightness starting with the lower, rightmost star on a star map. Actually, stars with a Bayer designation (Greek letter) also have a Flamsteed number. Like the Bayer designations, the Flamsteed system uses the Latin genitive form of the constellation’s name. For example, the famous star Betelgeuse (traditional name) in the constellation Orion can be called 19 Orionis (Flamsteed designation) or Alpha Orionis (Bayer designation). You may even find it noted as 19 Alp Ori on star charts. Its Flamsteed number is 19, its Bayer designation is alpha, and Ori is the abbreviation for Orion. Most maps use the Bayer designation for stars that have them and the Flamsteed numbers for those that do not.
In some cases, a star is not just “a” star. It can be a binary, double, or multiple star system, and this is where naming conventions get complicated. You may find designations using numbers, Latin letters, and sometimes superscript numbers and letters. Most often, you will see multiples represented as Alpha-1 and Alpha-2, and so forth, or sometimes Alpha-A and Alpha-B. The difference in using a number or letter is to distinguish multiple stars that are far apart or closer together (relatively speaking), respectively. For our purposes, and simplicity’s sake, I have used the naming convention where a number is appended to the star’s name. For example, Algorab, the delta star in the constellation Corvus, is a double star with its components designated as Delta Corvi-1 and Delta Corvi-2.
Of course, there are exceptions and the alpha star in Centaurus is one of them. It has three stars, two of which are identified as Alpha Centauri-1 and Alpha Centauri-2. However, instead of being called Alpha Centauri-3, the third star only has its traditional name, Proxima. Another exception is that spectroscopic binary stars do not have completely individual designations. For example, the delta star in Lyra has three components, but two of them share the Delta Lyrae-1 designation as Delta-1a and Delta-1b. The other star in this threesome is called Delta Lyrae-2. I have included this information for those who want to incorporate a full range of star color into their magic. There is more about working with star color in Chapter Three and Appendix B.
Before heading outdoors to find your way among the stars, it is helpful to become familiar with a star map. This can be a simple, conventional piece of paper, a more versatile planisphere, or a high-tech smartphone app. Knowing what you are going to be looking at and having something to refer to when you get outside will make star finding easier.
There are two conventions to get used to with a star map. Unlike the terrestrial maps that we are used to, many star maps have east and west reversed; east is on the left and west on the right. These are designed for the user to face south, which puts east and west in their correct orientation. The other convention for star maps is to have east on the right and west on the left where we are used to seeing them, but north and south reversed. These are designed for the user to face north. In both conventions, the direction that a user should face is the one noted at the bottom of the map.
For consistency, all of the maps in this book have been drawn using the first convention of facing south. Likewise, the directions given throughout the book for locating stars and constellations assume that the reader is facing south. It is important to note that the maps in this book are approximations to show the position of constellations and how they relate to each other. Also, they are intended to suggest the constellations rather than reproduce entire star patterns, which makes it easier to use them in ritual and magic work. The star maps that appear with the individual entries in this book show where the suggested star patterns fall within the overall figure of their constellations. Keeping the maps consistent means that some of the graphical depictions of the star figure characters may appear upside down or sideways. Hercules and Pegasus are two examples. While this may seem odd from a pictorial aspect, it is actually helpful to have these views in our minds when we are outside at night looking at the constellations.
A number of star maps in books and on the Internet are drawn in the shape of a circle to simulate the celestial sphere. This type of map is used by holding it over your head and aligning it with the cardinal directions. The center of the star map represents the zenith. Because the stars we can see change with the months and seasons, it is important to have the appropriate star map, as well as one that accommodates your latitude. The Internet is an excellent source for obtaining current star maps. A good source is the Evening Sky Map, which is produced monthly and available at SkyMaps.com. These maps also note the position of the moon throughout the month as well as star magnitudes.
The magnitude of a star indicates its brightness. While the Bayer naming convention also does this, it is somewhat arbitrary and only indicates the order of star brightness within a constellation. Stellar magnitude is applied to all stars regardless of constellation. It began with Greek astronomer Hipparchus around 129 BCE when he designated the brightest stars as being of the first magnitude. He called less bright stars second magnitude, and so on. The faintest stars were sixth magnitude. Ptolemy adopted this system, and it remained unchanged for about fourteen centuries. With the aid of his telescope, Galileo (1564–1642) found many more stars than Hipparchus and Ptolemy had been able to see. Over the centuries, as bigger and better telescopes were developed and more stars could be seen, the magnitude system was expanded. However, it has remained locked into counting backward with the largest numbers representing fainter stars. As light-measuring equipment advanced, the magnitude system was refined with the brightest stars now having negative numbers.
The simple long and short of the magnitude system for laypeople looking at a star map is the size of the dots that represent stars. The larger the dot, the brighter the magnitude of the star, which for most of us is more straightforward. However, now you will know why a map legend will show bigger numbers for smaller dots. The star maps in this book do not show magnitude, so the dots are all the same size.
Unlike the seasonal maps, another type of map called a planisphere is good for the entire year. It is especially helpful for becoming familiar with the night sky through the months and seasons. This is also a good tool if you are an armchair stargazer and simply want to know which constellations are current in the night sky. The planisphere is flexible and can be set to show the sky for any date or time during the year. Like any star map, it is important to get one that is appropriate for your latitude. Planispheres cover a lot of ground, so to speak, and run in ten-degree increments, for example 30º to 40º north.
A planisphere is made of plastic or laminated cardboard and has a center disk that can be rotated. With the constellations printed on it, this center disk represents the sky and shows the rotation of stars around the north celestial pole. Of course, one designed for the Southern Hemisphere rotates around the south celestial pole. The larger, stationary part of the planisphere shows the horizon. Unlike star maps, east and west are in the positions (right and left) that we are used to; however, “north” is printed at the bottom of the horizon, which means you need to face north. While the planisphere is low-tech, it is versatile. If you turn it over, the back has “south” at the bottom horizon so you can use it facing south, too.
To use a planisphere, simply rotate the center disk until the current date and time are aligned. Add an hour if the current time is on daylight-saving time. Of course, being able to rotate the “sky” also allows you to display the constellations for any date and time during the year. In addition, by rotating the disk you can determine when a constellation will rise and set. To do this, rotate the center until the constellation is on the eastern horizon, and then note the time and date. This will tell you when the constellation will rise. Rotating the center again until the constellation is on the western horizon will give you the setting time and date.
Of course, there’s an app for that. Smartphone technology puts so much at our fingertips, including the stars. Two popular apps are StarMap, available at iTunes (http://www.apple.com/itunes/) for the iPhone and iPad, and Google Sky Map for Android systems (google.com/mobile/skymap/). A good source for a range of sky apps is AppAdvice (appadvice.com/appguides/show/astronomy-apps). For computers, an online source for star maps is the website of Sky and Telescope magazine (www.skyandtelescope.com), which is full of great information, interactive sky charts, and information on space-related apps. For anyone who prefers armchair stargazing or is unable to go out to a good location, apps on smartphones and tablets and interactive websites are a good way to learn about the stars.
Getting Outside
The best place to begin is in your own backyard or neighborhood. Get to know what you can see when you step outside your door. If you live in a city, you may only see the brightest stars, but this is a good place to start. Light pollution is the biggest problem when stargazing in an urban area because the less-bright stars and the delicate band of the Milky Way are obscured. Luckily this is changing as cities and towns are switching to energy-saving downward-directed lighting.
Once you get to know what you can see from your doorstep or backyard, you may want to plan an excursion out to the countryside for a good dark sky. Check the moon phase for the night you plan to go out as the brightness of a full or near full moon can make it difficult to view faint stars. Follow the example of the experts who locate observatories on mountains to get above as much air turbulence and pollution as possible. Even if you cannot go to the mountains, hilltops are better than valleys.
However, if you stay in an urban or suburban area, station yourself as far away as possible from streetlights or other bright lighting. While your eyes will need about ten minutes or more to adjust to the dark, you don’t need to wait that long for stargazing. As your eyes adjust, you’ll notice more and more stars. Stars that can be seen with the naked eye are called lucid stars.
Whether you are in your backyard or out in the countryside, there are a few things that are useful to have on hand. A blanket is useful because it is often more comfortable (and less strenuous on the neck) to lie on the ground rather than sit in a chair. Along with a star map, take a flashlight but cover the lens with red cellophane so your night vision will not be disrupted. If you go stargazing often, you might consider purchasing a red light flashlight. A compass is a good tool to take along, too, so you can orient your star map correctly.
As we have learned, most stars and constellations appear to rise and set like the sun, but a few do not. These are called circumpolar constellations because they appear to circle the pole. In the Northern Hemisphere, the circumpolar constellations covered in this book include Ursa Major, Ursa Minor, Draco, Cassiopeia, and Cepheus. In the Southern Hemisphere, the circumpolar constellations covered in this book are Crux and Hydrus.

Figure 2.2. The northern circumpolar constellations
Now that you have your flashlight and star map and are comfortable on your blanket or chair, where do you start? First, check your compass to find which way is north, and then orient your star map to it. If you are using a map in this book, north should be to your back so you are facing south. When you look at the sky, the easiest “landmark” (so to speak) in the Northern Hemisphere is the Big Dipper. Since it is part of a circumpolar constellation, it will be visible all year. If you are in the Southern Hemisphere, look for Hydrus.

Figure 2.3. The southern circumpolar region
Once you find your circumpolar landmark, locate the brightest stars, which will be your next landmarks. Check your star map for these, choose one, and then find it in the sky. Now that you have found a primary star, check your star map again for others in the same constellation, and then find them in the sky. Take your time and don’t rush. It may take a while to get used to this different perspective. When you are ready, work your way around the sky to locate the constellations and stars that interest you.
If you see a star that seems out of place, it is likely to be a planet. Remember, stars twinkle, but planets do not. One last word about stargazing: be sure to dress appropriately for the weather and go where it is safe to be outdoors at night.
Once you find the stars and constellations with which you want to work, set aside the maps and apps and simply be with the cosmos.
In the next chapter, we will learn how to draw on the stars for magic.