Chapter 1
Introducing Arduino
IN THIS CHAPTER
 Looking at the various models of Arduino microcontrollers
 Learning how to program Arduino
 Creating a simple Arduino project
Arduino
(pronounced ar-dwee-
no) is one of the most popular microprocessor systems in use today. Arduino originally started in Ivrea, Italy, in 2005 and has become a global phenomenon. The original intent of the Arduino was to provide a less expensive alternative to the BASIC Stamp, which at the time cost about $75 (less expensive models are available now). Arduino is a little more difficult to program than the BASIC Stamp, but not much. Arduino boards can be purchased online for less than $10.
Arduino is formally known as the Arduino Project, reflecting the fact that Arduino is an open-source project developed by an online community. As a result, several different companies manufacture Arduino-compatible microprocessor boards. You can purchase Arduino boards directly from the Arduino website (
www.arduino.org
) or from other online retailers such as Amazon or Newegg.
Introducing the Arduino UNO
As of this writing, there are about two dozen different variations of Arduino boards, each providing different capabilities. For example, several Arduino boards come with built-in wired or wireless network abilities. Others are designed to be used in robots or game controllers.
The most popular Arduino board is the Arduino UNO, which is what I focus on in this book. However, just about everything you learn here about the UNO will apply to other Arduino models as well.
 Several manufacturers make compatible versions of the UNO board. You can construct the projects in this book using any of these compatible UNO boards.
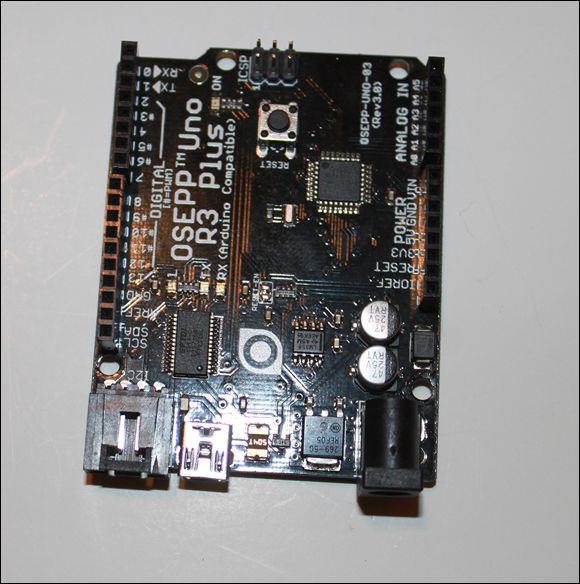
Figure 1-1
shows an Arduino UNO board. Here are its major features:
- An Atmel ATmega328 single-chip microprocessor with 2Kb of RAM for data storage, 1Kb of EEPROM memory for program storage, and a variety of useful input and output capabilities that are exploited by the UNO board.
- A
 power connector that can be used to power the device from a battery or wall adapter. Built-in 5 V and 3.3 V regulators drop the voltage to the levels required by the Arduino. (Note that the device can also be powered from the mini-B USB connection.)
- A power LED that indicates the UNO’s power status.
- A mini-B USB connector that is used to connect the UNO to a computer for programming. When connected, the UNO draws power directly from the USB connection, so a separate power connection is not required.
-
14 digital I/O pins.
- An onboard LED connected to pin 13. This LED can be controlled from programs that you upload from your computer to the UNO.
- 6 analog input pins.
- Power pins that provide access to 5 V, 3.3 V, and ground for external circuits.
- Onboard TX and RX LEDs that indicate when the board is communicating with the computer via the USB port.
- A Reset button that interrupts the program currently running and restarts the UNO.
Buying an UNO Starter Kit
 Although you can purchase an Arduino UNO board by itself, you may want to purchase your first UNO board as part of a starter kit that includes a variety of other components that will be helpful as you build your projects. These starter kits typically cost anywhere from $30 to $100 or more, depending on the additional components they include.
I suggest you start with an inexpensive kit such as the Elegoo UNO Project Super Starter Kit, which comes with a compatible UNO board, a small tutorial book, and a variety of goodies such as a breadboard, an LCD display, servo and stepper motors, some jumper wires, LEDs, resistors, and push buttons, and so on. In all, it contains enough parts to build a variety of UNO projects.
If you already have breadboards, resistors, LEDs, jumper cables, and the like, you can get a genuine Arduino UNO board for about $25, or you can get a compatible UNO board for less than $10.
Don’t forget that you’ll also need a short mini-B USB cable to connect the UNO board to your computer to program the board.
Installing the Arduino IDE
The Arduino IDE is the software that you use on your computer to create programs that can be uploaded from your computer to an Arduino board. This software is available free from the Arduino website. Just point your browser to
www.arduino.org
and click the Download menu. Then download the IDE package for the operating system you’re using. (The IDE comes in separate versions for Windows, Mac, and Linux.)
If you’re using Windows, you should choose the Windows Installer rather than the zip version. The Windows Installer version will install itself directly onto your computer so that you can then run it from the Start menu.
If you’re a Mac user, download the Arduino IDE program. Then copy the downloaded program to your Applications folder. Finally, to make it easier to run the program, drag it from the Applications folder onto the Dock at the bottom of the screen.
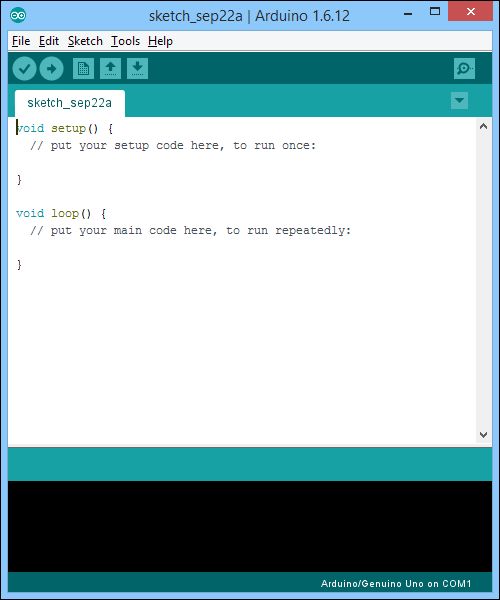
When you get the software installed, run it by choosing Arduino IDE from the Start menu (Windows) or from the Dock (Mac). Figure 1-2
shows how the IDE appears when you first run it on a Windows PC.
Connecting to an UNO
Before you can use the IDE to program an Arduino, you must first connect the Arduino to your computer. With an UNO, this is an easy task: Simply plug the small end of the micro-B USB cable into the small USB receptacle on the UNO board, and then plug the normal USB connector on the other end of the cable into any available USB port on your computer. The power LED lights up on the UNO, and the Arduino IDE automatically recognizes the UNO on the USB port.
To verify that the Arduino is connected properly, open the IDE software and perform the following steps:
-
In the IDE, choose Tools⇒ Board and verify that Arduino UNO is selected.
If not, choose Tools⇒ Board⇒ Arduino UNO.
-
Choose Tools⇒ Port and verify that the USB port is selected.
If it isn’t, manually select the USB port.
After you’ve verified that the UNO is connected, you can proceed with uploading your first program to the UNO.
Looking at a Simple Arduino Sketch
In the Arduino world, a program is called a sketch.
Contrary to what this gentle-sounding term implies, however, there is nothing artistic or visual about an Arduino sketch: It’s simply a program written in an advanced programming language called C++. Calling the program a sketch
instead of a program is simply a way of helping lower your defenses against the daunting task of learning how to program.
In just about every book on programming languages, the first program presented is called Hello World. This simple program displays the string “Hello, World!” as a way of demonstrating what the simplest possible program looks like.
Such a program is possible in Arduino, but it isn’t really the best sample program to start with. That’s because unlike most computers, microprocessors such as the Arduino do not have a built-in console that can show the “Hello, World!” text.
So instead, we’ll start with a simple program that flashes the built-in LED that is established on pin 13. This program simply flashes the LED on and off repeatedly, as long as the program is allowed to run — in other words, until you turn the UNO off. The program turns the LED on for one second, then off for one second, then on for one second, and so on, indefinitely.
Before I show you the code for this program, let’s walk through the steps that the program must take:
- First, the program must designate I/O pin 13 as an output pin. It will do this using a command called pinMode
.
- Next, it must turn the LED on. It does this by using a command called digitalWrite
, which is used to write the value HIGH to pin 13.
- Then the program waits for one second to elapse. It does this by using a command called delay
. During this delay, the LED remains lit because the output status of pin 13 is HIGH.
- After the one-second delay, digitalWrite
is used again, this time to turn the LED off by writing the value LOW to pin 13.
- Then the program uses delay again to wait for one second. During this delay, the LED remains off because the output status of pin 13 is LOW.
- Now the program repeats Steps 2 through 5, in sequence over and over again until the UNO is turned off.
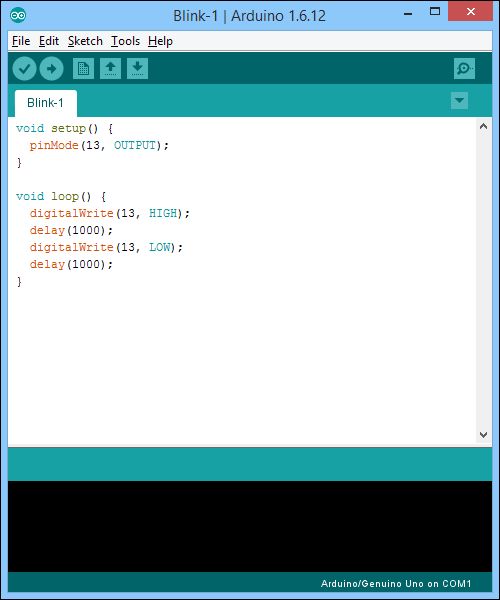
The actual Arduino program to implement these steps is shown in Listing 1-1
.
LISTING 1-1
The Blink Program
void setup() {
pinMode(13, OUTPUT);
}
void loop() {
digitalWrite(13, HIGH);
delay(1000);
digitalWrite(13, LOW);
delay(1000);
}
If you’re new to programming, there are a lot of details within this listing that I don’t expect you to understand yet. Don’t worry — I explain them all in the next chapter. For now, I just want you to peruse the code casually and note that the program uses the pinMode
, digitalWrite
, and delay
commands as described in the steps listed earlier.
The commands in the Blink program are grouped together into two functions,
which are simply sections of code that are collected together in a unit. These two functions are
-
setup
: The commands in the setup
function are executed once, at the very beginning of the program. In other words, the setup
function is run once whenever the UNO is turned on or when the UNO’s Reset button is pressed. In the Blink program, the setup
function has just one command — pinMode
— which sets pin 13 to OUTPUT
mode.
-
loop
: After the setup
function completes, the commands in the loop
function are executed repeatedly until the UNO is turned off or reset. These commands turn the LED on, wait for one second, turn the LED off, then wait for one more second. As a result, each time the loop
function is executed, one blinking cycle occurs — the LED goes on for one second, and then goes off for one second.
 All Arduino programs, from the simplest to the most complex, are organized into these two basic functions: setup
, which is executed once when the program starts, and loop
, which is executed repeatedly until the program stops.
Running the Blink Program
To actually run the Blink program described in the previous section on your Arduino UNO, follow these steps:
-
Connect the Arduino UNO to your computer.
Use the mini-B USB cable to connect the USB port on the UNO to a USB port on your computer.
-
Open the Arduino IDE program on your computer.
On a Windows computer, choose Arduino IDE from the Start menu. On a Mac, double-click the Arduino IDE icon from the Dock or open it from the Applications folder.
-
Choose the File⇒ New Command.
A window for the new sketch appears. Notice that this sketch already contains the outline for the setup
and loop
functions.
-
Edit the program so that it looks exactly like
Listing 1-1
.
The IDE editor works like any other text editor you’ve worked with. If you want, you can start by selecting the entire contents of the editor window and pressing the Delete key. Then simply type the program exactly as shown in Listing 1-1
into the editing window.
-
Save the sketch.
Choose File⇒ Save, enter the name “Blink-1,” and click the Save button.
When you’ve created and saved the program, the editor window should look like Figure 1-3
.
-
Choose File⇒ Upload.
The program is uploaded to the UNO. The TX and RX LEDs on the UNO board will flash for a few seconds while the program is being uploaded to the UNO. After the program has finished uploading, the onboard LED will begin to flash on an off at one-second intervals.
Congratulations! You’ve written your first Arduino program, and you’ve now stepped into the world of microcontroller programming!
Using a Digital I/O Pin to Control an LED
Now that you’ve written an Arduino sketch that can flash the onboard LED that’s connected to pin 13, the next step is to tap into pin 13 on the UNO board to light an external LED. As with most microcontrollers, the I/O pins on the UNO operate at standard logic-level voltage, so  is present at the pin when it is HIGH, and 0 V is present when the pin is LOW. On the UNO, the I/O pins are capable of sourcing 20 mA, so you’ll need to provide an appropriate current-limiting resistor to avoid burning out the LED. For this example, we use a
  resistor.
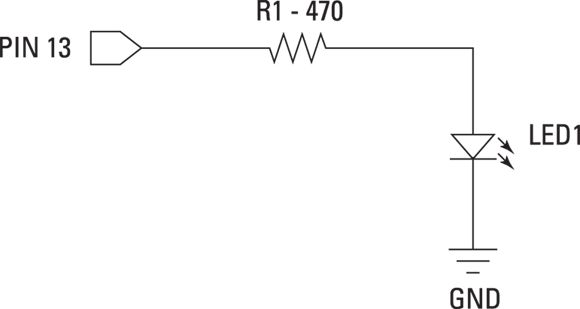
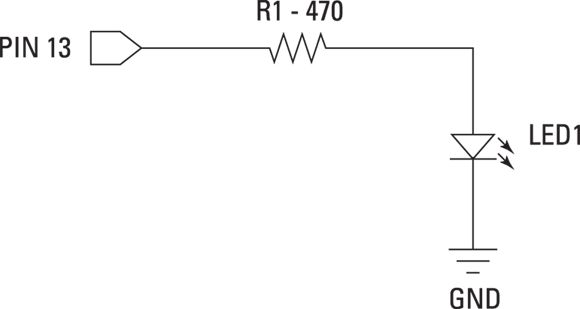
Figure 1-4
shows the schematic for this circuit. As you can see, the circuit is very simple: Pin 13 connects to the  resistor, which in turn connects to the LED’s anode. The cathode then connects to ground. Although the schematic doesn’t indicate it, we use one of the two ground pins on the UNO card for this ground connection.
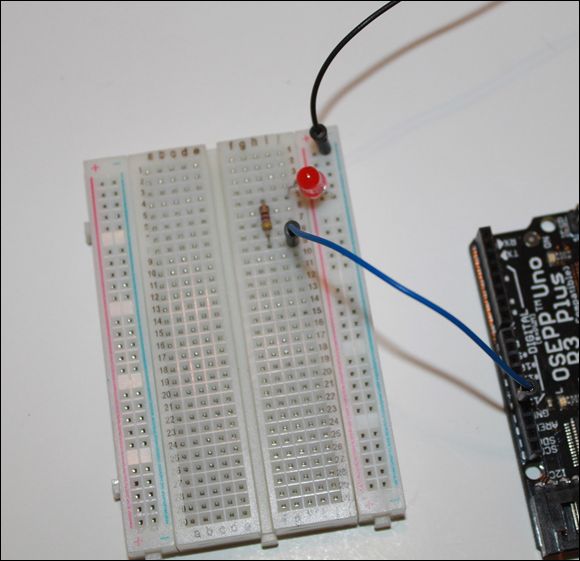
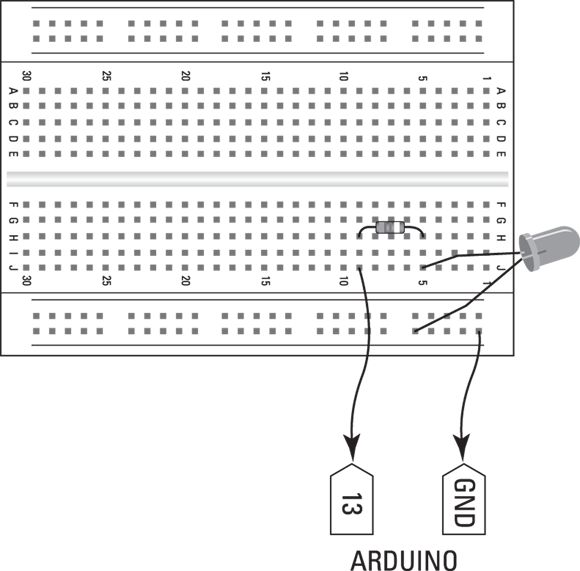
Project 43 shows how to assemble this project by using a breadboard to hold the LED and resistor, with jumpers to connect the breadboard to the UNO board. Figure 1-5
shows how the project appears when completed.
Project 43: Blinking an LED with an Arduino UNO
In this project, you connect an external LED to an Arduino UNO board. Then you use a simple sketch to turn the LED on and off at one-second intervals.
Parts
- One computer with Arduino IDE installed
- One Arduino UNO board
- One mini-B USB cable
- One small solderless breadboard (RadioShack 2760003)
- One 5mm red LED (RadioShack 2760209)
- One
 resistor (yellow-violet-brown)
- Jumper wires
Steps
-
Insert resistor R1.
 : H5 to H9
-
Insert LED1.
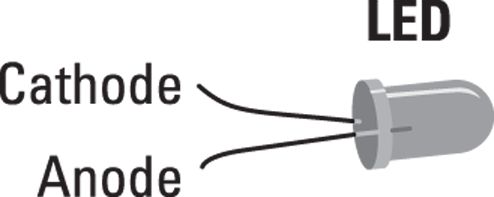
Cathode (short lead): Ground bus
Anode (long lead): J5
-
Connect the ground bus to the UNO board ground.
Use a jumper to connect any hole in the ground bus on the breadboard to either of the GND pins on the UNO board.
-
Connect pin 13 on the UNO board to J9 on the breadboard.
-
Connect the UNO to the computer.
Use the mini-B USB connector.
-
Upload the Blink program (see
Listing 1-1
) to the UNO if it isn’t already uploaded.
The LED on the breadboard will flash on and off at one-second intervals. Note that the LED on the breadboard will flash in sync with the LED on the UNO board.
 Looking at the various models of Arduino microcontrollers
 Learning how to program Arduino
 Creating a simple Arduino project
 Several manufacturers make compatible versions of the UNO board. You can construct the projects in this book using any of these compatible UNO boards.
 power connector that can be used to power the device from a battery or wall adapter. Built-in 5 V and 3.3 V regulators drop the voltage to the levels required by the Arduino. (Note that the device can also be powered from the mini-B USB connection.)
 All Arduino programs, from the simplest to the most complex, are organized into these two basic functions:
 is present at the pin when it is HIGH, and 0 V is present when the pin is LOW. On the UNO, the I/O pins are capable of sourcing 20 mA, so you’ll need to provide an appropriate current-limiting resistor to avoid burning out the LED. For this example, we use a
  resistor.
 resistor, which in turn connects to the LED’s anode. The cathode then connects to ground. Although the schematic doesn’t indicate it, we use one of the two ground pins on the UNO card for this ground connection.
 resistor (yellow-violet-brown)
 : H5 to H9