First off, let me preface by stating what this book is not . This book is not strictly hard light scenarios. Though it is mainly focused on scenarios using hard light, this book does include a few scenarios that involve mixing in a soft light source or softening an otherwise hard light source, so don’t email to inform me of this “oversight.” Secondly, this book isn’t a manual. As a matter of fact, I rarely even read manuals. Even Ikea instruction manuals, which are chock full of helpful illustrations, barely get a glance from me. I’d rather dive right in and figure it out as I go. What this book is, however, is a compilation of techniques, hacks, and tips that I’ve figured out or picked up over the years that build upon the techniques discussed in my previous book.
The main reason I rarely read manuals is that I am extremely impatient. Whenever I am buying a new piece of gear, it’s because I have thought about it and worked up to it for a while, so by the time the package arrives in the mail, the last thing I want to do is sit and read about it. I tear open the packaging, load up the batteries, and start shooting. Many times this results in my failure; I miss some important feature or do things out of order and have to backtrack. This haphazard manner of working isn’t for everyone, but it allows me to figure things out in my own way and to discover some wonderful, unconventional ways of doing things.
Nor is this book a glorified list of a bunch of gear you need to buy, which you may not be able to afford anyway, and it’s not meant to be an exhaustive guide to hard light, either.
Instead, I envision Studio Anywhere 2 to be what I would have wanted to be included in the packaging when I bought my first flashgun: part manual, part compilation of ideas and techniques that has taken years to develop and perfect. The techniques in this book are predominantly for hard-light scenarios—i.e., scenarios lit with harsh, unmodified light. But this book is about more than that. It’s also about how to manipulate, soften, and all-around shape light from an unmodified flashgun. Think about it: If all you needed to light any given scenario was one or two flashguns with few to no modifiers, you wouldn’t need a team of assistants and thousands of dollars worth of lights and light modifiers to make the shot. Sound good? Keep reading.
Preferences are subjective. Especially when it comes to the needs of a client. One client loves candid, on-the-fly shots while another prefers more polished, composed images. One Creative Director prefers natural light while their predecessor was only pleased with studio lighting. What I’ve learned to do is not get too comfortable in one particular niche of the industry and not take it personal if a client changes their mind after seeing my images mid-shoot. Maybe at first they thought that they wanted hard light, but after the shoot begins, they start asking for me to minimize shadows, and by the end of the shoot, I may end up firing a softbox through a scrim (FYI, that means extra, extra, extra soft light).
One of my regular clients is Jeni’s Splendid Ice Creams, a high-end ice cream boutique that started in Columbus, Ohio, over 10 years ago but has expanded across the country. They brought me on to help elevate their brand through photography. They showed me images of what they’ve been producing—which was really solid, beautiful work—but expressed a desire to start pushing in a new direction. They really liked my vibrant colors and hard shadows and thought we’d make a great team. They were right. But every shoot doesn’t consist of me just winging it, lighting according to the mood I’m in that day. I’ve learned that sometimes they still do want beautiful, soft light. So for the sake of time, money, and ice cream, I’ve learned to sometimes give them both soft and hard options for the same setup.
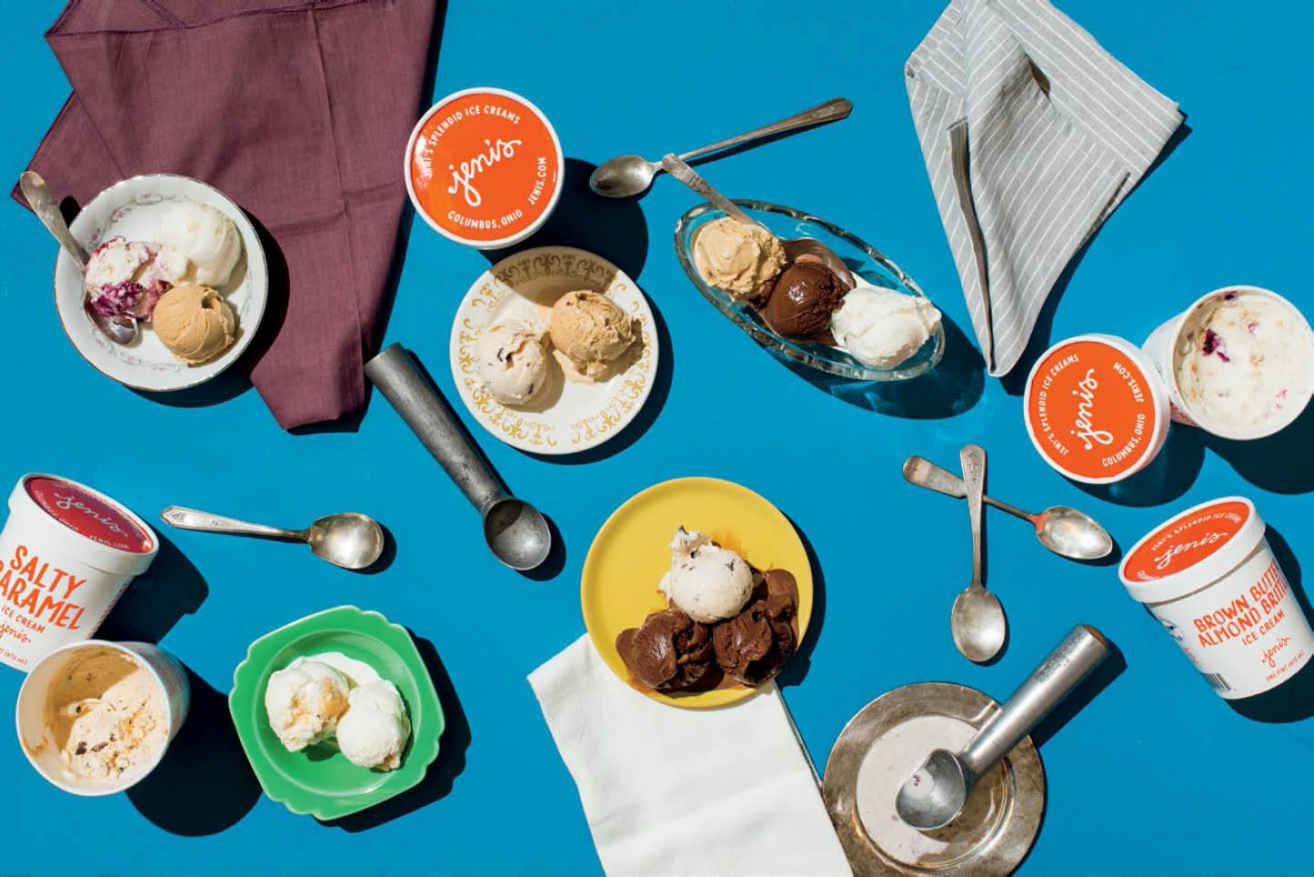
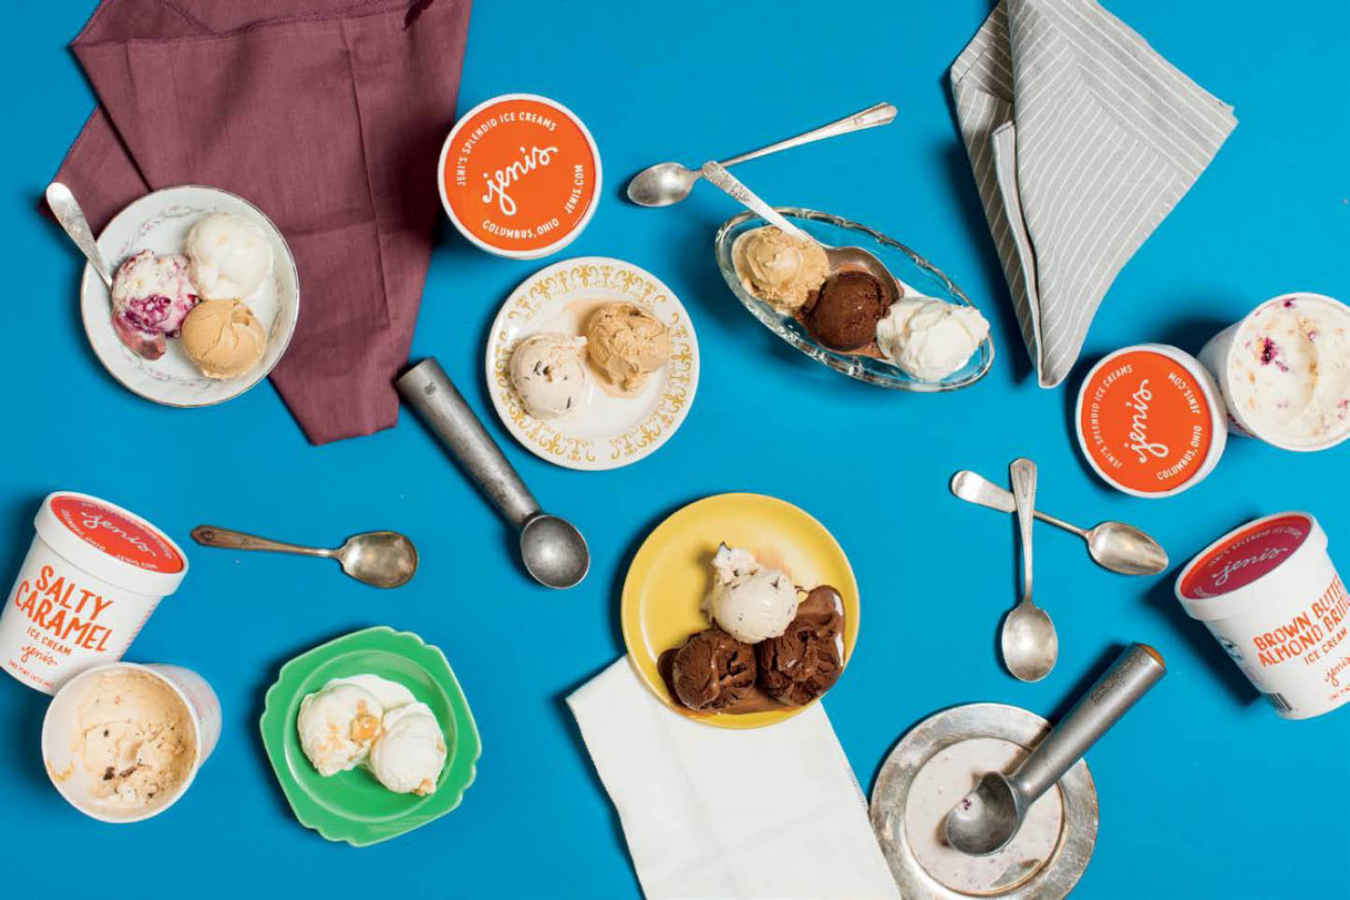
In Figure I.1 you can see my setup. I have an unmodified flash on a stand to the left, giving me hard light. I am also using the Jeni’s studio Paul C. Buff Einstein light, seen on the right, modified with a softbox to give me soft light. Figure I.2 is the hard light image. Note the presence of the hard, black shadows and how they take up space between the products, leaving less blue space. The shadows actually become a style element in the image. In contrast, the soft light image in Figure I.3 is almost shadowless. This results in more of the blue backdrop occupying real estate in the final image. I actually prefer the hard light image. How about you?
Figure I.1 This setup was for a Jeni’s Ice Cream product shoot. I was providing them with both a hard light (light on the left) and a soft light (light on the right) option for each image.
Figure I.2 The hard light shot. The presence of hard shadows adds another element to the image, lessening the blue space between objects and creating a fuller image.
Figure I.3 The soft light shot. The shadows are softer and even non-existent in some spots, leaving more space for the blue background.
Broncolor or Profoto? Fender or Gibson? Lamborghini or Ferrari? Which toy/software/high-end piece of gear is the best so that I can do exactly what my favorite photographer is able to do?
This is a mentality that many photographers, musicians, and hobbyists share. Yes, high-end gear is nice. Both Profoto and Broncolor lights will provide you with quality light at a high output with which to light agency-represented models in couture clothing. But how often is that caliber of gear actually needed? The question should not be, “Which expensive, high-end lighting rig should I buy?” Rather, it should be, “Have I yet reached the limitations of my current gear?”
I’ve been asked why I opt for such a minimal or even anti-gear approach to photography, while other photographers laud gear upgrades. Well, it’s not a choice made by moral reasons or even necessity; it’s one of preference. I like traveling light and working alone. A big gear kit requires help to haul it, room to store it, and money to fund it. No thank you. This was not a decision that I came to overnight, but one that was forged through years of working with the only gear I could afford.
When I first launched my business in 2007, all I had in terms of gear was a Canon 20D, one 430 EX flashgun (which didn’t have a port for a transmitter, so I couldn’t use it off-camera), a piece of junk 18–55mm f/3.5–5.6 kit lens, and a Sigma 70–200mm f/2.8 lens (without image stabilization). Let’s say, for example, that I wanted to get an off-camera flash shot. I would put my camera on a tripod and do a long exposure, walking over to the subject and manually popping the flash (think light painting). It was far from ideal, but I sure learned the limitations of my gear. It also gave me plenty of time to think about what piece of gear I needed next.
If your eyes don’t work well, everything that you look at will appear out of focus or hazy. So it goes with camera lenses. Upgrading my glass, I decided, would need to come first. I shelved my kit lens in favor of a (used) 24–70L. Now I was in business. My image quality improved considerably. The next step was getting a couple (affordable) flashes with triggers, so I wasn’t running around, flash in hand, hoping it would be dark enough for me to do a long exposure. I opted for the LumoPro LP160 flash unit, purchasing two, along with three PocketWizard wireless remote triggers. The whole transaction set me back $600, which was a big number for me at the time.
Getting reliable light and a quality image enabled me to realize that my camera sensor—a cropped 8-megapixel sensor—just wasn’t giving me what I needed. Even with good light and good glass, my camera wasn’t up to snuff with other, more current bodies on the market. However, I still couldn’t afford the Canon 5DII, which had just hit the scene. I got a 40D instead. Although the sensor was still cropped, the quality was a bit better, and because I was taking on more paid photo gigs, I needed more reliable gear—not to mention a second camera body, so I’d have a backup if one failed.
Seven years later, I now have the ideal gear setup, but it’s not identical to the setup of any other photographer. It’s completely mine, unique to my needs. If I had simply used a $10,000 credit line when I first launched my business and bought a bunch of gear that other people said were “must haves,” I would’ve cheated myself out of the learning process. My shooting and lighting process is now different than any other photographer’s because it had time to evolve and grow. Through this learning process, I have found that I need only two (prime) lenses and I prefer to use flashguns to studio strobes. On the rare occasion that I am shooting tight interiors, I’ll rent a 16–35mm lens, or if I am shooting small product, such as jewelry, I’ll rent a 100mm macro lens, and add the rental costs to the client’s bill.
Don’t get me wrong. Studio strobe systems, such as Profoto, are fantastic—a luxury but not, I dare say, a necessity. They provide a consistent (high) output and color temperature. If I were strictly shooting in the studio, a Profoto system would be perfect—I even owned one for about a year. Once I was making enough money in my business to afford one, I bought a used Acute2 pack with two heads, excited about the increase in power I would have. I was excited to shoot portraits in full daylight, eclipsing the sun with my output. The problem was not only did I need a 10-pound battery pack to accompany the already 25-pound light kit, but my lights were also tethered to the pack. The farthest each light could be moved from the pack was about 10 feet on either side, without getting power cord extensions, which would mean more money and more weight. Additionally, there were cords running everywhere and I needed an assistant to help lug the massive gear kit which, with light stands and sand bags, was well over 100 pounds (before adding in the weight of my camera and lenses). This meant booking an assistant, which meant even more money and planning and less spontaneity—no more running and gunning, which is how I prefer to roll.
After realizing this large light system was actually handicapping me, I sold the gear and bought some used Canon 430EX Speedlites with RadioPopper wireless triggers, which allowed me to use high-speed sync (HSS). This was the mobile answer to eclipsing full sunlight, and now I was running and gunning again. Having flashguns rather than studio strobes allowed me to place them anywhere and easily reposition them so I could quickly dial in the lighting for a shot.
In the time that’s passed since I last owned a Profoto system, the company has released the more portable B1 and B2 systems. The B1, a 500-watt head, has the battery right in the head, while the B2, a 250-watt light, has a smaller, flash-sized head with a battery pack attached by a cord. For the sake of better knowing my options when it comes to portable light, I did a comparison between the Profoto B1 and the Cactus RF60 flash ( Figure I.4 ).
Figure I.4 I wanted to know my options when it came to portable lights, so I tested the Profoto B1 against a Cactus RF60.
Although the Profoto lights have a higher output and a longer lasting battery, I still prefer the Cactus flashes, for several reasons. First, the size. For every B1 I put in a camera case, I could take four Cactus flashes. Second, the light and shadow quality. In Figure I.5 you can see the straight out of the camera (SOOC) file from the Profoto—nice light but soft shadows. Compare it with the cold, crisp shadows in Figure I.6 , which was lit with the Cactus flashes. If hard light is what I’m going for, the victor is clear.
The one thing I’ll point out is that the light spread of the Cactus flashes isn’t as broad as the Profoto—even at 24mm. Also, when the Cactus is at full power, it’s equivalent to the Profoto firing at 8.4, approximately. As you can likely guess, especially if you’ve shot with flashes much, you can’t shoot with them at full power much at all without getting a ton of misfires. I prefer to keep my output at 1/4 power or lower to keep a fast refresh time. This isn’t usually a big deal, especially when shooting indoors, because I can bump up my ISO a bit to allow for a smaller aperture without losing image quality. It only becomes an issue when you have a lot of ambient light that you need to overpower. That’s when having the more powerful Profotos woud make your job much easier.
Figure I.5 This is the SOOC file that was lit with the Profoto. The light is nice but the shadows are soft.
Figure I.6 This is the SOOC file that was lit with the Cactus. Cold, crisp shadows.
Figure I.7 This product shot was lit with three flashguns at 1/4 power, rather than studio strobes. By using a slightly higher ISO of 320, I was able to shoot at f/13, getting a sharp image.
Let’s imagine that you are doing a shoot indoors with flashes and need a good amount of depth of field, meaning you need a smaller aperture. For example, I was recently shooting glass products on a white sweep, as you can see in Figure I.7 . I had three flashes (two on the background and one into an umbrella on the product) all set to 1/4 power. By bumping up my ISO to 320 I was able to set my aperture at f/13, which allowed a deep depth of field. If I had needed an even smaller aperture, I would have felt comfortable going up to ISO 640 or even 800 with the 5DIII without losing image quality.
More often than needing more power when shooting product, I find myself needing smaller outputs, such as when I’m shooting with a large aperture in order to have a shallow depth of field in my shot. With flashes, I can easily dial down the power to 1/64 or even 1/128 in order to shoot at f/1.8, for example. If I were using studio strobes and wanted that large of an aperture, it’d be far more difficult. Even with the power pack dialed all the way down, I’d need to use a bleed light, which means plugging in an extra, unused light into my pack in order to pull additional power away from my light. My only other option would be to use a neutral density filter, which can result in a loss of image quality.
Occasionally, using this minimal setup on larger shoots has bit me in the ass. Earlier this year I was doing a two-day commercial shoot for a national ad campaign for a big client. It was one of those situations where the client knew just enough to be dangerous but not enough to trust me. My contact looked at my minimal rig and said, “The last photographer had more lights. Tomorrow can you bring more lights?” I should’ve said, “But mine go up to 11.”
The problem was not sufficient firepower, but rather proper client-photographer communication. I was shooting based on my typical workflow, which the client was unfamiliar with. Part of my workflow was to supply straight-out-of-the camera, small-resolution proofs immediately following the shoot, in order for the client to make selections for retouching. My contact for the client at the shoot was extremely happy with the images at the end of the first day, but when he forwarded the proofs to his boss late that evening, the response was less enthusiastic. The complaint was that the images were far too small and dark for print.
This was when my contact asked me to bring more lights to the second day of the shoot, as the previous photographer had done. He went on to explain that the previous photographer shot everything for $1000 and just gave them the raw files to edit. I did my best to not balk at this idea. I attempted to explain that I could light the images any way they liked and that they were looking at the preliminary, unedited proofs. They still weren’t convinced. Finally, I color graded one image from each scenario and sent them over, side by side with the original, to show how the final image would look. After seeing that the polished, final images weren’t, in fact, 800 pixels long and really dark, they relaxed a bit. Needless to say, at the end of day two, I made sure to throw a quick preset on all the proofs to brighten them up, before sending them over to the client.
After that interaction, the industry stories I’d been hearing started to make sense: photographers bringing a whole van full of lighting gear on high-budget shoots, knowing full well that they wouldn’t use most of it. Appearance, the theory goes, is everything. If the client is paying you big bucks, the client expects to see a big production.
I find this charade to be as cumbersome as it is deceptive, but I suppose that some people aren’t yet ready for change. Times are changing, nonetheless, whether the dinosaurs like it or not. It won’t be long before whole campaigns are shot with nothing more than a smartphone. But until then, on larger-budget shoots, I now play the part, renting out a large studio with large strobes to more effectively cater to clients’ large expectations.
This fixation on gear isn’t limited to just clients. Whenever I look at images in the small flash, or strobist, communities, whether on Flickr, 500px, or elsewhere, I get frustrated. Why? Because I see a parade of similar images all rationalized by the same faulty explanations. Thus-and-such gear, the photographers argue, was used and needed to produce this image (which is often of an amateur model, looking more uncomfortable than beautifully lit). I see images created with the discussion focused on how many lights and modifiers were used—images that were lit with five or even seven strobes, when only two or three were needed—which I attribute to photographers not fully understanding the limitations of their gear (the more-is-more mentality), which I illustrated in Figure I.8 . I often see poorly placed lights that create an unflattering or harsh look, even with a softening modifier like a softbox or umbrella. I see images taken by photographers who seem to be accepting “good enough” images and lighting rather than pushing themselves toward “great.” My hope is that after reading this book, you can tell me why you used two lights instead of one or why you shot from an elevated perspective instead of from head-on. I want you to be able to separate yourself from the shoot to see the image objectively.
Figure I.8 This illustration depicts how I see many photographers overcomplicating their lighting setups (top) as opposed to how simple they could be (bottom).
I often tell my students that if tweaking the lighting is getting in the way of a shoot, it’s time to turn off the lights and shoot with available light. Can’t figure out why your new strobe is misfiring? Troubleshoot it later. Turn off the transmitter, change your exposure, and go ambient, shooting with what you know.
Don’t fuss with your lights. Focus on putting your subject at ease. Talk to her. Ask her what she’s been up to earlier that day or what she’s doing later on, after the shoot. Casually snap some frames as you talk. Tell her that you’re just getting your exposure and lighting worked out. Often, you get some nice candid shots during this time. Once you’re ready to start, shoot for 30 to 60 seconds and review a few images (don’t bounce around checking things like a chimp after each frame). Is the lighting looking good or does it need to be adjusted? Make the changes and then shoot for 30 to 60 more seconds. Once you get the lighting nailed down, flip through and find a good shot to show her. It’ll help put her at ease and give her a little boost of confidence. Or maybe she’ll see that she wants to change her posture or expression. Either way, it’s helpful to do this before proceeding, and can save you the need for a re-shoot.
Once you’re dialed in, turn off the technical side of your brain. Focus solely on watching her move and directing her accordingly. Try shooting with both of your eyes open, rather than squinting through the viewfinder. Stay in the moment with her. It helps to have music on that matches the vibe of the shoot, quietly in the background. Don’t rush through it, if possible. You’ll be able to tell when your window has closed and she is ready to be done with the shoot.
That said, if you’re just getting started, start by doing a trade shoot, working with an equally inexperienced subject, so you can take the time to figure out your new gear in a low-pressure situation. By the time you’re working with paying clients, your lighting knowledge needs to be second nature, so your attention can be on them.
One thing I’ve learned recently is to shoot for one or two more minutes than I think I need. When I was first getting my lighting skills worked out, if I got the light anywhere close to decent, I would be thrilled and move on. But I was forgetting to look at the poses and subject expressions. I was only looking at my lighting and was missing out on possibly getting better moments out of my subject.
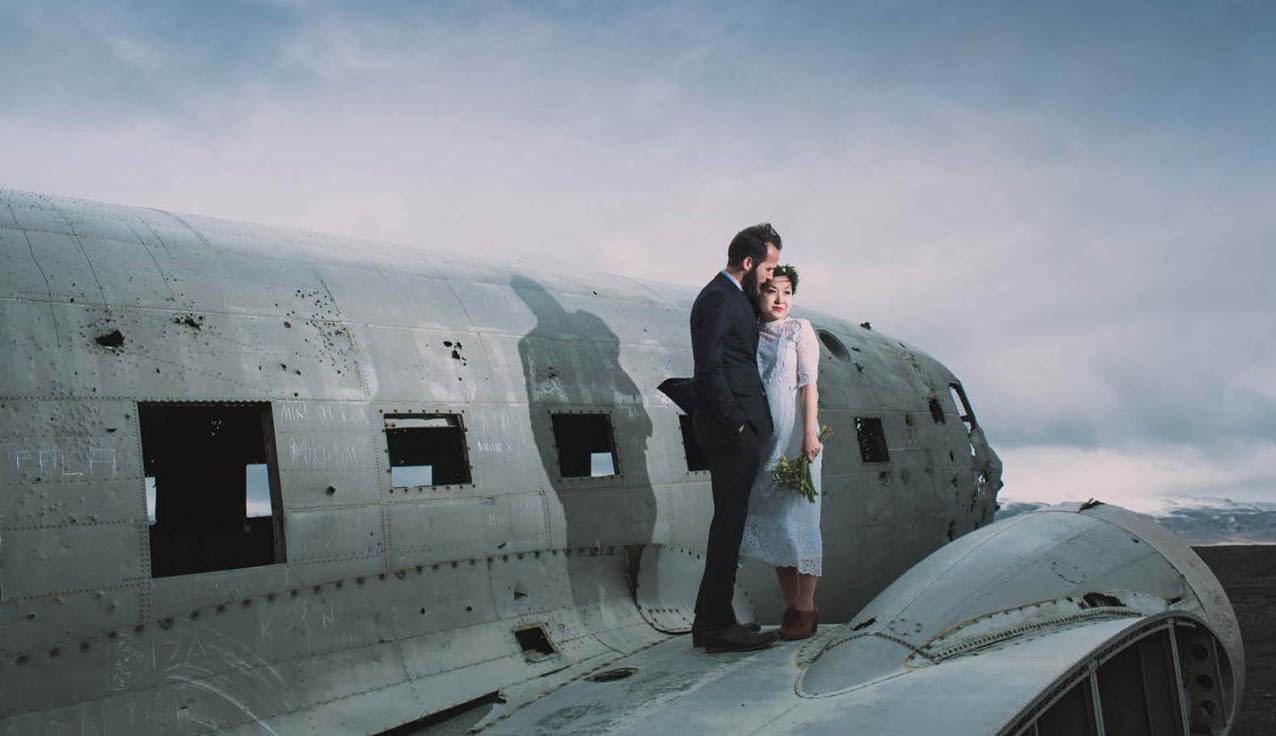
Ditching extraneous gear pays dividends when you’re traveling, as well—and not only the ones you might expect. Suppose you’re booked for a photo shoot in a foreign country. Because you’re not allowed to be in a foreign country to conduct work without a work permit, you have two options. You can get a work permit, which takes time and money, or you can do what I do: travel with a minimal gear kit to avoid suspicion. Not only is it easier and cheaper to do it on the sly, but traveling light (pun mildly intended) also helps you avoid checking bags. I’ve shot in Brazil, Japan, Tanzania, Jordan, and Iceland, and not once needed to check a bag. By knowing the full potential of my gear, I can enter any scenario with confidence that I can get the shot. In Figure I.9 , for example, by zooming in my flash to 105mm and powering it up to 1/1, I had enough light output to back the light off the bride and groom. Doing so allowed the light to spread and illuminate them from head to toe, while I was still able to shoot at f/8, bringing back detail in the sky, thus adding a bit more drama to the already dramatic Icelandic landscape.
Figure I.9 I lit this Icelandic wedding portrait with one unmodified flashgun. By traveling with minimal gear, I am able to avoid checking bags or raising eyebrows.
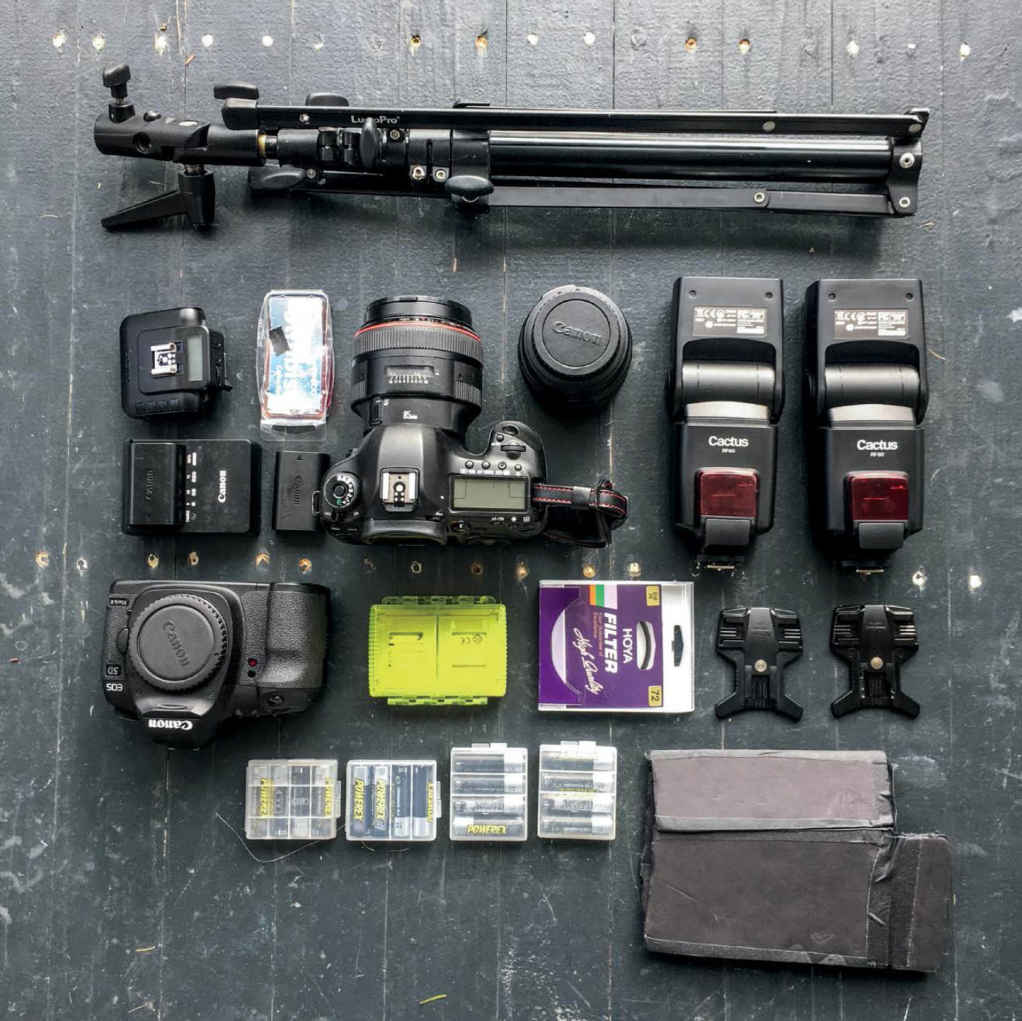
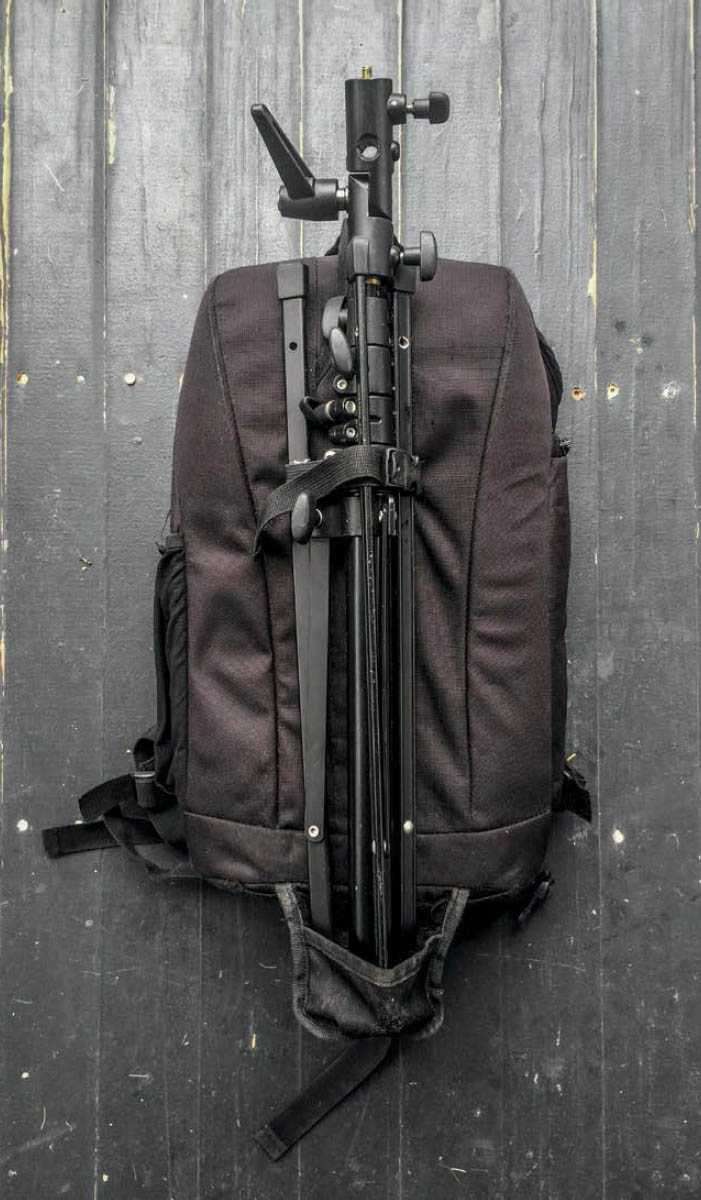
Figure I.10 This is my travel kit. It includes a Canon 5DIII body, a backup 5DII body, Canon 85 f/1.2LII and 35 f/1.4L lenses, two Cactus RF60 flashes and transmitter, several packs of Powerex AA batteries, memory cards, a gel kit, DIY barn doors, a star filter, and light stand. I can even squeeze my 13-inch MacBook Pro in there.
Airlines allow you to have one carry-on and one personal item, like a computer bag—which means essentially two bags. All the gear I need fits neatly into my Lowepro Flipside 300 bag ( Figures I.10 through I.12 ). Typically, I pack two camera bodies, two prime lenses, two flashes, memory cards, several sets of AA batteries, and my 13-inch MacBook Pro. For all intents and purposes, the Flipside is my computer bag. Then I fit in a compact light stand (I use a LumoPro LP605, which is 19 inches long but expands to 7.5 feet) and sometimes an umbrella, along with my clothing and toiletries, into a duffle bag.
Figure I.11 All my gear fits neatly into a Lowepro Flipside 300 bag, which easily stows in any airline overhead compartment.
Figure I.12 My pack is locked and loaded for run-and-gun photography.
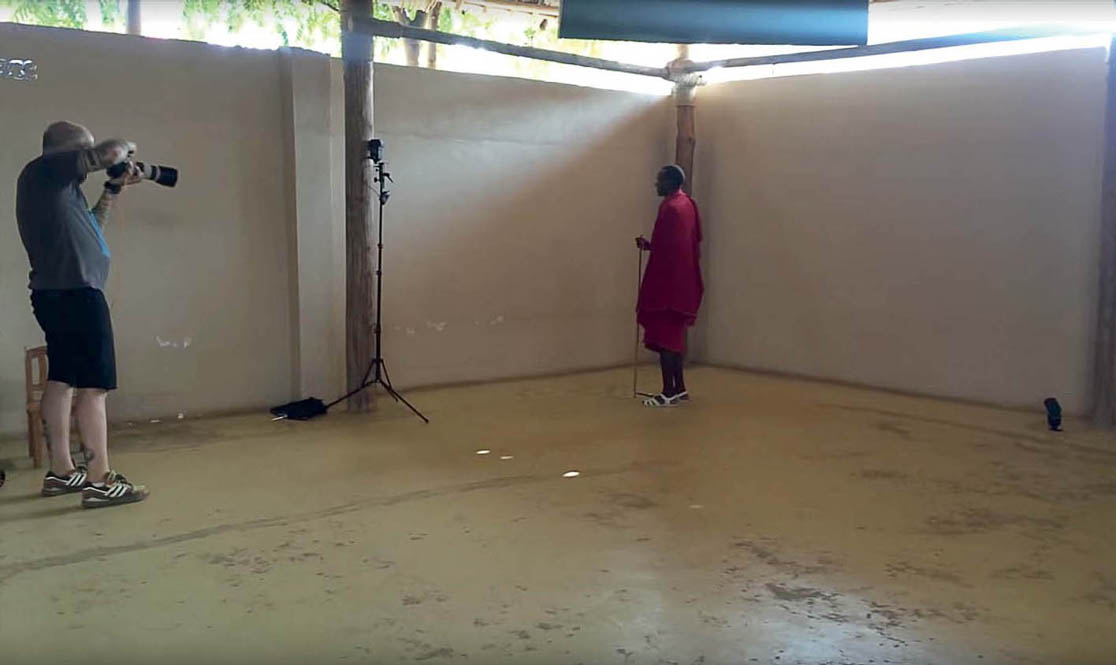
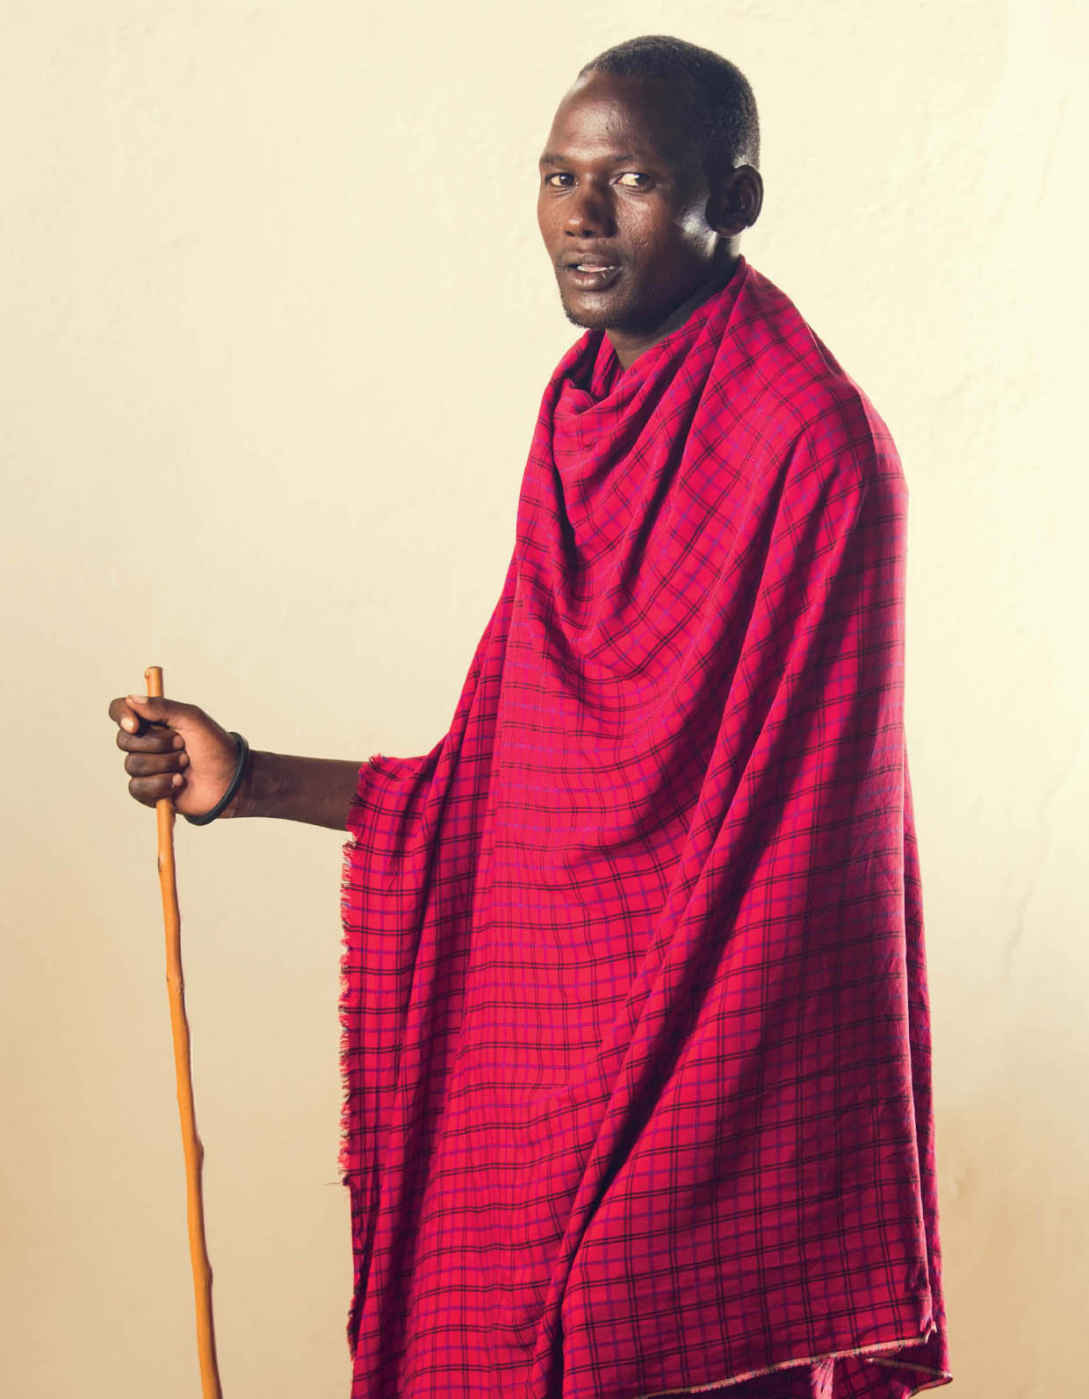
For my trip to Tanzania, I needed one more piece of gear. During my time there, I conducted two half-day Help-Portrait events. At these charitable events, photographers donate their time and often work with makeup and hair stylists to provide free, quality portraits for those who couldn’t otherwise afford or even have access to these services. This time, I was working alone with no team to help me nor any local print labs to accommodate my needs. I needed to print on location, so I brought a Canon Selphy printer, which prints borderless, archival 4x6-inch prints in one minute, along with enough ink, paper, and envelopes for 300 portraits. (I still didn’t need to check a bag.)
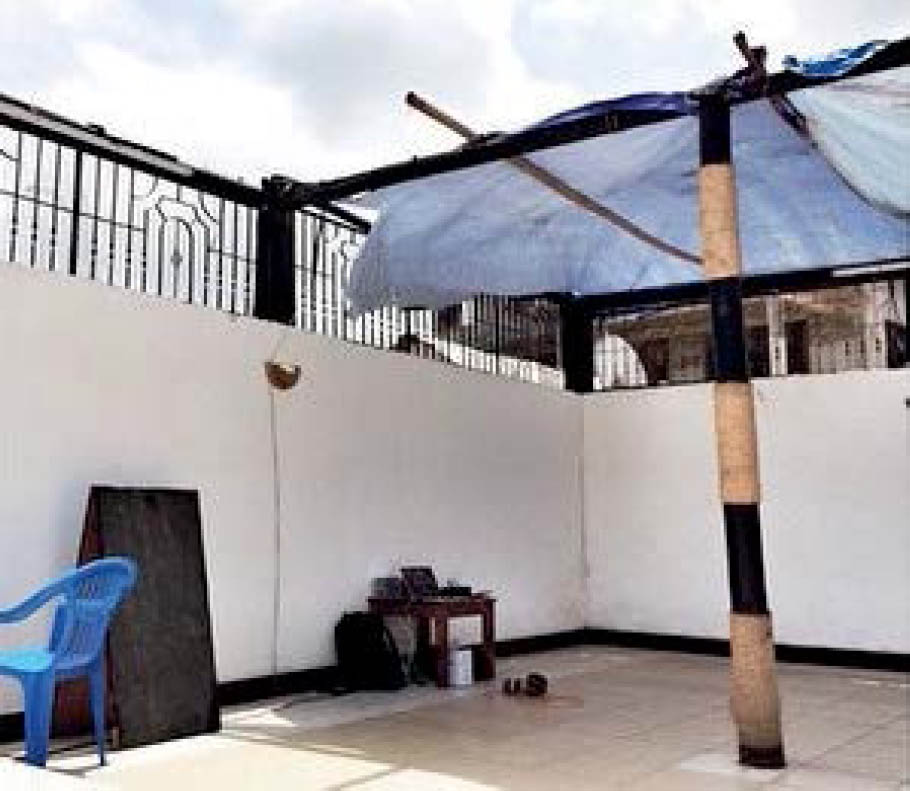
Figure I.13 During my time in Tanzania, I put on two Help-Portrait events. This was my setup on the first day.
My first session was held in a roofless church near an abandoned rock quarry, where the poorest of the region lived and worked ( Figures I.13 and I.14 ). The church’s thatched roof had recently burned in a lightning storm, and the only shelter from the scorching sun that we had was under a tattered tarp that covered about ten feet of the corner of the space. That’s exactly where I set up my laptop and printer and where I conducted the shoot. I didn’t even need to light it, because light was so soft under the tarp. Plus, the bright sun was bouncing off the tile floor about five feet from the subjects, which made for a fantastic catch light in their eyes.
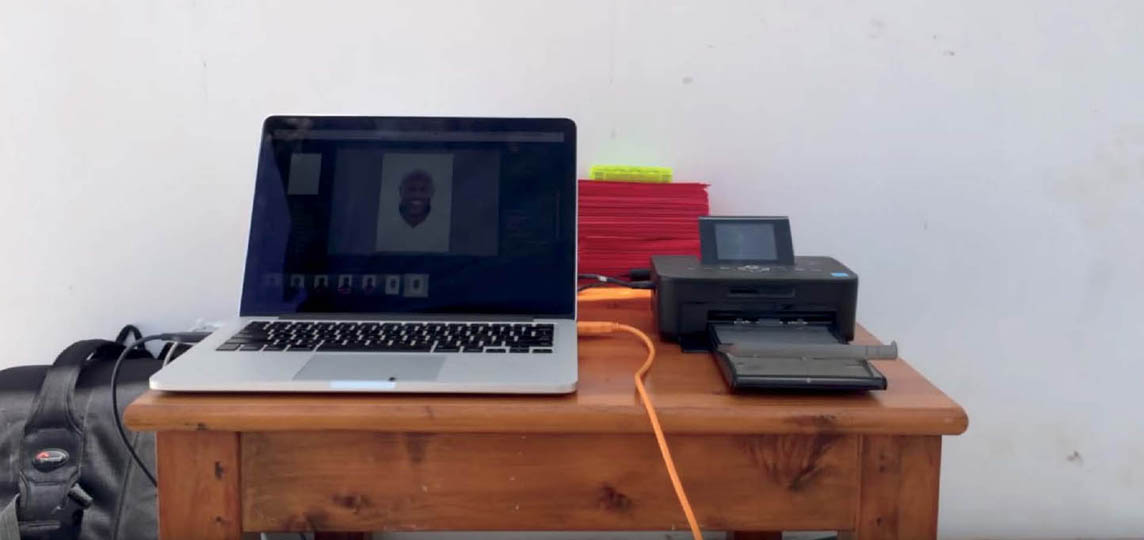
Figure I.14 All I needed was a power source. I shot tethered to Adobe Lightroom, applying a custom preset to each image as it imported. I printed borderless 4x6-inch prints, using a Canon Selphy printer.
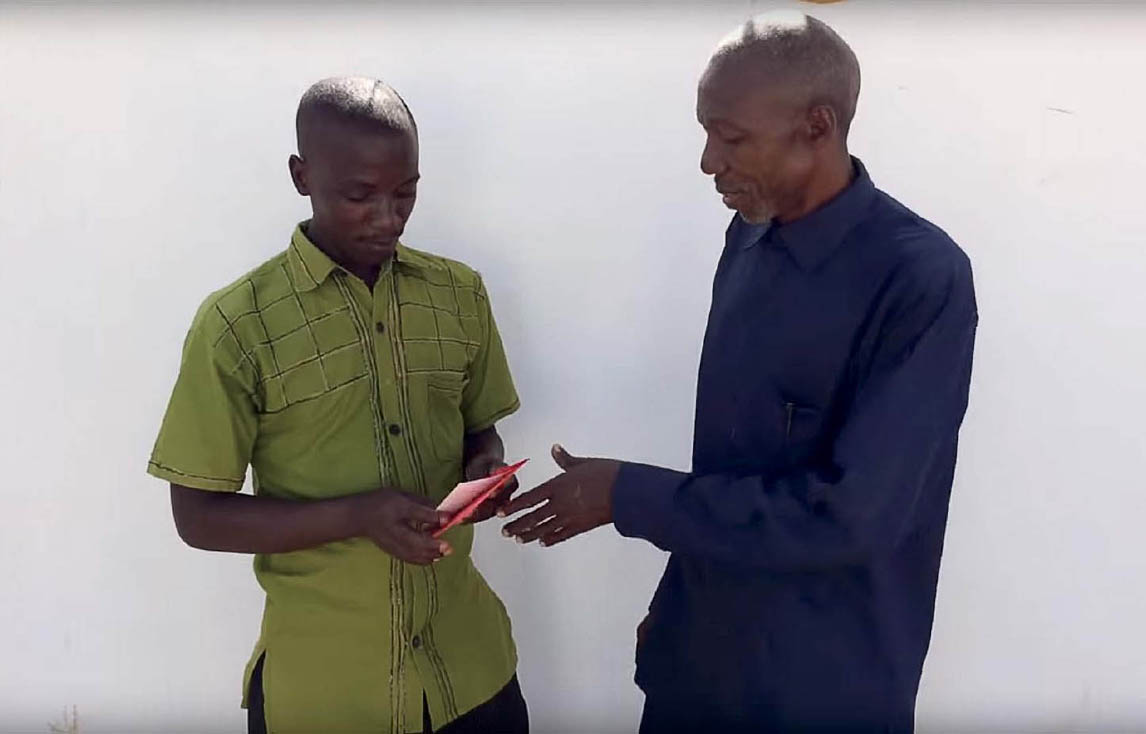
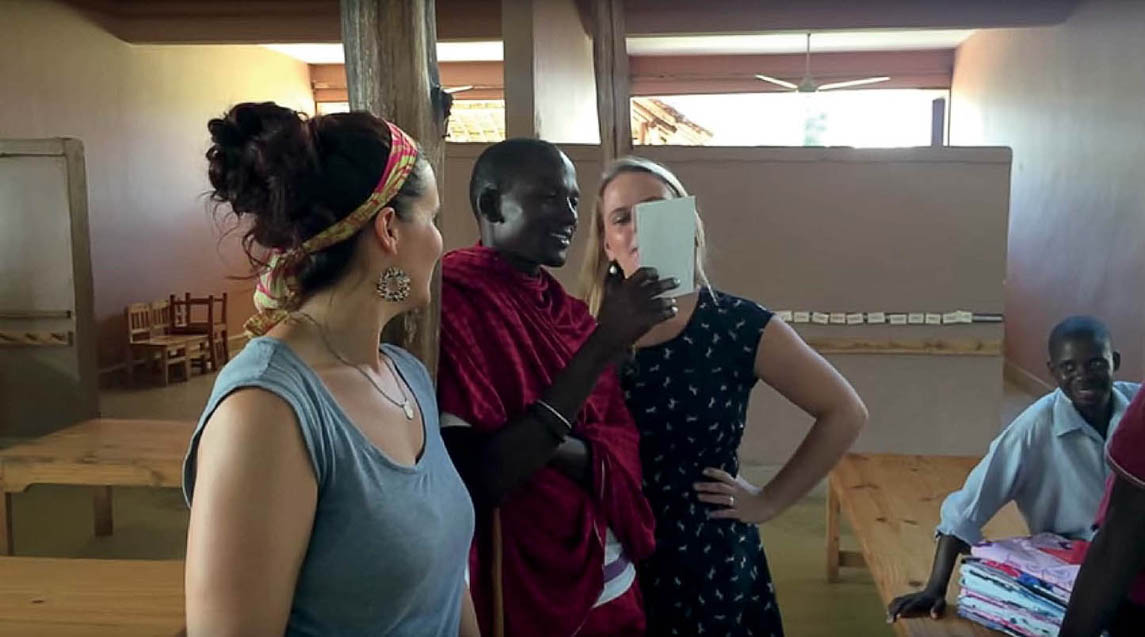
I brought a 15-foot TetherPro cable with me and shot tethered to Adobe Lightroom. (I’ve since switched to using CaptureOne when shooting tethered—less crashing.) Lightroom was set up so that it would apply a custom preset, color grading each image, before printing it out. I had an eight-year-old assistant tearing the tabs off the prints and putting them in an envelope for the waiting subjects. We didn’t even need to advertise what we were doing, because after we photographed the first wave of curious bystanders, they went home with their prints in hand and quickly returned with their friends and family who wanted ones of their own. See Figures I.15 and I.16 .
Figure I.15 I’m not sure who got more out of the portraits—the subjects or me.
Figure I.16 This is one of my (favorite) portraits from the event.
Figure I.17 The second Help-Portrait event was held a few days later in a school. The room was much darker, so I used my two flashes to light these portraits. The main light was bounced off the wall to the left of the subjects, and the background light was bounced off the back wall to the right of them.
The second Help-Portrait session was held a few days later in a school. This allowed me to work with a totally different group of people than those from the quarry. It was in a darker room, so I needed to light it this time. Even though I had traveled with an umbrella, I didn’t even need it. As you can see in Figure I.17 , I bounced the main light off of a cream-colored wall, which made for a larger light source than an umbrella could produce. I also had a background light, flanked into the back wall. Figure I.18 is considerably more dramatic than the soft-light portraits of the first day, but feels just as polished. As you can see in Figure I.19 , the Maasai guard, who had never before been photographed, was pleased with the result.
Figure I.18 The dramatic light gives the image a polished, studio appearance.
Figure I.19 The Maasai guard, who had never before been photographed, was fascinated by his image.
One of the only light modifiers that I travel with is an umbrella, which I rarely use. I avoid modifiers as much as possible because I am often shooting outdoors, which means wind, which means the light stand with an umbrella is now a sail boat. I don’t carry a sandbag around with me (they’re big and heavy), and I often don’t have an assistant or travel companion to help hold the light in place. This means that unless I am shooting inside, I am shooting without a modifier. Even if I’m shooting indoors, I have learned to shape, bounce, balance, and all-around manipulate my unmodified flash into nice-looking light, meaning I also rarely use an umbrella inside. Beats the hell out of lugging sandbags all around town.
Achieving flattering light—especially if it’s hard, unmodified light—generally boils down to two things: proper placement and ambient balance. As a rule of thumb, you should avoid lighting from a low angle, also known as monster lighting. Start with one light and place it at a three-quarter angle to your subject, slightly above the person’s eye level ( Figure I.20 ).
Figure I.20 When working with hard light, the most important thing to keep in mind is light placement. Start off with the light slightly higher than the subject, and off-center to the right or left, which is also known as a three-quarter angle.
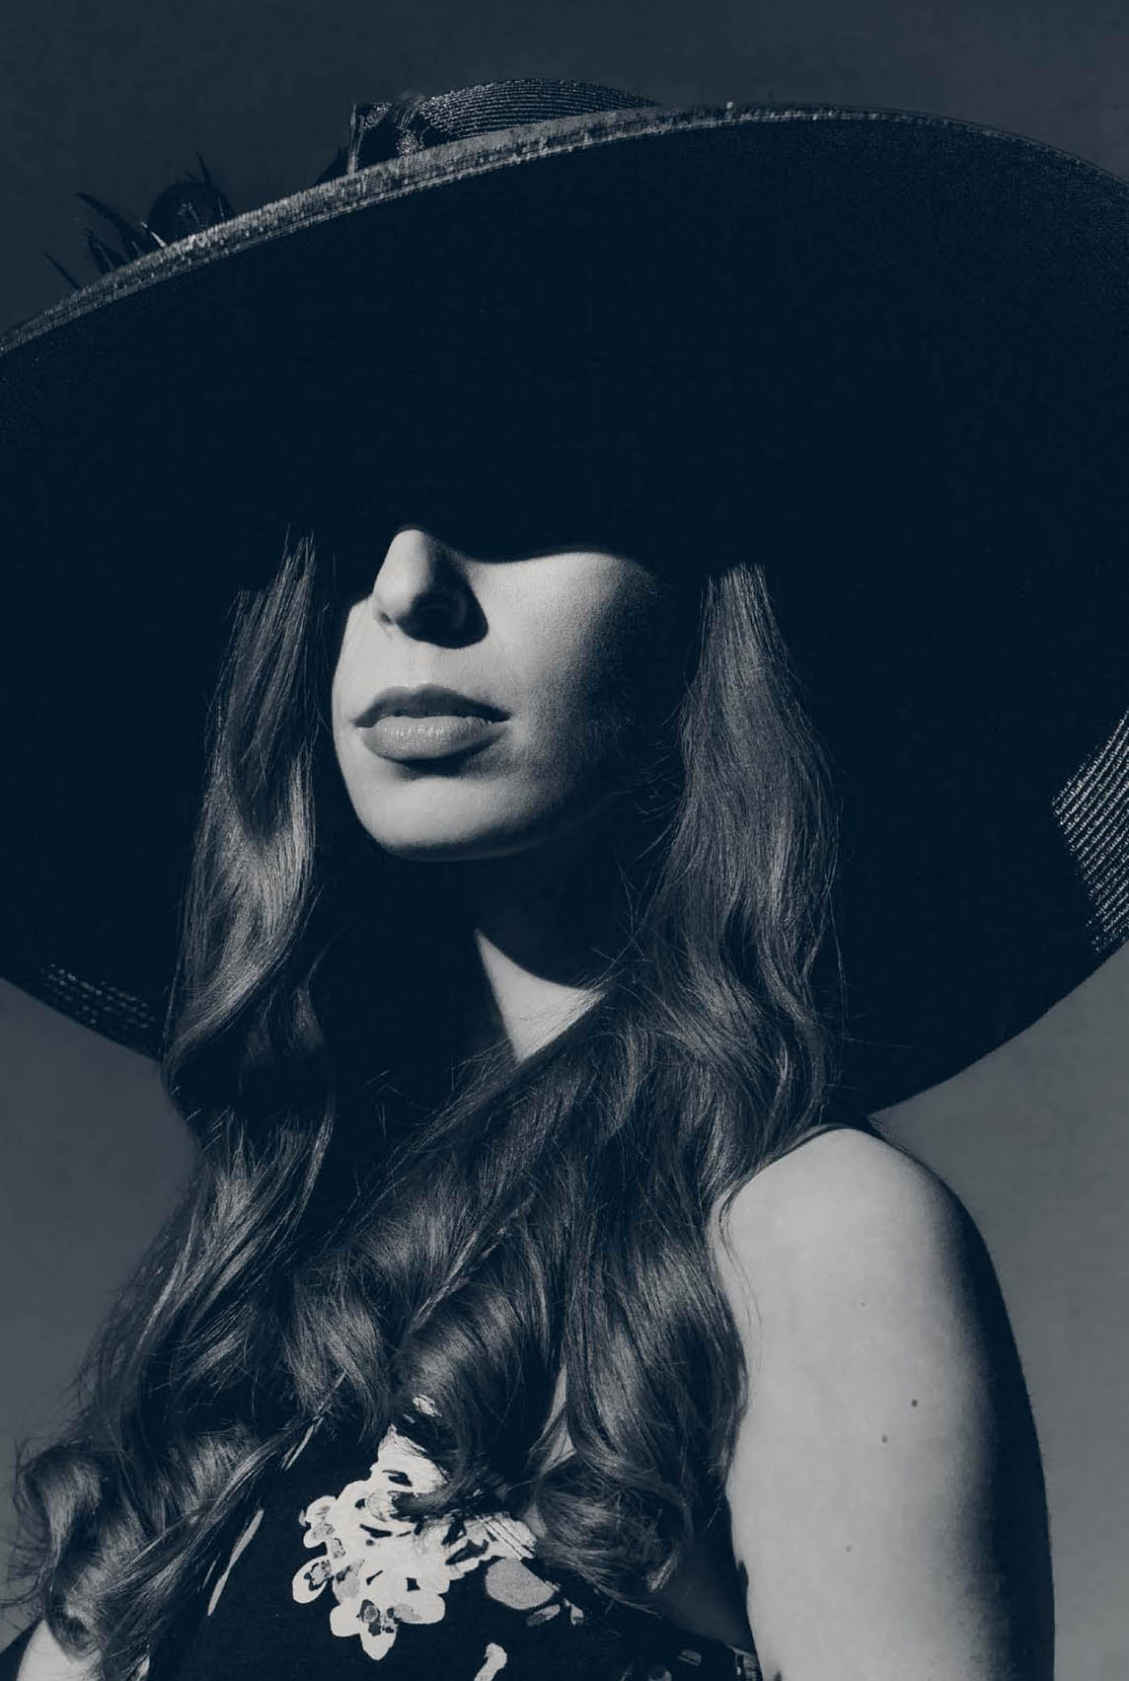
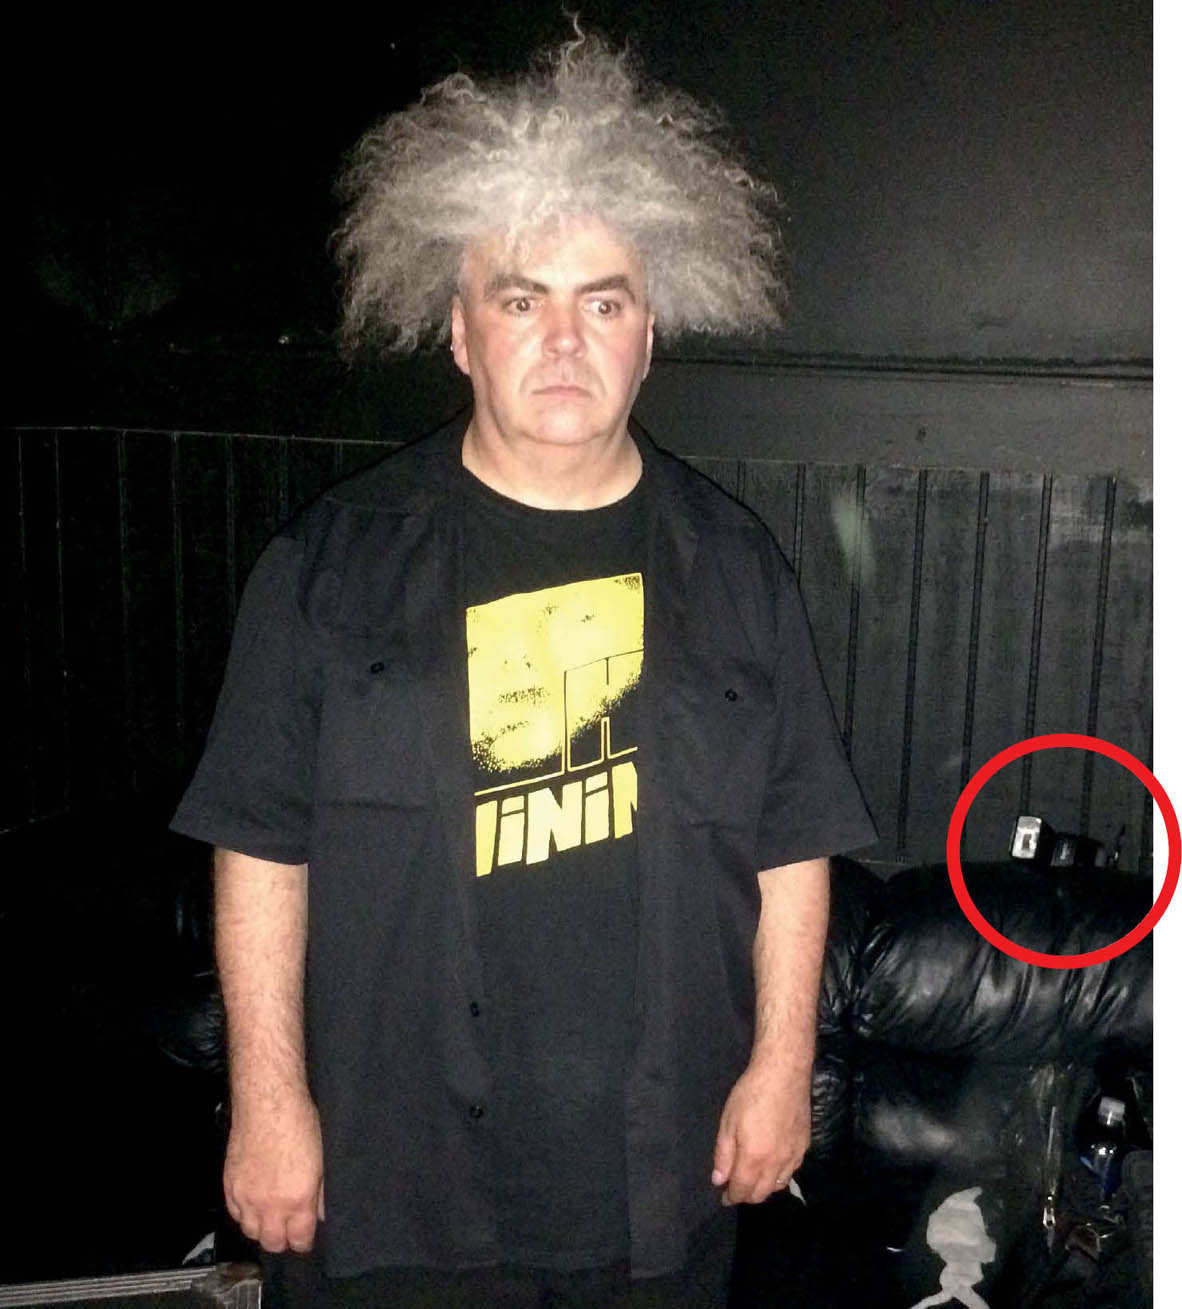
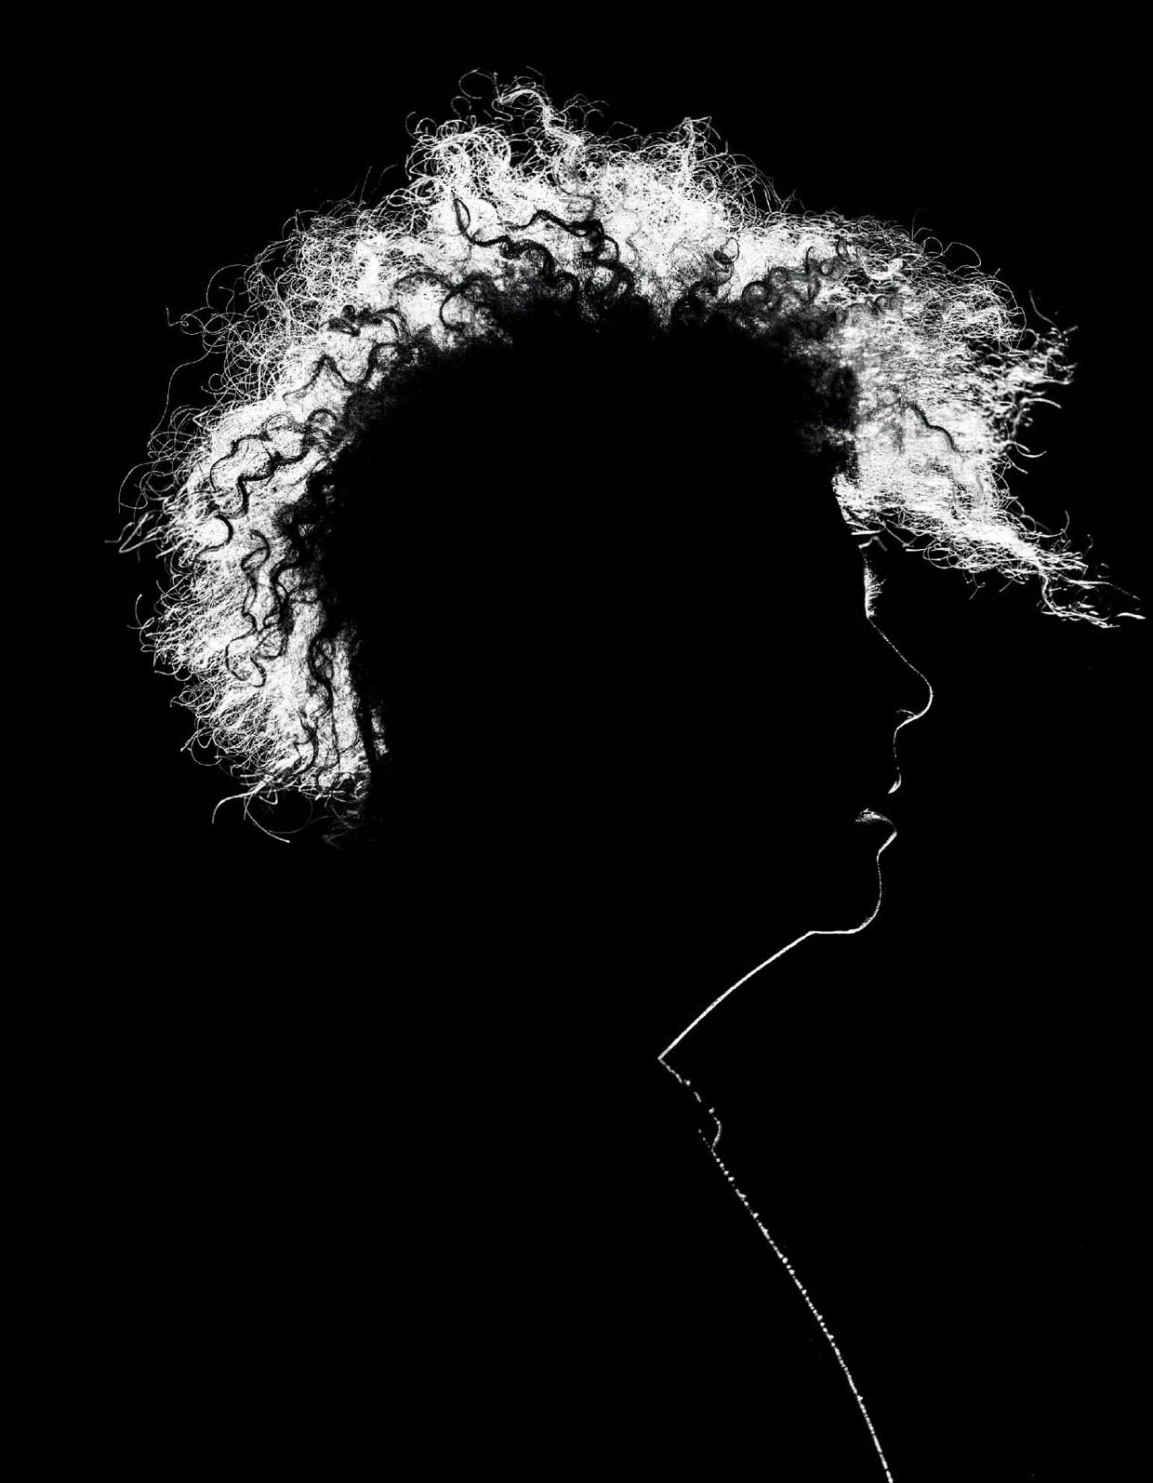
Try to avoid shooting your subject from the same side that your light is coming from. This makes flat, uninteresting light. You want dramatic light. Even intentional light. Consider if there is a specific part of your subject that you want to highlight, such as Buzz Osborne’s iconic hair, which I chose to backlight, as seen in Figure I.21 . Try placing a light behind the person, aiming back toward the camera. This allows you to achieve a glowing silhouette, a la the Nebraska movie poster ( Figure I.22 ).
Figure I.21 When photographing the Melvins’ lead Buzz Osborne, I knew I wanted to accentuate his iconic, fuzzy hair, so I opted to go for a dramatic silhouette by placing the flash behind him, aiming back toward the camera.
Figure I.22 By placing my light behind Buzz and firing it back toward the camera, I got a hard, glowing silhouette, similar to the Nebraska movie poster.
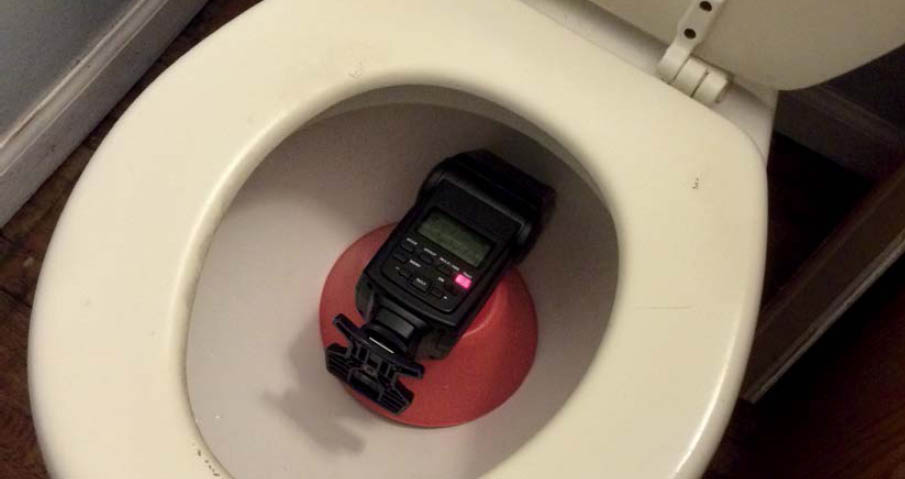
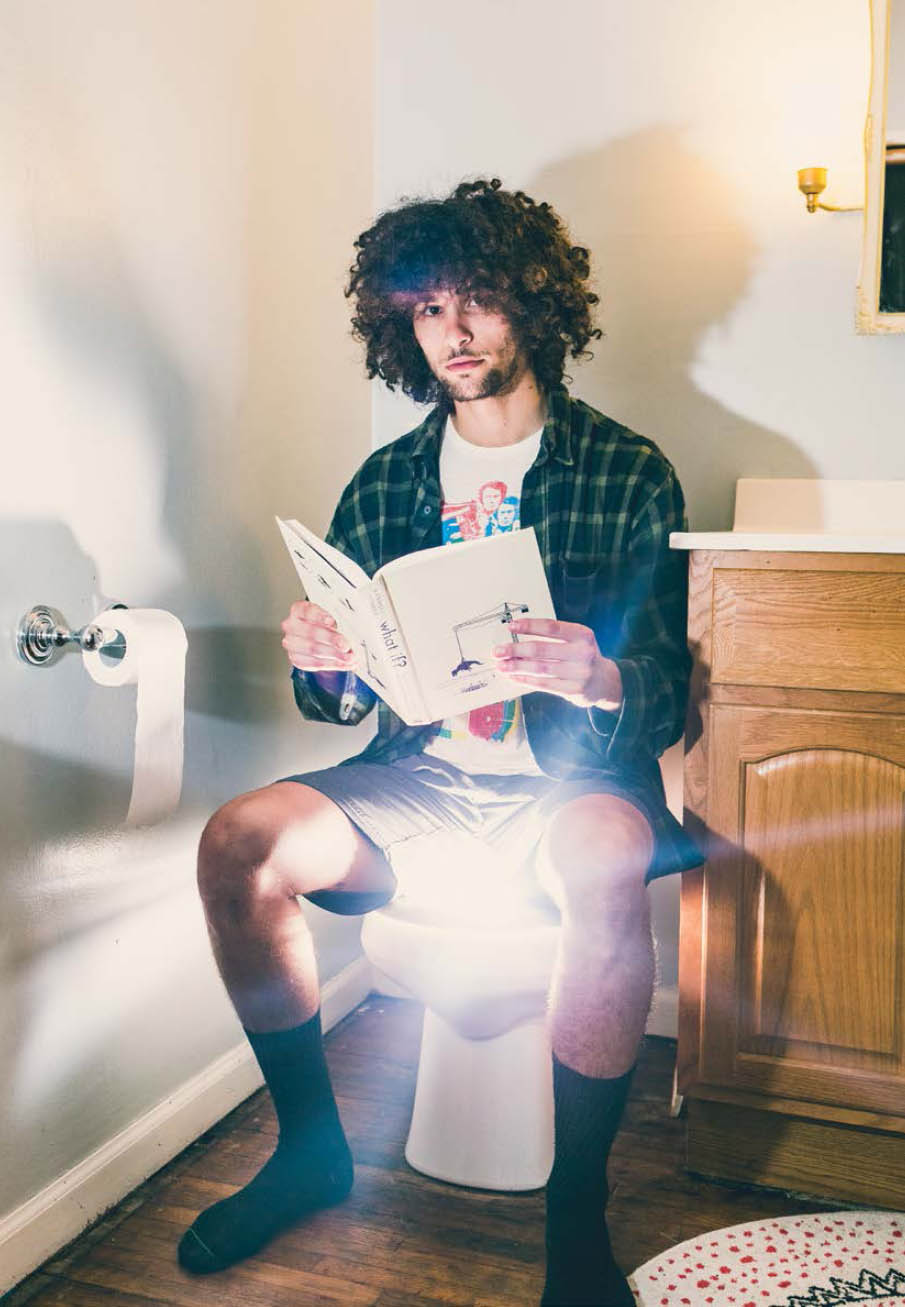
Or maybe you’re photographing a fecal-focused writer, whose blog is aptly named Help Me Poop, and you want to have him sitting on a glowing toilet. Yeah, it happened ( Figures I.23 and I.24 ).
My hope is that you’ll learn from the techniques in this book, build upon them, and come up with your own. Think strategically when lighting your subject. Take advantage of the fact that your light is small, which allows for strategic placement. Be intentional. Get inventive. Have fun.
Figure I.23 By draining the toilet and placing my strobe in the bowl, I was able to create a glowing throne for this fecal-focused blogger.
Figure I.24 This character writes a blog called Help Me Poop, which features things like tips to shorten your toilet time, so I was playing with the idea of poop enlightenment in the image.
Figure 1.1 If you see cool shadows, take advantage of them.