In the previous chapter, we discussed the technique of “painting” with light, wherein during a long exposure, ambient light can be burned into the exposure with flashlights, glow sticks, or other constant light sources. Well, it turns out that shadows can also be manipulated in creative ways. By changing the relation of the light source(s) to the subject, you can soften, harden, lengthen, or shorten shadows accordingly. By knowing how light direction and distance affect shadow quality, you can adjust the lights to shape the precise type of shadow that you desire. This chapter goes over these methods, setting you up to essentially “paint” with shadow.
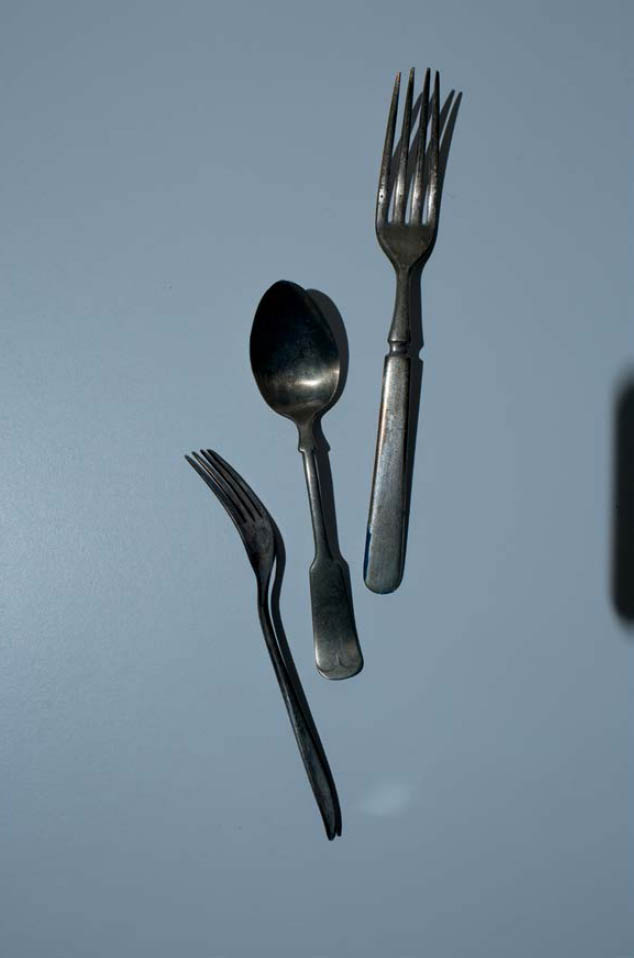
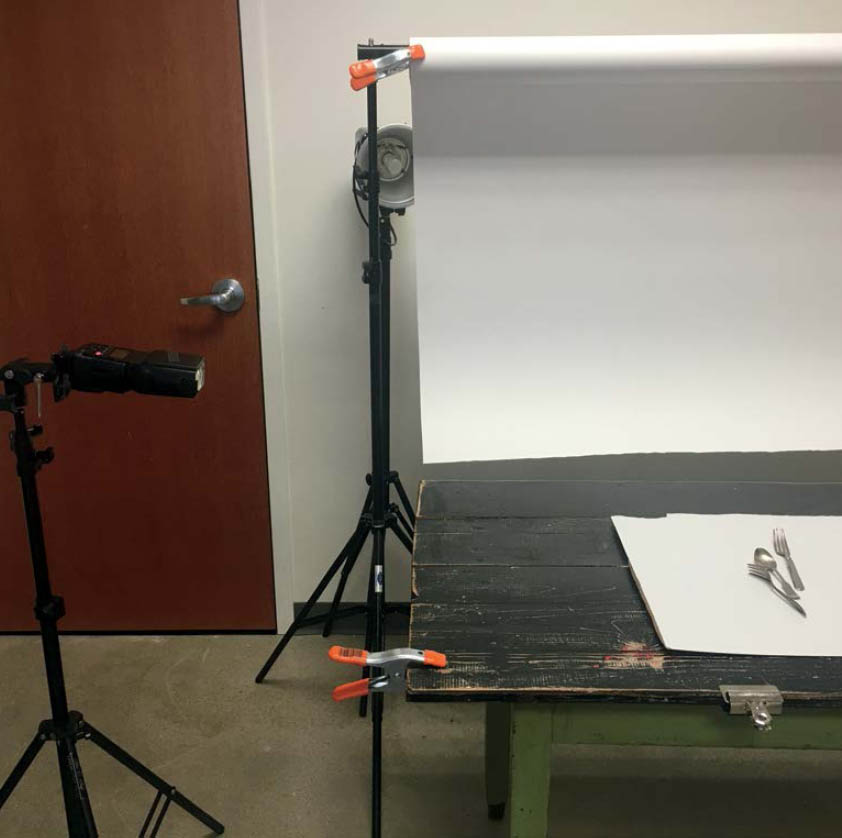
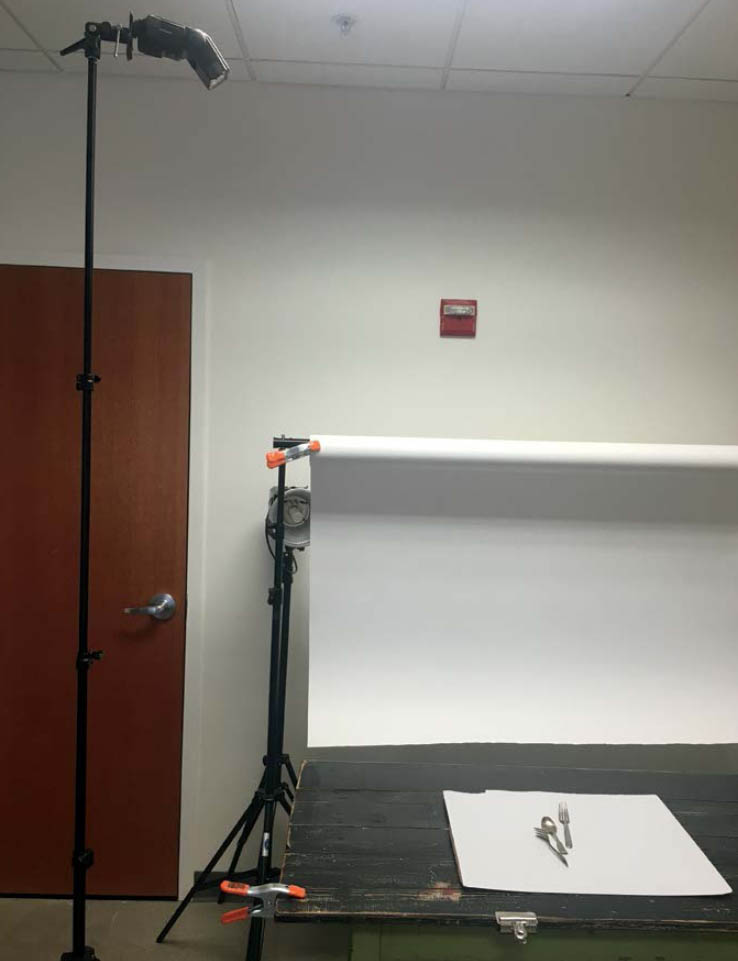
We touched on controlling shadow length and direction back in Chapter 2 , with the ice cream shots. I want to go a bit more in depth regarding how you can use the skill of shadow control to your creative advantage. Take a look at Figure 7.1 . As you can see, my light is raised quite high (about eight feet) and is close to the silverware (about three feet away), which helps give the silverware a short shadow ( Figure 7.2 ).
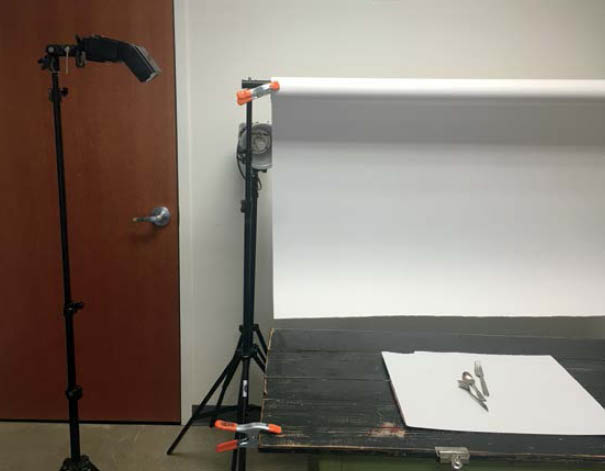
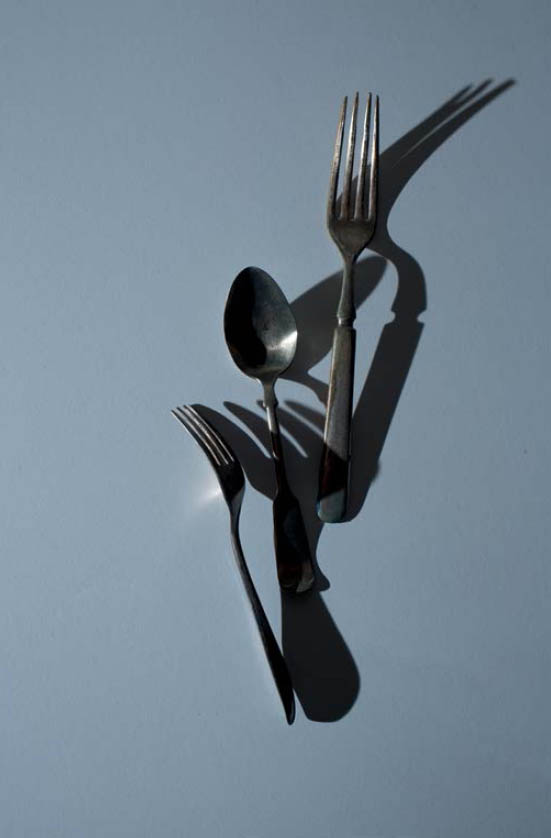
Note: when you’re lighting and shooting from overhead, it’s a balancing act to avoid getting your own shadow in the frame. This will be a no-brainer for some of you, but if you have a longer focal length lens as well as a wide angle, use your long lens, so you can back out of the way of the light, or even cheat your angle a bit to the side. As it is, you can see the edge of my transmitter on the right side of the frame in Figure 7.2 .
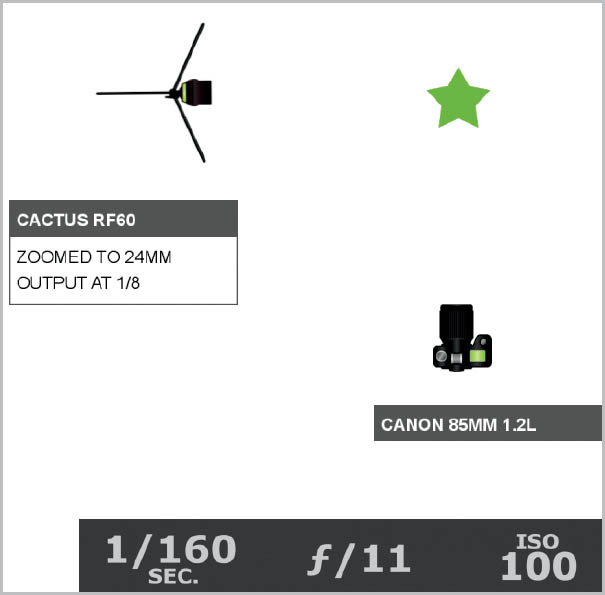
Regarding light height, the greater the distance of the light to the product, the more even the spread is by the time it reaches the product (inverse square law). As long as the product is close to the surface or background, the shadows produced will be well defined; it’s on par with looking at your shadow on the sidewalk at noon on a sunny day. I have the flash zoomed out to 24mm, which allows the flash spread to cover the image frame. Also, as you’ll recall from the introduction, a Speedlite creates a more defined shadow than a larger studio strobe.
Figure 7.1 My light is raised to about eight feet and is about three feet from the silverware.
Figure 7.2 The elevated height and close proximity of the flash produces a short, crisp shadow.
Figure 7.3 The lighting diagram. My flash and camera settings were the same in every shot.
Figure 7.4 All the settings and the distance of the light are the same as for the previous scenario, except this time my light has been lowered to five feet.
Figure 7.5 The shadows are starting to get longer, revealing more of the curvature of the silverware.
If I were to keep everything the same—same light output, camera settings ( Figure 7.3 ), and distance of the light to the silverware—but I lowered my light height ( Figure 7.4 ), can you guess what would happen? The shadows start to get longer, as you can see in Figure 7.5 . Again, think about the sun. Shadows begin to get longer as the sun starts going down. The cool thing that starts to happen as the light height is lowered is that more of the qualities of the silverware shape are revealed in the shadow. For example, you can see the curve of the spoon and fork now, where it wasn’t obvious in the first setup.
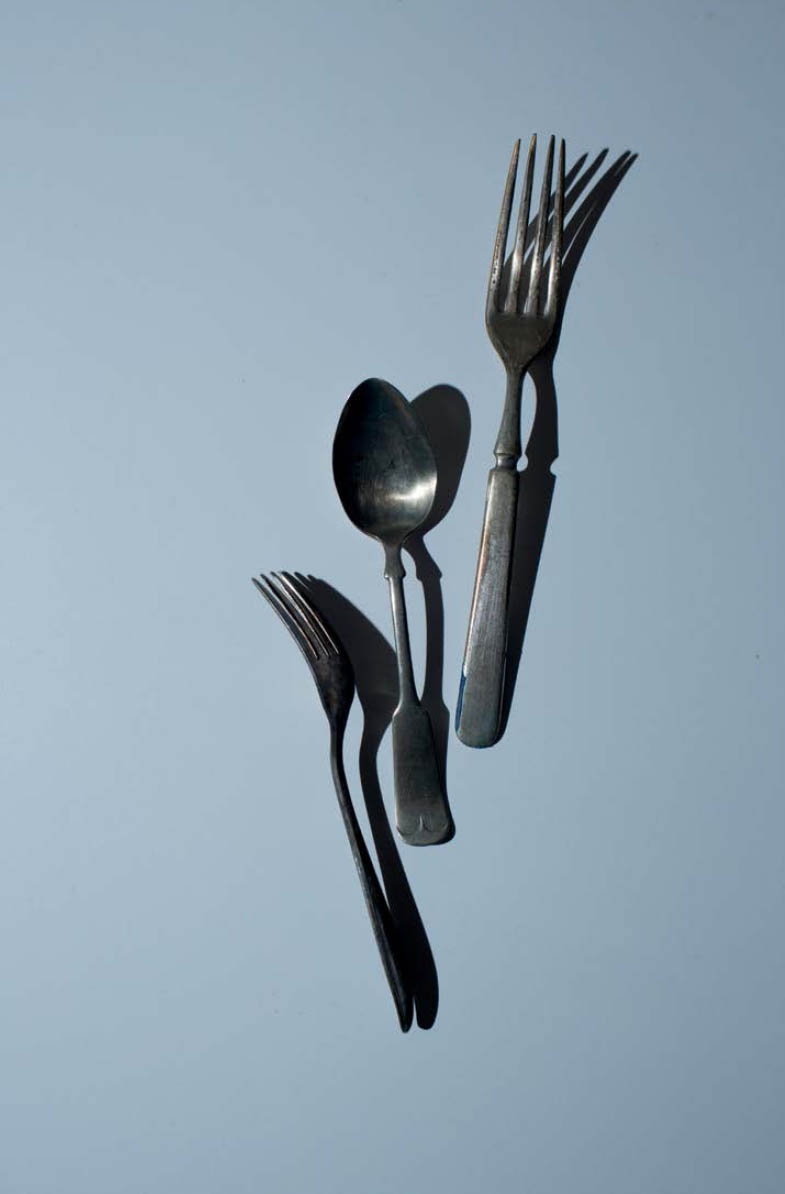
Finally, if I were to lower my light as low as I could without my setup going to total darkness ( Figure 7.6 ), the shadows would be so long that they would begin to overlap ( Figure 7.7 ). If you look closely at these shadows, you will notice that the shadows soften at certain points. These softer shadows are cast by the parts of the silverware that are further from the paper backdrop. The parts that are actually touching the paper make crisp shadows.
Figure 7.6 For the next shot, I lowered my light as low as I could, short of leaving my setup in darkness.
Figure 7.7 The shadows are now so long that they are starting to overlap.
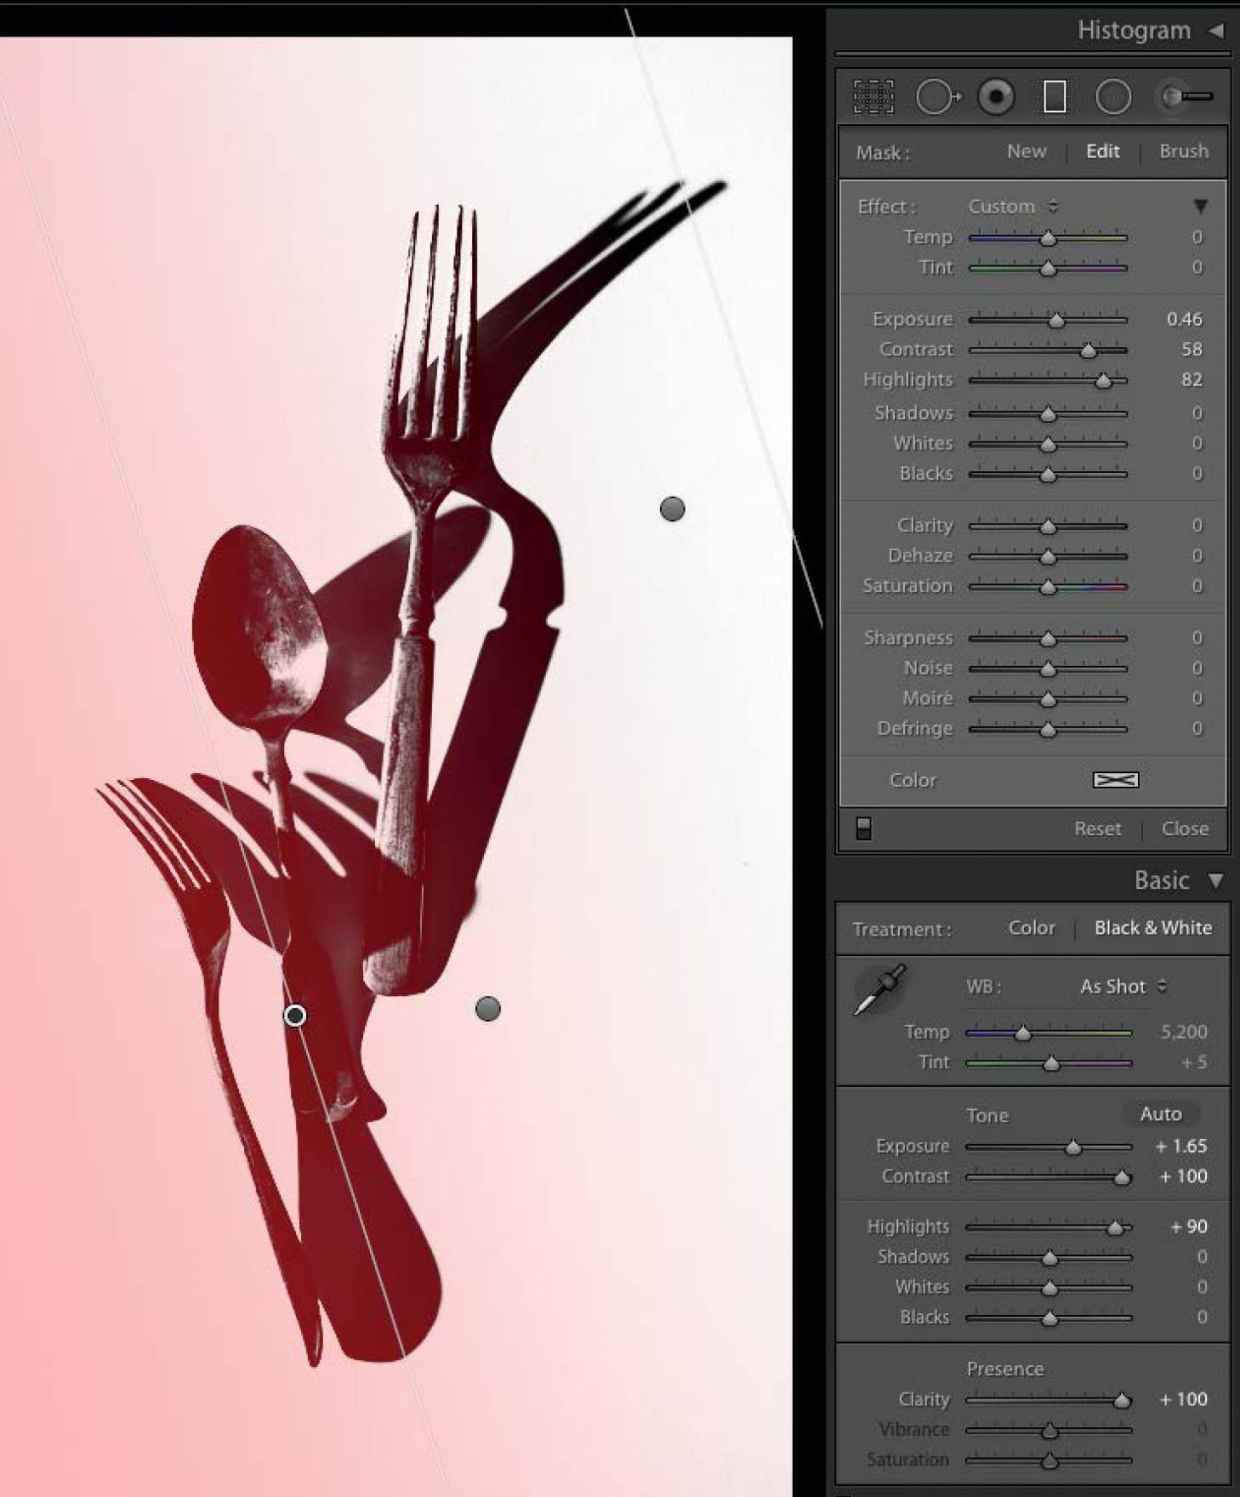
As you can see, the SOOC files aren’t too pretty to look at. Because I am showcasing the shadows only, however, I can get away with murder when it comes to my color grading ( Figure 7.8 ). Contrast? All the way over. Clarity? That too. Highlights up, Shadows down. Only the blackest blacks and the whitest whites for these light and shadow studies. It works for these images, as you can see in Figure 7.9 . It wouldn’t work as well when working with a person, however, as you’ll see in the next section.
Figure 7.8 The Lightroom settings. These images are about the shadows, so I was able to crank up the contrast without losing important details.
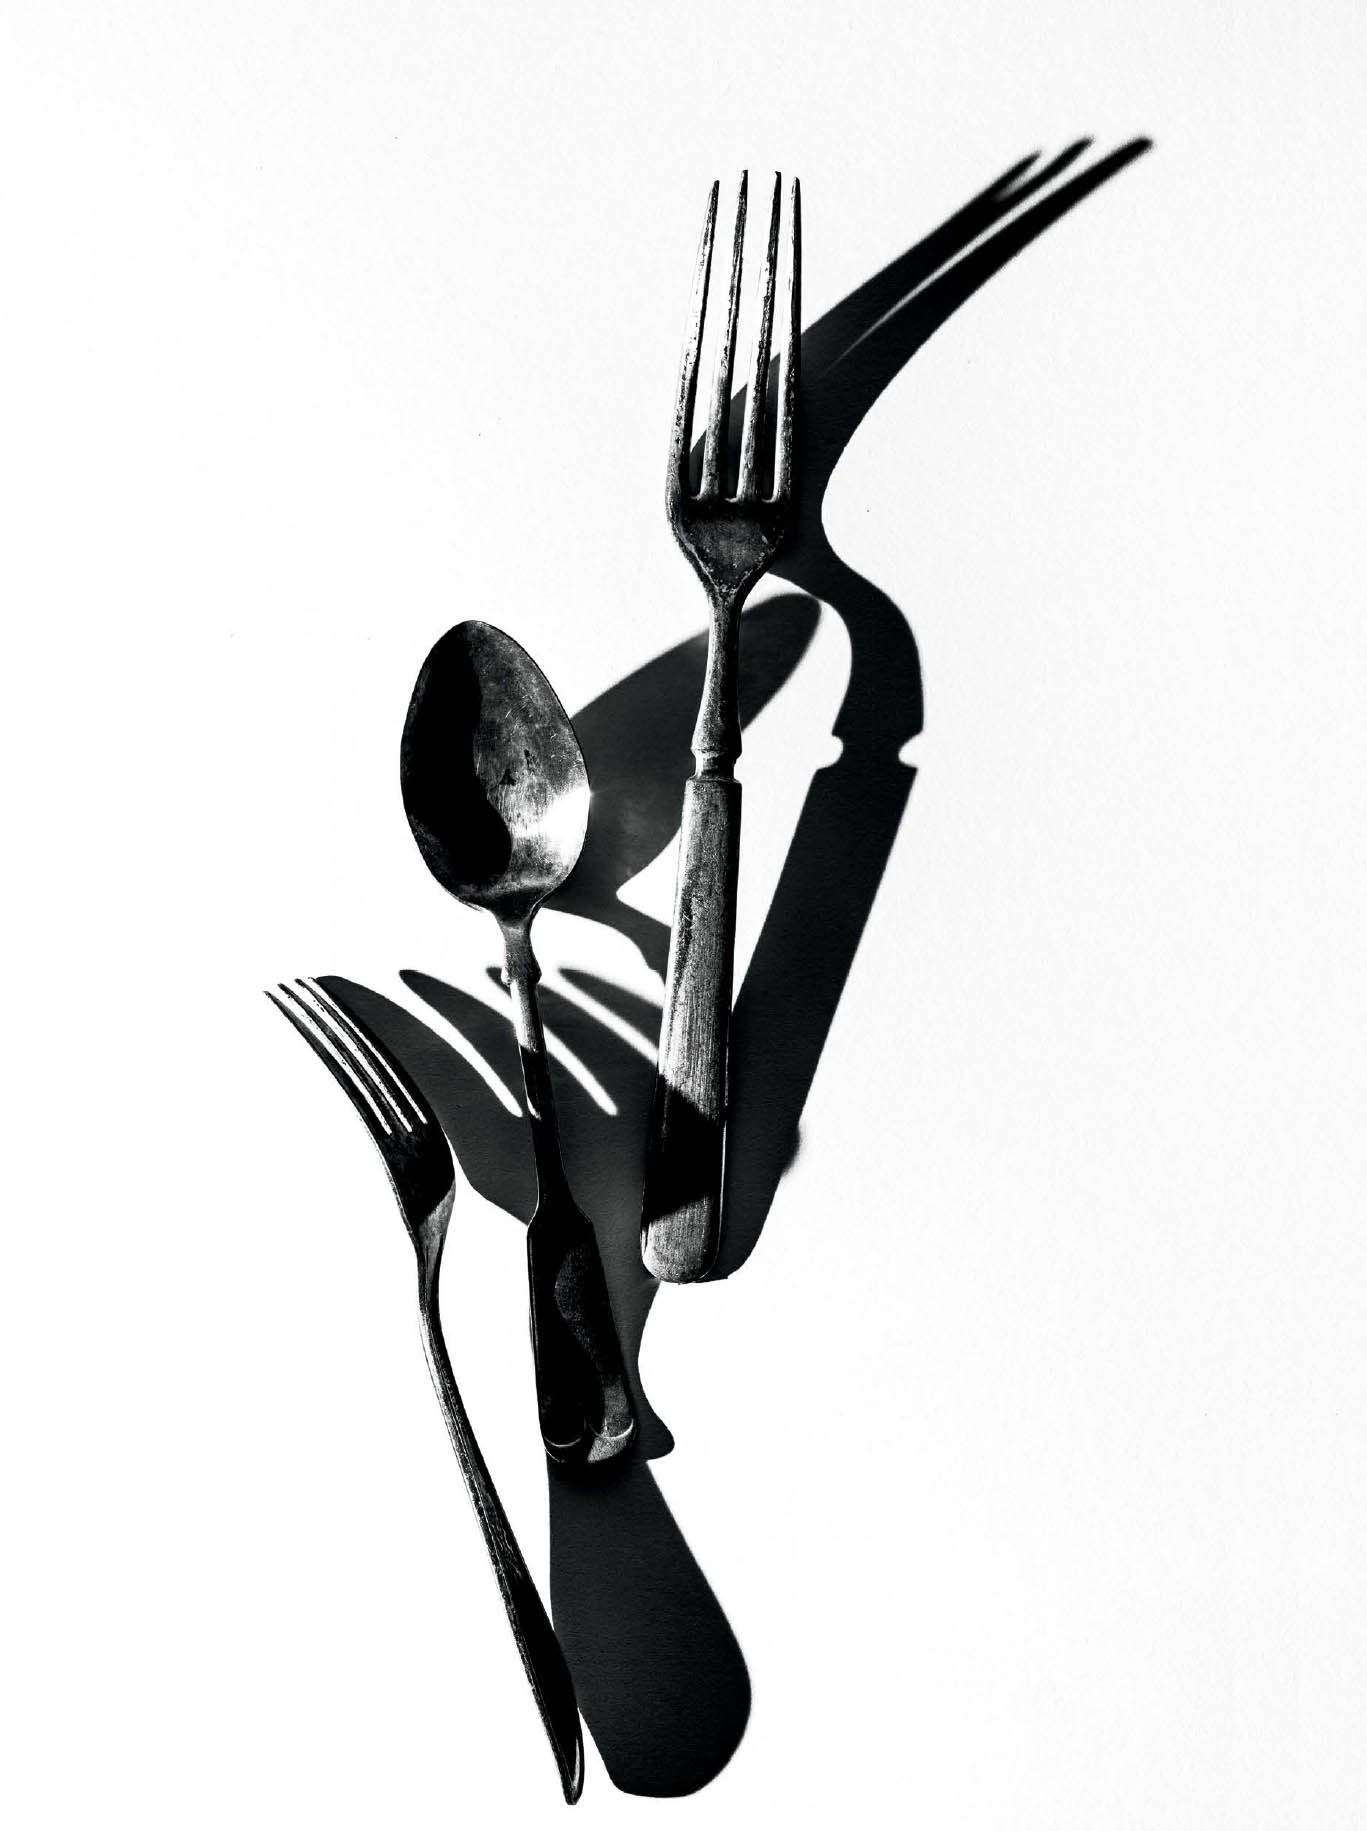
Figure 7.9 The final shot. Looks beautiful as fork, no?
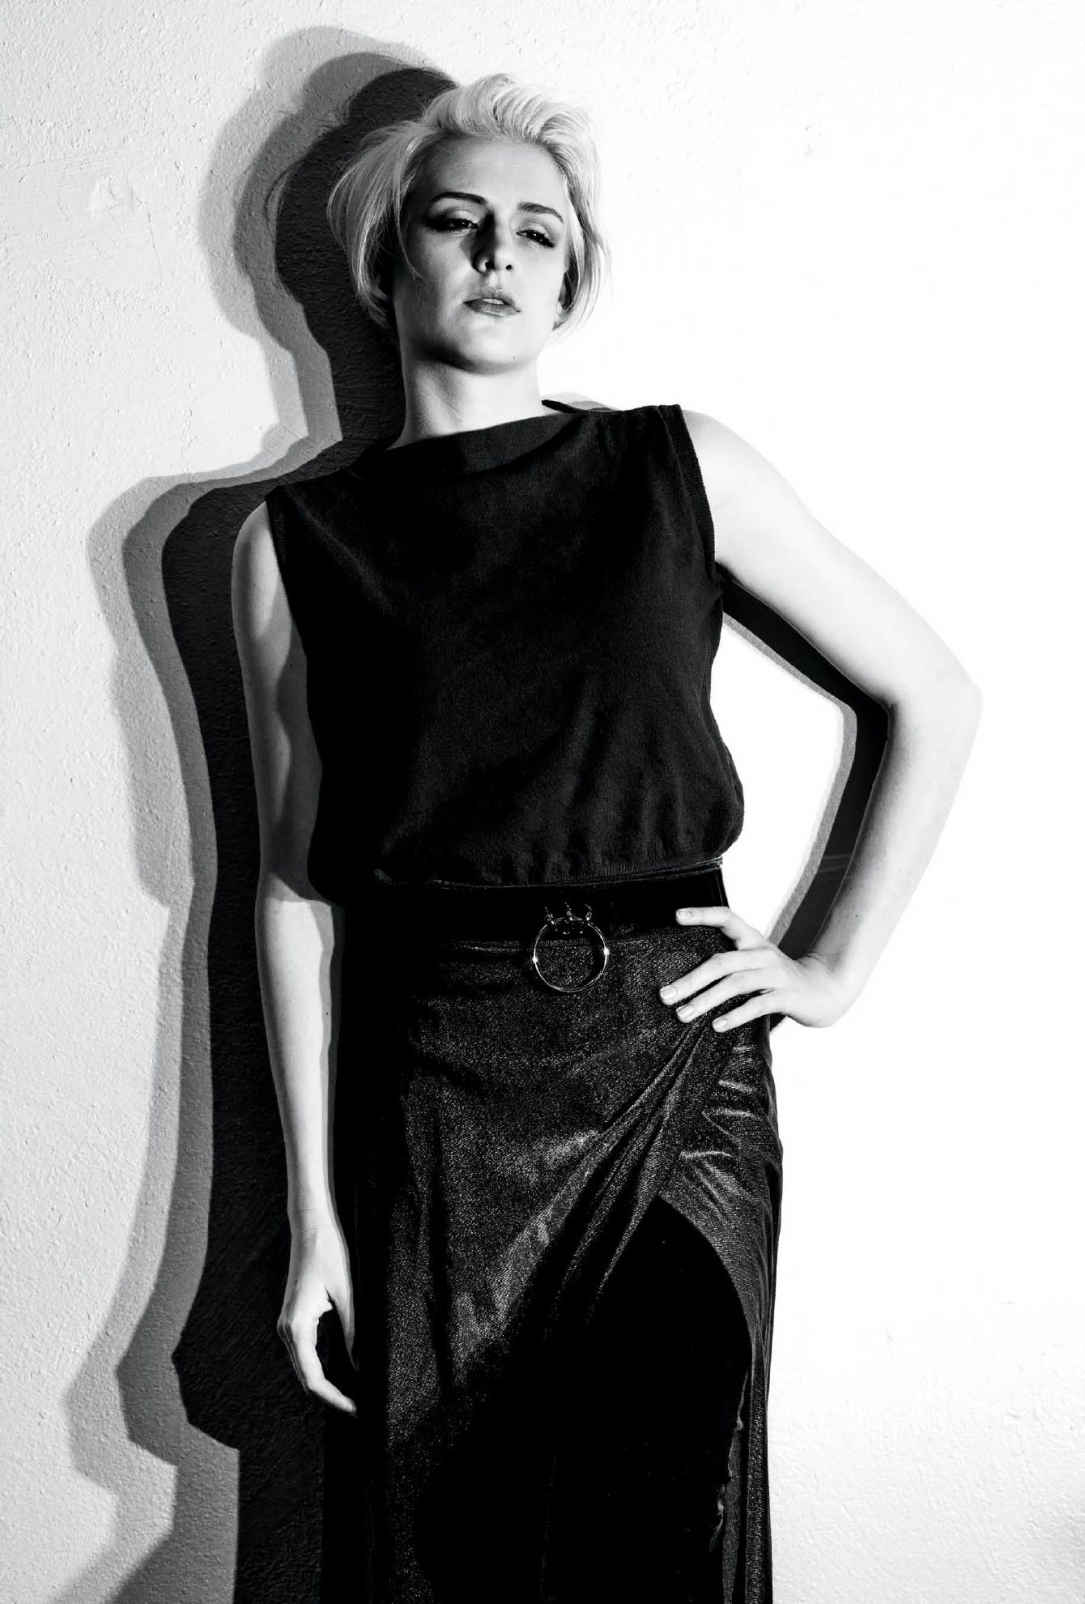
As I mentioned earlier in Chapter 5 ’s Finding Inspiration section, I try to surround myself with photographers who are doing what I want to do and are the masters of the field, with Interview magazine being one of my main sources of inspiration. There I found Sølve Sundsbø’s photographs of Game of Thrones actor Michiel Huisman, which were inspiring to say the least. One of my favorite photographers, Sundsbø had created an amazing triple shadow in one of the shots and a quad shadow in another. I had never seen anyone light like that before. Still, it wasn’t hard to reverse engineer his lighting setup by studying the light and shadow qualities in the images. All that remained was finding a model available within the next hour so I could try out this technique immediately .
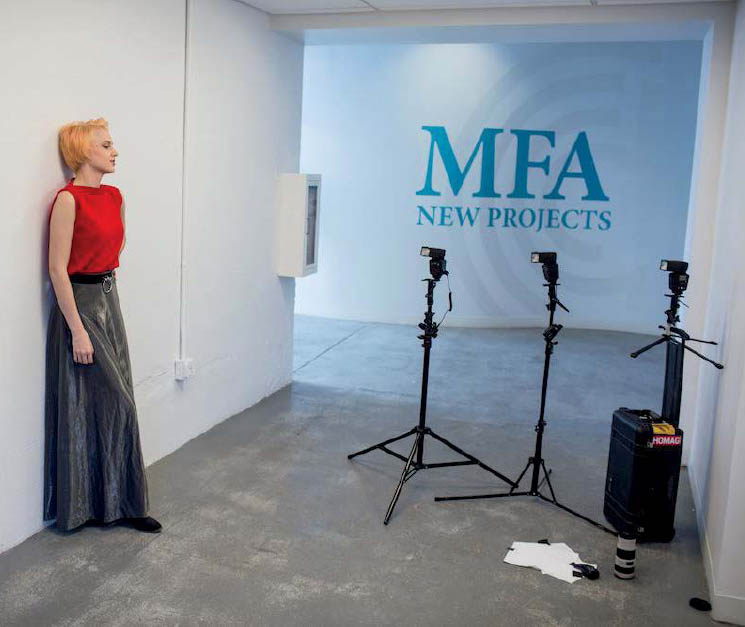
Lucky for me, art student/cosplay model extraordinaire Stephanie Flor was willing to give me 30 minutes before her class to try out this technique. I met her on campus and staged the shoot in the hallway outside her classroom—all I needed was a blank wall and a bit of space ( Figure 7.10 ). I set up my three flashes, staggered in a diagonal line to Stephanie, raised to chest-level height; the lower height gives the shadows an elevated angle ( Figure 7.11 ). Again, note the distance of the flashes to the subject. The closest one to her is still a good five feet away. I need to allow enough space for the flash to spread evenly across the frame. I also needed her right against the wall to get a crisp shadow ( Figure 7.12 ).
Figure 7.10 The setup. I staged the shoot in the hallway outside the model’s class. All I needed was a blank wall.
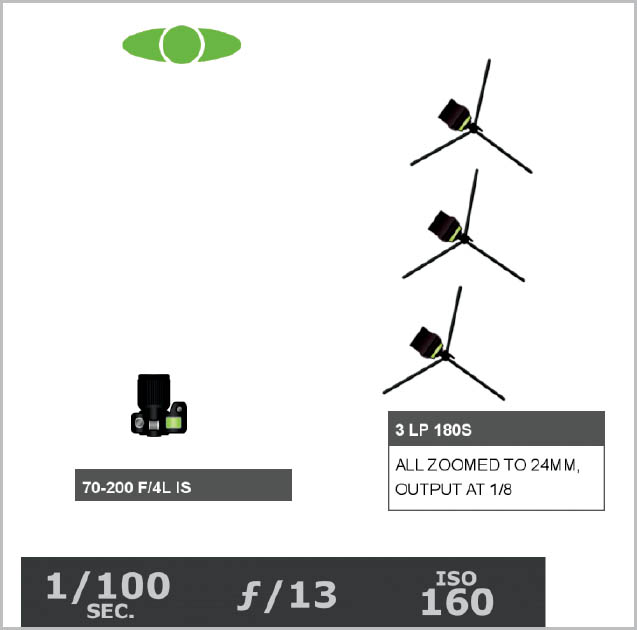
Figure 7.11 The lighting diagram. I staggered three flashes in a diagonal line to the subject, whose back was against a white wall.
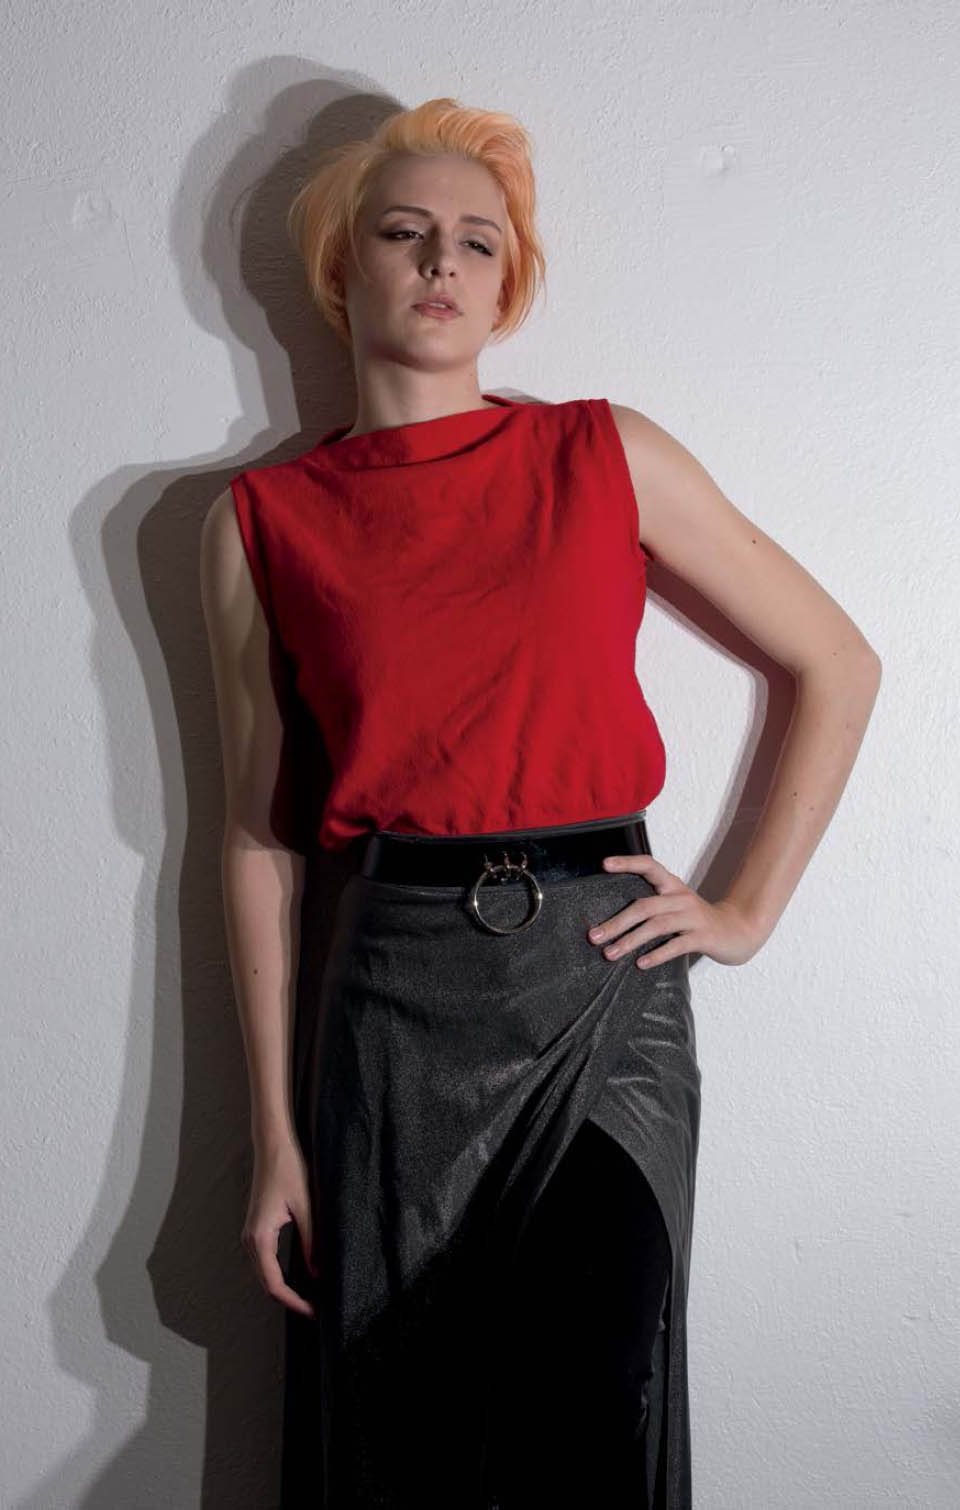
Figure 7.12 The raw file. Stephanie’s close proximity to the wall helped create crisp shadows.
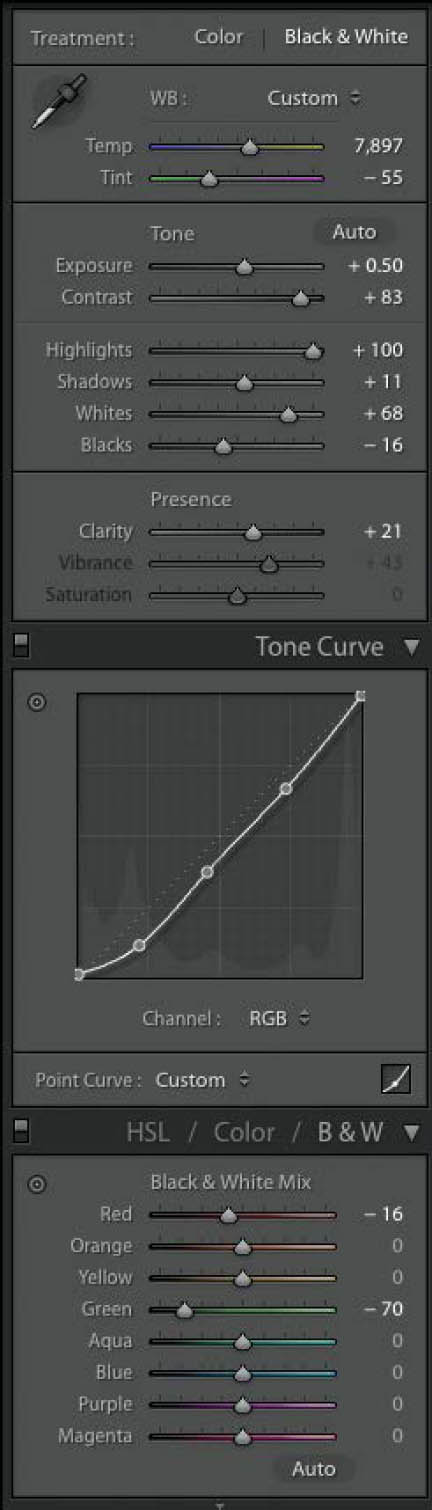
Figure 7.13 The Lightroom settings are similar to the way I processed the silverware shots, just less extreme.
When it came to color grading the image, I once again added a great deal of Contrast, in addition to raising the Highlights and Whites and lowering the Blacks ( Figure 7.13 ). Because Stephanie is a human and not a spoon or a fork, I had to go easy on the Clarity setting, which gets far too harsh with overuse. I also brought up some shadow detail in the Tone Curve.
Although I was happy with my results ( Figure 7.14 ), I wasn’t done experimenting with the technique. This exercise really opened up my mind to thinking about light in a whole new way. It whet my appetite, and I was hungry to keep exploring.
Figure 7.14 The final shot. Although I was happy with the result of this experiment, I knew that I was far from done experimenting with the technique.
When I graduated from college with a degree in photography, I was hungry for a job (read: any job) in my field. Because I lived in Columbus, Ohio, studio photography jobs were scarce. Hell, any photo jobs were few and far between. I was ready to take a job photographing babies, weddings, you name it—anything to get out of working retail. After receiving a ton of encouragement on how good my work was and how well I would succeed doing my own thing, I eventually decided to become an LLC (Limited Liability Corporation) and quit my part-time job at Starbucks, though I didn’t really have any photo gigs lined up at all.
Needless to say, I didn’t fare well. I spent most days alternating between checking the Creative Gigs section on Craigslist, laughing at the jobs posted in said section, and crying in the shower. Aside from picking up a couple of wedding gigs, I couldn’t find anything. My failure to launch was a result of poor planning on my part. I decided to get my job back at Starbucks, which at least covered health insurance for me and my wife, and continue to hustle for photo gigs in my spare time.
After a couple of years of slinging lattes in the morning, shooting random, one-off gigs in the afternoons, and photographing weddings on the weekend, I started to gain some traction. I got to the point where I was too busy to work at Starbucks any longer. Throughout this time, I was also doing as many test shoots and self-assignments as I could—mainly musicians, models, and dancers—in order to build a portfolio that matched the kind of work that I’d like to be hired to create.
I did mainly weddings for the next three years, all the while keeping my ear to the ground for any studio hiring a commercial, portrait, or fashion photographer. Although I didn’t mind shooting weddings, they weren’t the reason I got into photography in the first place. My first passion was editorial portraiture and fashion.
Finally, in 2011, four years after I had launched my LLC and two since I had quit Starbucks, my train came in. JackThreads was a new, local company, featuring men’s fashion, and the creative director wanted me to shoot for the company, full-time. Me! Shooting fashion! Full-time! It was a dream come true. (You know how the company’s creative director found me? I had shot his wedding a few years prior. Never take any gig for granted, because you never know where it could lead.)
As we started discussing time commitments versus compensation, I realized that I would be taking a significant loss in income if I were to go full time and totally cut out the wedding and smattering of random photo gigs that I was now bringing in. Remember, just three years ago, I would’ve killed for an in-house gig, and now I was weighing the pros and cons. I decided to counter the offer. What if, I suggested, I committed to five half-days a week at an hourly rate, as a freelancer, keeping my mornings (and weekends) open for other freelance work? That way, JackThreads wouldn’t need to pay for employee benefits and I would have the benefit of having regular income coupled with the freedom to bring in more freelance work on the side. After all, I was finally gaining some momentum in bringing in my own repeat clients, and I wouldn’t want to lose any momentum.
The creative director went for it, and I was ecstatic. I shot for JackThreads for 14 months, until the company announced that it was moving to Brooklyn and invited me to go along too. Talk about a dream job: shooting fashion in New York City. But seven years had now passed since I graduated from OSU. I had two kids and a mortgage. NYC was not in the cards for me. Again, if 2007 Nick could’ve heard me turning down that offer, he would’ve beat my ass. But now I knew for certain that freelance life was the life for me. Although the risks are higher, like not having benefits or a regular income, the payoff is also higher. And I still go through slow seasons, where I need to borrow money or open a credit card for a period of time. There are ebbs and flows. But the flows can sometimes be raging rivers. Some gigs, even after usage is factored in, have paid me the equivalent of three to four months’ wage had I been at a salary job. Those are the times that make the risks worthwhile.
In the time that’s passed since JackThreads moved to NYC, I have worked as an in-house freelance photographer for three other companies, and I have no regrets, making an hourly rate at each place. At my newest part-time gig, which is at Jeni’s Splendid Ice Creams, I decided to switch to a reduced day rate instead of hourly. I work very quickly, and found at my last gig that I was wrapping up my shot list several hours earlier than expected, but since I was hourly, I was actually getting paid less. I was essentially being penalized for being efficient. So rather than trying to dumb down my process and work slower so I could get paid the agreed-on amount, I opted to switch to a flat half-day or full-day rate that is significantly lower than my normal day rate, since this was a semi-permanent gig.
This arrangement is still mutually beneficial because I can book gigs the other three days of the week, and they get a senior level photographer at the rate of a junior level photographer, since they only need to pay me for two days. The reason why our arrangement works is because I am doing a week’s worth of work in two days—they just have to organize their shot lists so that I can get all their weekly photo needs knocked out in two days, which not every company can do.
If you are just launching your photo career, don’t put too much pressure on yourself. Don’t rush the process. The photographers you look up to have been doing this a lot longer than you. You have time to catch up. Focus on test shooting, building your portfolio with diverse, quality images that reflect your passion and skills. Clients don’t know that you’re capable of creating a certain type of image unless they see it in your portfolio. Although shooting food was no harder for me than shooting a person, I didn’t start getting food photography gigs until clients saw food photography on my website. So if your portfolio is lacking in an area where you want to be booking jobs, set up those types of shoots in your free time to fill those gaps. Meanwhile, take any photo gig you can land that pays the bills. Just don’t blog it if it’s not the kind of work you want to keep getting.
Finally, if you are lucky enough to have a full-time photo gig or get an offer to go in-house, consider all your options and see what the best fit is for your situation. Maybe you would prefer the less stressful pace of a studio staff position. I can only speak for myself, and now that I’ve had a taste of the freedom that comes with doing my own thing, I wouldn’t have it any other way.