So far we’ve discussed how to shape and control light by using snoots, grids, and barn doors. We’ve also talked about how the distance of the light to the subject and of the subject to the background affects the clarity of a shadow. What’s next? A different kind of modifier. A shaper of light that comes in so many shapes and sizes that, quite honestly, anything can be one. This magical light modifier is a gobo. The term is derived from the phrase “go between,” referring to anything that goes between a light source and the subject. After you train this final, mysterious, shade-throwing beast, your training will be complete.
Typically, the term “gobo” is reserved for the lens filters and patterns that are affixed to theater lights. The terms “flag” or “cucoloris/cookie” are actually more accurate for what we’re going to be using in this chapter, referring to an object placed between the light and the subject, but not attached to it. For the sake of simplicity, however, I’ll use the term “gobo” to encompass all such modifiers. So, what can you use to make a gobo? Here are some ideas.
As I said, gobos can be quite literally anything that stands between your light and your subject. To block or shape light or create stylized shadows, you use an opaque gobo. Although you can use pretty much any non-transparent material, such as cardboard, foam core, or poster board, cinefoil is the easiest to mold. If you aren’t familiar with it, cinefoil is essentially a slightly thicker, black aluminum foil. It’s lightweight and easy to cut and shape, which is both a blessing and a curse. You can quickly mold it into any shape you need, and because it’s super lightweight to work with, you can easily hang it with nothing more than gaff tape. The down side of working with a super thin, lightweight material like cinefoil is that your gobos will be fairly temporary. Any shapes that you cut into it can easily spread or tear, so you pretty much need to make a new one each time you use one.
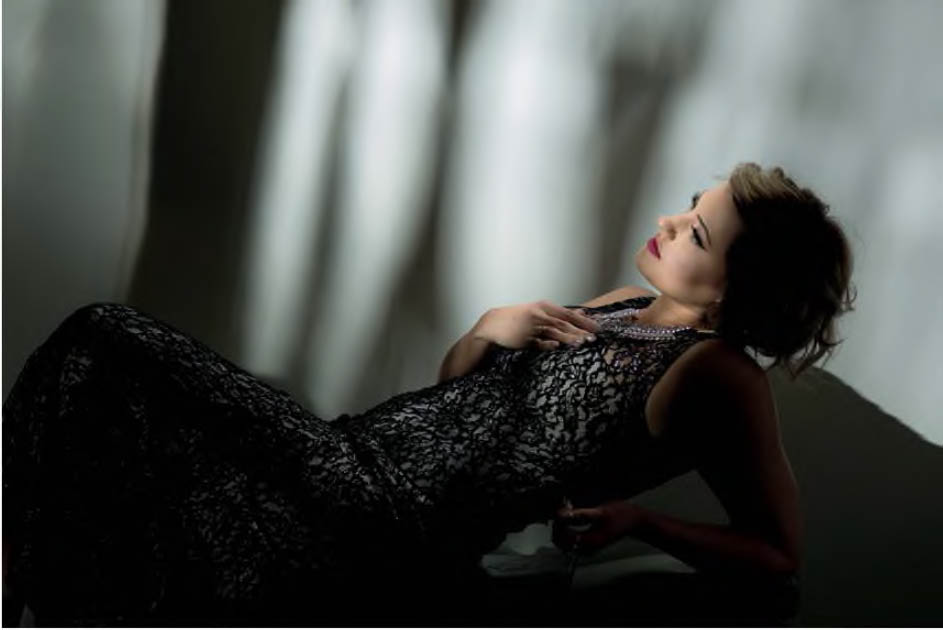
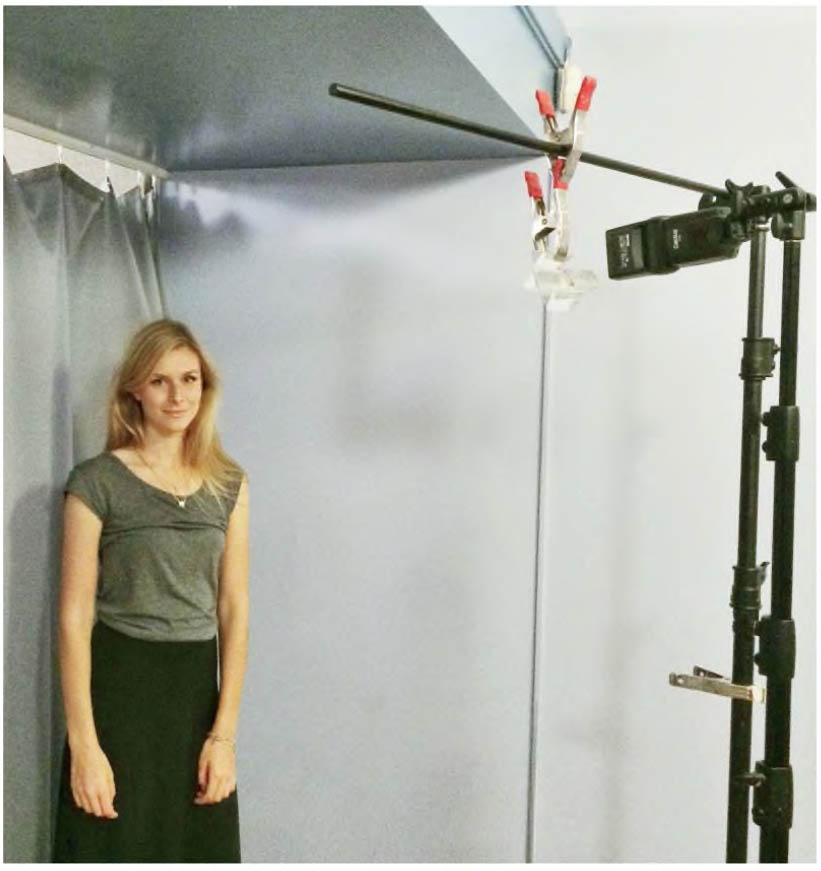
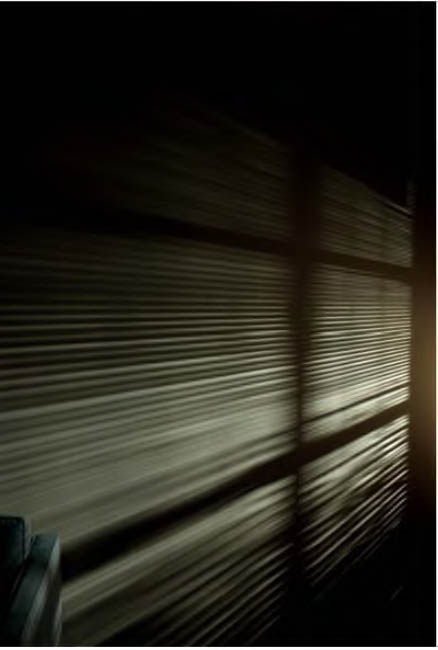
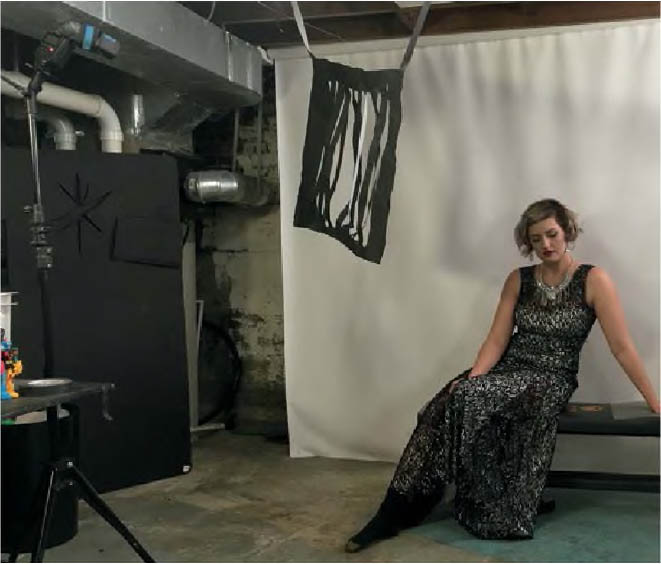
As you can see in Figure 9.1 , my gobo is hanging by strips of gaff tape from the low ceiling while Sydney is reclining on my weight bench (which never gets used) in a beautiful gown and black socks. You will learn just how invaluable mobility is when you start working with gobos and realize how precise the placement needs to be. I’m often moving the gobo two inches forward, back, to the right, or to the left in order to get it in proper position, so a lightweight modifier that’s held in place with tape makes the adjusting process an easy one.
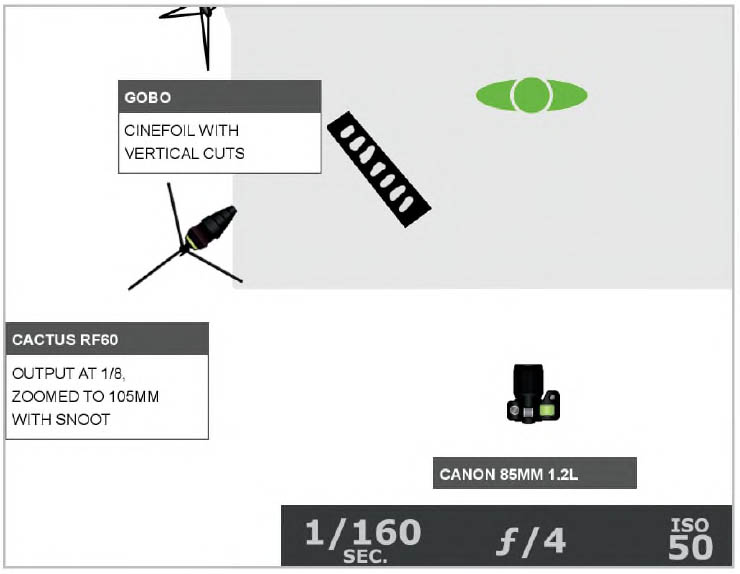
When working with gobos, you will need to call on your knowledge of light spread and shadow quality. Remember that the closer an object or person is to a background, the more crisp the shadow that’s created. This info is doubly important when using a gobo because not only are you factoring in the shadows being cast on the background but now you’re also factoring in shadows being cast on the subject. As you can see in the lighting diagram ( Figure 9.2 ) the light is about three feet from the gobo, which is about three feet from the subject, who is right in front of the background. Still with me? This distance, which is rather close, allows for more defined shadows (less feathering). Also note that my light is not only zoomed in to 105mm, to create a narrow light stream, but I even added a snoot to further contain the light. If I had failed to properly constrain my light, it would spill to the left or right of the gobo, resulting in harsh light directly hitting the model and the background.
Figure 9.1 The setup. This gobo was made out of cinefoil, a thin, lightweight, black foil that you can easily shape and use in a number of ways.
Figure 9.2 The lighting diagram. The light is roughly three feet from the gobo, which is roughly three feet from the subject, who is right against the backdrop. The close proximity creates more defined shadows.
To further complicate things, you can dramatically change the quality of a gobo just by positioning it at an angle to your light, rather than placing it straight on. For example, look at the gobo shape in Figure 9.1 . There are a number of similarly sized vertical strips removed from the cinefoil. If I shift the angle of the gobo so one side is closer to the light and one farther away, the gaps closest to the light will let more light through than the strips that are now positioned farther away and at an angle. To boot, now the thinner gaps that are farther from the light will be more defined, while the closer gaps, which are now appearing larger, will be more feathered by the time they reach the subject. If your mind isn’t twisted by now, I’m thoroughly impressed. Don’t get frustrated if you don’t understand gobos right away. The learning curve is much steeper. You really just need to experiment with them to fully grasp all the variances.
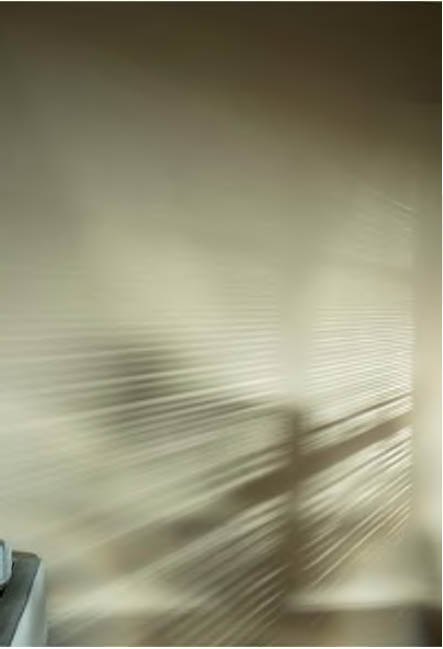
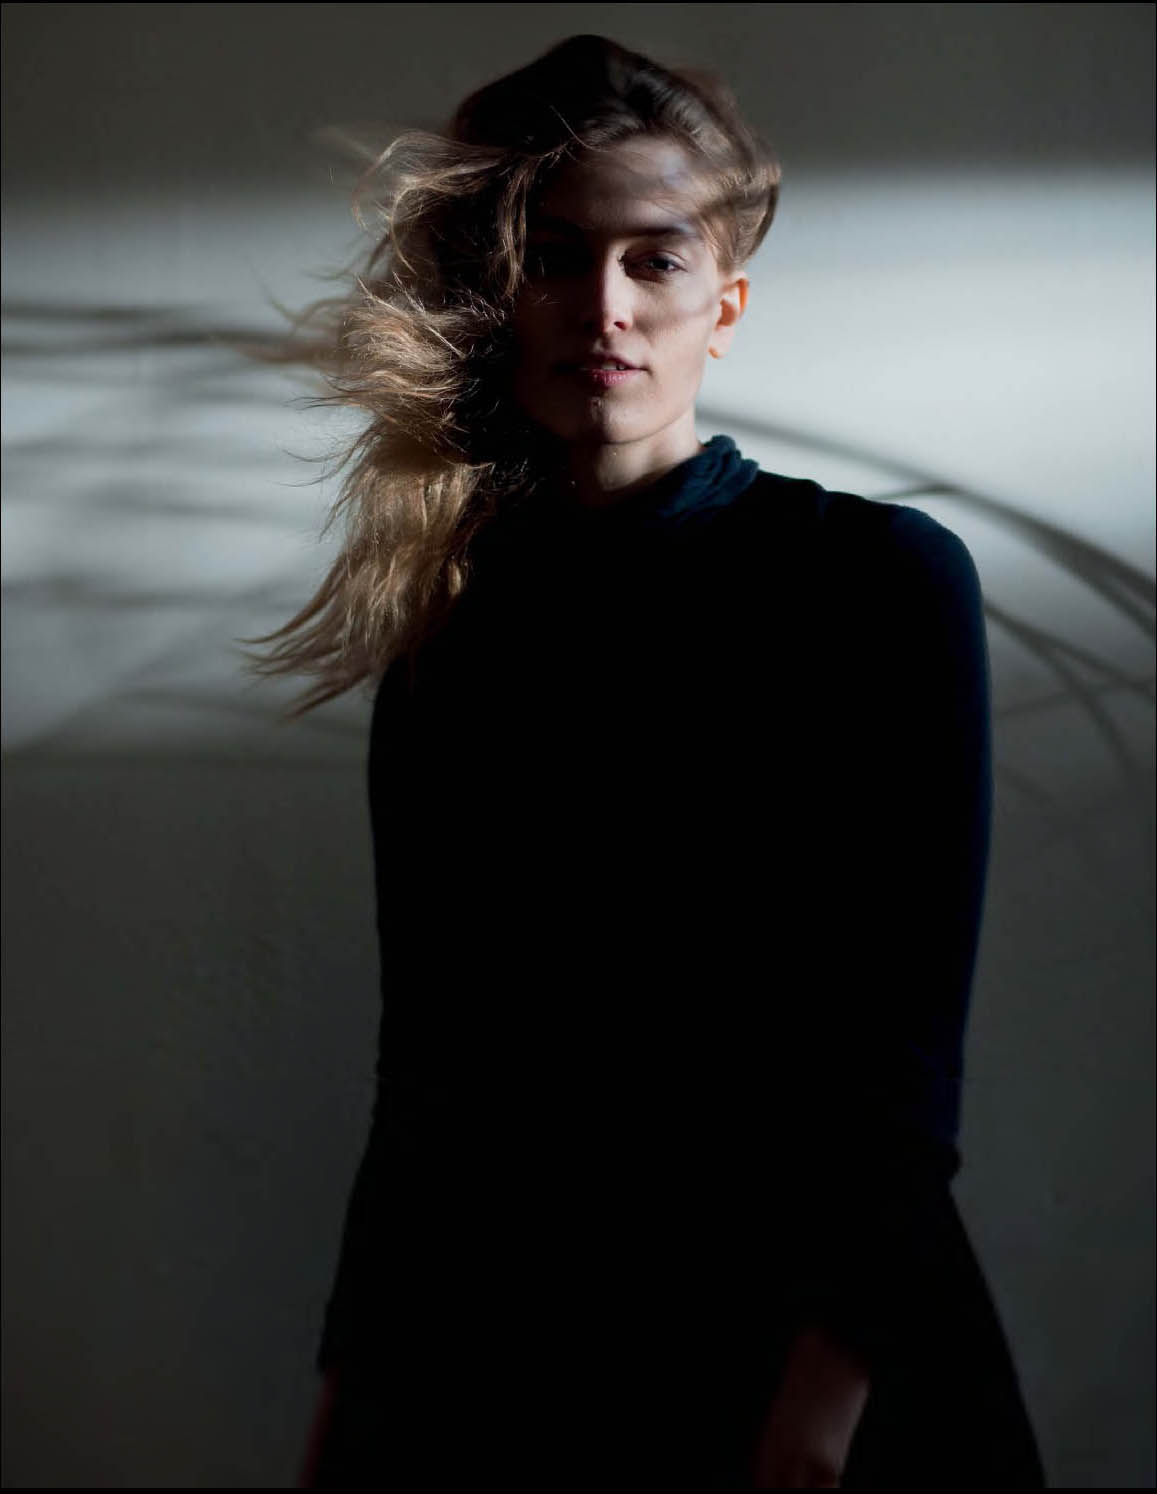
Moving on to the raw file, take a look at the shadows on the left side of the frame in Figure 9.3 . Notice that they appear more defined than the shadows on the right. This is because the gobo was closer to the background on the left than on the right. Meanwhile, her shadow on the background, seen on the far right, is very crisp, because she’s only a foot away from the sweep.
Figure 9.3 The raw file. Note that the shadows created on the left side (where the gobo was closer to the background) are more defined than the shadows on the right.
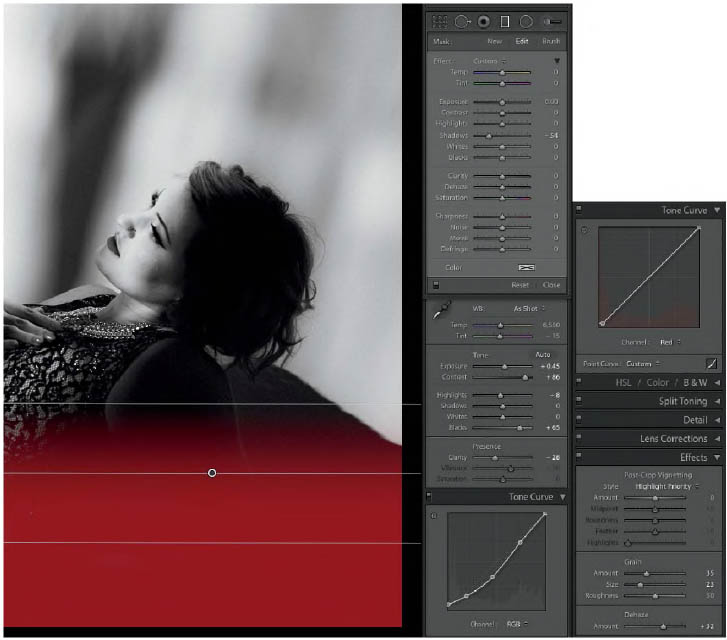
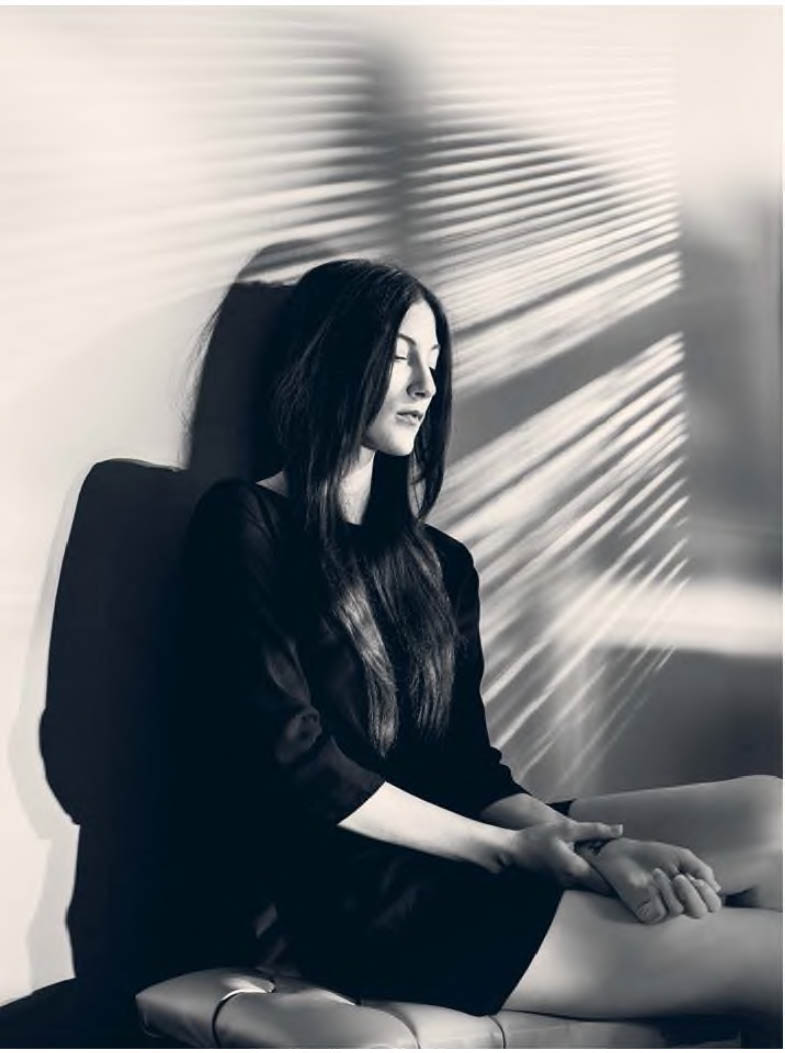
Because this was a film noir–inspired shoot, I converted the file to black and white in Lightroom and added some grain ( Figure 9.4 ). Aside from my normal adjustments to the tone curves I also used the Dehaze feature a bit, to pull down some of the extra light glow, bringing more detail back to the highlights.
Figure 9.4 The Lightroom settings. Because this was a film noir–inspired shoot, I converted the file to black and white, adding grain and using the Dehaze feature to restore highlight detail.
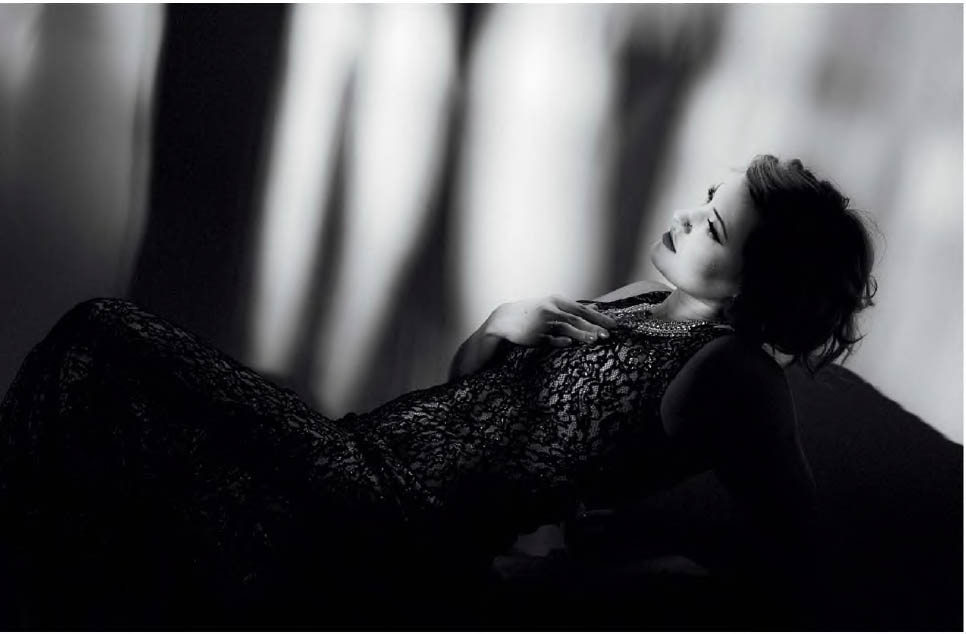
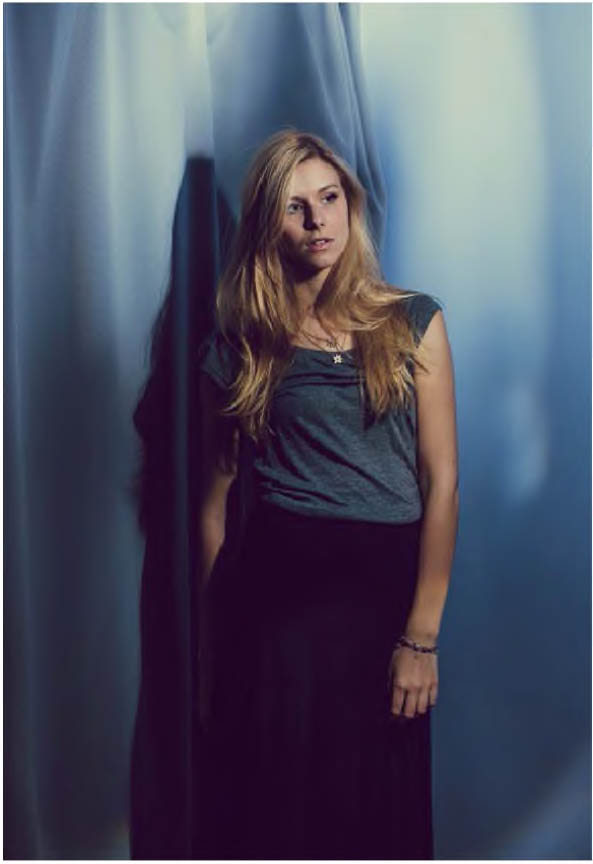
Figure 9.5 The final shot. Sydney is looking even more glamorous now that her black socks and the workout bench are gone.
Finally, I made a gradient adjustment to the bottom portion of the frame, pulling the bench she was reclining on into shadow. No more weight bench or black socks to be seen. Shadow can hide a multitude of sins ( Figure 9.5 ).
Prisms are really fun to play with. They are also really unpredictable. Depending on the size, shape, and distance of the prism(s) to your light, the effects you create can differ dramatically. However, prisms are also more difficult to work with because they are often heavy and oddly shaped. This makes rigging them up in front of a flash a bit tricky. In Figure 9.6 you can see I used a C-stand and a couple of spring clamps to dangle a custom prism rig in front of my light. For this shot, I zoomed my flash in to 105mm and placed it right against the prism, which worked in throwing some beautiful, dappled light on my subject, reminiscent of reflected window light ( Figure 9.7 ).
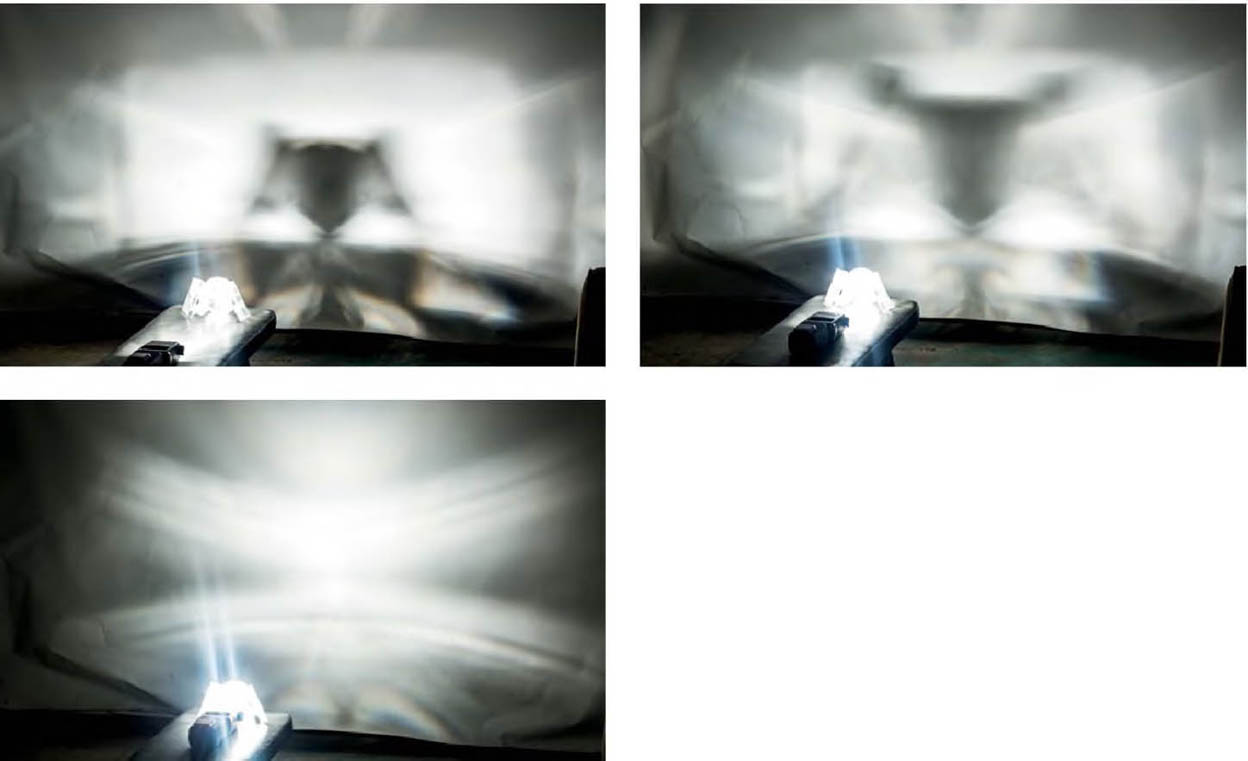
I commissioned a photographer I know to glue a handful of long, triangular prisms together into a giant Voltron prism. This beautiful monstrosity throws more light than Zeus ( Figure 9.8 ). As you can see, the light quality changes dramatically as you move the light away from the prism. I wouldn’t recommend experimenting with prism gobos until you have a pretty firm grasp on shaping light. They can be endlessly maddening to work with, because of how quickly they change the light.
Figure 9.6 The setup. I used spring clamps to hang my prism gobo from a C-stand in front of the light, which was zoomed in to 105mm.
Figure 9.7 The final shot. The dappled light has a nice, natural quality to it.
Figure 9.8 The prism gobo. I had this custom prism gobo built for me by a photographer. The distance of the light from the gobo dramatically changes quality of light.
You can also get some fun effects by using more than one gobo in a shot. In Figure 9.9 you can see a shot that was lit with my prism gobo. I was also using a second light, which was placed behind a door window, firing through a set of blinds ( Figure 9.10 ). When I fired both lights together, the effects overlapped ( Figure 9.11 ), creating a cool shot ( Figure 9.12 ).
Figure 9.9 This shot was lit by one light firing through the prism gobo.
Figure 9.10 This shot was lit by one light firing through window blinds.
Figure 9.11 This is what it looked like when both lights were fired.
Figure 9.12 The overlapping gobo’d lights make a cool effect.
A white bed sheet can make a great gobo. Sheets are cheap, easy to modify and hang, and more durable than cinefoil. Because they are translucent, they allow some light to pass through, giving a softening effect to the light, similar to a softbox. If you cut some shapes into the fabric, however, you can let some hard light peek through, making for some cool effects. In Figure 9.13 you can see I am using two lights, one gelled red, aiming through the hole in the fabric, and one gelled cyan, firing through the lower, uncut portion of the fabric. The result, seen in Figure 9.14 , is soft light falling on the bust (Michelangelo’s David Bowie , get it?), with a strip of hard, red light on his face. Are you beginning to see the possibilities?
Figure 9.13 The setup. I modified a white bed sheet by cutting a horizontal slit in it, which allowed a bit of hard light to peek through and mix with the otherwise soft light.
Figure 9.14 The final shot. Michelangelo’s David Bowie is looking vaporwave as hell. Here I fired a red-gelled light through the gobo hole and I bounced a cyan-gelled light.
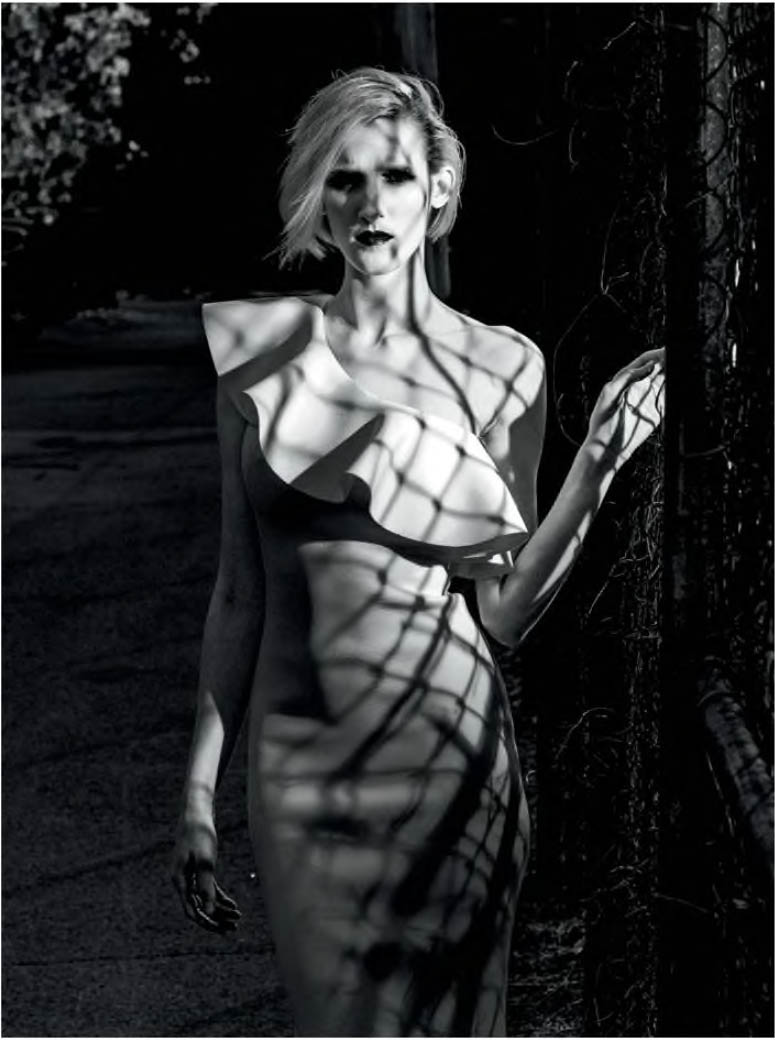
As I already mentioned, because anything that is placed between a light source and a subject is technically a gobo, you can be creative using found objects to shape the quality of light. A chain-link fence, for example, is an easy gobo to set up ( Figure 9.15 ). Just make sure to place your light several feet away from the fence with a wide light spread, and place your subject as close as you can to the fence to get crisp shadows ( Figure 9.16 ). In Figure 9.17 , I used a potted plant for a gobo. Where do you think I placed the light? If you guessed several feet away from the plant, you’d be correct. This time, I zoomed in the flash to 105mm to make sure that the direct light didn’t hit the subject. I wanted only the light coming through the leaves to reach him.
Figure 9.15 The chain-link fence gobo. When placing your light, set it several feet from the fence and place the subject close to it.
Figure 9.16 The shadows are crisp and create a dramatic effect on the model.
Figure 9.17 The potted plant gobo. Just like the previous setup, place the light several feet away, only this time zoom in the light to 105mm to make a narrow stream of light.
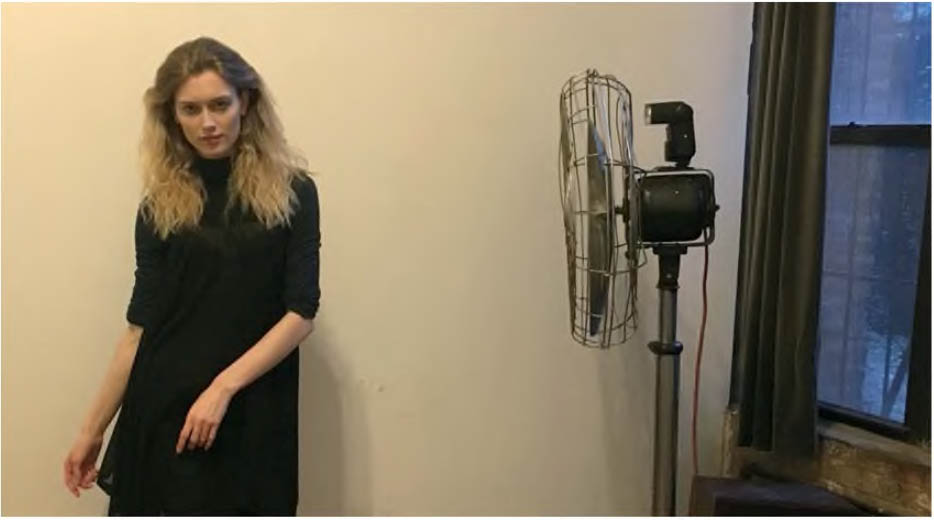
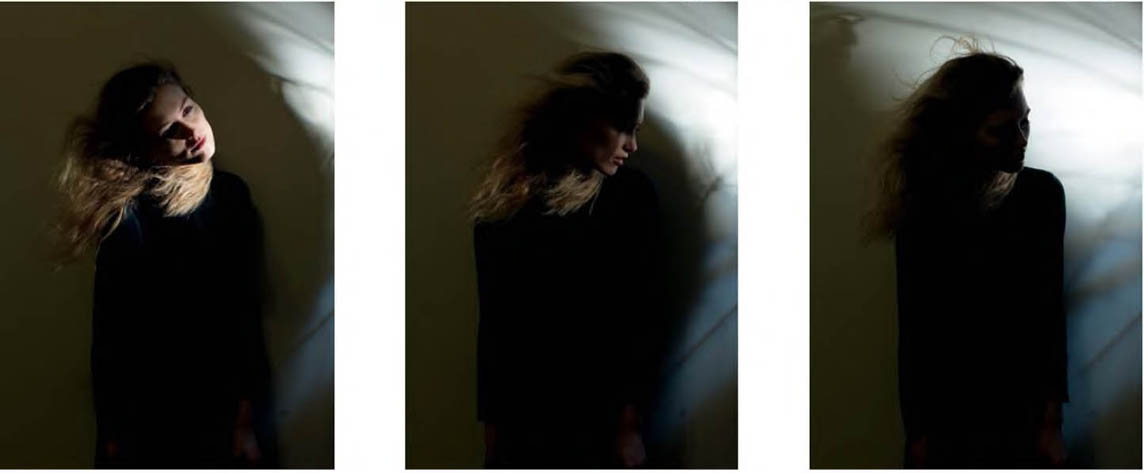
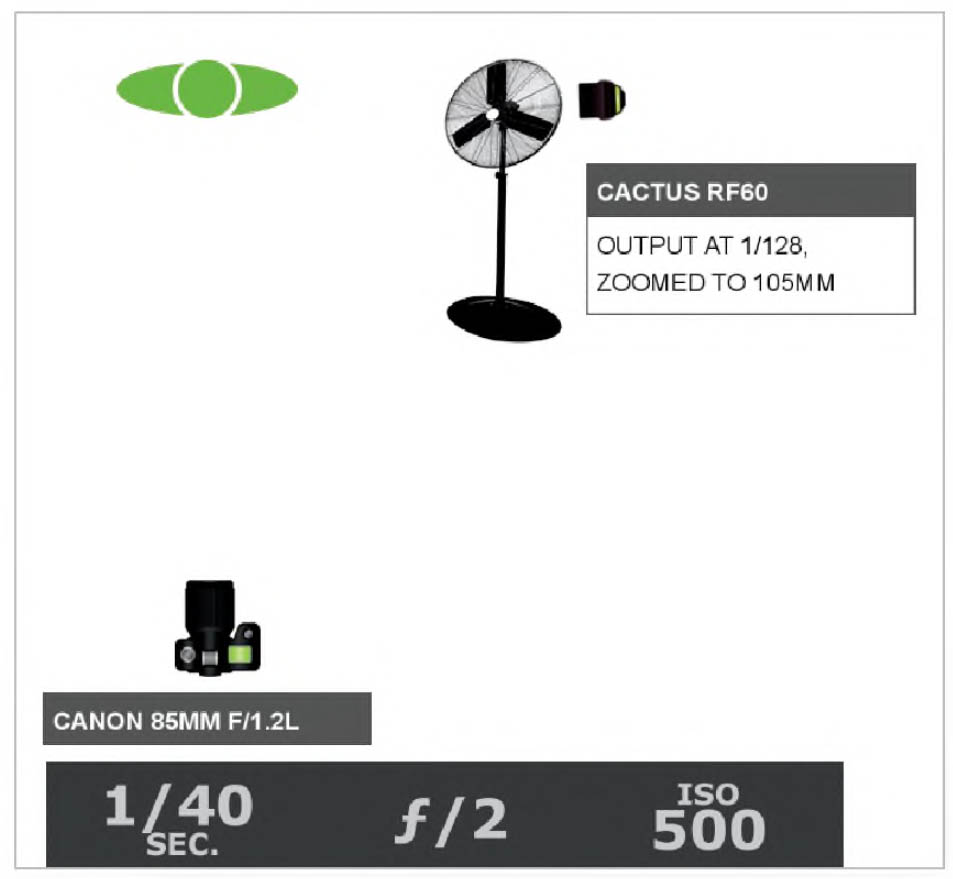
As I began experimenting with gobos, I started looking at the world around me a bit differently. Everything was a potential gobo. When I met with (amazing) model Clara Buchanan at her Williamsburg apartment, which was serendipitously a block away from my hostel, I immediately spotted the fan and knew I had to try it out as a gobo ( Figure 9.18 ). When I began dragging it across her floor, she apologized for the large machine, explaining that she didn’t have air conditioning. I assured her that I wasn’t trying to get it out of the way but rather wanted to use it to shape my light. There were two things that I learned from working with the fan. The first was that the light hitting the model fluctuated about five stops, depending on how much of a fan blade happened to be blocking the light ( Figure 9.19 ). This meant that I needed to shoot relatively rapid fire because every third or fourth shot was drastically underexposed. The super cool, unplanned thing that came from working with a high-powered-fan-as-light-modifier was that it also acted as a hair fan. This meant epic hair and fabric movement in every shot ( Figure 9.20 ).
Figure 9.18 The setup. Here I used a pedestal fan for a gobo, placing my flash on the motor.
Figure 9.19 I needed to shoot in bursts because every few shots were drastically underexposed if a fan blade happened to be passing in front of the light.
Figure 9.20 The raw file. Having a hair fan built into my gobo made for some rad shots.
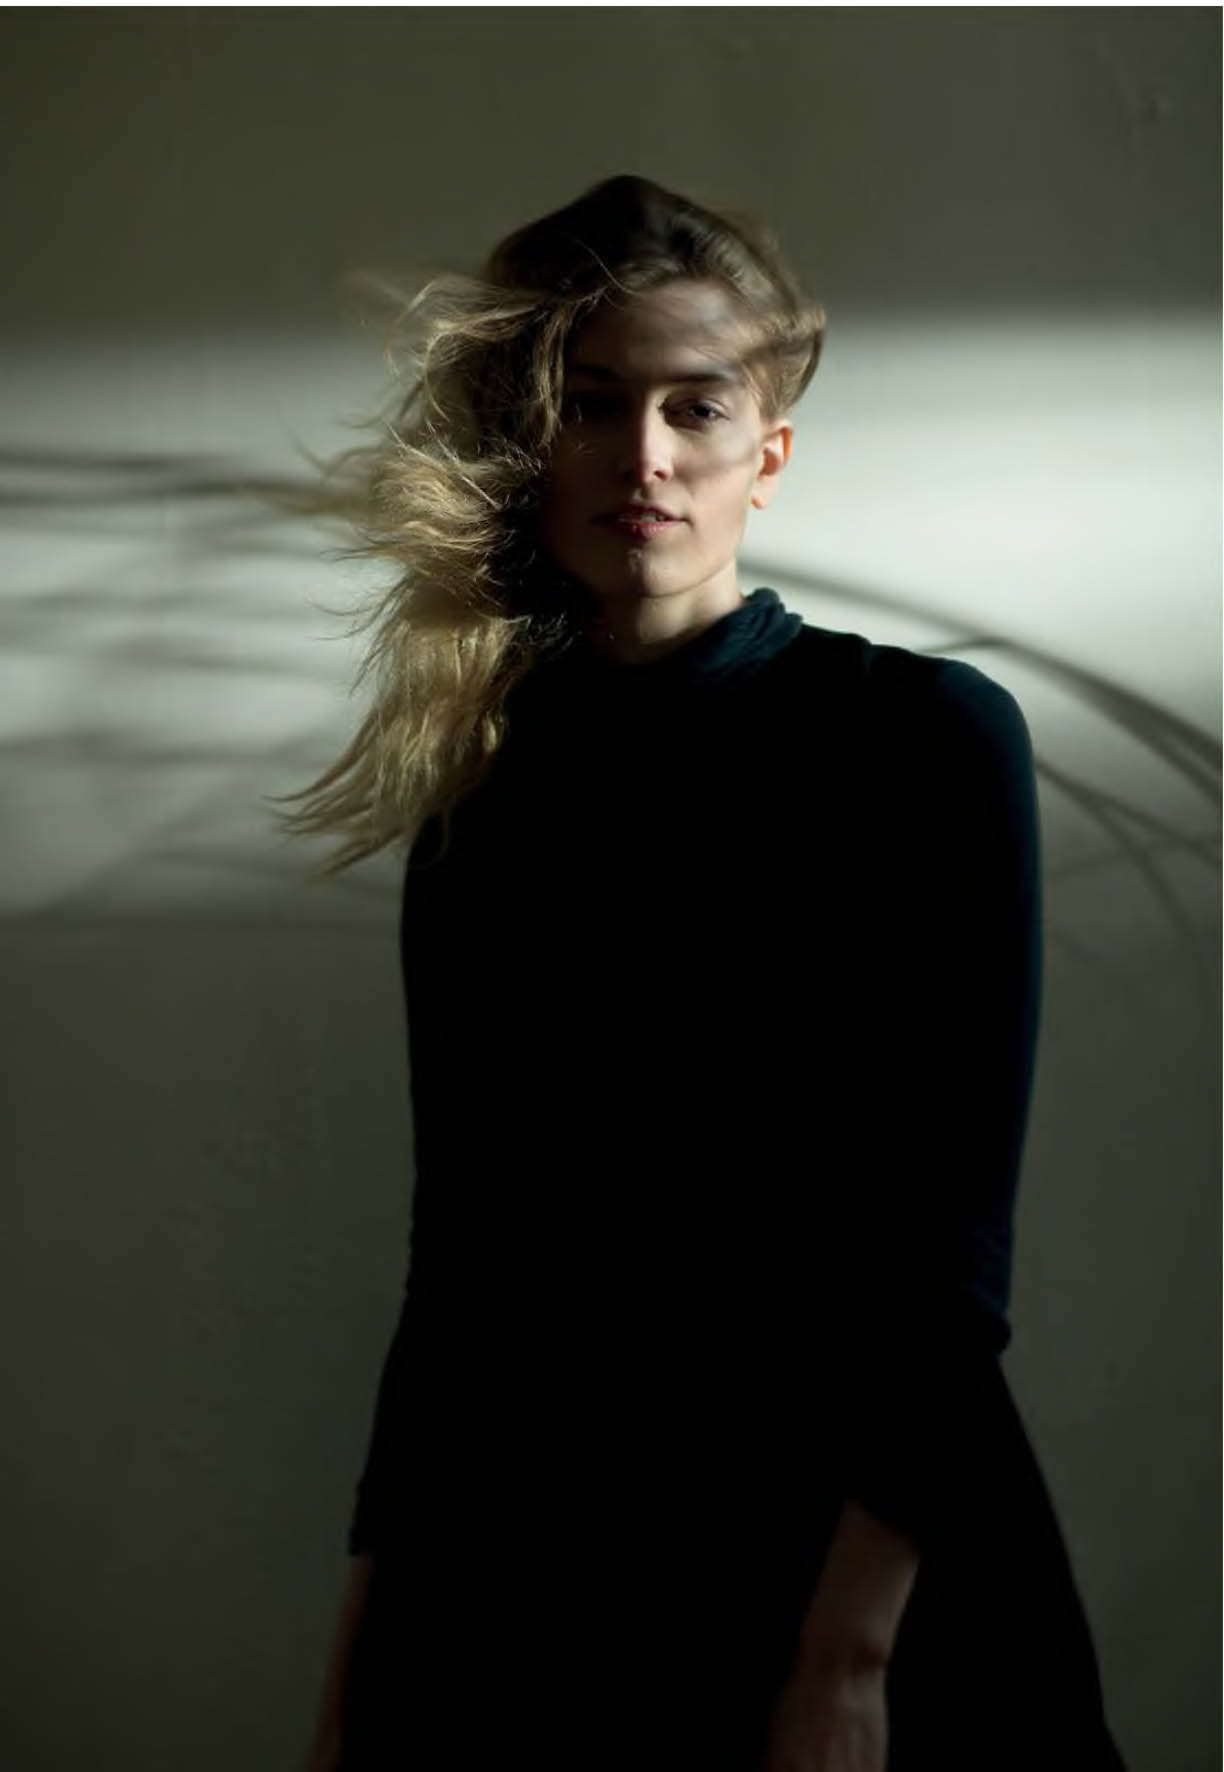
Because my light was sitting on the fan’s motor, meaning it was right up next to the gobo, the shadows were a bit softer. I also zoomed in the flash to 105mm to ensure that the only light reaching the model had to go through the fan to get there ( Figure 9.21 ). Basically, I didn’t want a broad spread lighting the whole wall around her. In Lightroom ( Figure 9.22 ), I hardly did a thing. Because the light was already so dramatic, if I did anything more than just bump the Contrast setting, the shadows got muddy and the highlights blew out. But as is often said, less is more, more or less.
Figure 9.21 The lighting diagram. I also zoomed in the flash to 105mm to keep the light narrow and dramatic.
Figure 9.22 The Lightroom settings. Hardly any adjustments were needed because the light was already so dramatic.
I definitely want to experiment some more with fan gobos. I feel like there is a lot more that could be done with them. And having dramatic hair and fabric movement built in is an amazing feature. I guess you could say that I’m a big fan of what this gobo can do ( Figure 9.23 ).
Figure 9.23 The final shot. I, for one, am a fan.
Let me set the scene: It’s February in Ohio, which means it’s below freezing, cloudy, and icy as hell outside. Perfect time to shoot a travel-themed magazine editorial, no? But that’s what the editor of 614 Magazine was asking for, so that’s what I planned on delivering. My options were to shoot in the Franklin Park Conservatory or fake it. I went with the latter.
For some reason I thought of Kanye West’s “Bound 2” video, where he and Kim (and then later James Franco and Seth Rogen) are dramatically lit on a prop motorcycle, obviously on some sort of movie set or sound stage in front of a very fake backdrop. Although I generally loathe West’s music, I actually loved that video. I loved the disjointed feeling of the scene. It was obviously fake but wasn’t trying to hide it. It felt kind of like Old Hollywood, in a way. There is also a fantastic scene in Pulp Fiction in which Bruce Willis is talking to a cab driver after a boxing match; the scene seen through the windows is obviously not real, but that complements the scene, adding a detached, surreal vibe. This is what I wanted to bring to the photo shoot.
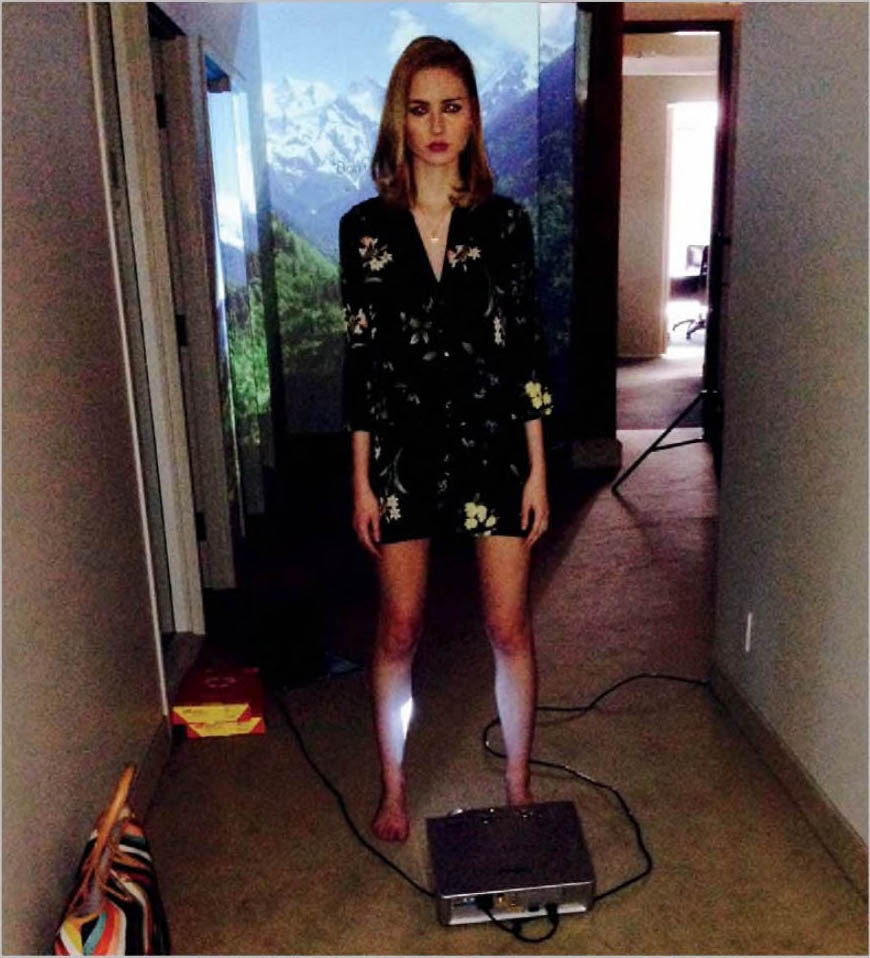
Still set on finding an indoor setting that could pass as a vacation spot, the stylist chatted with the editor about Columbus’s limited options. I chimed in with my idea to shoot in an empty hallway at the magazine office—not what they expected to hear, but eventually they went with it. I then asked the stylist if she could track down a projector for the shoot. Meanwhile, I hopped on Google and searched for a number of exotic scenes. I made sure to use only royalty-free images, and I searched for higher-resolution files.
The day of the shoot, the stylist brought a janky, old projector that she had dug up. This thing was so fidgety that if you unplugged it to move it, it wouldn’t turn back on for 15 minutes. It also projected a pretty dim image—the overhead office lights were overpowering the projected image (yeah, that dim). I needed to find a dark hallway, away from the lights.
Figure 9.24 The setup. The model is standing over the projector that is displaying the mountain backdrop on the wall behind her. The main light, not pictured, is just out of the frame to the right.
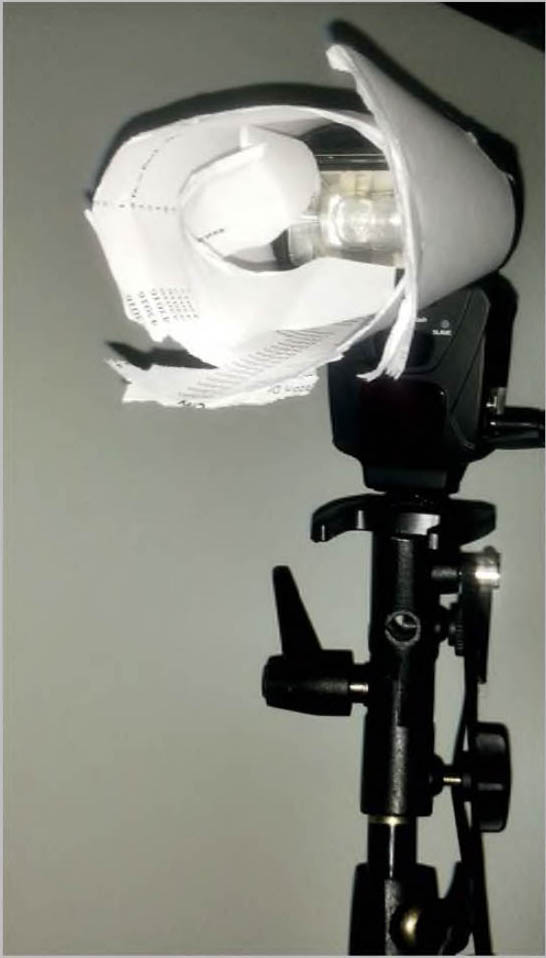
Figure 9.25 The main light. I made a snoot out of printer paper, cutting slits in the edge of the paper with scissors in order to feather the light falloff.
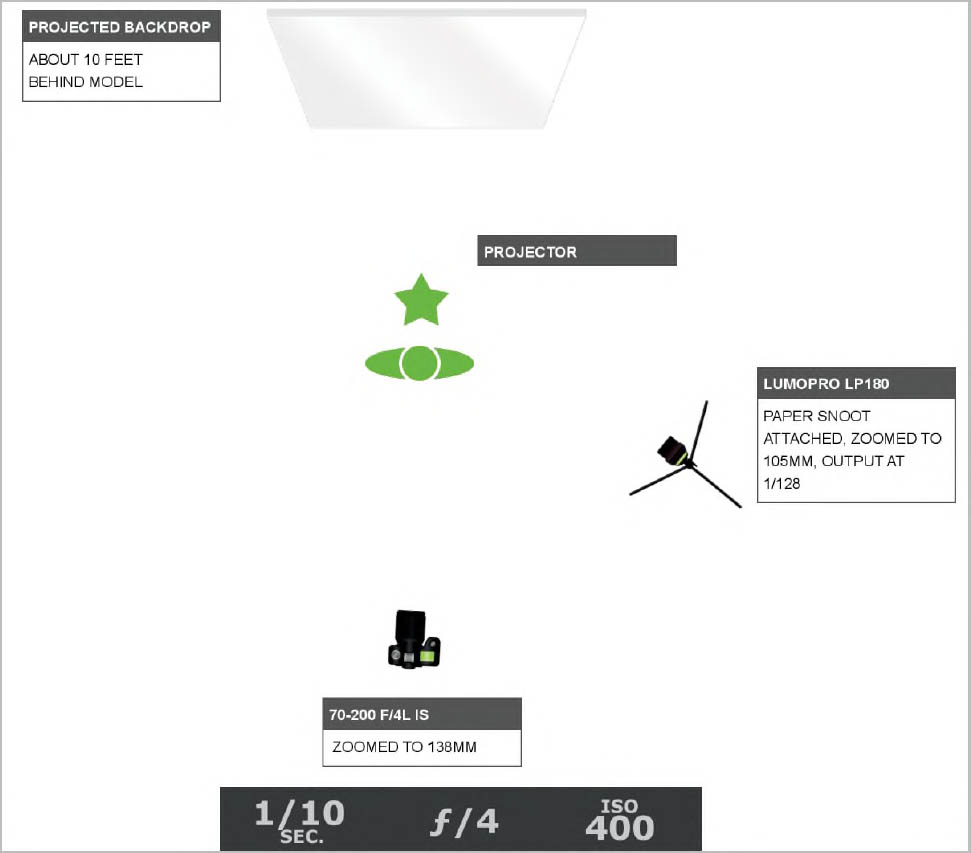
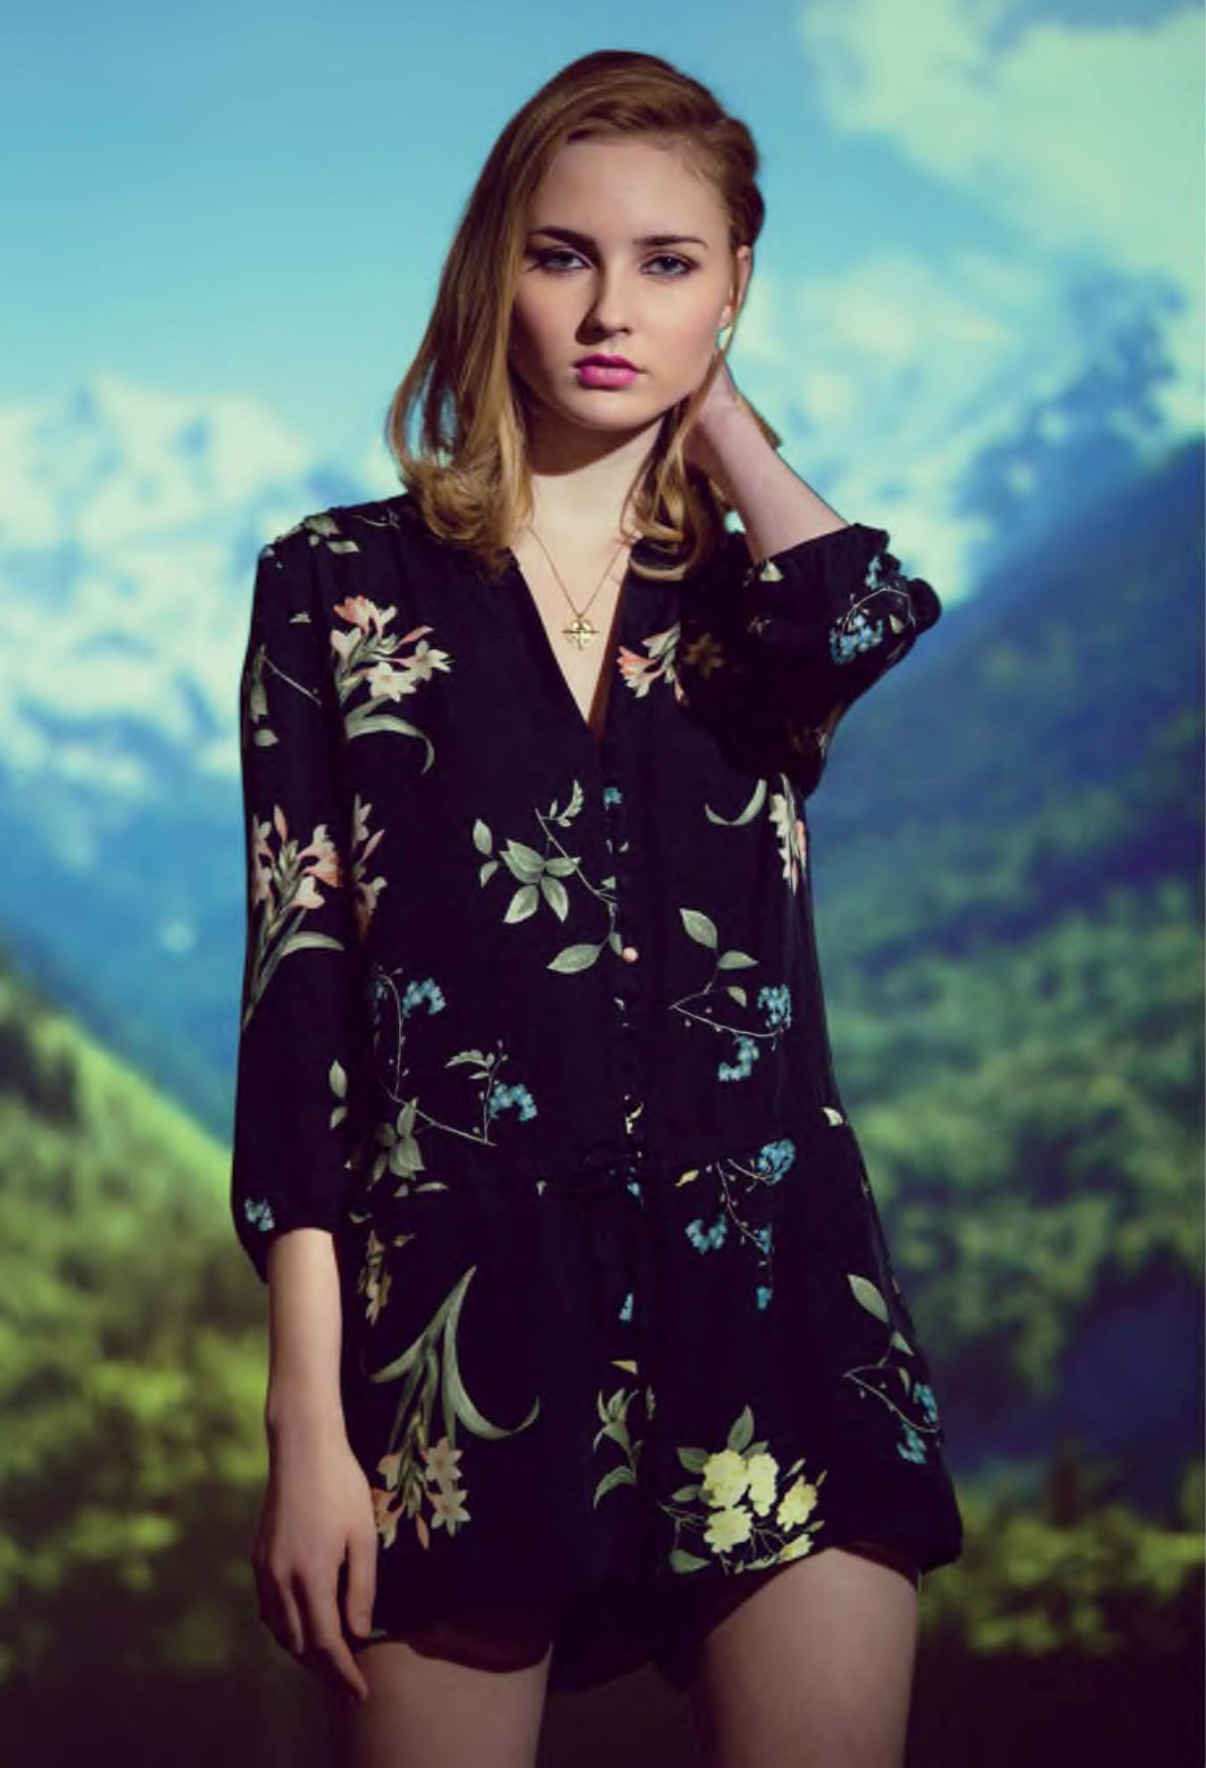
Now that I had a working projector (more or less), images of exotic backgrounds, and a dark, empty hallway to shoot in, I was ready to light a model ( Figure 9.24 ). Then I ran into another issue: The wall at the end of the hall was really narrow. I wanted the projected backdrop to go out of focus a bit, so that it looked more real. The long lens that I had with me was a 70–200 f/4L IS. Because the aperture couldn’t open up more than f/4, the background was looking too sharp. This meant that to push the background out of focus in camera, I’d need to have the model as far in front of it as possible and then use a longer focal length (which brings lens compression into effect). All that is to say that I was using every inch of the hallway’s length. My back was against a wall and Halle, the wonderful model, was standing as close to the background as she could, without blocking the light from the projector—which is why she is standing over it.
Now that the background was ready, it was time to actually light the model. As you may have guessed, my light output needed to be very low so as not to overpower the dim projection. Accordingly, I powered my flashgun all the way down to 1/128, but it was still too bright. I was also getting some light spill from the flash onto the projected background. A snoot would take care of both of these issues. I grabbed some printer paper, taped one side to the top of the flash head, wrapped the paper around to make a tube, and taped the other side. I also made several cuts into the paper in order to feather the light a bit ( Figure 9.25 ).
Remember when I said that the projector was dim? It was so dim that my ISO was at 400 and my shutter speed was at 1/10 in order to get a proper exposure (I was really hating my f/4 lens that day). Figure 9.26 shows the lighting diagram. After all those obstacles had been successfully hurdled, the images looked just how I had hoped. In fact, they almost looked believable ( Figure 9.27 ).
Figure 9.26 The lighting diagram. Because the projector was so dim, I needed to open up my ambient, resulting in an ISO of 400 and a shutter speed of 1/10.